-
Creamy Avocado Dressing – Gluten-free + Dairy-free w/ Vegan Option
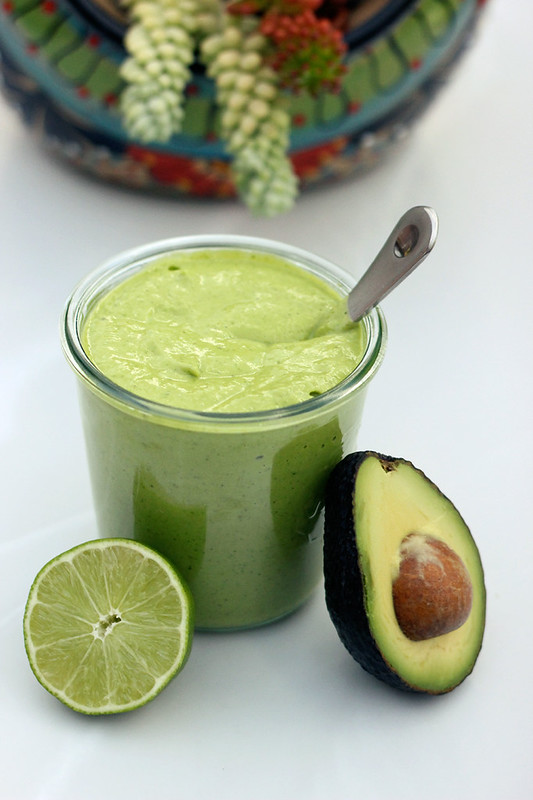
I am not going to lie, one of my absolute favorite things about living in Southern California are the inexpensive avocados. I always have a few on the counter just waiting to get added to a salad, made into guacamole or just spread fresh onto toast or crackers.
When we lived in New York, it was always the painful part of my grocery shopping trip. Seeing the price tag on the avocados and deciding how much they were worth to me. Did I HAVE to have them? Usually I did, but some weeks I just couldn’t stomach the cost. Plus let’s be honest, they weren’t all that fresh, not compared to the ones out here.
-
Chocolate Peanut Butter Road Trip Energy Bars – Gluten-free, Vegan + Refined Sugar-Free
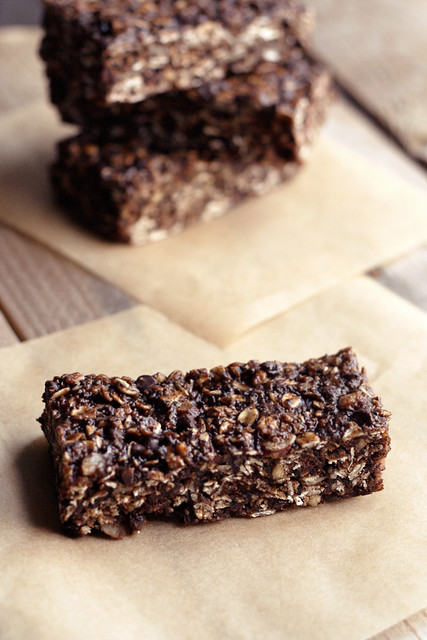
Some of you may recall seeing this recipe before, I shared it in the spring of last year during one of our busiest travel seasons. After sharing my tips for traveling with a restricted diet last week on the Free People Blog BLDG 25, I thought it would be great to share one of my favorite recipes for traveling with the readers over there. These Road Trip Energy Bars are one of my go-to treats to make and bring along on every trip. They travel well and they are super simple to make. Read the rest of this entry »
-
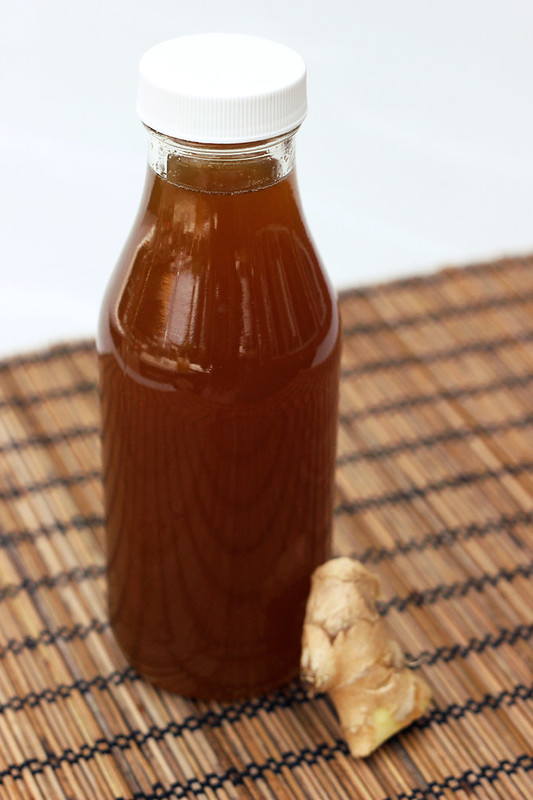
Homemade Ginger Ale – Honey Sweetened – Gluten-free with Vegan option

As part of our Six Month Mindful Living Challenge I am going to be sharing recipes that follow that compliment the theme of the month, when possible. This month, with our plastic consumption being the focus, I wanted to share a recipe that is simple to make at home that is not only delicious but can single handedly cut down on your plastic use.
This homemade ginger syrup has a great kick to it from the fresh ginger and it is full of beautiful, bright flavors. Not only is it great for this refreshing and delicious homemade ginger ale, but it would also be great drizzled over homemade ice cream and yogurt or even over your morning oatmeal or other cereal. I sweetened this with local raw honey, since honey provides a variety of amazing benefits, but I also just love the flavor. If you are vegan, play with your favorite sweetener, anything will work. Granulated sugars to liquid, they’ll all work just as easily. For some of the amazing benefits of raw honey, check out this post from Body Unburdened. See the notes at the end of the recipe if you wish to retain the full benefits of the raw honey in this recipe.
-
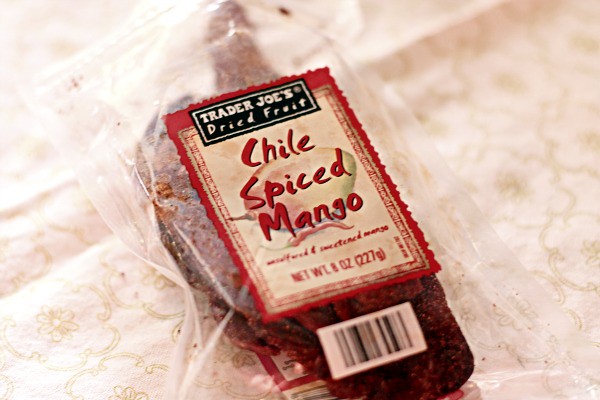
Chili Spiced Coconut Mango Salad – Gluten-free + Vegan

This simple salad is inspired by a snack I have had a few times from Trader Joes. Chile Spiced Dried Mangoes. I really love these, but I don’t love that they contain sugar, so I wanted to make something at home that has some of the same flavors but was a bit healthier and fresher
This salad is super simple to make, it takes longer to peel and cube the mango than anything else. The spice from the chili powder is so nice with the bright, fresh and sweet flavor from the mango and the coconut chips bring a great welcomed crunch to the salad. I like to add in a little dash of chipotle powder because that smokey taste is just so complimentary, but it is definitely optional. This salad is great on it’s own or it makes a wonderful side dish for a BBQ or picnic. To me this is just summer in a bowl! It’s so good. Read the rest of this entry »
-
Strawberry Honey Simple Syrup – Gluten-free + Refined Sugar-free
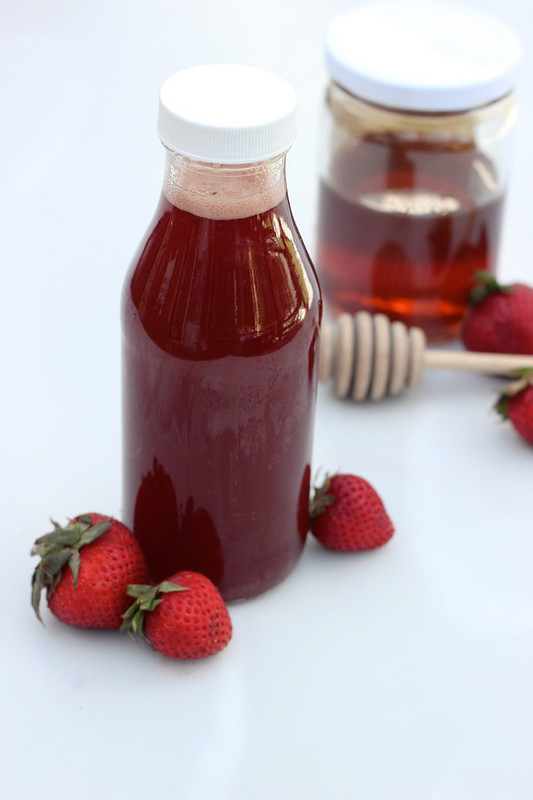
I am a sucker for summer beverages. I love a good refreshing cocktail, beer, sangria, champagne or prosecco cocktails, agua fresca, etc. Most times it is either the bubblies or the fruit that really attracts me. If you can get them both together in one drink, even better. I love a good, subtly sweet carbonated beverage.
I don’t drink much alcohol these days, I reserve that for special occasions, but I still love having fun with my drinks at home. Although making fruit infused simple syrups is one of my favorite things, I really don’t love consuming refined sugar, even if it is organic and raw, etc. Sure, you can absolutely just let the fresh fruit infuse or you can muddle it right into water, sparkling or flat, without any sweetener. But, there is something about the subtle sweetness from an infused simple syrup, even in the smallest amount, that gets me every time. Obviously I don’t consume traditional HFCS laced soda’s anymore, so I prefer to just make them myself at home.
In an effort to try making a fruity simple syrup without my usual raw organic sugar, I gave some local raw honey a try instead and I am sooo excited about the results. This strawberry honey syrup is thick, perfectly sweet and full of incredible flavors from both the fresh strawberries and the good quality local raw honey.
I would personally suggest always consuming raw honey over the processed stuff. Even though you cook it down in this recipe, raw honey is still the better choice. Raw honey provides a slew of amazing benefits, but regular pasteurized honey is processed with damaging levels of heat stripping it of these beneficial properties through the heating process, making it just as unhealthy as refined sugar. Also, many times store bought pasteurized honey is actually cut with corn syrup. YUCK! I prefer to get my raw honey from a local farmer, either at the farmers market or a local grocery store.
-
Lavender Berry Parfaits with Whipped Coconut Cream {Gluten-free + Vegan}
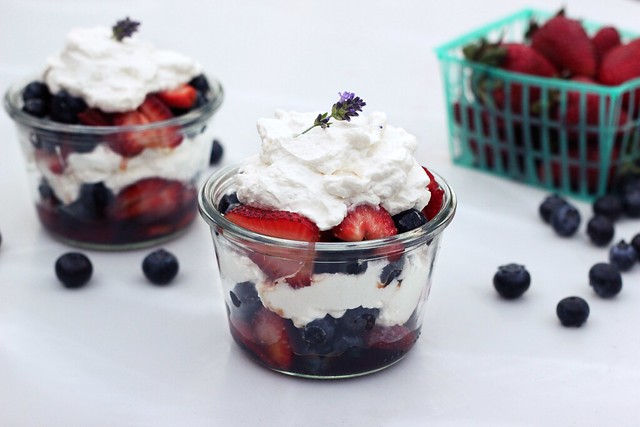
I have been obsessed with berries lately. They are in season here in Southern California so much earlier than I was used to on the East Coast, so I feel like I have been given this extra special gift this year. The berries out here are seriously better than I have ever tasted before. The pint of strawberries I picked up a from my favorite organic farmer this week, are seriously THE best I have ever had. I can’t get over it.
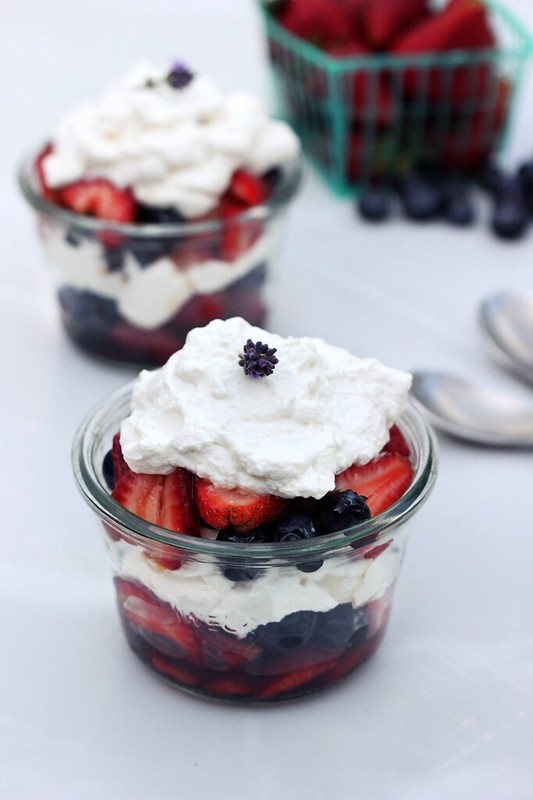
When Sherrie from With Food + Love invited me to share a seasonally inspired dish for The Spring Dish {PLANT POWER}Blog Series, I knew instantly I wanted to share a sweet berry recipe. I wanted simple and light, but with a little something special to make it unique. A fragrant lavender simple syrup compliments the berries with all that lovely soft aroma and flavor and the coconut sugar gives it a nice robust almost rustic finish. And of course, the whipped coconut cream is the best way to finish these parfaits off. Read the rest of this entry »
-
Restricted Diets: Advice For Dining Out

This next post in my ongoing Restricted Diet series with the Free People blog BLDG25, covers a topic that people write me requesting help with and advice on, all of the time. Besides eating at parties or events where the menu is out of your control (which I talk about here), dining out is one of THE most challenging situations when you have dietary restrictions. As with most situations, the best thing you can do is plan ahead and do your research.
-
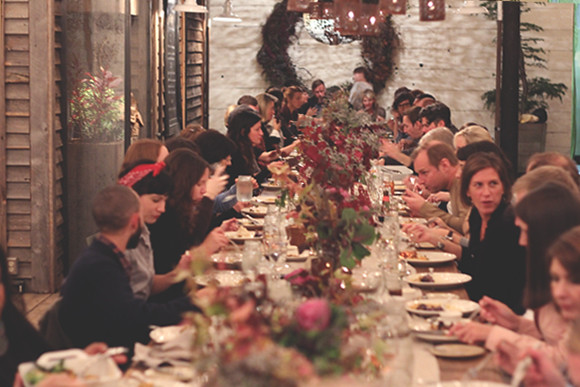
Restricted Diets: How To Be A Gracious Guest & an Accommodating Host

As part of my ongoing series with Free People on Restricted Diets, today I am sharing a quick how-to for both host and guest, when dealing with special dietary needs.
Even if you yourself do not have a restricted diet, chances are you probably know someone who does. Whether by choice or due to food allergies or intolerances, more and more people are becoming aware of foods that don’t serve their bodies and are consequently removing them from their diet. This awareness allows people to live a much happier and healthier life. I am living proof of that!
If you choose to host a dinner party at your home, even one as casual as a backyard BBQ, having someone on the guest list with a limited diet can definitely be daunting and intimidating. Sometimes it probably even seems easier to just scratch them off the list and not invite them at all. The simple truth of the matter is, it isn’t easy, especially if you don’t have experience with their special dietary needs or choices. If you are making the choice to host them and accommodate their needs, the best advice I can give is to always ask them any and all questions that you have, so you can be educated on their diet limitations and provide for them, as best possible.
Those of you with the restricted diets, as a guest, you owe it to your host to let them know of all of your restrictions – especially if they are offering to make food you can eat. Most of all, be as gracious as possible, especially if they are cooking and trying to accommodate you and your needs.
This post was originally shared on the Free People Blog, BLDG 25
How To Be A Gracious Guest & an Accommodating Host

Below are my how-to lists for both host and guest, to hopefully help make your next dinner party or BBQ as successful and enjoyable as possible, for all.
Host:
Do your homework. Don’t be afraid to ask questions – ask about ALL of their restrictions. Don’t guess and don’t ignore.
Ask what they CAN eat. Just as important as the things they cannot eat, ask about all of the foods your guest is able to eat. Sometimes this can help open your eyes to all of the possibilities instead of focusing on the restrictions.
Ask specifically for recommendations or recipes. Ask about dishes that you could make that would be safe for your guest, enjoyed by all and easy for you to prepare.
If you feel comfortable, ask the guest to bring a dish or dishes to share.
Search the internet for recipes that fit into their restrictions. There are so many amazing blogs with incredible recipes that everyone can enjoy. Send them over to your guest ahead of time for their approval.
Select a menu that is simple and enjoyable for all of your guests. There are so many foods that are naturally gluten-free, vegan, etc. Focus on those.
Ask your guest to help you menu plan, cook and/or go shopping with you. This will insure you are selecting safe ingredients and you won’t put a ton of time into a dish they can’t end up eating.
Be mindful of cross contamination and watch for hidden ingredients.
Don’t try to guilt your guest into “just eat this or that”. If they aren’t interested in your cheese dip, even if they are just dairy-free by choice, it’s OK – I am sure your cheese dip is just fine, they probably just don’t want to spend the remainder of the evening in your bathroom. You probably don’t want this either.
Guests with Restricted Diets:
Make sure to call ahead to let the host know of your restrictions. Some hosts may have more experience and awareness with your restrictions than you might realize.
Kindly offer to bring a dish to share that everyone will enjoy or to bring your own meal entirely. Some people just might be uncomfortable with the daunting task of cooking for special dietary needs. Be prepared for that and don’t be put off.
Make it clear that you aren’t expecting them to bend over backwards for you. Let them know you are totally willing to bring your own food if that makes them more comfortable.
Offer your advice if they have any questions. Let them know to contact you with any and all things they are uncertain about.
Have a snack (or a full meal, if necessary) before you go. If you are staying with someone for a length of time, bring plenty of snacks and foods to have on hand for in between meals or making your own meals.
Be as gracious as possible, no matter what the circumstances. When there isn’t much for you to eat and the host is feeling guilty, let them know you appreciate their effort, be grateful and appreciative.
If you are headed to a formal event like a wedding, make note of your restrictions on the reply card if you feel comfortable. If you don’t, eat a decent sized meal before you leave in the event you cannot eat. If you can’t eat anything being served, don’t make a big deal at the event. Most people won’t even notice if you aren’t eating.
(dinner party photos courtesy of Free People)
-
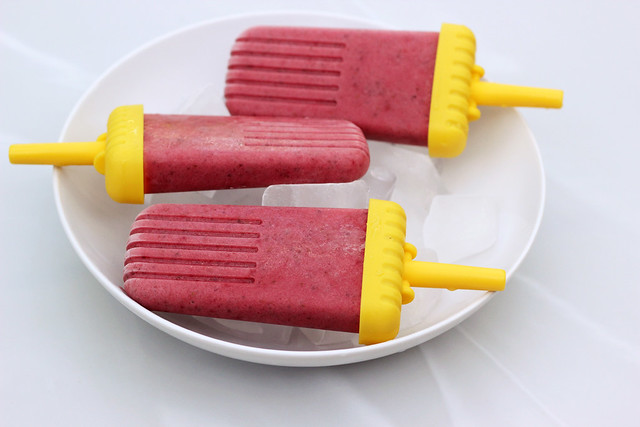
Strawberry Coconut Frozen Fruit Pops / Smoothie – Gluten-free, Vegan + Sugar-free
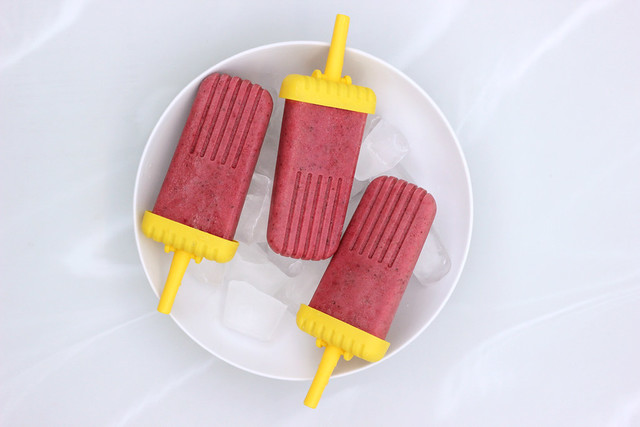
This week as part of my ongoing Restricted Diet series with Free People, I created a simple Strawberry Coconut Smoothie recipe featuring the beautiful fresh strawberries that are in season here in California right now. I still cannot believe how much earlier in the year they are in season here, they are everywhere and so delicious.

When I made the smoothie to photograph it, I wasn’t in the least bit hungry so I didn’t want to drink it, but I obviously also didn’t want to just pour it out, so I was thinking of what I could do with the mixture. Then I recalled the popsicle molds I got for Christmas from my mom and dad. Perfect!
I just poured the mixture in and let it freeze up. Later that night I was ready for a treat! Here’s the original post on Free People highlighting the smoothie, but I couldn’t let these frozen fruit pops go ignored!
Since there is no sugar or sweetener in these, when they freeze up they aren’t overly sweet. Just the perfect amount sweetness from the bananas and strawberries and just a little tartness, too. If you like things to be a bit sweeter, you can add a little honey or maple syrup, or even try blending 1 or 2 dates into the mixture. Also, depending on how much coconut you add to the mixture, if you decide to, you will see pretty white flecks of coconut in the pops. I didn’t think to add any until it was too late, but next time I certainly will.
[print_this]Strawberry Coconut Frozen Fruit Pops / Smoothie – Gluten-free, Vegan + Sugar-free
makes 6 frozen pops or 1 large smoothie
1 cup fresh organic strawberries, hulled
1 frozen organic banana
3/4 cup Unsweetened Organic Coconut Milk(light or full fat)*
1/2 cup ice cold cold water
1 tablespoon Chia Seeds
1 teaspoon vanilla extract
1/4 cup unsweetened shredded coconut, optionalAdd all of the ingredients to your blender and blend until smooth and creamy. Pour into a glass and serve for the smoothie. If you are making the frozen fruit pops – pour the mixture into your popsicle molds and chill for a minimum of 4 hours or until completely solid.
I use these popsicle molds – Tovolo Groovy Ice Pop Molds
*Note – Look for a non-BPA containing canned coconut milk, if you can.
[/print_this]
-
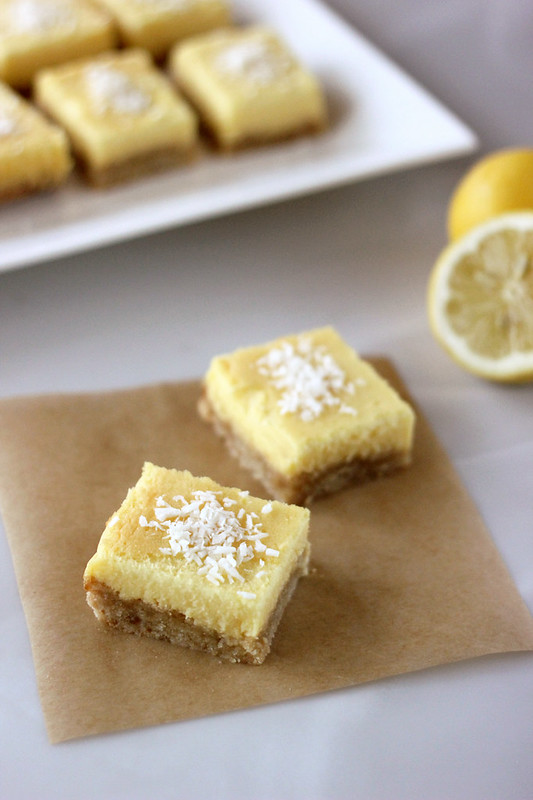
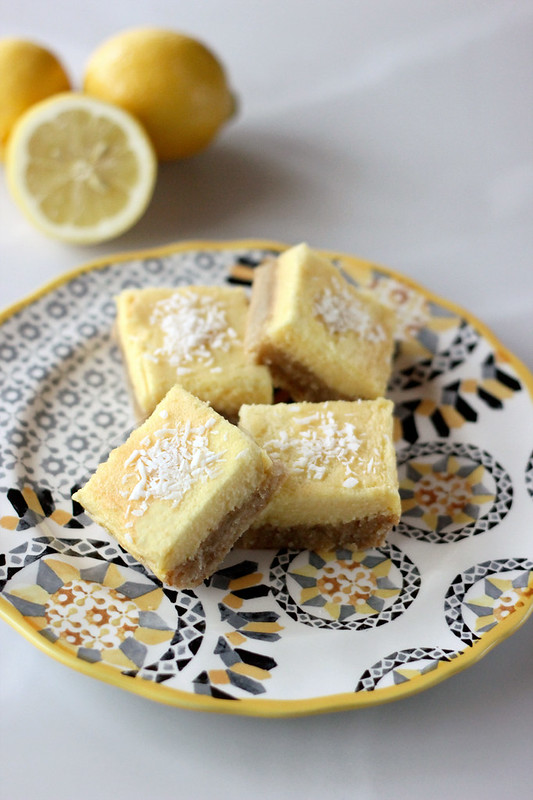
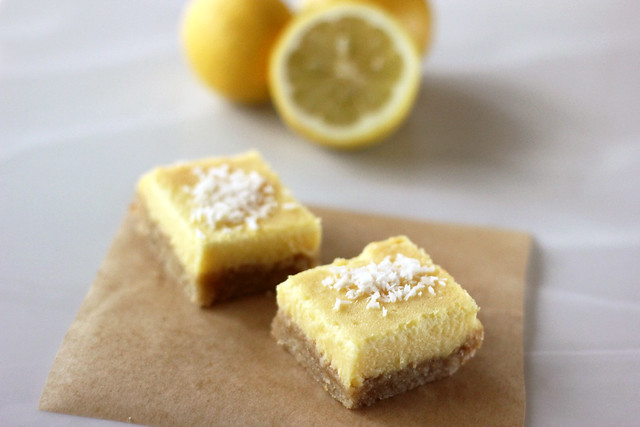
Grain-free Meyer Lemon Bars
Since we’ve moved here to Southern California, just about two months ago, we haven’t had any guests come stay with us just yet. My sister comes two weeks from today and I have literally been counting down the
daysminutes, then my parents come just one month later! I cannot wait! Last week however, our very good friend Jane, who lives in Colorado, came to see us for the day. She had been in Corona, CA for the week and she was able to borrow a car to drive out to our neck of the woods.Although we have quite a few good friends here in Southern California, whom we have known for many years, it was really nice to have our first “family” guest since we’ve moved here. Even if just for a few hours. Jane has been a part of my life since I can remember, she and Mom went to high school together and have remained in contact since. My sisters and I have always jokingly called Jane, “our other Mother”. There hasn’t been a Christmas morning that we didn’t share with Jane, she would always make the trip back to Buffalo from Colorado to spend the holidays with her family and we were always lucky enough to steal her away for a few hours on Christmas morning. Before she had nieces Jane would actually spend Christmas Eve night at our house and we would wake up in the morning and she would make us clean our room before we could go downstairs and attack the tree. Likely buying my parents time to get more sleep, since I am sure they were all up late.
Besides my own actual immediate family, I don’t think that we could have another guest here in the first two months that could have made me any happier. Since she was here a short time, I offered to make her lunch. She absolutely adores my family’s Greek Avgolemeno soup, which she loves to tell me Mom that I make better than her. So I of course, made a big pot of that for her visit. I am sure you have heard me mention many times before that this soup always reminds me of home and my family, so it really couldn’t have been more perfect for this visit.
When Jane arrived she brought me a huge bag FULL of fresh produce from the organic farm on the land where she was staying. So many different varieties of oranges, lemons, a few grapefruits and a few types of citrus that I have never even seen before, plus the most delicious avocados. Besides looking beautiful and tasting amazing, all of the citrus have been making the house smell incredible.
There were some Meyer lemons in the bag. Those are my absolute favorite. They are just so tasty and subtly sweet, so much so that I hate to waste them just in my morning lemon water or in a juice. I wanted to make something extra special with them. I just wish I could have made these bars and then shared them with Jane.
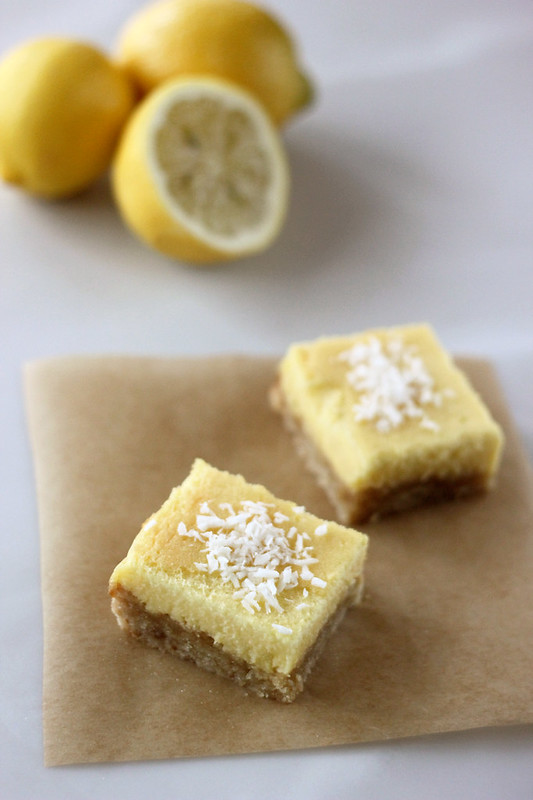
What makes this recipe extra special, besides who/where I got the Meyer lemons from, is that you actually use an entire whole lemon in the filling. Yes the whole fruit. Peel, pith and all. So, it is quite important that you use an organic lemon, or at least one that is unsprayed and free of pesticides or other chemicals.
You can certainly use a regular lemon in place of the Meyer lemon, but you’ll want to increase the sweetener a bit since it won’t be as sweet as the Meyer lemon is. The filling of this recipe was adapted from David Lebovitz. His recipe utilizes corn starch, a regular lemon, regular sugar and butter, so I tweaked it to make it work for me and to highlight the flavor of the Meyer lemon.
*If you are vegan, I would be hesitant to recommend any egg replacers in place of the eggs, since there is a fluffiness from the eggs that gives the filling it’s texture. There are many vegan lemon bar recipes that use silken tofu or soaked cashews to created a creamy topping, but since I had a dozen beautiful brown eggs fresh from a local farmer, I decided they would be perfect for this. If anyone does experiment in making this vegan, please do report back, I would love to hear how it turns out.
[print_this]Grain-free Meyer Lemon Bars
{Gluten-free, Grain-free, Dairy-free + Refined Sugar-free}
One 8-inch Square Pan – Makes 16 squaresCrust:
- 1 1/2 cups blanched almond flour, I prefer Honeyville brand
- 2 tablespoons honey or maple syrup
- 1/4 cup coconut oil, melted
- 1/2 teaspoon baking soda
- 1/8 teaspoon salt
Lemon Topping:
- 1 whole organic Meyer lemon, washed (organic or unsprayed)
- 3 tablespoons honey or maple syrup*
- 1/3 cup freshly squeezed Meyer lemon juice (approx 2 additional lemons)
- 4 large farm fresh brown eggs, at room temperature
- 4 teaspoons arrowroot starch (tapioca starch or corn starch would also work)
- 1/4 teaspoon salt
- 3 tablespoons coconut oil, melted (make sure it isn’t too hot when you add it in, you don’t want it to cook the eggs)
- Unsweetened shredded coconut for topping or the traditional powdered sugar works, too.
*Please Note – since the sweetness and bitterness on Meyer lemons can vary drastically, you may need to increase your sweetener to account for more tart Meyer lemons. Give the mixture a quick taste before you add the eggs to see if you need to. It should be a bit bitter but not too much so. Obviously the sweetener will have to be increased if you choose regular lemons over Meyer lemons. Additionally, if they are on the tart side, powdered sugar on top can definitely help with that, as well.
Preheat the oven to 350º F. Line an 8-inch square pan with two pieces of parchment paper, one going in each direction. In a medium bowl, mix all of the crust ingredients together. You may want to get your hands in there to really get it mixed together well. This will be a thick crumbly crust that you will need press onto bottom of pan. Make sure it is even and gets into the corners. Place in oven to pre-bake the crust. Bake for 15-20 minutes or until lightly golden brown. Remove from oven.
While the crust is baking, cut the whole lemon in half, remove the seeds, and cut the lemon into chunks. Put the chunks of lemon in a food processor or blender along with the honey and additional lemon juice, and let it run until the lemon is completely broken up. Add the eggs, arrowroot powder, salt, and melted coconut oil and blend until almost smooth. (A few tiny bits of lemon pieces are ok and totally encouraged.)
Once the crust comes out of the oven, lower the temperature of the oven to 300ºF. Pour the lemon topping over the hot crust and bake for 25 minutes or just until the filling is no longer jiggling and is barely set.
Remove the bars from the oven and let them cool completely. Once totally cool, carefully lift out the bars out grasping the parchment paper. Cut the bars into squares or rectangles. I like to cut into 16 smaller sized squares. They last longer that way. Add shredded coconut or sift powdered sugar over the top just before serving, if desired.
These bars will keep covered or in an airtight container at room temperature up to three days. The crust will definitely get soggy as they sit, however. You can also freeze the lemon bars for up to one month, letting them come to room temperature before serving. [/print_this]
-
Orange Chia Refresher – Gluten-free, Vegan + Sugar-free

For the last 4 weeks, I have been working on a running program. A gradual build-up to a 5K for beginner runners, such as myself. It is an 8 week program, so this week marks the halfway point. So far I am really loving it. First time in my entire life I have tried running and I actually didn’t adamantly HATE it.
I think the biggest difference for me, is with now living here in California, every single run brings the sun shining it’s amazing rays down on me, I am surrounded by the beautiful views of the ocean, lagoon, palm trees, amazing birds, etc. These amazing surroundings has really changed running for me.
That being said, the thing I have found most challenging is being alone with my thoughts. What I enjoy about yoga is with the practice being a moving meditation, it is a wonderful way to get out of my head for a while. I don’t look at yoga as an escape from my life, but a time to acknowledge, express gratitude and strengthen, in more ways then one. I am able to shut off the constant chatter in my head and my inner voice telling me that “I can’t” or “I am not good enough”. Instead I just am. I just do. It is such an amazing thing. Yoga has taught me to not just ignore those thoughts as they arise, but to acknowledge them and the place they are coming from, then set them aside and focus on my breath and being.

With running, I haven’t quite gotten there, yet. However, that is part of what I like about running, the time it gives me to think. To really focus on the things in my head, process them fully without distractions and deal with them in whatever way needed. There are lots of thoughts swirling in my head when I run, good and bad. So different from yoga, but a really nice compliment.
Sometimes I have deep thoughts when running and sometimes I think about food and recipes. The idea for this Orange Chia Refresher came to me during a run and I couldn’t wait to make it and share it with you guys. Based on the response on my Facebook page when I asked who would be interested, you guys couldn’t wait either.
In looking around, I realized I didn’t exactly have some unique idea on my run, I discovered a drink like this has existed in Mexico for a long time. They call it a chia fresca. I don’t recall ever seeing this, but either way I guess it was in my subconscious. This drink could be made with lemon, lime or grapefruit and be just as tasty, plus I bet it would also be amazing with a sparkling water. First time I tried chia seeds in a drink, was in kombucha and I wasn’t a huge fan. However, I do think there were WAY too many seeds in it, so it was super thick and weird. I went light on the seeds with this, but feel free to add as much or as little as you’d like and sweeten according to your own preferences. I find with these measurements, you end up with a delicious water drink that isn’t overwhelmed with seeds and isn’t thick or chunky. I particularly enjoy drinking this with a straw.
Chia seeds are a super food that provides a variety of wonderful health benefits. It a nutshell – by adding just 2 tablespoons of chia seeds to your daily diet it will give you approximately 7 grams of fiber, 4 grams of protein, 205 milligrams of calcium, and a whopping 5 grams of omega-3! OK, I won’t go into a huge rant about all of the many benfits of chia – instead I will ask:
What is your favorite benefit(s) of chia seeds?
[print_this]Orange Chia Refresher – Gluten-free, Vegan + Sugar-free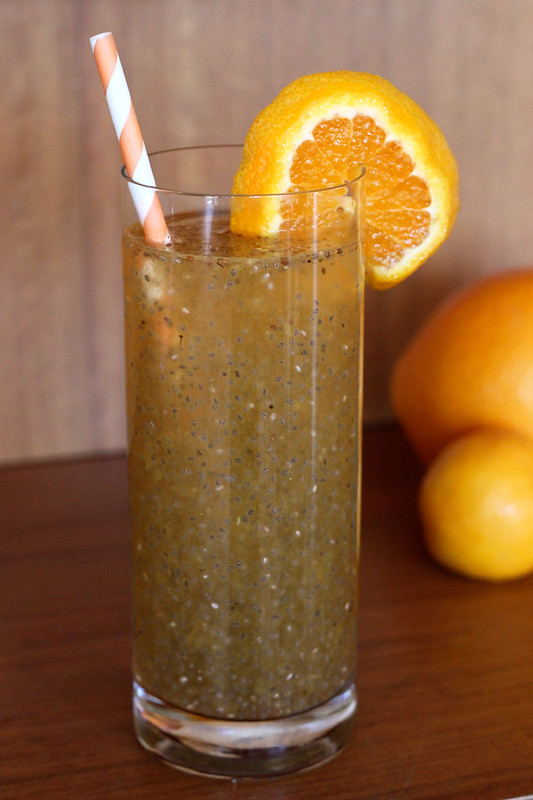
Makes 1 drink- 12 ounces (1 1/12 cups) of cold filtered water
- 1/4 cup freshly squeezed orange juice (grapefruit, lime or lemon would also be amazing)
- 2-3 teaspoons whole chia seeds
- Sweetener to taste (stevia, maple syrup, sugar, etc)
Pour water and orange juice into a glass jar with a lid (or a glass), add the chia seeds. Put the lid on and shake very well to combine (or stir if in a glass). Let stand for 10-15 minutes to let the chia seeds do their thing and get all puffy.
Take a quick sip and add sweetener to taste, shake (or stir) again, well to combine. Add ice and an orange garnish and enjoy.
*Fresher seeds will float throughout the liquid, while older ones tend to sink to the bottom. If they sink, that is totally ok, you will just need to stir them up a bit to keep them evenly dispersed as you are drinking it. [/print_this]
**Please don’t be turned off by the odd color of this drink in the photos, as the seeds soak, settle and swell even more, you will see the pretty and subtle orange hue more than the color of the seeds. I happened to only have black chia seeds on hand, but I bet white seeds would be even prettier.
-
Gluten-Free Sunday Brunch Recipes
Are you hosting an Easter brunch this Sunday? Or maybe you are headed as a guest to someones house and you want to make sure you have something you can eat there? Or maybe you yourself can eat gluten, but you are SOO sweet, you are stopping by to get a recipe that is friendly for a gluten-free guest, in which case you get bonus points!
At any rate, here are some of my favorite gluten-free Tasty Yummies recipes, that would be perfect for any Sunday brunch, whether you are gluten-free or not!
This site is full of lots of other recipes that would work, so if you don’t see what you are looking for below, head to the search box off to the right or check the recipes page.
Maple Cinnamon Crunch Quinoa Granola {Gluten-free, Vegan + Refined Sugar-Free}
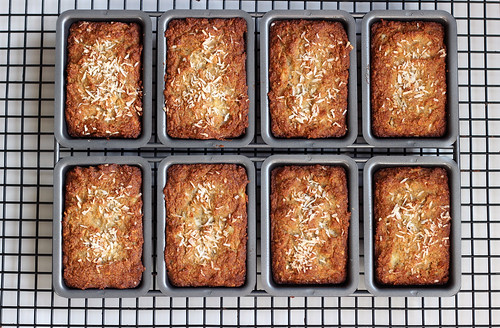
Grain-free Banana Coconut Mini-Loaves {Gluten-free, Dairy-free + Refined Sugar-free}
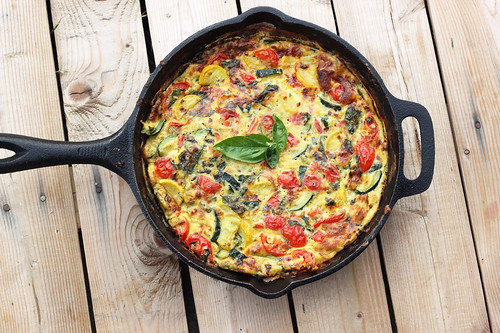
Summer Harvest Frittata {Gluten-free + Dairy-free}
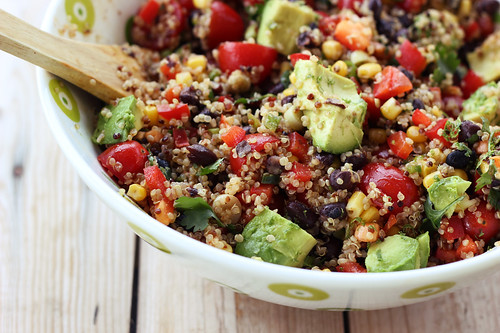
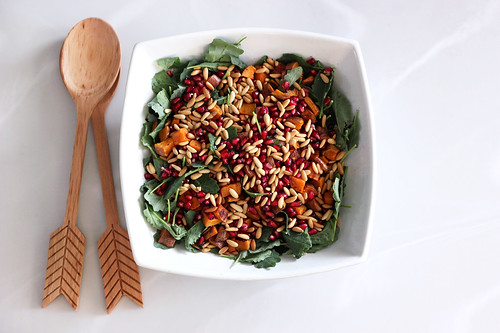
Fiesta Quinoa Salad {Gluten-free + Vegan}
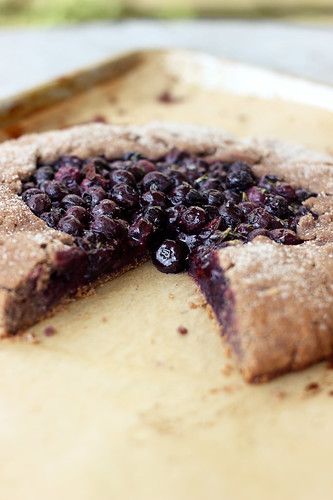
Blueberry Rosemary Multi-Grain Galette {Gluten-free + Vegan}
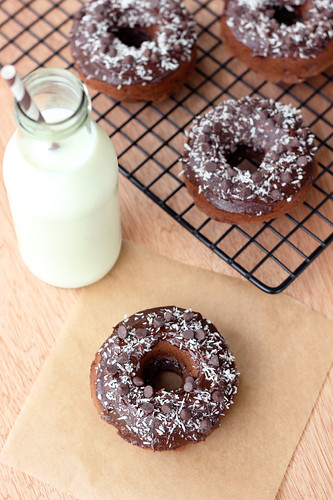
Double Chocolate Donuts with Coconut {Gluten-free, Dairy-free, Refined Sugar-free}
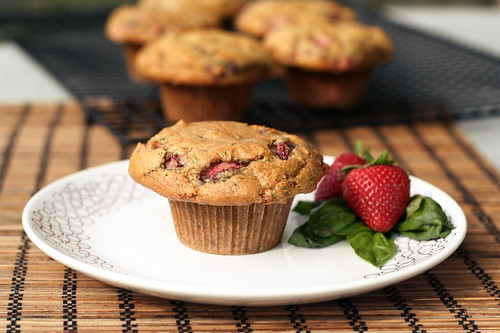
Strawberry Basil Almond Flour Muffins {Gluten-free, Dairy-free, Refined Sugar-free}
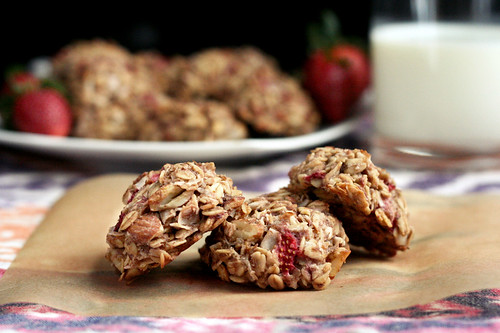
Strawberry Coconut Breakfast Cookies {Gluten-free + Vegan}
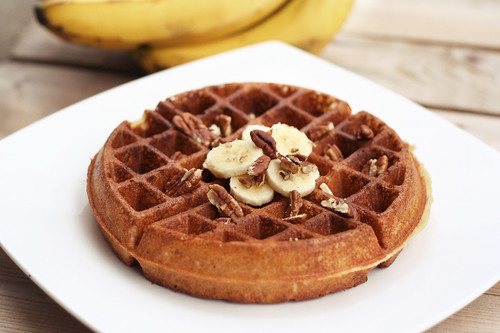
Banana Pecan Waffles {Gluten-free, Vegan + Refined Sugar-free}
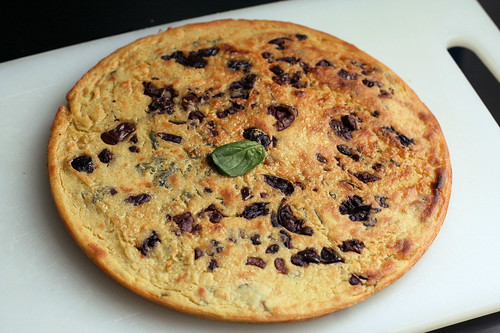
Kalamata Olive and Herb Socca (with Roasted Vegetables options) {Gluten-free + Vegan}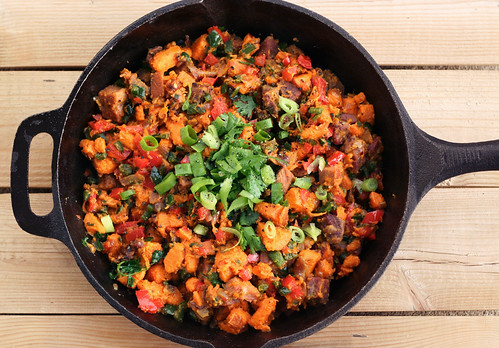
Sweet Potato and Poblano Hash {Gluten-free + Dairy-free with Vegan Option}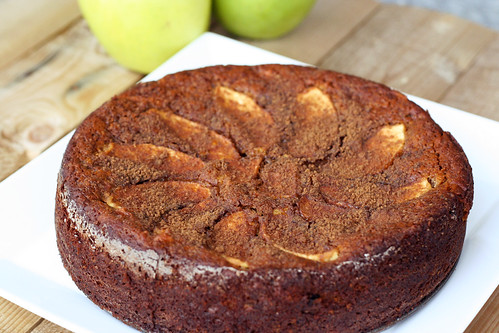
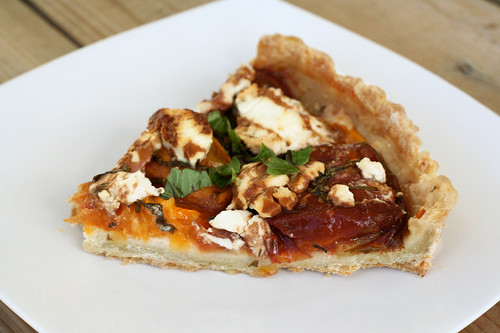
Gluten-Free Heirloom Tomato and Goat Cheese Tart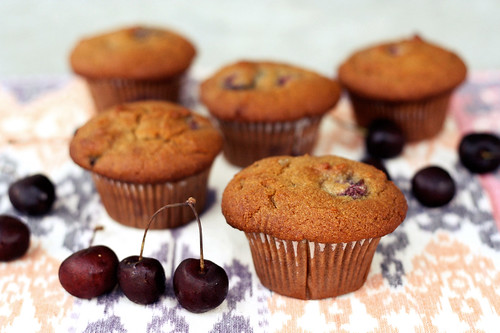
Cherry Almond Flour Muffins {Gluten-free + Dairy-free}
-
Restricted Diets: Focus On What You CAN Eat, Not What You Can’t
This post was originally shared on the Free People blog, BDLG 25.
Restricted Diets: Focus On What You CAN Eat, Not What You Can’t
Many of you know this from following my blog over the past few years, but due to health reasons I was forced to give up gluten in 2005. Since then, I have also willingly removed dairy (with the exception of goat’s milk occasionally) and processed foods from my diet and I maintain a conscientious omnivore diet, with a focus on nutrient-dense whole foods, which means TONS of veggies. I generally avoid refined sugars and processed and refined carbs (though I am not perfect, obvi). One of the number one questions I receive from people when they first meet me and hear of all of my restrictions, is “what else is left” or “so what DO you eat then?”. This question always makes me laugh for the pure fact that I feel like the possibilities are endless and the weeks are not long enough for all of the foods I love to eat to make it into a meal.
I decided a while back instead of focusing on the long list of things I cannot eat, to instead celebrate the never-ending list of those that I CAN. It has been freeing to not only discover new foods that I never even knew existed, but to also get creative with some of the old standbys that pop-up often.
Having so many restrictions, some self-inflicted and some for medical/health purposes, may seem like it leaves very little for me to eat. This couldn’t be further from the truth. Restricting my diet has actually allowed me to find more foods and ingredients than I ever even imagined existed. There was a time when I first went gluten-free that all I could do was think about what I couldn’t eat. Cookies, pizza, cake, pasta, sandwiches…the list goes on and on. I was so sad over what I could no longer eat, that I couldn’t even focus on all of the many things there still were, and many that I didn’t even know about, yet. I began eating anything that I knew was gluten-free and even just closely resembled the food I had been missing so dearly. I gained weight and I felt terrible. It was all over-processed, filled with preservatives, and lab created junk made to make you think you were eating it’s gluten-containing counterpart. It all tasted terrible, was expensive, and I was even more unhappy. That is when I decided to take control of my eating and get adventurous and explore a little.
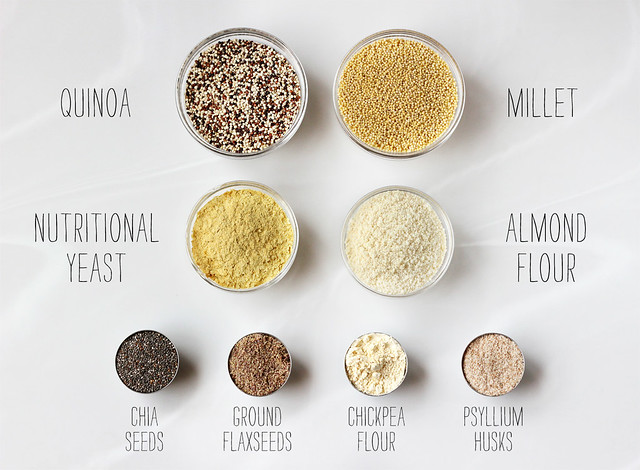
There had to be more out there and I was ready to find it. I discovered there are so many amazing gluten-free grains that I never even knew existed until I went searching (some of my favorites are pictured at the top of this post). Amaranth, millet, buckwheat, so many various rices – just to name a few. I also decided to start focusing more on fresh and whole fruits and vegetables, legumes, nuts and seeds. After I decided to go dairy-free, processed and packaged food-free and eating very little meat, I really had to get creative with what I was eating. I have discovered so many fun things – for example:
– Using nutritional yeast in a recipe can give a cheesy flavor to vegan pasta sauces.
– Use ground flax seeds with hot water to replace eggs in many recipes to make them vegan.
– Psyllium husks give a great texture to gluten-free breads and baked goods that I had never found before.
– Make absolutely delicious baked goods totally grain-free by using almond flour – you would never know there isn’t a single grain in there.
– Make a delicious flatbread with literally just chickpea flour, water and oil.
The list of my discoveries just goes on and on! Instead of looking around and seeing all of the things that everyone else can have and I cannot, I now think about all of the creative ways to play with all of the amazing ingredients I have discovered. One of my favorite things to do is to go to the farmers market each week and with each trip I challenge myself to find and buy a food I have never heard of before or have never cooked with and get creative with it. It is so exciting and it keeps me on my toes.
This same philosophy can work for you, whether you are gluten-free, vegan, dairy-free, paleo, corn-free, sugar-free, nut-free, soy-free, grain-free, etc. Get out explore the rows of food at your farmers market and your local grocery store. Buy something you normally wouldn’t (as long as it is safe for you) and play. You might actually surprise yourself and learn to love a food you never even knew existed. Focus on the long list of amazing fresh and healthy foods that you can eat, instead of dwelling on the list of things you cannot. It is so freeing and inspiring!
-
Mexican Mocha No-Bake Cookie Balls (grain-free, gluten-free, vegan + sugar-free)
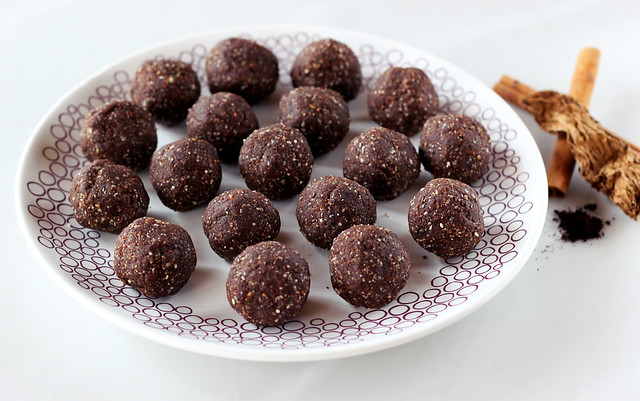
In stepping into a coffee shop next door to the yoga studio I go to here in Long Beach the other day, to grab a juice, I saw something called a Mexican Mocha on the menu. I was intrigued but didn’t order it since I knew it would be loaded with sugar and other stuff I try to avoid, but I was definitely curious, so I asked. It is basically a mocha, which we all know is a sinfully delicious drink where coffee meets hot cocoa, but this one comes with some additional spices, which can vary based on coffee shop and some even add in almond extract/flavor. In looking around online, most Mexican Mochas include cinnamon and some also chipotle or cayenne for a little extra kick.
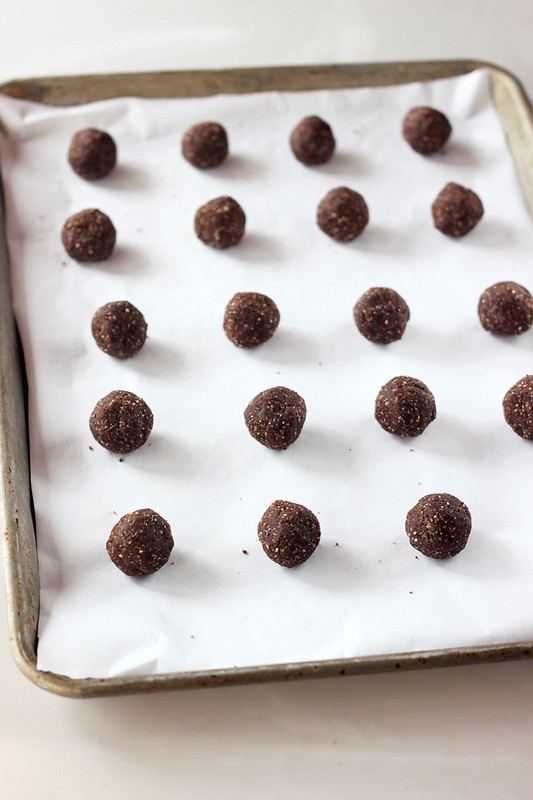
I have had a Mexican style hot cocoa with those spices, but never with the addition of java. Sounded pretty delicious. Although, I drink very little coffee these days, I was still excited to try the flavor combination and I was inspired to have a little fun with it.So, I created these simple to make no-bake cookie balls. They are grain-free, vegan and sugar-free. If you are sensitive to caffeine, no worries, you could leave out the espresso and then you would just have Mexican Hot Cocoa Cookie Balls. Oh and either way, if you really wanted to go crazy with the chocolate, you could even dip them in some melted chocolate or add some mini chocolate chips.I think what I like most about these cookie balls, unlike the other no-bake cookie balls I have made in the past, is that normally I use uncooked oats and although they make for a really nice texture, I find oats in that state to be quite hard to digest. So I experimented in making these without any grain and I just added in the chia seeds to give these a little crunch and to also add some of that healthy Omega-3 Oil to this treat.These are a nice little sweet treat, with just a little hint of a coffee and spice kick, which are an extra added bonuses.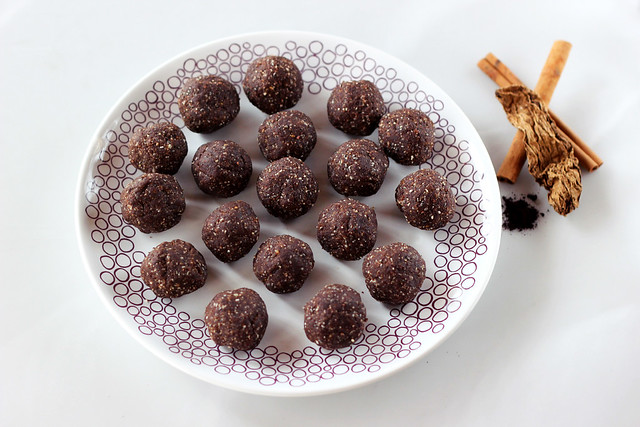
[print_this]Mexican Mocha No-Bake Cookie Balls (grain-free, gluten-free, vegan + sugar-free)
makes about 18-20 cookie balls1 /2 cup raw organic cashews
5-6 medjool dates, pitted and chopped
1/2 cup blanched almond flour (I like Honeyville)
1/4 cup coconut flour
2 tablespoons cocoa powder
1/2 teaspoon ground cinnamon
1 tablespoon chia seeds
dash or two of ground chipotle powder (optional)
1/2 – 1 teaspoon instant Espresso powder (optional)
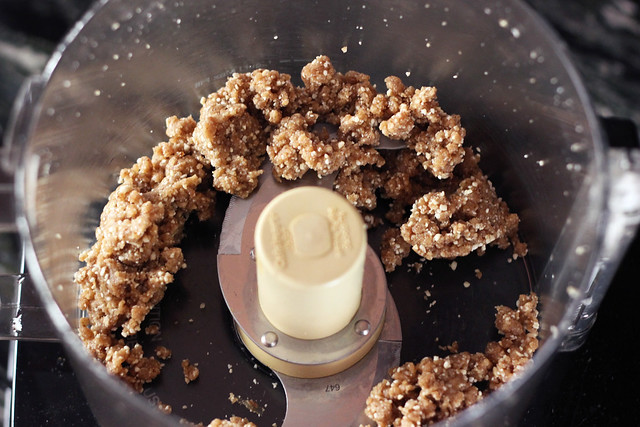
1 tablespoon vanilla extractAdd the cashews and dates to your food processor and pulse a handful of times until it becomes a chunky crumble.(see below photo)
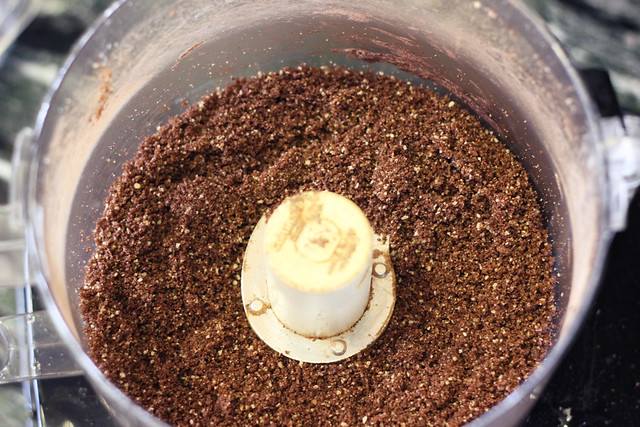
Add in the almond flour, coconut flour, cocoa powder, spices, espresso powder, chia seeds and vanilla. Process until it is a fine crumble, almost sand-like.
It may seem to try to roll, but you will be surprised. Put a bit of the mixture into your hands, roll it around, it should come together into a ball. If it seems a bit too dry and crumbly add a bit more water or if you want it a bit sweeter, maybe a little maple syrup. Don’t add too much though, you don’t want it to get to soggy.
Roll the mixture onto ball and place on a parchment paper lined baking sheet. Refridgerate for 30 minutes or so to firm them up. [/print_this]
-
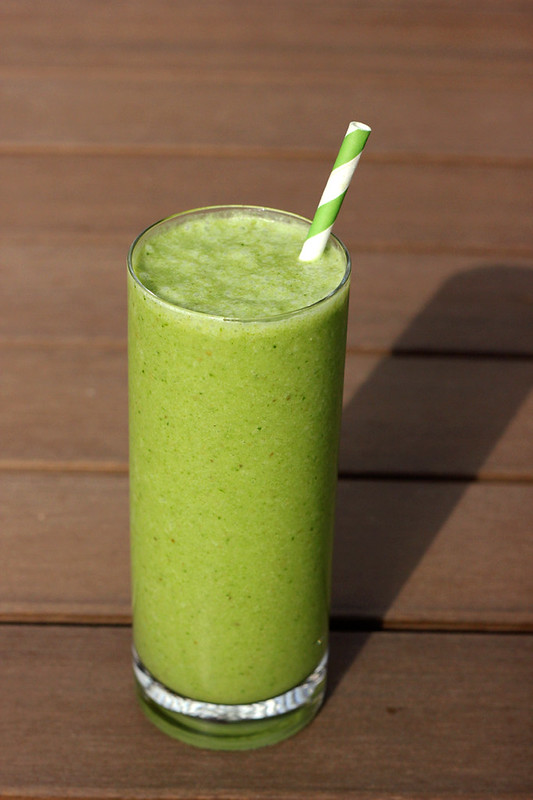
Spring Cleanse – Asian Pear Green Smoothie – Gluten-free, Vegan + Sugar-free

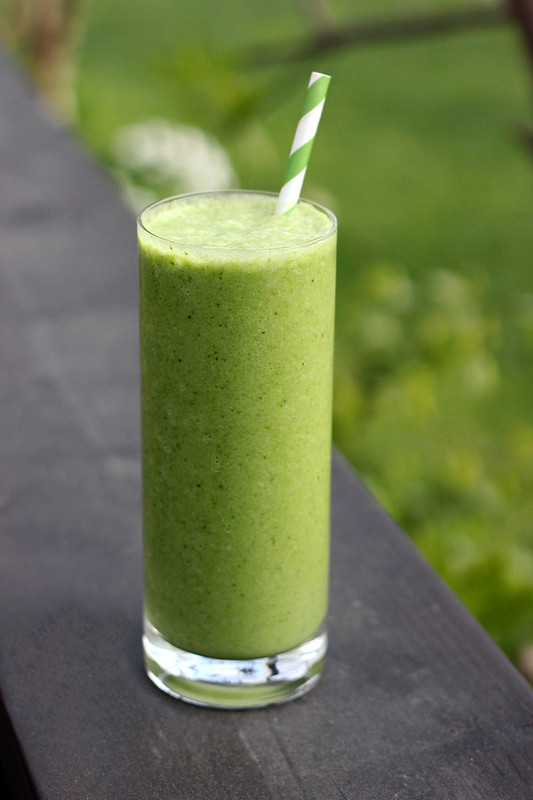
Happy St. Patrick’s Day and Happy Cleanse Day 5 to me!! I am feeling super great today. Tons of energy, my skin is clearing up and I just feel lighter and more grounded, all at once.
I am never one to celebrate St. Patrick’s Day, honestly I don’t think I ever have outside of possibly a grade-school classroom shindig. Since everyone was posting photos of their green clothes, green beer and green-filled parades and whatever else green you can think of, I was inspired to take a run first thing this morning enjoying all of the beautiful greenery around Southern California right now. The grass is vibrant, the trees are blooming and there is a wonderful aroma in the air. I am trying to get into a regular running routine, now that I have such incredible views to keep me inspired. Even though it will be a slow start getting my body used to the idea of running and everything that goes with it, I have to start somewhere.
After this morning’s run, I was craving another green smoothie. I was super happy with the green smoothie I made the other day, but wanted to play with some of the other amazing ingredients I picked up at the farmers market earlier this week. There is a local organic apple farmer that had tons of delicious apples, but he also had some beautiful and super flavorful Asian pears, the large round yellow skinned ones, I believe they are Hosui. I grabbed a couple of those and anticipated adding them to a fresh crisp salad, but then was inspired to add some to this morning’s smoothie.
Besides the beautiful green hue, this smoothie was full of flavor and was nice and creamy, with just the perfect amount of sweetness. If you don’t have an Asian pear, just go with a medium apple, of your favorite variety. If you wanna add 1/2 an avocado instead of the banana, like my last smoothie, go for it, you may just want to add another date. if it is lacking sweetness.
Are you celebrating (did you celebrate) St. Patrick’s Day? If you are on the cleanse, did you eat something green today? Hope you have all been following along with my cleanse on my Facebook page, where I have been sharing what I am eating for each meal.
[print_this]Spring Cleanse – Asian Pear Green Smoothie – Gluten-free, Vegan + Sugar-free
makes 1 large serving or 2 small- 1 cup organic non-dairy milk or water (I used 1/2 coconut milk and 1/2 water)
- 1 cup organic baby spinach
- 1/2 large organic Asian pear, cored and diced (or 1 whole small/medium, mine was pretty big)
- 1/2-inch piece of organic ginger, peeled and chopped
- 1/2 organic banana (preferably frozen)
- 1 organic Medjool date, pitted
- 1/4 teaspoon ground nutmeg
- 1/2 teaspoon cinnamon
- A few ice cubes
Add all of the ingredients to your blender (in the order above) and process until smooth and creamy.
* I know it is repetitive on the “organic”, but it is especially important to consume organic produce when cleansing. All of my ingredients, included the flax and cinnamon were all organic.
[/print_this]
-
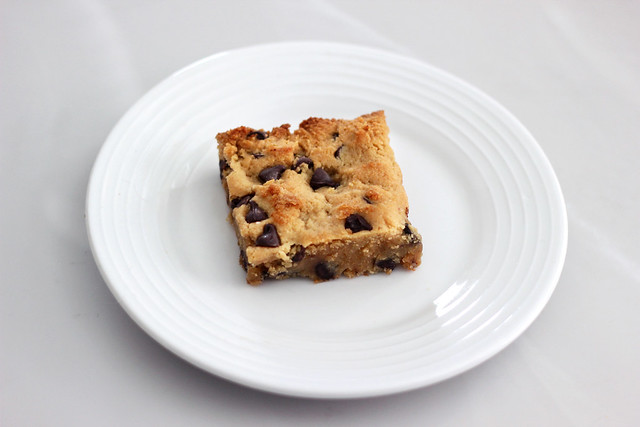
Grain-Free Chocolate Chip Cookie Bars – Gluten-Free + Dairy-Free
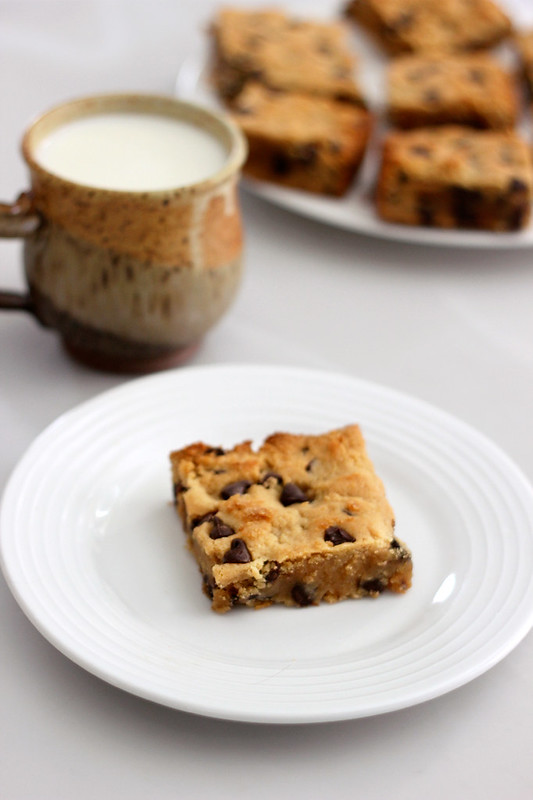
I finally made some time to play in the kitchen with a new baked good recipe and boy am I glad I did. I have been craving chocolate chip cookies like crazy lately but rather than another cookie recipe, which there are a ton of all over the internet, I wanted to make cookie bars. These tasty beauties are soft and chewy and the chocolate just melts in your mouth. They satisfy that craving for chocolate chip cookies, and then some.
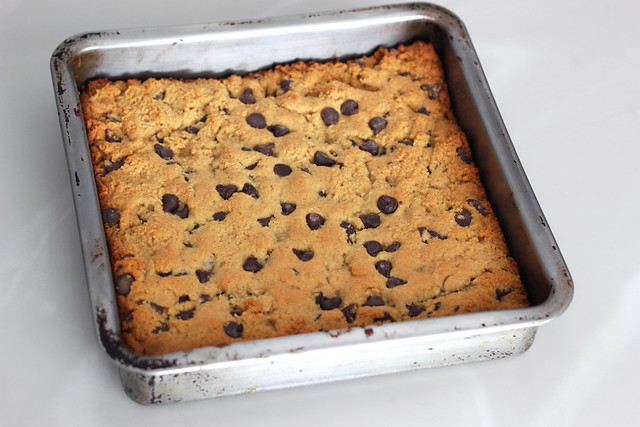
I made these with coconut oil, since that is what I had on hand, but I cannot wait to try it with palm shortening, since whenever I have made cookies with it they are always extra incredible. But, these are definitely not lacking in any way! These bars would be great with other goodies added like dried cherries, chopped walnuts, coconut, etc.

I cannot wait to share these with my parent’s tonight after dinner. I made these last night and I couldn’t try them until today after I took photos and the anticipation was killing me. As much as I don’t necessarily want to share these, I am quite happy to not only have other recipe testers around, but also a few more mouths to eat my creations, to save me from sitting down and eating ALL of them! Also two more people to judge me if I am a pig and eat ALL of them in one day. Ooh it’s so tempting.
[print_this]Grain-Free Chocolate Chip Cookie Bars – Gluten-Free + Dairy-Free
- 2 1/2 cups blanched almond flour (I use Honeyville)
- 1 teaspoon baking soda
- 1/2 teaspoon sea salt
- 1/3 cup honey
- 2 extra-large local farm fresh brown eggs
- 1/4 cup coconut oil, melted (grass-fed butter, palm shortening or ghee will also work)
- 2 teaspoons vanilla extract
- 1 tablespoon unsweetened non-dairy milk (I used almond)
- 3/4 cup dairy-free gluten-free semi-sweet chocolate chips (I like Chocolate Dream or Enjoy Life)
- 1/4 cup walnuts (optional)
Preheat the oven to 350º F and lightly grease the bottom and sides of an 8″ square baking pan with coconut oil.
In a large mixing bowl, whisk together all of the dry ingredients. In a smaller bowl, add all of the wet ingredients. Mix well with a hand mixer or a whisk. Add the wet ingredients to the dry and mix very well with a hand mixer. Then fold in the chocolate chips and nuts (if you are including) with a spatula.
Pour all of the batter into the greased pan and spread evenly with a spatula or your hands, gently press in.
Bake for 20 – 25 minutes until the top is nice and golden brown and the center is no longer doughy. Allow to cool 10-15 minutes before cutting into bars or they could fall apart.
*These keep best in an air-tight container in the fridge. You could put these in the microwave for a few seconds when serving to take the chill off or to get them slightly warm. [/print_this]
-
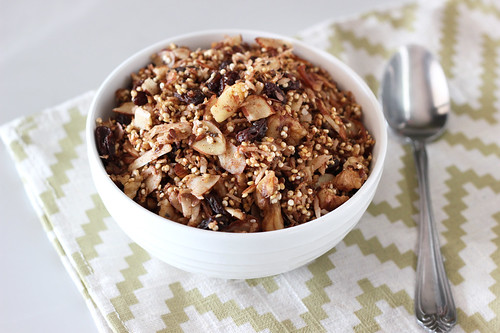
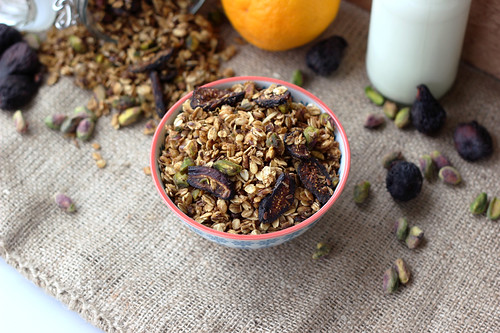
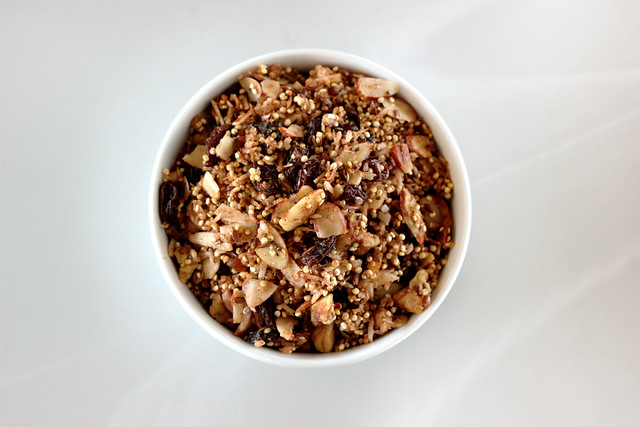
Maple Cinnamon Crunch Quinoa Granola – Gluten-free, Vegan + Refined Sugar-Free

It has been quite a whirlwind for us since the start of the new year. On Friday, January 4th the moving truck to got dropped off at our house and we had that weekend to pack up everything we wanted to keep, to go out to California and go into storage. The truck was on it’s way on the following Monday, January 7 and then we had the rest of the week to finish cleaning up the house, sell off our remaining furniture that we weren’t taking with us and get ourselves temporarily moved over to my parents house where we are staying until the official move to California.
Yesterday our house closed!! So, after the moving truck pulled away last week and now handing off the keys of our house to the new owners, it is definitely all very real. We have a lot to do before we are officially on our way to California for good, but it is all feeling a little less overwhelming. At least right now. Staying at my parent’s house is going to take some getting used to, since I haven’t lived at home in nearly 10 years, but it is also really nice to spend some quality time with my parent’s before we move across the country.
Last week was spent getting settled here and wrapping up everything at our house, but over the weekend I finally got some time to sit down and write up some recipes that have been swirling around in my head the last few weeks. I also made time to meal plan for the next week and write a grocery list. Yesterday I made dinner for everyone, hopefully the first of many while we are here. We popped a bottle of prosecco to celebrate the house sale being finalized and I made a huge pot of my chili, with some of the grass-fed ground beef from our farmer and some ground venison from a local hunter. Then I spent some time in the evening making this granola.
I am quite fond of minimal food photos that really allow the food to be the center focus rather than lots of props and other stuff, and I am excited to have some of my photography stuff here, but I really don’t have any of my props besides my nice white back drop. So, look for even more minimal photos than ever here at Tasty Yummies over the coming weeks. Hopefully the food will be as enticing as ever and I can create some fun stuff in the kitchen here at my parent’s place to share with you guys. With or without props and linens. I have some fun stuff in the works for you guys. By the way, the napkin seen in these photos is something I made as a gift for my mom. Designed and hand silkscreened fabric made by me and then I sewed it into a set of napkins. I still owe her a few to make the set complete, but we are going to work on them together, now that I am staying here! Can’t wait.
I think what I like about this granola is that it is grain-free, something I am trying to be much more aware of, as I definitely feel better and less bloated when I am not consuming a lot of grains. Besides the fact, quinoa, those cute little seeds, often mistaken for a grain, is a nutritional powerhouse of a super-food, take a read here for the long list of benefits quinoa has to offer. I went a bit heavier on the maple syrup than I normally would have, but I really wanted to capture some of the wonderful maple flavor. I wanted to make sure it wasn’t lost in the flavor of the quinoa and cinnamon. Feel free to use less and/or to also consider adding in a tablespoon or two of some blackstrap molasses, which is a great source of iron. And as always with so many of my recipes, you can easily make this recipe your own. Taking out, adding in or swapping your favorite nuts, seeds, fruit and spices. This is a versatile recipe that is quite easily adaptable.
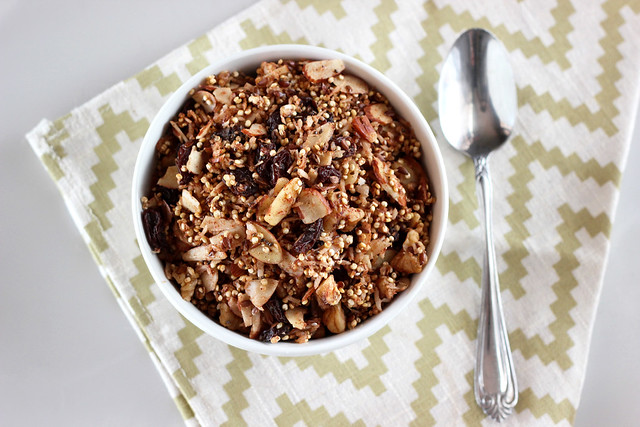
[print_this]Maple Cinnamon Crunch Quinoa Granola
Makes approximately 4-5 cups- 1 cup quinoa, uncooked (rinsed well and drained)
- 1 cup sliced almonds
- 1/2 cup walnuts, chopped
- 1 cup unsweetened shredded coconut or coconut chips
- 1/3 cup flax seeds
- 1 tablespoon chia seeds
- 3/4 cup raisins or dried cranberries
- 1 tablespoon ground cinnamon
- 1/2 teaspoon ground nutmeg
- 1/2 teaspoon sea salt
- 1/2 cup maple syrup
- 1/3 cup coconut oil, melted
- 1 teaspoon vanilla extract
Preheat the oven to 375°F. In a large bowl or directly in a roasting pan, combine all of the dry ingredients, including the spices. If solid, heat the coconut oil in a small microwave-safe bowl on high for 20-30 seconds until melted. Pour the coconut oil and maple syrup evenly over all of the granola. Toss it all very well to make sure the dry ingredients are all nicely coated.
Make sure the granola is evenly spread in a thin layer in your roasting pan (you can also use a parchment paper lined baking sheet as well). I like using a roasting pan, since it makes stirring easier, so you don’t lose any over the sides. Bake for 15-20 minutes or until golden brown, and slightly crisp. Stirring a few times while it is baking.
Cool completely in the roasting pan or on the baking sheet. As it cools the granola will crisp up even more. Cool fully before adding placing in air tight container for storage.
Enjoy this granola as cereal in your favorite milk (dairy or non-dairy), sprinkled with fresh fruit over your favorite yogurt or ice cream, on top of a smoothie, etc.
[/print_this]
-
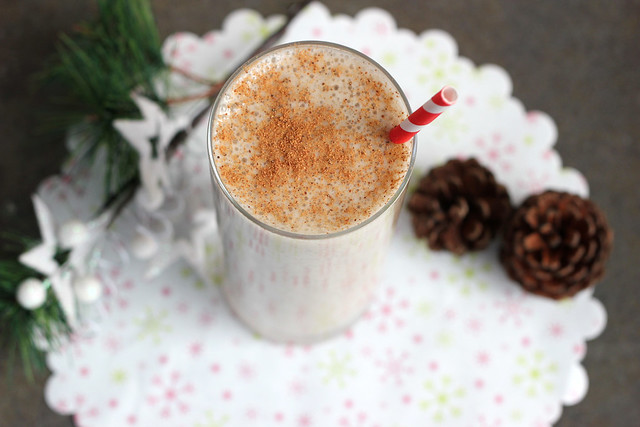
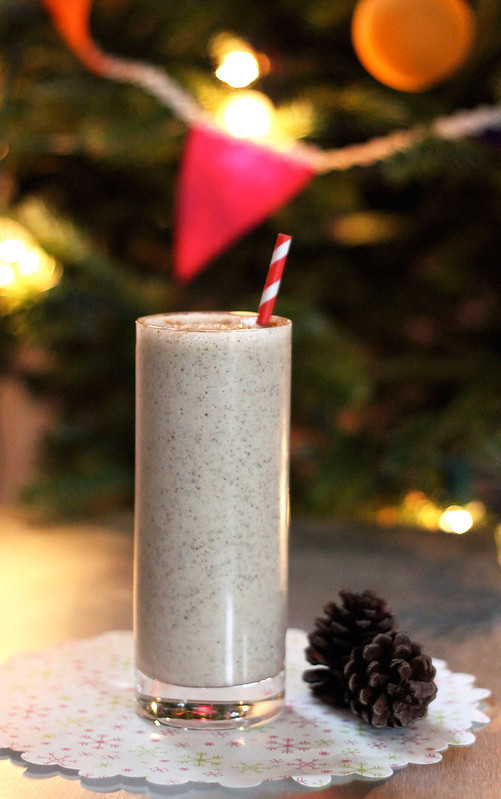
Banana Nog Smoothie – Gluten-free + Vegan
It is likely you have noticed how quiet things have been around here on Tasty Yummies. We have been traveling up a storm over here this holiday season to different events and fairs all over the east coast. In the last month we have been to Washington DC, Baltimore, Philadelphia, Brooklyn, Chicago and Pittsburgh. As of this past weekend, are finally done traveling for the year! At the start of the crazy month of travel, in mid-November, we got an offer on our house. YAY!!! Closing is scheduled for early January. I honestly cannot believe it’s all really happening.
So, besides being overwhelmed with all of the travel and the holidays, we are in the midst of selling our house and figuring out packing up all of our personal and business related belongings to relocate to California in early 2013. I don’t consider myself a stressful person or a worrier in the least, but I have to say, we haven’t even really begun packing up boxes and all of that real stuff, and I am kinda already freaking a little bit. Hubby, of course, continuously reassures me it is all fine and everything will all get done, but I cannot quiet the constant voice in my head reading the long list of the many things that need to get done before closing (and having to be totally moved out) next month, a month from yesterday to be exact. I have surprisingly only moved once in my adult life and that was from living at home with my parents to buying my first home at 23, 9 years ago. So, I am just a bit overwhelmed.
As you can imagine, between the travels, running the business, preparing for the move and dealing with all the holiday fun of shopping and such, there just hasn’t been much leftover time for me to play in the kitchen. That is the only bummer about all of it. Obviously as with most painful things in life, it is temporary. This time will pass and be over before I know it. Doesn’t make it all any easier though.
I have been eating well and cooking every single chance I get, but the time to create new recipes, set up photo shoots, edit photos, etc – just doesn’t seem to be there right now and I have tried to do my best to accept that, as much as I am not exactly happy about it. I will obviously be sharing recipes whenever I can, I am not totally disappearing, I just wanted to explain the quiet and lack of recipes. Oh and I have some really fun end of the year stuff planned for the end of the month here on the blog, so stay tuned for that.

In the meantime, I created this tasty smoothie this morning after yoga. By the way, another quick side note yoga has been my saving grace this past month. That is one thing that I have made sure to find as many free moments for right now. I need it. It has helped keep me grounded (mostly) and has allowed me to quiet my mind, even if only temporarily, in a way that nothing else can. I am so grateful for my practice every day, but especially in times like this. OK, back to the tasty smoothie…. I wanted to create something that really had some holiday flare to it. I am a Christmas junkie and I have been trying to take in and cherish every single moment of it this year. I like to squeeze in the holiday cheer wherever I can. So, what better way than with the classic flavors of egg nog, in a healthy and hearty smoothie. I actually had planned on using canned coconut milk since I have plentyin the pantry but I had some So Delicious Coconut Milk Nog in the fridge (which I am admittedly addicted to) so I thought that would really bring on the extra nog flavor. Obviously this would be equally as delicious with just coconut plain milk. Feel free to sweeten and spice to your liking. Since I used the nog and my banana was nice and sweet, I didn’t add any sweetener and I went with the below measurements for spices, you may want more though, depending on how strong a flavor you are looking for. This smoothie would of course also be delicious with a shot (or two) of your favorite spirit if you really want to celebrate!
[print_this]Banana Nog Smoothie
makes 1 large serving or 2 smaller servings- 1 cup organic coconut milk – the canned kind (or for even more flavor, opt for your favorite vegan eggnog, instead)
- 1/2 cup unsweetened organic vanilla almond milk (or other non-dairy milk)
- 1 frozen banana
- 1/2 teaspoon ground nutmeg
- 1/4 teaspoon cinnamon
- pinch of cloves
- 1 teaspoon vanilla extract
- 1 tablespoon chia seeds
- 1 small handful ice cubes
Optional – 1 tablespoon maple syrup, honey or other sweetener if it isn’t sweet enough for you)
Add all of the ingredients to your blender and blend on a high speed until thick and creamy. Give it a quick taste and adjust any seasonings or sweetness to your liking. Sprinkle a little nutmeg and/or cinnamon on top. Serve right away. [/print_this]
-
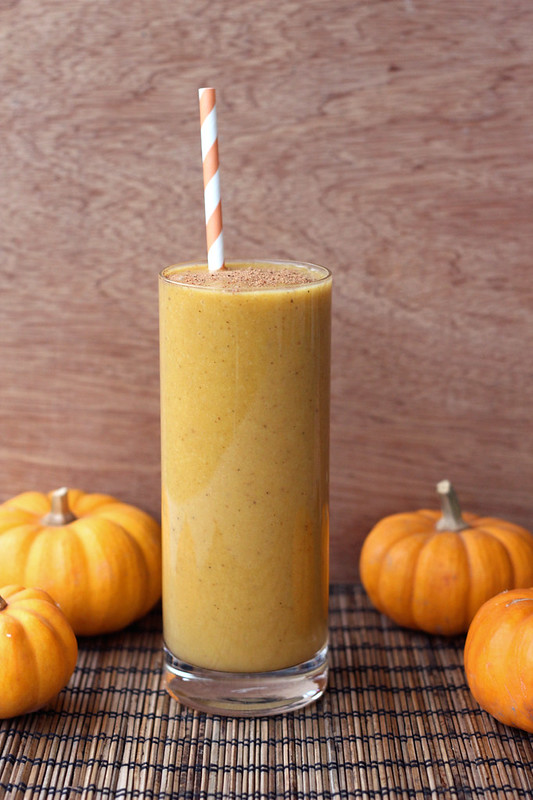
Butternut Squash Chai Smoothie – Gluten-free, Vegan + Sugar-free
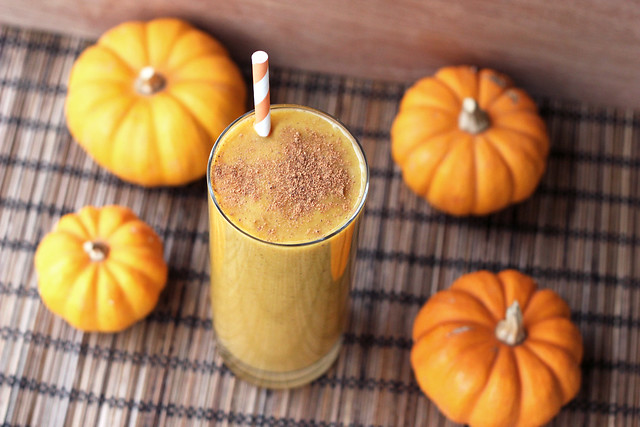
For my final recipe as part of my vegetarian Thanksgiving series this month with Free People, it just didn’t seem right to share another side dish for the feast or a sweet dessert, I thought it appropriate to share a recipe that is not only healthy and delicious, but also one that uses up some of the leftovers from the big day.
This smoothie is simple to make, perfectly sweet without any refined sugar and it has the most beautiful autumn-inspired hue. The spices are just perfect and you can feel free to adjust accordingly to your own taste. Plus, this smoothie makes the perfect quick and easy breakfast as you are heading out the door to Christmas shop for the day!
If you don’t have any leftover butternut squash puree, feel free to just sub in some unsweetened pumpkin puree. Canned or fresh will work.
Hope everyone had a great Thanksgiving surrounded by the people they love and delicious foods! My day was absolutely perfect!!
This recipe was originally shared on the Free People Blog BLDG 25.
[print_this]Butternut Squash Chai Smoothie – Gluten-free + Vegan
makes 1 large serving or two smaller servings- 1 1/2 cups unsweetened non-dairy milk (I used 1 cup of almond milk and 1/2 cup of coconut milk)
- 1 cup butternut squash purée (or pumpkin)
- 4 Medjool dates, pitted (soaked if they are very dry)
- 1 tablespoon ground flaxseed
- 1/2 teaspoon ground cinnamon
- 1/4 teaspoon ground cardamom
- 1/4 teaspoon ground nutmeg
- 1/4 teaspoon ground ginger
- Pinch ground cloves
- Pinch of ground pepper
- 1 teaspoon vanilla extract
- A couple of ice cubes
Add everything to your blender, blend until smooth and creamy. Serve topped with a sprinkle of cinnamon and/or nutmeg, and enjoy![/print_this]
-
Raw Butternut Squash and Kale Salad – Gluten-free + Vegan

Today I am sharing a recipe as part of both our Very Tasty Thanksgiving series as well as my ongoing vegetarian Thanksgiving series I am doing with Free People this month. This colorful raw squash and kale salad is so simple to make, full of delicious seasonal flavors and doesn’t require any cooking or baking, which is a huge bonus on Thanksgiving, when the oven and stove are in high demand. Enjoy.
• • • • • • • • • • • • • • • • • • • • • • • • • • • • • • • • • • • • • • • • • • • • • • • • • • • • • • • • • • • • • •
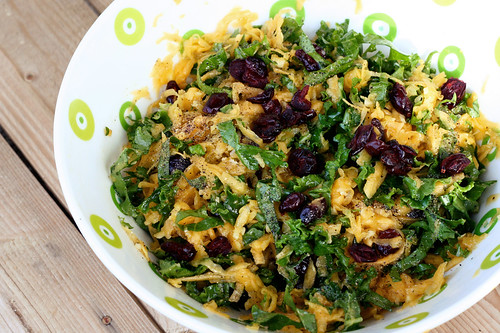
I shared this recipe previously when I made it last year for Thanksgiving. It was such a hit, so easy to make, I couldn’t let it get passed by this year. Anything raw and this healthy should be celebrated on a day of indulgences.
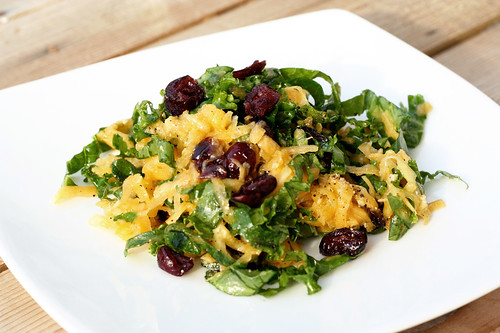
This vibrant and bright salad is crunchy, sweet and so satisfying. It would be a welcome side dish at any Thanksgiving feast and it is a wonderfully unique option for everyone, especially for those who are gluten-free, vegan and/or vegetarian. Plus, I personally love the idea of any Thanksgiving sides that aren’t heavy and carb loaded and more importantly, that don’t require the use of the oven that is always far too crowded on Thanksgiving. Head over to the Free People blog BLDG 25 now to get both recipes. -
Salted Caramel Cheesecake – Gluten-free, Vegan + Sugar-free {Guest Post by Spabettie)
This next post in our Thanksgiving series comes from one of my favorite bloggers, Kristina of spabettie. I am not sure how, but every single time I open my google reader, there always promises to be at least one, if not more, amazing new recipes from spabettie. Every one looking even better than the last. I don’t know how she does it. Kristina’s recipes are always so delicious, healthy and totally approachable, plus you can tell she really has fun creating all of it. This recipe for Salted Caramel Cheesecake is definitely no exception and would make the perfect Thanksgiving dessert instead of all of the sugar and dairy-filled usual suspects. Enjoy.
• • • • • • • • • • • • • • • • • • • • • • • • • • • • • • • • • • • • • • • • • • • • • • • • • • • • • • • • • • • • • •
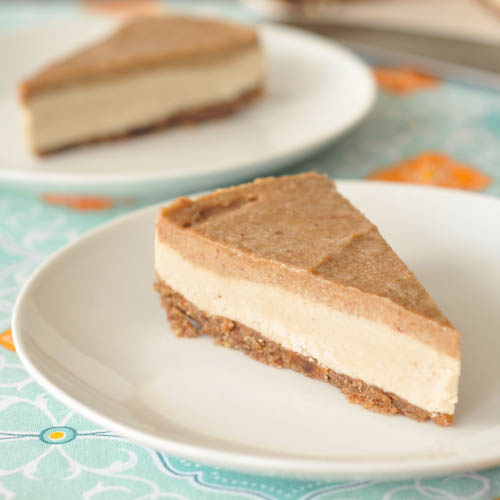
I am always honored when asked to appear on another website – especially when asked by someone like Beth – who shares the same ideals, is wonderfully creative, who is a bright spot in my days! I am thrilled to be a part of Beth’s Thanksgiving Series – I so love the holidays.
The dessert I created for Beth is a classic spabettie recipe – free of many ingredients but still insanely delicious! There are three layers and several steps, but this is a straightforward and simple recipe that is a proven crowd-pleaser!
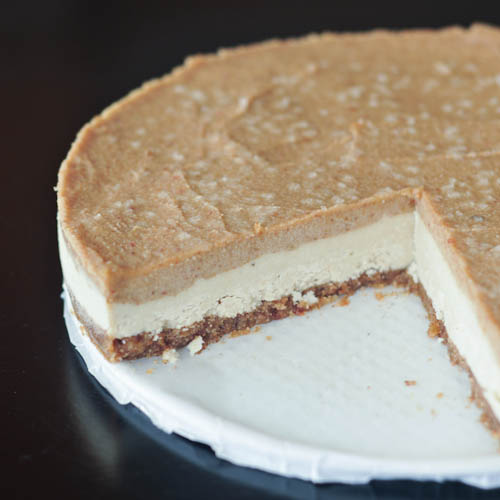
[print_this]salted caramel cheesecake – dairy, egg, oil, soy, gluten and sugar free, vegan, raw
makes one 9 inch cheesecakeraw pecan crust
- 1 cup pecans
- 1 1/2 cups Medjool dates
Line a 9 inch spring-form pan with parchment. In food processor, pulse hazelnuts to a fine crumb. Add dates, process until combined completely. Press into spring-form pan.
salted caramel cream sauce
- 1/2 cup raw cashews
- 3/4 cup water*
- 1 1/2 cups Medjool dates, soaked
- raw sea salt, to taste (Moroccan Atlantic raw coarse sea salt)
*add more water for a more liquid sauce; for this recipe I wanted a thick salted caramel layer
In food processor, combine cashews and water to make a cashew cream. Add dates and raw salt, process to a creamy smooth sauce. Set aside (this will be used as the cheesecake sweetener and the top layer).
cheesecake layer
- 2 cups cashews, soaked several hours
- juice of two lemons
- 1/2 cup salted caramel cream sauce (see recipe above)
- 1/2 cup Irish moss paste (see instructions here)
Process cashews in food processor, add lemon juice and blend until creamy. Add caramel sauce and Irish moss, blending until incorporated and mixture is smooth. Spread in an even layer over crust. Pour / spoon salted caramel cream over cheesecake layer, smooth in an even layer. Place in refrigerator to set. [/print_this]

Thank you, Beth – and thank you all for reading – Happy Holidays!
spabettie focuses on (mostly!) healthy recipes with vibrant fresh foods – choosing clean and organic, while leaving room for indulgence. Kristina enjoys the challenge of making a ‘regular’ recipe vegan and or gluten free, and creating unique recipes from scratch.Visit Kristina’s blog spabettie
You can also follow Kristina on:
Twitter: @spabettie
Instagram: @spabettie
Facebook: facebook.com/SpabettiePage
Pinterest: @spabettie