-
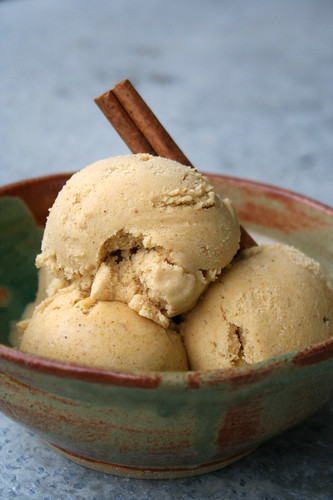
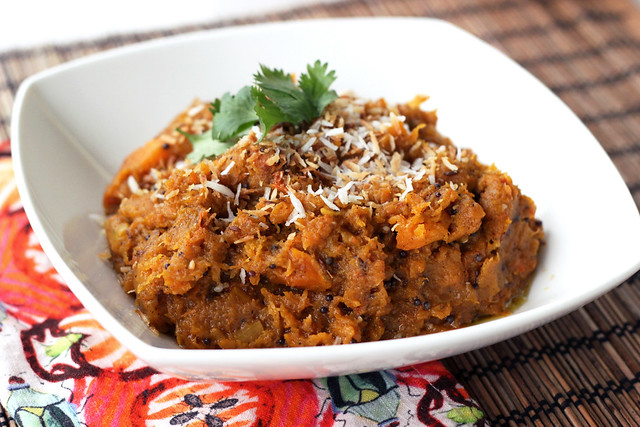
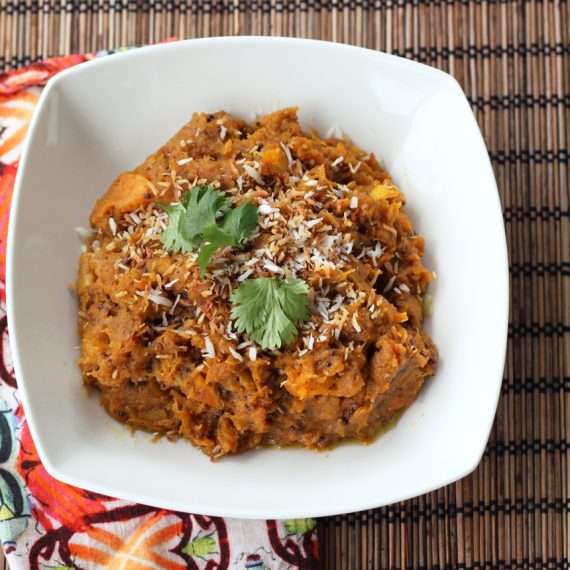
Indian-Spiced Butternut Squash Mash with Toasted Coconut (Gluten-free + Vegan)
This month as part of my ongoing series with Free People, I am sharing a series of healthy gluten-free and vegetarian Thanksgiving recipes. I absolutely love Thanksgiving, the entire holiday season really, and I get excited to start planning my Thanksgiving menu as soon as the fall season hits.
For this series, I will be sharing both classic recipes re-imagined and some unique and totally non-traditional recipes that you aren’t used to seeing amongst your traditional Thanksgiving spreads.
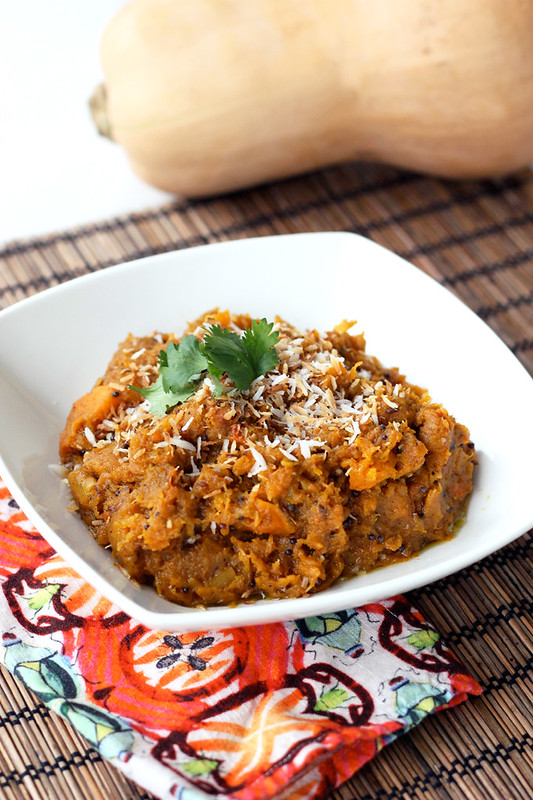
A blend of classic traditional Thanksgiving ingredients with a little non-traditional Indian inspiration, this butternut squash mash is sure to please everyone at your feast, but especially those who are gluten-free and/or vegan, who may likely have limited options. It is creamy, rustic and full of so many amazing flavors.
Head to the Free People blog BLDG 25, to get the full recipe and stay tuned throughout the entire month of November as I share a new gluten-free vegetarian Thanksgiving creation each week! Plus, make sure to check in here on Tasty Yummies starting later this week, where I have a really fun Thanksgiving series planned for you guys. More on that soon.
Indian-Spiced Butternut Squash Mash with Toasted Coconut (Gluten-free + Vegan)
Print Pin RateServings: 4 -6Ingredients
- 2-3 lb butternut squash, halved and seeded, peeled and diced into 1-inch cubes
- 1-2 tablespoons olive oil
- 2 tablespoons coconut oil
- 1 teaspoon mustard seeds
- 1 teaspoon cumin seeds
- 3 cloves garlic, minced
- 1 2- inch piece of fresh ginger, finely minced or grated
- 1 tablespoon garam masala powder, you can add more if you want the flavor to be even more powerful
- ½ teaspoon sea salt
- ¼ cup coconut milk, full-fat canned kind
- ⅓ cup finely shredded unsweetened coconut
- fresh cilantro for serving, optional
Instructions
- Preheat the oven 400º F.
- Toss the squash with oil, salt and pepper and spread out in a single layer on a rimmed baking pan. Roast, tossing occasionally, until just tender and golden brown, about 30-40 minutes. While the squash is roasting, arrange the raw coconut in a single layer on another baking sheet. Once the squash comes out, place the coconut in, bake for about 3 to 5 minutes, toss around and then bake another 3 to 5 minutes. Watch it carefully, as it can burn quickly.
- Once the squash and coconut are both ready and out of the oven, heat the coconut oil in a large saucepan over a medium heat, add in the mustard and cumin seeds, heat for a few minutes until the spices begin dancing around the pan, popping and jumping. Add in the garlic, ginger, garam masala powder and salt. Stir around for a minute or two, reduce the heat to low or off, add in the roasted squash cubes and coconut milk and mash by hand with a potato masher, until as smooth and creamy as you’d like it to be. Salt to taste, serve immediately topped with toasted shredded coconut and a little fresh cilantro, if you’d like.
-
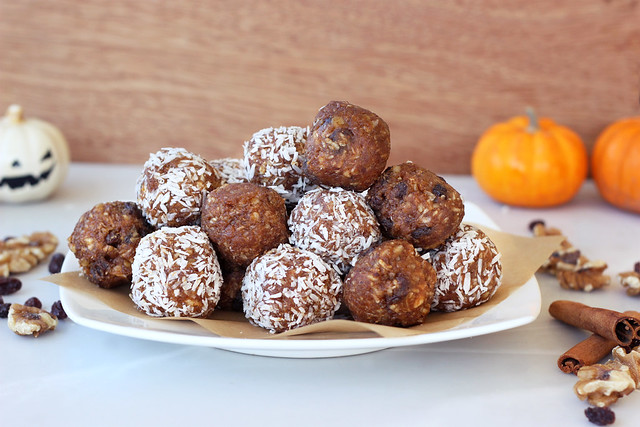
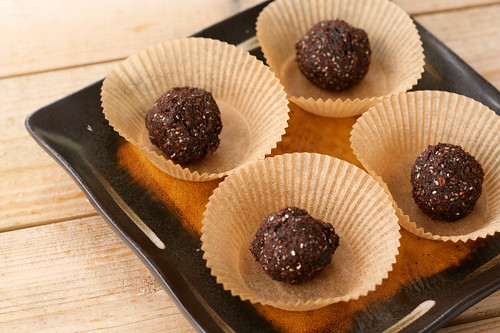
No-Bake Pumpkin Spice Cookie Balls (Gluten-free, Vegan + Sugar-free)
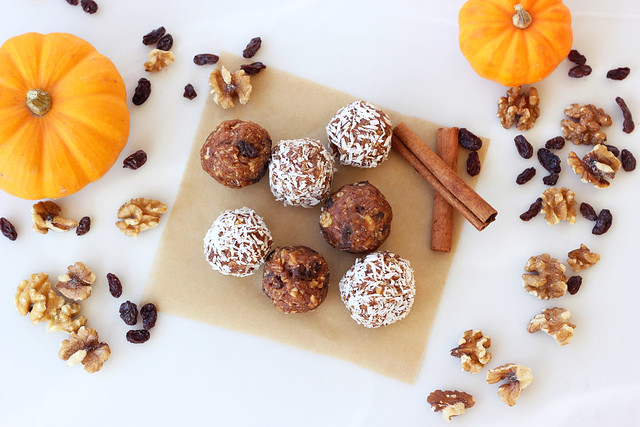
My final recipe in my healthy Halloween series with Free People this month is for a simple, quick no-bake cookie ball, that is full of delicious fall flavors. Instead of the cut-out cookies and donuts and wayyy too much Halloween candy, why not snack on these? Gluten-free, vegan and sugar-free these no-bake treats will still wow your socks off.
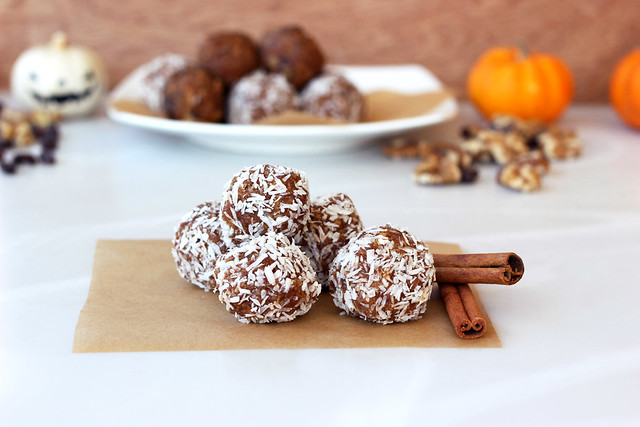
The spicy pumpkin flavor is perfect for this time of year and the whole recipe can be put together from start to finish in about 15 minutes. Plus, you can have fun with these and add in your own favorite extras like coconut, raisins, additional nuts, chocolate chips, powdered sugar or maybe even a drizzle of caramel sauce.
This recipe was originally shared on the Free People Blog, BLDG 25
[print_this]No-Bake Pumpkin Spice Cookie Balls (Gluten-free, Vegan + Sugar-free)
Makes approximately 18 balls
- 8 Medjool Dates, pitted
- 1/4 cup creamy almond butter
- 2 tablespoons pumpkin purée (canned or fresh, if you use fresh be sure to drain as much water out as you can)
- 1 teaspoon ground cinnamon
- 1/2 teaspoon ground nutmeg
- 1/4 teaspoon ground ginger
- Dash of ground cloves
- Pinch of salt
- 1 teaspoon vanilla extract
- 3/4 cup raw walnuts
- 1/2 cup unsweetened shredded coconut plus more for rolling
Optional Add-ins:
- raisins (I used raisins in half of the recipe, about 1/4 cup)
- additional coconut for rolling
- additional chopped walnuts for rolling
- mini chocolate chips
Add just the pitted dates to the food processor and process for a minute or two until a thick paste forms – if they are quite dry, you may need to add a teaspoon or two of water to get it moving. If they are pureed and form a large ball in the food processor, don’t worry too much, the other ingredients will thin it out. Next, add the almond butter, pumpkin puree, the spices, salt and the vanilla extract. Process for a minute or two again until thick and creamy. Add in the nuts and coconut and pulse a few times until the nuts are chopped and it all comes together into a thick dough. Try to roll a little in your hand, if it is holding together it is ready, if it is too crumbly try adding more almond butter and/or pumpkin. If it is too creamy and sticky, add more nuts and coconut. If you are adding raisins, just fold them in by hand with a spoon or spatula.
Take the blade out of the processor and roll the dough into balls, about 1 1/2-inches in diameter. Roll into shredded coconut, if you wish. You should end up with approximately 18 cookie balls. You can eat them right away, or place them in the fridge for a bit to firm up (which is what I prefer).
[/print_this] -
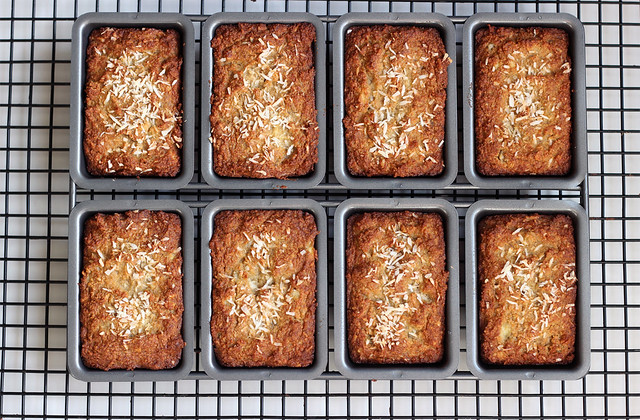
Grain-free Banana Coconut Mini-Loaves – Gluten-free, Dairy-free + Refined Sugar-free
If you follow me on Instagram you probably already know this, but I just love Instagram 🙂 It is probably my favorite social networking platform there is right now, because it is just a little glimpse into people’s lives. Very few words, just a quick glance. It doesn’t feel totally invasive and it is rare that you have people complaining on there or posting political rants, etc. I just feel like it is a big celebration of everything happy going on in our lives. I love seeing peoples pets, their kids, what they are working on, a snapshot from their amazing vaction and of course, all of the food. Some days I put up so many photos of food, I am sure most of my non-food blogging friends want to (or do) unfollow me, but I personally love seeing what is happening in everyone’s kitchens. It is always so inspiring and exciting.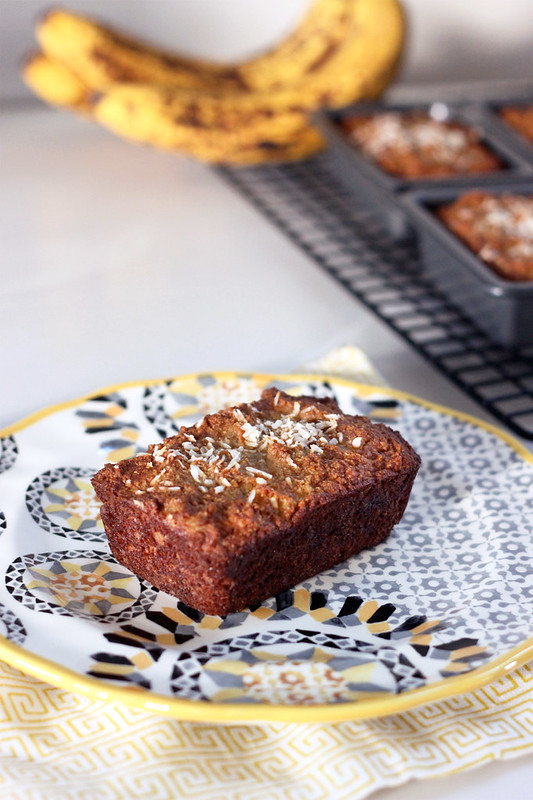
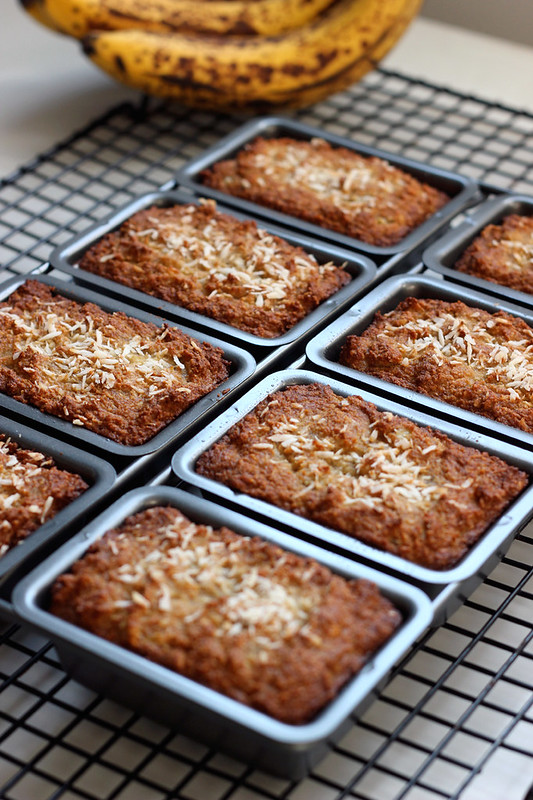
A week or two ago my good friend Esther, who I sadly haven’t seen in a while, posted a photo on Instagram of some amazing little mini-loaves she just pulled out of the oven. They looks delicious and I loved the pan she made them in. The pans are all connected and just the perfect sized little treat, I had never seen anything like it. I mean, what is it about miniature things that is just so irresistible? When I asked Esther where she got it from, she said just up the street from her (she lives in Princeton, NJ), and she offered to pick one up for me. Yay! So, I told her to tell me what it costs and I would send her the money. Next thing I know a package comes in the mail to me, with the pan and a sweet note, as a birthday gift from Esther. It made my whole day! Thank you again so much Esther! The very next morning I started thinking about what I would make with it.

I had some bananas in the pantry that were definitely overripe, so I thought I had to make some banana bread but I wanted to do something a little different and create a grain-free recipe made with my favorite, almond and coconut flours, that also included some yummy coconut, since the two go so well together.
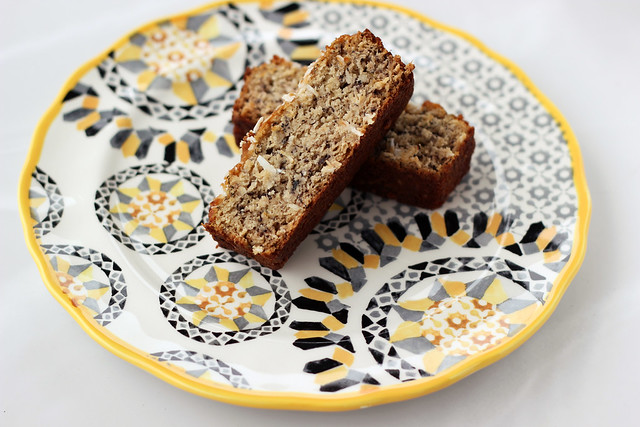
Even after playing around with so many baked-good recipes that use the combination of almond and coconut flours, I am still amazed every time I bake with it and it comes out with a grain-like quality to it, it really surprises me each time. I always expect a weird goopy mess that doesn’t quite work. These mini-loaves are just perfection, they are moist and spongey like any good banana bread should be, plus I really love the little bits of coconut throughout and on top. These loaves would also be good with nuts on top or some mini-chocolate chips (both of which I thought of after it was too late). By the way, how great is that plate? Perfect for these mini-loaves right? That was a super thoughtful birthday gift from my friends Sarah and Brian. I have some pretty amazing pals!
What’s your favorite mini-food or mini kitchen gadget?
FYI – this is the mini-loaf pan that I used for reference. Each loaf well measures 3 13/16″ x 2 1/2″ and 1 1/2″ high, I haven’t tried this recipe as a single loaf or even the slightly larger mini-loaf pans, so I cannot attest to how it will come out, likely it will work, the loaves will probably have less height to them and you will have to bake it for longer. If you experiment with different loaf pans and this recipe, please let me know how it comes out. Thank you!
[print_this]Grain-free Banana Coconut Mini-Loaves – Gluten-free, Dairy-free + Refined Sugar-free
makes 8 mini-loaves- 1 1/2 cups blanched almond flour (I like Honeyville)
- 1/4 cup coconut flour
- 1 teaspoon baking soda
- 1 teaspoon sea salt
- 1/2 cup unsweetened finely shredded coconut, saving a small amount for the top of the loaves
- 2-3 large ripe bananas, mashed (you are looking to get about 1 1/2 cups)
- 4 extra-large local farm fresh brown eggs
- 1/4 cup coconut oil, melted
- 1 tablespoon honey or maple syrup
- 1 tablespoon vanilla extract
Preheat the oven to 350º F. Grease your mini-loaf pans with a little coconut oil, I used this pan.
In a large bowl combine the almond and coconut flours with baking soda, sea salt and shredded coconut. In a small bowl combine the eggs with the coconut oil, maple syrup, vanilla extract and the mashed bananas, whisk until very well combined.
Pour wet ingredients into the dry and mix well until fully incorporated.
Divide the batter evenly into the 8 mini-loaf pans, smooth it out a bit with a spatula and sprinkle a little shredded coconut on top of each loaf.
Bake for 30 to 35 minutes. Test with a tooth-pick for doneness. Remove loaves from oven, let cool in pans for 10-15 minutes and then transfer to a wire rack to continue cooling.I find for these type of grain-free baked goods, that storage in the fridge seems to be best, I usually just cover or wrap them in plastic wrap or put them in a large ziplock bag. When I am ready to eat one, I pull it out, give it 20 seconds in the microwave or a minute or two in the toaster oven and then I slather a little coconut oil on top.
[/print_this]
-
Pumpkin Pie Chia Pudding – Gluten-free, Vegan, Sugar-free
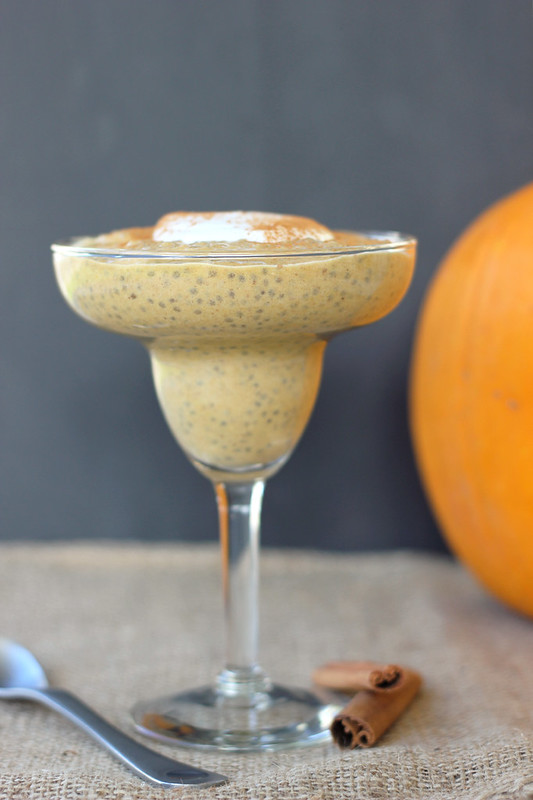
I will spare you the details of my obsession with pumpkin, I know you are all well aware. Let’s just say I cannot get enough and I am constantly trying to come up with new recipes to sneak it into. This quick and simple chia pudding recipe is a great way to indulge in all of the wonderful pumpkin pie flavors and aromatic spicy scents, but without any of the guilt. It is sugar-free so technically you can even eat it for breakfast and not feel bad about it, which is what I do. Make it the night before, let it set up in the fridge overnight and you have a perfect treat for a crisp, cool fall morning.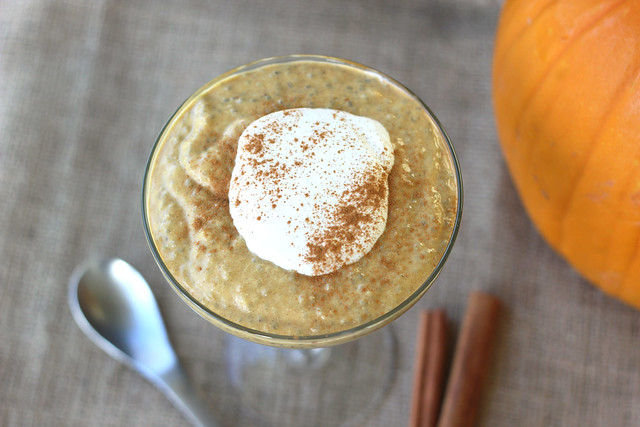
This chia pudding is really great with a dollop of freshly whipped coconut cream on top, too. This pumpkin pie inspired treat was a wonderful way to finish off my September series of gluten-free recipes with Free People. This post was originally shared on the Free People blog, BLDG 25.
[print_this]Pumpkin Pie Chia Pudding (gluten-free, vegan, sugar-free)
serves 2-4 – makes approximately 3 cups
- 1 cup coconut milk (the canned kind – lite or full-fat)
- 1 cup unsweetened almond milk (or other non-dairy milk of your choice)
- 1 cup pumpkin puree (here’s how to make it yourself)
- 2 teaspoons vanilla
- 1 teaspoon ground cinnamon
- 1/2 teaspoon ground nutmeg
- 1/4 teaspoon ground ginger
- pinch of ground cloves
- 5 medjool dates, pits removed
- 3 tablespoons chia seeds
Puree everything but the chia seeds in a blender until smooth, combined and thick. You may see a few little bits of the dates still, it’s OK. Pour the mixture into a glass bowl or a mason jar, stir in the chia seeds. Make sure to stir well to combine. Cover the bowl or put the lid on the jar. Keep in the refrigerator overnight or for at least 4 hours.
Spoon or pour into bowls, top with a sprinkle of cinnamon and maybe even some fresh whipped coconut cream, if you wish. Serve cool or room temperature.[/print_this]
-
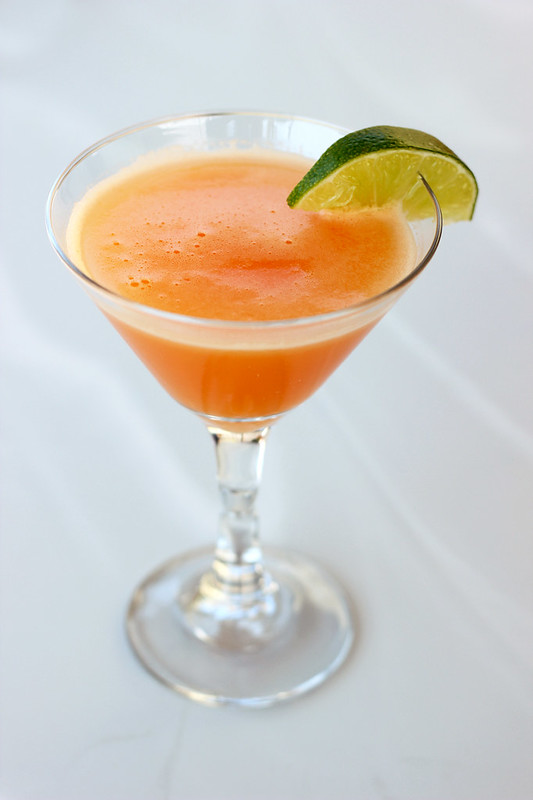
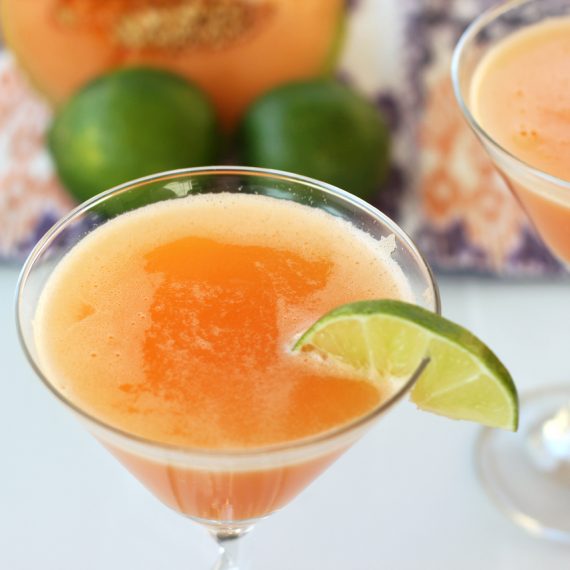
Cantaloupe Mocktini/Martini – Gluten-free, Vegan + Refined Sugar-free
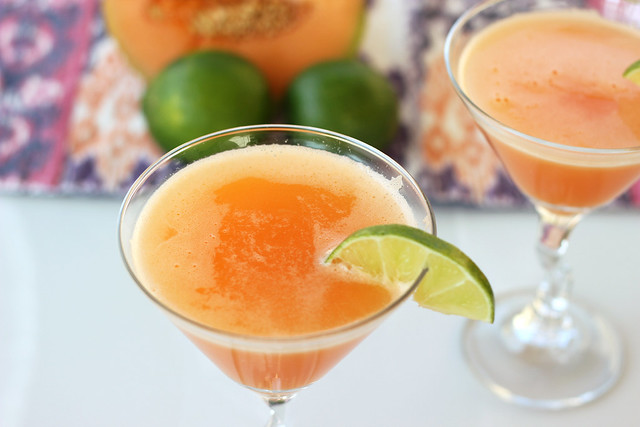
My fourth post in my ongoing series with Free People is now live. This refreshing mocktini/martini recipe features some of the beautiful and sweet cantaloupe we have been getting from our Porter Farms CSA.
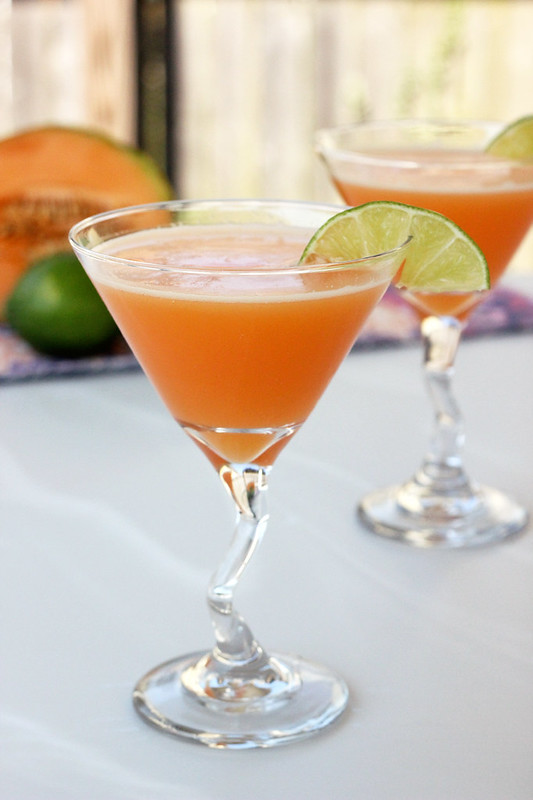
Sweet, smooth and a little tart – this refreshing cantaloupe mocktini is the perfect way to celebrate the summer coming to an end. And of course, if you are looking for a “spirited” version of this drink, there is an option to make this mocktini into a traditional martini.
Ingredients
- 1 small cantaloupe or 1/2 of a medium to large one
- ½ cup freshly squeezed lime juice
- 1-2 tablespoons of honey or maple syrup or 7-10 drops of liquid stevia, sweeten to taste with your favorite sweetener, you may need very little depending on how sweet your cantaloupe is
- Approximately 1 cup sparkling water
- Ice
- Optional: To make this a “spirited” martini, add in 4 ounces of vodka and 1 ounce of grand mariner (or triple sec)
Instructions
- Scoop the seeds out and cut the flesh of the cantaloupe into small cubes. Add to the food processor or high speed blender with the lime juice and sweetener of your choice (if necessary). Puree until smooth.
- Pour through a strainer to remove the pulp then fill a cocktail shaker halfway with the cantaloupe juice (you may have to do this in batches depending on the size of your shaker). Add a few ice cubes and shake – this is when you would add your liquor, if you are so inclined.
- Pour into chilled martini glasses, filling about 2/3 of the way full with the cantaloupe mixture and then top with sparkling water. Give it a swirl and serve with a lime garnish.
-
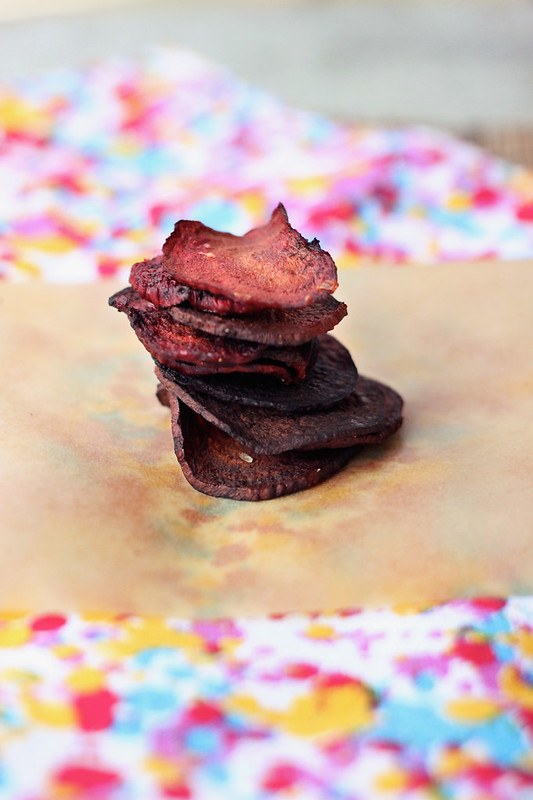
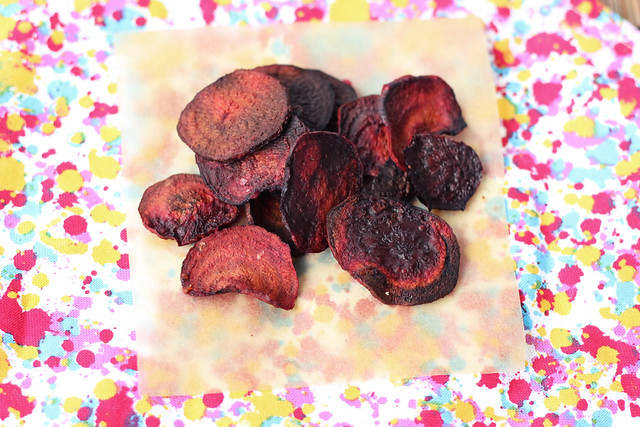
Crispy Baked Beet Chips – Gluten-free + Vegan

See, I told you that I would use up the beets from our CSA share. I wanted to do something fun and different with the beets, since I usually just juice or grill them. My husband, Mark, absolutely HATES beets, he despises them and won’t try them no matter how good I tell them they are. He thinks they are gross and taste like ‘ground’ or ‘dirt’!
Well, I can officially say – I have WON the beet war in our house! I got Mark to eat beets and he actually liked them. I didn’t even have to sneak them into something else. I just said “here, just try this beet chip, don’t be a jerk”. He tried it and he liked it, then he had another and then a few more. Then he proclaimed “I have never,ever liked beets before, ever, but these I actually like!” S U C C E S S !
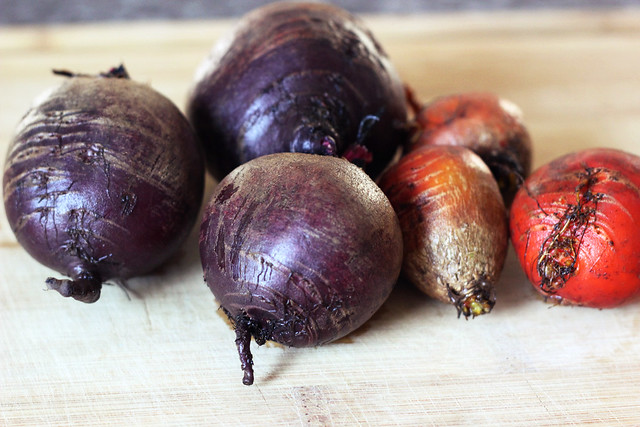

These beet chips are super easy to make and you can keep them simple with just a little sea salt, or you can add some fun things like onion powder, or rosemary or any other spices or herbs you desire. I used a mix of both golden beets and red beets that we got in our CSA share from Porter Farms. Once you peel the feels and slice them, you will not believe the vibrant bright colors. They are almost too pretty to eat. Almost. These chips are so crispy and satisfying that you won’t be able to eat just one or even a couple. I made this batch and had planned to eat a few for a mid-afternoon snack and then save the rest for an evening snack. That didn’t work. At all. We ate them all.
As far as storing goes, these chips will likely lose a bit of their crisp when you store them, so as with most crispy baked foods, best to eat these up right away when they are their crispiest. Darn.
Besides being super delicious and so vibrantly beautiful, if you need even more reasons to eat beets here are a few of their wonderful benefits, beets are a unique source of phytonutrients called betalains. The betalains found in beets have been shown to provide antioxidant, anti-inflammatory, and detoxification support. If that isn’t enough, the combination of antioxidant and anti-inflammatory molecules in beets makes this food a highly-likely candidate for risk reduction of many cancer types. Oh and don’t forget the fiber! Beet fiber (along with carrot fiber) are two specific types of food fiber that may provide special health benefits, particularly with respect to health of our digestive tract (including prevention of colon cancer) and our cardiovascular system. More info about the wonderful benefits of beets can be found here.
[print_this]Crispy Baked Beet Chips – Gluten-free + Vegan
- 3-4 medium beets (or 6-8 small beets), peeled and sliced thinly about 1/16 – 1/8 inch – using a mandoline slicer is the best and easiest way to do this
- 1 tablespoon olive oil
- Sea salt to taste
- Feel free to add any additional seasonings that you wish *
Preheat oven to 350º F. Toss beets slices with oil in a medium sized bowl until they are all well coated and lay them flat in a single-layer on a rimmed baking sheet (bake in multiple batches, if necessary). Bake for 20-30 minutes, until chips are crispy. Check after about 15 minutes since the time will vary based on thickness of chips and how dark your baking pan is, mine took about 30 minutes since my baking pan was really light in color. The second batch I made was on a much darker baking pan and they cooked up much quicker. Sprinkle a little sea salt over top when you take them out. Transfer to a wire rack and they will crisp up a bit more as they cool.
* Play around with adding in different spices and herbs. I made one batch with some fresh rosemary, another with some onion powder and then just a plain batch, all were very good.
[/print_this]
-
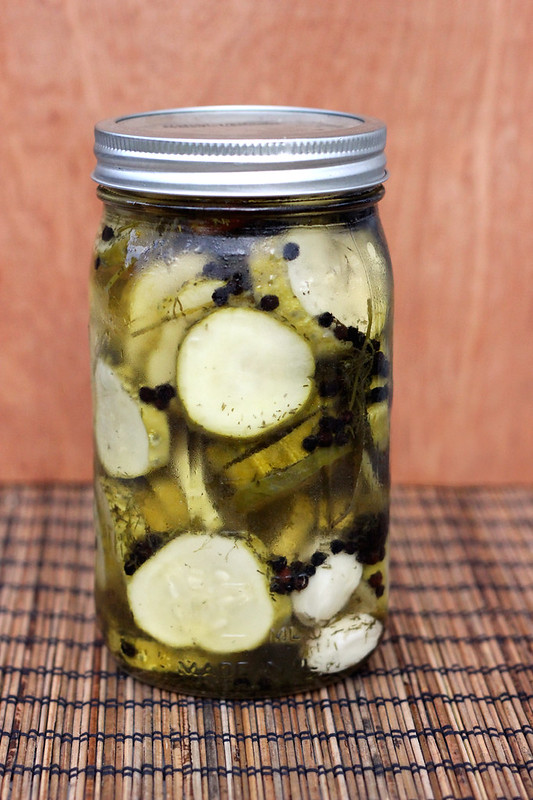
Refrigerator Garlic Dill Pickles – Gluten-free, Vegan + Refined Sugar-free
If you have ever been to a restaurant with my husband Mark and I, for a quick bite at a diner, or any type of place that serves sandwiches or burgers, we have a bit of a ritual. Since I am obviously rarely able to order a sandwich at a restaurant, but Mark obviously can and does quite often, we have a little rule where the pickle on his plate is always saved for me. He likes pickles, but he knows how much I love them, so he will gladly gobble up his turkey club and then hand the delicious briney pickle spear or round over to me. Even when I haven’t noticed that he even had a pickle, let alone save it for me, there it is, at the end, waiting for me. What a great hubby I have – he totally supports my obsessive LOVE of pickles!!
I also have been known to order a side order of pickles if a restaurant is known for having delicious ones. There is a place near Austin, Texas that everyone loves to go to for BBQ, it’s called the Salt Lick. They have delicious food, but since I am not a huge meat eater, I usually get a small order of smoked turkey with all the fixins’ and a huge side of pickles. I usually make a small dent in the food and then eat the pickles until I can’t eat them anymore. I have been to Disneyland in California twice now, and thanks to my friend Summer, getting one of the large dill pickles from one of the fresh food carts there is part of the whole experience. They are so delicious and they are best when eaten very slowly, to savor each and every bite. I seriously could eat pickles until my tongue hurts from all the vinegar. They are the best. But not all pickles are created equal. It is very rare that I buy pickles from the grocery store and just eat them at home, they are never quite good enough. A couple of weeks ago, I bought a jar of pickles from a girl at the farmers market and they were incredible. It was then that I realized that I should really just be making my own at home, especially now that cucumbers are in season.
Most summers I usually make a batch or two of pickled peppers with the different hot peppers we grow in our garden, but since I didn’t plant any this year, I am not sure I will be doing it. But when I saw the delicious local gherkin cucumbers at the market a few weeks ago, I knew I HAD to buy some and make refrigerator garlic dill pickles. How could I not?
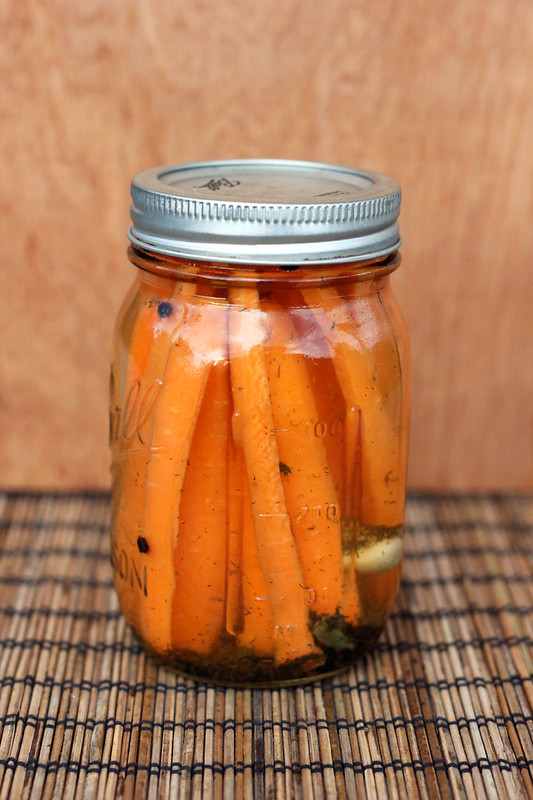
You can play around with the spices in this recipe, too. I added my usual favorites and also tossed in a couple of dried super spicy thai peppers that I had dried out from our garden last year. They brought a very subtle spicy heat, that I really loved. You can omit the peppers all together or add a teaspoon or so of dried red pepper flakes if you don’t have whole dried pepper. Plus, you can use this same brine to pickle other things like peppers, cauliflower or carrots, which I did, since I had some leftover brine. The carrots were amazing and I think I may have eaten them between two sittings.
OK, so who else is obsessed with pickles? I know I am not alone in my love.
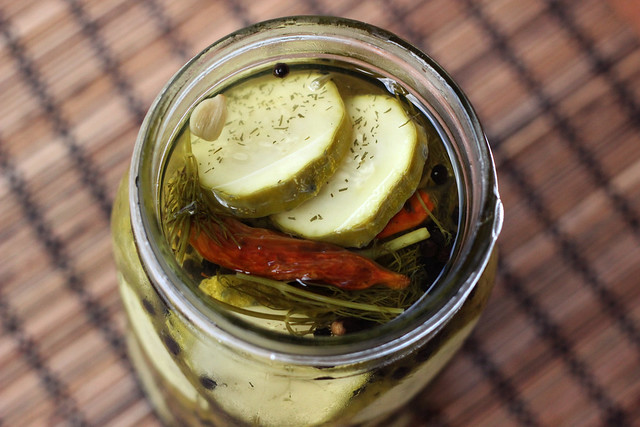
[print_this]Refrigerator Garlic Dill Pickles – Gluten-free, Vegan + Refined Sugar-free
Makes a couple of jars (depends on the size of your cucumbers and your jars, etc)- 2 pounds local gherkin cucumbers (you can also use any other small firm cucumber of your choice)
- 2 1/2 cups water
- 2 1/2 cups white distilled vinegar
- 3 tablespoons raw cane sugar or other sweetener of your choice
- 3 tablespoons coarse kosher salt
- 2 bay leaves
- 2 tablespoons whole coriander seeds
- 4 cloves garlic, peeled
- 2 tablespoons black peppercorns
- a couple of sprigs of fresh dill (or a couple of teaspoons of dried dill)
- Optional spicy add-ins: 1 or 2 spicy dried peppers, red pepper flakes or you can add some sliced jalapeños in with the cucumbers.
Clean the cucumbers very well and slice them as thin as you would like them, I would say I cut mine to about 1/4″ thick rounds. You could also cut them into spears or leave them whole depending on their size. Place them in a large glass preserving jar or two smaller jars.
In a non-reactive saucepan, bring the other ingredients to a boil, then reduce the heat and simmer for five minutes.
Remove from heat and pour the brine over the cucumbers. Place the lid on the jar and let cool. Once cool, refrigerate. You can start enjoying them the next day, but obviously they are better after a couple of days. They’ll keep for about 2 months in the fridge.
* This brine is great on lots of other veggies, like carrots, cauliflower, peppers, etc. You can also add onion slices to the jar with the cucumbers, if you wish. Play with the recipe and make it your own.
[/print_this]
-
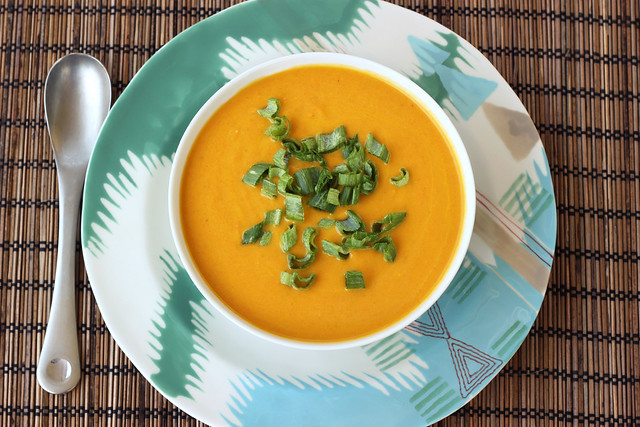
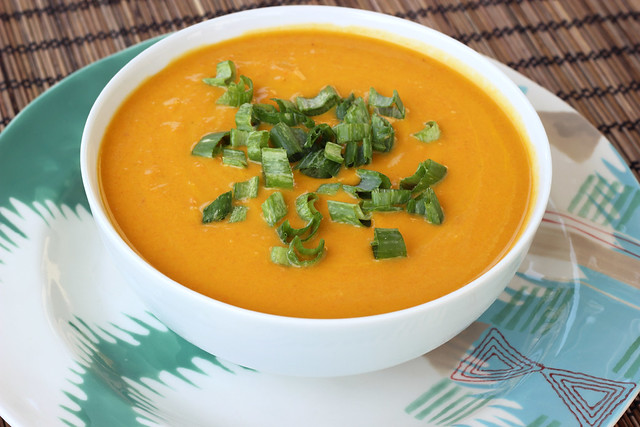
Chilled Carrot Ginger Coconut Soup – Gluten-free + Vegan
I am very excited to be sharing another recipe with the Free People Blog, BLDG 25. Today’s recipe is a simple but totally impressive chilled soup that is perfect for all of these hot weather days we’ve all been having.
When it is as hot as it has been, I find it hard to want to start up the stove or oven and then do all the prep work in a hot kitchen. Then, once I am really good and sweaty, that’s when dinner is ready. Nothing like eating a hot meal and feeling like you want to just pass out or jump in a pool.
The great thing about this chilled carrot soup is you can do the prep work the night before or early in the morning when the kitchen and the rest of your house still has a chill to it from the overnight cool down. You make the soup quick, puree it and then put it in the fridge until you are ready to eat. It makes a wonderful dinner or lunch with a simple side salad, or it would be wonderful as an appetizer.
But, if you are like my hubby, Mark, and chilled soups totally skeeve you out, you can enjoy this soup warm, room temperature or hot. Trust me, I may have taken many spoonfuls of it, while it was cooling and it was just as incredible.
This recipe was originally shared on the Free People blog.
[print_this]Chilled Carrot Ginger Coconut Soup – Vegan + Gluten-Free
serves 4-6- 1 tablespoon olive oil
- 1 onion, chopped
- 3 tablespoons finely chopped ginger
- 3 cloves garlic, minced
- 1 lb. organic carrots, peeled and chopped into 1-inch pieces
- 4 cups organic low sodium vegetable broth
- 1/2 teaspoon sea salt
- 1-2 teaspoons yellow curry powder (optional)
- 1/4 teaspoon red pepper flakes (optional)
- 1 cup full fat organic coconut milk
Heat olive oil in a large saucepan over a medium/high heat. Add in the onions and ginger, sauté for 4-5 minutes until the onions are beginning to get translucent and both the onions and ginger are fragrant. Add the garlic and sauté for another minute. Then pour in the broth, add in the carrots, salt, curry powder and red pepper flakes.
Bring to a boil, then turn the heat down and cover the pan and allow to simmer for 25-30 minutes until the carrots are nicely tender. Remove the pan from the heat (or just turn off) and allow the soup to cool, uncovered, for about 15-20 minutes.
Purée with an immersion blender or in batches using a regular blender or food processor*, until smooth. Return the puree to pot over a low heat. Pour in the coconut milk, stirring well to combine. Once combined, remove it from the heat and serve hot, or store it in the refrigerator and serve chilled, which is what I did. Top each bowl with some thinly sliced green onions.
*When puréeing hot soup in a blender or food processor, do so in small batches, filling the blender pitcher only about halfway. Put the lid on, but remove that small cap in the lid (if you have it) and hold the lid down tight with a towel, otherwise the steam will cause the lid to explode off, spewing hot liquid everywhere. This has never happened to me, but it can, so be careful. [/print_this]
While you are over there check out some of my other recipes: Roasted Balsamic Strawberry Mini-Tarts with Whipped Coconut Cream – Gluten-free + Vegan, No-Bake Banana Cream Pie – Gluten-free + Vegan, Blueberry Lavender Vanilla Ice Cream – Vegan, Gluten-free, Refined Sugar-free
-
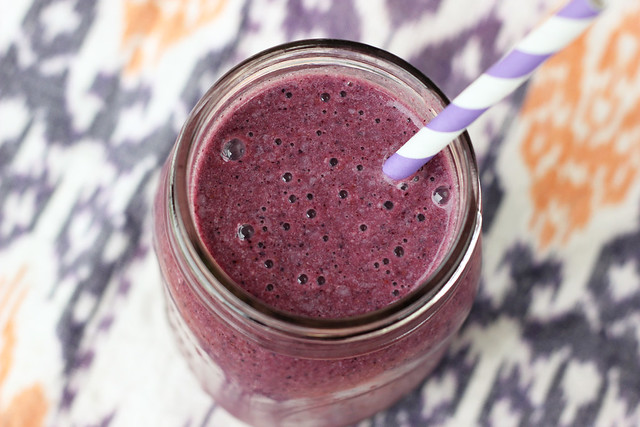
Banana Blueberry Coconut Smoothie – Vegan + Gluten-free
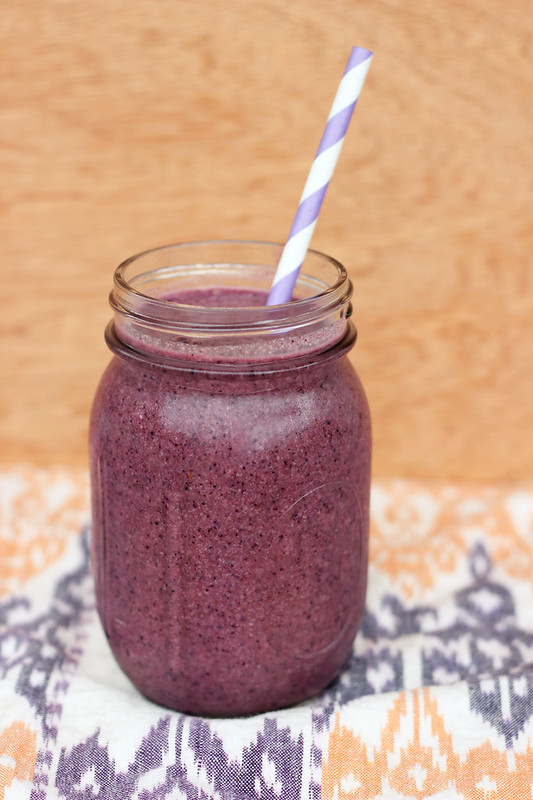
I am still on a huge smoothie kick right now and I see no end in sight. For me, smoothies are the perfect after-yoga snack/breakfast that keeps me pleasantly full and satisfied until lunch. Plus I love having fun playing with different ingredients and flavors.
This satisfying and tasty drink was so smooth and creamy from the banana and coconut oil. The blueberries gave the smoothie a really nice bright and tart flavor and a really beautiful color. I really love the great texture from the shredded coconut flakes and ground flaxseeds, I have found that I like a little bit of texture in my smoothies, feel free to leave either or both of these out, if you wish. Besides the texture, ground flaxseeds are great in smoothies because they work as a thickener and the bonus is all of the added benefits of flaxseeds, like the Omega-3 essential fatty acids. These “good” fats that have been shown to have heart-healthy effects. Each tablespoon of ground flaxseed contains about 1.8 grams of plant omega-3s. Plus of course, the wonderful fiber. The list of benefits goes on and on too, what more can you ask for in a little seed? I tend to find smoothies that I add flaxseeds to, also tend to keep me fuller and satisfied a bit longer.
I personally found this smoothie to be plenty sweet on it’s own with no sweetener, I just added 3 drops of liquid stevia to offset some of the tartness from the berries. If it isn’t sweet enough for you, feel free to add any sweetener of your choice like maple syrup, medjool dates, raw honey, etc. If you wish, you can top your smoothie with a small sprinkle of shredded coconut, I actually had meant to, but totally forgot. Definitely would have been nice in the photos, but by the time I remembered, I was halfway through the smoothie, oh well.
What are your favorite things to add to smoothies?
[print_this]Banana Blueberry Coconut Smoothie – Vegan + Gluten-free
serves 1- 1 cup organic unsweetened vanilla almond milk (or any other non-dairy milk)
- 1 cup organic blueberries (fresh or frozen)
- 1 organic banana
- 1 tablespoon flaxseed
- 1 tablespoon coconut oil, in liquid form
- 1/4 cup unsweetened coconut flakes, plus more for topping if you wish
- 1 teaspoon vanilla extract
- 3-5 drops of vanilla stevia or any sweetener of your choice (optional)
- handful of ice if the blueberries aren’t frozen
Add all of the ingredients to the blender and puree until smooth and creamy, adding ice if desired.
[/print_this]
-
Blueberry, Banana and Kale Smoothie – Vegan + Gluten-free
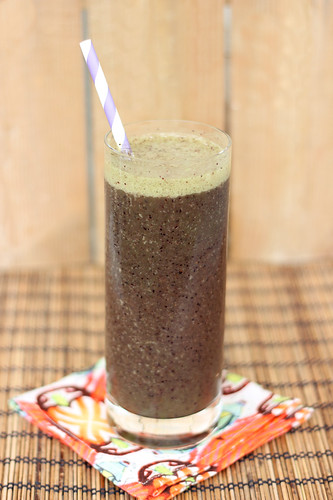
I am back from a short, but very lovely trip to California for the wedding of our very good friends, Patrick and Summer. We got back home on Tuesday morning after flying a red-eye out of LAX Monday night and I am still trying to readjust to being back home. It was a great trip, but we crammed a lot of celebrating into just a couple of days. My body was definitely hurting when I woke up yesterday morning. Between eating a little bit different than I normally would, getting way less sleep and doing less yoga than normal and OK maybe there was lots of wine, a few chocolates and even a cigar or two. I feel pretty beat up, but it was definitely worth it.
First thing I decided I would do to get back on track, was a 3 day cleanse. Lots of fruit and vegetables, juices and smoothies, tons of water, etc. And of course, lots of yoga. My everyday diet has evolved so much that this really isn’t a massive difference from my usual daily eating, but for the next couple of days I am actively avoiding any and all sugar or sweeteners of any kind (including my usual maple syrup or honey), no caffeine, no alcohol, no meat, no eggs, no grains and of course, the usual no gluten and no dairy. My body just needs a break. Summertime can be a bit rough, even when I think I am being careful and mindful, only indulging a little here and there, the little celebrations that I allow myself, happen a bit too often in the summer. Next thing you know, I am feeling worn out, sluggish and all of those other yucky things. I actually got a migraine yesterday for the first time in many, many months, and it was a bad one. I am sure my body was angry at the excessive amount of travel, lack of fruits and veggies, lack of water and all of that wine.
Our bodies definitely can only take so much. When you are always treating your body with love and care being very mindful of every little thing going into it, even just a few days of “letting go”, can affect you.
I normally have a smoothie or juice in the morning after yoga anyways, but this week I am really trying to load the smoothies up with tons of fruit and veggies. Today I put a big, tightly packed cup of organic kale into my smoothie and it was perfect. I know I have shared kale’s many benefits with you before, but here it is again in case you had forgotten: One cup of kale contains 36 calories, 5 grams of fiber, and 15% of the daily requirement of calcium and vitamin B6 (pyridoxine), 40% of magnesium, 180% of vitamin A, 200% of vitamin C, and 1,020% of vitamin K. It is also a good source of minerals copper, potassium, iron, manganese, and phosphorus. Kale, as with broccoli and other brassicas, contains sulforaphane (particularly when chopped or minced), a chemical with potent anti-cancer properties. Read more about kale here.
Blueberries rank as having one of the highest antioxidant capacities among all fruits, vegetables, spices and seasonings. Additionally blueberries are an amazing source for vitamins and minerals and they are high in fiber. Blueberries are also beneficial for your brain. On a test tube level, blueberry antioxidants activate two brain-protective enzymes, catalase and superoxide dismutase. These are the enzymes that keep neurons from being “deactivated” after they are attacked by free radicals. You can read more about the many benefits of blueberries here.
Bananas are one of our best sources of potassium, an essential mineral for maintaining normal blood pressure and heart function. Since the average banana contains a whopping 467 mg of potassium and only 1 mg of sodium, a banana a day may help to prevent high blood pressure and protect against atherosclerosis. Bananas are also great for digestive issues, replenishing your body of much needed electrolytes after a bout of diarrhea. Additionally, bananas contain pectin, a soluble fiber (called a hydrocolloid) that can help normalize movement through the digestive tract and ease constipation. You can read more about bananas many great benefits here.
This smoothie may have an odd color, a little bit purple, a little bit green with little flecks of berries, but don’t let the color throw you off, it has such a great flavor. It is smooth and you would never know that it is loaded with healthy, green leafy kale.
[print_this]Blueberry, Banana and Kale Smoothie – Vegan + Gluten-free
serves 1- 1 cup unsweetened organic vanilla almond milk (homemade works great)
- 1 tightly packed cup organic kale leaves, stems removed and roughly torn
- 1 cup organic blueberries (frozen or fresh)
- 1 organic banana
- 1-2 soft medjool dates (optional, or other sweetener of your choice, like maple syrup, honey, etc)
- 1 small handful of ice cubes
Add all of the ingredients to a high speed blender and blend until smooth. Serve immediately.
[/print_this]
-
Sloppy Joes – Gluten-free + Vegan
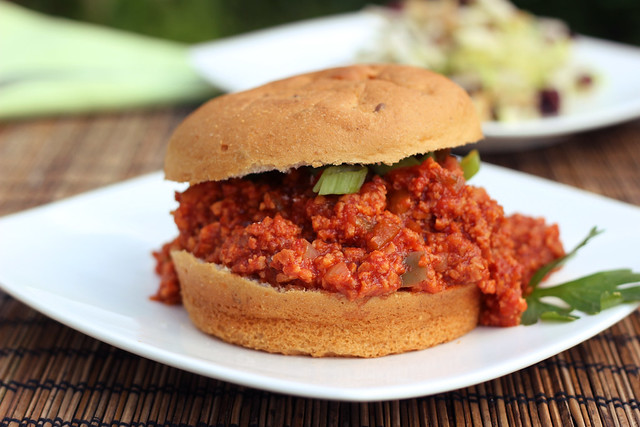
It is so rare that I make a dish that is meant to simulate an actual meat dish, but sometimes there are those old classic comfort foods that need to be re-imagined and updated. Hubby and I do eat meat, although at most we eat it once a week at home, and we get all of our meat from a local farmer, Sojourner Farms, who raises all of his meat on pasture without hormones or antibiotics. Since we tend to try to make the meat from him last, I make many vegan meals throughout the week, which not only is easier on my digestion it just feels better.
I’ve made these vegan sloppy joes a few times now and they have been a huge hit over here. Mark asks for them on almost a weekly basis. The first couple of times I made them, I didn’t really measure, I just added ingredients as it cooked, tasting and deciding what it needed. That is my favorite way to cook. I think I have the recipe pretty close to the way I like it, but I am known to squirt in a little more sriracha or add another spoonful of mustard.
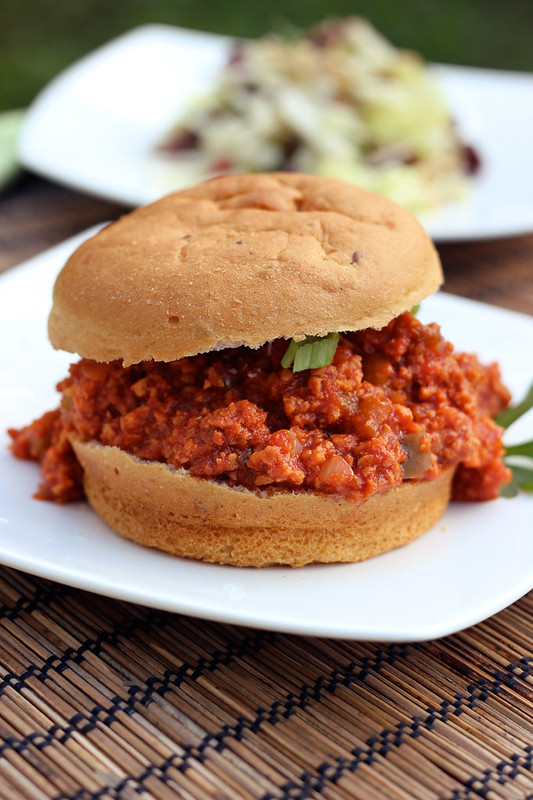
These sloppy joes taste much like the original, but in my opinion even better. The sauce has so much great flavor from the smokiness to the hint of heat. If you don’t eat soy, consider replacing the textured vegetable protein with cooked lentils or chopped up cooked portobello mushrooms, both would be delicious. And as always with my recipes, play with the sauce, make it your own, add more heat, take out the sriracha if you don’t want any spiciness, add in your favorite BBQ sauce, etc. Play!
When I was contacted recently by the very sweet and lovely, Cara, from Forks & Beans, to share a recipe with her readers, I immediately thought of this one. Cara encourages us to have fun with our food, play with it, make it exciting and I am not sure what is more fun and whimsical that sloppy joes. It’ll instantly transport you to being a kid and having your fingers and face covered in sauce.
This recipe was originally shared on Fork & Beans. Please do head over there and make sure that you have some time to spend on Cara’s site, you’ll want to click around and check out all of her incredibly fun and delicious looking gluten-free and vegan recipes, your mouth will be watering in just a few short minutes.

[print_this]Sloppy Joes – Gluten-free + Vegan
Makes 6-8 servings- 1 tablespoon olive oil
- 1 small onion (or 1/2 of a large), diced
- 2 cloves garlic, minced
- 1 green bell pepper, diced
- 2 cups textured vegetable protein TVP – (cooked green lentils or chopped up cooked portobello mushrooms would also be great here)
- 1 28-ounce can of organic crushed tomatoes
- 1/4 cup organic tomato paste
- 2 teaspoons Worcestershire sauce (make sure it is gluten-free and vegan)
- 1-2 teaspoons sriracha sauce (optional)
- 1 teaspoon liquid smoke
- 1 tablespoon stoneground or wholegrain mustard
- 1 tablespoon maple sugar (brown sugar or any other sugar of your choice)
- 3/4 – 1 cup water (you may need a little more if it is too thick)
- Salt and pepper to taste
Heat olive oil in large sauté pan over a medium heat. Add diced onion,
green bell pepper and garlic, sauté for 5 to 8 minutes.Add the TVP, crushed tomatoes, tomato paste, Worcestershire sauce,
sriracha sauce, liquid smoke, mustard, maple sugar, 3/4 cup of water, salt
and pepper to the sauté pan. Lower the heat, cover and simmer for 40 –
45 minutes. Stirring often. You may find you want to add more water if it
seems too thick. Serve on gluten-free/vegan hamburger rolls.[/print_this] -
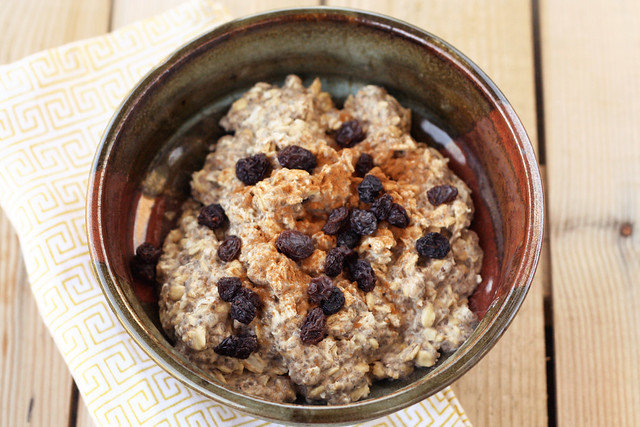
I’m Back!! Overnight Chai Oatmeal – Gluten-free, Vegan + Sugar-free

I am finally back guys and I have never been happier to be home and sitting at my desk! We actually got home on Friday but it has taken a few days for us to get through mountains of mail, email, orders, voicemails and well, just life! I hope you enjoyed all the lovely guest bloggers that were kind enough to post here on Tasty Yummies while I was away. It was so fun for me!


Our road trip to SXSW was so wonderful, overall one of the best we have ever taken. It had a few bumps along the way, but it is always so nice to be on the open road with the person I love more than anything, to see our friends from all over the world, meeting and chatting with customers and clients new and old! Plus the insanely warm weather, delicious food and rowdy nights don’t hurt either. This yearly trip is by far one of my favorites. This year’s 4-day Rock Poster Convention, Flatstock, was our most successful one yet. All of our hard work in preparing our booth and products felt like it really paid off. Oh and in addition to all the awesome work goodness, we even got to attend a private party at Willie Nelson’s ranch with a client.

In between all of the work and hangouts I was able to sneak in some yoga where I could either in hotel rooms or at a great little studio I found around the corner from our hotel in Austin, and we were able to stay on track with our eating both by enjoying all of the foods I made for us and a couple of trips to the Whole Foods flagship store. All in all a really great trip!

Unfortunately, on the way home from Austin, as we were making our way back to Louisville to spend time with my husband Mark’s family for a night before the last leg of the trip home to Buffalo, we got a phone call when we were just 5 hours away that his Grandmother, “Momo” had passed. We all knew this day was coming and although it was a sad one and she will be deeply missed, everyone was happy that she was no longer suffering. Mark and I were lucky enough to have stopped by the hospital on our way down to Austin, and we spent a few hours with her. She knew we were there and was able to speak with us, so we both feel insanely blessed for those precious moments. Thankfully we were able to extend our trip by a few days to attend the funeral, be with family and celebrate the life of one of the most amazing women I have ever met. It’s funny how life works.

So after two weeks on the road with many emotional ups and downs, when we pulled onto our street all I could think about was cuddling with my pets, who I missed dearly, getting back to my daily yoga practice, juicing, cooking in my kitchen, sleeping in my own bed and of course, all the amazing client projects we have lined up for the coming months. Even though I am doing a simple and quick cleanse this week to get my body back to feeling like itself after all of the traveling, I plan to finally have some recipes for you this week and next.
What is your favorite part of coming home after a long trip?
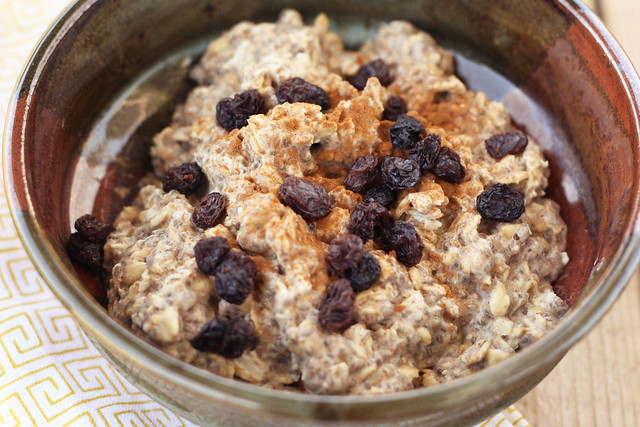
This first recipe is something I thought up on one of our long stretches of driving when I was thinking of all the mornings I get home from yoga and I want to get right to my desk and get to working. Many times I will just grab a homemade bar of some sort or make some juice or a quick smoothie. I wanted to come up with another simple breakfast like my overnight cinnamon raisin chia pudding or my banana cream chia pudding (which can also be made overnight). I have seen many versions of overnight oats made in a similar way so I thought up this fun version. Overnight Chai Oatmeal.
This tasty breakfast treat can easily be put together the night before, popped into an airtight glass mason jar or a covered bowl and left to soak. By the time morning rolls around you will have a delicious breakfast that can be served chilled or warm. You can have fun with your toppings, adding dried fruit or nuts or maybe even some shredded coconut. I just added a small handful of raisins.
Play around with this spices and get it to your liking. I like my chai spicy, as I am sure you recall from my chai concentrate recipe. I add in a pinch of black pepper, but you can leave that out. Have fun with it and make it your own.
Much like the chia puddings I make, I cannot wait to make this again and play with different flavor combinations. Imagine sinful chocolate peanut butter overnight oats. Mmmm…
Have you ever made overnight oatmeal or chia pudding? What is your favorite flavor combo?
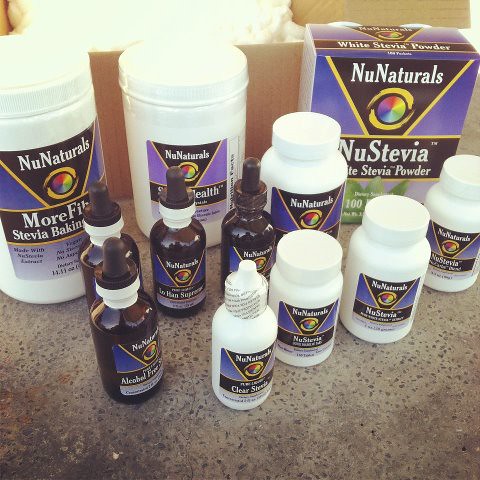
When I arrived home from our trip, I came in to a large box of goodies from NuNaturals. They asked me to give their products a try, see what I think of them, develop some recipes with them, etc. I haven’t really done much official research and reading on stevia products yet, but I have been meaning to try them for sometime, as many bloggers who I follow love to cook and bake with it, so I am excited to get to experimenting with all of this. Look for more recipes in the coming weeks using NuNaturals products. I decided to use the Pure Liquid Clear Stevia for this overnight oatmeal, feel free to use whatever your favorite sweetener is, just add it to taste when mixing or when serving.
[print_this]Overnight Chai Oatmeal – Gluten-free, Vegan + Sugar-free
serves 2- 1 cup gluten-free rolled oats (not quick cooking) – make sure they are certified gluten-free
- 2 tablespoons chia seeds
- 1 cup unsweetened almond milk (you can also use soy, hemp, flax-seed milk, oat milk, whatever your favorite is)
- 1 teaspoon vanilla extract
- 5-10 drops of liquid stevia (or to taste of whatever sweetener you wish, maple syrup or coconut sugar would be great)
- 1/4 teaspoon ground cardamom
- 1/4 teaspoon ground cinnamon
- 1/4 teaspoon ground ginger
- 1/4 teaspoon ground nutmeg
- 1/4 teaspoon ground anise
- a pinch of ground black pepper
- a pinch of ground cloves
Mix together all of the above ingredients in a glass jar or a bowl, cover and refrigerate overnight. Serve the oatmeal chilled or slightly warmed up. Top with a dash of cinnamon, some raisins or whatever other toppings you wish.
[/print_this]
-
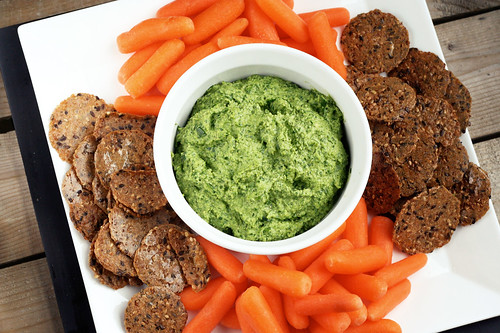
Creamy Dairy-Free Spinach Dip (vegan, gluten-free)
I am having a lot of fun making different dishes and snacks dairy-free. For the most part, as with my gluten-free or even vegan cooking, I have just been cooking around it, enjoying things that are naturally such, I don’t usually make tons of substitutions with weird processed things like fake cheeses or fake meats, etc. Even though I think that some dairy-free cheeses (like Daiya) might be nice for the occasional special treat if I really feel like I am missing out or want some cheese, I usually just get really creeped out by how much weird stuff are those types of foods. Many times you read the package and you don’t even know what the ingredients are, you can’t pronounce them, etc.
I was craving a delicious Italian-style pasta dish the other night, so I made gluten-free penne with a creamy roasted tomato and basil sauce. No cheese or dairy! The creaminess came from soaked cashews and I added in a little nutritional yeast for the nutty/cheesy flavor it brings. It was so perfectly delicious and it really hit the spot. I didn’t miss the dairy one bit. There is always the option of using nut milks instead of dairy milk in recipes, which I have been doing for a long time when making, but it doesn’t always give you that super creamy cheese-like texture when cooking, so that is where raw nuts have been coming in handy for me.
I did some serious cooking, baking and making over this weekend. I made my first ever batch of Kombucha, which I cannot wait to try, I love that stuff. I also made gluten-free, dairy-free refined sugar-free chocolate donuts for breakfast yesterday in my new donut pan (recipe coming soon) and all of my Super Bowl treats. We watched the Super Bowl last night at my parents’ with my family and some friends, so I decided to experiment a little with my Super Bowl snacks, making things that not only I would eat, but that would still appeal to everyone else. So, I made three different things: this creamy spinach dip, a creamy eggplant and roasted red pepper dip and Thai Meatballs (made from some grass-fed beef from our local farmer) with a red curry peanut sauce. I will be posting the eggplant dip likely tomorrow so look for that. As for the meatballs, I basically just altered this recipe to be gluten-free and I used some of our lean grass-fed ground beef from the half cow that we shared with my parents. I was really excited to find a meatball recipe that wouldn’t need any cheese of some sort, since I was initially playing with the idea of making regular Italian style meatballs. They were so delicious! I really recommend that recipe.
I served the two dips with tons of fresh cut raw veggies, regular whole grain crackers and some Mary’s Gone Crackers Black Pepper Crackers for me. Both the dips were enjoyed by everyone and the meatballs FLEW off the plate. This particular dip is so creamy, you would swear it had ricotta cheese in it. It has a nice flavor from the garlic and the nutritional yeast brings an almost “cheesy” taste. Nutritional yeast is low in sodium and it is one of the few non-animal sources of B-12, it is rich in folic acid and many other nutrients and amino acids. This is not your typical yeast and is free of the Candida Albicans strain, making it safe for those concerned with candida. Per ounce nutritional yeast packs in 14 grams of protein and 7 grams of fiber.
I’ll be honest, I did a lot more gabbing and snack-eating then football watching last night. We did manage to keep quiet through the half-time show, which I thought was just so-so. I love old-school Madonna and was excited to hear some of the old hits but that is about it. I was a bit let down, it didn’t do it for me. Though I did make it a point to listen to all of her old albums today on Spotify to make up for it!
Did you watch the Super Bowl? What did you think of the half-time show? What foods did you make or eat?

[print_this]Creamy Dairy-Free Spinach Dip (vegan, raw, gluten-free)
1 cup raw unsalted cashews, soaked for 1 to 3 hours and drained
2 cloves garlic
1 tablespoon nutritional yeast
1-2 tablespoons of water
4 cups baby spinach (split to 3 cups and 1 cup, roughly chop the 1 cup)
1/4 teaspoon kosher saltAdd the cashews, garlic and nutritional yeast to the food processor, puree until thick, creamy and smooth. You can add a tablespoon or two of water to the mixture as needed to make it more creamy. Add 3 cups of the spinach and continue pureeing until smooth. Fold in the remaining chopped spinach and stir by hand to combine. Pour the creamy spinach mixture into a serving dish and serve with fresh cut raw veggies, tortilla chips, crackers, toasted bread, etc.
[/print_this]

-
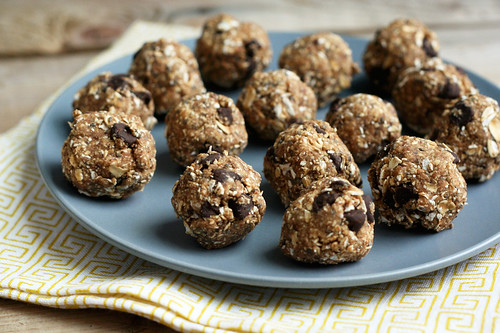
No-Bake Oatmeal Chia Chocolate Chip Cookie Balls (Vegan and Gluten-free)
So yeh, that name is definitely a mouthful, but I promise you, it is a very tasty mouthful! I have been craving a little something sweet for the last day or two, but for the last two weeks I have been laying off sugar, caffeine, dairy and all that stuff, attempting to give my digestion a bit of a break.
Today marks two weeks, I have no more pains, I feel less bloated, I am full of energy and I have dropped about 10lbs! I am attributing most of this to removing dairy from my diet, since that is what I believe to have caused the upset in the first place. So for now, I am continuing on this path of no dairy! I am actually quite excited about this discovery and revelation, I think my body has probably been trying to tell me this for sometime now. I really wasn’t consuming much dairy before all of this, but probably when I did have even the littlest amount, it was just too much for me. Ironically this month also marks the 7-year anniversary since I went gluten-free, so I suppose it is fitting that I make another huge dietary change. Why not, right?
So I decided as a little treat to myself to celebrate the two weeks and my new discovery and as a treat to my amazing hubby, Mark, who has been a trooper though all of this, we needed a healthy mid-day energy-boosting sweet. Who wouldn’t love that?
Since I have avoided chocolate for the last two weeks to give my tummy a break (caffeine is a stimulant and can be a bit rough on an already upset digestive tract), I wanted just the littlest taste today! I didn’t wanna go hog wild and get myself sick, so I thought adding them to a cookie ball like this, in the smallest amount possible, would be perfect. I have made many versions of these cookie balls, but I rarely measure and I usually just make do with what ingredients I have in the pantry and go with what I am craving. Since I knew I wanted to feature this recipe, I decided to measure this time. However, I still find that with a recipe like this, it is best to eye-ball it and go with texture. Some dates can be a bit drier than others, so you may have to soak yours first or add some water to get the consistency just right. I added about 2 tablespoons of water to my dough since I didn’t soak mine, but I could tell when the texture was just right for rolling. If you are ever unsure, just take a glob of the dough in your hands and feel it. You will know if it is too crumbly and dry or if it is too wet and goopy. Adjust your ingredients accordingly.
I added in chia seeds this time, but you could certainly leave them out if you don’t have them or don’t want them. I like the crunchiness that they bring and I also love that chia is a power-food known for being high in fiber and great for digestion. Chia seeds also increase your energy levels, so these cookie bites are the perfect afternoon pick me up. I love that these little treats are naturally vegan and sugar-free, they are gluten-free if you make sure to use gluten-free rolled oats and they are the perfect treat to get you through the middle of the day! Have fun with this recipe, I have made these with raisins or dried cranberries before, you can add banana and peanut butter, cocoa power, nuts, coconut, etc. These have become my go to treat when I want something sweet but I don’t want sugar and other junk.
What is your favorite mid-day snack?
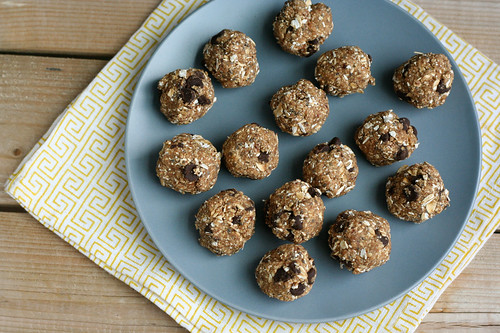
[print_this]No-Bake Oatmeal Chia Chocolate Chip Cookie Balls (Vegan and Gluten-free)
makes about 15 cookie balls1/3 cup Medjool dates, pitted and roughly chopped (about 5 dates – soak if they are very dry)
1 teaspoon vanilla extract
1 1/4 cups gluten-free rolled oats (you can use regular rolled oats if you aren’t gluten intolerant)
1 tablespoon chia seeds
1 – 2 tablespoons water (you could need more, you could need less, just go by how your dough feels)
1/4 cup dairy-free chocolate chipsAdd the medjool dates and vanilla to a food processor or high powered blender (like a Vitamix). Process until a thick paste forms, you may want to add some water here if it is too dry. You will also want to take a spatula and scrape down the edges. Add in 1 cup of the rolled oats and the chia seeds, process until the oats are no longer whole and it all comes together into a thick dough. Again, add water if it is super dry (just don’t add too much water). Add in the remaining 1/4 cup of oats and the chocolate chips and pulse just a few times to bring it all together. Take a small amount of the dough into your hands to make sure it will roll and stay together. If the dough is crumbling a bit, add more water, if it is too goopy and wet, add more oats.
Taking 1 tablespoon of the dough at a time, roll the dough, in the palm of your hands, into about 15 balls. Set on a plate and place it into the fridge for about 15 minutes to all them to chill. Then enjoy!
[/print_this]
This recipe is featured in the Allergy Friendly Lunchbox Love.
-
Overnight Cinnamon Raisin Chia Pudding (vegan, gluten-free, raw)

I have seen many recipes for chia pudding on my internet travels, some seem to be thicker than others, but they have all looked delicious to me. I have been meaning to make this for some time. I have seen chia puddings made with all types of milk, including coconut, I’ve come across many many different toppings and “extras” including chocolate chia puddings made with cocoa. This Berries and Cream version from Leanne at Healthful Pursuit looks super duper creamy, containing less chia seeds and adding in coconut milk. I plan to make something very similar to this soon, myself, I really love how creamy it looks.
I decided on a thicker version for this first time, with similar flavors to my dad’s famous Greek style rice pudding, that I love so much and have mentioned on here before. Since, I wanted it to be a bit thicker of a pudding – I used a ratio that I found on Whole Food’s website, of seeds to milk. I do plan to make another version of this later this week, with less seeds and with coconut milk, similar to the one I posted from HP, but I had been dreaming of this thick rice-pudding like version for a while now. I will plan to post the next one I make as well, so I can compare to this. In fact, I plan to be making lots more chia pudding, so look out!
When soaked overnight chia seeds turn into a simple pudding, similar in consistency to tapioca (which I love). This pudding was thick and creamy, and it had a little bitty crunch from the seeds. I drizzled a bit of honey overtop of this to add a subtle sweetness, you could also add stevia, coconut sugar or any other sweetener you desire. You probably could also just use sweetened non-milk, I just never have that in the house. I am super surprised at how filling this pudding is, I was worried I would be hungry in an hour or two, and I wasn’t. For me that is when I know I have found a breakfast winner! In addition to breakfast, this pudding would be great for dessert or even a little afternoon snack.
If you haven’t yet had chia seeds, you must try them. I like them in muffins, granola, breads, smoothies, etc. Chia seeds are a super food that provides a variety of wonderful health benefits. It a nutshell – by adding just 2 tablespoons of chia seeds to your daily diet it will give you approximately 7 grams of fiber, 4 grams of protein, 205 milligrams of calcium, and a whopping 5 grams of omega-3! The benefits are far too many to list here, so I will direct you to this simple to read list, Top 10 Benefits of Eating Chia Seeds. And yes, these are the are the same chia seeds made famous by the Chia Pets. Ch ch ch chia! Chia seeds can be found at most healthfood stores, normally where you would find the flaxseeds.
Obviously you can play around with your toppings and flavors of this pudding, skipping the cinnamon and adding your own spices, going with fresh berries instead of dried fruit, adding nuts, cocoa or topping with shaved fresh coconut, etc.
[print_this]Overnight Cinnamon Raisin Chia Pudding (vegan, gluten-free, raw)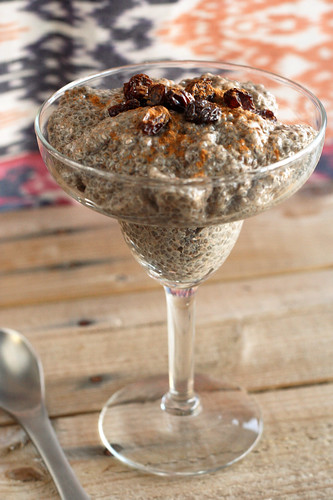
Serves 2 to 4 (depending on serving size)2/3 cup chia seeds
2 cups unsweetened organic non-dairy milk like almond or rice milk (I bet coconut milk beverage would also be great)
1 teaspoon ground cinnamon
1/2 teaspoon pure vanilla extract
1/4 cup raisins
Coconut sugar, stevia, honey, maple syrup, or any other sweetener of your choice, to taste (optional)Combine chia seeds, almond milk, cinnamon and vanilla in a glass bowl, stir well to combine. Cover with plastic wrap or lid. Or add those ingredients to a glass mason jar with a lid, tighten and shake well to combine (this is what I did). Refrigerate overnight. Stir well before serving, spoon into bowls and top with raisins, a dash of cinnamon and a little sweetener, if you wish.
[/print_this]
-
Chocolate Cherry Fudge Bites – Vegan, Gluten-free, Sugar Free, Corn Free

I don’t usually put all those health terms in a recipe title, since I fear that it may scare some people off. Although on the other hand, I worry that if I skip out on adding them, sometimes people looking for healthy recipes, may just pass over something called “Chocolate Cherry Fudge Bites”, assuming that it is loaded with fats and sugars. These little fudge balls are super simple to make and they are so tasty. It is hard to believe there is no sugar in these. They have such an amazing chocolatey fudge flavor with a little bit a chewy tartness from the bing cherries and a little crispy crunch from the chia seeds.
You could use this same recipe and instead of the dried bing cherries add in peanut butter and/or chocolate chips for a peanut butter fudge bite. You could add in candy cane pieces and peppermint extract. You could also leave out the cocoa use oats instead of the nuts and add in raisins for little oatmeal raisin cookie bites (which I have made before and I love). The possibilities are endless. Once you make these once you will know what the consistency of the dough needs to be for the next time you are experimenting. I love having these on hand to satisfy my sweet craving without the guilt. Not only do you not have to feel guilty about eating these, you can feel like you are doing yourself a favor – we all know the many benefits of chocolate, more specifically cocoa in it raw state, such as decreased blood pressure, improvement in blood vessel health and cholesterol levels, plus it is believed that the phenylethylamine in cocoa has mood boosting effects. The dates used to sweeten these fudge bites are a great source of dietary fiber and they are an energy powerhouse. Dates are low in calories and they are fat and cholesterol free, they are a great source of B-complex vitamins and they are one of the best natural sources of potassium.
So come on, don’t you just wanna reach for dessert when you hear all of that? Trust me, make these and you will always want to have them on hand to satisfy your sweets cravings. They do the job and then some.
Are you getting ready for the holiday? What do you have to make this week still? In addition to working all week, I am hoping to have time to finish up all of my craft projects that I took on for gifts, plus finish all of my shopping and then I have to get started on my wrapping – one of my favorite parts. I am hoping that I can squeeze a little cooking and baking in there too, somewhere.
[print_this]Chocolate Cherry Fudge Bites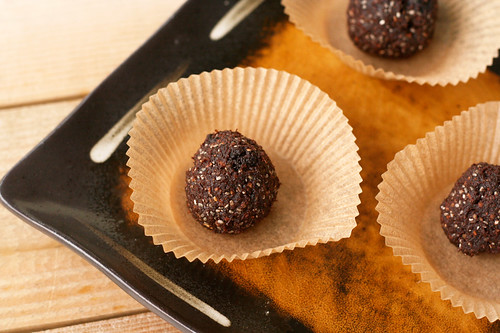
Makes approximately 16 balls3/4 cup medjool dates, pitted
4-5 tablespoons water
2 teaspoons vanilla extract
4 Tablespoons unsweetened cocoa powder
1/2 cup raw organic almonds
1 1/2 tablespoons chia seeds
1/4 tsp sea salt
1/2 cup dried organic bing cherries (other dried cherries will also work here)In food processor puree the dates, water and vanilla until a sticky paste/ball forms. Pulse in cocoa powder, almonds, chia seeds and salt until solid dough forms. Stir in the dried cherries. With small scoop, form mixture into 16 tablespoon-sized balls.
Refrigerate for 30-60 minutes to set.You can dip the balls in melted chocolate, roll them in seeds, nuts, coconut or cocoa, etc. – if you wish. See above for other fudge and cookie bite ideas. Have fun.
[/print_this] -
Rice-Pudding Balls
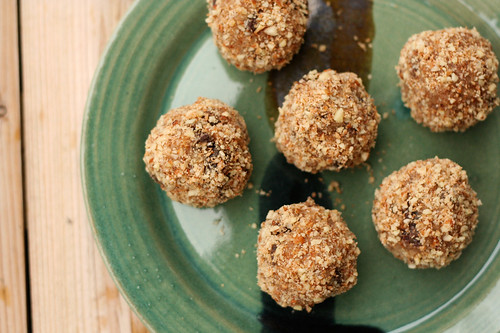
Well now that I got my blog all snug and nestled in on it’s own little server, it’s back to making the yummies! I am still on a kick of making different alternative Christmas sweets, so here is another one for the list. I have so many different recipe ideas in my head right now, I just need the time to make them all. I also am going to need to start sharing these sweets, so I don’t eat them all up myself.
I came across this recipe a while back and I couldn’t wait to try out a version of it with coconut milk instead of regular milk and coconut sugar instead of brown sugar. I am sure the recipe would be great with both of these, but I wanted to make it my way. I am sure this would be great with almond milk, too. If you are vegan, you can try making it using maple syrup or brown rice syrup instead of the honey.
My dad makes the BEST classic Greek-style rice-pudding (Rizogalo) that you will ever eat. I haven’t had it in a while and I have been craving it, so when I saw this recipe, I knew I could make some updated to the spices and flavors and make it very similar to my dad’s classic pudding. Since my dad’s original rice pudding isn’t the healthiest dessert in the world with milk, egg yolks and sugar in it, I figured these could possibly come a close second and would definitely do the trick of satisfying my craving. They definitely did just that, they are creamy little bites with so much flavor. I love a lot of cinnamon in my rice pudding, so I went with a full teaspoon, you can go with less if you wish, along with a small pinch of nutmeg. The crunchy almond and coconut “crust” is a super nice touch that I feel like should be on top of every serving of rice pudding from now on.
Look for recipes for cherry chocolate fudge balls later this week as well as some salty pistachio dark chocolate bark! I have also been dreaming of mint chocolate brownies. What is it about this time of year? I just want anything and everything sweet!
What sweets are you making this holiday season?
[print_this]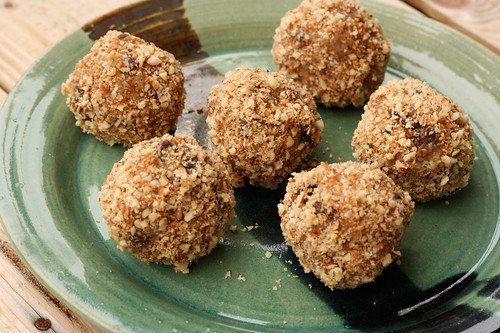
Rice-Pudding Balls
Adapted from Body and Soul Magazine, 2008
makes anywhere from 12-24 balls, depending on the size you make them2 cups unsweetened coconut milk (I used So Delicious Unsweetened Coconut Milk Beverage)
1/4 cup coconut sugar (or brown sugar)
2 tablespoons honey (if vegan, try maple syrup or brown rice syrup here)
1/4 teaspoon ground cardamom
1 teaspoon ground cinnamon
a pinch of nutmeg
Salt
1/2 cup arborio rice
1/2 teaspoon vanilla
1/2 cup raisins
1/2 cup unsweetened flaked coconut
1/2 cup raw whole almondsPreheat oven to 375 degrees. In a large saucepan, combine coconut milk, coconut sugar, honey, cardamom, cinnamon and nutmeg with a pinch of salt; bring to a boil over medium-high heat. Add in the rice and stir. Partially cover, reduce heat to low, and simmer, stirring occasionally, until rice is tender, 30 to 35 minutes.
Transfer rice to a bowl and stir in vanilla and raisins. Cover with plastic, and refrigerate until cold, at least 2 hours.
Spread coconut and almonds on a rimmed baking sheet and bake, tossing occasionally, until the coconut is golden brown, 4 to 6 minutes; set aside to cool. Grind nuts and coconut in a food processor until very finely ground; set aside.
Using level tablespoons, form rice mixture into balls (you should get about 24) and roll in the almond/coconut mixture. Place on a rimmed baking sheet or a couple of plates and refrigerate until firm, at least 1 hour or covered, up to 2 days.[/print_this]
-
No Bake Pecan Pie Bars – Gluten-free, Raw and Vegan

I have become obsessed with Medjool dates and I am still just as amazed now as I was the first time I baked with them. It is incredible how sweet they are. I have made quite a few simple raw “cookie” balls in the processor with just oats and/or nuts, some dates and other goodies like chocolate chips or peanut butter. They are so simple and a totally healthy way to get your sweets-fix. I need to start taking photos of those and sharing them with you. You will love them.
A few months back while shopping at the Lexington CoOp here in Buffalo, I ran across something called a “Raw Pecan Pie Bar” (I forget the name of the company that made it) – it was raw and sweetened only with dates and also had sprouted pecans and sprouted something else (can’t remember, again). It immediately peaked my interest, so I picked one up. It was quite tasty, but I couldn’t help but think I could make it even better. Plus, at $3.50 for a single small bar, I knew I could make it cheaper.
I had been looking at different recipes online for date bars as a base for my recipe and ultimately settled on Oh She Glow’s blog, once again. I liked how simple her recipe was and that it included everything that I love! I made a few additions and changed it up a bit to make it similar to a pecan pie. I am so excited about how these turned out. Oh and one quick thing to mention about these bars, because they aren’t loaded with sugar, you could even have this as a breakfast bar. I cannot believe it is sugar-free, egg-free, dairy-free, gluten-free and it’s even raw! If someone rattled off all of those things to me, with the words “pecan pie” – I would likely laugh in their face. You have to trust me though, these are so amazing. Even my southern-boy pecan pie loving hubby liked him, though he took one bite and said “man, these are good, a big ‘ol scoop of vanilla ice cream over top would really make this.” haha some things will never ever change.
I tend to actually have cravings for sweets around this time of year, which is crazy since I really don’t crave sweets that often. I think it could be the fact that everywhere you look there are holiday cookies and sweets just laying out, begging to be eaten. I am trying really hard to stick with my usual way of eating through the holidays this year, so I don’t step on the scale after the holidays to find I put on 5-lbs. I am planning to make a handful of alternative holiday sweets over the next couple of weeks, so I can still partake in the festive eating, but in a healthy way. I am also making sure when and if I do partake in some not-so healthy holiday eating – that I remember that everything in moderation is OK, a taste here won’t kill me and I would much rather have a little and know when to stop then to feel like I am missing out on something I really want.
Do you try to eat healthy during the holidays or do you just forego all healthy eating rules during the holidays?

No Bake Pecan Pie Bars – Gluten-free, Raw and Vegan
Adapted from Oh She Glows
Makes 9 large squares or more if cut smallerCrust:
1 1/2 cups whole raw almonds (you could also do 3/4 cup almonds and 3/4 cup shredded unsweetened coconut)
1 1/2 cups gluten-free rolled oats (if you aren’t gluten-free just use regular rolled oats)
1/2 tsp kosher salt
10 Medjool dates, pitted and roughly chopped (about 1 cup)
1/4 cup coconut oil
1/4 teaspoon vanilla extractDate and Pecan Topping:
25 Medjool dates, pitted and roughly chopped (about 2 1/2 cups)
1/4 – 1/2 cup water
1 teaspoon vanilla
1 cup roughly chopped raw pecansLine an 8″ x 8″ pan with two pieces of parchment paper going opposite ways. In a food processor, process the almonds, salt, and oats until a fine crumble forms. Add in the chopped dates and process until crumbly again. It your coconut oil is solid, melt it quick and add to the mixture with vanilla and process until sticky and a bit doughy. If your dough seems a bit dry, you can add a bit more oil, mind was fine as is. Remove from processor and press the dough very firmly and evenly into the pan to form your crust.
Clean the food processor real quick and process the dates with water (adding a little at a time so it doesn’t get too runny) and vanilla until a thick paste forms, it should be mostly smooth and creamy. You may need more or less water, depending on how soft your dates are. You will have to stop and scrape down the sides of the bowl often. You can add a tiny bit more water if needed, but you want the paste quite thick. Scoop out the date mixture onto the crust and gently spread with the back of a wet spatula until even.
Sprinkle the chopped pecans evenly across of it and gently press down with fingers. Refrigerate in the fridge until firm for at least 1 hour, preferably overnight. Cut into squares and serve. Store in the fridge or freezer.
-
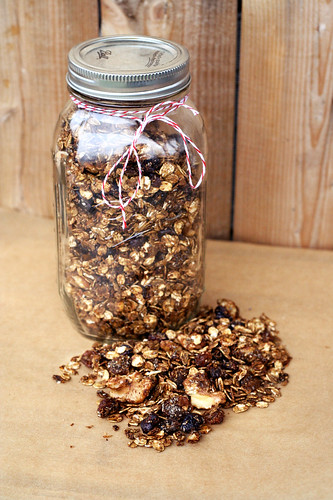
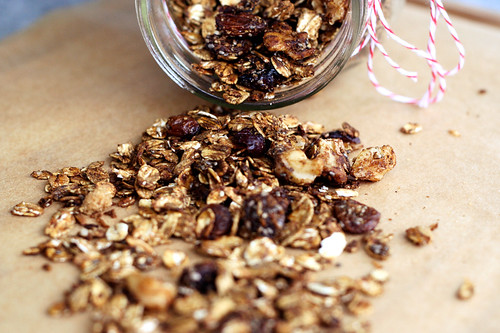
Gluten-free Gingerbread Granola {Vegan}
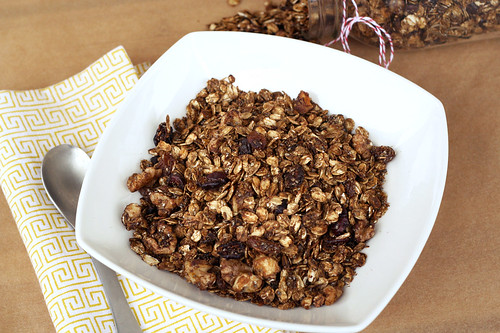

We are back from our very short trip to Chicago, we got back late Monday night. It was a whirlwind of a trip, but it was super fun and totally successful on the business front. The holiday market was jammed packed with people and everyone was in such a festive holiday mood. I love that about this time of year.
When we are in Chicago we stay with good friends and it is so enjoyable and relaxing. We are so lucky to have so many amazing friends across the country that open their homes to us. It makes it feel like we took a trip to see and stay with family instead of the alternative of it feeling like the (somewhat) stressful work filled trip that it actually is. I really wish I had more time before we left for this trip to make cute little homemade gifts like this granola for our friends that we stayed with as a “thank you”. This granola would make a wonderful holiday gift for the cereal lover on your list and it would also be the perfect gift for the host or hostess that invites you by for a holiday party. This granola in a simple canning jar wrapped up with some sweet ribbon or twine with a little tag, it really doesn’t get any better. I wish I could also capture and bottle up the smell in the house after baking this and wrap that in a bow and give it to everyone I know. It was that good.
The only bad thing about coming home after traveling, is that the fridge is usually so empty when we return. I try to be smart and plan ahead so we don’t leave town with a ton of fresh produce or leftovers in the fridge, etc. But that also means that when we come home there is very little fresh food to eat and I need to find the time to get to the market. We are pretty busy with work right now, so I haven’t had the extra time to get groceries just yet, so we have been just making do with what we have on hand right now. I have been craving some holiday-inspired goodies, like crazy, so, I decided a fun and healthy way to get some holiday flavor in my life, is to make this gingerbread granola. It made the house smell amazing and it is a great breakfast and snack option. It would also be good sprinkled on top of greek yogurt or ice cream. I’ve been enjoying this granola for breakfast with a few glugs of almond milk or coconut milk (not the canned kind, the beverage kind from So Delicious).
I had blackstrap molasses on hand, so I used that, but feel free to use regular light or dark molasses if that is what you have. Since blackstrap molasses can have a bit of a bittersweet taste, I also added an additional 1/4 cup of coconut sugar. You could leave this off or substitute brown sugar or honey here if you are looking for a bit more sweetness, like I was. Blackstrap molasses is not only a healthier choice for a sweetener, it actually has some health benefits, which is a lot more than more sweeteners can say for themselves. Blackstrap molasses is high in iron and a variety of other minerals.
Is it bad that I want to wrap this granola up and give it to everyone on my list? It’s that good.
Do you plan to make homemade gifts food or otherwise for anyone on your list?
Gingerbread Granola
This made enough to fill two 1-quart canning jars4 cups old-fashioned rolled oats (if you are gluten intolerant, be sure these are certified gluten-free oats. I use Bob’s Red Mill)
1 teaspoon cinnamon
1 teaspoon of ground ginger
1/4 teaspoon ground nutmeg
1/4 teaspoon ground cloves
1/2 cup chia seeds (flax seeds would also be nice)
1/2 cup unsweetened shredded coconut
3/4 cup walnuts, roughly chopped (or pecans, almonds, etc)
1/2 cup golden raisins
1/2 cup dried cranberries
1 teaspoon kosher salt
1/3 cup blackstrap molasses (light or dark molasses will also work)
1/4 cup coconut sugar (optional, you can also use brown sugar)
2 teaspoons vanillaPreheat oven to 325ºF. Line large baking sheet with parchment paper. You can also use a roasting pan, which is nice since you can just mix all of the ingredients right in it, without losing things over the edge.
Combine all of your dry ingredients, oats, seeds, nuts, dried fruit etc., in a large bowl (or in your roasting pan). Add in your spices and salt. Mix well.
Pour the molasses and vanilla over the dry ingredients and stir until well coated. Let sit 5 to 10 minutes. Give the mixture a little taste and add the coconut sugar (or brown sugar) if it’s too bitter for you.If you aren’t using a roasting pan, spread the granola on the baking sheet and bake for 30-40 minutes. Toss every 10 minutes or so to provide even toasting.
Let cool completely – it will get crispier as it cools. Keep in airtight container.
-
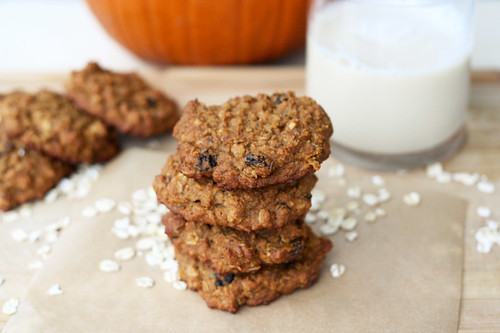
Chewy Pumpkin Oatmeal Raisin Cookies (Gluten-Free)
It is pretty unbelievable to me just how much I love baking now. I actually used to despise it, I hated that seemingly every little measurement had to be perfect or you would pull it out of the oven to find it ruined, with no way to fix it. That is so different from cooking and it was way too much pressure for me. I love with cooking how no measurement has to be precise, there isn’t as much chemistry of ingredients involved so you can really play around. I got even more scared of baking when I found out I was gluten intolerant nearly 7 years ago. All the different flours, starches and gums made my head spin. I was always nervous that I would spend nearly $10 on a package of flour that I had never heard of, to just ruin the recipe and not even have a delicious treat after all that.
I have finally loosened up a bit with baking and I am really starting to enjoy it. There are so many wonderful bloggers sharing their delicious gluten-free baked good recipes that I just started out by making those, making subtle substitutions here and there. As I have done more and more baking and experimenting, I have started to see what works and what doesn’t. What flours react well together and which ones don’t. I am still far from being an expert and I very rarely just dive right in and create my own recipe completely from scratch, it still intimidates me quite a bit. However, I have started to play a lot more this year and though there have been some pretty rough flops and fails along the way, I am still enjoying it.
I decided I wanted to make a fun fall-inspired cookie this weekend. Beyond wanting something sweet but relatively healthy after my cleanse, oatmeal cookies have just sounded good for a while now. Plus, it was my birthday weekend and we had a really fun weekend of fall activities planned to celebrate my aging and the beautiful fall weather. On Friday, we played hooky from work a few hours early to head up to Niagara-on-the-Lake for the afternoon. We walked around and checked out the little shops, I did some wine tasting, we had a couples massage at the Shaw spa and we had an incredible dinner at Epicurean. It was such a fun night. On Saturday morning, I made some delicious concord grape jam (I am gonna try to get a post together, though I didn’t take any process photos since it was a very dark and rainy morning), these cookies and then we spent the rest of the day working. Saturday night my parents took us out to Mangia Ristorante to celebrate my birthday. (By the way, Mangia has some of the most delicious Italian food I have had and almost all of their pasta dishes are available with gluten-free pasta). On Sunday we woke up and went apple-picking in the morning at Blackman Homestead Farm with my sister, Vicky, and my niece, Teagan. We had so much fun. Then we came home and I made a delicious fall dinner for us – a roast chicken from Sojourner Farm, with roast acorn squash wedges and baby fingerling potatoes over arugula – all from local farms. For dessert, we had some hot spiced apple cider that I had picked up at Blackman Homestead when we were apple picking and we served it with a couple of these cookies on the side. Such a perfect way to end a perfect fall weekend. Yesterday was my actual birthday and when we were eating dinner Mark had mentioned feeling bad that we were eating cookies that I made for dessert and that there hadn’t been any cake or candles all weekend and no birthday gifts to unwrap. I explained to him that my birthday included absolutely everything that I love and I couldn’t ask for anything more. That really is the truth. I am not one for cake and to me being around the people I love is truly gift enough.

Me at Niagara-on-the-Lake

Mark and me at Blackman Homestead Farm
My niece, Teagan, enjoying an apple while apple picking at Blackman Homestead Farm
My sister, Vicky and Teagan sharing an apple.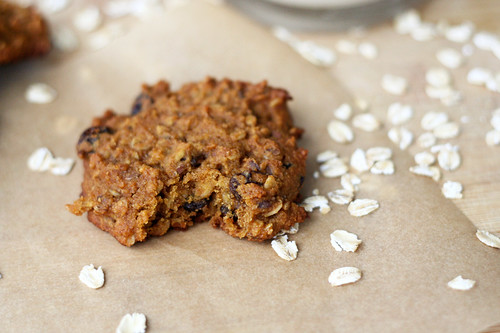
Beyond all the awesomeness of the events surrounding these cookies, they also made me super happy because I didn’t use a recipe – I just planned my own recipe with ingredients I knew (well, probably more like hoped) would work together. I ended up adding more oats than I had originally planned, because I knew with how the dough felt in my hands that it would be too thin. This is huge for me. A year ago I would have slopped the dough onto the baking pan and had a little fit when they came out flat and too soft. My guessing and instincts overall paid off and these cookies turned out wonderful. They are so moist and chewy, not dry at all the way some oatmeal cookies can be. They have the perfect mix of spices and I love that there is no butter or sugar in them. Just grape seed oil and honey. You could certainly replace the raisins with dried cranberries or even chocolate chips, you could add nuts and of course, you could simply use your favorite egg replacer to make them vegan.
Hope everyone had a lovely weekend as well? Did you do anything fun?
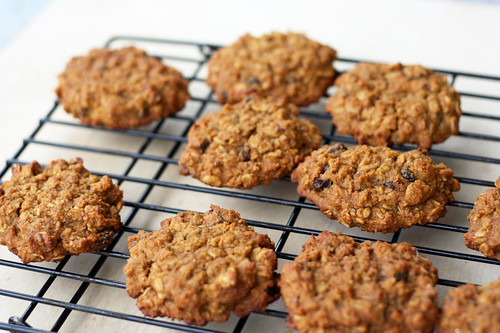
Chewy Pumpkin Oatmeal Raisin Cookies (Gluten-Free)
makes approximately 2 dozen cookies- 2 cups blanched almond flour (meal) – I use Honeyville brand, I don’t care for the Bob’s Red Mill almond flour
- 2 cups rolled oats (not instant) certified gluten-free if you are intolerant
- 1 cup fresh pumpkin puree (canned will work)
- 1 teaspoon baking powder
- 1 teaspoon baking soda
- 1/2 teaspoon salt
- 1/2 cup olive oil or melted coconut oil
- 1/2 cup organic local honey (maple syrup would be great here, too)
- 1 large farm fresh brown egg (or egg replacement of your choice)
- 1 1/2 teaspoons ground cinnamon
- 1 teaspoon ground nutmeg
- 1 teaspoon vanilla extract
- 3/4 cup raisins (dried cranberries would also be delicious)
- 1 1/2 tablespoons flaxseeds (optional)
Preheat the oven to 375º F, line two baking sheets with parchment paper.
In a large mixing bowl, whisk together the flour, baking soda, baking powder, cinnamon, nutmeg and salt.
In a small bowl, whisk together the oil and honey until smooth and well blended. Mix in the egg, pumpkin and vanilla.
Add the wet ingredients to the dry, stir to combine well, add in the oats, raisins and flaxseeds, stir until everything is well combined.
Drop the batter by rounded tablespoons 2-inches apart on the baking sheets, flatten the dough gently with a fork. Bake the cookies for 18-20 minutes until they are moist and soft but appear to be dull on the outside and are starting to lightly brown. Rotate the baking sheets during baking for even heating (I rotated mine every 6 minutes). Remove the cookies from the baking sheet after a few minutes and allow to cool on a wire rack. Or eat one while they are still warm, you know you want to.
Once the cookies are cool, store in an airtight container at room temperature.
-
Pumpkin Spice Granola, Gluten-Free
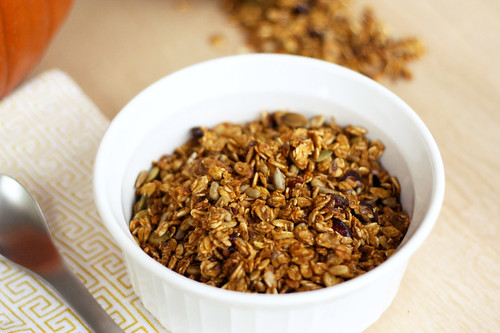
This time of year I really cannot get enough squash, apples and especially pumpkin. I honestly buy as many sugar pumpkins as I can stand cutting up and baking, so I can puree the flesh and freeze it to use throughout the winter. I stayed strong for two weeks on my cleanse and I am now slowly adding some items back into my diet such as a small amount of organic dairy, some alternatives to sugar such as honey and coconut sugar and some of our pasture raised meat from the farm. I had fresh fruit and vegetable juices or smoothies many mornings for breakfast throughout the first two weeks of the cleanse that I was excited to bring a little something different into my morning routine this week.
I was looking for something a bit crunchy, subtly sweet and that echoed the beautiful fall weather that we’ve been experiencing. I thought of granola late Tuesday night and couldn’t wait to get up the next morning to make it. Granola – YES! I was most excited that I still had some fresh pumpkin puree in the fridge from the last pumpkin I baked, so I decided to incorporate that.
Granola is one of those things that for many people scream “healthy hippie food”, for me it was something I had given up on, being that I am gluten-free. For many years I couldn’t find a granola that I liked and I honestly never thought about making my own. When I started seeing different recipes throughout my travels online, I realized how simple it was to make at home and how much fun you could have with your recipe. I am not usually a traditional cereal person, I find it to rarely be satisfying and since I try not to eat processed foods that usually leaves most cereals in the dust. Granola, though it could be considered a cereal, is so much more than that junk in a box (cue Justin Timberlake and that Saturday Night Live skit, wait – what?).
There are so many variations you can take when making your own granola, with different nuts, fruits and seeds, you can experiment with sweeteners, you could go with or without oil or butter, the possibilities are endless. Really any combination of dried fruits and nuts would be delicious. I almost added some dry quinoa, but I figured I could experiment with that next time since my list of ingredients was already getting super long. Heck – you could even add chocolate chips if you’re one of those people who loves a sweet breakfast. Many granola recipes call for oil, but I decided to attempt to keep the recipe low in fat and make it without, it came out perfectly crispy. Feel free to add a tablespoon or two, if you’d like.
Beyond being super satisfying and delicious this granola made our house smell incredible. After it cooled and I took some photos, I poured a bunch into a bowl and splashed some ice-cold organic almond milk over the top, it was perfection. I haven’t yet done it, but it would also be delicious sprinkled over some greek yogurt or your favorite ice cream.
I had so much fun making this granola yesterday morning mostly because it was the first day my back felt like it was getting better instead of worse or staying the same. Getting down to go in and out of the oven was much less painful and tedious, sitting at my desk finally doesn’t hurt and yesterday and today were the first days since I hurt my back over a week and a half ago, that I didn’t cry from the pain and frustration. I think I am on the mend folks!! Cross your fingers and send me more of those healing thoughts – I miss yoga terribly and I can’t wait to be back to feeling like my normal self again. This granola definitely made it feel like I am taking a step in the right direction. Enjoy.
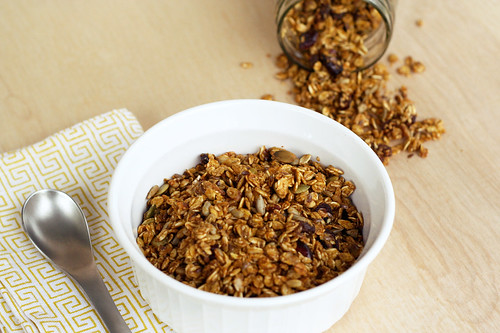
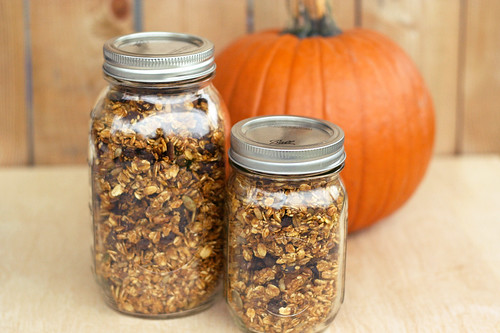
By the way – is anyone else as obsessed with jars as I am? I want to store everything in jars, they just look so pretty on the countertop and in the pantry.Pumpkin Spice Granola
1 cup fresh pumpkin puree (canned will also work here, but fresh is much tastier)
1 teaspoon cinnamon
1/4 teaspoon nutmeg
1/4 teaspoon of ground ginger
1 teaspoon salt
1/2 cup honey, maple syrup or agave (I used honey)
1 teaspoon vanilla extract
4 cups old-fashioned rolled oats (if you are gluten intolerant, be sure these are certified gluten-free oats. I use Bob’s Red Mill)
1/4 cup flax seeds
1/4 cup sesame seeds
1/4 cup hulled sunflower seeds
1/4 cup hulled pumpkin seeds (pepitas)
1/4 cup raisins
1/4 cup of dried cranberries (you can mix and match your dried fruits as you wish, I just used what I had in the pantry)
1/4 cup dried apricots, roughly chopped
1/2 cup pecans , roughly chopped (almonds or walnuts would also be delicious)
1/4 cup unsweetened flaked coconutPreheat oven to 300ºF.
Line large baking sheet with parchment paper. You can also use a roasting pan, which is nice since you can just mix all of the ingredients right in it, without losing things over the edge.Combine all of your dry ingredients, oats, seeds, nuts, dried fruit etc., in a large bowl (or in your roasting pan). Mix well.
In a small bowl stir together all wet ingredients plus your spices (pumpkin, honey, spices, etc).
Pour the wet ingredients over the dry ingredients and stir until well coated. Let sit 5 to 10 minutes.
If you aren’t using a roasting pan, spread the granola on the baking sheet and bake for 30-40 minutes. Toss every 10 minutes or so to provide even toasting.
Let cool completely – it will get crispier as it cools. Keep in airtight container.
Here are a few of my other favorite pumpkin recipes:
Pumpkin, Ricotta & Gruyère Pasta Casserole (gluten-free)
Gluten-Free Pumpkin Spice Muffins with Hazelnuts and Cranberries