-
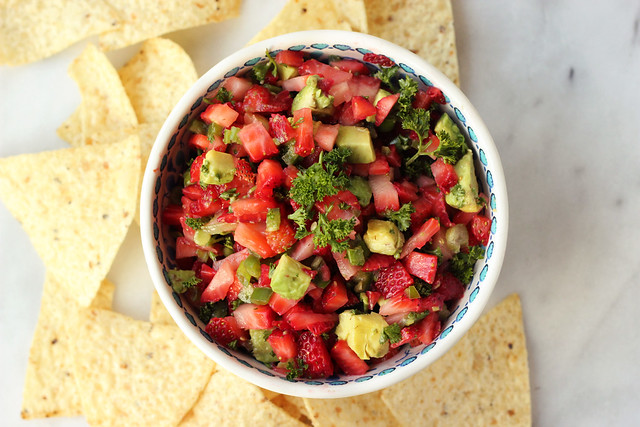
Strawberry Avocado Jalapeño Salsa {Gluten-free and Vegan}
It’s strawberry season, it’s strawberry season and I might be just a little bit excited! Iapologize in advance, I know it isn’t quite strawberry season for those of you not in Southern California. But, that just means you can start bookmarking and saving all of these yummy strawberry recipes I share and they’ll be all ready for you to get to cooking as soon as they are in season near you.
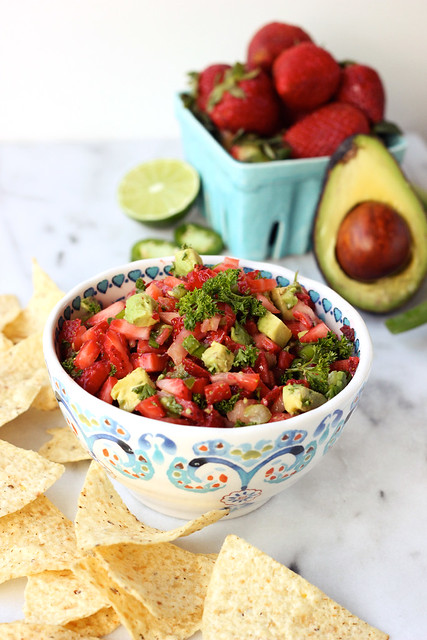
This slighty sweet, kinda tart, and a little bit spicy, Strawberry Avocado Jalapeño Salsa, is just as amazing as it is beautiful. Great on tortilla chips, over your favorite tacos, on grilled chicken or fish, or even just with a spoon. We have already had some hot weather here in Southern California, so I have been enjoying summery treats a little early. This salsa is simple to make and just full of so much flavor. I don’t always love fruit in savory dishes, but this one is incredible. I have a feeling this is going to be a staple snack around here this strawberry season! Read the rest of this entry »
-
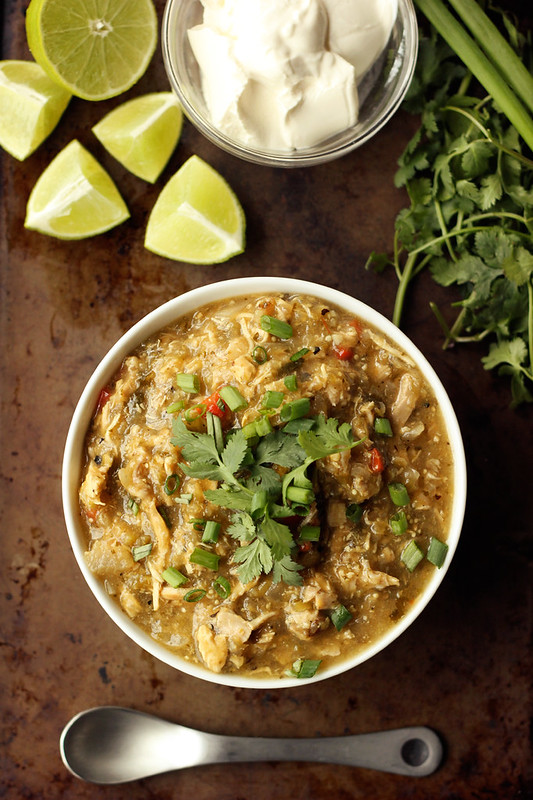
Slow Cooker Chicken Chile Verde {Gluten-free, Dairy-free, Paleo-friendly}
I have really come to love my slow cooker over the years. Crock Pot cooking is one of my favorite ways to make easy dinners, especially recipes that make multiple meals. I have said it before and I will say it again – a meal made in a slow cooker is just about the closest I may ever come to a personal chef. I load it up in the morning and by dinnertime the house is filled with incredible aromas and all I have to do is set the table and serve. It is amazing.
I have shared many plant-based slow cooker recipes here on Tasty Yummies, over the years. Like this Butternut Squash and Chickpea Coconut Curry or this Chipotle Black Bean and Quinoa Crock-Pot Stew, which is a reader favorite. I also have a simple recipe for Slow-Cooked Black Beans, that are great for vegan tacos or it can just be pureed into an amazing soup. Speaking of soup, this comforting Slow Cooker Split Pea Soup can be made with or without ham, to be vegan. Or for a really different Crock Pot experience, try my Creamy Crock-Pot Pumpkin Risotto recipe.
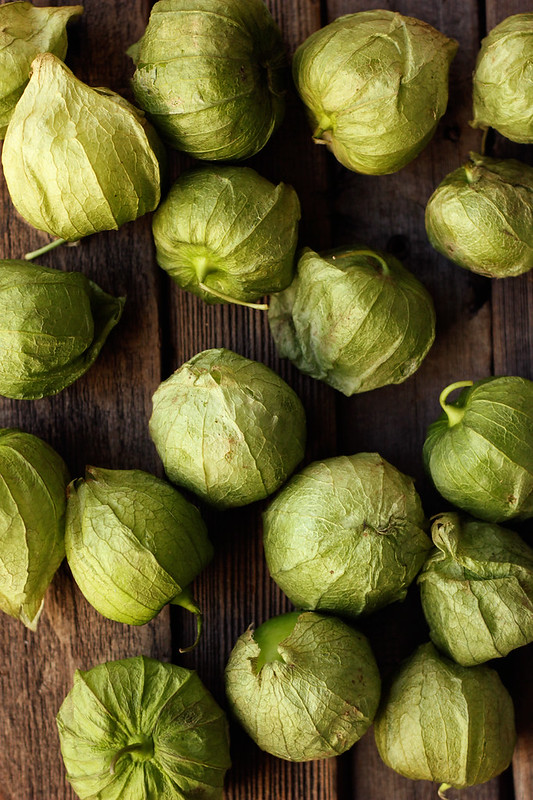
Since I have shared so many plant-based Crock Pot recipes, I thought it was time to share a meat-based recipe since, I know many of you are like me and do eat meat from time-to-time. Plus, when I asked on my Facebook page, a good majority of you were lookin’ for a “meaty” recipe. I had tons of ideas I was working on, but I had a beautiful locally-raised whole organic chicken that I thought would be perfect to create something different with. I thought about making my Chicken and White Bean Chili again with the whole chicken, but then I saw the beautiful tomatillos at the market and came up with the idea for this Slow Cooker Chicken Chile Verde.
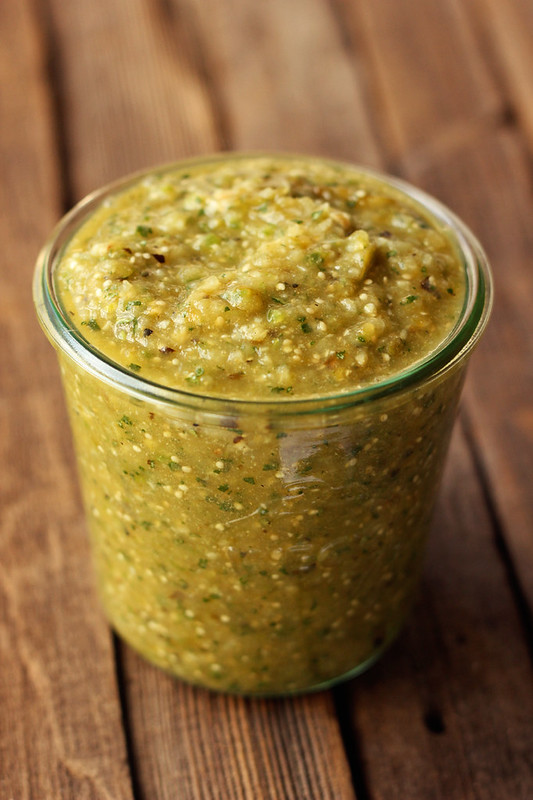
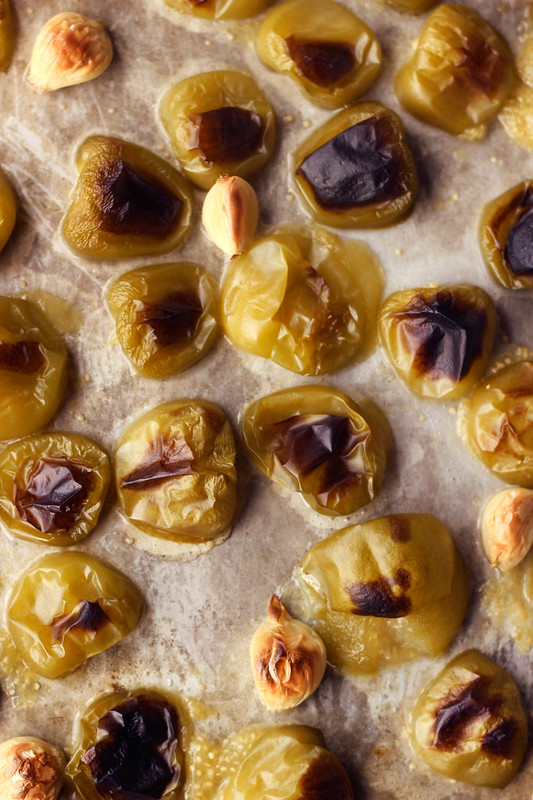
This post is extra special – because it’s actually a two-part recipe. Besides the amazing chile verde, first – I have a super simple salsa verde/sauce that can just be used as-is, a salsa perfect for dipping your favorite corn tortilla chips into, or even better, served warm in this amazing chile verde or it’d also be great as a topping for homemade veggie enchiladas. So many possibilities. This salsa verde is just loaded with amazing fresh flavors, so bright and unique. You could certainly use the tomatillos raw if you wish, but I have found that roasting the tomatillos first really brings out their incredibly bright flavor. I have a feeling I will be making homemade salsa verde way more often now. It was so easy. Read the rest of this entry »
-
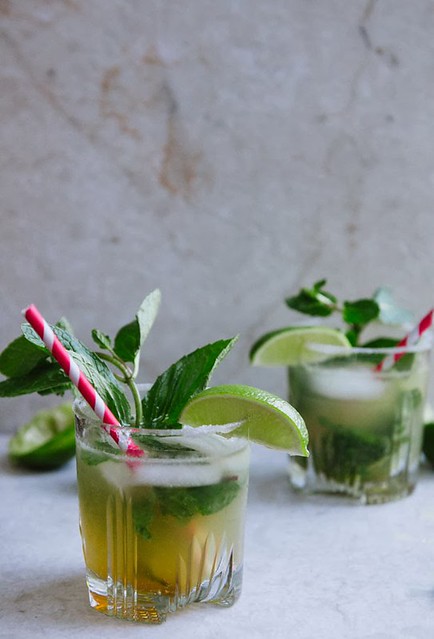
The Kentucky Mojito
OK, so I might be wayyy too insanely excited about today’s guest blogger, my girl Gina from So…Let’s Hang Out. Lovely Miss Gina is just about the most magical, polar bear loving, super sweet lady you will ever meet. I am proud to have her as a friend and to bring her here to Tasty Yummies for the first time to share an incredible cocktail with you guys. I hope you enjoy.
:::::::::::::::::::::::::::::::::::::::::::::::::::::::::::::::::::::::::::::::::::::::::::::::::::::::::::::::::::::::::::::::::::::::::::::
Firstly, I want to thank and virtually chest bump my friend Beth for letting me come over to her really pretty corner of the interweb today and sully you all with booze and tomfoolery. I think we can both agree that this lady is pretty tops! Like, if we were texting right now and you asked me, “how do you feel about Beth from Tasty Yummies?” I wouldn’t have enough Emojis to properly respond. I’d have to use all of them. But, I think I’d probably use the one that looks like tap dancing twins more than once, because it just feels right. There would be exclamation marks and goings-on about how this lady is for reals one of the loveliest friends and one heck of an inspiring blogger. Since this is still my fantasy text to her, I think I’d end it with these Emojis in the following order: donut, ramen noodles, panda bear, thumbs up, jazz hands, tap dancing twins, donut, donut, guy with mustache, camel, tap dancing twins, donut.
It’s so like me to write an entire paragraph of arguable nonsense without introducing myself. Hi there! *Waves enthusiastically*My name is Gina and I write over at So…Let’s Hang Out. It’s a whole lot of gluten-free recipes, the occasional drawing of animals in human clothes, and spontaneous dance party encouragement all doused in copious amounts of oversharing about how I learned for the hundredth time that cooking bacon without wearing pants is just not a good idea. Splatter. Bare thighs. No. Just, no.
I know we’re just getting to know each other (even though I’ve already talked about my penchant for not wearing pants—too soon?) so, why don’t we just do this thing over cocktails? That would probably be best.
-
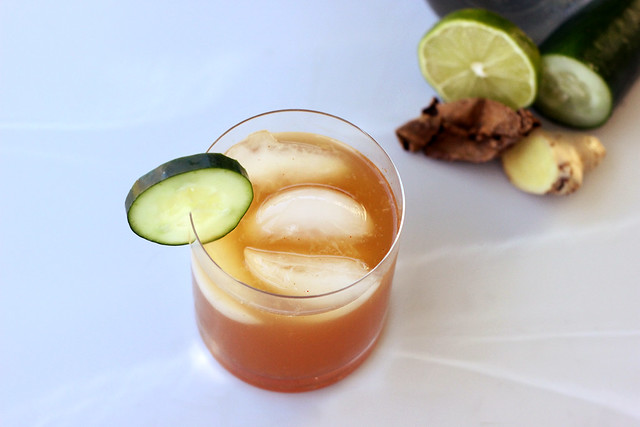
Fairly Modest Mule Cocktail made with FAIR. Quinoa Vodka – {Gluten-free and Fair-trade}
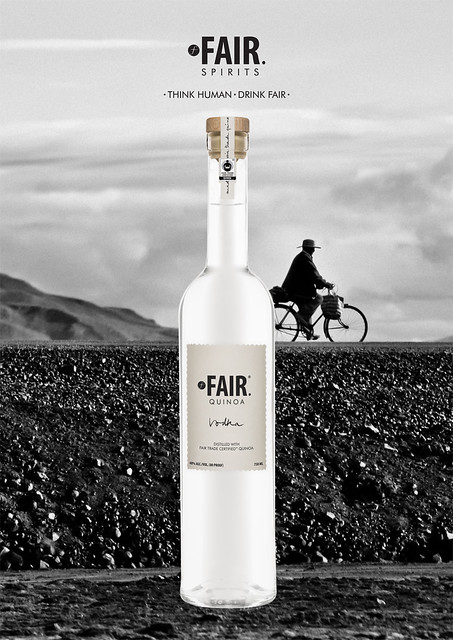
We are all very aware of the well loved, super-food, quinoa, by now. How could you not be? It could nearly have it’s own section at a Whole Foods now and we certainly can’t eat at a trendy healthy restaurant without seeing it on the menu somewhere, if not in multiple places. I am personally a big fan of quinoa and it appears I am not alone! The United Nations actually declared 2013 the International Year of Quinoa. I love that! Quinoa is the mother of all grains and is an ancient power food used by Incan warriors 5000 years ago. The popularity of the seed, (which is commonly referred to as a grain) has grown exponentially over the past few years, I’ve seen it in everything from savory dishes, cookies, cakes, breads and now VODKA!! I mean really, does it really get any better than this?
Yup, it actually does. FAIR. Quinoa Vodka is an ethically sourced, one-of-a-kind spirit made with unique ingredients that is certified gluten-free and fair-trade, too!! FAIR.’s long list of boast-worthy qualities won me over, before I had ever even tasted it. Then, in a moment just like those in blockbuster chick-flicks, with a slow move in towards my lips, it was love at first sip! OK, who am I kidding, I am not that dainty, it was first a sip, then a good ‘ol fashioned vodka gulp. This stuff is really good, guys. It’s clean, smooth and fresh, no strange aftertaste like many vodkas can have. It’s full flavored while still being delicate with a slightly warm fruity finish. I have been loving it paired with a homemade coffee liqueur on the rocks, but it is also incredible in a simple dirty martini. Read the rest of this entry »
-
How-to Make Preserved Lemons


How-to Make Preserved Lemons
Along with the gluten-free cooking demo I hosted on Saturday night at Surfas, I had the pleasure of hosting a hands-on preserved lemons workshop this weekend at the Patchwork Show Edible Edition in Costa Mesa and it was so much fun! It was a packed house. My only regret is that I didn’t stop to take some photos of everyone working on their jars of preserved lemons. It was so fun for me to look out and see everyone getting their hands dirty and learning to do make something new. Not a single person there had ever made preserved lemons!
For those that were are the workshop, these are the instructions for what I taught you on Sunday, thanks again so much for coming. For those that couldn’t make it to the workshop, here is how you easy it is to make preserved lemons. It is really this simple.
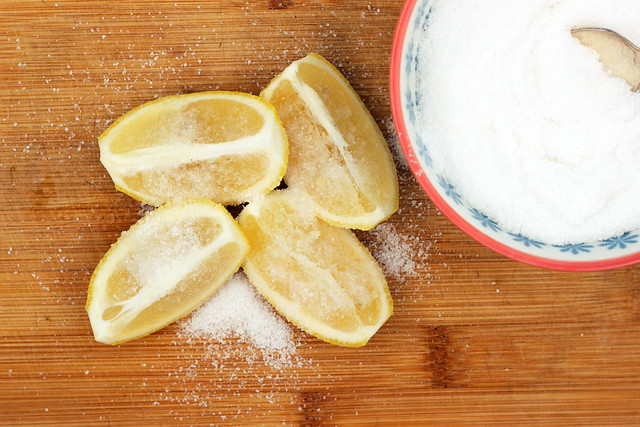
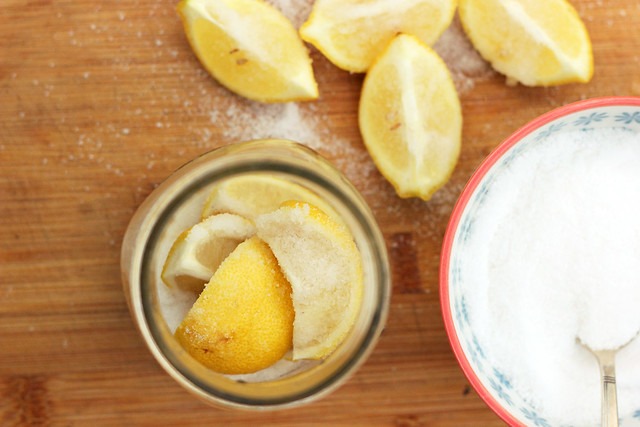
I prefer to work with a 16-ounce or quart-sized wide-mouthed jar when I can, but they just aren’t always available at our house, I literally use jars for everything. So, these measurements are for one 12-ounce jar. Adjust your quantities as needed for different sized jars or multiples. Additionally it should be noted, the amount of salt and the number of lemons is just an approximation. It doesn’t have to be exact and it will depend on the size of your lemons.
By the way, you can also add spices to your preserved lemons such as, cinnamon sticks, bay leaves, peppercorns, cloves, coriander, dried peppers, cardamom, etc. Read the rest of this entry »
-
Fermented Salsa – Gluten-free, Vegan
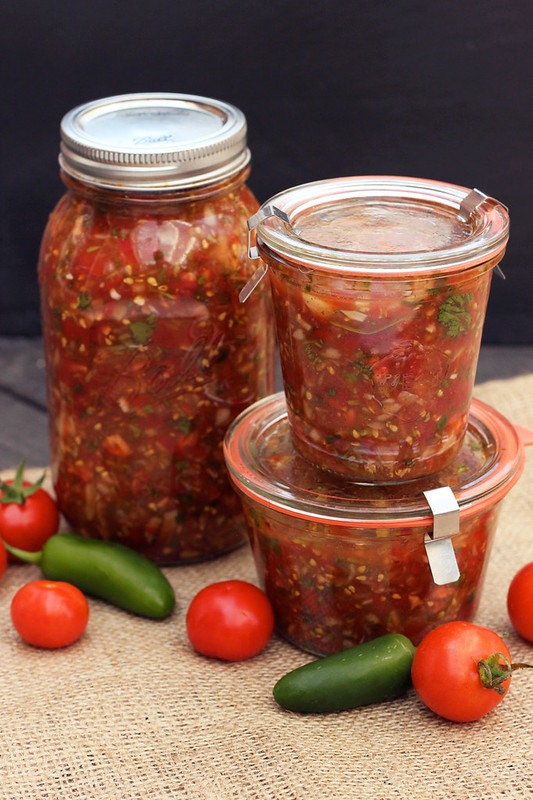
First off, I know for many of you, your very first question will likely be “Why?” Why would you ferment salsa? Well, I suppose that could be asked about many things. Why ferment? Admittedly, fermentation and cultured foods is something I am newly interested in and I am still learning a lot about. So, I will just share some of what I have learned about why fermented foods are so good for us.
There is so much more to having a balanced and happy gut than we realize. It is now estimated that over 500 species of bacteria are present in our intestinal track with reports of 50 – 75% of our immune system activity residing there. In our modern world filled with antibiotic drugs, chlorinated water, antibacterial soap and pasteurized foods, we are killing off all of the good bacteria we need to maintain good health and digestion. If we don’t actively replenish this good bacteria that we need, we won’t get the proper nutrients out of the foods we are eating.
Why Ferment?
There are so many healthy enzymes that flourish and live cultures that are created when vegetables are fermented, creating an environment full of probiotics, enzymes and minerals which are important in maintaining healthy digestion and a healthy body. These live cultures, usually bacteria or yeast, that fermented foods contain, help balance the microflora are a little city of tiny organisms in our large intestine that, when working well, help digest fiber, protect us from things we’d rather not absorb like carcinogens, and keep the bowel healthy.
The probiotic good bacteria and enzymes in fermented foods help to populate our gut and intestines with Lactobacilli which are really important for healthy digestion. They also help to eliminate toxins from our body, so eating them will allow your intestines to detox, which is a really good thing! All of this beneficial bacteria (or probiotics) have also been shown to help slow or reverse some diseases, improve bowel health, aid digestion, and improve immunity! I am a huge proponent of taking a daily probiotic, which has changed the way my gut feels on a daily basis.
-
No-Bake Vegan “Cheesecake” – Gluten-free + Refined Sugar-free

This week I thought it was appropriate to share a fun patriotic-inspired treat that you could take to any BBQ or picnic on the 4th! Not only is this dessert festive, but it is super simple to make, doesn’t require you to ever heat up the oven and it is sure to please everyone — restricted diets or not.
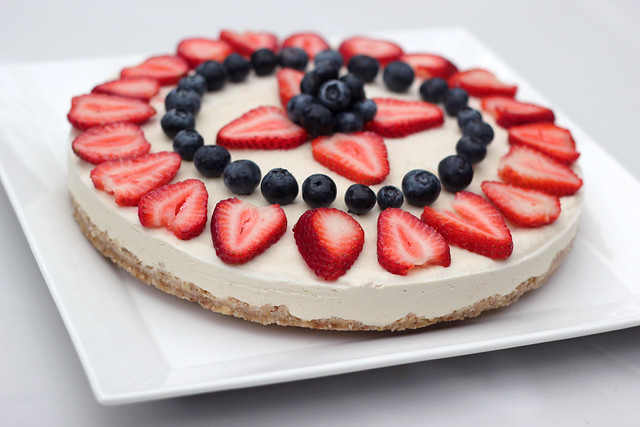
Since I cut most dairy from diet last year, there are a few things I miss from time to time. A rich and creamy cheesecake is certainly one of them. This “cheesecake” has a smooth and creamy flavor, with a bright tanginess you would find in most traditional cheesecakes. The crust is super simple and compliments the filling perfectly. The best part about this crust is, besides being raw, is how super versatile it can, you can use whatever nuts you have, I went with 1 cup raw macadamia nuts and 1/2 cup raw almonds. Plus it would be great for many other pie recipes, too. Read the rest of this entry »
-
Creamy Avocado Dressing – Gluten-free + Dairy-free w/ Vegan Option
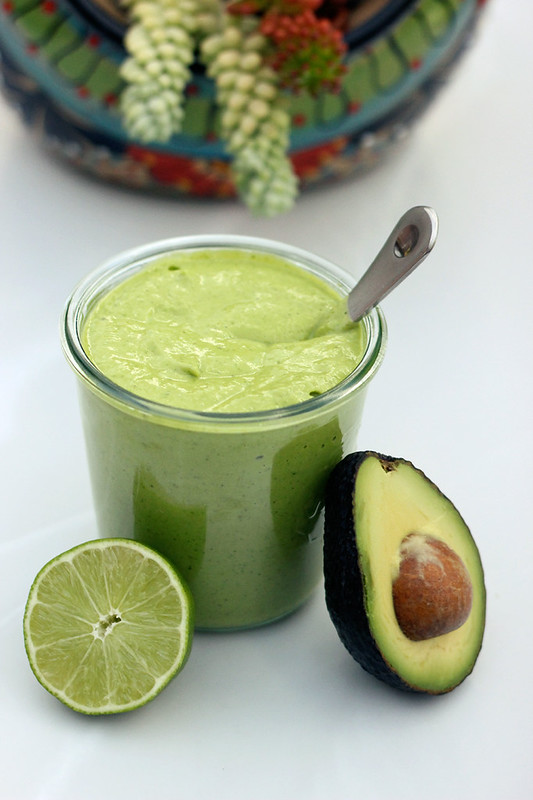
I am not going to lie, one of my absolute favorite things about living in Southern California are the inexpensive avocados. I always have a few on the counter just waiting to get added to a salad, made into guacamole or just spread fresh onto toast or crackers.
When we lived in New York, it was always the painful part of my grocery shopping trip. Seeing the price tag on the avocados and deciding how much they were worth to me. Did I HAVE to have them? Usually I did, but some weeks I just couldn’t stomach the cost. Plus let’s be honest, they weren’t all that fresh, not compared to the ones out here.
-
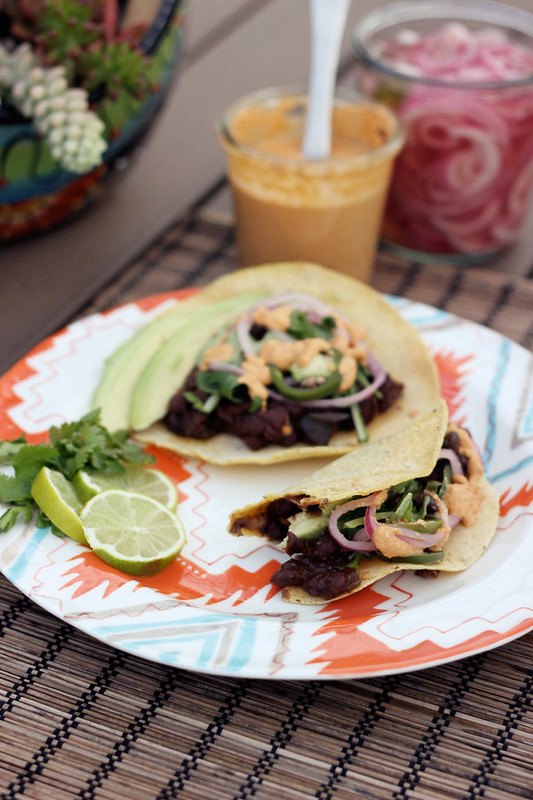
Slow-Cooked Black Bean Tacos with Vegan Chipotle Cream {Gluten-free + Vegan}

I have always LOVED tacos, but from traveling a ton to Texas and California and even Mexico once or twice, I am well aware of what makes a good taco. Living in Western New York for the past 30+ years meant getting the very best tacos I could on the road and when I was really craving them at home, just making them myself. I have made soo many different tacos, some vegan, like these, some with slow cooked meat from our farmer, some loaded just with grilled veggies, and so on. I am not saying my homemade tacos are THE very best and most authentic, but for the most part they were better than any I could get in Buffalo. (Though Lloyds Taco Truck were damn delicious and the best in WNY outside of my kitchen, for sure!)
I find the key to authentic tacos (or at least for my taste) is skipping on the loads of cheese and chopped iceberg lettuce like most Americans love. You want good quality ingredients like slow cooked beans or a meat, spiced to perfection. Add some fresh cilantro, a quick homemade pico de gallo or other salsa and add a few other simple but yummy things like quick pickled red onions, (diced onions or green onions are always great to) or maybe a simple chipotle cream. Less is more in a lot of ways.
OK so now I am living in Southern California, the land of amazing tacos. Why did I make tacos at home, you ask? Almost every week for Taco Tuesday we have tried a different place out, since you can get amazing prices/deals at most places. Last week, we didn’t wanna go out and we still wanted tacos, so this was the next best thing.
These tacos feature super flavorful slow-cooked black beans, that do their thing ALL day in the crock pot. Load it up in the morning before work and by dinner time it’s all ready for you. You can make the pickled onions and chipotle cream the day before, the morning of when you are loading up the crock pot or just a couple of hours before you serve dinner. I highly suggest making your own corn tortillas whenever possible, they are so simple to make and once you do, you will realize what you have been missing. I was forced to skip on it this time as I wasn’t able to find non-GMO masa harina around here, so I just bought some pre-made organic non-GMO corn tortillas that were very good and very fresh.
**BONUS ADDITIONAL MEALS: The great thing about this recipe is that it makes a decent amount of black beans and other goodies. So make tacos for 4 – 6, or more – or make tacos for 2 one night, then make delicious black bean and brown rice bowls another night. Instead of tortillas start with brown rice in a large bowl, top with the slow cooked black beans, add any other veggies or toppings, top with the pickled red onions and chipotle cream sauce and you have another deliciously incredible meal.
Slow-Cooked Black Bean Tacos with Vegan Chipotle Cream {Gluten-free + Vegan}
[print_this]Slow Cooked Black Beans
- 1 lb organic dried black beans – soaked overnight, drained and rinsed*
- 4 cups water and/or vegetable broth (if you aren’t using canned tomatoes, you may want a bit more water)
- 1 jalapeño, diced
- 1-2 dried chipotles, left whole
- 2 stalks celery, diced
- 1 red onion, diced
- 1 green bell pepper, diced
- 2-3 cloves garlic, minced
- 1 bay leaf
- 1 small can diced fire-roasted tomatoes (I like Muir Glen organic) you can also use fresh tomato
- 2 teaspoons ground cumin
- 3 teaspoons chili powder
- 1 teaspoon ground coriander
Salt to taste at the end of cooking
Soak the beans overnight. Drain and rinse well.
Add all of the ingredients to the crock pot. If you aren’t using canned tomatoes, add another 1-2 cups of water. You want to make sure there is enough liquid so the beans don’t scorch or burn.
Stir well. Cover and cook on low for 8 hours. Salt to taste and the end.
*If you forgot or didn’t leave time to soak the beans overnight, no problem. Put them in a large pot, and cover completely with water. Bring to a rapid boil for 10 minutes, then turn off stove and cover pot. Let your beans sit for 1 hour, then drain water and put beans into crockpot) [/print_this]
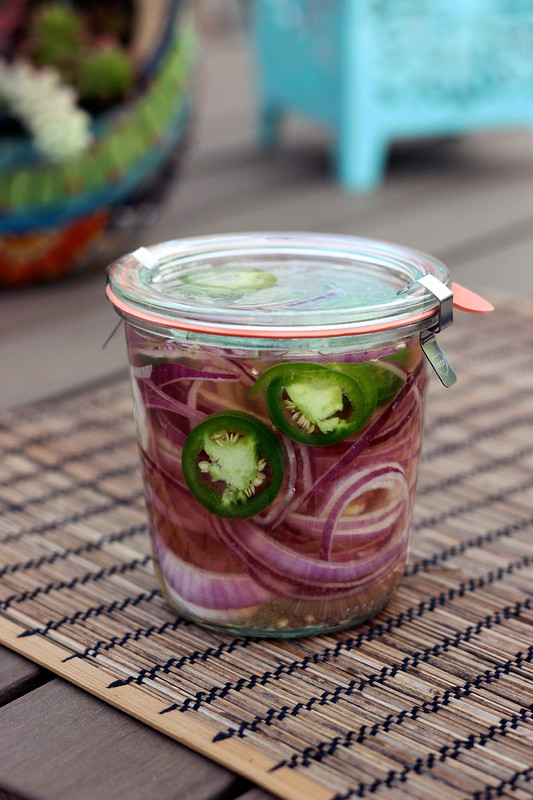
[print_this]Quick Pickled Red Onions (and Jalapeños)
These simple pickled onions can be made ahead, it will keep for 2 weeks.
- 1/3 cup red wine or apple cider vinegar
- 1 teaspoon raw sugar (if you are totally sugar-free try a splash of maple or other sweetener of your choice)
- 1 teaspoon kosher salt
- 1 red onion, thinly sliced
- 1 jalapeño, cut into rings
Whisk first 3 ingredients and 1 cup water in a small bowl until sugar and salt dissolve. Place onion and jalapeños in a jar, pour the vinegar mixture over. Let sit at room temperature for at least 1 hour and up to 8 hours. Cover and chill. Drain onions before using or just pull right out of the jar and add them to your tacos. [/print_this]
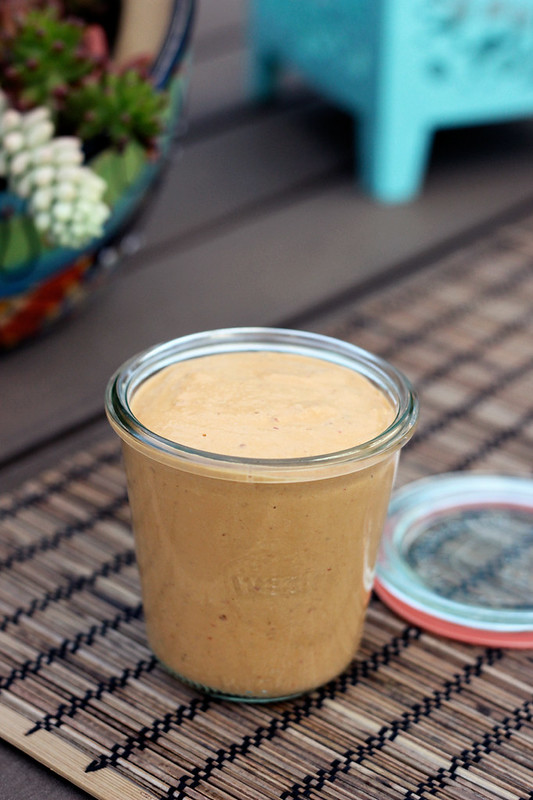
[print_this]Vegan Chipotle Cream
This sauce is great on these tacos, but also delicious in place of mayo or other spreads on sandwiches or wraps.- 1/2 cup organic raw cashews (soaked for at least an hour), drained then rinsed well
- 1/4 cup water (you may need more)
- 2-3 chipotles (the canned kind in adobo sauce)
- 1 teaspoon of apple cider vinegar
- 1 large clove garlic
- squeeze or two of fresh lime
- salt, to taste
Add all of the ingredients to your blender. Start on a low speed. You may find you need to add more water to get it moving and to reach your desired consistency. Gradually increase the speed of the blender until the desired creaminess is reached. If you add to much water and it’s too thin, just add a couple more cashews. Pour into a jar, cover and place in the fridge. [/print_this]
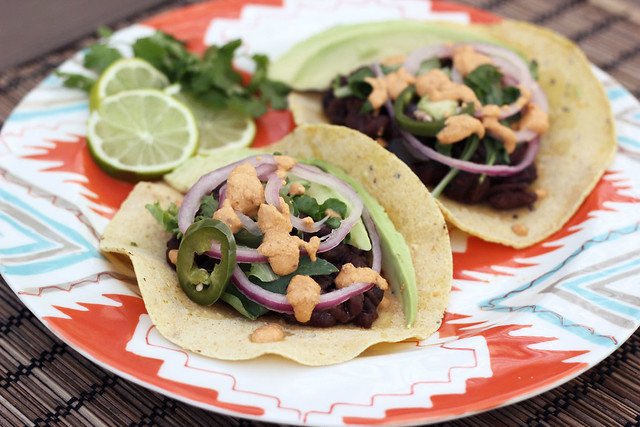
[print_this]Assembling Your Tacos – All The Add-Ons
These are the other ingredients you will need:- Slow Cooked Black Beans (above)
- Pickled Red Onions and Jalapeños (above)
- Chipotle Cream Sauce (above)
- 6-8 Corn Tortillas (more if serving more)
- Organic baby greens, shredded lettuce or cabbage
- fresh cilantro
- lime wedges
Optional:
- sliced avocado
- roasted corn
- pico de gallo, salsa or fresh tomatoes
- Tapatio or Sriracha or other hot sauce
- etc
Assemble. Heat up your corn tortillas. Add the beans, lettuce, pickled onions and jalapeños, cilantro and drizzle the chipotle cream over top. Serve with a fresh lime wedge.[/print_this]
-
Orange Chia Refresher – Gluten-free, Vegan + Sugar-free

For the last 4 weeks, I have been working on a running program. A gradual build-up to a 5K for beginner runners, such as myself. It is an 8 week program, so this week marks the halfway point. So far I am really loving it. First time in my entire life I have tried running and I actually didn’t adamantly HATE it.
I think the biggest difference for me, is with now living here in California, every single run brings the sun shining it’s amazing rays down on me, I am surrounded by the beautiful views of the ocean, lagoon, palm trees, amazing birds, etc. These amazing surroundings has really changed running for me.
That being said, the thing I have found most challenging is being alone with my thoughts. What I enjoy about yoga is with the practice being a moving meditation, it is a wonderful way to get out of my head for a while. I don’t look at yoga as an escape from my life, but a time to acknowledge, express gratitude and strengthen, in more ways then one. I am able to shut off the constant chatter in my head and my inner voice telling me that “I can’t” or “I am not good enough”. Instead I just am. I just do. It is such an amazing thing. Yoga has taught me to not just ignore those thoughts as they arise, but to acknowledge them and the place they are coming from, then set them aside and focus on my breath and being.

With running, I haven’t quite gotten there, yet. However, that is part of what I like about running, the time it gives me to think. To really focus on the things in my head, process them fully without distractions and deal with them in whatever way needed. There are lots of thoughts swirling in my head when I run, good and bad. So different from yoga, but a really nice compliment.
Sometimes I have deep thoughts when running and sometimes I think about food and recipes. The idea for this Orange Chia Refresher came to me during a run and I couldn’t wait to make it and share it with you guys. Based on the response on my Facebook page when I asked who would be interested, you guys couldn’t wait either.
In looking around, I realized I didn’t exactly have some unique idea on my run, I discovered a drink like this has existed in Mexico for a long time. They call it a chia fresca. I don’t recall ever seeing this, but either way I guess it was in my subconscious. This drink could be made with lemon, lime or grapefruit and be just as tasty, plus I bet it would also be amazing with a sparkling water. First time I tried chia seeds in a drink, was in kombucha and I wasn’t a huge fan. However, I do think there were WAY too many seeds in it, so it was super thick and weird. I went light on the seeds with this, but feel free to add as much or as little as you’d like and sweeten according to your own preferences. I find with these measurements, you end up with a delicious water drink that isn’t overwhelmed with seeds and isn’t thick or chunky. I particularly enjoy drinking this with a straw.
Chia seeds are a super food that provides a variety of wonderful health benefits. It a nutshell – by adding just 2 tablespoons of chia seeds to your daily diet it will give you approximately 7 grams of fiber, 4 grams of protein, 205 milligrams of calcium, and a whopping 5 grams of omega-3! OK, I won’t go into a huge rant about all of the many benfits of chia – instead I will ask:
What is your favorite benefit(s) of chia seeds?
[print_this]Orange Chia Refresher – Gluten-free, Vegan + Sugar-free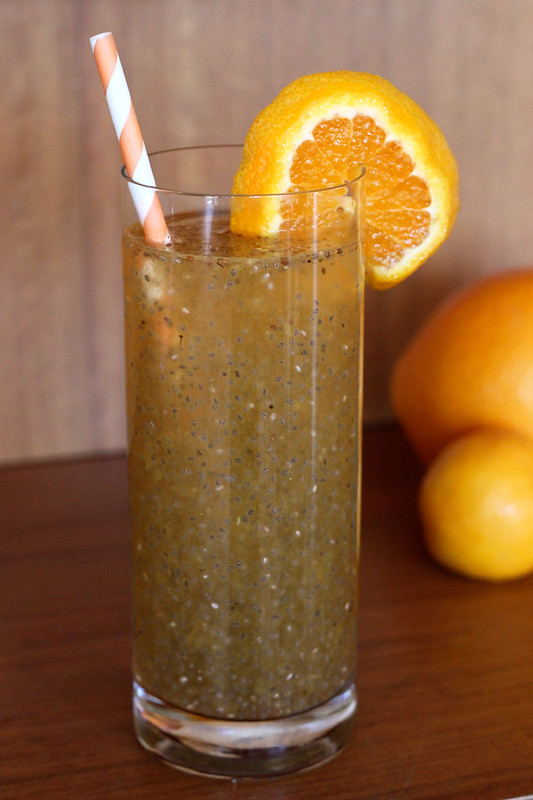
Makes 1 drink- 12 ounces (1 1/12 cups) of cold filtered water
- 1/4 cup freshly squeezed orange juice (grapefruit, lime or lemon would also be amazing)
- 2-3 teaspoons whole chia seeds
- Sweetener to taste (stevia, maple syrup, sugar, etc)
Pour water and orange juice into a glass jar with a lid (or a glass), add the chia seeds. Put the lid on and shake very well to combine (or stir if in a glass). Let stand for 10-15 minutes to let the chia seeds do their thing and get all puffy.
Take a quick sip and add sweetener to taste, shake (or stir) again, well to combine. Add ice and an orange garnish and enjoy.
*Fresher seeds will float throughout the liquid, while older ones tend to sink to the bottom. If they sink, that is totally ok, you will just need to stir them up a bit to keep them evenly dispersed as you are drinking it. [/print_this]
**Please don’t be turned off by the odd color of this drink in the photos, as the seeds soak, settle and swell even more, you will see the pretty and subtle orange hue more than the color of the seeds. I happened to only have black chia seeds on hand, but I bet white seeds would be even prettier.
-
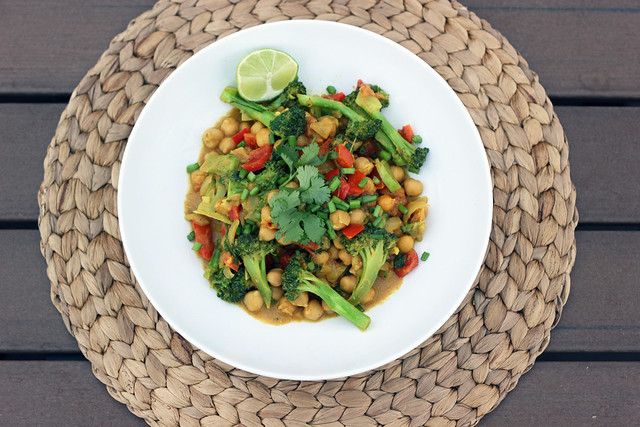
Spring Cleanse – Broccoli and Chickpea Curry – Gluten-free + Vegan

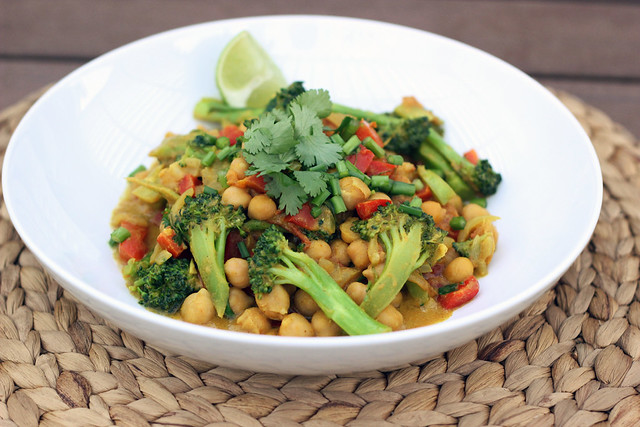
Good morning guys!! Today is day 4 of my 7-Day Cleanse. Yesterday, day 3, was a lot easier than day 2. No more headaches, but I definitely felt pretty tired. I had that delicious creamy green smoothie for breakfast and for lunch I heated up some of the leftover vegetable soup that I had made the night previously for dinner (see my Facebook page for a photo and description of the soup). I decided a curry for dinner sounded perfect. I need you to know that I fought off every single desire to serve this over brown rice, like I was craving. I wanted to keep the first 3-4 days of my cleanse totally grain free, since I am absolutely a carboholic!! Always have been. Honestly, I didn’t miss the rice one bit. Seriously.
This curry is full of flavor and has a very satisfying crunch and texture to it, and it is insanely simple and quick to make. There is so much going on with the different flavors and the creamy curry sauce is so delicious. And look at all of those beautiful colors! What a feast for your eyes and your tummy! I ended up sprinkling some shredded unsweetened coconut on top after I took photos, along with the fresh cilantro and garlic chives and it was amazing. Mark even liked this dish and it is hard to get him to eat anything that even slightly resembles Indian food (after last year’s food poisoning incident at an Indian restaurant in Austin).
FYI – if you prefer to make your own curry spice blend, definitely go for it. I have a premixed blend that I bought at an Asian market and I really love it, so it makes this dish that much easier.
How are you feeling today on Day 4 if you are following along? What have you been eating? Hope you have all been following along on my Facebook page, where I have been sharing what I am eating for each meal.
[print_this]Broccoli and Chickpea Curry – Gluten-free + Vegan
serves 2- 1/2 – 1 tablespoon olive oil (ghee or coconut oil would be great here too)
- 1 small organic onion, diced
- 1/2 large (or 1 small) organic red bell pepper
- 1-inch nub of ginger, peeled and grated
- 1 clove garlic, minced
- 1-2 tablespoon yellow curry powder (I prefer a lot and a lot of heat, so I use 2 TBS +)
- salt to taste
- 1 head organic broccoli, cut into florets
- 1 medium organic tomato, diced
- 1 cup organic chickpeas cooked, you can use canned (BPA free) or if you soak dried beans over night and cook them, those would be even better
- 2 tablespoons (up to 1/4 cup) full-fat organic coconut milk (you can certainly use more, I was just looking to go light)
- 1 lime
- bunch of cilantro
- Green onions or garlic chives
- shredded unsweetened coconut
In a large pan, heat oil. Add onion and bell pepper. Sautee for a couple of minutes until the onion is slightly translucent and both are beginning to get tender, add the ginger and garlic, stir around and cook for about a minute, until fragrant. Add the curry powder and salt to taste. Give everything a good stir to get it all covered in the spices.
Add in the broccoli, sautée/stir fry until tender to your liking. Add in the tomatoes, chickpeas and coconut milk, stir around and let it all simmer for a 5-10 minutes. Just before serving, squeeze in the juice from half the lime and a bunch of cilantro, stir around and taste. Adjust seasonings to your preference.
Serve as is (which is how I ate it) or over brown rice, topped with some fresh cilantro, green onions, a lime wedge and some shredded coconut if you wish (forgot to put it on for the picture, but it sure is good).
* I know it is repetitive on the “organic”, I truly believe it is always good to choose organic, but it is especially important to consume organic produce when cleansing!
[/print_this]
-
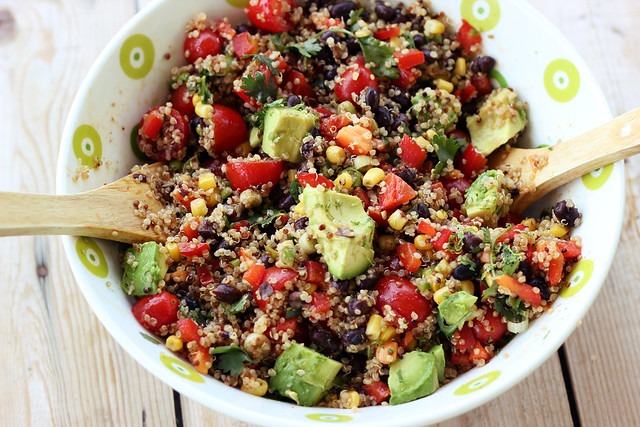
Fiesta Quinoa Salad – Gluten-free + Vegan
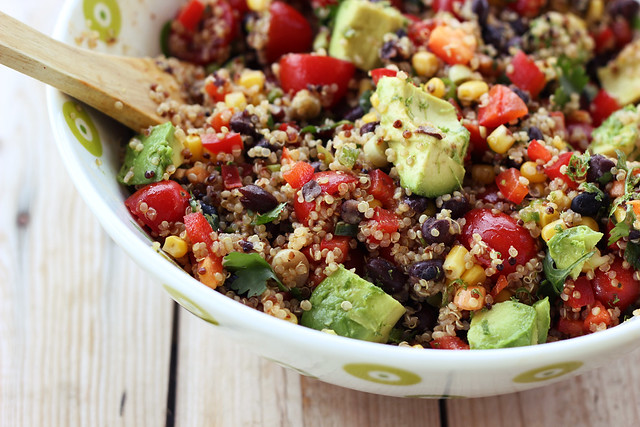
Here is a quick recipe, that I have been meaning to share in full here with you guys for some time now. I made this again this week with the abundance of peppers and tomatoes we have from our CSA. This salad is full of so many of my favorite flavors but even more so, it is so full of beautiful and vibrant colors. A real party in the bowl (hence the name).
I am a big fan of Mexican flavors and spices, they are so bright and intense! If it were up to me, add just a little cilantro and cumin to a dish and you already have a winner, add avocado and now there is no way I would ever turn it down. Speaking of, I have heard that people either love cilantro or absolutely despise it, I just read a quick article the other day that it could be an actual genetic trait. So do you love cilantro or do you hate it?
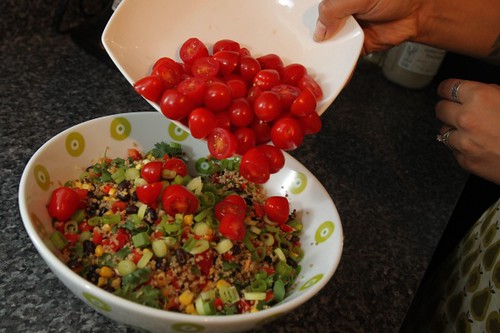
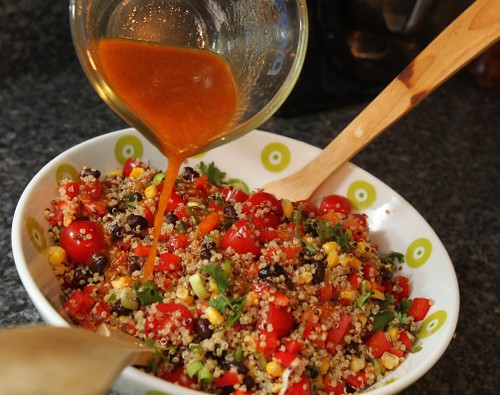
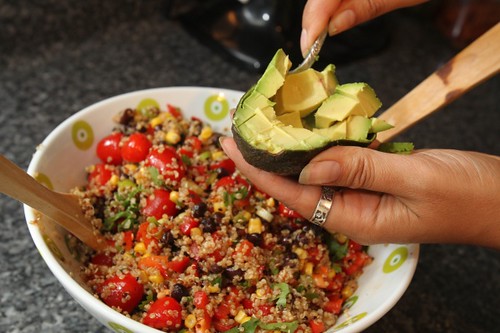
This quinoa salad is one of the recipes I made for my Buffalo News Cook of the Month feature back in July, so I included (above) some of the photos that Sharon Cantillon of the Buffalo News, took while I was preparing this dish. Since I take all of my own photos and really only feature photos of the finished dishes, I thought it would be fun to see some “action” shots. I hope you enjoy.
[print_this]Fiesta Quinoa Salad – Gluten-free + Vegan
serves 6-82 cups cooked quinoa, cooled to room temperature (I used an organic sprouted quinoa trio)
1 red bell pepper, diced
1 jalapeño, finely chopped
1 cup of cooked corn
1 cup black beans
1 pint grape tomatoes, halved
3 fresh scallions, thinly sliced
1/4 cup fresh cilantro, roughly chopped (if you don’t like cilantro, you can use mint instead)
1 avocado, diced
Zest from 1 limeDressing:
1/4 cup olive oil
1 lime, juiced
2 garlic cloves, minced
1/2 teaspoon cumin
1/2 teaspoon chili powder
1/2 teaspoon saltAdd all of the dressing ingredients to a small bowl and whisk very well to combine. Set aside.
Add the cooked (and cooled) quinoa to a large serving bowl. Add everything to the serving bowl with the quinoa, except the avocado. Toss very well to combine.
Give the dressing a quick whisking again to combine and pour it over the salad. Top with avocado and lime zest. You can also add another small handful or two of the fresh scallions and fresh cilantro. Salt and pepper to taste. Serve the salad immediately at room temperature or chilled. [/print_this]
-
Death Of A Matador – Mocktail/Cocktail

This is my final recipe in the 5-part series of summertime cocktails I created for Free People. It has been such a delight creating all of these fun and unique drinks that are equally as delicious without any alcohol. It has also been a fun creative challenge to use ingredients differently than my usual cooking and baking. And of course as with all of my recipes, all of the mocktails that I shared are without any mixes, refined sugar or other processed ingredients, celebrating what is in season now, whenever possible! I hope all of you have enjoyed the drinks as much as I have enjoyed making them.
For this final drink I collaborated with my good friend, Brian Kruglak, for a unique mocktail to end things in style. This drink is a unique blend of so many of my favorite flavors, chipotle, ginger, cucumber, lime and if you are going for a spirited version, chipotle infused blanco tequila. It is refreshing with a little surprise and smoky kick, it really cannot get much better than that.
To read more about this drink that Brian calls, Death of a Matador, and for the full recipe – check out my post on Free People blog. Thanks again to Free People for having me this month, look for me again next month with an all new series of recipes!
Check out the other posts in my summertime mocktail series with Free People: Basil Watermelon Refresher, Blackberry Lavender Lemonade, Banana Piña Colada and Cantaloupe Mocktini/Martini.
-
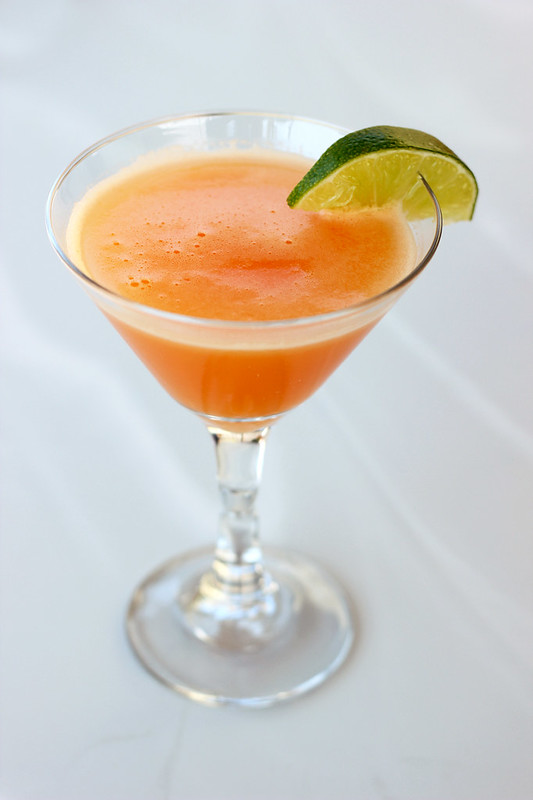
Cantaloupe Mocktini/Martini – Gluten-free, Vegan + Refined Sugar-free
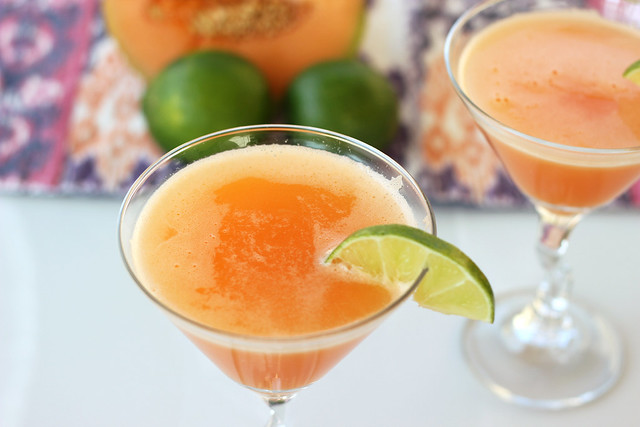
My fourth post in my ongoing series with Free People is now live. This refreshing mocktini/martini recipe features some of the beautiful and sweet cantaloupe we have been getting from our Porter Farms CSA.
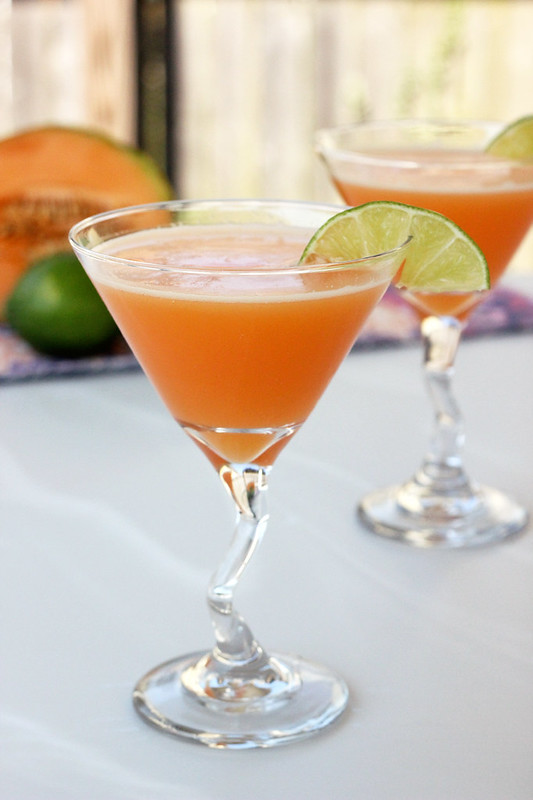
Sweet, smooth and a little tart – this refreshing cantaloupe mocktini is the perfect way to celebrate the summer coming to an end. And of course, if you are looking for a “spirited” version of this drink, there is an option to make this mocktini into a traditional martini.
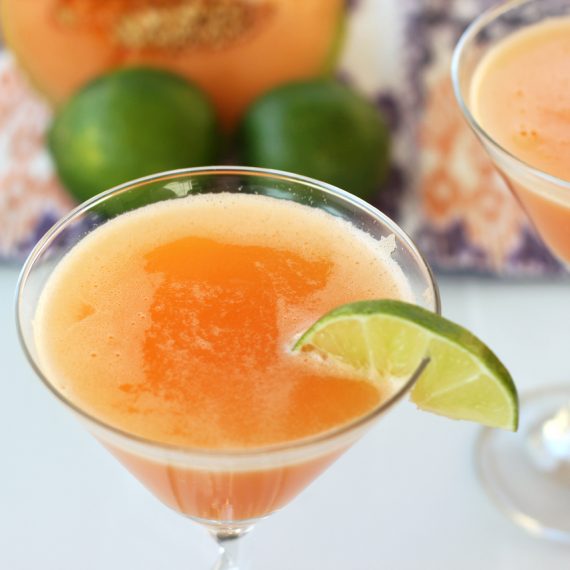
Ingredients
- 1 small cantaloupe or 1/2 of a medium to large one
- ½ cup freshly squeezed lime juice
- 1-2 tablespoons of honey or maple syrup or 7-10 drops of liquid stevia, sweeten to taste with your favorite sweetener, you may need very little depending on how sweet your cantaloupe is
- Approximately 1 cup sparkling water
- Ice
- Optional: To make this a “spirited” martini, add in 4 ounces of vodka and 1 ounce of grand mariner (or triple sec)
Instructions
- Scoop the seeds out and cut the flesh of the cantaloupe into small cubes. Add to the food processor or high speed blender with the lime juice and sweetener of your choice (if necessary). Puree until smooth.
- Pour through a strainer to remove the pulp then fill a cocktail shaker halfway with the cantaloupe juice (you may have to do this in batches depending on the size of your shaker). Add a few ice cubes and shake – this is when you would add your liquor, if you are so inclined.
- Pour into chilled martini glasses, filling about 2/3 of the way full with the cantaloupe mixture and then top with sparkling water. Give it a swirl and serve with a lime garnish.
-
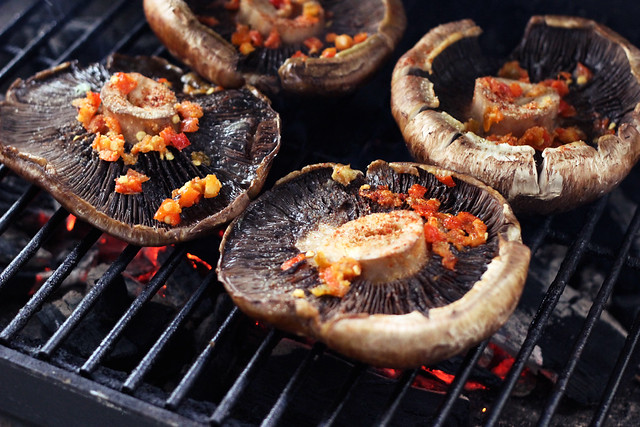
Grilled Portobello Mushroom Tacos with Mango Black Bean Salsa – Gluten-free + Vegan
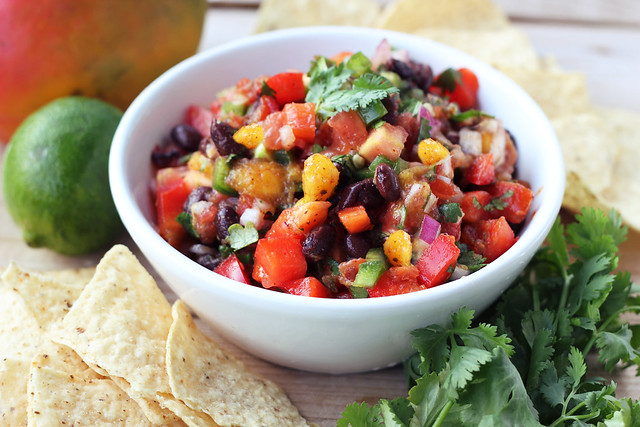
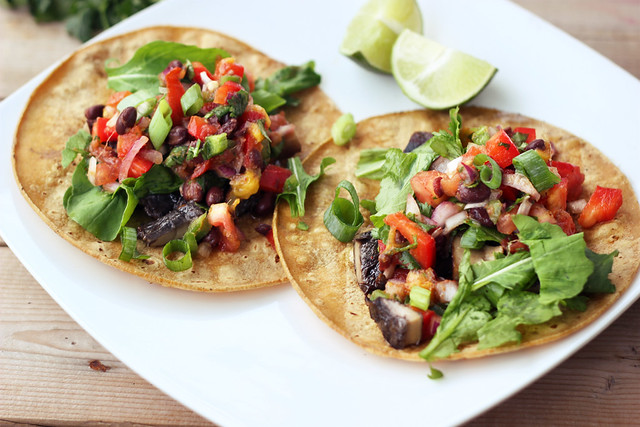
Tuesdays have slowly, inadvertently turned into Taco Tuesdays here at our house. Totally unplanned every week I have been making some type of fun vegan, grilled tacos! This portobello mushroom taco has become a new favorite in our house. Even though we both eat meat (though very rarely), it is always a super welcomed challenge to come up with fun vegan versions of classic meat dishes. In my opinion, portobello mushrooms are better than any creepy overly processed meat alternative on the market. By grilling the portobellos slowly over a smoky charcoal grill, they end up so loaded with flavor, even the most hardcore meat eater couldn’t turn it down.
I keep these fairly simple and they are always a little bit different each time I make them. I have served them with this tangy, sweet and spicy mango black bean salsa, but I have also just used the traditional pico de gallo or salsa verde. I have topped them with baby spinach and tatsoi instead of arugula, and sometimes I add avocado or a drizzle of sriracha, it just depends on what I have on hand and what I feel like. Play with this recipe, add and take away as you’d like, that is one of my favorite things about tacos, they are so versatile and really hard to screw up. This is just a nice, simple recipe to use as a guide.

In keeping with the Taco Tuesday thing we have going on around here, tonight we are having Crock Pot Korean Beef Short Rib Tacos. We have a few servings of short ribs from the 1/4 share of a pasture-raised cow we purchased from our local farmer and I honestly have no clue what to do with them. Now that it is so hot, I have no interest in slow braising them in the oven and turning the house into a sauna, so I thought slow-cooking the short ribs in the crock pot all day will make for a very simple and incredibly delicious dinner (here’s hoping). I plan to make a tangy cabbage and cucumber slaw to serve on top of the tacos and possibly a dairy-free creamy spicy sauce. I have never made anything like this before, so it is an experiment. If it works out, I will definitely make it again to share the recipe. So cross your fingers for me!

Oh and in other news, we finally got the house on the market yesterday morning. I couldn’t be happier to start this process and to begin our journey into the next chapter of our life. Who knows how long it will take before we get to make the move to California, there is so much out of our control and we are OK with it, but it feels good to have accomplished this first major feat towards our new adventure. Hold some positive house-selling thoughts and vibes for us, if you will, we would love if we could move past this part and start this journey, as soon as possible. We are so excited!
[print_this]Grilled Portobello Mushroom Tacos with Mango Black Bean Salsa – Gluten-free + Vegan
serves 2-4Mango Black Bean Salsa
- 1 mango, diced
- 1-2 tomatoes, diced
- 1 red bell pepper, diced
- 1 jalapeño, finely diced
- juice from 1 lime
- 1/4 cup fresh cilantro, roughly chipped
- 1/2 medium red onion, diced
- 1 cup cooked black beans
- 1/2 teaspoon cumin
- 1/2 teaspoon chili powder
- salt and pepper, to taste
Add all of the ingredients to a medium bowl, stir/toss well to combine. Set aside while you make your tacos. Taste again just before serving to see if it needs any additional seasoning.
Grilled Portobello Mushroom Tacos
makes 6-8 tacos- 4 portobello mushrooms
- 1-2 tablespoons hot pepper spread or a teaspoon or two of red pepper flakes (optional)
- 1-2 cloves garlic, finely minced
- 2-4 tablespoons olive oil
- juice from 1/2 lime
- salt and pepper, to taste
- 6-8 corn tortillas (store-bought or you can make your own)
- 3 cups arugula, roughly chopped or torn (or baby spinach or tatsoi, etc)
- 3 or 4 green onions, thinly sliced
- 1/4 cup fresh cilantro, roughly chopped
- fresh lime wedges
Additional topping options:
- avocado
- queso fresco or vegan cheese
- sour cream or vegan sour cream
- tomatoes
- black olives
- radishes
- pickled red onion
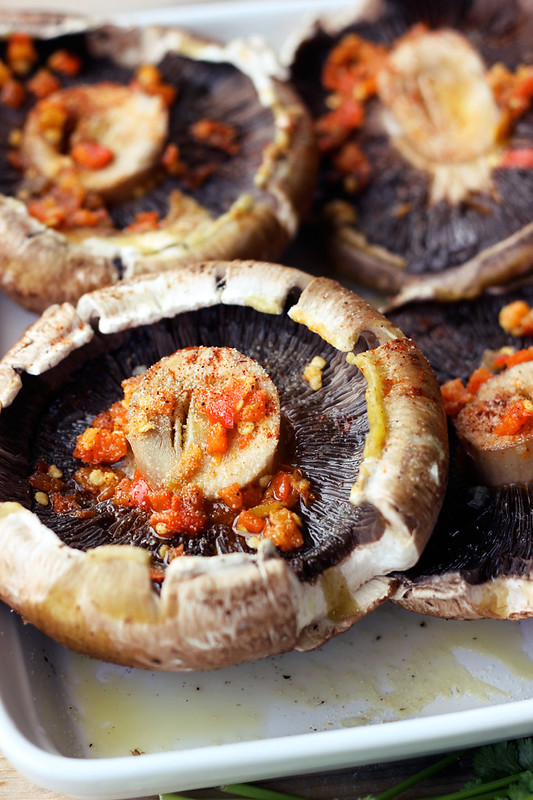
Place the portobello mushrooms stem side up on a plate, drizzle olive oil over both sides of the mushrooms use a brush to evenly disperse, divide the hot pepper spread (or red pepper flakes) and garlic evenly over all 4 mushrooms and salt and pepper, to taste. Squeeze the juice from 1/2 a lime over them all. Set the mushrooms aside to marinate a bit while you preheat your grill. We have a charcoal grill that we burn all natural wood charcoal in. We allow it to heat up for approximately 15 minutes before we start grilling. Once your grill is a medium-high heat, add the mushrooms, stem side facing up and close the lid. Allow the mushrooms to cook for 15-20 minutes or until they are tender and getting some nice browned/blackened grill marks. It may take less time if you have them on a direct flame on a gas grill. Just keep your eye on them, we check ours every 5 or so minutes.
Once the mushrooms are cooked, place them on a plate and allow them to cool enough to cut them into strips or cut into small cubes, whichever you prefer. While the grill is still hot, add your corn tortillas, heat for approximately 30 seconds to 1 minutes per side, until the edges are slightly browned, being careful not to burn them or dry them out.
When you are ready to serve the tacos, top each corn tortilla with grilled portobello mushroom pieces, a small handful of arugula (or green of your choice), fresh cilantro, green onions, the mango black bean salsa and a squeeze or two of fresh lime juice. If you are looking for even more heat, squeeze a little sriracha on top. Our salsa was perfectly spicy, so we didn’t need it.
Have fun with these tacos, add any other toppings that you prefer. [/print_this]
-
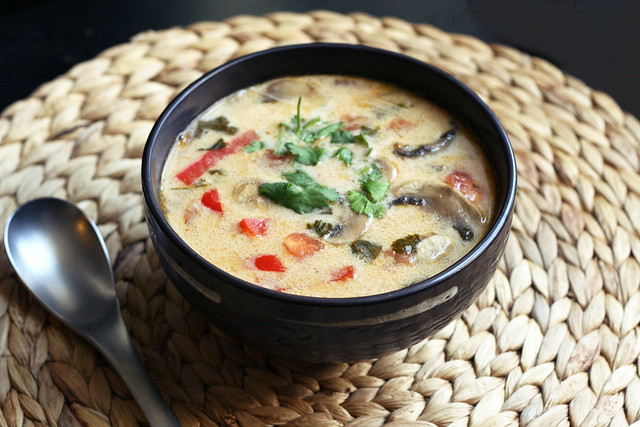
Tom Kha Gai (Thai Coconut Soup) Gluten-free + Dairy-free, w/Vegan options
I am really obsessed with Thai food. I actually crave the flavors of Thai food quite often. Honestly, if we could go out for Thai food once a week, I would be totally content. However, we really try to not eat out very often, and I also really prefer to know what exactly is in my food. So, what better way to get what you want, then to just make it yourself. I started looking around at different authentic Thai recipes online and quickly learned to be able to really get the authentic flavors, I would need the proper ingredients. I planned to make Pad Thai and this Tom Kha Gai Soup over the weekend so I had to get all of my ingredients in order to do so. Seeing as a couple of the ingredients I was looking for didn’t exist in my regular circle of grocery shopping, this meant it was time for an adventure. I found there were two different Asian markets on Niagara Street in Downtown Buffalo, conveniently on my way home from yoga, so Saturday morning after my yoga practice, I took my little list and headed over to Niagara Street, feeling very intimidated.

First up, I stopped at A’Chau Oriental Food Market at 833 Niagara St., this is where I was able to grab most of what I needed to make my Pad Thai and Tom Kha Gai Soup, however they were out of fresh kaffir lime leaves. So, after really walking the aisles and grabbing some things not on my list, I headed over to Niagara Asian Market at 937 Niagara Street, where they had fresh kaffir lime leaves and a HUGE basement full of ingredients. In addition to the things I was looking for, I grabbed a few more that caught my eye. I actually picked up a HUGE 4-lb bag of gram flour aka chickpea flour, for just $4.99. I see lots of soccas in my near future! Both markets had so many ingredients I was already familiar with and so many that I had never heard of. They both had unlimited selections of rice noodles, rice flour, tapioca starches, palm sugar etc, available at very inexpensive prices. I could go nuts in those places for sure.

I also grabbed a bag of these Pandanus flavored Crispy Rolls from India, because they caught my eye only having 6 ingredients, coconut milk, tapioca starch, sesame, sugar, salt and pandanus extract. Naturally gluten-free and vegan, what isn’t to like? To be honest, I didn’t (and still don’t) really have a clue what pandanus is, but I didn’t care, I went for it. Some of the best foods and flavors I have discovered that I love are by completely chancing it and trying something totally new. These crispy rolls are super light and crispy, delicious and very satisfying, I love the crunch and the subtle sweetness. Looks like I will be stopping by these Asian markets a lot more than I had planned.
Once I got the few ingredients I couldn’t easily find – specifically the kaffir lime leaves and the galangal root, making this soup was an breeze. I ended up making it for lunch on Sunday! Tom Kah Gai soup has always been one of my favorites. Even when I know I am going to order some type of noodle dish at a Thai restaurant, which is more than enough food, I always feel obligated to order this soup, just because I don’t know when I will have the opportunity again. Now that I know how easy it is to make, I will just make it at home. The flavors in this soup are intense and so wonderful. The bright fresh flavor from the lemongrass is definitely the star of the show, but you get an equal burst of flavor from the keffir lime leaves. It is amazing what a punch those little guys pack! The galangal also brings a pungent flavor very similar to ginger, spicy with a little bit of bite. A little goes a long way with galangal. If you can’t find it easily, ginger will also work great here. Traditionally this soup is made with homemade chicken stock and along with diced or shredded chicken breast. I didn’t have any homemade stock at home so I went with some high quality organic low sodium chicken broth and skipped out on the meat and tofu. I just wanted to enjoy the best part, the delicious broth! To make this soup vegan you could substitute vegetable broth for the chicken and add in tofu or skip it like I did. It won’t be exactly the same flavor profile of traditional Tom Kha Gai soup, but it will still be absolutely delicious.
I am so glad I made the time to make some Thai food at home and explore the Asian markets. Look for my Pad Thai recipe, very soon! I made that Saturday night and both hubby and I were so excited with how it came out that we didn’t take a minute to stop eating so I could take pictures. Mark has already asked me when I will be making it again, so I should have that recipe up soon! Also, if you enjoy Asian foods of any kind (Thai, Chinese, Vietnamese, Japanese, Indian, etc) and you know of an Asian market in your neighborhood, I highly recommend checking it out.
What is your favorite type of Asian food? Do you have a favorite dish? Have you tried making it at home?

[print_this]Tom Kha Gai (Thai Coconut Soup) Gluten-free + Dairy-free, w/Vegan options
serves 44 cups organic free-range low sodium chicken broth (or vegetable broth)
1 15-ounce can full-fat organic coconut milk
1 stalk lemongrass, cut into 1-inch pieces and pounded to really release the flavors
6 kaffir lime leaves
6 thin slices fresh galangal root (or ginger)
1 cup sliced mushrooms
1 small red bell pepper, thinly sliced
1/2 medium red onion, thinly sliced
3 tablespoons fish sauce (or soy sauce)
2 tablespoons fresh lime juice
1/4 teaspoon chili flakes
1 cup firm tofu, diced (optional, you could also add in chicken or shrimp, etc)
1 tomato, diced
1/4 cup thai basil, roughly chopped (optional)
1/4 cup cilantro, roughly choppedBring the chicken broth to a boil in a large saucepan over a medium-high heat, add in the coconut milk, lemongrass, kaffir lime limes, galangal, mushrooms, bell pepper, red onion, fish sauce, lime juice, chili flakes and optional tofu (or meat or shellfish). Simmer for 15 minutes. Add in the diced tomato and stir. Just before serving add in the thai basil and cilantro. Ladle into bowls and serve immediately, topped with additional chopped cilantro, thai basil and maybe some thinly sliced green onions.
[/print_this]
-
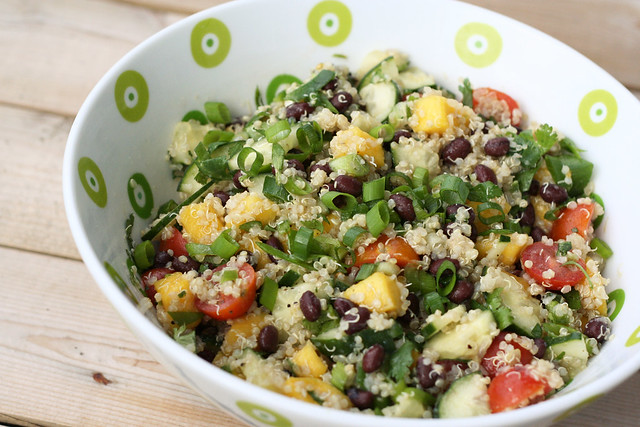
Sprouted Quinoa Salad with Mango, Black Beans and Avocado – Gluten-free + Vegan
Phew! Life has been a bit busy lately. We’re still trying to get caught up on all the work we have going on right now. Between being away from the studio for 2 weeks and with how much client work we have booked, we’ve really been putting in the hours. We also spent the weekend painting the downstairs here at the house, getting it ready to sell. OK, well actually we had a friend here doing most of the painting while we worked on client work, but I helped for a handful of hours on Sunday! We also spoke at the State University at Fredonia on Monday night, to final-year design and print making students, which was really, really fun. On top of all of this, I have been trying to get to yoga every morning for my 90-minute practice. I have had to miss a day here and there, but when life is busy, it is when I need it the most.
The last week and a half actually seems a little bit like a blur. So, I have been trying to sneak time into the kitchen here and there, when I can, but it is proving to be a bit difficult right now. Last week, besides the delicious Baingan Bharta that I made, I made a HUGE pot of vegetable soup and I also made a version of this delicious gluten-free flatbread with roasted vegetables from Karina, the Gluten-Free Goddess. I basically lived off of those meals and that worked fine, but now I am ready for life to calm down a bit, so I can start playing with new recipes!
I am hoping to have some time this weekend to play around with some gluten-free, vegan waffle recipes and I am also thinking of making a fun new dessert treat, similar idea to the coconut dark chocolate treats that I made and everyone has been loving so much! Plus, I have been dreaming of a pie recipe, that I just need to find the time to actually make. So look for those recipes, hopefully really soon, and definitely some others, too.
In the meantime, I made this salad for lunch today and I was really glad that I made the time to do so. It was super simple and a really nice bright and fresh spring meal. I happened to have sprouted quinoa that I had picked up at the market, but any regular quinoa would do. I also ended up topping this salad with avocado when I served it. I forgot about the avocado when I took the photos, but it was a perfect addition. You could also add in some red bell pepper if you have some on hand or fresh corn, etc. If you don’t want a little spice, skip the jalapeño or just start with half of one.
The weather is starting to really warm up here, but more than the temperature, the biggest change in this time of year that I absolutely adore is the sunshine. I miss the sunshine during the winter months and it is my favorite part of the spring. Salads like this feel like the perfect light meal to eat when the sun is shining!
What have you been eating lately? Have you had a lot of time in your kitchen or has life been hectic?
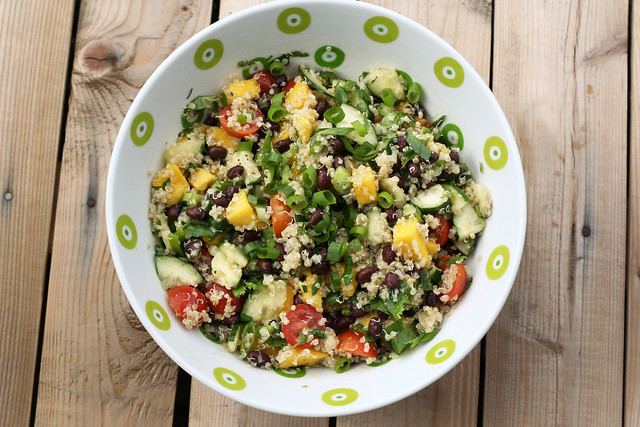
[print_this]Sprouted Quinoa Salad with Mango, Black Beans and Avocado – Gluten-free + Vegan
serves 4-6- 2 cups cooked organic sprouted quinoa
- 1 mango, diced
- 1 cup of canned organic black beans, drained and rinsed
- 1 cucumber, quartered the long way, then sliced
- 1 cup organic cherry tomatoes, halved
- 1 jalapeño, seeds removed, minced
- 3-4 scallions, sliced thinly
- 1/4 cup fresh cilantro, roughly chopped
- 1 avocado, diced
Dressing
- juice from 1 lime
- 2 tablespoons olive oil
- 1 clove garlic, minced
- zest from 1/2 lime
- salt and pepper, to taste
Cook the quinoa according to package directions. After it is cooked, fluff the quinoa with a fork and set aside to cool.
While the quinoa is cooling, mix the dressing in a small bowl, whisk well to combine.Once the quinoa is cooled, toss it with the mango, black beans, cucumber, tomatoes, jalapeño, green onions and cilantro. Drizzle the dressing over top the salad, and toss gently to evenly coat. Salt and pepper to taste.
Serve the salad at room temperature or chilled topped with a small sprinkle of sliced green onions and fresh cilantro, as well as some diced avocado on top, if you wish.
[/print_this]
-
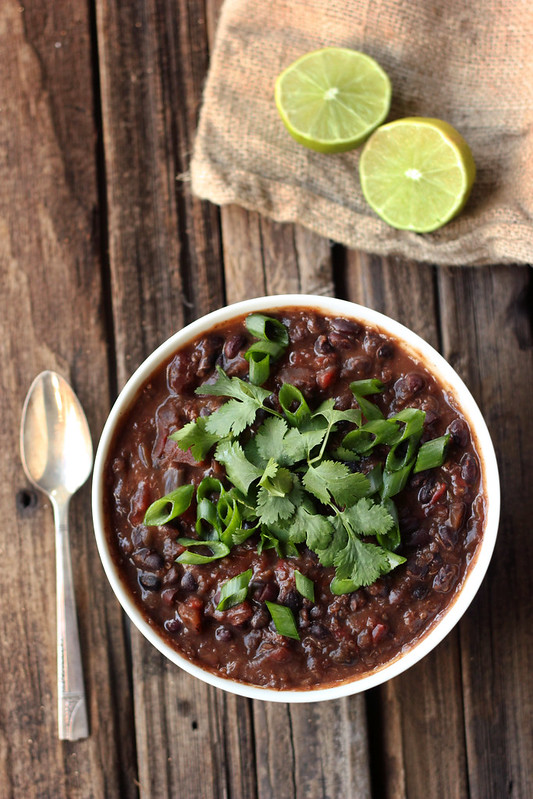
Chipotle Black Bean and Quinoa Crock-Pot Stew – Vegan + Gluten-free
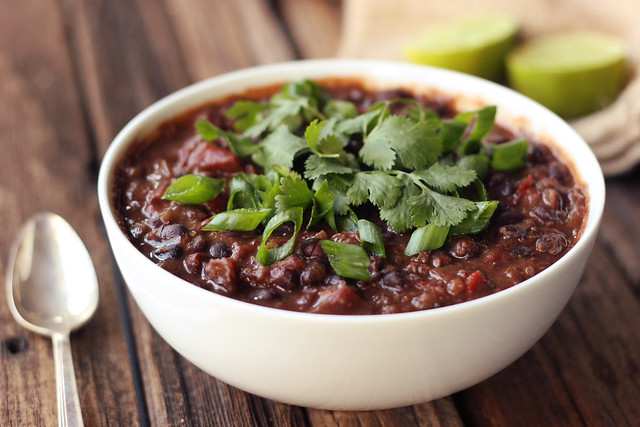
This post will be quick and easy, just like this recipe. Which is exactly what I need right now with everything going on. I made this the other night in an effort to make something hearty, healthy and satisfying without having to spend at least an hour in the kitchen. Since we are getting ready to hit the road this weekend for SXSW in Austin, every minute counts. This is where cooking dinner in a crock-pot comes in. No matter how busy I am though, I insist on eating as healthy as I can, especially at times like this. It is when you need nutritious goodies and healthy energy the most!
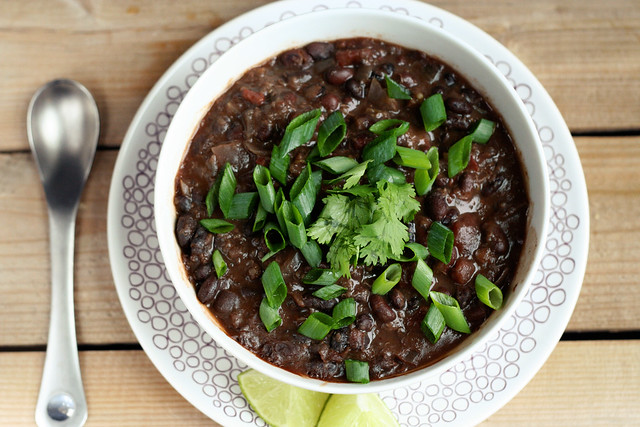
This stew was super easy to toss together and it made the house smell amazing all day long while it cooked. Plus, we’ve been enjoying the leftovers ever since. You can have fun with the toppings on this or keep it as simple as you’d like. Additionally, if you want to saute the veggies first, you can do that too, but I like keeping my crock-pot cooking as easy and quick as I can. After all, that is the entire point of it, in my opinion anyway.
This recipe is similar to my crock pot black bean soup, but I thought leaving the beans whole and adding in the quinoa and diced tomatoes would make it more stew-like and a fun change. The quinoa was a subtle addition but it was nice. I think I could actually get away with adding in 1 full cup, but I didn’t want the quinoa to steal the show! The bonus, this stew is naturally vegan and gluten-free. Feel free to play around with the spices making it to your liking, maybe adding in some cumin or leaving out the cinnamon, etc. Make it your own.
Do you have a favorite crock-pot meal? What do you like most about cooking in a crock-pot or slow-cooker?
[print_this]Chipotle Black Bean and Quinoa Crock-Pot Stew – Vegan + Gluten-free
serves 6-8- 1-2 dried chipotle peppers
- 1lb of dried organic black beans, rinsed and picked over, soaked overnight
- 3/4 cup uncooked quinoa, rinsed and picked over
- 1 28-ounce can organic diced tomatoes
- 1 red onion, diced
- 3 cloves garlic, minced
- 1 green bell pepper, chopped
- 1 red bell pepper, chopped
- 1 dried cinnamon stick
- 2 teaspoons chile powder
- 1 teaspoon coriander powder
- 1/4 cup fresh cilantro
- 7 cups water
- sea salt and pepper, to taste
for topping:
- cilantro
- green onions, thinly sliced
- lime wedges
- avocado
Load all of the ingredients, except the salt, into your slow-cooker, stir to combine. If you wish to saute the onion, garlic and bell pepper first, you can, but I like to make crock-pot cooking as simple and quick as possible. Cook on high for 4 to 6 hours, or on low for 8 to 10 hours, until the black beans are tender. The time to cook the beans can vary based on the strength of your slow cooker and also the freshness of your beans. Add the salt at the very end, as it will affect how the beans cook, if you add it at the beginning.
Remove the chipotles (if you don’t want a mouthful of a whole spicy pepper) and the cinnamon stick before serving. Ladle into bowls and serve topped with fresh cilantro, green onions, a squeeze of fresh lime juice, diced avocado, sour cream, hot sauce, tortilla chips, etc.
PLEASE NOTE:
It seems due to the varying cooking power and strengths of crock pots and other slow cookers, unfortunately the cooking time for the dried beans can vary significantly. For some, this time works great and for others the beans are still crunchy even after 12 hours. If your crock pot is older or is known for not being very strong, I would suggest soaking a bit longer and/or pre-cooking the beans first, before putting them in the crock pot. This time has always worked for me and my crock pot and I have made this recipe many many times. Sadly without being able to test it on other slow cookers, I have know way of knowing how much that time can vary.
Older beans can take longer to cook, so that is also something to keep in mind.
[/print_this]
-
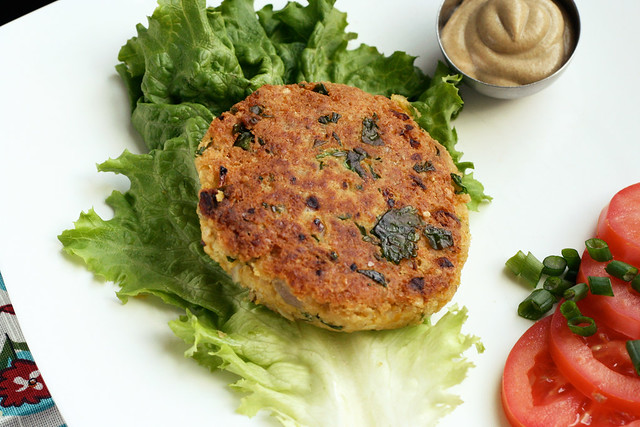
Chickpea and Brown Rice Burgers
This week has been really nice. I am feeling much more like myself, I have been spending time taking the necessary (and long overdue) steps to be as organized and productive as I can (in life and work) and I have actually really been enjoying eating a limited diet.
The only bad thing about this week is that it’s almost over. I cannot believe it is already Thursday night. How did that happen?
Today is day 5 of no dairy (among other things) and I am feeling really good. I stepped on the scale today for the first time since the holidays and my weight was WAY down (like nearly 10lbs)! YAY! A wonderful bonus to healing my grumpy digestive tract, I would say! I have been enjoying piling in the vegetables this week but on Tuesday night I was wanting something a little bit different for dinner than a plate of vegetables, a smoothie or fresh juice. Since the January/February issue of Whole Living features tons (over 50) great cleansing recipes for their New Year’s Action Plan, I knew I would be able to find the perfect starting point recipe that would still adhere to all of my current self-imposed rules!
These burgers jumped out at my instantly. They are so simple, just a few ingredients and with a few tweaks on my end to my tastes, they would be exactly what I was looking for. I served my burger on top of a nice big leafy piece of green lettuce as they suggested, hoping that the raw roughage wouldn’t be too much for me right now, and it wasn’t, which I was definitely pleased about. I served my burger with some roasted cauliflower tossed with steamed baby spinach on the side and it was a nice light dinner! These patties held together very nicely when cooking and had a beautiful crispy and browned outside. The original recipe suggests mashing the chickpeas with the rice by hand, but I just wasn’t getting the consistency I was looking for and I worried they would end up falling apart, so I processed the chickpeas and brown rice and my food processor and I think that was a wise decision. I also went with cilantro instead of the recipe’s suggested parsley, for a brighter and bigger punch of flavor and I added in some lime juice and chile powder. You could certainly add whatever your favorite fresh herbs and spices are, so many different combinations would work in these bugers. The flavors I went with were so perfect together and topping the burger with fresh scallions and dijon mustard was a great way to finish them.
I kept debating adding fresh spinach to these, but I was worried about them staying together, so I figured it was best not to mess with the ratio too much, but I hope to make these again and play with adding either the spinach or shredded carrots or zucchini or something like that, for some extra color and nutrients.
I think you could also make these burgers a bit smaller and make them more of an appetizer than a meal, serving them with a fun dipping sauce.
How has your week been? Has it flown by or carried on very slowly?

Chickpea and Brown Rice Burgers
Adapted from Whole Living Magazine, January/February 2012 Issue
Makes 4 burgers2 cups cooked and drained chickpeas
1 cup cooked brown rice
1 large shallot, minced
1 clove garlic, minced
2 tablespoons chopped fresh cilantro (You could also use parsley, chives or whatever your favorite fresh herb is)
1/2 teaspoon chile powder (I used ground smoked chipotle powder)
2 tablespoons freshly squeeze lime juice
Coarse salt and pepper
1 large farm fresh brown egg, whisked (you could try an egg replacer here, I haven’t yet, but it’s worth a shot)
2 tablespoons olive oil
Whole-grain or Dijon mustard
Tomato, sliced, for garnish
4 green onions, thinly sliced, for garnish
Green-leaf lettuce, for wrappingAdd the chickpeas and brown rice to your food processor and process until a thick paste forms (you can also mash them by hand). Add the mixture to a large mixing bowl. Stir in shallot, garlic, cilantro, chile powder and fresh lime juice. Season with salt and pepper. Stir in the egg. Form into four 1/2-inch-thick patties.
Heat olive oil in a large skillet over a medium-high heat. Add the burgers and cook until golden brown, about 4 to 5 minutes per side. Spread with mustard, top with tomatoes and scallions and wrap in lettuce.
-
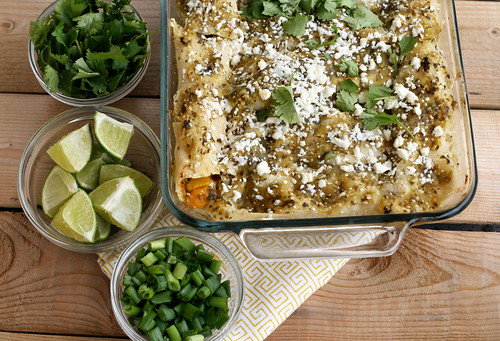
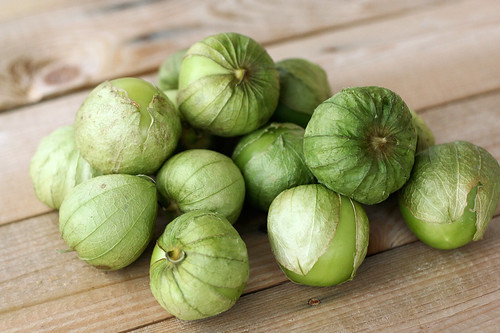
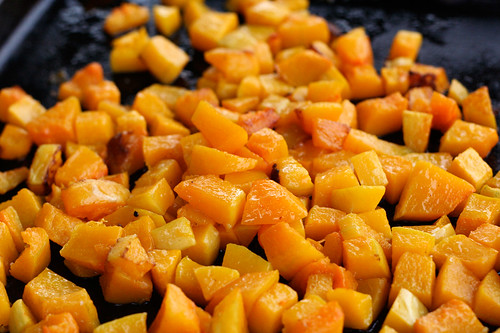
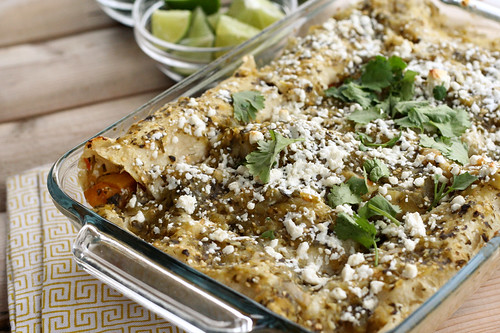
Butternut Squash Enchiladas with Tomatillo Sauce

Having a creative job means that sometimes you just can’t work. I know that sounds like an excuse, but when you are supposed to be creating something and you just don’t have any ideas, it’s quite hard to “work”. I am very lucky that we now work from home, so some days when that “creative block” happens – if I can’t find some silly administrative task like updating our webstore, shooting photos of new products or responding to emails, I can just walk away from my computer and get into any number of different things that are completely unrelated to work, like taking the dog for a walk, heading to a yoga class, watching TV, reading a book or magazine and my most favorite distraction from work… cooking! This week I have been feeling a bit stressed and the ideas just haven’t been flowing as freely. It has been a bit frustrating to say the least. We have a ton of work on the books right now, so it is no time to screw around or to just stare at a blank sketch pad. Wednesday, I decided rather than sitting at my desk with my sketchpad, that I would make our dinner early, so we could enjoy it for lunch and I could take photos when it was freshly cooked instead of trying to shoot them without daylight or shooting the leftovers the next day!
So, I got up at my usual 7am and started prepping the squash and the tomatillos for the sauce. Then I went upstairs for a few hours, it was the perfect boost that I needed and I started working on a poster design that I was stuck on and I made some major headway! It felt great. When lunchtime came, I scooted downstairs, preheated the oven, heated up the sauce and started assembling the enchiladas. I popped them in the oven and went back upstairs to work for a bit. When the buzzer rang, I ran down, took some photos and served my husband and our assistant the best lunch we’ve had since we moved the business home. It was actually really fun to eat a bigger meal in the middle of the day. It felt like the right time to eat that way.
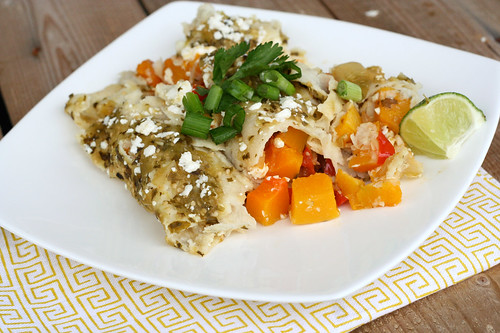
These enchiladas, besides being a burst of beautiful colors, are so full of delicious and bright flavors. The squash has a bit of a rustic nuttiness, the tomatillo has a bright almost citrus flavor to it, with a little bit of heat from the lemon drop peppers I added. I thought about adding black beans inside of the enchiladas, but ended up deciding against it since I thought they would just be bursting open. I think even though it would taste incredible, it would be too many things inside with the big hunks of squash. But I will likely make them that way at some point. I used a simple traditional Mexican crumbly white cheese called queso fresca, it was the perfect compliment and didn’t make the dish too heavy and gooey cheesy, which can be a bit too much for me, sometimes. They were delicious topped with a fresh squeeze of lime juice, fresh green onions and cilantro and a little dollop of organic low-fat sour cream. If you are vegan, you could definitely leave out the cheese or substitute Daiya for the queso fresco. Or if you can’t find queso fresco, you could go with a small amount of good quality sharp cheddar cheese.
I have made homemade tortillas in the past when making enchiladas and it is most definitely worth it, but since I didn’t really have an unlimited amount of time to make these, I decided to go with a high quality corn tortilla from the store. The key to making enchiladas keep their shape, is to steam the tortillas first, otherwise they will break apart a bit. I know this and I steamed mine, but I think they should have been steamed a bit more, some definitely fell apart just a tad when I rolled them up. I decided to just go with it, since I knew it would all taste the same, but some would just fall apart when I served them. Of course, the two that I decided to take a photo of did just that when I served them, but I kinda liked how rustic they looked and I love how you could see the color from the squash exploding out. So I said, screw perfection and just went with it! Life isn’t perfect, I’m not perfect and my enchiladas aren’t perfect – and I am OK with ALL of it! I embrace it.
Yesterday afternoon I had another one of those moments where I hit a creative road-block, for some reason this one hit me harder than ever. I actually felt sad over it and I let it beat me, a bit. I was working on a project that is seemingly very simple and should have an easy solution, but I was struggling. It broke me! I cried. I decided to take a step away “virtually” and move over to another project and then to editing the photos for this post. It definitely helped and today I am looking at it again with fresh eyes and I am ready to tackle it again. So I wanna hear from you….What do you do when you hit a creative roadblock?
Do you find cooking and baking to be a good escape from everyday life and your work or does it stress you out too much?
I’d love to hear your thoughts on how you get through when you are feeling stumped with a problem, creatively or otherwise. Share away!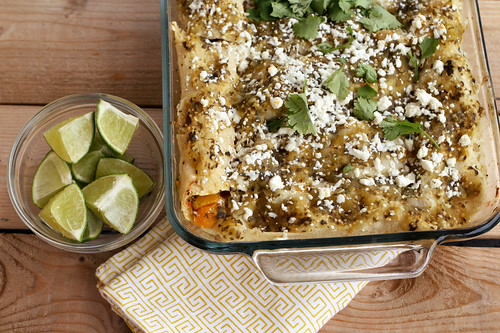
Butternut Squash Enchiladas with Tomatillo Sauce
serves 6Tomatillo Sauce
1 1/2 pounds of fresh whole tomatillos, husked and rinsed
2 hot chiles of your choice, stems removed (I used dried lemon drop peppers from my garden) – you can skip this or just use one if you want it less spicy
enough water to cover the tomatillos
3 whole cloves garlic, peeled
1 handful of fresh cilantro (about 1/4 cup)
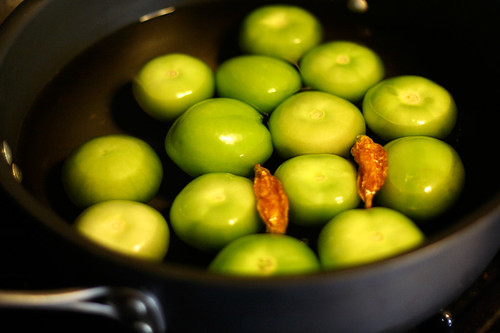
1/2 teaspoon kosher saltAdd your tomatillos and chiles to a large saucepan and cover with water. Bring to a boil over a medium-high heat, then reduce the heat and allow to simmer for approximately 5-7 minutes until the tomatillos are soft but still whole. If they aren’t all totally soft, no worries, still remove them from the heat and drain. Add the tomatillos and chiles to a food processor and add 2 cloves of garlic, fresh cilantro and salt, puree all the ingredients together and set the sauce aside.
Butternut Squash Enchiladas
1 – 2lb butternut squash, peeled, seeded and diced into 1-inch cubes
1 tablespoon plus 1 teaspoon extra virgin olive oil
1 red bell pepper, diced
1 yellow onion, diced
1 large garlic clove, minced
6-8 ounces queso fresco, crumbled (you can skip the cheese or use Daiya to make this vegan) – reserve approximately 1/4 cup for the topping
12 corn tortillasfresh lime wedges
fresh cilantro, roughly chopped
fresh green onions, thinly sliced
organic sour creamPreheat the oven to 400º, place the squash cubes on a rimmed baking sheet toss with 1 tablespoon of the olive oil and place into the oven to roast for 30-40 minutes until tender and lightly browned. Set aside when done.
While the squash is baking, add the onion, garlic, red bell pepper and a dash of salt to the teaspoon of olive oil in a medium pan over a medium-high heat, sauté. Cook for 5-8 minutes until the onion is translucent and both the onion and pepper are tender. Remove the vegetables from the pan and set aside in a bowl.
Use the same pan from the onion and pepper mixture to heat up your tomatillo sauce. Bring it to a simmer over a medium-heat and allow it to heat through and slightly thicken. Just about 5 minutes.
Once the squash is done, you are ready to start assembling your enchiladas.
Start by spooning a small amount of the tomatillo sauce into the bottom of a 9 x 13 inch baking dish (I used an 8.5 x 11 pan and it was a bit crowded, but it worked) – just enough to cover the bottom with a very thin layer.
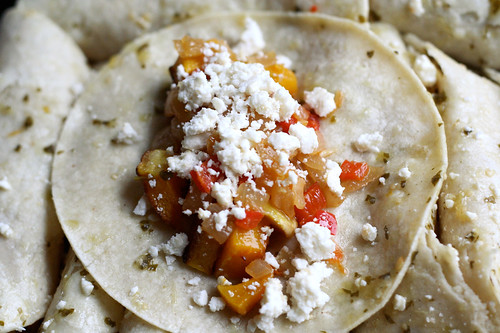
You will need to steam the corn tortillas so that they don’t break when rolled. Moisten two paper towels, working in batches of 3 or 4 tortillas at a time, wrap the tortillas in the damp paper towels and microwave them for approximately 30-45 seconds. Once microwaved, dip each tortilla into the tomatillo sauce, one at a time, making sure both sides get coated in the sauce. Scoop a small amount of butternut squash cubes (probably about 2 tablespoons), the onion and pepper mixture and cheese, keeping in mind how much to use so that you can roll the enchiladas shut and also so you have enough to fill 11 more. Place the enchilada, seam side down, in the baking dish. Repeat until you’ve made as many enchiladas as you want or have filling for (this recipe made 12, with a small amount of squash and pepper mixture leftover).
Spoon the remaining tomatillo sauce overtop all of the enchiladas and top with the remaining 1/4 cup of queso fresco.
Place the pan in the oven and bake for 30-40 minutes until the cheese is slightly melted, golden brown and everything is bubbling. Pull it out of the oven, sprinkle a bit of fresh cilantro on top to make it even prettier and allow it to cool for 5 minutes. Serve your enchiladas warm with fresh cilantro, fresh green onions and a squeeze of fresh lime juice, you can also add a dollop of organic sour cream, if you wish.
-
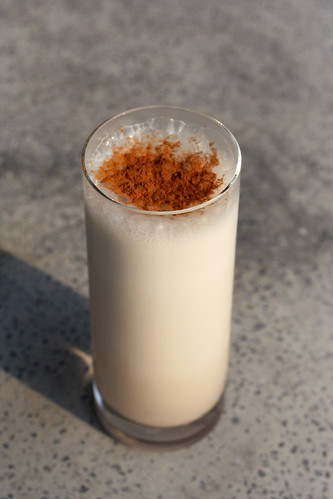
Horchata
It has been a hot summer in Buffalo. One of the hottest that I personally can recall. We’ve been traveling a ton and trying to enjoy every last-minute of the heat and sun while we are in town. We don’t leave again for another month so we hope to get the bikes out a few times, head to the beach and maybe even squeeze in some hiking or camping or something. Now that we are working from home, we really want to take advantage of the summer months while we can and enjoy the beautiful weather, before the snow and cold set in.
One of my favorite things about the short-lived summertime in Buffalo, is playing around with refreshing drink recipes. Admittedly, I planted mint in my yard, just to make mojitos and this summer I even infused my own liquors after reading this article in Bon Appetit magazine. Now that I made my first two batches and they turned out great, I plan to write-up a post about them. Don’t worry though, it isn’t just “adult beverages” I like to create, I love making fresh smoothies in the morning, iced teas, flavored sparkling waters and the like. Naturally, when I came across a post on David Lebovitz’s blog about making homemade horchata, I couldn’t wait to try it. There is nothing better than an ice-cold refreshing glass at an authentic mexican restaurant. OK, so maybe it is a close second to a good margarita, but it’s still incredible. It’s light, full of delicious flavors and it is perfect on ice on a hot summer day. There are few “authentic” Mexican restaurants here in Buffalo, (as far as I am concerned, none of them are authentic) and definitely no taquerias, so the chances of finding horchata here, are slim to none. I usually reserve my mexican indulgences for when we travel, rather than being let down, so when we aren’t traveling and I am craving Mexican, I tackle it myself at home. It isn’t nearly the same, but I still find it to be better than any of the Mexican restaurants here. I make my own tortillas, pico de gallo and guacamole, which is already a step above most places. We are actually having black bean tacos at home this week and I cannot wait.
When I saw how easy this horchata recipe was, I knew that this would be another Mexican treat worth trying at home. It is quite simple, you will spend more time waiting for the rice to soak then all of the prep time combined. You definitely want to make sure you strain in through cheese-cloth so you get all the rice bits, otherwise it will settle to the bottom of the pitcher in the fridge.
In addition to David’s recipe, I also checked out Rick Bayless’ recipe and many others. I came across many variations on the recipe, some include almonds, lime zest, etc. I decided to alter them all slightly and go with my own combination and I was very happy with the results. Oh and definitely try a glass with a shot of good rum stirred in, YUM!
Another fun twist you can take with the horchata is something that I have now learned is called a “Cochata”: Iced Coffee + Horchata. I made this apparently trendy drink in accidental desperation the morning after making the horchata. I wanted an iced coffee and realized after it was poured that we were out of any milk or cream, so I poured in a large glug of the horchata and was instantly in love. You have to try it.
On a side note, I apologize for the lack of posts and recipes on here, we just got home from nearly 2 weeks on the west coast. So I am hoping to get more recipes up here in the next few weeks as we are home for a month straight, finally. It has been a busy summer, full of travel and events, so I am excited to have some time at home.
Horchata
Makes 7 servings
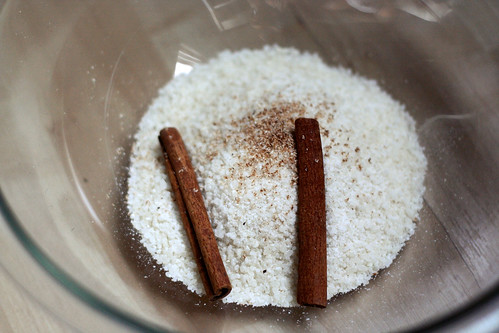
Adapted from recipes from Rick Bayless and David Lebovitz2/3 cup white rice
2 cinnamon sticks
Pinch of freshly ground nutmeg
3 2-inch strips of lime zest (colored rind only) 3/4 inch wide
3 cups of hot water
3/4 – 1 cup sugar
3 cups of cold waterGrind the rice in a blender or spice grinder into fine pieces. Transfer to a medium-sized bowl and add in the cinnamon sticks, nutmeg and lime zest. Stir in 3 cups of hot tap water, cover and let stand at least 6 hours or preferably, overnight.
Remove the cinnamon sticks and pour the mixture into a blender and blend for 3 to 4 minutes, until it no longer feels very gritty. Add 2 cups of water, and then blend for a few seconds more. Set a large sieve over a mixing bowl and line with 3 layers of dampened cheese cloth. Pour in the mixture a little at time, gently stirring to help the liquid pass through. Squeeze the cheese cloth firmly to extract as much of the rice flavor as possible.
Add 1 cup of water and stir in your desired amount of sugar, mix until the sugar is dissolved. Taste, and adjust sweetness, if necessary. If the consistency is too thick, add additional water. Cover and refrigerate until you’re ready to serve. Stir before pouring. Serve over ice with a sprinkling of ground cinnamon on top.


