-
Chilled Avocado & Corn Soup with Cilantro Oil

I don’t always love cold soups, sometimes I find them to be weird or odd. I almost hate the word soup being used at all since once chilled, it is hardly anything close to a classic soup recipe. I had a puree similar to this a couple of years ago at a local restaurant that has since closed, Juniper, and it was super delicious, light and full of flavor. I am obsessed with avocados, so short of sticking a straw directly into an avocado, it really doesn’t get much better than this. I had wanted to recreate that soup for so long, but kept forgetting about it, but I ended up running across the recipe that I pulled to work from, while moving our studio home a few weeks back. I couldn’t wait to try it out.
I knew I would be on my own with this one though, Mark refuses to try cold soups, he thinks they are “stupid”, haha. So on a work day a week or so ago, I prepped the soup and oil during my lunch time break and allowed everything to cool the rest of the day, while I worked. It was such a nice treat on a hot day where I didn’t feel like cooking. I have also been getting to a ton of yoga classes every week, so this was perfect the following day after a hot and sweaty yoga class. This soup has all the flavorings of a great guacamole recipe in each spoonful. It’s refreshing but adequately filling. The cilantro oil drizzled on top is loaded with a beautiful, fresh, clean finishing flavor and I especially love the subtle heat from the poblano pepper. I went pretty light on the sour cream, as it really didn’t need much, but a small drizzle was nice, especially in contrast to the heat from the pepper. If you love avocado as much as I do, I know you will love this soup. I served it with a handful of organic corn tortilla chips on the side, which ended up being delicious dipped right into the soup. Obviously if you are vegan, simply skip the sour cream or crema at the end and you have a beautiful, tasty vegan dish.
Chilled Avocado & Corn Soup with Cilantro Oil
serves 4-6
adapted from Gourmet Magazine, May 20052 fresh or frozen ears of corn, shucked
4 cups plus 2 tablespoons water
1 garlic clove, smashed
1 1/2 teaspoons salt
1 1/4 cups chopped white onion
1 fresh poblano pepper, stemmed and coarsely chopped (including seeds)
3 firm-ripe California avocados
3 tablespoons fresh lime juice
1/4 cup crema or sour creamFor cilantro oil
1 cup coarsely chopped fresh cilantro
1/4 cup olive oil
1/2 teaspoon saltMake soup:
Roast ears of corn on rack of gas burner over high heat, turning occasionally with tongs, until kernels are charred in spots, 4 to 5 minutes. (Alternatively, heat a dry well-seasoned cast-iron skillet and roast corn over moderately high heat, turning occasionally, about 10 minutes.) Transfer the ears of corn to a cutting board and, when cool enough to handle, cut kernels from cobs with a sharp knife, then cut cobs into thirds.
Bring kernels, cob pieces, 4 cups water, garlic, salt, and 1/2 cup onion to a boil in a 3-quart saucepan and boil until liquid is reduced to about 3 cups, about 20 minutes. Remove from heat and cool, uncovered. Discard cob pieces.
Purée corn mixture along with the poblano pepper and remaining 3/4 cup onion in a blender, then pour through a fine-mesh sieve into a bowl, pressing hard on and then discarding solids. Return broth to cleaned blender.
Quarter, pit, and peel 2 avocados, then add to blender with 2 tablespoons lime juice and purée until smooth. Transfer soup to a bowl and cover surface with plastic wrap. Cover bowl with plastic wrap and chill soup at least 1 hour.Prepare cilantro oil while soup chills:
Purée cilantro, oil, and salt in cleaned blender, scraping down sides of blender several times. Pour oil into cleaned fine-mesh sieve set over a bowl and let drain 15-20 minutes (do not press on solids). Discard solids.Assemble soup:
Halve and pit remaining avocado and cut into 1-inch cubes, toss gently with remaining tablespoon lime juice in a bowl.
Whisk together crema or sour cream and remaining 2 tablespoons water in a small bowl until smooth.
Season soup with salt and ladle into 4-6 soup bowls. Divide avocado chunks among bowls, then drizzle with crema and cilantro oil.Notes:
Soup can be chilled up to 1 day ahead.
Cilantro oil can be made 3 hours ahead and chilled, covered.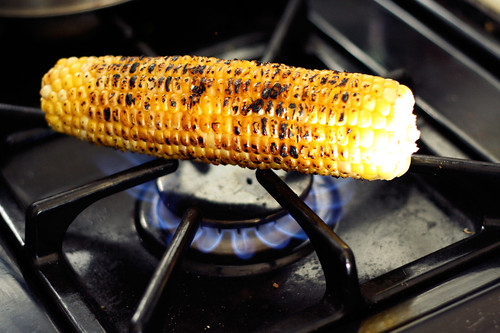
-
Thai Chicken Soup
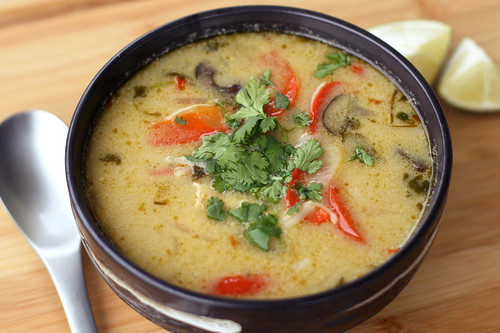
I absolutely love Thai food! The layers of flavors and the spices are so amazing and there are so many naturally gluten-free options. One of my favorite things are the different soups. The flavors are always so distinct in Thai soups from the curry pastes, lemongrass, ginger, cilantro, etc. I have wanted to try making a Thai coconut milk soup at home with all the fresh herbs and spices. With the lingering chilly weather, last week was the perfect time. The original recipe I found was a bit basic, so I added in mushrooms, fresh ginger, fresh lemongrass and jarred kaffir lime leaves (which I was very excited to finally find), I also went with a light coconut milk instead of the full fat version and I used more of it, I find it is still quite creamy and it has a bit less fat and calories. I also added a bit more broth, curry paste, fish sauce and noodles so I would have more leftovers for lunches and dinners on some of the busy nights we have this week. Don’t worry if you can’t find lemongrass or the kaffir lime leaves, the soup will still be really great even without them. The curry paste really has a lot of flavor. I just find that adding those extra fresh ingredients makes this soup more authentic. I know from eating a lot of Thai food that lemongrass can be a bit annoying to eat, since they are a bit tough to chew, so I decided to cut the stalk in large pieces so that I could easily pull them out just before serving.
Since we normally buy whole chickens from the farm we get all of our meat from, I just grabbed two organic chicken breasts from Wegmans, I honestly can’t tell you the last time I bought meat from the grocery store. Thankfully Wegmans has a great selection of organic and grass-fed meats, though it just isn’t the same as getting it from a local farm. You could also roast a whole chicken or buy a rotisserie chicken and shred some of the cooked chicken and add it in to the soup at the end. This soup could also easily be made vegetarian/vegan with vegetable broth and by skipping the chicken or you could make a seafood version and add shrimp or scallops.
Serve the soup with lime wedges and maybe even a little Sriracha if you want a bit more heat. Enjoy, this soup really is incredible.
Thai Chicken Soup
serves 6
loosely adapted from Food Network Magazine1 tablespoon olive oil
1/2 lb of sliced mushrooms (I used baby bellas)
1 onion, thinly sliced
2 cloves garlic, minced
1 tablespoon fresh ginger, peeled and chopped finely
1 stalk fresh lemongrass, cut into 1-inch pieces
4 tablespoons green curry paste (If you don’t like spicy, start with 2 and go from there. It seems some curry pastes are spicier than others)
8 cups low-sodium organic chicken broth
2 15-ounce cans organic lite coconut milk
2 tablespoons fish sauce, plus more to taste
2 red bell peppers, thinly sliced
6 ounces thin rice noodles, broken into pieces
2 small skinless, boneless chicken breasts preferably local and hormone and antibiotic free (about 1 pound), very thinly sliced crosswise
1 tablespoon fresh lime juice, plus more to taste
1 tablespoon kaffir lime leaves (I used were jarred, you can also find them fresh or frozen, use about 3 or 4 leaves)
1 cup roughly chopped fresh cilantroHeat the oil in a large pot over medium-high heat. Add the mushrooms and cook, stirring often until they begin to soften and get a bit brown, about 5-7 minutes. Remove the mushrooms and set aside. Add a bit more oil if you need it and add the onion to the pot over medium-high heat and cook, stirring occasionally, until softened and lightly browned, about 8 minutes. Add the garlic, ginger, lemongrass and curry paste, cook, stirring, 1 to 2 minutes. Add the chicken broth, coconut milk and fish sauce; cover and bring to a boil.
Add the mushrooms, bell peppers and noodles and simmer, uncovered, until the noodles are al dente, about 3 minutes. Add the chicken and simmer until just cooked through, about 3-5 more minutes. Stir in the lime juice, kaffir lime leaves and cilantro. Remove the chunks of lemongrass just before serving. Add more fish sauce and lime juice, if desired.
-
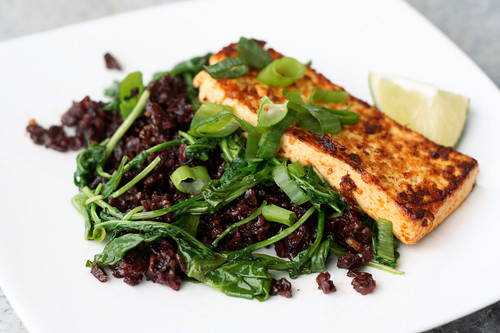
Fried Black Rice with Ginger Tofu and Baby Arugula
I came across this recipe in a recent issue of Whole Living and couldn’t wait to make it. I love black rice so much, it is full of flavor. I always keep a pound or two of Black Japonica in the pantry, a unique field blend of medium grain black and short grain mahogany rice. It’s so nutty and sweet, perfect in many different dishes.
This recipe is so healthy and fresh, simple to make and full of so many flavors. The original recipe called for spinach but since I still had some baby arugula on hand, I figured that would work just as well. I was pleasantly surprised how much more delicious the rice was after frying it up in the pan, it grabbed all the little bits of ginger and garlic and the Sriracha left in the pan from the tofu. The tofu had a nice crisp outside and it was full of flavor from the ginger and Sriracha and the arugula brought a beautiful peppery crunch. I hope to plan spinach and/or arugula in our garden this year so I have a feeling we’ll be eating this dish a lot this summer.
Fried Black Rice With Ginger Tofu and Baby Arugula
Adapted from Whole Living, March 2011
Serves 4-63/4 cup black rice (I used a blend of black and mahogany rices)
1 1/2 cups water
1 bunch organic baby arugula, rinsed and roughly chopped (spinach will work here, too)
3 tablespoons olive oil
2 cloves garlic, minced
3 tablespoons finely chopped fresh ginger
3 scallions, thinly sliced, white and green parts separated
1 pound extra-firm tofu, cut into six 1/2-inch-thick rectangles
2 tablespoons Sriracha sauce
Lime wedges, for servingBring rice and water to a boil in a small saucepan. Reduce to a simmer, cover, and cook until rice is tender and liquid is absorbed, about 45 minutes. Let stand 5 minutes. Fluff with a fork and set aside.
Steam baby arugula, covered, in 1 tablespoon oil over medium-high heat for 2 minutes; set aside. Saute garlic, ginger, and scallion whites in remaining oil until fragrant, about 1 minute. Add tofu and Sriracha and cook until tofu is golden, about 6 minutes per side. Remove and set aside.
Add rice to skillet and cook over medium-high heat until crisp, about 2 minutes. Serve with baby arugula and tofu. Garnish with scallion greens and serve with lime. Add more Sriracha when serving, if you like.
-
Chipotle Potato Soup with Bell Pepper Salsa

There is something about a creamy and spicy soup that just warms your tummy and your soul. It is still bitter cold here in Buffalo and I am trying to look on the bright side of this brutal winter, by enjoying that I can still cook hearty and hot, wintry dinners. I know soon when the warm weather is upon us, I will miss the hot soups and stews, one of my favorite things about the winter months.
This soup brings a nice kick of smokey spice from the chipotles, it’s comforting, thick and creamy, three things that just really make winter dinner satisfying, to me. The great thing about this soup and the fact that most of the creaminess comes from blending the potatoes, is that it can easily be made vegan. Go with vegetable stock over chicken and you can either skip the milk altogether or use a non-dairy milk like plain unsweetened almond, rice or soy milk. Then just skip the cheese or top with your favorite vegan cheese. I used local, pasture-raised whole milk that we bought at Farmers and Artisans, one of the few milks I have ever tasted that is actually good enough to enjoy a glass of (in my opinion). There is only a cup of milk and a cup of cheese in the entire pot of soup, so don’t even feel the littlest bit guilty about it. On the other hand, if you have no guilt and really want to indulge, you could go with a cup of heavy cream instead of milk and maybe even some crispy bacon on top, why not right? Either way, before the warm weather shows itself again, you need to make a pot of this soup and not only remember, but enjoy the lovely things about the winter that we will all surely miss in the heat of July or August. Trust me, we all miss it, even just a little.
Chipotle Potato Soup with Bell Pepper Salsa
serves 8Bell Pepper Salsa
1/2 red bell pepper, seeded and diced
1/2 orange bell pepper, seeded and diced
1/4 cup fresh cilantro, chopped
1 1/2 tablespoons chopped red onion
Juice from 1 lime
Kosher salt , to tasteIn small bowl, mix together bell peppers, cilantro and onion. Squeeze lime over. Gently stir to combine. Season to taste with salt. Set aside.
Chipotle Potato Soup
2 1/2 – 3 lbs red potatoes, peeled and cut into 2 inch cubes
1 onion, roughly chopped
2 large cloves garlic, minced
1/2 red bell pepper, seeded and diced
1/2 orange bell pepper, seeded and diced
2 tablespoons olive oil
3 tablespoons chipotle chiles in adobo sauce (this soup is spicy, go with less chipotles if you don’t want all the heat, you can always add in more)
6 cups low-sodium vegetable stock or chicken stock
1 cup organic whole milk (you can either skip the milk and add an extra cup of stock or use a non-dairy milk and skip the cheese, to make this soup vegan)
1 teaspoon ground chili powder
1 cup grated extra-sharp cheddar cheese, plus additional for garnish
kosher salt, to taste
fresh ground black pepper, to tasteIn a large pan of salted water over high-heat, bring the potatoes to a boil and then drop the heat to simmer and cook for approximately 20 minutes, until potatoes are soft. Drain.
In a large stock pot, over high heat, sauté onion, bell peppers and garlic in olive oil for 2 minutes, add the chipotle chiles and the chili powder. Lower heat to medium; continue cooking until the onions are soft and translucent, approximately 5 minutes.
Add the potatoes, stock and milk (if you are using it) to the stock pot. Bring to gentle boil. Reduce the heat to low and simmer 10-15 minutes. Turn off heat and let the soup cool about 5 minutes.
Purée with immersion blender or in batches using a regular blender*, until smooth, gradually adding cheese. Season to taste with kosher salt and pepper. Ladle the soup in large serving bowls and top with shredded cheese and the bell pepper salsa.
* When blending hot soup in a blender, do so in small batches, filling the blender pitcher only about halfway. Put the lid on, but remove that small cap in the lid (if you have it) and hold the lid down tight with a towel, otherwise the steam will cause the lid to explode off, spewing hot liquid everywhere. This has never happened to me, but it can, so be careful.
-
Sweet Potato and Black Bean Stew
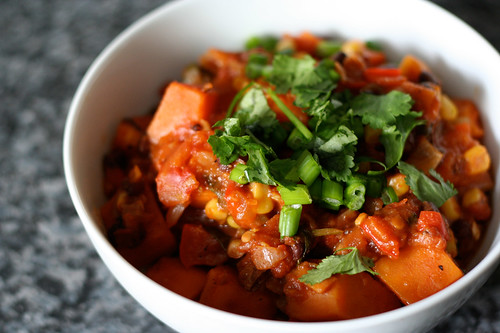
This is what winter is all about – spicy, hearty and healthy! This was a delicious one-pot dinner for a very frigid winter night. I made this for dinner on the second to last day of my cleanse and it was hard to believe this was not only healthy, but cleanse-friendly. I had been avoiding corn throughout my entire cleanse, though I just couldn’t resist adding it to this stew, not only for taste, but for the lovely “pop” of the bright sunshine color in an already beautiful dish. Though this dish is vegan, it would satisfy the most ravenous of meat eaters, Mark was raving about it, which can be hard to get him to do sometimes without meat. It is reminiscent of chili but is a combination of flavors unlike any chili I have ever had. The subtle sweetness from the sweet potatoes is so perfectly unexpected. I personally love spicy, so I kept the seeds in on both the jalapeño and chipotle pepper, this stew had a pretty nice kick to it. If you don’t like spicy, you can certainly choose one over the other on the spicy peppers or leave out the seeds. The splash of fresh lime juice is such a perfect compliment to all the flavors and really brings a nice brightness to the dish. If you don’t like black beans or don’t have any on hand, so many other beans would work well in this dish, kidney, pinto, navy, etc. I also think this stew would be great with butternut squash or pumpkin, as well. If you aren’t vegan or on a cleanse and you love your cheese, grate some nice extra-sharp cheddar cheese on top of this stew when you serve it. It would be incredible. Avocado or sour cream would also be great on top. And, if you really like the heat, a few squirts of your favorite hot sauce when serving, would give you another kick of spice. Please do yourself and make this super easy and hearty stew before winter is over and you regret it.
Sweet Potato and Black Bean Stew
serves 62 tablespoons olive oil
3 small-medium organic sweet potatoes, peeled and chopped into 1-inch cubes (you basically want about 1 1/2 pounds of sweet potato)
2 small onions, peeled and roughly diced
2 cloves garlic, minced
1 red bell pepper, seeds removed and chopped into 1/2-inch pieces
1 jalapeño, diced (I left the seeds in, I like spicy, take them out if you don’t)
2 teaspoons chili powder
1 1/2 teaspoons cumin
1 teaspoon kosher salt
1 dried chipotle pepper, roughly chopped, again seeds left in
3 cups organic low sodium vegetable broth
1 – 15 ounce can organic black beans, no salt added, rinsed and drained
1 – 28 ounce can diced organic fire-roasted tomatoes
1 1/2 cups frozen organic sweet corn
1/2 cup fresh cilantro, chopped, plus more for serving
1/4 cup freshly squeezed lime juice, plus more for serving
3 green onions, thinly slicedHeat olive oil in a large stock pot over medium-high heat. Add sweet potatoes, onion, garlic, red pepper and jalapeño, stir well to coat. Sauté until onion and peppers are slightly soft, about 5-7 minutes. Add in the chili powder, cumin, salt, and chopped chipotle pepper, still well to combine. Add in the vegetable broth, black beans and diced tomatoes (including all the juice in the can). Bring the stew to a boil, stirring well to combine all the ingredients and remove any stuck bits or spices at the bottom of the pot, reduce the heat to a simmer, add in the frozen corn and allow it to cook 15-20 minutes longer or until the sweet potatoes are fork-tender.
Just before serving add the fresh cilantro and lime juice to the stew, season to taste with salt and pepper. Serve in large soup bowls, top with a bit more fresh cilantro and green onions, you can add an additional squeeze of lime, if desired. Enjoy.
-
Sweet Potato with Pomegranate, Coconut and Lime
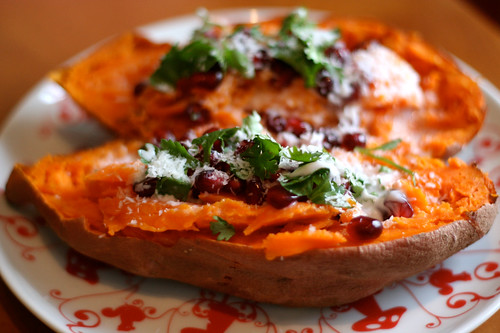
This was today’s lunch and wow what a treat. I almost always bring lunch to work, usually leftovers from whatever I had made the night prior or a simple salad, etc. Today I decided to try something a little different. It required a bit more planning and assembling, but it was definitely worth the extra work. I deseeded the pomegranate at home and premeasured out the coconut milk, shredded coconut and cilantro. I packed those up with a whole lime, a raw sweet potato, a nice plate and a fork and knife. When lunch rolled around, I pierced the potato and tossed it in the microwave, when it was cooked I just topped it with all the goodies and enjoyed it! It was pretty nice for a lunch at the studio and it felt good to eat off a real porcelain plate with real silverware, and on top of all of this, it was absolutely delicious. Far better than I could have imagined. I am not always a fan of fruit with savory dishes, but there are many exceptions to this and more often than not lately, I find I end up liking the fruit and can’t imagine the dish without it. This is how the pomegranate seeds were for me in this dish, I was a little unsure but very excited to try it out. They were perfect, so bright and so much flavor. The coconut taste was perfect and the lime and cilantro finished it all off very nicely. You could easily make 4 of these for a delicious side-dish for dinner.
For cleanse day 3, I have to say I am eating really well and I don’t feel deprived of a thing. I am already feeling less weighed down and sluggish, too. I am so glad I decided to do this cleanse. I have been trying to really experiment with new things on this cleanse and today (admittedly) was the first time I ever deseeded a pomegranate. Not sure why I never have before, I guess because I thought I didn’t know how. It was simple and now I will be buying them all the time since they are in season.
Sweet Potato with Pomegranate, Coconut and Lime
Serves 1
1 sweet potato
2 tablespoons organic coconut milk
2 tablespoons unsweetened organic coconut, shredded
1 tablespoon chopped cilantro
1/4 cup pomegranate seeds
Fresh lime juice from half a limeBaking the sweet potato in the oven: Preheat oven to 400º. Pierce the sweet potato all over with a fork, place on a baking sheet and bake until tender, approximately 35-45 minutes. Let cool slightly.
Baking the sweet potato in the microwave: Prick the potato in 5 or 6 places with a fork. Place on microwave safe plate and microwave on high for 6 minutes, turn over and microwave another 6 minutes. Let cool slightly. (time will vary based on your microwave oven and the size of the potato)
Slice the potato in half and slightly mash with a fork. Top with coconut milk, shredded coconut, chopped cilantro, and pomegranate seeds. Squeeze lime juice over top. You can add a light sprinkle of kosher salt if you wish (I left this off since I am on a cleanse).
-
Roasted Spiced Chickpeas

I like salty snacks. Many people crave sweets, but I crave salty, crunchiness. There is nothing like a good quality crispy potato chip (the kettle cooked are the best). Since I try not to eat that stuff these days, I am always looking for a healthy alternative. Spicy and/or salty nuts are always great, but I get bored with nuts. These roasted chickpeas are just as delicious as any potato chip or nut (if not more) and they have the perfect amount of crunch. The perfect toss in your mouth snack, great with cocktails and beers. I could sit down and eat so many of these. It’s nice they are so low in calories and they are a great source of fiber. I decided to make a big tray of these to have around during the holidays since the nibbling and munching is so much more prevalent this time of year. Now when I have that urge, I can just grab a handful of these and be totally satisfied.
You can play around with spices and flavors on these, there are so many possibilities. Curry flavors would be great, as would garlic and rosemary, cinnamon and honey, wasabi and soy, sage and garlic, etc. etc. etc. The combinations really are endless. Have fun and if you are like me, once you’ve made these, you will always want to have them on hand. I plan to have a batch of these in the pantry at all times, they are a great healthy snack option for us salty craving nibblers.
Roasted Spiced Chickpeas
makes about 4 cups1 – 25 ounce can organic chickpeas
1 tablespoon olive oil
1/2 teaspoon black and red pepper mix (I used a mix of Tellicherry black pepper and hot cayenne red pepper)
1/2 teaspoon kosher salt
juice from 1-2 limesPreheat the oven to 400º F.
Pour the chickpeas in a colander, rinse with running water, drain very well and pat dry. Toss the chickpeas in the olive oil, pepper mix, salt and lime juice. Make sure they are well coated.
Spread the chickpeas out evenly on a large baking sheet. Roast for 30-40 minutes or until browned and crispy. Turn and toss with a spatula every 10 minutes so they don’t burn or stick. Taste and add more salt or peppers if needed.
Serve warm or let cool.

-
Cilantro Lime Sweet Potatoes with Honey
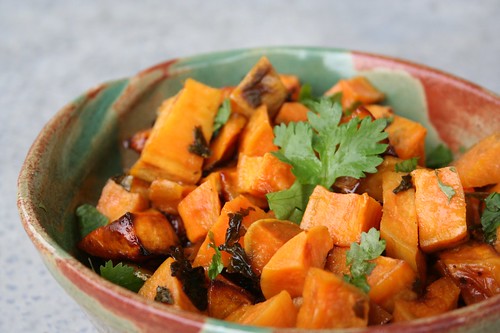
This is a lovely Autumn recipe that my good friend April shared with me years ago. It is a staple in our house once the cooler weather hits, perfect with so many meals. It is super easy to throw together and it’s very tasty. The sweetness from the honey, the salt and the tang from the lime all match-up so perfectly, then the distinct flavor from the cilantro finishes it off so nicely. If you are vegan and want to skip the honey, a nice organic brown sugar would be nice, too.
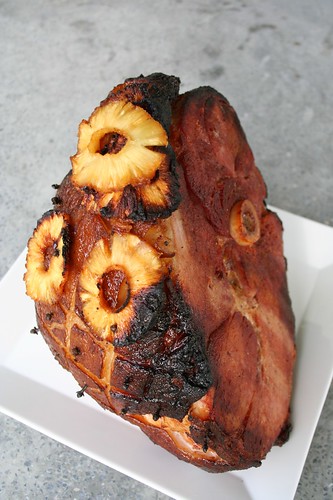
I had my parents over for a delicious Autumn dinner last night and this was the perfect side. Our entire meal was made from either our gardens, the farmers market or Sojourner Farms. We had a baked smoked ham from our pork share at Sojourner, these fantastic sweet potatoes, a green salad and southern-style green beans. My mom even made her delicious gluten-free apple crisp from the apples growing on the tree in their yard. (Recipe to follow).
Cilantro Lime Sweet Potatoes
serves 42 lb sweet potatoes, peeled and cut into 3/4-inch pieces (about 4-6 potatoes, depending on size)
3 tablespoons extra-virgin olive oil
3/4 teaspoon kosher salt
2 tablespoons honey (You can find great local honey from your farmers market)
1/2 teaspoon finely grated fresh lime zest
fresh lime juice from one lime
1/4 cup chopped fresh cilantroPut oven rack in lower third of oven and preheat oven to 425°F.
Toss sweet potatoes with oil, honey, lime juice and salt in a shallow baking pan. Top with lime zest. Arrange potatoes in 1 layer and roast, stirring halfway through roasting, until tender, about 30 minutes total. (You can taste halfway too to see if you need more of any of the ingredients – sometimes you may need a bit more of something) Remove potatoes from pan to a serving bowl, top with a bit more fresh cilantro, lime juice, lime zest and kosher salt to taste. Toss slightly and serve.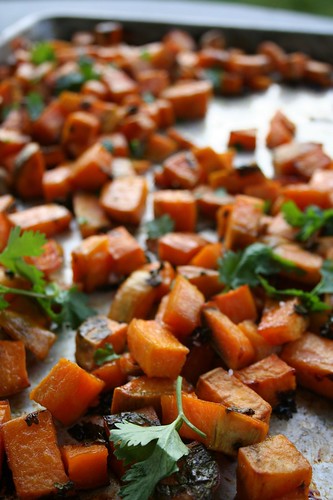
Here is a photo of the beautiful smoked ham that we baked from Sojourner Farms. Hands down, the tastiest ham I have ever had.
-
Beef Pho Noodle Soup (Pho bo)

I have been wanting to make traditional Vietnamese Pho forever and finally made the time to do so this weekend. I can’t get over all the depths of flavor and how easy it is to make. I used two different recipes as reference and consulted a Vietnamese friend, who is an incredible chef, known for his world-class Pho. The two recipes I followed are both traditional and have just a couple of small differences. The first, which I followed the closest was from Viet World Kitchen, the other recipe that I used more for tips and a couple of spices that weren’t in the first recipe, was from an article about Pho, that was in the Washington Post back in 2005.
The only thing I would change next time around would be to possibly simmer the broth even longer, not that it needed it, but I can only imagine how much more intense those flavors would be with more simmering. Also, I really wish I had taken more photos of the process and all the beautiful ingredients, but I was way too excited to sit down and eat that I couldn’t be bothered with taking photos. Plus Saturday was a marathon cooking day in my kitchen, beside the Pho, I was making tomato sauce from scratch, gluten-free sandwich bread and I preserved Meyer lemons. (Recipes to follow on all of those)
I was unable to get soup bones at the farmers market from Hanova Hills Farm, as I had liked, since they were sold out, but I was able to get both a beautiful piece of chuck for the broth and a 1lb cut of sirloin to slice thin for the bowls. I ended up buying the soup bones at Wegmans, I was happy at the great selection they had.

Beef Pho Noodle Soup (Pho bo)
serves 8For the broth:
2 medium yellow onions (about 1 pound total)
4-inch piece ginger (about 4 ounces)
4-5 pounds beef soup bones (preferably marrow, knuckle and shin bones, with some meat on them)
6 star anise
6 whole cloves
3 cinnamon sticks
1 tablespoon cardamom pods
1 tablespoon black peppercorns
1 pound piece of beef chuck, rump, brisket or cross rib roast, cut into 2-by-4-inch pieces (weight after trimming)
1 tablespoon kosher salt, or to taste
4 tablespoons fish sauce
1 ounce (1-inch chunk) yellow rock sugar (I just used about 2 tablespoons of organic raw sugar)For the bowls:
1 pound (16 ounces) rice noodles
1/2 – 1 pound raw eye of round, sirloin, London broil or tri-tip steak, thinly sliced across the grain (1/16 inch thick; freeze for 15 minutes to make it easier to slice) We bought a lovely 1 pound piece of grass-fed sirloin from the farmers market.
1 medium yellow onion, sliced paper-thin, left to soak for 30 minutes in a bowl of cold water
3 or 4 scallions, green part only, cut into thin rings
1/3 cup chopped cilantro
Ground black pepperOptional garnishes arranged on a plate and placed at the table:
Sprigs of spearmint and Asian/Thai basil
Bean sprouts (about 1/2 pound)
Sliced green chili peppers (jalapeño or serrano)
Lime wedges
Red chili sauce (such as Tuong Ot Sriracha)Prepare the pho broth:
Char onion and ginger. Use an open flame on grill or gas stove. Place onions and ginger on cooking grate and let skin burn. (If using stove, turn on exhaust fan and open a window.) After about 15 minutes, they will soften and become sweetly fragrant. Use tongs to occasionally rotate them and to grab and discard any flyaway onion skin. You do not have to blacken entire surface, just enough to slightly cook onion and ginger. You may also instead roast the ginger and onions on a baking sheet in a 400-degree oven for 30 minutes, this is what I did.Let cool. Under warm water, remove charred onion skin; trim and discard blackened parts of root or stem ends. If ginger skin is puckered and blistered, smash ginger with flat side of knife to loosen flesh from skin. Otherwise, use sharp paring knife to remove skin, running ginger under warm water to wash off blackened bits. Set aside. (I’ll be honest, since I roasted the ginger in the oven, and it was far too hot to peel, I just halved the big piece in two and dropped it into the stock, peel and all.)
Parboil bones. Place bones in stockpot (minimum 8-quart capacity) and cover with cold water. Over high heat, bring to boil. Boil vigorously 2 to 3 minutes to allow impurities to be released. Dump bones and water into sink and rinse bones with warm water. Quickly scrub stockpot to remove any residue. Return bones to pot.
Simmer broth. Add 4 quarts water to pot, bring to boil over high heat, then lower flame to gently simmer. Use ladle to skim any scum that rises to surface. Add all remaining broth ingredients and cook, uncovered, for 1 1/2 hours. Boneless meat should be slightly chewy but not tough. When it is cooked to your liking, remove it and place in bowl of cold water for 10 minutes; this prevents the meat from drying up and turning dark as it cools. Drain the meat; cool, then refrigerate. Allow broth to continue cooking; in total, the broth should simmer a minimum of 3 hours, I simmered mine for around 6 hours. If I had the time, I would have simmered it even longer.
Strain the pho broth through fine strainer. If desired, remove any bits of gelatinous tendon from bones to add to your pho bowl. Store tendon with cooked beef. Discard solids.
Use ladle to skim as much fat from top of the pho broth as you like. (Cool it and refrigerate it overnight to make this task easier; reheat before continuing.) Taste and adjust flavor with additional salt, fish sauce and yellow rock sugar. The pho broth should taste slightly too strong because the noodles and other ingredients are not salted. (If you’ve gone too far, add water to dilute.)
Assemble pho bowls:
The key is to be organized and have everything ready to go. Thinly slice cooked meat. For best results, make sure it’s cold.
Heat the pho broth and ready the noodles. To ensure good timing, reheat broth over medium flame as you’re assembling bowls. If you’re using dried noodles, cover with hot tap water and soak 15-20 minutes, until softened and opaque white. Drain in colander. For fresh rice noodles, just untangle and briefly rinse in a colander with cold water.Blanch noodles. Fill 3- or 4-quart saucepan with water and bring to boil. For each bowl, use long-handle strainer to blanch a portion of noodles. As soon as noodles have collapsed and lost their stiffness (10-20 seconds), pull strainer from water, letting water drain back into saucepan. Empty noodles into bowls. Noodles should occupy 1/4 to 1/3 of bowl; the latter is for noodle lovers, while the former is for those who prize broth. We used a thicker noodle, so I went with the package instructions which called for adding the noodles to boiling water, and to boil for 6-8 minutes until cooked to your desired doneness.
If desired, after blanching noodles, blanch bean sprouts for 30 seconds in same saucepan. They should slightly wilt but retain some crunch. Drain and add to the garnish plate.
Add other ingredients. Place slices of cooked meat, raw meat and tendon (if using) atop noodles. (If your cooked meat is not at room temperature, blanch slices for few seconds in hot water from above.) Garnish with onion, scallion and chopped cilantro. Finish with black pepper.
Ladle in broth and serve. Bring broth to rolling boil. Check seasoning. Ladle broth into each bowl, distributing hot liquid evenly so as to cook raw beef and warm other ingredients. Serve your pho with the garnish plate.
Note: Yellow rock sugar (a.k.a. lump sugar) is sold in one-pound boxes at Chinese and Southeast Asian markets. Break up large chunks with hammer.
-
Thai Rice Noodle Salad
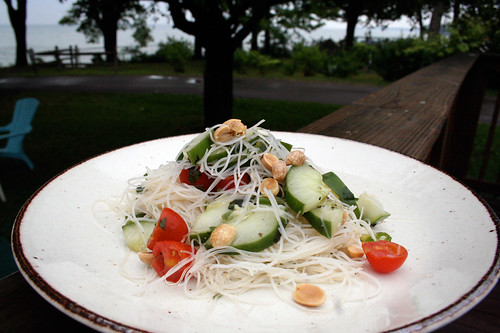
After all of our friends left the beach on Friday, Mark and I stayed and my parents came out to spend the weekend with us and for the big Greek Family reunion on Saturday. Though my Papou (My Grandfather) passed away 7 years ago and my Yia Yia (My Grandmother) 5 years ago, Papou’s remaining siblings, all the children, the grandchildren and the great-grandchildren all get together every summer at the beach. It is so amazing that we all still get together and are so close. We get tons of lamb, it marinates for days and then my Dad and his cousin Paul grill it up. Everyone brings a dish or a snack to share and everyone eats their faces off. So much delicious, authentic Greek food and other goodies.
I had all the ingredients on hand last week to make this salad for everyone at the beach house but never got around to it and although this dish has nothing to do with Greek food in the least, since I had everything with me and it was both vegan and gluten-free, I knew it was a good dish to share. If I had shredded carrots I would have added those, but it certainly didn’t need it. Additionally, I left out the fish sauce in the dressing, since I didn’t know if anyone was vegan, but normally I would have included it. Since there was so many people, I actually doubled this recipe and made huge serving of the salad, which was nice since I had leftovers.
*Also, I’ll be honest, the photo above makes this salad seem boring and blah, but it is anything but, the dressing has so much flavor and it’s damn delicious. I need to get better with the camera.
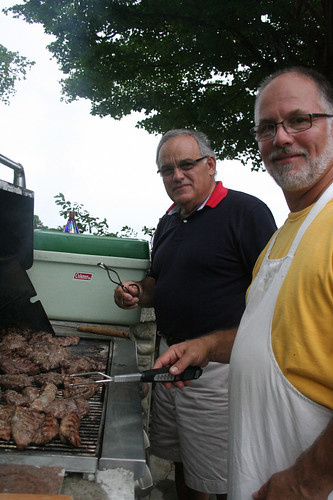
Paul and my Dad grilling the lamb
Cold Asian Rice Noodle Salad
Dressing:
1/4 cup rice wine vinegar
1 tablespoon sesame oil
1 tablespoon olive oil
3 tablespoons fish sauce (leave this out to keep it vegan)
2 cloves garlic, minced
1 teaspoon of ginger, finely minced
1 teaspoon crushed red pepper flakes
1 tablespoon organic raw sugar (or honey)
juice from 1/2 lime
1 teaspoon kosher saltWhisk it all together. Set aside.
Salad:
8 ounces thin rice noodles or rice stick noodles (the kind you just have to soak)
1/2 pint of cherry tomatoes, halved
1/2 cucumber, quartered lengthwise, and sliced 1/2-inch thick (I used a beautiful organic heirloom satsuki madori from my garden)
1 jalapeno pepper, chopped
1/2 cup of Thai basil, roughly torn or chopped up
1/2 cup of fresh mint, roughly torn or chopped up
*(you can also use fresh cilantro and/or regular basil)
3 or 4 scallions, thinly sliced
1/4 cup dry-roasted peanuts, chopped
1/2 lime
fresh ground black pepper, to taste
kosher salt, to tastePrepare the noodles according to package’s directions.
Drain and rinse with cold water. Drain well and pat dry. Add noodles, cucumbers, tomatoes, jalapeno, basil, mint, scallions, peanuts and whatever else, to a large bowl. Pour on the dressing, toss to combine. Squeeze the juice from the other half of a lime over the top. Garnish with a small handful more each of chopped peanuts and sliced scallions. Taste, add salt, pepper or more lime to taste. Serve room temperature or put in the refrigerator for an hour or two and serve cold. -
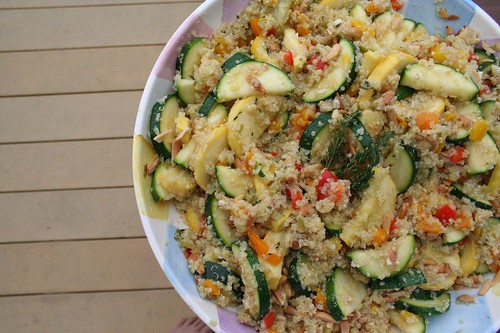
Quinoa Salad with Toasted Almonds
Again, sorry for the lack of posts. This time it wasn’t that I wasn’t cooking or away for work, Mark and I took a week “off” with 5 of our friends and spent some time at my family’s beautiful beach house on Lake Erie that we rented for an entire week. What a much-needed, relaxing time away. We got to just hang out and spend time together, no event to rush off to, no posters to be printed, just good a old-fashioned vacation. Sure most of us still had to pull the laptops out and get some work done, but being away from life, on the beach and with the people you love most, is one of the best ways you can spend your time.
We of course, planned meals and cooked and ate like kings and queens, ok and we may have drunk a bit, too. I had a handful of recipes I wanted to make and some that I wanted to try for the first time, what better group of people to use as guinea pigs than your friends.
Over the next couple of days I will be posting some of the recipes that I made. I did make a huge pot of my chili one night, but I never measure with that and of course forgot photos, but I make that often during the fall, so that will be posted soon.
The first recipe that I tried out was this delicious quinoa salad with toasted almonds. It was a great way to highlight all the lovely veggies that are in season and it was the perfect side to one of our butterflied grilled chickens from Sojourner Farms that Mark and I made for everyone. Since there were 7 of us, I multiplied the original recipe for this salad by 4, to serve 8, but I am posting it here to serve 2. Not only is this recipe gluten-free but also vegan.
It was so good, we were all eating it right after it was done cooking, right out of the bowl on the countertop and before it had fully cooled. It is always hard to please a large group of people with food, but surprisingly everyone loved this salad and the leftovers were perfect for lunch after enjoying some time in the sun and swimming. A couple of things that I had changed since I made such a large batch, was instead of 1 yellow pepper, since we needed so much more, I went with one each of yellow, red and orange peppers. I also went with green zucchini and yellow squash, since I had an abundance of both, and I loved all the color. Because we were at the beach house and our supplies were limited, I also skipped the celery when I made it, and instead of dried red pepper flakes (which we didn’t have), I went with a hot pepper oil from some hot pepper sandwich spread that Allison and Craig had bought for sandwiches, the subtle heat was so perfect. I have become a huge fan of quinoa and I love it’s versatility. It can be served like most grains, though it is actually a seed, it is perfect sweet or savory, hot or cold. It really is the super food, as they call it. It is packed with protein and loaded with fiber. Quinoa can be found with other grains in the natural or organic section at most supermarkets or at natural food stores.
This recipe came from the Whole Living website and it was featured in Body + Soul Magazine, March 2006. I have a subscription to Whole Living, and I really cannot recommend it enough, great recipes, articles and tips for clean and healthy living.
Quinoa Salad With Toasted Almonds
Serves 2
Adapted from Body + Soul Magazine, March 20061/4 cup slivered almonds
1/2 cup (3 ounces) quinoa
4 teaspoons olive oil
1 yellow bell pepper, ribs and seeds discarded, cut into 1/2-inch chunks
2 garlic cloves, minced
2 scallions, thinly sliced
1/8 teaspoon red-pepper flakes
1 teaspoon chopped fresh thyme, plus more for garnish (optional)
1/4 teaspoon coarse salt
1 medium zucchini, halved lengthwise and sliced 1/2-inch thick
1 large celery stalk, diced
1 lime, halvedPreheat oven to 350 degrees. Toast almonds until crisp, lightly browned, and fragrant, about 7 minutes. Remove from oven and set aside. Meanwhile, place quinoa in a fine sieve and rinse under cold running water until the water runs clear; drain well.
In a medium saucepan, heat 2 teaspoons olive oil over medium heat. Add yellow pepper, garlic, scallions, and red-pepper flakes; cook until the pepper is crisp-tender, about 5 minutes.
Stir in quinoa, thyme, 1 cup water, and 1/4 teaspoon salt. Bring to a boil, reduce to a simmer, cover, and cook 7 minutes. Stir in zucchini, cover, and cook until quinoa is tender but not mushy, 5 to 8 minutes longer. Remove the saucepan from heat.
Stir in celery, almonds, and remaining 2 teaspoons oil, season with salt, and fluff with a fork. Cool to room temperature before packing into two containers and refrigerating. When ready to eat, squeeze lime over salad, if desired. Serve with additional lime wedge and thyme, if desired.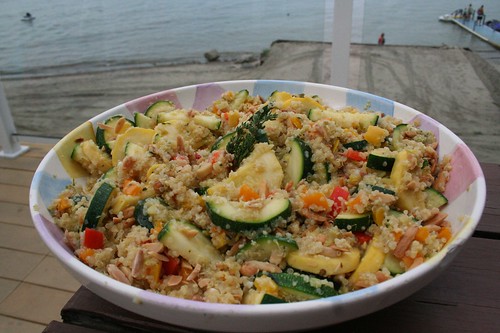
-
Southwest Rice Salad
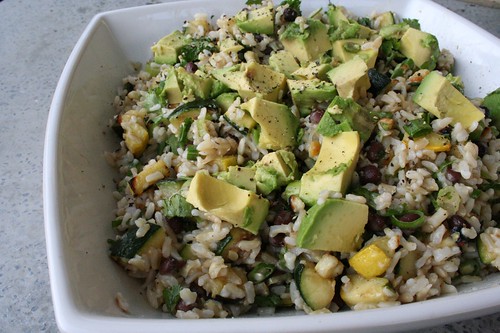
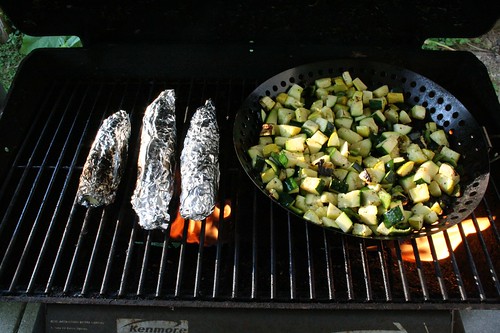
I came across this recipe a week or so ago while browsing on the Epicurious iPhone app (which I am obsessed with) and couldn’t wait to try out my version of it. I changed a few things around like using brown rice instead of white and I added some things that weren’t in the original recipe (the beans, banana pepper, green zucchini, etc). Also, considering the corn that we got at the farmers market this week was still very small and a bit early in the season, we didn’t have a lot of it in the dish. Later in the season, that part of the dish will be even better, so we will for sure have to make this again when the corn is tastier. I was very excited though, that we did get to include the first banana pepper of the season from our garden to add a little heat on top of the poblano that was already in there. I made a bit larger of a serving that what the recipe called for, so we could eat it for lunches throughout the week. For a side dish at one meal, you could probably get away with just making 1 cup of rice.
We decided to cook up the corn and other veggies on the grill, which we were already heating up, so we could get some of that lovely smokey grill taste in the dish. You could easily cook the veggies in a non-stick skillet over a medium heat on the stove top if that is easier. This dish was light and refreshing and was the perfect side to the pork steaks from Sojourner Farms that we were cooking up. It had a very subtle spicy kick from the peppers and a great bright flavor from the lime.
Southwest Rice Salad
serves at least 8 as a side dish, less if you are serving it as your main entree
adapted from Bon Appétit2 cups long-grain organic brown rice
1/3 cup fresh lime juice
4 tablespoons olive oil, divided
1 garlic clove, minced
1 1/2 cups fresh corn kernels (cut from 2 or ears) or frozen corn kernels, thawed
1 large fresh poblano pepper, diced
1 seeded spicy banana pepper, diced
1 medium zucchini, cubed
1 medium yellow squash, cubed
1 avocado, halved, peeled, diced
1 cup of canned organic black beans, drained and rinsed
3/4 cup thinly sliced green onions
3/4 cup chopped fresh cilantro
salt
freshly ground black pepperCook rice until just tender, follow directions on the package. Ours cooked for 50 minutes. Drain and rinse in cold water. Drain again. Meanwhile, whisk lime juice, garlic and 3 tablespoons of olive oil in small bowl. Season dressing to taste with salt and pepper.
Start your grill and get it to a medium-high temperature. Wrap the ears of corn in foil and place them on the grill. Toss the peppers, squash and zucchini with 1 tablespoon of olive oil and add to a grill pan. Sprinkle with salt and pepper. Place the grill pan on the medium-high grill. Cook the corn until it is done, approximately 10-15 minutes, cut off the cob once done and slightly cooled. Sauté the vegetables until they are just tender and starting to brown up a little, 15-20 minutes; scrape into a large serving bowl. Add rice, beans, green onions, cilantro, and dressing; toss to coat, top with avocado. Season with salt and pepper.
-
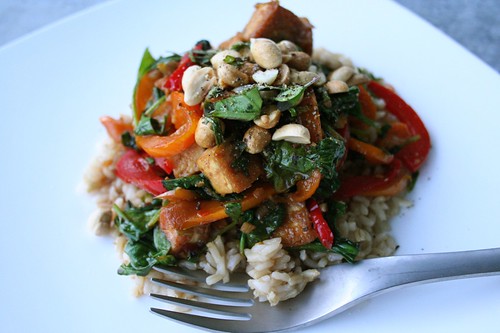
Spicy Thai Tofu and Peppers with Peanuts
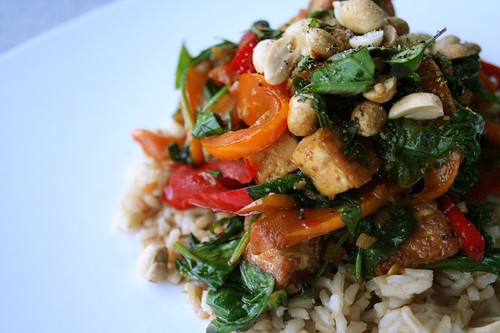
After a few weeks of travel, events and lots of work, life is finally getting a bit closer to normal for us. I have still been eating well and fresh, just a bit more rushed and with no time for blogging. I planned some great meals for the next week or so, and I cannot wait to share them with you.
I decided on this dish because the thai basil I planted in my herb garden has been growing wonderfully and I couldn’t wait to use it in something. It is so fragrant and has a hint of anise flavor. If you don’t have access to thai basil, you can use regular sweet basil, as well. But I recommend trying to get thai basil if you can.
I personally recommend pre-baking tofu when using it in stir fries and the like. The tofu keeps that crunch and has a much better texture than just cooking it up in the wok. The tofu made with recipe I included below can also be used over rice, in soups, salads and just as a snack. You can also add soy sauce, citrus juice, play with spices, etc.

Crispy Baked Tofu
1 – 14-16 ounce package of extra-firm tofu drained, pressed and cut into 1-inch cubes
2 tablespoons sesame oil
1 teaspoon saltPreheat your oven to 450ºF. Arrange tofu cubes in a single layer on a baking sheet, drizzle over sesame oil and lightly toss to coat, sprinkle with salt. Bake 30-35 minutes, turning with a spatula every 10 minutes to get a good crunch on all sides.
Spicy Thai Tofu and Peppers with Peanuts
4 servings
adapted from Bon Appétit June 20081/3 cup olive oil
2 large bell peppers, seeded, thinly sliced (I used 1 red and 1 orange)
3 tablespoons minced peeled fresh ginger
3 large garlic cloves, finely chopped
3 green onions, thinly sliced on diagonal
14-16 ounces of crispy baked tofu cubes
3 tablespoons low sodium gluten-free tamari soy sauce (regular soy will do)
2 tablespoons fresh lime juice
1/2 to 3/4 teaspoon dried crushed red pepper
6-ounces organic baby spinach leaves
1/3 cup chopped fresh thai basil (you can use regular sweet basil, also)
1/3 cup lightly salted roasted peanutsHeat oil in wok over high heat. Add bell peppers, ginger, and garlic; sauté until peppers just begin to soften, about 2 minutes. Add green onions; toss 2 minutes. Add next 4 ingredients. Toss to blend, about 1 minute. Add spinach in 3 additions, tossing until beginning to wilt, about 1 minute for each addition. Mix in basil. Season with salt and pepper. Sprinkle peanuts over. Serve.
Can be served over brown rice, thin rice noodles, or alone.
-
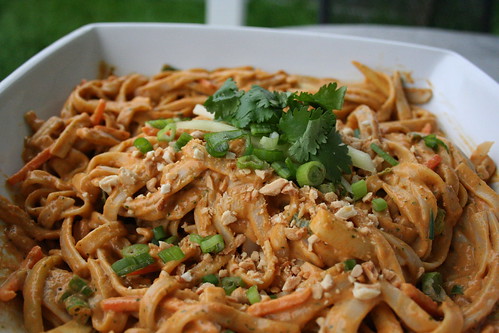
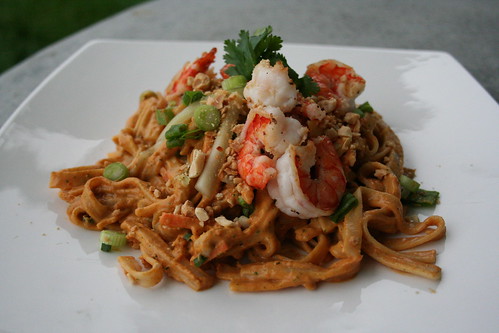
Curry Peanut Rice Noodles
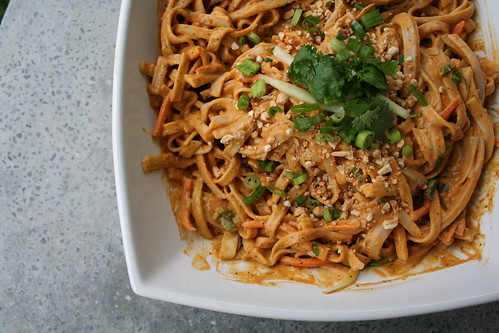
This was a delicious and quick weeknight dinner, it was full of so many different levels of flavors and textures. If you have never tried red curry, you really need to. It has a very subtle heat and it is made up of a variety of different spices, I really love the hint of lemongrass that it brings. Look for jars of red curry paste in the Asian aisle at the supermarket. These noodles have a lovely creaminess from the peanut butter, that subtle spice from the red curry and so many great textures with the green onions, carrots, cucumber and peanuts. We served a few grilled shrimp atop the noodles, but it definitely doesn’t need it, so you can go without for a great vegetarian meal.
This would also make the perfect side dish for a summer-time picnic. I rinsed our noodles in hot water to keep the dish at a warm temperature but you could easily rinse the noodles in cold water to make it a completely cold dish. You could even make the noodles and chill them up to a day ahead of time, just make the sauce the day-of and toss it together to make a quick cold noodle salad. You could use any noodle you like here, regular fettucini, whole wheat spaghetti, etc.
I didn’t think this was too spicy by any means, but if you aren’t a big fan of spicy, take the red curry paste to 1 tablespoon and leave off the red pepper flakes at the end.
Curry Peanut Rice Noodles
serves 4
adapted from Food Network Magazine, June 2010Kosher salt
12 ounces gluten-free rice noodles, I prefer Tinkyada’s pad thai style brown rice fettucini
2/3 cup organic crunchy peanut butter
2 tablespoons red curry paste
2 teaspoons rice vinegar
juice of 1 lime, plus wedges for serving
1/3 cup of fresh cilantro, plus more for sprinkling
1/2 cup water
3 green onions, thinly sliced
1 cucumber, peeled, seeded and cut into thing strips
1 large carrot, coarsely grated
1/2 cup of dry roasted unsalted peanuts, crushed
Red pepper flakesBring large pot of salted water to a boil. Add the rice noodles and cook as the label directs. Reserve 1/2 cup of cooking liquid, drain the noodles and rinse. Shake off excess water.
Meanwhile, puree the peanut butter, curry paste, vinegar, lime juice, cilantro, 1/2 cup of water and of salt in your food processor until smooth. Toss the noodles with the peanut sauce, green onions, cucumber and carrot in large bowl until coated. Season with salt and stir in some of the reserved cooking liquid from the pasta to loosen the sauce, if necessary. Serve on plates, topped with more cilantro, green onions, crushed peanuts and pepper flakes, if you like a bit of heat. Serve with lime wedges. We topped our noodles with a few pieces of shrimp that we grilled up quickly, it added a nice taste.
-
Vegetarian Faux Pho
This is a VERY thrown together version of traditional Pho, though there is little that is traditional about my version. Traditional Pho (pronounced “phuh”), is a staple of Vietnamese cuisine and culture. A hearty soup usually made with a clear beef or chicken broth that includes rice noodles and distinct flavors such as cinnamon, star anise, clove, basil, lime and more. There are many, many variations to this dish and it is often eaten as breakfast, lunch or dinner.
Last night, I had a head full of congested sinuses, wasn’t feeling so hot and I just wanted something hot, spicy and brothy. Pho was all I could think of, but I didn’t want to leave the house. I had to make it with what I had on hand in the refrigerator and pantry. I would have preferred to have included some tofu, star anise, bean sprouts and thicker more traditional rice noodles, but I made do with what I had. Mine was much thicker than traditional Pho is, since I cooked my rice noodles right in the broth, but the flavors were there, none the less. I have to say, it turned out pretty good, considering it was thrown together. Which is why I decided to share my faux recipe, to show you that you can always come up with something quick and fresh with what you have on hand.
Making this faux Pho, however has made me realize that I would really like to make a full on pot of traditional Pho very soon.
Vegetarian Faux Pho
Serves 2-41 tablespoon olive oil
1 small onion, diced
1 shallot, diced
2 cloves garlic, minced
1 small jalapeño, seeds and stem removed, minced
1 tablespoon ginger, minced
1 tablespoon cinnamon (I used ground because I didn’t have sticks)
1/2 tablespoon cloves (I used ground because I didn’t have whole cloves)
6 cups vegetable broth
3 tablespoons soy sauce (I use low sodium, gluten-free Tamari)
2 tablespoons basil, finely chopped
8 ounces rice noodles (all I had on hand was gluten-free rice spaghetti)
1 lime, cut into wedges
cilantro
scallions, sliced
sriracha chili pasteHeat olive oil in a large pot over medium-high heat, add onions, shallots, garlic, jalapeño, ginger, cinnamon and cloves, stirring occasionally until the vegetables turn clear and start to char a bit. Add the stock, soy sauce, basil and a squeeze or two of sriracha and bring to a boil over high heat. Turn the heat down to medium-low and simmer for about 25 minutes.
You can cook the rice noodles separately or if you are lazy like I was, just toss them right into the broth and cook them in there. By cooking the noodles in the broth, it made the broth very, very thick, but I didn’t care, I wanted fast and easy. I added the noodles, brought it to a boil then lowered the heat to medium-high and simmered until the noodles were cooked. About 10 minutes.
Ladle the broth and scoop a bunch of noodles out into large soup bowls. Serve topped with scallions, cilantro, a squeeze or two of lime juice and if you want it more spicy a bit more sriracha.
-
Guacamole
I am an avocado addict, I love them. They are great chopped up in salads, spread on toast, or just plain with some salt and a spoon. I wish I lived in a climate where I could have an avocado tree in my yard. This guacamole is my go to Summer time snack, especially with a side of freshly made pico de gallo. The avocados are looking great at the super market right now and they are a good price.

Guacamole
3 ripe avocados
1/2 of a red onion, minced
1-2 cloves of garlic, minced (I use just 1 if it is a large clove)
1-2 jalapeños, stems, seeds and veins removed, diced finely
juice from 1-2 limes
2 green onions, diced
1/4 cup cilantro, chopped
kosher salt
pepper
*In the summer time when the tomatoes are perfect and ripe, I chop up the meat from one or two tomatoes (squeezing out the extra pulp and seeds) and include it. This is how I prefer my guacamole, but the tomatoes just aren’t there quite yet, so I left it out this timeCut avocados in half. Remove the seed. Run your knife through the avocados and scoop out away the chunks from the peel, put in a mixing bowl. Add the rest of the ingredients to the bowl, and mash with a fork. Leave as chunky as you’d like. Taste, then season to taste with salt and pepper, add more lime juice if needed. Serve immediately fresh corn tortilla chips or raw veggies like carrots and celery.
This recipe can be changed around to your taste, if you don’t like spicy omit the jalapeños and go with just a green bell pepper. Sometimes if I have red bell peppers on hand, I will add those for the color.
-
Mango Shrimp Kebabs
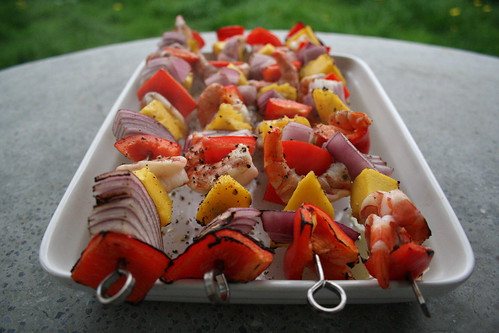
These simple and fresh-flavored skewers were the perfect quick and tasty dinner option for a very busy night. Plus, it happened to be a perfect night for grilling. Besides being delicious, they are so colorful and beautiful to look at. A feast for your senses. Mangoes are in season right now and though they are not local I couldn’t resist buying a couple at the market, they are one of my favorite fruits.
The only thing I would change the next time I made these would be to add some sort of fresh herbs or additional spices, it needed another level of flavor. I am thinking some freshly grated ginger and/or some red pepper flakes. Another thing I may try next time would be to create a marinade of the lime juice, olive oil and spices and marinade the shrimp for 5-10 minutes, first.
These skewers would be great served as an appetizer or entrée with rice or a salad. I served them over brown rice.
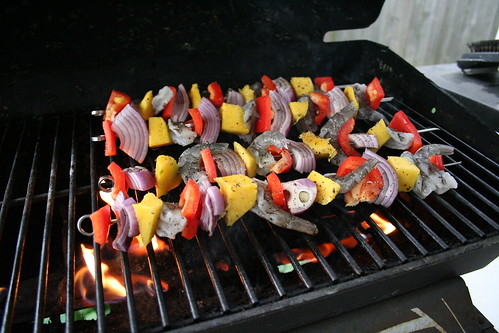
Mango Shrimp Kebabs
Adapted from Cooking Light, April 2010
Serves 2-41/2 lb of large peeled and deveined shrimp
1 large red bell pepper, cut into 1-inch pieces
1 mango, peeled and cut into 1-inch cubes
1 small red onion, cut into 1-inch pieces
1 lime, cut into wedges
olive oil
salt
pepper
(fresh grated ginger and/or red pepper flakes – see above notes)Prepare grill to medium-high heat. Sprinkle shrimp evenly with 1/4 teaspoon salt and 1/8 teaspoon of freshly ground pepper. Thread shrimp, pepper pieces, mango cubes, and onion pieces alternately onto each of 4 (12-inch) skewers – if using bamboo skewers don’t forget to pre-soak. Drizzle a small amount of olive oil over the top, if adding ginger or pepper flakes sprinkle these over the skewers now. Place the skewers on a grill rack coated with cooking spray; grill 2-3 minutes on each side or until the shrimp are done. Yield: 2 servings of 2 skewers each as an entrée or 4 servings of 1 skewer each as an appetizer.
-
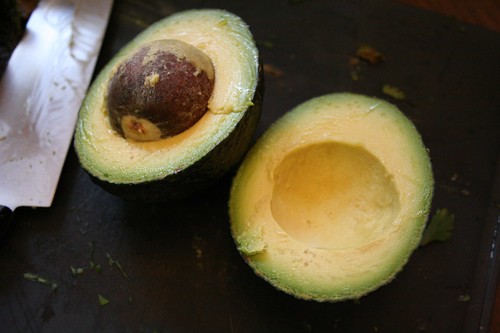
White Bean and Avocado Salad
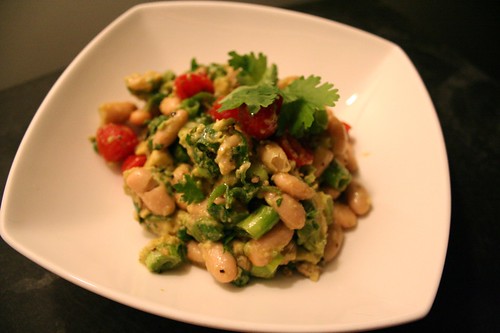
This is my idea of “fast food”. When I have a long, busy day and I am not getting home until late, I don’t crave take out, a drive thru or a restaurant – I want my home, my kitchen and my ingredients. I have been known to come home from a very busy day and whip together a full on pasta dish with fresh veggies and things I have in the pantry. This recipe is something I threw together randomly, last week after my Thursday night yoga class with things I had on hand and it was so good I went for it again this week. I don’t get home until almost 9pm on Thursdays, so after a long work day and a 90 minute yoga practice I want something light, tasty and quick.
Since avocados are in season right now, I have been buying a few every time I go to the market since I could eat them daily. The last time I made this salad I had some leftover dried great Northern beans that I had soaked for a soup I had made and they were even better than the canned beans I used this time. Unfortunately, for as much as I prefer dried beans over canned, they are just not as quick to prepare and therefore not ready on the drop of a dime. Any white bean will do for this recipe, great Northern, cannellini, navy or even lima beans.
This salad is light, refreshing, adequately filling and it has the perfect balance of crunch and creaminess. I had a small piece of toast on the side. This makes a great main course dish or a it can be substituted for your typical green salad.
White Bean and Avocado Salad
serves 2-4 (depending on how you are serving it)1 can of white beans (15.5 ounces) cannellini, great Northern, etc
1 avocado diced
1 handful of cilantro, chopped
4 or 5 green onions, chopped
juice from 1/2 lime
salt
fresh ground pepper
2 T olive oil
handful grape tomatoes, halvedDrain and rinse the beans. Place the beans, tomatoes, avocado, green onions and cilantro into a mixing bowl. Drizzle with the olive oil and lime juice, season to taste with salt and pepper. Gently toss until combined. Don’t worry if the avocado starts to mash-up a bit, mine did this time as the avocado was very ripe, it still tastes delicious. Serve immediately as main dish or side dish. Refrigerate leftovers.
-
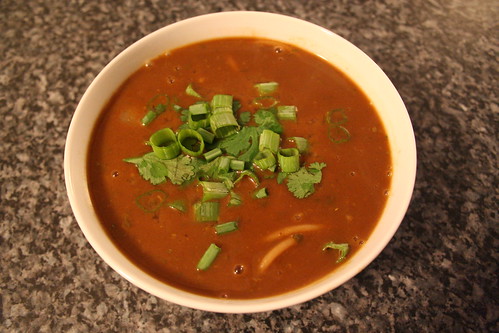
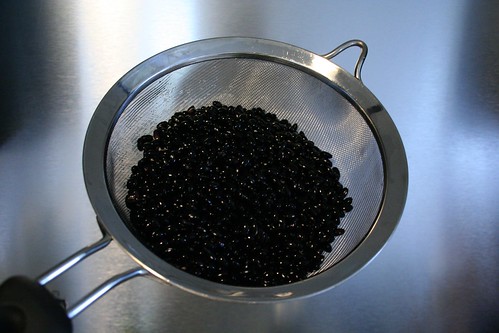
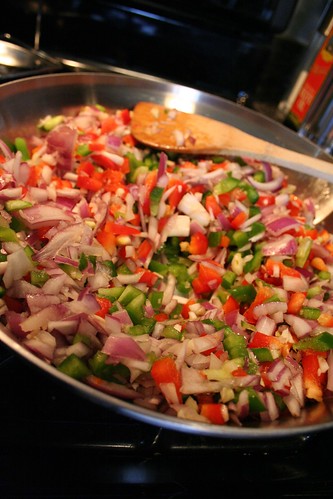
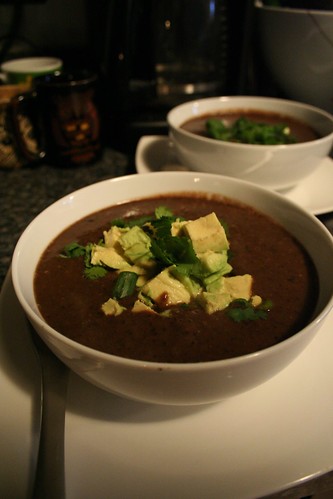
Black Bean Soup with Tortillas de Maíz

Three things I am very obsessed with: my slow cooker, soup and fresh corn tortillas! I have made black bean soup quite a few times, but this is hands down, the best it has ever turned out.
Black Bean Soup
Adapted from Bon Appetit and smitten kitchen
A big note about cooking times when using dried beans: The original recipe says 6 hours, smitten kitchen’s took 2 hours 45 minutes, mine took just over 4 hours. Not sure if it is a variation in the beans or slow cookers cook times.
Yields 6 main course servings
1 tablespoon olive oil
2 medium-size red onions, chopped
1 medium-size red bell pepper, chopped
1 medium-size green bell pepper, chopped
4 garlic cloves, minced (I only used 2 this time, as they were MASSIVE cloves)
4 teaspoons ground cumin
1 16-ounce package dried black beans
1 tablespoon chopped chipotle chiles from a can (this gives it a solid kick, dial back if you are wary, I LOVE spicy so I used even more than this)
7 cups hot water (I just used very hot tap water)
2 tablespoons fresh lime juice
2 teaspoons coarse kosher salt
1/4 teaspoon ground black pepper
1 avocadocilantro
green onionsHeat olive oil in large skillet over medium-high heat. Add onions and both bell peppers and sauté until beginning to brown, about eight minutes. Add garlic and cumin; stir one minute. Transfer mixture to 6-quart slow cooker. Add beans and chipotles, then 7 cups hot water. Cover and cook on high until beans are very tender, about 3 hours. [See note up top.]
Transfer bean mixture to blender; puree until smooth. Return puree to the pot or a large serving bowl (the original recipe calls for just two cups of the soup to be pureed but I wanted a smooth and creamy soup this time). Stir in lime juice, salt, and pepper. Adjust seasonings to taste; we found we needed more salt. Ladle soup into bowls. Top with diced avocado and chopped cilantro and green onions.
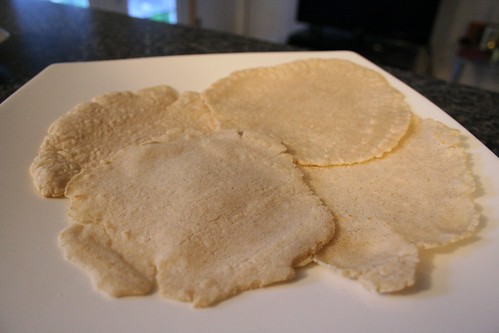
What goes better for dipping into your spicy black bean soup than warm, freshly made corn tortillas?? NOTHING. Being that I have an intolerance to gluten, I have found a love for corn tortillas and their many practical uses. They are delicious with soup, on tacos, for breakfast, the list just goes on and on. I would always get incredibly excited when I would go to a restaurant that made their own. Since so few did, I always assumed it was incredibly difficult or time consuming. Man, was I wrong. This was the first time I made them and it was a breeze. The most important thing to remember is that the more imperfect they are, the more “homemade” they look, so don’t stress about the perfection.


Handmade Tortillas de Maíz (Corn Tortillas)Yields 16 tortillas
2 cups masa harina (Mexican corn “flour” for making tortillas—Maseca brand is widely available in well-stocked groceries and Mexican markets)
1-1/4 to 1-1/3 cups of water- Mix the Masa Harina and the water; knead to form your masa (dough), you will be able to tell if it needs more water.
- Roll the dough with your hands into a long cylinder and equally divide it into 16 pieces
- Take one of the 16 pieces and roll it into a ball with your hands
- Set the masa on a piece of plastic in the tortilla press; cover with another piece of plastic (at the time I made this, I didn’t yet have a tortillas press and I had to use a combination of a coffee can and a rolling pin)
- Press the masa
- Transfer the tortilla to a hot, dry skillet
- Cook for about 50 seconds on one side; gently turn
- Cook for about 50 seconds (it should puff slightly); turn back to the first side and cook a few seconds longer if you think you need it. You’ll probably have to play with the time a bit to get it right.
- Remove and keep the tortilla warm in a tortillas warmer or on a cookie sheet in the oven (set to 250°F)

Here are some of the yummies we made in the days after with the corn tortillas. Veggie tacos with avocados, tomatoes, limes, lettuce, cilantro and green onions and a side of mexican rice (I am still perfecting that recipe so I will post it when I am happy with it).

And a quick egg taco for a tasty and fast breakfast. Just fry an egg quick, put it on a warm tortilla and top with cilantro, green onions, salt and pepper and whatever else you’d like. One of my favorites.