-
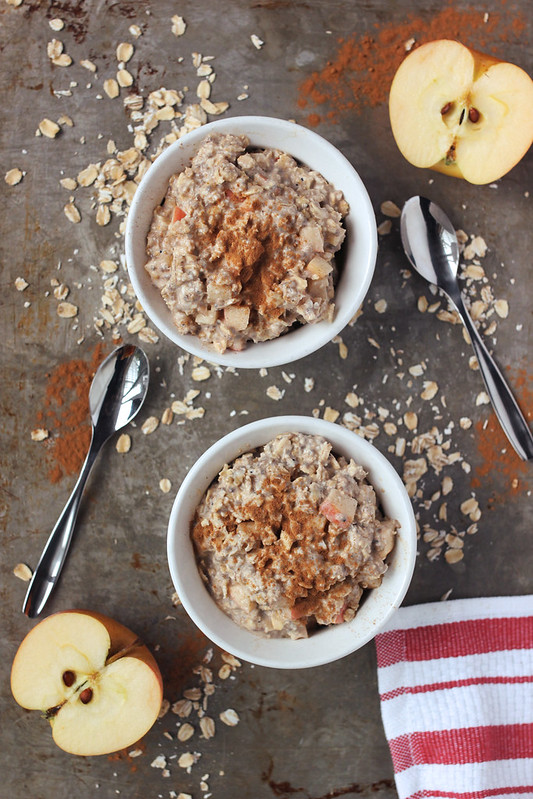
Apple Cinnamon Overnight Oats {gluten-free and vegan}

This post is part of my restricted diet series on the Free People Blog BLDG 25
Since my daily yoga practice is as important to me as the food I eat, I try to plan ahead with my meals, to make getting to the studio as easy as possible. Lately I have been enjoying daily 6am vinyasa flow classes, so that means getting to bed at a reasonable time and being up at 5am. I don’t eat before I practice yoga, but the minute I come home and walk through the front door I am starving – so I love easy, simple, quick, and healthy breakfast options.
-
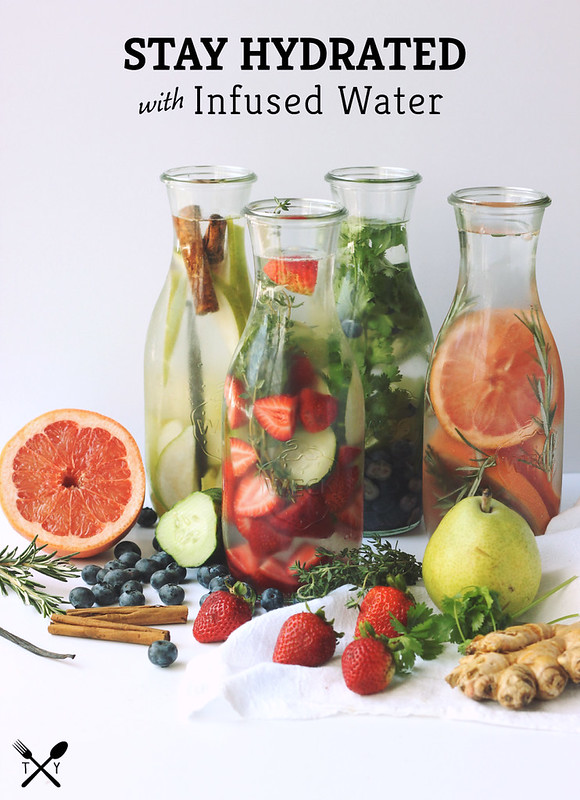
Infused Waters to Keep You Hydrated this Summer
We all know how important it is to stay hydrated, year round, but this is especially important in the summer. When the weather is hot and you are spending much of the day outside being active, it is extra important to drink more fluids than usual and most especially that you are doing so before you start feeling thirsty – as that is a sure sign you are on your way to dehydration.
Did you know that every single cell in the human body needs water to function properly? Much like the plants in your garden, your cells, too, can perk up immediately upon watering. It’s that simple.
What Does Water Do in My Body?
Water Helps Your Body with the Following:
- Getting rid of waste through urination, perspiration, and bowel movements.
- Keeping it’s temperature normal.
- Lubricating and cushioning your joints.
- Protecting your spinal cord and other sensitive tissues.
Tips for Drinking More Water:
- Drink a glass of water as soon as you wake up in the morning (I prefer mine warm with a little lemon).
- Carry a dedicated bottle or container with you are all times, at work, at home, even if you are just out running a few errands.
- Use an app on your mobile phone to track your water intake or simply set an alert on your phone to remind you.
- Choose water at restaurants instead of other beverages. not only will you save on calories while simultaneously hydrating yourself, but it also saves money.
- When you are hungry, start with a glass of water before you reach for the snack. sometimes feelings of hunger are actually your body telling you that it’s thirsty. it may just curb the cravings.
- Drink before you eat. 16 ounces 30 minutes before every meal can actually keep you from over indulging. make this a regular practice and you might even find yourself losing weight.
- Infuse and flavor your own water.
Today, I am sharing with you one of my very favorite ways to stay hydrated during the summer months…
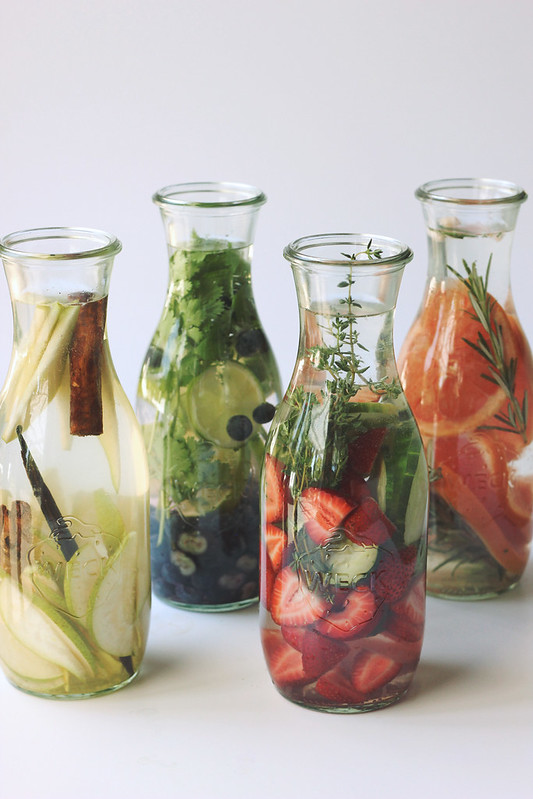
INFUSED WATER!
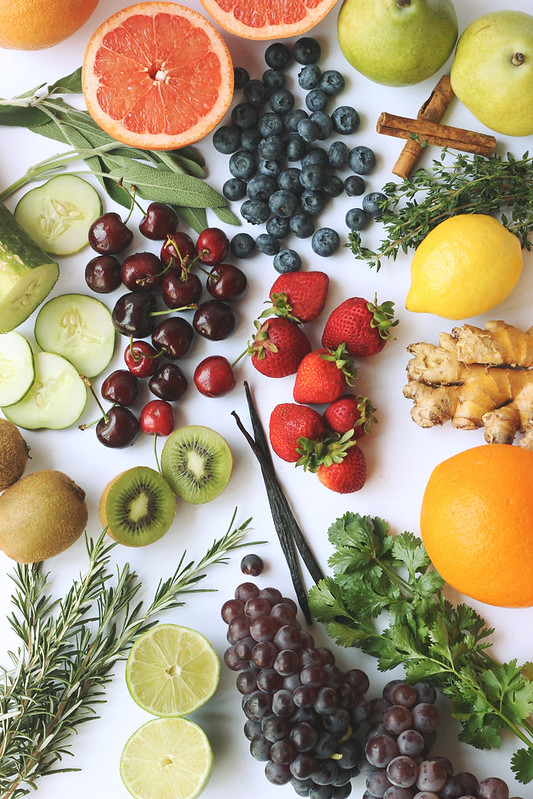
Infused water is not only a tasty way to stay hydrated but it is nutritional, healthy, fresh and all-natural!
How-to Make Infused Water:
 Read the rest of this entry »
 -
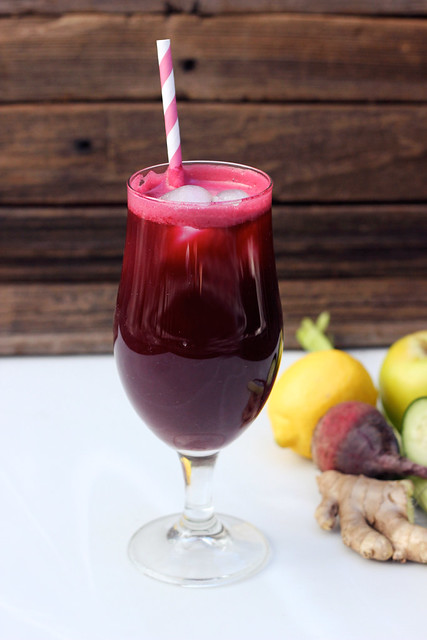
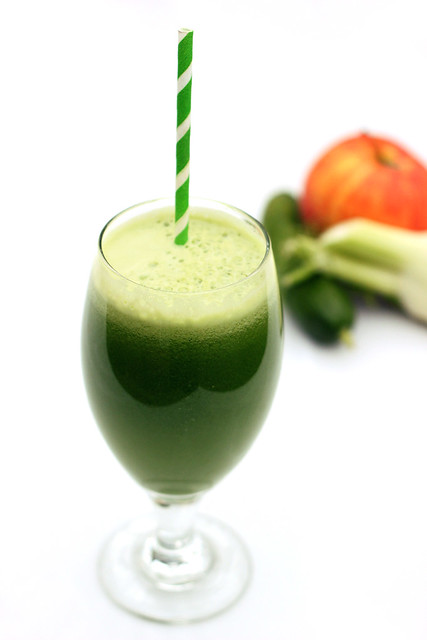
New Year’s Detoxifying Juice
Happy New Year!! I hope you all had a wonderful holiday season. I decided to take a step away from the computer and online for the last week and a half and enjoy family, friends and to celebration all of the goodness of the holidays!!
It has been a busy two months and the last two weeks have definitely been no exception. Though I do my best to stick to my clean and healthy eating, I do also like to indulge a little at the holidays. Everything in moderation, is how I choose to look at it. That said, by the time New Years rolls around I am tired and not feeling like my usual self.
However, come January 2nd – every year, I am ready to get back to super clean eating, tons of fruits and veggies and wave goodbye to the sweets, cookies and cocktails, for a while.
I am taking extra special care the next couple of days to get in lots of detoxifying and cleansing foods to help get my body ready for my month-long yoga teacher training program that I start next week!! I want to be in tip-top mental shape, ready to take in all that I am about to learn. For me what I am eating and consuming has a direct reflection on my mind and my ability to focus.
This juice was the perfect way to start the day today and I have a feeling many days to come this month. Ginger, beet, lemon, apple, celery, cucumber and parsley together for a bright, fresh and cleansing juice. Read the rest of this entry »
-
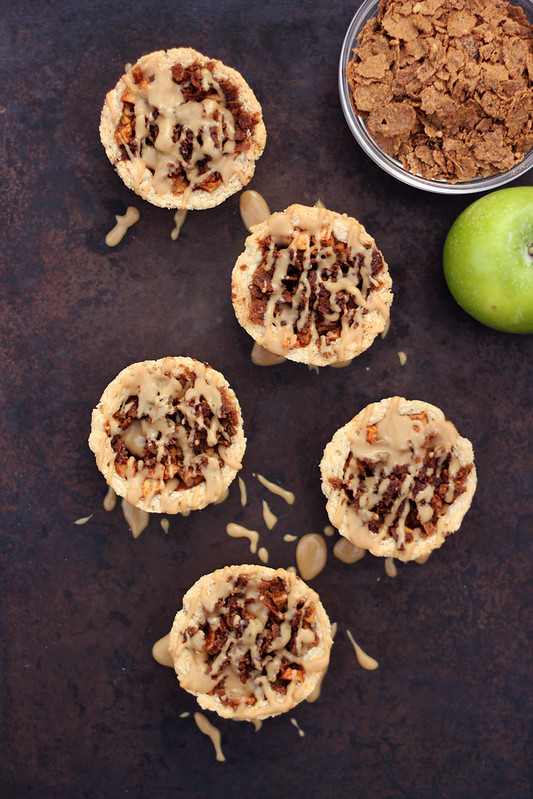
Mini Caramel Apple Pies with Cinnamon Streusel {gluten-free, vegan}
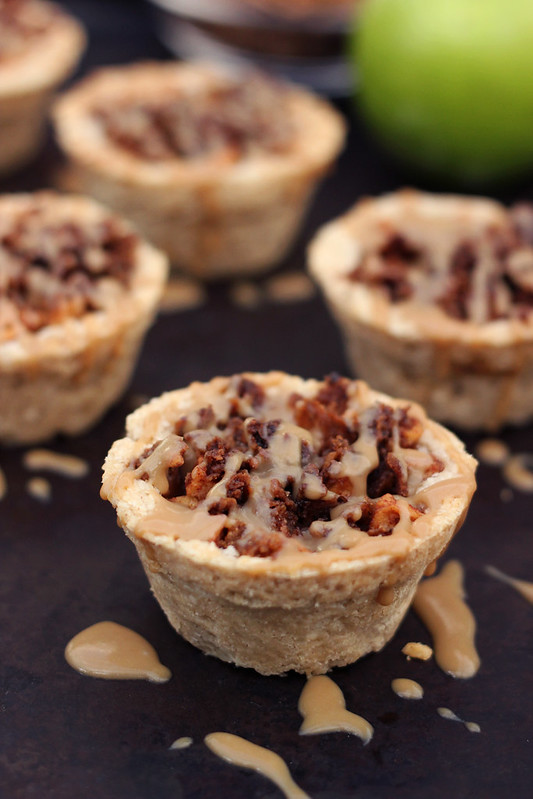
In case you haven’t noticed, I have a thing for mini stuff! Why make a single large-sized pie, when you can have 12 tiny ones? I am not sure where or when this love affair began, but I constantly find myself opting for littler things over the traditional size. (spoiler alert: I have another mini dessert coming to the website later this week)
When Attune Foods contacted me to develop a holiday-worthy dessert recipe using one of their Erewhon Supergrain cereals, I was excited for the challenge of recreating a classic sweet treat, like apple pie. I opted for mini apple pies with a deliciously simple crust and filling, a crunchy spiced streusel topping made with the buckwheat hemp cereal, all topped with a drizzle of my very easy-to-make vegan caramel sauce.
 <
< -
Spiced Apple Smoothie – Gluten-free & Vegan

Good morning! We are onto day 4 of the 5-Day Fall Cleanse. I am feeling great today! How are you feeling? When Sherrie and I talked about creating this short and simple cleanse, we wanted to be mindful of and gentle on our bodies to soothe our digestive system, instead of disrupting it and upsetting it. We wanted to create a simple plan that would continue to connect us with our food, but while slowly purging the toxins that like to hide out in all the little cracks and crevices. We weren’t looking to shock our systems with anything drastic like a juice-only cleanse, we simply wanted to get back to eating intuitively, to check in with our bodies, to return that conscious awareness back to what our bodies truly need right now, to reset any bad habits and get ready for the seasonal changes that lie ahead.
Cleansing and detoxifying can be quite challenging and difficult depending on your mental state at the time. It can not only bring on physical symptoms of the cleansing, but often times it can bring emotional imbalances to the surfaces, as well. I have cleansed in the past when I wasn’t quite ready for the full extent of it all and it wasn’t pretty. I simply felt deprived or left out the entire time, even angry at myself for choosing to do something so limiting and challenging to my own self. It is with so much gratitude this time, that I can honestly say the experience this time has been peaceful, to say the least. I honestly was worried that I would experience some amount of side effects/detoxing symptoms with how I had been eating leading up to this cleanse, but with how good I am feeling throughout this process, I think I can thank my general everyday clean diet for that. I possibly don’t give myself enough credit. With eating a clean diet, at least 95% of the time, it is easy for me to focus on the 5% when I am not at my best and beat myself up for it. I can tend to do that sort of thing, I am hard on myself. This cleanse has been a gentle reminder that I have been quite good to my body and that I want to continue to be as good or better to it. There truly is no greater reward than feeling good!
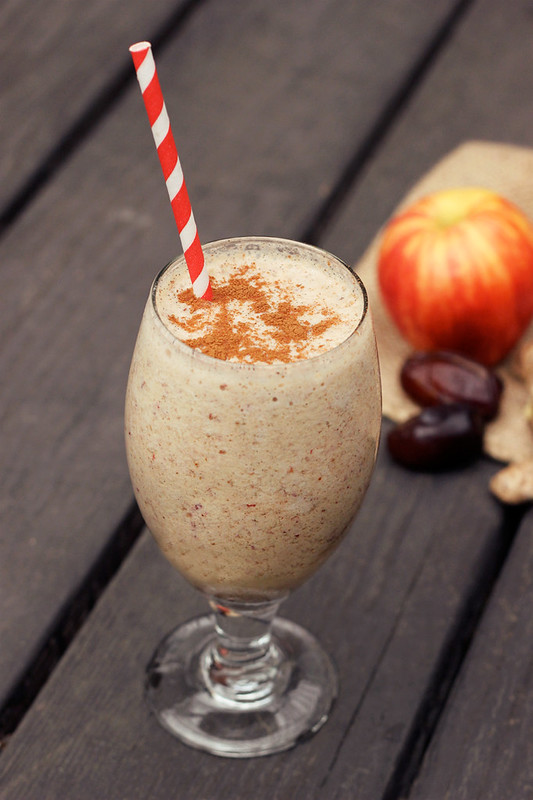
On the evening on day 2, I did experience some minor sweet cravings and Sherrie made the suggestion of stuffing a few dates with coconut oil, so I did just that and added some shredded unsweetened coconut on top. It felt like I was cheating. It was so delicious and rich. The next morning, I was looking for something a bit more substantial than a juice so I made this simple smoothie for breakfast. It really set the tone for my amazing day yesterday and it was perfect given the beautiful Autumn day that it was here in Southern California.
-
Fall Cleanse Green Juice
Onto day 2 of the 5-Day Fall Cleanse and I am feeling great! I really did need this little reset both physically and mentally. This juice was actually breakfast for day 1, yesterday. I should really call it, “Fridge Cleaning Juice” or “I am surprised to find anything healthy in the fridge with all the leftovers, wine and hard cider, juice”. It was a busy weekend and my fridge showed it. Saturday, we drove down to San Diego for the Gluten-free Oktoberfest, which was amazing! Sunday, we had a fun little late-day lunch with some of my favorite gluten-free girls Meg from Beard and Bonnet, Gina from So…Let’s Hang Out and Cara from Fork and Beans, plus Meg’s friend Amber was visiting from Georgia, too. Such a fun afternoon. I laughed so hard, we ate so well, cocktails were had and then just like that, they were all gone and I was sad. I seriously don’t know if I have ever hung out with that many ladies at once, that I had so much in common with.
-
Apple Fennel Salad Stack – Gluten-free w/ Vegan Option

This time of year, as excited as I am for all the comfort food, the hot meals, soups and stews, pumpkin baked goods and halloween candy – I do find myself missing all the fresh produce of summer. For me, there is nothing as satisfying as a healthy, crisp and light salad made from what is currently in season. I get so much enjoyment out of creating fall and winter salads, where the options are a bit more limited.
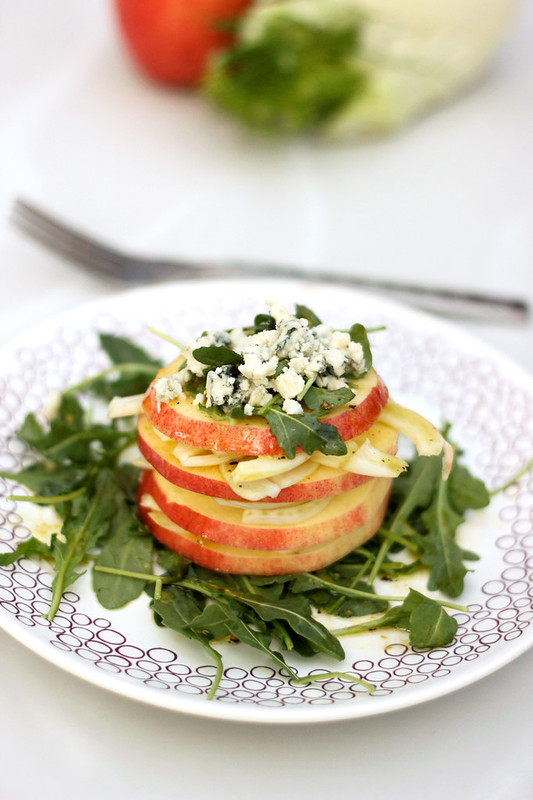
This simple and beautiful Apple Fennel Salad Stack is so quick to make and the finished result is so elegant and colorful. If you are vegan, feel free to leave off the cheese on top, it isn’t necessary at all, it just brings another layer of flavor that compliments the apples so well. Read the rest of this entry »
-
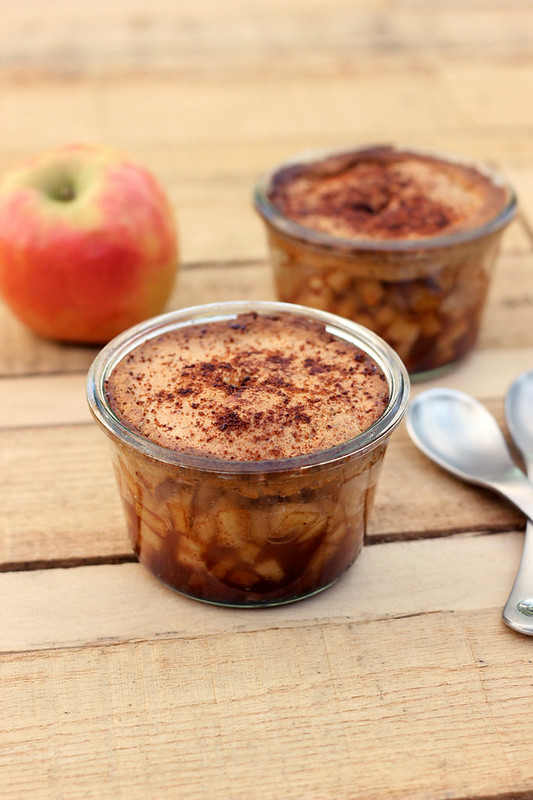
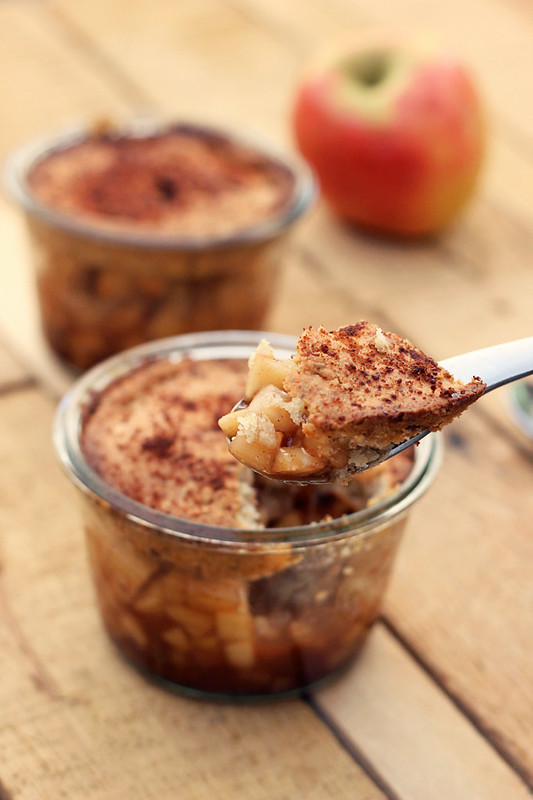
Grain-Free & Vegan Apple Cobbler In A Jar

Even if you were unaware of the dropping temps and earlier sunsets, given all the pumpkin and apple recipes floating around online right now, it’d be hard not to notice that fall is on its way! I just love fall and all of the yummy comforting food that comes along with it. Spiced apple anything is a pretty surefire way to get me into an autumnal mood! The smell wafting through the house while anything apple-spiced bakes is probably one of the best smells in the whole entire world. These single-serve grain-free vegan apple cobblers in-a-jar are so simple to make, and they are a lovely healthy alternative to the usually heavy-on-the-butter and grain-containing original. Plus, these are great for those of us with restricted diets.
If you follow a paleo diet, I think just swapping the maple syrup out for honey should make these more paleo friendly. If you can’t have nuts, try using sunflower seed flour in place of the almond flour. If you like butter and you aren’t vegan, swap out the coconut oil with some good local grass-fed butter.
One bite of these amazing little treats will have you in the fall state of mind, as quick as can be! What’s your favorite fall food?
This recipe was originally shared on the Free People Blog BLDG 25.
[print_this]Grain-Free & Vegan Apple Cobbler In A Jar
makes 2 servings
Apple Filling:
- 2 large apples, peeled and diced small
- 1/4 teaspoon ground cinnamon
- 1/8 teaspoon ground nutmeg
- 3 teaspoons arrowroot starch (or other starch, corn, tapioca, potato, etc.)
- 1 tablespoon fresh lemon juice
- 2 tablespoons maple syrup or honey
- 1/2 teaspoon vanilla
Cobbler Topping:
- 3/4 cup blanched almond flour (I use Honeyville brand)
- 3 tablespoons arrowroot starch (or other starch, corn, tapioca, potato, etc)
- 1/2 teaspoon baking powder
- 1 tablespoon ground flaxseed
- 1 tablespoon maple syrup (or honey)
- 1 tablespoon melted coconut oil or butter
- 2 tablespoons warm water
- dash of salt
- additional coconut oil for greasing jars
- coconut sugar or regular sugar for the top, plus additional cinnamon
Preheat oven to 375ºF
Lightly grease two half pint-sized jars with coconut oil*
In a medium mixing bowl, mix all of the cobbler topping ingredients together. Make sure all of the ingredients are incorporated very well. Get your hands in there, if need be.
Form the dough into two equal sized balls using your hands and wrap tightly in plastic wrap. Place it into the fridge while you prep the apples.
Once the apples are peeled, core them and cut them into small thin slices or small cubes, place them in a bowl and add the remaining filling ingredients.
Take the dough out of the fridge — it should be a bit firmer now — and roll it out between two pieces of parchment paper or plastic wrap. Don’t press too hard, just enough to flatten it out into circles the size of the jars (it helps to use the lid).
Carefully cover the apple filling with the cobbler dough, cut a small slit in the middle and sprinkle a little cinnamon and sugar (of your choice) on top.
Place the jars on a baking sheet and bake for approximately 20 minutes. The topping should be browned and the filling should be bubbling. Serve warm and, if you’d like, add some dairy-free ice cream or whipped coconut cream to the top.
*I used two 12-ounce sized jars but there was a little bit of extra room — that’s just the size of jars that I happen to have. If you use a half-pint sized jar they should be nice and jam packed with apples! [/print_this]
-
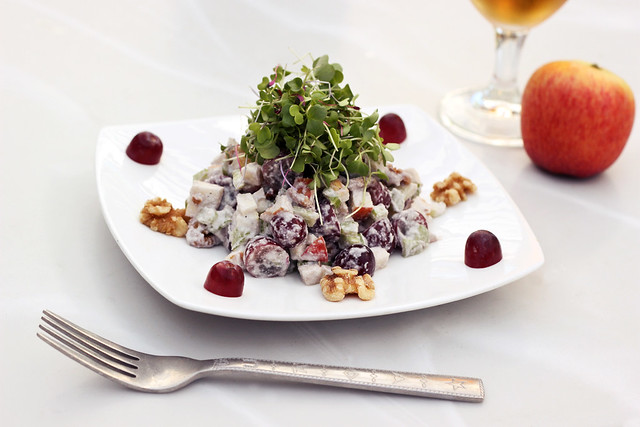
Vegan Waldorf Salad – Stella Artois Apple Cidre Perfect Pairing
It’s that time of year already, apple season is upon us! I think I may be in the minority when I say I might get more excited about the apples than pumpkins this time of year. GASP! I know right? While everyone else is going pumpkin crazy, I am quietly enjoying and celebrating the often-forgotten apple! This year I am lucky enough to have a small apple tree in our yard, that has already given me a few apples. Honestly, if you saw this tree, that would shock you. It is barely 3 and a half feet tall and really nothing spectacular, but it must be healthy, hearty and well since we’ve already gotten 4 big apples from it and it has another few that will be ready soon.
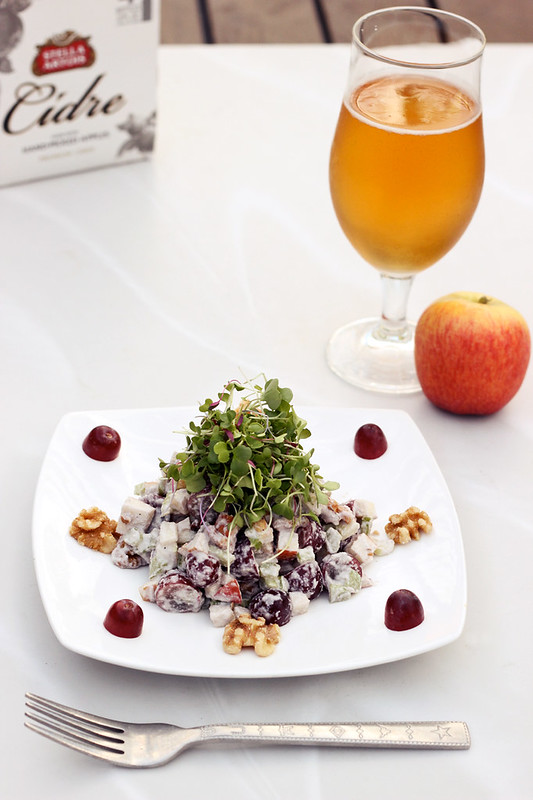
Since we won’t be getting a ton of apples from our tree, I wanted to make something that would highlight and use just one apple in a very special way. I didn’t want to just juice it or mix it up in a cake or some muffins. When I was offered the opportunity to try Stella Artois’ newest beverage, a delicious Apple Cidre, I was inspired to make a light and savory fall salad to pair with it.
Stella Artois Apple Cidre is a European-style cider made from fresh, hand-picked red apples with accents of peach, apricot, and orange. The crisp, and refreshing taste paired perfectly with this light, fresh salad. I will for sure be serving the two together at our next BBQ if we still have apples from the our tree. My favorite part of the Cidre is how it instantly brings me to the feeling of the fall that I grew up with back east! Something I am going to miss intensely this year! This Cidre has a hint of spice and the perfect apple flavor and it isn’t overly sweet like some ciders can be and it is far lighter and more natural tasting than most every other hard cider I have tried. It’s basically a grown-up spiked, sparkling apple juice! Plus, the best part is, like most hard ciders, Stella Artois’ Apple Cidre is naturally gluten-free. BONUS! Back in the day, I used to love Stella Artois’ signature lager, it was one of my go-to beers, but after going gluten-free nearly 9 years ago, I haven’t been able to enjoy it. So as you can imagine, I was super excited to see they had introduced a naturally gluten-free Apple Cidre to the market and of course, even more excited that it tastes so good.
-
Apple Spice Granola (Gluten-free + Vegan)

How is it already time to be thinking about fall? It just doesn’t seem right. I feel like we were just talking about summer being around the corner. Phew, it has flown by. I try really really hard not to rush the seasons. I personally don’t think we should be talking pumpkin recipes for at least a few weeks. What’s the hurry? Let’s enjoy the summer weather and produce while we still can.
I am going to try my hardest to hold off on pumpkin recipes at least until October. Let’s see if I can do it.
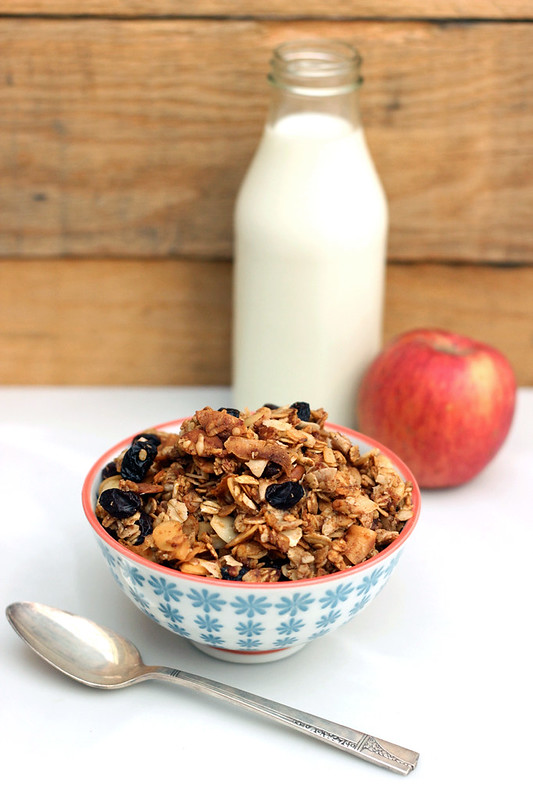
With that being said, we did get some apples in our CSA box this past week, so I was inspired to create something a little bit autumney. This granola is so simple to make and it is wonderful with your favorite dairy or non-dairy milk as cereal, it’s great over yogurt or ice cream or just on it’s own by the handful, as a snack. Read the rest of this entry » -
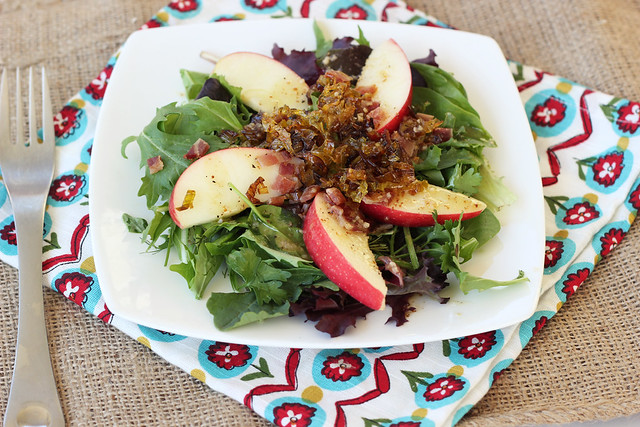
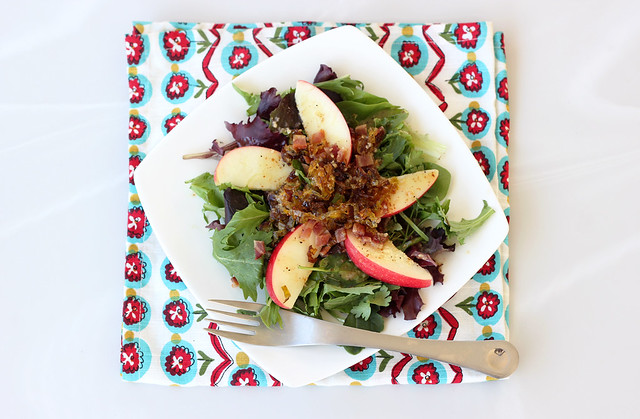
Mixed Greens Salad with Apples, Caramelized Leeks and Maple Dijon Dressing – Gluten-free + Dairy-free (vegan option)
This has been a bit of a trying week for me, getting back into town after being on the road for a week, plus I generally feel just a little bit down. Could be the change of the season and the daylight hours shifting (both always affect me with every season, even with fall, my favorite season) or maybe it’s the lack of sleep from traveling or the stress of this house-selling business. I have generally been staying upbeat and positive about trying to sell this house and our pending move to California, but I think it all might finally be getting to me. While we were away we had my mom come by the house to make sure it was all ready for a showing we had scheduled (we had it all cleaned and ready, but I wanted her to make sure there wasn’t mail sitting on the porch and I had her open windows and make it smell nice). While she was at our house and texting me about what to do, I got notice that the showing for 2 hours later was now cancelled. It happens, I know that. They have actually already rescheduled, so no major loss there, but there was something about being so far away, feeling terrible about my mom having to go out of her way to help and everything else on my mind. I actually welled up with tears and felt like I could lose it. Over one showing. I guess I hit my breaking point. Doesn’t happen often, but it does happen.
Really none of that has anything to do with this salad, except that with the change of the season and the general feeling of being a little down, I still know what my body craves and it is craving all of the wonderful seasonal produce we are surrounded by right now. Besides craving comforting foods like warm soups and stews, I also find myself craving beautiful vibrantly colored meals. Celebrating what is happening all around me outside, but also knowing that in a few short months it will be hard to find those beautiful hues. My very good friend April is beginning a new journey into Holistic Health Coaching and she sent out her first newsletter this morning. Not only was it super informative and so timely for me, but it had a line that really stuck with me “The transition to fall may leave us feeling exhilarated but unsettled, ungrounded.” That thought really resonated with me and definitely allowed me to accept what I was feeling right now with a bit less judgement and harshness.
With so much great produce in season right now, it is easy to plan simple meals to celebrate it all. This week I have been celebrating squash and apples specifically, but with this quick and light dinner I wanted to also include some of the beautiful greens that are in season as well as the leeks, both of which I picked up at my local Co-Op. This salad is so simple to put together and it really packs a beautiful punch of flavor from the applewood smoked bacon, the crisp and tart local gala apple, the delicious crispy and rich flavor from the caramelized leeks and of course the tart and slightly sweet maple dijon dressing. So much delicious goodness in one small salad.
If you are interested in reading a few Ayurveda tips for Autumn, check out this great article from Yoganonmous here. I came across it this morning and it definitely validated me in the way I have been feeling this week. Also, you can also check out my good friend April’s first newsletter that discusses the transition into Autumn and Winter and what we can do to ground ourselves and make it an easier shift. Plus, look for some upcoming guest-posts filled with informative holistic health tips and corresponding recipes from my good friend April here on Tasty Yummies.
How have you been feeling lately? Does the change in the seasons affect your moods?
[print_this]Mixed Greens Salad with Apples, Caramelized Leeks and Maple Dijon Dressing- Gluten-free + Dairy-free (vegan option)
Serves 4- 6-8 cups of mixed greens of your choice – lots of great greens in season right now
- 2 local, organic gala apples, cored and cut into slices (I cut each apple into 16 slices)
- 4 slices of local, pasture-raised applewood smoked bacon (leave off to make vegan)
- 1 large leek, rinsed very well, slice thinly white and light green parts only*
- 1-2 tablespoons of olive oil
- salt and pepper, to taste
Maple Dijon Dressing
adapted from this recipe- 1/4 cup olive oil
- 3 tablespoons apple cider vinegar
- 2 cloves garlic, minced
- 3 tablespoons maple syrup
- 2 tablespoons no-salt added dijon mustard
- salt and pepper, to taste
Preheat your oven to 400ºF
Combine all of the ingredients for the dressing in a small bowl or bottle and whisk (or shake) together well, to combine. Set aside.
Start by cookin your bacon in the oven (you can also cook it on the stovetop, but I find this way to be much easier and cleaner), line a baking sheet with foil and place your bacon on top. Place into the oven for 12-18 minutes until the bacon is nice and crisp. No need to flip it.
While the bacon is cooking, start caramelizing your leeks. Heat olive oil in a large skillet over a medium-high heat, once the oil is hot enough add the properly cleaned and thinly sliced leeks to the pan. Give them a good stir or two to coat them all in oil and to break them apart a bit. Turn the heat down if need be at any point if they start to cook too quickly. Gently toss the leeks around in the pan and cook slowly until they are golden browned and caramelized. Just as you would with onions. Take it slow, you don’t want them to burn up quickly, you want a nice slow cook to them. Once they are cooked to your liking, turn off the heat.
Once the bacon is done lay it on a paper towel lined plate to absorb some of the excess oil. Then cut it up or crumble it into small pieces.
Toss the greens with a small amount of the dressing. Plate the dressed greens and top each serving with a few apple slices, sprinkle the crumbled bacon over top and top it all with a good spoonful of the caramelized leeks. Drizzle additional dressing overtop all of it.
Serve immediately.
* a quick note on cleaning leeks: leeks tend to have a lot of dirt and grit in them. If you aren’t careful when cleaning them, you may think they are totally clean, start cooking with them and find your entire dish has a nasty grittiness to it. This can ruin a dish. After trimming off the ends (called the beards) and the dark green tops (save these for stocks). You can run them under cold water at this point, or even better, you can submerge the leeks in a large pot of cold water. Swirl them around to really remove all the grit and dirt. Drain well and then cut.
[/print_this]
-
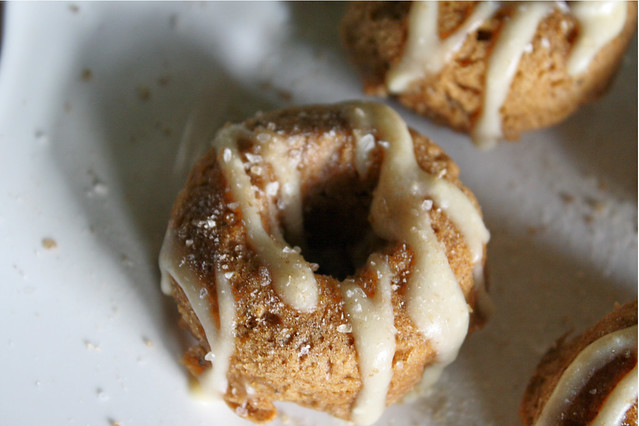
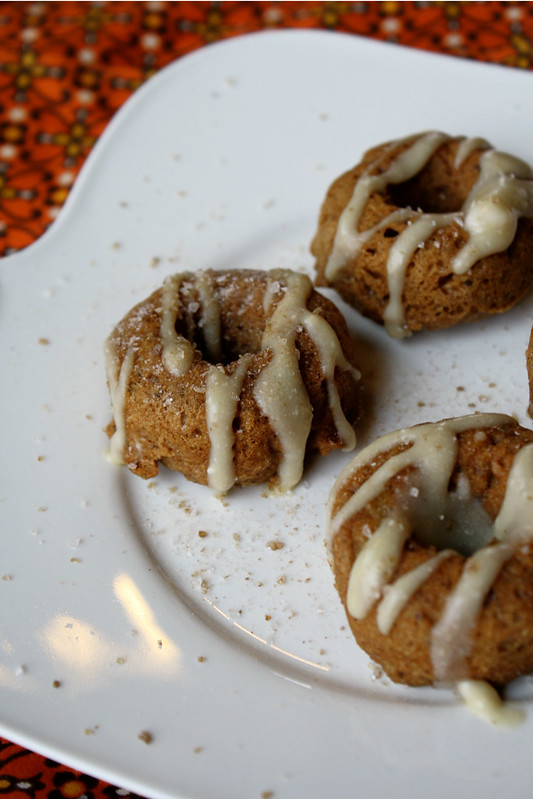
Tessa, The Domestic Diva: Maple Apple Cinnamon Donuts – Gluten-free + Vegan
As much as it saddened me to take nearly 2 weeks away from Tasty Yummies while we travel to Austin, Texas for SXSW and the Flatstock Rock Poster Convention, I am also very excited for the first time ever, to have a series of wonderful and very lovely guest bloggers holding down the fort while I am away. Right now I am in the car starting our journey from Buffalo, NY to Austin, TX, likely dreaming of these very doughnuts and all of the other delicious treats we have for you while I am gone. If only I could have found the time to make one of everything to take on the road with me, so I wouldn’t miss my kitchen too much.
I am excited that the first Tasty Yummies guest blogger, Tessa the Domestic Diva, made a very special donut recipe, just for you guys after reading about my own experience of making donuts for the very first time, not too long ago. Additionally she shares her three very popular donut recipes, which are all gluten-free and vegan. Tessa’s blog grabbed my attention recently both from the Allergy-Free Wednesday series she hosts with 5 other bloggers and more specifically with her Coconut Secret Bars, that inspired me to create my own Dark Chocolate Coconut Treats. I am so excited to have found her blog! All of Tessa’s recipes on her blog are free of gluten, dairy, and corn and each looks more delicious than the last. So now that you are drooling at the thought of even more donuts, please enjoy Donut Mania with Tessa the Domestic Diva!
When Beth asked me to do a guest post, I knew almost immediately I would like to create a donut for her. I enjoyed reading about her first donut adventure, and knew she would love some more spins to put that donut pan to good use, and that YOU all might too! I already had three donuts up on my blog, but the possibilities are really endless! (SSH!! Let me let you in on a little secret: baked donuts work well with most muffin batters! Add a hole and a little frosting, and you’ve created a crowd-pleasing donut! I won’t tell if you don’t!)
Donuts lend themselves to personal creativity and tastes very nicely. Think of a favorite flavor combo, and most likely you can make it happen. Go ahead, don that baker’s hat and start cooking! And if you are feeling less than adventurous (my sisters tease me all the time how I can whip things together in 10 minutes when it would take them 60), here is a recipe to get you started, and a few more to make sure you’re fully inspired and ready to bake!!
Here are some alternative donut recipes, with loads of frosting/topping options that can be used on ANY donut, all of which are wholesome, gluten-free, and vegan:Pumpkin Donuts
Healthy Cake Donuts (this post also talk about how to make donuts WITHOUT a donut pan!)
Banana Donuts
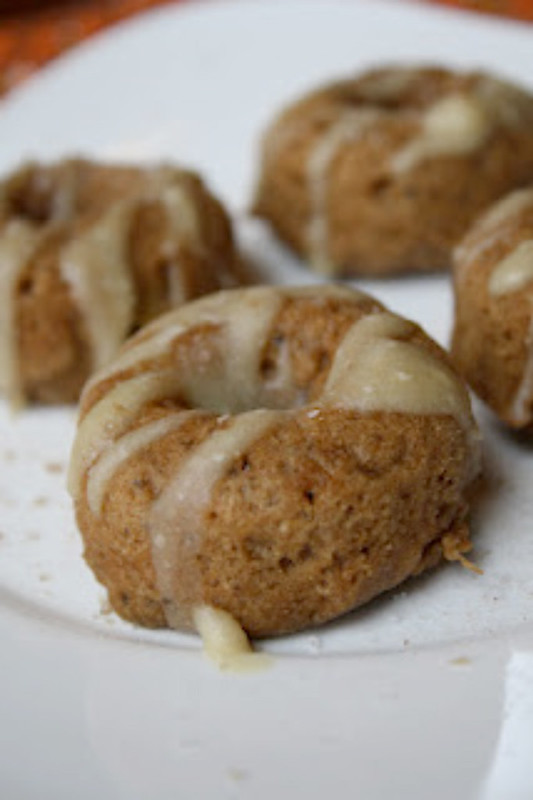
[print_this]Maple Apple Cinnamon Donuts, Vegan + Gluten-free
makes approximately 18 mini-donuts or 7-8 regular sized donuts (this depends on your pan)Wet:
- 1/2 cup applesauce
- 1/4 cup oil (I used melted coconut oil)
- 2 tablespoons chia meal/flax meal mixed w/ 3 tablespoons hot water
- 1/2 cup palm sugar (or other granulated sugar)
- 2 tablespoons maple syrup
- 1 teaspoon molasses
- 1 teaspoon vanilla
- 1/4 teaspoons maple extract (optional but yummy!)
Dry:
- 1/2 cup oat flour
- 1/2 cup teff flour (or brown rice)
- 1/4 cup potato starch (or tapioca)
- 1 1/2 teaspoons baking powder
- 1/2 teaspoon salt
- 1/4 teaspoon guar gum (optional)
- 1/2 cup finely diced tart apple
Maple Butter Glaze:
- 2 tablespoons Earth Balance (or butter)
- 2 tablespoons vegan cream cheese (Trader Joe’s has a new one made w/ coconut oil!)
- 2 tablespoons maple syrup to achieve desired consistency
Preheat your oven to 350 degrees. In a medium-mixing bowl, whisk the wet ingredients. Place the dry ingredients minus the diced apple, in order over the top. Whisk in to fully incorporate all ingredients. Fold in the diced apple.
Dollop spoonfuls of the batter into a greased donut pan. Fill about 2/3 full. Bake for about 8 minutes for mini donuts, and 12 for regular. You want the tops to be just done! I used a mini donut pan (12 holes) and made about 18 mini donuts.
Mix your glaze: Beat the cream cheese, butter, and maple syrup until smooth (I used an immersion blender to eliminate the lumps). Drizzle over the muffins. If you like your glaze thinner, you can add more maple syrup or milk of choice. If you like yours more like a spreadable frosting, reduce the amount of liquid!
[/print_this]
-
Green Goddess Juice
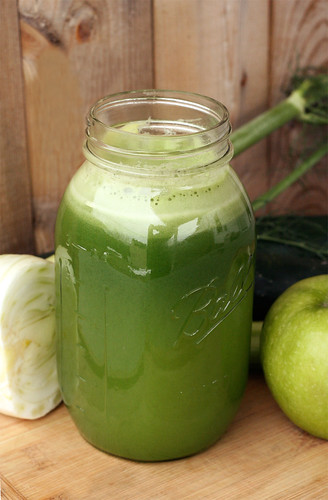
Yup – I am still on a major juicing kick. I am loving it. I am so full of energy, I feel totally content with what I am eating otherwise and I have no cravings at all. I think by cutting back on some things but not going into a full on cleanse or detox, I am able to reap many of the benefits without putting my body through hell of those rough few first days and I am not taxing my digestive system, which is already a bit grumpy. I didn’t want to do that to my body right now.
I am excited because every day my tummy is feeling better and better and I am really able to notice what is triggering it when it does get upset again. The juicing has really given my digestive tract the rest that it so badly needed. This Green Goddess juice in particular is full of so many of my favorite things and it really made me feel great, on top of the energy I am already bursting with, this juice actually made me feel like I had more! That’s why I decided to call it Green Goddess Juice. Truthfully I really wanted to call it “Green Superheroine Juice”, but that just didn’t have the same ring to it, but it did make me feel like I had super powers! I once again included fennel in this juice, I have been trying to include it in every juice I am making right now since it is so great for your digestion, plus I am really loving the unique flavor it adds.
We had a very busy weekend filled with tons of home projects like ripping up carpeting, reflooring our bedroom, moving furniture around and work for clients. While doing all of those things, I have been ridding myself of so much stuff, both in my personal life and my digital life. I have been going through all of my clothes and accessories and getting rid of things I no longer need or wear. I have donated so many bags of clothes and other goodies to the Salvation Army in the last few weeks and yesterday I did the same to my computer. Well kinda. I backed up and removed over 200 GB of files on my computer that I really didn’t need on there, so my computer can perform better. I streamlined my already existing backup system to be even more thorough and easy to manage. I also organized my email inbox and archived old emails. I took my inbox from over 4000 email down to 81! It feels so good to be lightening my baggage in all of these areas of my life, it is instantly therapeutic and cathartic. It only takes a few bags full of stuff and a handful of gigabytes for you to feel that liberation and suddenly you find yourself looking at everything and thinking “Do I really need that?”.
Since we plan to move later this year and we are in the process of finishing up a few projects to the house that we have to do before we put it on the market, there really has never been a better time to do all of this, than now. I have been putting it off because it takes time and some tough decision making to decide what things in your life you don’t need, but once you start, it really gets easier and easier.
Now I can walk into a room in our house and feel the weight that has been lifted. There is still a lot of stuff that we need to go through and I actually can’t wait! It is ironic the timing on all of this, with me deciding to also take out things from my diet that I really don’t need. I think I can say the same for my eating as my house, I was putting off removing certain things but now that I have, I feel great! I honestly haven’t felt as good as I do right now, in years. So, if there are boxes you need to go through, piles of shoes you know you don’t wear, an email inbox that is jammed full of messages, etc – make the time to go through it. It doesn’t take as long as you think, in the last 3 days I have gotten rid of more stuff from my life than I have in the last year plus I still had time to grocery shop, go to yoga, bake bread, make soup, watch a movie and some football with my hubby and more. Don’t talk yourself out of things, don’t put them off, just do them. It feels better to accomplish something than it does to sit down and feel guilty that you aren’t.
I plan to continue purging things from my life this upcoming week and I am looking forward to it instead of dreading it and I also plan to continue juicing, so look for more recipes.
Have you gotten rid of anything in your life lately? How does it feel?
[print_this]Green Goddess Juice
Makes 1 large serving or 2 smaller (it makes about 1 quart)
(if you want less juice go with 1 cucumber and 1 stalk of celery)2 cucumbers
1 granny smith apple
1/2 or 1/3 of a large bulb of fennel (stalks and leaves included)
2 stalks of celeryJuice all of the ingredients, saving the celery for last since it is stringy and can sometimes clog the machine. Serve immediately.
[/print_this]
-
Digest Ease Juice
As I have previously mentioned this week, I have been on a bit of a healing path for the last few days. Trying to ease my digestion woes caused by a grumpy ileocecal valve. In addition to avoiding all dairy, I have also cut out caffeine, alcohol, sugar and chocolate. I am also avoiding roughage like raw leafy green vegetables, raw whole nuts and seeds and spicy foods, among other things. One of the things I have been doing every day is after my morning yoga practice, I come home and make a smoothie or a fresh juice blend. This has been a nice way to get some necessary nutrients and to also give my upset digestion a little rest. I have really been enjoying it. Then I have a light lunch and a light dinner. I have been drinking a lot of water, not really snacking much and making sure to self-massage my abdomen (you can read more about that in my last post).
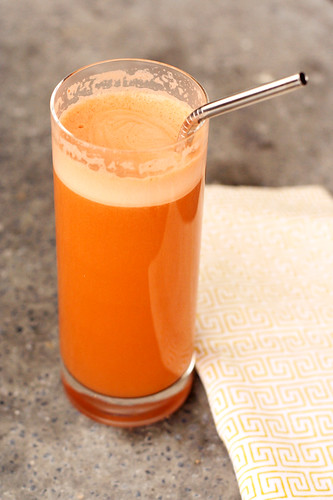
In my research to find the best ingredients for juicing to help with digestion, the ingredients I used in this particular juice seemed to be at the top of many of the lists. Here is just a tad bit of info about each ingredient from what I have read. I’ve learned that carrot juice is considered the golden juice of healing, it is an excellent tonic for just about every ailment imaginable. It can be consumed in large quantities as well. Carrots are a natural blast of high energy and they are a powerful internal cleanser and detoxifier and they can help an inflamed colon (I dunno if mine is, but it can’t hurt either way).
Apples remove toxins from the intenstines; stimulate peristalsis and bowels; flush kidneys; natural acids for digestion. Apples contain pectin which is a form of soluble fiber. This helps with the detox flush that removes cholesterol and toxins through the liver and kidneys. Apples also contain a substance called malic acid, that helps maintain liver function and improves digestion.
Celery has been known to help in diseases of the kidneys, pancreas, liver and gallbladder. The nutrients in the fiber released during juicing, aid in bowel movements. Celery promotes healthy and normal kidney function by aiding elimination of toxins from the body. While eliminating toxins, it also prevents formation of kidney stones. Celery actually boasts a very very long list of incredible powers, these are just some of the many.
Fennel is probably best well known as a digestive aid. It can help with trapped wind, poor digestion and more painful conditions such as gastritis and enteritis. Fennel is also a diuretic and therefore is very effective when dealing with kidney or bladder troubles and fluid retention. It is also a general pick-me-up and helps to combat general tiredness and fatigue.
Ginger helps to soothe and improve digestion by increasing secretions of digestive juices in the stomach. It also aids blood circulation and metabolism, increases the immune system and strengthens the internal organs of the digestive tract.
When juicing you always want to use organic produce whenever possible and regardless if produce is organic or not, you always want to thoroughly wash it. I am absolutely no expert on juicing so please use your own judgement and do your research before jumping into any sort of juice-only cleanse or detox. Leanne of Healthful Pursuit, a holistic nutritionist, has been doing an enlightening series of posts this week talking about her own journey to healing her digestion. Leanne’s posts have all been very thorough and provide some really great information about what she is going through, how she feels and what she is doing. Yesterday’s post (the third in the series) features some really great information as well as two great juice recipes. Be sure to check it out and follow Leanne along her journey, as I am.
Look for more juice recipes from me over the next two weeks and hopefully in that time my photos of said juice will get better. After I was about halfway done with this glass of juice and was looking at the photos, I realized how boring and blah they were. I need a fun glass or I should have put some of the ingredients in the background. Ah well.
What is your favorite juice combination?
[print_this]Digest Ease Juice
serves 11/2 to 1-inch piece of ginger
1/4 to 1/2 of a large fennel bulb (about 4 oz), I also included some stalk and leaves
3 carrots
1 apple (I used a honeycrisp)
2 celery stalks, with leavesJuice all of the ingredients, saving the celery for last since it is stringy and can sometimes clog the machine. Serve immediately.
[/print_this]
-
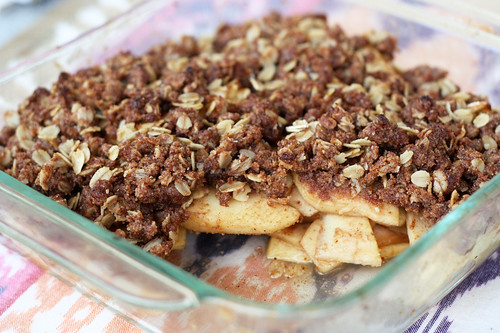
Apple Crisp (Gluten-Free and Vegan)
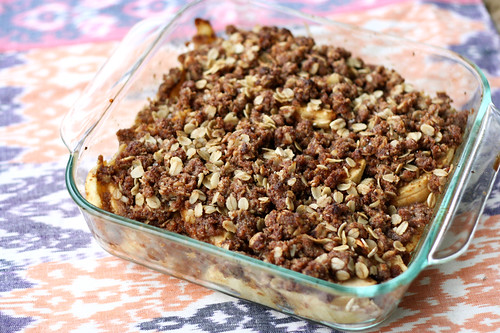
I absolutely love my mom’s apple crisp, it is one of my favorite things about fall! I have been making my own gluten-free version for a while now and it is so delicious. After I made the vegan apple cobbler two weeks ago with palm oil shortening instead of butter, I decided I wanted to make an updated and healthier version of the apple crisp, too. I’ve actually been calling it Apple Crisp 2.0, but I didn’t think that would make for a good title or dish name. This apple crisp is as healthy as dessert can get in my opinion – it is gluten-free, vegan, refined sugar-free, dairy free, egg free and corn free. Besides using organic all natural palm oil shortening in place of butter in recipes to make them vegan, I have also really fallen in love with baking with coconut oil. When solid, it makes a great replacement for butter in many baking recipes that call for cutting it in. The benefits of coconut oil are numerous and can be attributed to the presence of lauric acid, capric acid and caprylic acid, and its properties such as antimicrobial, antioxidant, antifungal, antibacterial, soothing, etc. It is great for your skin and hair when used topically and has been found to have anti-aging, regenerative effects. We even use it topically on and feed it to our dog, Seri, when she has itchy skin. She LOVES the way it tastes.
I was also excited to play with date sugar and maple syrup in this recipe instead of refined white or brown sugar. It turned out so perfectly sweet. Date sugar is totally unprocessed, unrefined and raw. It naturally contains fiber and is loaded with vitamins and minerals like calcium, iron, magnesium, phosphorus, zinc, iron, copper, manganese, and selenium. Because date sugar doesn’t melt the way sugar does, I knew I wouldn’t get that delicious syrup with the apples that I usually get with the brown sugar, so that is how I decided to add in the maple syrup. It was such a small amount, you can barely distinguish any maple flavoring, if any at all. Other options instead of the maple syrup would be rice syrup or molasses or if you aren’t vegan, you could also use honey. I am so excited about how this apple crisp turned out. It has so much flavor and I actually think it is better than any apple crisp I have made in the past.
You could serve this with your favorite vegan (or not vegan) ice cream or whipped topping. Something that I saw a while back on Healthful Pursuit that I have been meaning to try is coconut whip, which I think would be perfect on top of this recipe. I may just need to make that happen this week.

Gluten-free Apple Crisp (Vegan)
serves 6Filling:
- 4 cups of peeled and sliced apples (4 med)
- 2 teaspoon fresh lemon juice
- 1 tablespoon maple syrup
- 1 teaspoon vanilla
- 1/4 teaspoon ground cinnamon
- 1/4 teaspoon ground nutmeg
Topping:
- 1/2 cup blanched almond flour
- 1/2 cup certified gluten-free oats (I like Bob’s Red Mill Gluten Free Rolled Oats)
- 1 tsp ground cinnamon
- 1 tsp ground nutmeg
- 1/3 cup date sugar, coconut sugar or other granulated sugar of your choice
- 1 1/2 tablespoons maple syrup (1 for the topping and 1/2 to drizzle over the top)
- 1/3 cup coconut oil (make sure it is somewhat solid and not liquid)
Preheat oven to 375°F.
Place apples in an 8-inch square pan, pour lemon juice over. Add 1 tablespoon of maple syrup, spices and vanilla, toss around to combine.Mix almond flour, oats, spices, date sugar and maple syrup together in a medium sized mixing bowl. Cut in coconut oil in to make crumbly consistency.
Sprinkle over the apples, drizzle remaining 1/2 tablespoon of maple syrup over top and bake 30-40 minutes or until apples are tender and topping is golden brown. Serve warm.
-
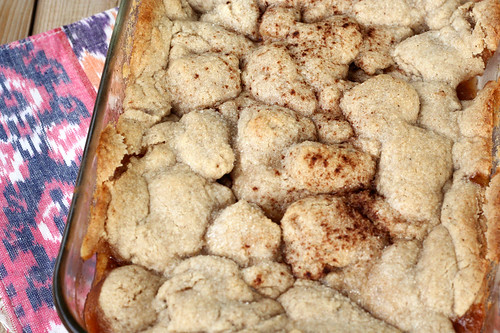
Gluten-free Vegan Apple Cobbler
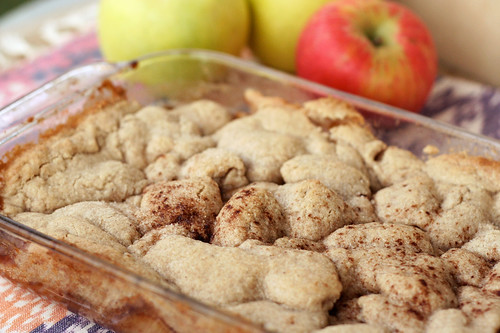
First off, I know the name makes this dessert sound so far off from the traditional cobblers that we all know and love. How can a cobbler be good without flour or butter? I am sure you are thinking this tastes like a healthy hippie dessert, made from sticks and dirt. WRONG. You really would never know that the gluten or the dairy is missing in this one. It is full of flavor and is so deliciously satisfying. My husband, Mark, is a southern boy who loves his cobbler. He actually gets angry at crisps and how “stupid they are” (in his words). Whenever we head down south, he seeks out cobbler on every trip. He loved this cobbler, he kept telling me he couldn’t believe it was gluten-free! He of course served a big ‘ol scoop of vanilla ice cream on top of it, but I can’t really blame him.
I honestly was playing around with this recipe thinking it would likely not work on the first try and I would have to try it again and again to get it right, so I am pretty shocked that it not only worked, but it was absolutely delicious. I plan to make it again in a smaller pan next time, so both the apple filling and the cobbler topping are a bit thicker, but that is just a personal preference. When I loaded the apples into the pan it looks like so much, but as it cooked down it definitely sunk in a bit, so maybe the answer is more apples. I liked that the cobbler topping got a bit brown and crisp and I love how beautiful it looked as it baked and sunk in around the apples pieces. The spices were perfect, the topping was crisp and perfectly doughy and the sweetness level was exactly where it needed to be. Obviously everyone’s personal sweet tooth is a little different plus the sweetness of the apples may affect how sweet the filling is, so taste your apple filling before you put the topping on, you may find that you want more sugar. I personally don’t like excruciatingly sweet desserts. Plus, since it isn’t disgustingly sweet it would also make a delicious breakfast, if you are into that sorta thing.
Speaking of sweet, feel free to play around with sweetener options too, I had wanted to use coconut sugar, but I finished off what I had in the pantry on the pumpkin bread. You could also play around with using honey or maple syrup as the sweetener in the apple filling. Just remember if you use a liquid sweetener in the cobbler topping, to adjust your flours accordingly. Also, if you aren’t vegan and you absolutely need to have butter in your cobbler, you could certainly substitute butter for the palm oil shortening. I just really wanted to try making this without butter. I am so excited that this cobbler came together and it’s so incredibly delicious, plus low in sugar (just a half cup in the whole recipe), no butter and gluten-free. I am so proud of this!

Gluten-free Vegan Apple Cobbler
serves 6Apple Cobbler Filling
2 1/2 pounds (or more) peeled apples – I used a mix of Crispin’ and Honeycrisp apples
1/4 cup organic raw cane sugar or coconut sugar
1 tablespoon fresh lemon juice
1/2 teaspoon cinnamon
1/2 teaspoon nutmeg
1/4 teaspoon cloves
1 teaspoon vanillaCobbler topping
3/4 cup almond flour
1/4 cup sorghum flour
1/2 cup tapioca starch
1 teaspoon fine sea salt
1/4 cup organic raw cane sugar or coconut sugar (plus a little bit more to sprinkle on top)
1/2 teaspoon cinnamon, ground (plus a little bit more to sprinkle on top)
1/4 teaspoon nutmeg, ground
1/4 cup unsweetened organic almond milk, you may need less
4 tablespoons chilled organic palm oil shortening (you can use unsalted butter here instead, if you wish)Preheat the oven to 375º F.
Make the cobbler topping first. Combine almond flour, sorghum flour and tapioca start with the salt, sugar, cinnamon and nutmeg. Cut the pieces of shortening into the flour mixture until it comes together, it should be like coarse sand. Pour in the almond milk, a little at a time, continuing to stir until it all just starts to come together. You may not need all of the almond milk, so don’t add it in too quickly. It will feel a bit sticky, don’t worry.
Form the dough into a ball using your hands and wrap tightly in plastic wrap. Place it into the fridge while you peel the apples. Once the apples are peeled, core them and cut them into thin slices or small cubes, place them in your baking pan and drizzle them with the lemon juice and set them aside. (I used a 11″ x 7″ pan, but I think next time I would use my 8″ x 8″ pan.)
Take the dough out of the fridge, it should be a bit firmer now and roll it out between two pieces of parchment paper or plastic wrap. Don’t press too hard, just enough to flatten it out into a square the size of the pan. Place the rolled out square onto a baking sheet and place it into freezer, let it chill while you finish preparing the apple filling.
Add the sugar, spices and vanilla to the apples, toss gently to combine everything. Check on your dough, if it seems nice and firm and chilled, pull it out and gently lay it over the top of the apples, it is definitely a tricky maneuver but you can do it. I just peeled the parchment paper off of one side and flipped that size down on top of the apples, then I carefully peeled the other parchment sheet off the top. If any of the dough rips or peels off, hangs over, etc – you can just easily fix it up with your hands. The dough is really forgiving and it definitely doesn’t have to be perfect. If all else fails and your cobbler topping is being a jerk, or it’s too sticky, just spoon it on top biscuit style, it will still be totally delicious.
Sprinkle another teaspoon or so of sugar on top of the cobbler as well as a little sprinkle of cinnamon. Place the pan in the oven and bake the cobbler for 35-40 minutes, until the filling is bubbling and the topping is brown and firm. Cool for 5 to 10 minutes, then serve.
-
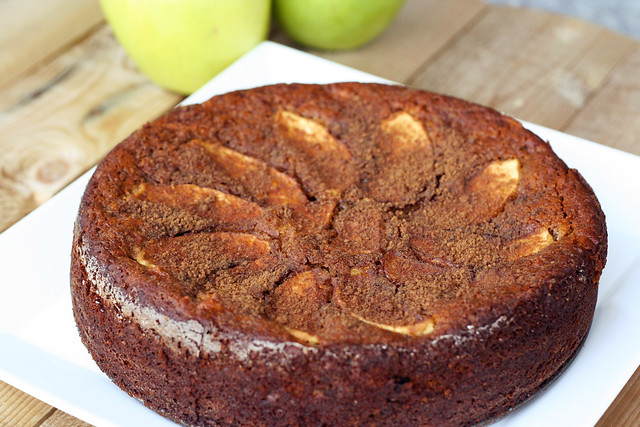
Gluten-Free Apple Spice Cake
This afternoon when I took a break from work to have lunch, I was struggling to figure out what to make since our fridge is looking a bit bare. We are leaving Monday morning to go to Birmingham for a job we are working on, so we are nearing the end of the planned meals and the groceries I bought earlier in the week. As I sat thinking for a minute, it came to me, I made a chickpea, kale, sun-dried tomato salad with goat cheese and a homemade multi-grain mustard vinaigrette, on the side I toasted up one of those delicious gluten-free multi-grain rolls I had made earlier in the week and topped it with a tad bit of garlic butter and small sprinkle of Parmigiano Reggiano. As I was “whipping” this all up, Mark sat down to eat his lunch, a peanut butter and jelly sandwich, and he started laughing at me and my creation. First he told me how jealous he was of my lunch and that he wished he had waited to see what I came up with. Then, he asked ‘what is your first memory of really loving good food. Like, at what age do you remember thinking, THIS is really good food?’
It was such a good question, I really had to think about it. I didn’t really have one solid memory, I just always remember loving good home-cooked food. Besides the traditional and super delicious Greek foods my dad and his family always made for holidays and the like, my parents cooked dinner every single night for us. My dad did the majority of the cooking, my mom most of the baking, but my mom had some really classic and comforting dishes, that I still think very fondly of now as an adult. One of my favorite memories growing up, that I always think of, was when my mom would make her homemade tomato sauce, totally from scratch, and the whole house would fill with the amazing smell of her sauce. I love my mom’s sauce so much. I used to come into the kitchen quite often while it would simmer away and grab the spoon and take a huge taste. I would sometimes grab a bowl from the cupboard and just ladle a ton of the sauce into it, maybe a meatball or two and just spoon it into my mouth like soup. It was so good. She never bought the jarred spaghetti sauce crap. It was that way for almost everything my family made. There was a major emphasis on homemade food. I am sure that is a large part of where I got my love of food and cooking from.
I asked Mark what he remembers and he told me about him being really young and biting into a really good ham sandwich and think “woah, this ham sandwich is REALLY really good” – haha. I can totally see a young, adorable little Mark all excited about his ham sandwich, likely served with some southern style sweet tea or orange soda on the side.
Can you remember the first time you really realized your love for good, home cooked food? Were you a kid? Or did you not really realize your love of food until you were an adult?
I made this cake yesterday morning. I was going to my sister’s apartment for a party in the evening and she asked everyone to bring a snack and something to drink. Since I knew there would be tons of savory snack options and wine, I decided I wanted to bring a healthy fall inspired dessert and some spiced rum and apple cider. At first I thought about making my gluten-free apple crisp (well really it’s my Mom’s recipe), but then I thought up the idea of an apple cake made with some of that great almond flour that I am obsessed with and just a tad bit of honey and dates as the sweetener. Look at me, all confident after my cookie recipe last week. I baked a cake, guys! My own cake with my own recipe.
The cake turned out great, I honestly have to say I was a little surprised, I had visions of the entire thing sinking in, or just being totally tasteless. It was the right amount of moist, which I honestly was a bit worried about, it seemed like so many wet ingredients to me. The spices all sang in perfect harmony with the apples and the dates and the small amount of honey surprisingly made it the perfect amount of sweet. I honestly hate super sweet cake, I think that is one of the reasons I don’t care for most cakes.
I cut into the cake to take photos to post the recipe here on the blog, but I didn’t taste it before I brought it to my sister’s. It seemed kinda tacky to show up with a whole cake, with one piece missing. So I served it up and crossed my fingers! Every one that tried it, loved it and some even asked for the recipe! Yay – success! This cake is gluten-free, dairy-free and egg-free, it is also easily made vegan by substituting maple syrup for the honey.

[print_this]Gluten-free Apple Spice Cake
Serves 8-10- 2 cups blanched almond flour (meal) – I like Honeyville
- 1/2 cup chickpea flour
- 1/2 cup tapioca starch
- 2 teaspoons baking powder
- 1 teaspoon baking soda
- 1 teaspoon ground cinnamon
- 1/2 teaspoon nutmeg
- 1/4 teaspoon ground ginger
- 1/4 teaspoon ground clove
- 1/4 teaspoon sea salt
- 1 cup apple cider (unsweetened) (you could also try unsweetened apple sauce)
- 1/4 cup grape seed oil
- 1/4 cup unsweetened almond milk (cow’s milks or other non-dairy milk should work as well)
- 1/2 cup honey (use maple syrup to make vegan)
- 2 tablespoons fresh lemon juice
- 1 teaspoon vanilla extract
- 2-3 peeled and chopped medium-sized apples, reserve half (or more) of one peeled apple to slice thinly for the top of the cake (I used two very large Crispin apples that we picked last weekend at Blackman Homestead Farm)
- 8 or so Medjool dates, pitted and finely chopped
Optional add ins:
- 1/2 cup chopped walnuts or other nut
- 1/2 cup raisins or craneberries
Topping:
- 1 tablespoon brown sugar or raw sugar
- 1/2 teaspoon ground cinnamon
- 1/4 teaspoon ground nutmeg
Preheat your oven to 350ºF. Grease and lightly flour (I used sweet rice flour) a 9″ springform pan.
In a large mixing bowl, add the almond flour, chickpea flour, tapioca starch, baking powder, baking soda, all the spices and the salt. Whisk together well so it’s all evenly mixed.
In a separate mixing bowl, whisk together well the apple cider, grape seed oil, almond milk, honey, lemon juice and vanilla. Add the apple pieces and the finely chopped dates. Mix well to incorporate.
Pour the wet ingredients into dry and stir by hand to combine. Be sure it is well mixed and there are no flour lumps.
Pour the cake batter into the prepared springform pan and top with the remaining apple slices in a circular pattern . Use as many or as few slices as you’d like. (I actually wish I had used a few more apple slices, but I was afraid to overdo it.) Mix together the sugar, cinnamon and nutmeg and sprinkle the mixture on top of the cake.
Bake the cake for about 60-70 minutes or until a tester or a very thin knife inserted in the middle of the cake comes out clean. Allow the cake to cool for about 15-20 minutes, or longer before removing the ring on the springform pan, you may need to loosen the cake from the sides of the pan with a think spatula or knife. Slice with a sharp knife and serve slightly warm or at room temperature. [/print_this]
-
Green Smoothie

I have to say, I am having fun experimenting with different things for breakfast. I am actually excited to get up in the morning and cook or prepare something. So many mornings I tend to feel stressed about what to have for breakfast and I get frustrated. This smoothie may be a turn off to some of you due to its color, though I think it is quite beautiful. Don’t be fooled, it is so much tastier and sweeter than you could ever imagine and such satisfying breakfast. Such a nice way to start your day, with that beautiful green color and a healthy drink. Again, you could really change this around so many different ways, it probably doesn’t need the peaches but I thought rather than ice cubes a few frozen peaches would be nice for another layer of flavor. The parsley gave it such a bright and fresh taste, certainly this can be left out too if you don’t have parsley or don’t care for it.
Green Smoothie
(serves 1)1 cup loosely packed organic baby spinach
3/4 cup organic white grape juice (no sugar added)
1 small organic granny smith apple, peeled, cored and cut into 1 inch cubes
1 small handful frozen organic peaches (about 5 or 6 wedges)
1 handful fresh parsley
(add water if necessary to thin)Add all ingredients to your blender, process until smooth. Add more ice or water as needed to get desired thickness.
-
Millet and Apple Salad with Curry Dressing

Yes, another millet salad. This is great warm, cold or room temperature. I ate it warm, just after the millet was done cooking. I have to say, tossing millet with fruits, veggies, nuts, etc, to create a salad, has to be one of my new favorite things. It works perfectly as a starter, side dish or in this case, a main course. I came home and wanted to throw something together quick for a dinner for just myself and I didn’t have a huge appetite. This has the perfect combination of so many great things, spicy, sweet and crunchy. The colors on this dish are perfectly beautiful. The curry flavor isn’t overpowering and is perfect with the fresh mint, which I was happy to be cooking with, we still have so much of it growing in the yard. This is another great vegan dish to take to a party to share or maybe even a Thanksgiving side.
Warm Millet and Apple Salad with Curry Dressing
Serves 4
adapted from Martha Stewart Living, October 20041/4 cup raw sliced almonds
1 cup organic whole millet
2 teaspoons olive oil
1 teaspoon honey (use maple syrup to make vegan)
1 tablespoon finely chopped shallot
1 1/2 teaspoons curry powder
1/4 teaspoon coarse salt
2 tablespoons fresh lemon juice
Freshly ground pepper
2 tablespoons extra-virgin olive oil
1/4 cup dried currants
1 small apple, cut into 1/8-inch-thick wedges
1/4 cup loosely packed fresh mint leaves, coarsely chopped, plus more for garnishPreheat oven to 375º. Spread almonds on a rimmed baking sheet; toast in oven until lightly toasted and fragrant, about 7 minutes.
In heavy skillet heat 1 tsp of oil, add the millet and toast gently until the grain is tan. Bring the water to a boil in saucepan, add remaining oil and grain. Stir; cover and simmer gently for 25 to 30 minutes to desired texture or until all of the water is absorbed.
Whisk together honey, shallot, curry powder, salt, and lemon juice in a large bowl. Season with pepper. Whisking constantly, pour in oil in a slow, steady stream; whisk until dressing is emulsified. Add millet, currants, apple, mint, and almonds; toss well. Garnish with mint.
-
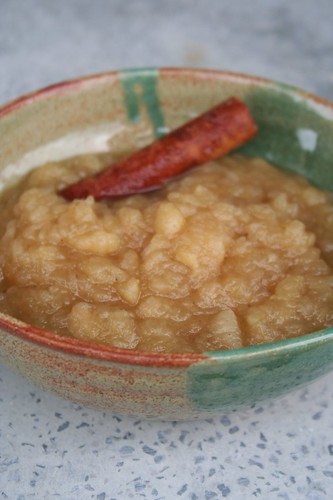
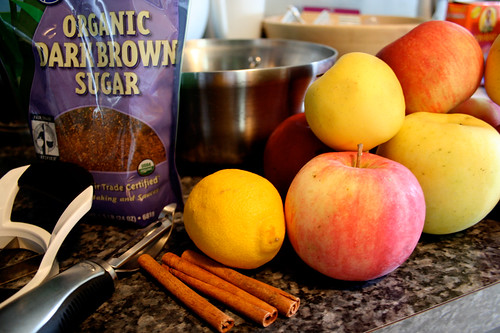
Chunky Applesauce
My friend Margaux, shared her family’s recipe for applesauce on her blog, Sweet and Savory Kitchens, a couple of weeks back and I haven’t been able to stop thinking about applesauce, since. The smell in your kitchen and that unremarkable old-fashioned taste, just reminds me of being a kid, for some reason. My mom must have made applesauce when we were kids. I would like to have homemade applesauce simmering on the stove everyday during Autumn, just so I could enjoy that lovely smell.
Applesauce is a great way to use up the apples that are maybe a bit too bruised and dinged up or that may have started to get a bit softer. We went apple picking a few weeks back and I was a feeling bit “appled-out”, I think I may have eaten one too many whole apples, so I thought this would be a great way to use up the last of them. This applesauce is great on its own as a side dish, it’s a wonderful and healthy snack or dessert, you can serve it over vanilla ice cream or yogurt, spread it on toast and you can eat it warm or cold. It’s just a great homestyle dish that is incredibly easy to make.
I like the flavor from the spices and how it pairs so nicely with the apples, if you are a purist and just want to enjoy the apple flavor, leave out the spices. I also tend to like my applesauce on the chunky side, so I hardly mash mine up, though some folks love a smooth pureed applesauce, whatever you like, this recipe is super simple and in no time your house will smell so good, you won’t want to leave.
Chunky Applesauce
3 to 4 lbs of apples, peeled, cored and sliced ( I think I used about 8 apples, a couple different varieties*, left over from apple picking)
Juice of one lemon
3/4 cup water
1/4 cup organic dark brown sugar
2 tablespoons organic pure cane sugar
3 whole cinnamon sticks (3-inch sticks)
2 whole star anise
1 teaspoon ground cloves
1/2 teaspoon saltAs you are slicing and peeling your apples, place them in a large saucepan. Once you have all of your apples in there, place the saucepan over a medium-high heat, add the lemon juice and water. Stir in the sugars and add in the spices and the salt. Stir to combine. Bring the mixture to a boil then lower to a low-medium heat and simmer for 25-30 minutes or until the apples are thoroughly cooked. They will start to mash-up and breakdown on their own. Once your apples are fully cooked, and soft, remove the pan from the heat and remove the cinnamon sticks and star anise. Mash it up with a potato masher or a large wooden spoon, it won’t take much. Leave your sauce as chunky as you would like. If you like a very smooth applesauce you can blend it in your blender or food processor. Serve warm or cool.
This applesauce will keep a few weeks, covered in the refrigerator or it can easily be stored in your freezer.
* Be sure to choose a good quality sweet cooking apple such as – Cortland, Empire, Gala, Golden Delicious, Granny Smith, HoneyCrisp, McIntosh, Pink Lady, Rome, Fuji, Ginger Gold or Jonathan. I think I used a combination of golden delicious and McIntosh, not entirely sure since I was apple picking with my high-energy 3-year old nephew, Noah.
-
Apple, Gruyère and Sage Muffins (Gluten-Free)
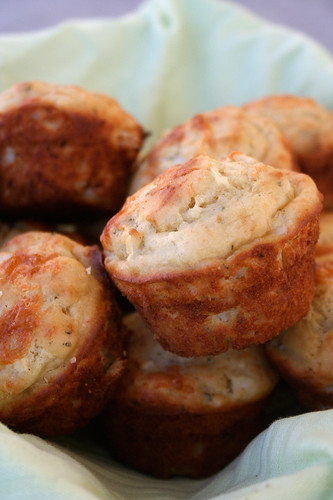
I would LOVE to take credit for this amazing recipe and all of it’s tastiness. But, I cannot. I simply saw the recipe, knew they would be amazing and made them. Now I am sharing it with you because you really need to make them yourself. Someone recently told me about Cannelle Et Vanille, a lovely food blog filled with some of the most beautiful photography I have ever seen. On top of all of that, the recipes are all gluten-free :swoon:!
I had been wanting to make some type of apple muffin or bread ever since we had gone apple picking last weekend, so when I came across this recipe, I knew it was perfect. Let’s be honest, apples and cheese together are definitely drool-worthy. I am a big fan of savory for breakfast instead of overly sweet, so these have been the perfect morning meal for me the last few days. I used a really nice aged Gruyère that brings a nice earthy flavor to these muffins that are a bit sweet, a bit salty and perfectly moist. The nice thing about this recipe is you could also make it in loaf form instead of muffins. Bake it at the same temperature at 40 minutes instead of 20.
Apple, Gruyère and Sage Muffins (Gluten-Free)
adapted from Canelle et Vanille
makes 12 muffins1 cup (150 grams) superfine brown rice flour
1/2 cup (75 grams)millet flour
2 tablespoons (30 grams) potato starch
2 tablespoons (20 grams) tapioca starch
1/3 cup (70 grams) cane sugar
1 tsp (8 grams) baking powder
1/2 tsp (3 grams) baking soda
1/2 tsp (5 grams) salt
1/4 tsp xanthan gum
1 tablespoons fresh sage, finely chopped
1 cup (55 grams) shredded Gruyère
1 egg
1 cup (250 ml) buttermilk
1/4 cup (55 ml) olive oil
2 apples, peeled and small diced
Extra shredded Gruyère for toppingPreheat over to 400ºF. Grease your muffin pan. In a large bowl, whisk together the first 11 ingredients. In a small bowl, whisk together the egg, buttermilk and olive oil. Add the wet ingredients to the dry and mix until combined. Fold in the diced apples.
Scoop batter into mold, sprinkle a bit of shredded Gruyère on each muffin. Bake for 20 minutes or until golden and firm to the touch. A wooden pick inserted into the center should emerge clean.


