-
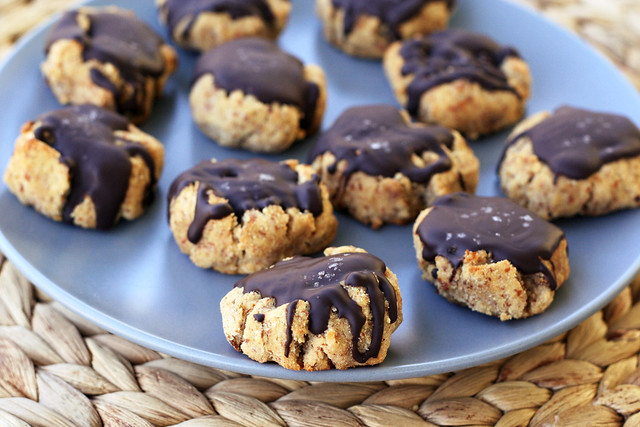
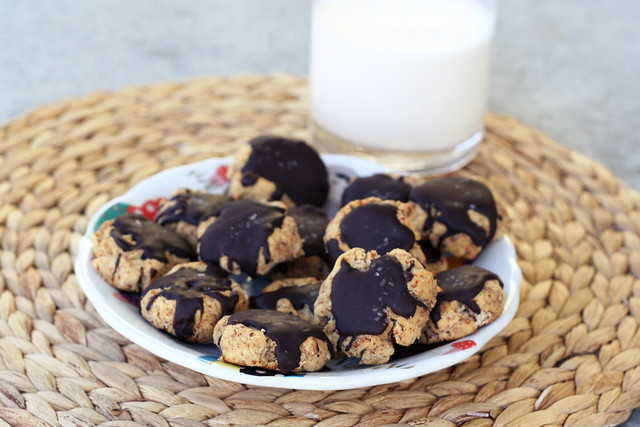
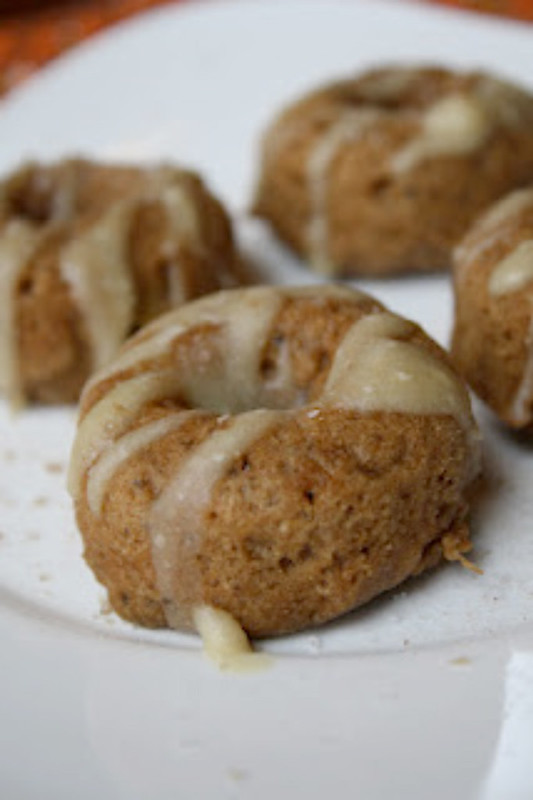
Grain-free Berry Cobbler – Gluten-free, Vegan + Refined Sugar-free
A week or two ago, I came across this amazing grain-free thick pizza crust recipe from Real Sustenance and it instantly peaked my interest. More and more I am amazed by what almond flour can do and the results you can get when baking with it. It is by far my favorite flour these days.
When I saw the photos of that crust I couldn’t wait for my order of almond flour from Honeyville to come in the mail. Oh and what a painful wait it was this time. This wait made me realize I should really stop waiting till I am totally out of almond flour to order more. Once the almond flour arrived it immediately became pizza night at our house and I made a version of my vegan hummus pizza with this new crust recipe. Oh my goodness! Best gluten-free pizza crust I have ever made at home, actually, best gluten-free crust that I have ever had anywhere. It was fluffy, soft and thick, and it has a nice subtle crisp to the outside of it. It was perfect and I couldn’t believe it was totally grain free.
As soon as I took a bite I couldn’t help but think about what else I could come up with to do with this dough. That is when I realized I needed to adapt the recipe to make a cobbler topping. It was perfect for it. I wanted to play around a bit to make it vegan, so I replaced the eggs with flax-seed eggs and I also used coconut oil instead of olive oil, plus I of course had to add a little sweetness, so I went with my go-to maple syrup. (feel free to use whatever sweetener you prefer, though)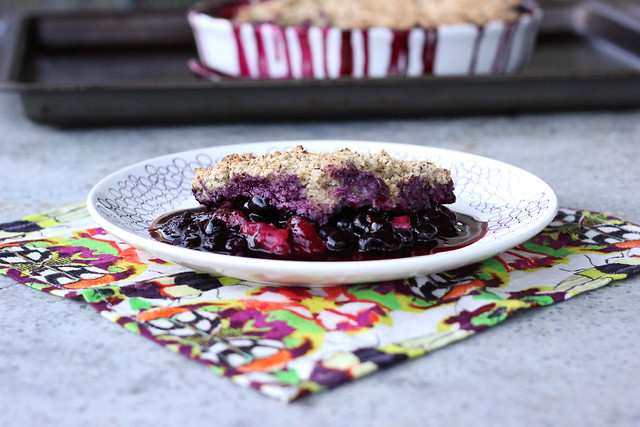
This cobbler according to my hubby, is THE best cobbler I have ever made and maybe one of the best cobblers he has EVER had anywhere. Then he declared it might just be the best gluten-free dessert I have ever made. Mark hails from the south, so for him to not just eat my cobbler but to rave on and on about it, has to be the best compliment he could give. He is a harsh critic of cobblers and I have seen him push aside sub-par cobblers if they weren’t to his liking. And don’t even get him started on crisps, he doesn’t understand them and wishes they would just be a cobbler.
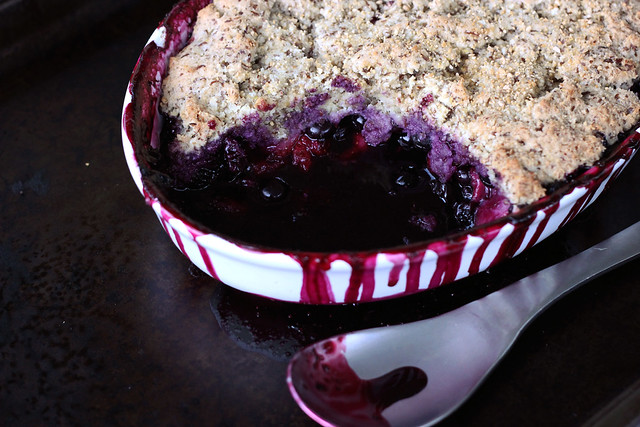
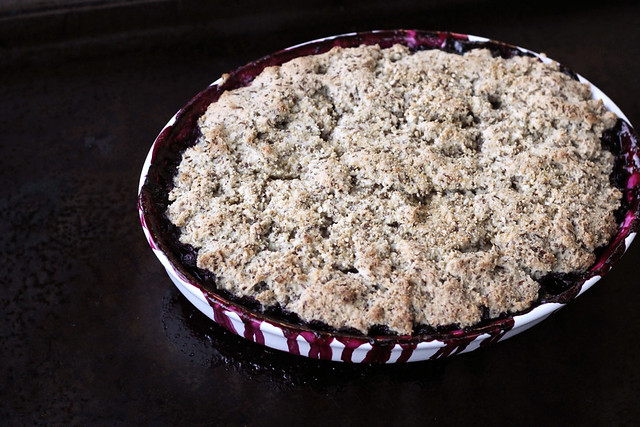
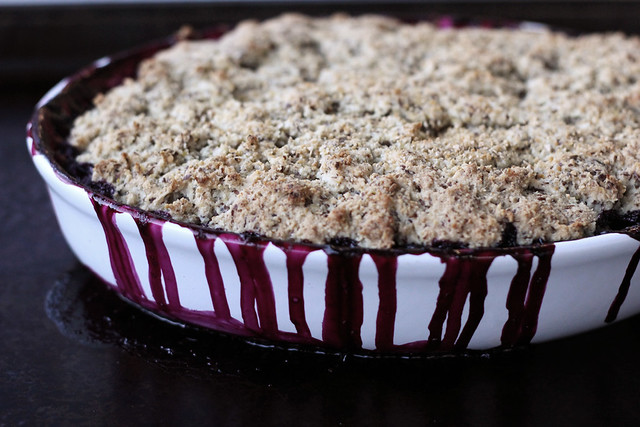
The crust on this cobbler is thick and almost biscuit-like but not at all heavy or too dense. The flax seed eggs besides helping to bind also provide little golden flecks of color and texture in the crust that really makes it feel rustic, homemade and healthy, all of which it is. You can make this berry cobbler with any combination of berries that you choose. I had planned to use just blueberries, but I had a small amount of strawberries leftover that I decided to slice up and add in. You could also use blackberries, peaches, apples or whatever your favorite fruit or combination of fruits might be. I cannot wait to go apple picking in the fall and to make an apple spice version of this. Oh and like most cobblers, this one is of course be great served warm with a scoop of your favorite vanilla ice cream or even some whipped coconut cream on top.
[print_this]Grain-free Berry Cobbler – Gluten-free, Vegan + Refined Sugar-free
Serves 6-8
Inspired by this pizza crust recipeBerry Filling
- 3 cups of organic berries – I used a pint of blueberries and 1 cup of fresh strawberries, sliced
- 2 tablespoons maple syrup (you could also use honey, brown rice syrup, coconut nectar or whatever your favorite sweetener is)
- 1 tablespoon arrowroot starch
- 2 tablespoons fresh lemon juice
Cobbler Crust
- 2 tablespoons ground flaxseeds plus 6 tablespoons hot water (or two eggs)
- 1 cup blanched almond flour
1/2 cup arrowroot starch (you can also use tapioca or potato starch) - 1 teaspoon baking powder
- 1/2 teaspoon salt
- 1 tablespoon almond milk
- 1 tablespoon maple syrup (you could also use honey, brown rice syrup, coconut nectar or whatever your favorite sweetener is)
- 2 teaspoons melted coconut oil
- 1 tablespoon psyllium husk
- 1/2 teaspoon fresh lemon juice
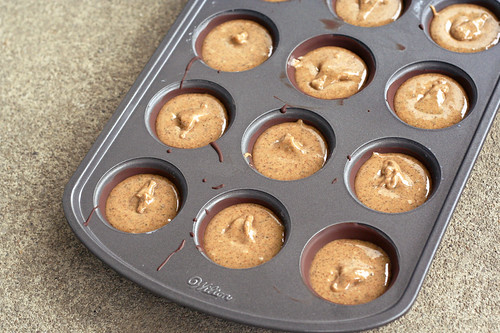
Preheat the oven to 425º F. Grease an 8″ square pan (or something similarly sized) with some coconut oil.
In a medium sized bowl mix the berries with 2 tablespoons maple syrup, lemon juice and 1 tablespoon arrowroot starch, set aside.
In a small bowl whisk together the 2 tablespoons of ground flaxseeds with 6 tablespoons of hot water, set aside to let it thicken.In a large bowl whisk together the almond flour, arrowroot, baking powder and salt. In a second smaller bowl whisk together the flaxseed eggs, almond milk, maple syrup, coconut oil, psyllium husk and lemon juice. Add the liquid mixture to the dry and mix until well combined.
Add the berry mixture to the greased pan and drop spoonfuls of the dough to the top. Spread it out evenly with your hands or a greased spatula. You can leave it as rustic biscuit-like rounds or spread it to one even dough topping, like I did.
Place the pan onto a rimmed baking sheet to catch any berry juice that will run out. Bake for 30 minutes until the cobbler topping is golden brown and cooked through and the juices start to bubble up over the crust. Remove from oven, cool slightly, and serve.
[/print_this] -
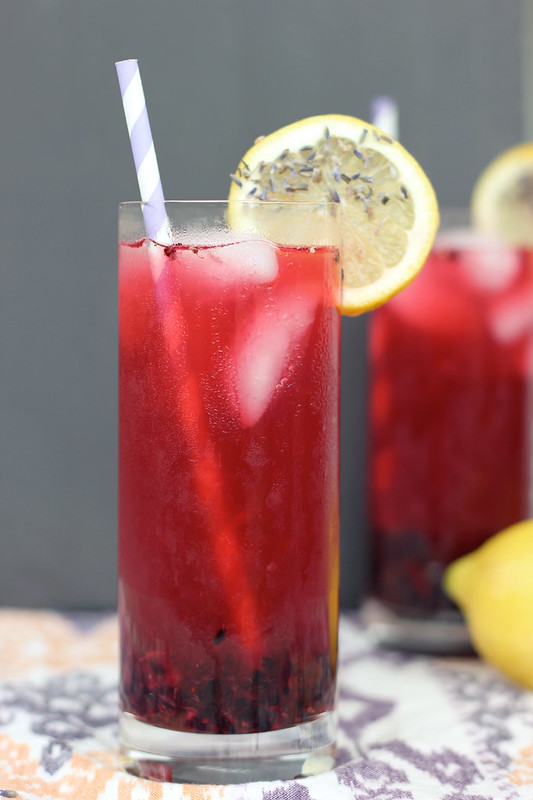
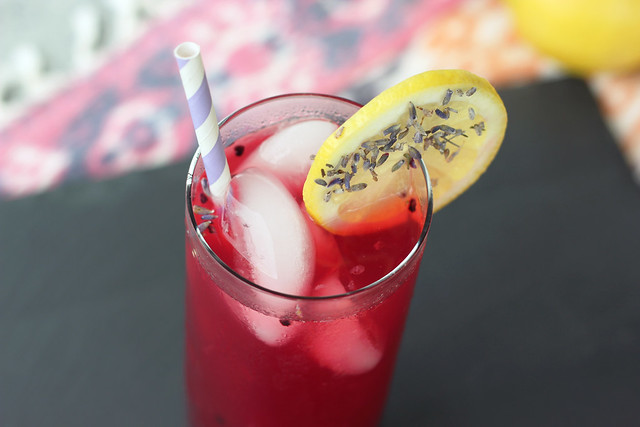
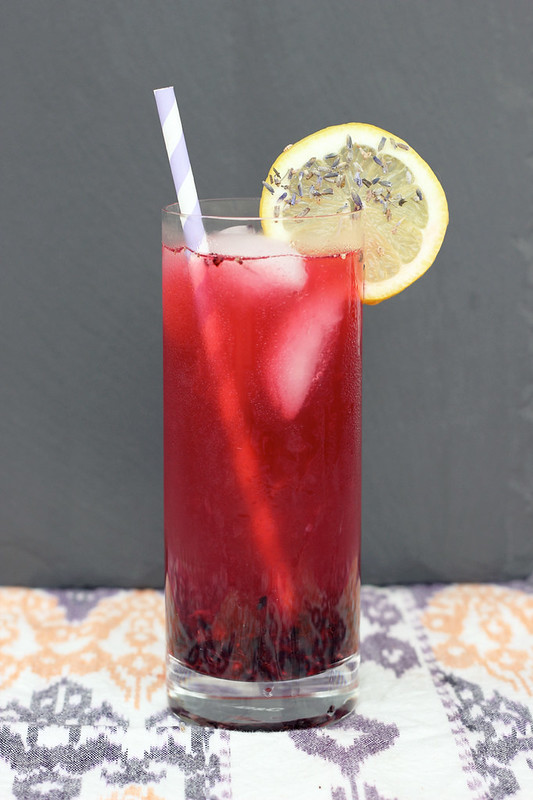
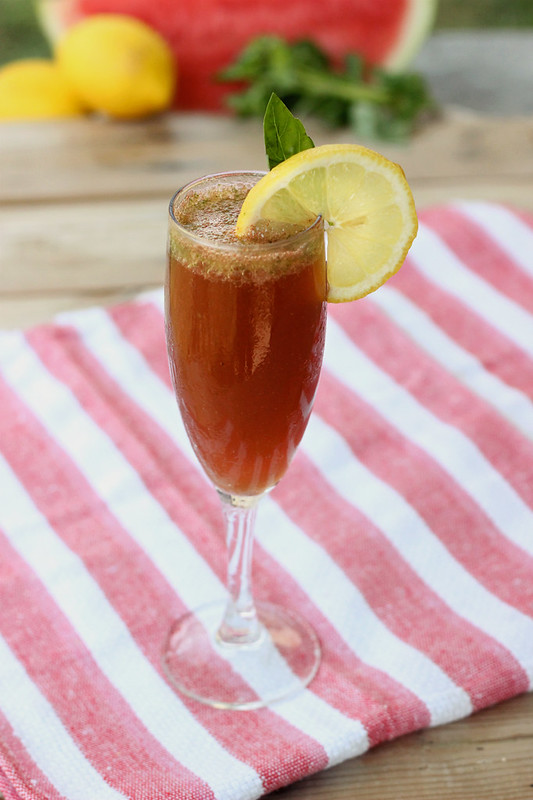
Blackberry Lavender Lemonade – Gluten-free, Vegan + Refined Sugar-free
I have really been enjoying playing around with different seasonal flavor combinations for the series of cocktail recipes that I have been sharing over on the Free People blog BLDG 25. This is my second post in my 5-part Summer Mocktail series for Free People.
I have been letting what I find at the market determine the drinks, instead of the other way around. I had been thinking up some type of twist on the standard “Arnold Palmer” of tea and lemonade, which we love over here. I wanted it to be brighter, more colorful and featuring a seasonal fruit. When I saw the blackberries I instantly knew that was the way to go. Not only will this quench the thirstiest of thirsts, but it is such a beautiful and bright color, to boot!

The delicate aromatics from the lavender, paired with the pleasant tartness from the lemons and the blackberries is absolute perfection and sure to please anyone on a hot summer day. I decided to use my go-to sweeteners for this since I prefer to not use refined sugar, but you can feel free to substitute whatever sugar or sugar-alternative you desire. I also go light on the sweetness since I prefer my lemonade drinks to be on the tart side. Make sure to taste and sweeten to your own liking. If you are looking to make this into an alcoholic beverage, simply add in 1 shot of your favorite vodka, stir and enjoy!
[print_this]Blackberry Lavender Lemonade
serves 4-6- 1/2 cup dried culinary lavender
- 5 cups water
- 1/4 – 1/2 cup maple syrup (raw honey, agave or raw sugar will also work)
- 1 cup freshly squeeze lemon juice (about 6-8 lemons)
- 4-6 teaspoons maple sugar (you can also use raw sugar or any other sugar of your choice)
- 6 ounces fresh blackberries
- ice
Bring 5 cups of water to a boil in a medium saucepan over high heat, stir in the lavender and reduce the heat. Partially cover and simmer for 10-15 minutes. Strain the lavender tea over a strainer or through cheesecloth, pressing down to get out as much liquid as you can, discard the lavender. Pour the liquid into a large pitcher. Stir in maple syrup, honey or whatever sweetener you are using, until it has dissolved. I prefer my lemonade on the tart side so I only used 1/4 cup of maple syrup, but feel free to use as much as you would like. Let cool. Once cooled, add the lemon juice to the pitcher and give it a good stir. Taste to see if it needs more sweetener or if you want to add some water to dilute it a little.
To serve, place 5 to 8 blackberries and 1 teaspoon of sugar in each glass. Muddle. Pour the lemonade mixture over to fill the glass about 2/3 of the way full, give it a stir, then top with ice. Garnish with lemon slices pressed into some dried lavender, or add a fresh sprig of lavender if you have it.
*For an alcoholic cocktail, add in a shot of vodka [/print_this]
This recipe was originally shared on the Free People blog. Check out my first post in the series here.
-
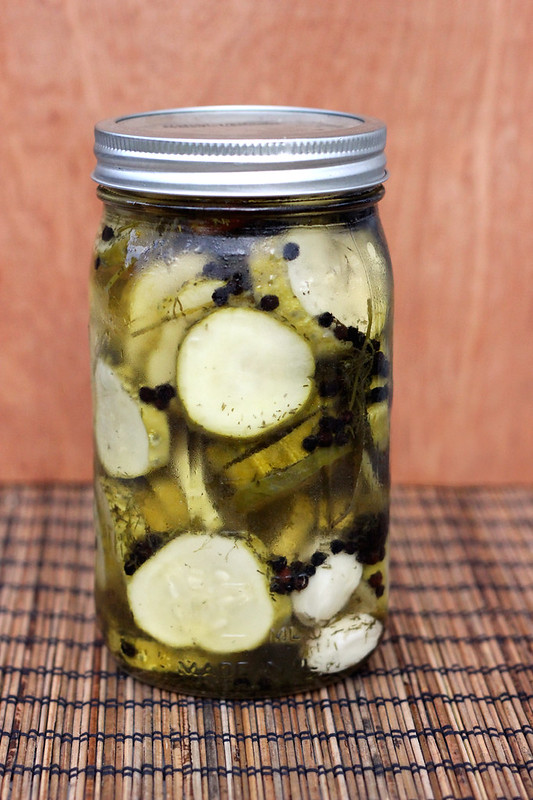
Refrigerator Garlic Dill Pickles – Gluten-free, Vegan + Refined Sugar-free
If you have ever been to a restaurant with my husband Mark and I, for a quick bite at a diner, or any type of place that serves sandwiches or burgers, we have a bit of a ritual. Since I am obviously rarely able to order a sandwich at a restaurant, but Mark obviously can and does quite often, we have a little rule where the pickle on his plate is always saved for me. He likes pickles, but he knows how much I love them, so he will gladly gobble up his turkey club and then hand the delicious briney pickle spear or round over to me. Even when I haven’t noticed that he even had a pickle, let alone save it for me, there it is, at the end, waiting for me. What a great hubby I have – he totally supports my obsessive LOVE of pickles!!
I also have been known to order a side order of pickles if a restaurant is known for having delicious ones. There is a place near Austin, Texas that everyone loves to go to for BBQ, it’s called the Salt Lick. They have delicious food, but since I am not a huge meat eater, I usually get a small order of smoked turkey with all the fixins’ and a huge side of pickles. I usually make a small dent in the food and then eat the pickles until I can’t eat them anymore. I have been to Disneyland in California twice now, and thanks to my friend Summer, getting one of the large dill pickles from one of the fresh food carts there is part of the whole experience. They are so delicious and they are best when eaten very slowly, to savor each and every bite. I seriously could eat pickles until my tongue hurts from all the vinegar. They are the best. But not all pickles are created equal. It is very rare that I buy pickles from the grocery store and just eat them at home, they are never quite good enough. A couple of weeks ago, I bought a jar of pickles from a girl at the farmers market and they were incredible. It was then that I realized that I should really just be making my own at home, especially now that cucumbers are in season.
Most summers I usually make a batch or two of pickled peppers with the different hot peppers we grow in our garden, but since I didn’t plant any this year, I am not sure I will be doing it. But when I saw the delicious local gherkin cucumbers at the market a few weeks ago, I knew I HAD to buy some and make refrigerator garlic dill pickles. How could I not?
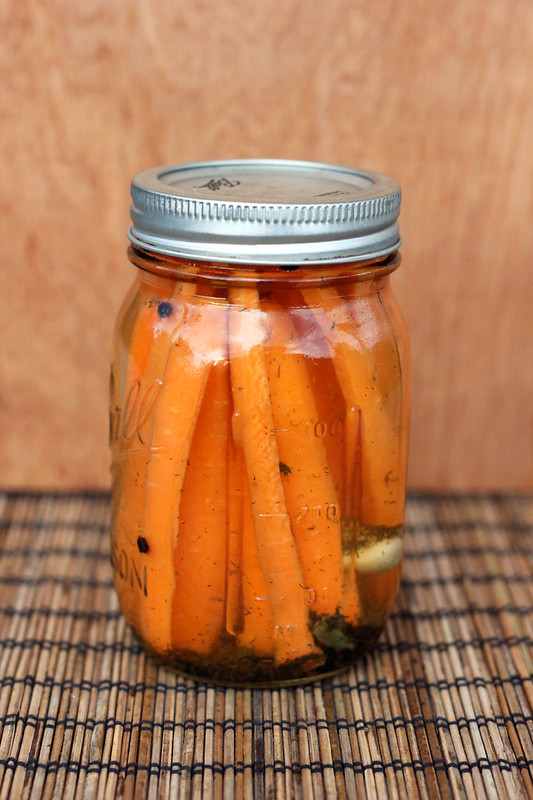
You can play around with the spices in this recipe, too. I added my usual favorites and also tossed in a couple of dried super spicy thai peppers that I had dried out from our garden last year. They brought a very subtle spicy heat, that I really loved. You can omit the peppers all together or add a teaspoon or so of dried red pepper flakes if you don’t have whole dried pepper. Plus, you can use this same brine to pickle other things like peppers, cauliflower or carrots, which I did, since I had some leftover brine. The carrots were amazing and I think I may have eaten them between two sittings.
OK, so who else is obsessed with pickles? I know I am not alone in my love.
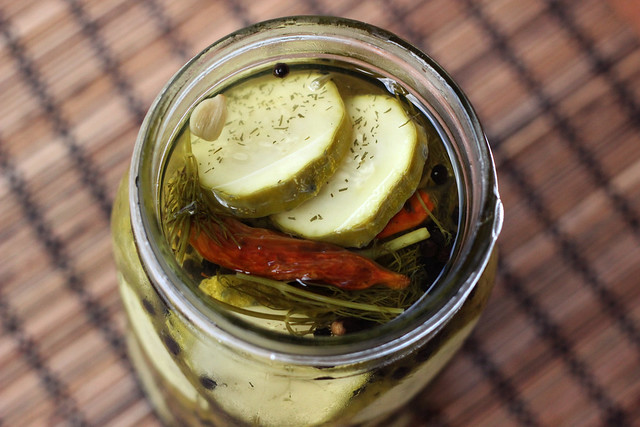
[print_this]Refrigerator Garlic Dill Pickles – Gluten-free, Vegan + Refined Sugar-free
Makes a couple of jars (depends on the size of your cucumbers and your jars, etc)- 2 pounds local gherkin cucumbers (you can also use any other small firm cucumber of your choice)
- 2 1/2 cups water
- 2 1/2 cups white distilled vinegar
- 3 tablespoons raw cane sugar or other sweetener of your choice
- 3 tablespoons coarse kosher salt
- 2 bay leaves
- 2 tablespoons whole coriander seeds
- 4 cloves garlic, peeled
- 2 tablespoons black peppercorns
- a couple of sprigs of fresh dill (or a couple of teaspoons of dried dill)
- Optional spicy add-ins: 1 or 2 spicy dried peppers, red pepper flakes or you can add some sliced jalapeños in with the cucumbers.
Clean the cucumbers very well and slice them as thin as you would like them, I would say I cut mine to about 1/4″ thick rounds. You could also cut them into spears or leave them whole depending on their size. Place them in a large glass preserving jar or two smaller jars.
In a non-reactive saucepan, bring the other ingredients to a boil, then reduce the heat and simmer for five minutes.
Remove from heat and pour the brine over the cucumbers. Place the lid on the jar and let cool. Once cool, refrigerate. You can start enjoying them the next day, but obviously they are better after a couple of days. They’ll keep for about 2 months in the fridge.
* This brine is great on lots of other veggies, like carrots, cauliflower, peppers, etc. You can also add onion slices to the jar with the cucumbers, if you wish. Play with the recipe and make it your own.
[/print_this]
-
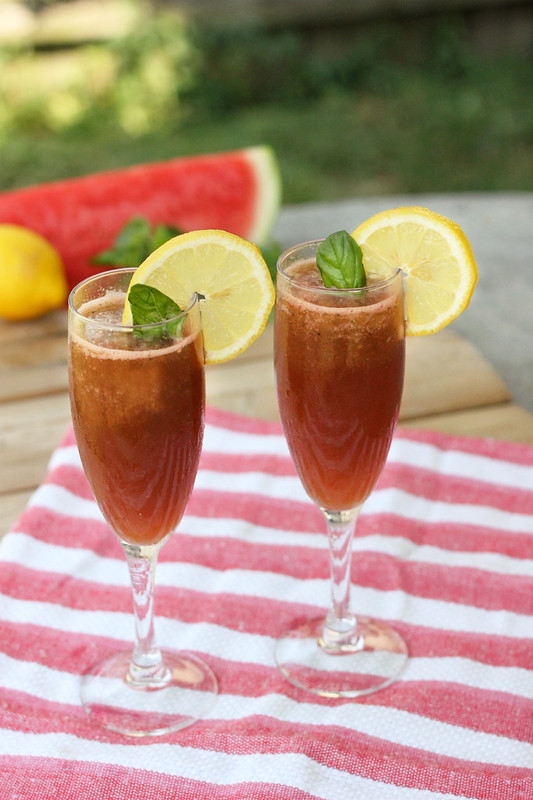
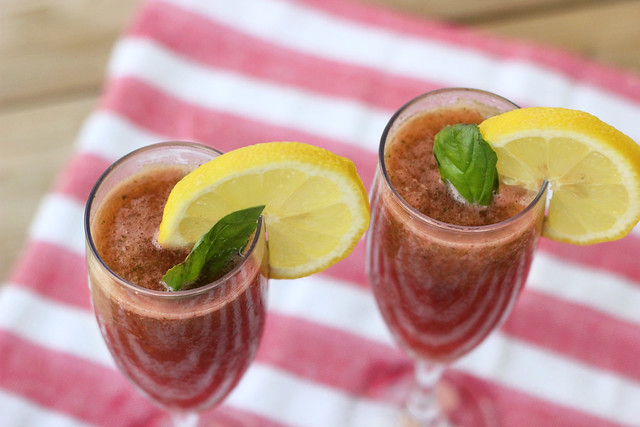
Basil Watermelon Refresher – Gluten-free, Vegan + Refined Sugar-free
I am sure based on the sweat dripping down your brow (and likely other places) right now, we are all fully aware that not only are we at the peak of the summer, but it is a super duper hot-ass summer, at that! With record highs, excessive humidity and a lack of rain, it has been crazy unbearable in our parts and I know that is the case for most other areas in the US.
What else is there to do when it is crazy, stupid hot, then to have a refreshing beverage? And no, it doesn’t necessarily have to be an alcoholic beverage, “mocktails” (non-alcoholic cocktails) are just as refreshing, if not more, plus you can save on those empty calories. I am always playing around with different drink recipes over here and since I eat a very clean diet, I try to keep my alcohol consumption to a minimum at home. I feel so much better without it.I was elated when Free People asked me back as a guest-poster to share a series of non-alcoholic cocktail recipes with their readers through the month of August. Each week I will be sharing a different summertime inspired beverage that is safe for the whole family and is sure to refresh you on the hottest of days. And don’t worry, there will also always be a note on how to make each drink alcoholic, if you wish.
The first recipe I am sharing is Basil Watermelon Refresher. This drink is bursting with refreshing summer flavors. Frozen watermelon and lemon pair together for a sweet and tart treat for your mouth with a surprisingly subtle, sweet and almost spicy punch from the basil. Top the slushy mixture off with sparkling water for a fizzy kick or if you are looking for a kick of a different kind, you replace the sparkling water with Prosecco, a delicious and refreshing dry sparkling white wine.
Head on over to the Free People Blog, BLDG 25, for the full recipe and stay tuned for more “mocktail” recipes in this series that I will be sharing each week throughout August.
-
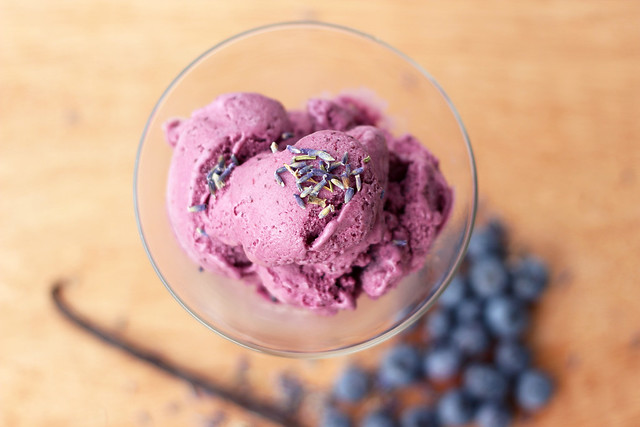
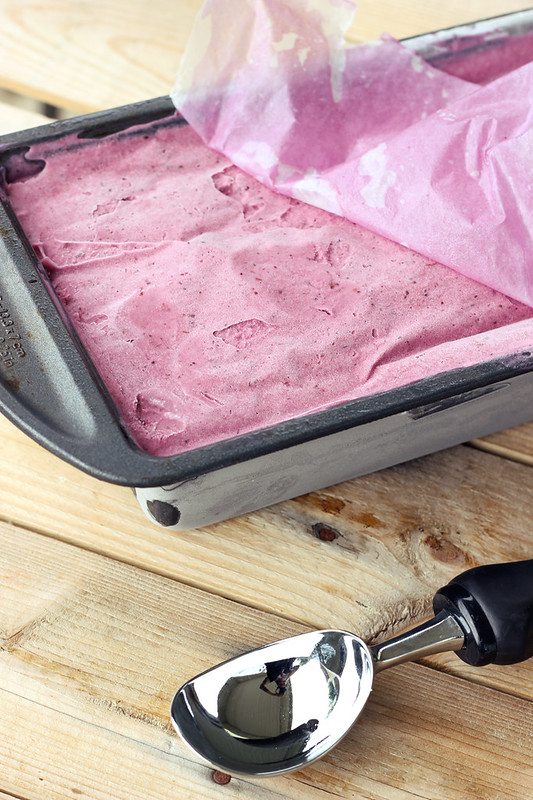
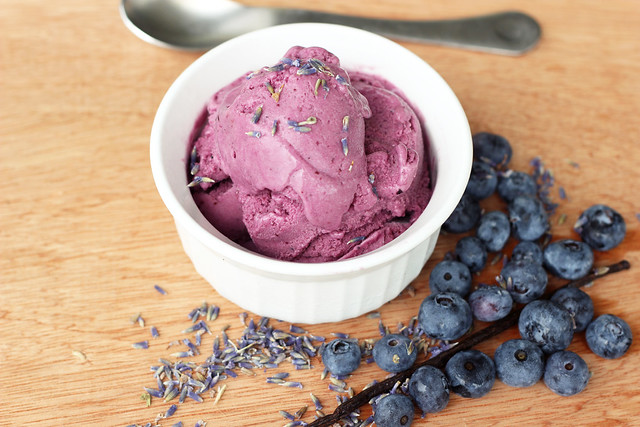
Blueberry Lavender Vanilla Ice Cream – Vegan, Gluten-free, Refined Sugar-free
I cannot believe this is the first time this summer that I have pulled out my ice cream maker. So many missed ice cream opportunities. It actually makes me a little sad. But, don’t worry, I am back and committed to playing with my ice cream maker.
I found myself insanely inspired this past weekend after a super fun trip to the farmers market after yoga. I met up with some friends and I ended up spending over 2 hours there, buying delicious foods, chatting, getting inspired and seeing tons friends and even some family. It was a really fun morning. I had planned in advance to meet up with Janine, Alyssa and her boyfriend Daren. Alyssa recently started a blog, Wild Roots, where she shares her recipes for allergen-free foods as well as her incredible knowledge of the many benefits of the foods she cooks with. Alyssa has some really big plans she is working on that is going to be great for Buffalo, I am so excited for her and plan to be one of her biggest cheerleaders. Alyssa and I talked forever about food and cooking, playing with pairing unsuspecting ingredients together and so much more. Alyssa is such a breath of fresh air with her food and I am totally inspired by what she is doing. After sharing a recipe last week for Lavender Honey Glazed Sweet Potato Wraps with Garlic Crusted Mushrooms & Spicy Pea Spread, I recalled my search for lavender a while back where I was left empty handed. I didn’t think it would be that hard to find. I had planted some lavender last summer and for whatever reason it never really grew that well. Whether it be hubby’s lawn mower, the dog, another critter or just imperfect conditions, it never really made it. I had so many plans for that little plant and it just left me dreaming.
After being reminded of my search for lavender, finding out where to buy it locally (the Lexington Co-Op near the other dried spices and herbs), spending a few hours at the farmers market (where I purchased a beautiful basket of blueberries) and chatting with friends about delicious food, I came home inspired to make something seasonal, beautiful and tasty. This Blueberry Lavender Vanilla Ice Cream is just as delicious as it looks. That color is even more beautiful that the photos show and as I was making it, I wished I could bottle the scents up and wear them as a perfume. If the idea of eating lavender doesn’t appeal to you because of it’s floral scent, I really recommend trying to give it a shot anyway. You’ll be quite surprised at how wonderful it is. The subtle flavor that the lavender brings is so beautiful, delicate and perfect with the fresh tartness from the blueberries. The strong vanilla undertones rounds it all out so nicely, bringing it all together into a creamy, dreamy dessert that is perfect on a hot summer evening.
It was quite hot and muggy today, so I took my photos as fast as I could. I may have eaten a bowl of ice cream in between shots, ya know – cuz it was melting and all.
Happy 4th of July to all of my American readers. I hope your day is filled with family, friends, fun, delicious food and lots of magic! Enjoy!
[print_this]Blueberry Lavender Vanilla Ice Cream * – Vegan, Gluten-free, Refined Sugar-free
- 1 quart fresh blueberries
- 1/2 cup maple syrup (honey or agave)
- 1 cup water
- 2 1/2 cups full fat organic coconut milk (about 1 1/2 cans)
- 2 tablespoons dried culinary lavender blossoms
- 1 vanilla bean (or an additional 1-2 tablespoons of vanilla extract at the end)
- 1 cup unsweetened organic vanilla almond milk
- 1 teaspoon vanilla extract
In a large sauce pan over medium-heat, add blueberries, maple syrup and 1 cup water, bring to the start of a boil then drop the heat down and allow it to simmer for about 5-8 minutes. Continue simmering until the berries begin to pop and break open, remove from the heat and using a fine strainer, pour the mixture into the strainer, over a bowl, catching the berries. Then add the syrup back to the saucepan and add the blueberries to the pitcher of your blender and set aside.
Add the coconut milk and lavender to the pan with the blueberry syrup. Slice open the vanilla bean and scrape the seeds into the pan, then go ahead and toss the whole bean in, too. Over a medium-high heat, allow to mixture to simmer for about 5 minutes, then remove from the pan from the heat, cover and allow the lavender and vanilla to infuse for about 15 minutes or longer.
Using the fine strainer, strain the liquid into the blender with the blueberries, gently pressing down onto the lavender and the vanilla bean to get all of the flavor. Add the extra vanilla and the almond milk and blend until very smooth.
Pour the mixture into a large glass bowl, cover and place in the refrigerator for at least a few hours, or overnight. I usually just leave it overnight.
Once chilled, pour the mixture into an ice cream maker and process according to manufacturer’s directions. Eat right away as a soft-serve or add to a freezable container and place in the freezer for at least 8 hours or longer, to firm up. Freeze until it is firm enough to scoop.
TIPS: Try freezing your ice cream in a loaf pan, covered in wax paper and foil. Really press that wax paper down and every time you serve some, repress the wax paper down. This will help to keep it from getting freezer burnt. You can also add a tablespoon or two of vodka to the mixture, which doesn’t affect the taste but will help keep it from getting too hard. I didn’t do it this time around since I didn’t have any vodka in the house, but I usually do.
*NOTE: If you don’t have an ice cream maker, these would be great as popsicles, too! Thanks for the idea, Alex!
[/print_this]
-
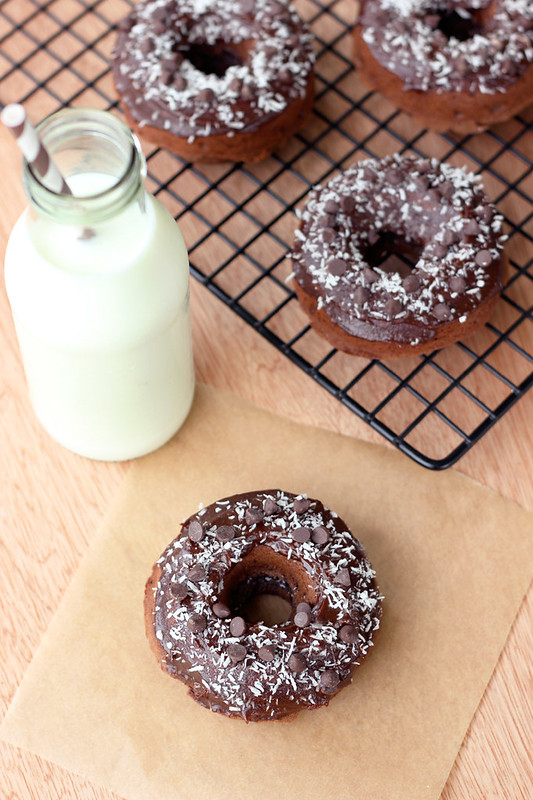
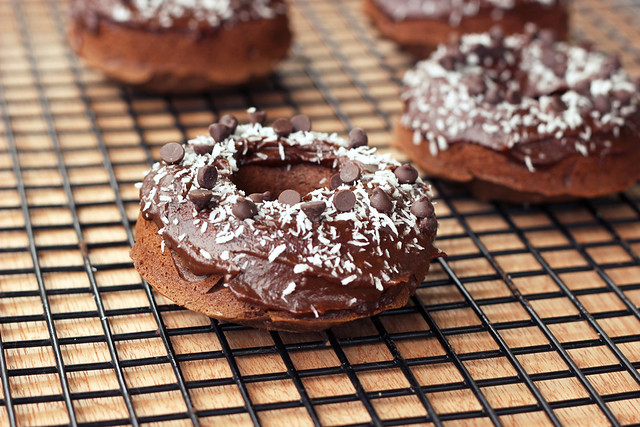
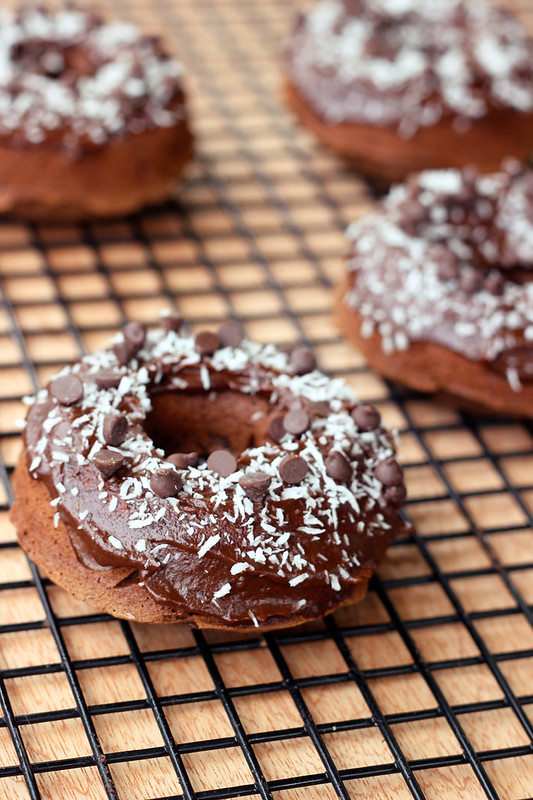
Paleo Double Chocolate Donuts with Coconut {Gluten-free, Dairy-free, Refined Sugar-free}
This weekend was the last hurrah for getting things done on the house. The realtor comes in the morning and we are starting the process of getting the house on the market, finally. Yay! Since yesterday afternoon my project was to re-caulk the bath tub and shower walls, it had to sit for at least 24 hours before getting wet. I woke up this morning, realized that I couldn’t shower before leaving for yoga, but felt so gross from all the house work yesterday, so I decided to take the day off and lay in bed for a bit this morning with hubby and the pooch to watch a movie! It felt really nice to just get up at my leisure and be lazy for a bit. It has been a while since I have done that. I will likely squeeze some time in later today for a brief yoga practice at home on the grass in the yard.After the movie was over, I rolled over and asked Mark what he wanted for breakfast. Since most mornings I don’t even eat breakfast since I am at yoga, I get really excited when I have the time to make something special. Mark exclaimed “donuts!” and I jumped out of bed and made my way to the kitchen to start creating. Even though we don’t have kids and Mark may only be a daddy to our pooch, our two cats and our business, I still thought that he should be spoiled this morning for Fathers day. So his wish was my command.
I used Coco from Roost’s recipe for donuts not too long ago and I was incredibly impressed, so I decided to make that my starting point for these. I also decided to play around with a simple frosting recipe that didn’t require any sugar. Topped with some shredded coconut and some mini-chocolate chips, these were perfect and Mark was happy!
[print_this]Double Chocolate Donuts with Coconut- Gluten-free, Grain-free, Dairy-free + Refined Sugar Free
(makes 6 regular sized donuts or 18 mini donuts)- 1 1/4 cup blanched almond flour (I prefer Honeyville brand)
- 1/4 tsp salt
- 1/2 tsp baking soda
- 1/4 cup cocoa powder
- 3 organic farm fresh brown eggs
- 1/4 cup coconut oil, melted (you could also use ghee, grape seed oil, etc)
- 2 tablespoons honey (you could also use maple syrup, brown rice syrup, agave, etc)
- 1/2 teaspoon pure vanilla extract
Preheat oven to 350F. Grease your donut pan with coconut oil.
In a medium-sized bowl, whisk together all of the dry ingredients. Transfer to the blender*.
In the same bowl, whisk together all of the wet ingredients. Add to the blender.
Blend the batter until is very smooth. Pour into greased donut molds, filling them about 2/3 of the way.
Bake for 12 minutes. DO NOT OVERBAKE or they will be dry. Remove the donut pans from the oven, allow to cool in the pan for 3 minutes, then pop them out and all them to cool the rest of the way on a rack. Make your frosting in the meantime.* I never thought to blend a batter like this, but I went with Coco’s suggestion and it is brilliant. It can be challenging to get a smooth batter with nut flours, but using the blender definitely gives you a very nice, smooth batter.
Chocolate Frosting – Gluten-free, Grain-free, Vegan + Refined Sugar Free
- 3/4 cup pitted Medjool dates
- 1/4 cup cocoa powder
- 1/4 cup sustainable organic palm oil shortening or coconut butter
- 1/3 – 1/2 cup water (you may need less or a tad bit more depending on how soft your dates are, be careful not too add too much though)
Add all of the ingredients to a high-speed blender, start with just 1/3 cup of water, you can always add more. Let everything sit for a few minutes, especially if your dates are very firm.
Blend everything together at a high speed. It may take a little bit to get the it started, so you can start at a slower speed and increase the speed a little at a time.
Continue blending long enough to get a smooth, velvety consistency, this may take 5 minutes or more. If the frosting seems like it isn’t moving around in the blender because it is too thick, before you add more water, use a spatula to unstick the mixture from the blades and make some room in there. Put the lid back on and keep blending. When there are relatively no bits of dates and you have a rich, smooth chocolatey mixture, your frosting is ready.
In addition to donuts, this icing would be great on cakes, cupcakes, brownies, cookies, etc. Store any remaining icing in the refrigerator.
SERVING THE DONUTS:
Additional toppings:
1/4 cup unsweetened finely shredded coconut
1-2 tablespoons of semi-sweet mini chocolate chipsOnce the donuts have cooled, spread a thin layer of frosting on top and sprinkle with some finely shredded unsweetened coconut and a few mini chocolate chips. Instead of these toppings or in addition to them, you could also add some crushed cocoa nibs, chopped nuts or anything else you might like.
[/print_this]
-
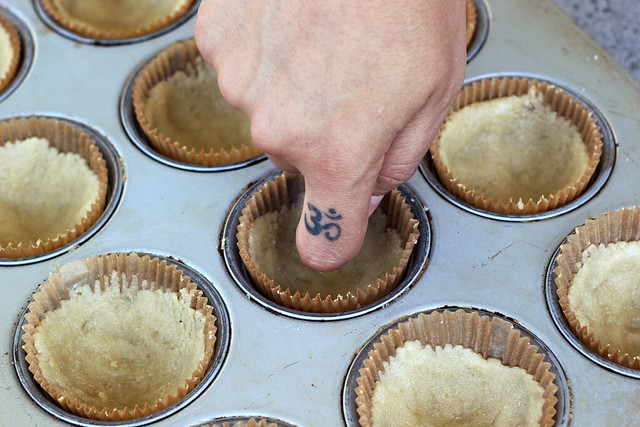
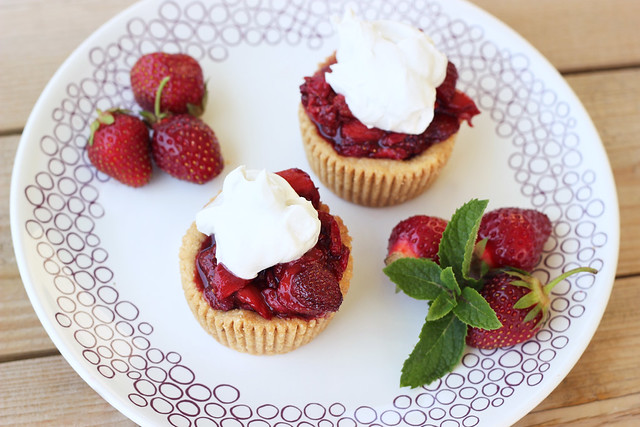
Roasted Balsamic Strawberry Mini-Tarts with Whipped Coconut Cream – Gluten-free + Vegan
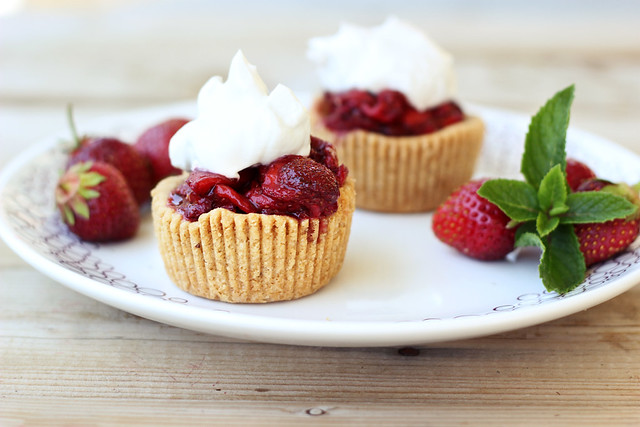
I am so elated over the outcome of this super fun, kickoff to summer-time recipe. It was one of those things I dreamt up (and loosely wrote up) while sitting at my computer working and when it finally came time to make it, I crossed my fingers and dove right in. I had to make a few subtle corrections from my original notes to make the tart shells work perfectly, but other than that, it all came together so perfectly. On the first batch, I didn’t use the paper muffin cup liners and the tart shells didn’t want to come out in one piece, even with greasing the pan, but add in the paper liners, and it was simple as can be!
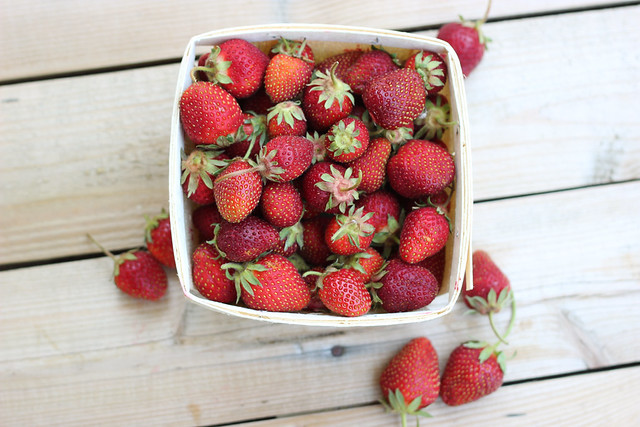
This recipe is insanely simple to make, please don’t let the three-part recipe throw you off. Just remember to refrigerate your coconut milk the night before for the whipped “cream”. The dough for the tart shells takes just minutes to make, you need only one bowl and you can literally just use your hands to mix it, that’s what I do. It takes just a couple of minutes to get it evenly divided and pressed into the muffin cup and while the mini tart shells bake, you can cut up the strawberries and allow them to sit for a small bit in the balsamic/maple sugar mixture. Once they are done baking, you can chill the tart shells while you roast the strawberries, meanwhile you can whip up your coconut cream and when the strawberries are done, you can serve it all up. It can all be done in less than an hour, probably more like 45 minutes and it is so simple, you won’t believe it. If you want to make it even quicker and skip out on the heat from the oven, serve the strawberries fresh. With or without the balsamic vinegar. No matter which way you make it, this recipe will impress the pants off any one at a party, especially those that are gluten intolerant and vegan. They truly won’t believe that it is safe to eat. It is that good.
My favorite thing about this recipe is that although it is gluten-free and vegan, no one would never know it. Mark kept eating bite after bite telling me, that this was seriously one of the best things I had ever made. ‘Pastry shop grade’ – he even said. Quite the compliment. Beyond the shells being totally grain-free, and everything being refined sugar-free, it is hard to believe the fluffy, creamy whipped “cream” is dairy free. I honestly need to have a can of full-fat organic coconut milk on hand at all times, so I can always make some whipped “cream”. The other great thing about this recipe is how versatile it is. It can go through the summer with you as different fruits come into season. I cannot wait to make it in the fall with some baked spiced apple slices. YUM!
I am happy to once again be posting over at Free People’s blog, BLDG 25 where this week they are celebrating all things ‘Americana’. When they asked me to share a recipe that went along with that trend, I kept thinking of all of the wonderful summertime picnics, BBQs and beach trips. I wanted something simple and tasty, but full of beautiful, bright summertime flavors! Although nothing says summertime in America better than ice cream, berry pies and strawberry shortcakes, if you are the gluten-free and/or vegan at the party, that doesn’t always leave much for you. So, I decided to marry the idea of a berry pie with strawberry shortcakes to create these adorable little mini-tarts!
This recipe was originally shared on Free People’s Blog, BLDG 25.
[print_this]Roasted Balsamic Strawberry Mini-Tarts with Whipped Coconut Cream – Gluten-free + Vegan
makes 12Grain-free Mini Tart Shells
- 2 cups blanched almond flour
- 2 tablespoons maple syrup
- 1/4 cup coconut oil, melted
- 1/2 teaspoon baking soda
- 1/8 teaspoon salt
Preheat oven to 350ºF. Line 12 cups in a muffin tin with paper liners (you could also use greased mini tart pans). In a large bowl, add all of the crust ingredients and mix very well. Really get your hands in there to get it all together and work it into a nice dough. Add the crust mixture to the muffin cups and press down firmly into the cup using your knuckles, going up the sides a tad bit. Bake for 15-20 minutes until golden brown. Allow to cool in the pan for about 10 minutes, then place the pan in the refrigerator until you are ready to serve.
Roasted Balsamic Strawberries
- 2 pints baskets of strawberries, hulled and sliced (it’ll look like a lot of berries, but they cook down a lot)
- 3 tablespoons balsamic vinegar
- 3 tablespoons maple sugar (or palm/coconut sugar, raw sugar, etc)
Raise the oven to 400º F. Toss the strawberries with the balsamic vinegar and maple sugar. Allow to sit for a few minutes while your oven preheats. Pour all of the strawberries and their juices onto a parchment paper lined baking sheet or any other overproof dish or pan. Roast for about 10 to 12 minutes until the strawberries are hot but not too overly mushy. You can separate the berries and pour off some of the juices if you want to use it for drizzling, or you can just keep it all together. I kept some of the juice aside to add to some sparkling water for a refreshing drink.
Whipped Coconut Cream
- 2 cans organic full fat coconut milk, refrigerated overnight
- 1 tablespoon maple syrup (use more or less or none at all, or whatever your favorite sweetener is)
- 2 teaspoons vanilla
Make sure that your cans of coconut milk are well chilled. I recommend leaving item in the fridge overnight. Open the cans of coconut milk carefully, keeping them level. There will be a firm, waxy layer of coconut cream that solidified on top. Carefully scoop this off into a chilled glass bowl. Keep the leftover coconut water, it is great for smoothies.
Using a mixer, whip the coconut cream for 3 to 5 minutes until it becomes light and fluffy, with soft peaks. Mix in your maple syrup and vanilla, if you are using. Place the whipped coconut cream back into the fridge until you are ready to use. This may be more than what you need for all 12 tarts, but that’s ok, it keeps for several days, covered in the fridge.
ASSEMBLING THE TARTS:
Remove the paper liner off of the tart shells. Top each of the tart shells with a spoonful of the roasted balsamic strawberries and a dollop of whipped coconut cream. Serve immediately. [/print_this]
-
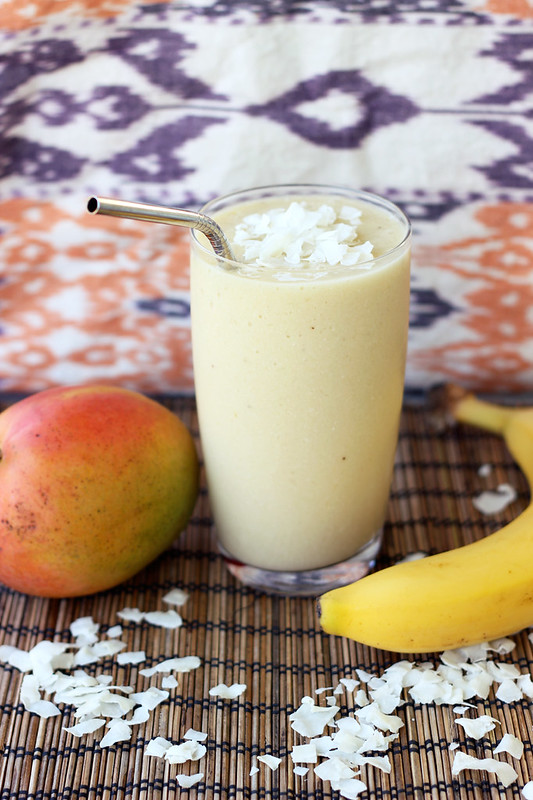
Coconut Mango Banana Smoothie – Gluten-free, Vegan + Refined Sugar-free
Not only did I live through my first run on Thursday evening, but I even went again today! So far, so good, I’m actually really enjoying it and I wasn’t even sore after. I definitely need to take it slowly and not try to do too much, but I could already see a slight improvement from my first run to the second.
In addition to adding running to my weekly fitness routine, I also decided I am going to try to wake up every morning at 6am (or thereabouts). I have found I am quite productive in the morning hours, so I really should be getting up as early as I can. With the sun already being up that early this time of year, it’s actually quite easy. I’ve done it every day this week since we returned home and I’m loving it. Even if I don’t jump right out of bed, at least I’m awake and getting my day started.
This morning I was up at 6 am and out of the house by 8:00 for a 90-minute vinyasa yoga class at East Meets West. Then I got home, grabbed my hubby and my iPod and we went for a 2-mile run together. It felt great to run after being nice and stretched out from yoga. I was hungry but I really didn’t have a huge appetite for a big meal after doing all of that. Since I had an afternoon’s worth of house cleaning to do, I decided to make this deliciously satisfying smoothie and it kept me full for many hours after while I washed flours, did dishes and cleaned the bathtub.
This filling and creamy little drink is so smooth and thick, almost milk-shake like. The flavor from the mango and banana are so bright and fresh which pairs so nice with the smooth creamy taste of the coconut and vanilla. I had grabbed a carton of unsweetened almond milk/coconut milk blend at the store the other day so I used that, but you could use straight coconut milk , almond milk or whatever your favorite non-dairy milk is.
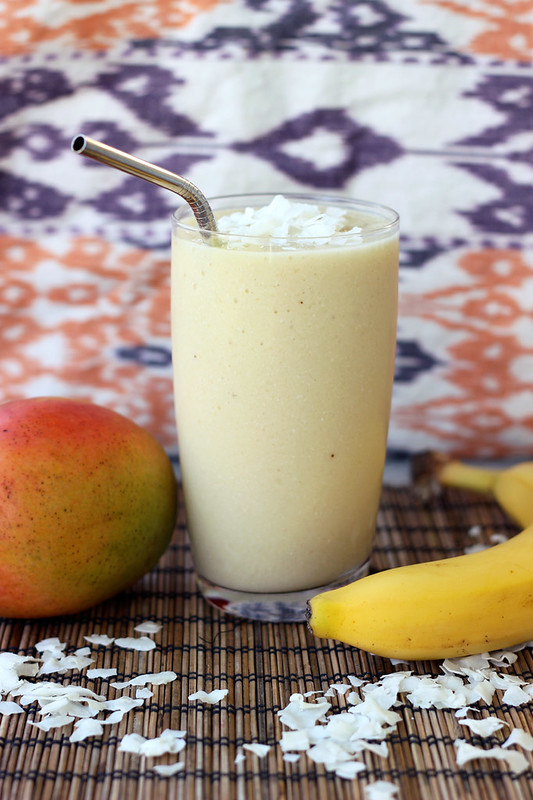
[print_this]Coconut Mango Banana Smoothie – Gluten-free, Vegan + Refined Sugar-free
serves 1- 1 cup unsweetened almond milk / coconut milk blend (or any other non-dairy milk)
- 1 organic mango, sliced
- 1 organic banana, peeled
- 1 tablespoon maple syrup (or any other sweetener of your choice, dates, stevia, hone, raw sugar, etc)
- 1 tablespoon extra virgin coconut oil
- 1 handful of ice
- 1 teaspoon vanilla extract
- 1/2 tablespoon unsweetened coconut flakes for topping, optional
Add all of the ingredients to a blender and puree until smooth and creamy. Serve immediately. Sprinkle some coconut flakes on top, if you wish.
[/print_this]
-
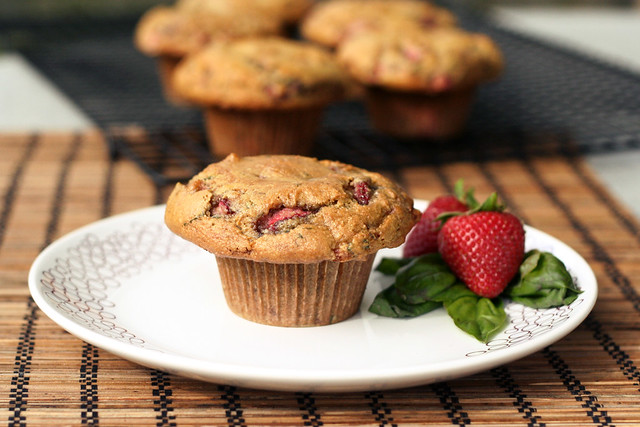
Strawberry Basil Almond Flour Muffins – Gluten-free, Dairy-free, Refined Sugar-free
Before I get into chatting about muffins, I wanted to take a minute to thank all of you for your amazing, inspiring and humbling comments on my two year blogiversary post. Besides hearing about how many of you read Tasty Yummies and have been inspired by it, reading all of your touching comments about what makes you happy, seriously moves me. I have read each and every comment and so many of them brought tears to my eyes. So, even though I haven’t responded to all of you, thank you all from the bottom of my heart!
The last week has been a really great one for me, between all the inspiring comments about happiness on my post, meeting a new friend and the wonderful week of yoga I had, I am seriously on cloud nine. I have managed to get to a ton of yoga classes this past week (6 in the last 7 days) and despite my injury a few weeks back, I seem to have found a really sweet spot in my yoga practice, at least it really feels that way to me. Every time I think I couldn’t possibly enjoy the practice of yoga and everything it brings, any more than I already do, I have a breakthrough week. This week that feeling came a few different ways, the first is that I got to spend some time with a fellow student that I have practiced alongside many times. Upon hearing the news that she would be moving back to Rochester tomorrow, after nearly a year of living in Buffalo, before heading off to Africa to teach yoga, we decided we had to get together before she left. We grabbed some food and had a couple drinks and just hung out and got to know each other better. I rarely meet people whom I feel that instant of a connection to, and it was yoga that brought us there. I know that although Lyndsey will be far away and I am relocating to California later this year, we both agreed we will stay in contact and who knows where that connection will take us. I feel there are people in this world that we are meant to meet and even though we wish the circumstances would be different or that they lived closer, etc, it is incredible how powerful it can be that we find one another despite all that. Life is pretty amazing. Besides all of the amazing teachers at East Meets West Yoga that I have gotten to know and love, there are so many other great people that are there, like me, to practice, that I have shared such meaningful conversations with, or even just a warm hello! I feel like I have never ever felt that sense of community anywhere else in my life.
The other thing that made this week of yoga a special one is that I was able to get into three different arm balances that I hadn’t quite been able to master before. I had gotten close on all three in the past at different times, and maybe popped up into them once or twice (likely in happenstance), but it was like I hit a light switch this week and found something that I hadn’t found before. It felt amazing! That is what I love most about yoga, it is ever changing and ever growing. I can’t believe there was ever a time I told myself that I would never be “better” then where I was at that point and that I just couldn’t get into certain poses. Once I let go of that frustration and fear, it not only became so much more enjoyable, but I also found myself doing things I never thought I could. I can honestly say that yoga has changed me both on the mat and off and I will be forever grateful for that.
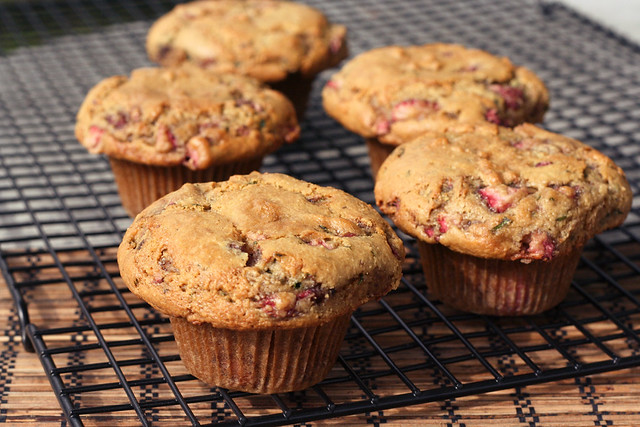
OK, let’s talk muffins! Strawberry basil is one of my absolute favorite flavor combos! I discovered it a few summers back when I was obsessed with mojitos. I started playing with basil instead of mint and adding in strawberries instead of lime. It makes for a great adult drink if you add rum, or a refreshing non-alcoholic drink if you just muddle the two together and top it off with a little sparkling water. They are so perfect together, the tart and subtle sweetness from the strawberries paired with the sweet, almost peppery flavor from the basil. If you aren’t a fan of basil, you can add in fresh mint to these muffins, or just skip it altogether. But I highly recommend trying the two together if you haven’t yet, it is a wonderful surprise for your palette.
These muffins are bursting with flavor and are also quite healthy for you. They are not only gluten-free, but they are totally grain-free, they are also dairy-free and refined sugar-free. I haven’t yet played with using an egg replacer to make these vegan, but I don’t see why it wouldn’t work. If you do try it out, please do let me know what you think. This recipe makes 6 large muffins. I fill the batter all the way to the very top and as you can see in the photos, that gives you the lovely puffy muffin tops, if you want more muffins, just fill the cups up less and keep an eye on your bake time, it may take a little less time.
Thank you again guys for your wonderful blogiversary wishes and if you haven’t yet entered the contest, please do. You have 5 different opportunities to enter and the giveaway closes on Wednesday.
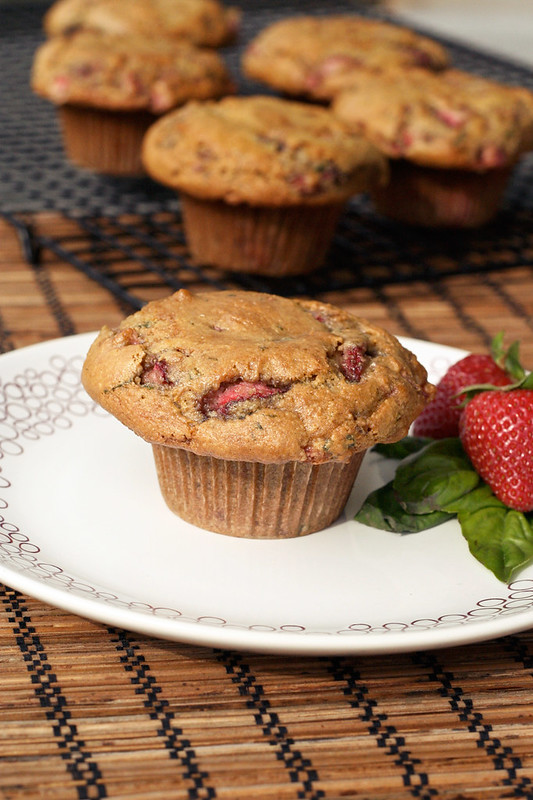
[print_this]Strawberry Basil Almond Flour Muffins – Gluten-free, Dairy-free (vegan option)
makes 6 or 7 large muffins- 2 1/4 cups blanched almond flour*
- 1 teaspoon baking soda
- 1/2 teaspoon sea salt
- 2 local farm fresh large brown eggs (you can try an egg replacer here, I haven’t yet however)
- 1/4 cup maple syrup (or honey)
- 1/4 cup coconut oil, melted
- 2 teaspoons vanilla extract
- 1 cup fresh strawberries, hulled and roughly chopped
- 1/4 cup fresh basil, finely chopped
Preheat oven to 350˚F. Line a muffin tin with paper liners.
In a medium bowl, whisk together the almond flour, baking soda, and salt. In a separate bowl, beat the eggs. Add in the honey, vanilla and oil and whisk until well combined. Add the dry mixture to the wet, stirring until combined. Carefully fold in the strawberries and basil.
Spoon the batter into the muffin tin, filling to the top if you want a nice muffin dome, or as us ladies know it “muffin tops”. Bake for 25 to 30 minutes or until the tops are golden brown and a toothpick inserted into the center comes out clean. Cool the muffin pan on a wire rack for five minutes. Gently pop the muffins out to continue cooling on the rack (don’t cool them longer than 5 minutes in the hot pan they’ll definitely get soggy). Enjoy a muffin after they have cooled 10 minutes, you know you want to.
I find storing muffins covered tightly in the refrigerator or freezer to be the best. Just pop one out as you want it, heat slightly in the microwave if you want to take the chill off and go.
*Something I have learned from baking on my own and from reading Elana’s Pantry, is that not all almond flour (or meal) is created equal. Bob’s Red Mill makes an almond flour, though easy to find, that doesn’t seem to react quite the same as other almond flours. It doesn’t seem to rise as much and it just seems to leave recipes flat. On Elana’s recommendation I now buy Honeyville brand almond flour in a 5-lb bag from their website.
[/print_this]
-
Vanilla Almond “Sugar” Cookies Made from Almond Milk Pulp – Gluten-free, Vegan + Refined Sugar-free
Every time I make my homemade almond milk, I swear that I am going to do something amazing with the leftover almond pulp. Enter Vanilla Almond “Sugar” Cookies Made from Almond Milk Pulp! Most times I put it in the fridge with really great intentions and plans, then within a few days it has mold and I feel horrid throwing it out. Happens way more often that I would like to admit. Almond pulp has to get used up within a day or two, so if you can muster up the motivation to do something with it, you have to do it quickly. This time as soon as I finished making the almond milk I started looking around online at different recipes I could use the pulp in. I have seen many recipes for savory crackers made from the almond pulp, but since this time the almond milk (and therefore the almond pulp) that I made was sweetened and I added vanilla, I wanted to make some type of sweet cookie. I still want to play around with a cracker recipe, too. So hopefully soon.
These cookies have a really great vanilla flavor and they are delicious with an ice cold glass of almond milk, or a mug of hot tea or coffee. If you want to skip the chocolate and sea salt on top, go for it, I just felt like it was the perfect compliment to them, who doesn’t love chocolate? These cookies are subtly sweet and reminiscent of a classic sugar cookie, but without all the junk. Side note, even after baking and making dozens of different sweet treats and smoothies, etc – sweetened only by using dates, I am still completely amazed by them. Who knew those funny looking little things could be so sweet and sinful. The sweet nuttiness from the almond pulp is so delicious and pronounced in these cookies, it’s really one of my favorite flavors. After eating a bunch of these, I started thinking about different ways I could play with this recipe. I think you could add cocoa to make a chocolate cookie and I also think a spicy gingersnap version of these cookies made with ground ginger and cinnamon would also be delicious, so I will definitely have to play around with both of those.
Just a quick note, the original recipe has an option to dehydrate these cookies to make them “raw”, but since I don’t have a dehydrator and I was making these at night and wasn’t comfortable leaving them in the oven overnight, I just baked them as the recipe also suggests. The bake time can vary a bit depending on how moist your pulp was when you started, I think mine ended up baking for nearly 30 minutes, but I would suggest checking them around 18 or 20, since you don’t want them to dry out or burn.
[print_this]Vanilla Almond “Sugar” Cookies with Dark Chocolate and Sea Salt – Gluten-free, Vegan + Refined Sugar-free
Makes approximately 2 dozen cookies
Recipe adapted from Choosing Raw- 2 cups almond milk pulp
- 8 soaked and pitted medjool dates
- 1/3 cup almond or coconut flour
- 2 teaspoons vanilla extract
- dash of sea salt
- 1/4 – 1/3 cup melted dairy-free dark chocolate (I melt unsweetened bakers chocolate and sweeten it with a little maple syrup and/or stevia, you can use semi-sweet chocolate chips or whatever your favorite chocolate happens to be)
1 teaspoon course sea salt
Preheat the oven to 350º F. Line a cookie sheet with parchment paper.
Add the almond pulp, dates, coconut flour, salt and vanilla extract into a food processor and process until the “dough” is the same texture and consistency of sugar cookie dough, or there about. You may need to add a little more flour, depending on how moist your almond pulp was to start.
Using your hands, make small little round balls with the dough (about a tablespoon or so each) and line them up in rows on your parchment paper lined cookie sheet. Press each one down very gently using a fork. (the original recipe called for using a fancy cookie press, but since I don’t have one, I improvised)
Bake cookies for about 20 – 25 minutes, or until golden brown. This time may vary depending on how moist your cookies are. Just keep checking on them so you don’t burn them or dry them out.
Allow the cookies to cool totally then drizzle the dark chocolate over top of each cookie and sprinkle a small amount of seat salt on each cookie.
[/print_this]
-
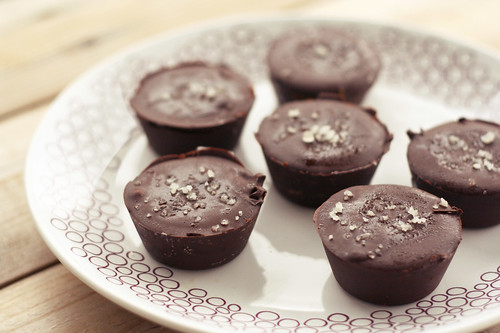
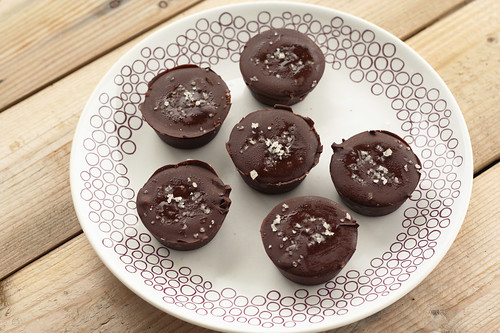
Dark Chocolate, Almond Butter Mini-Cups with Sea Salt – Gluten-free, Vegan + Refined Sugar-free
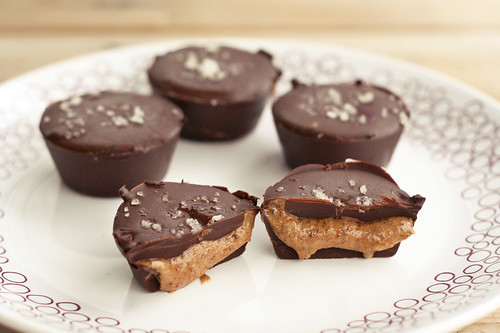
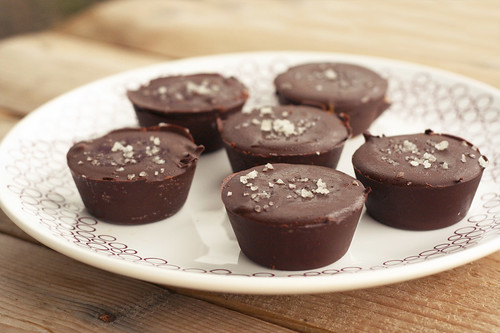
Ever since I made these dark chocolate coconut treats about a month or so ago, I have been a little obsessed with making simple little chocolate treats at home. On Easter, since we really don’t keep many sweets at home and we didn’t do the Easter basket thing, I was craving chocolate treats and decided to make some dark chocolate peanut butter cups. I didn’t take any photos since they weren’t totally perfect and I also decided I wanted to buy a mini-muffin tin so I could make smaller cups. The full size muffin cups are nice, but it is way more chocolate than what I need. I also thought it would be nice to make them with almond butter instead of peanut butter since I am so obsessed with it. Any nut or seed butter would work here, so play around. You will also see in my notes below that if you don’t wish to sweeten your own dark chocolate, you can simply just melt semi-sweet chocolate chips. I prefer to start with a good quality organic unsweetened dark chocolate something in the range of 70 – 100%, and then sweetened to my own liking since I like my dark chocolate to be subtly sweet. You may find that my measurements are too low and you want more sweetness. Go for it. Or skip sweetening it yourself and buy premade chocolate. Whatever you’d like.

I make these in a non-stick mini-muffin pan, like this one. You could definitely use a candy mold, a full sized muffin tray or maybe even a larger ice-cube tray. If you’d like, you can also line your muffin pan with paper liners. I didn’t happen to have any, so I went without, and very lightly greased my pan with some coconut oil, to be sure they wouldn’t stick. They likely wouldn’t have stuck, but I wanted to be sure of it.
Some of you may be wondering why I included the chia seeds in the almond butter filling or if you could use flax seed meal instead. I decided to include it because besides LOVING chia seeds, I had some leftover ground up chia sees on hand after making these delicious tortilla wraps from The Spunky Coconut, over the weekend. I thought it would help bind together the filling so it wouldn’t be too runny and I also thought it was a nice way to add some of the lovely benefits that chia seeds have to offer. You can read more about all of those lovely benefits here in this post from Lexie’s Kitchen. Feel free to use ground flax seeds instead or to skip it all together. It isn’t a necessity in the recipe.
As far as the sea salt goes, I really adore the flavor combination of dark chocolate with sea salt, so I try to squeeze it into my life whenever humanly possible. It may actually be one of my all time favorite things. If you aren’t a fan of the luscious salty/sweet combo, leave off the salt. You could also press a single almond or some almond slices into each one. Have fun.
What is your favorite flavor combination when it comes to sweets?
[print_this]Dark Chocolate, Almond Butter Mini-Cups with Sea Salt – Gluten-free, Vegan + Refined Sugar-free
makes 12 mini-cupsDark Chocolate Outside:
- 8-9 ounces of dairy-free, dark chocolate – (I used this unsweetened dark chocolate and sweetened it myself, as you can see below. If you use semi-sweet chocolate or chocolate chips you can skip the coconut oil and the sweeteners below.)
(optional if using unsweetened chocolate)
- 1 tablespoon coconut oil
- 3 tablespoons pure maple syrup*
Almond Butter Inside:
- 1/2 cup chilled organic unsalted almond butter (or any other nut butter or seed butter of your choice)
- 1 tablespoon ground chia seeds (you can just grind whole chia seeds in a coffee grinder or Magic Bullet)
- 2 tablespoons pure maple syrup
- a pinch of fine grain sea salt
For Topping:
- 1/2 to 1 teaspoon course grey sea salt (you can also try smoked sea salt)
Using a little coconut oil on some wax paper or a paper towel, very lightly grease a non-stick mini-muffin pan. (the muffin tin may not need to be greased, but since I didn’t use any paper liners, I didn’t want to risk the candies sticking.) You could also use a silicon candy mold. Set the pan aside. Melt the dark chocolate with the coconut oil (or your chocolate chips), either very carefully in a double boiler setup on the stove top or in small increments in the microwave. After the chocolate and coconut oil is melted, whisked together and well combined, remove from the heat (if you melted it on the stove), and add in the maple syrup. Stir well to combine. Give the chocolate topping a little taste to see if you want it any sweeter. Add more syrup, if you wish.
Using about half of the melted chocolate, add a little bit to each cup of your mini-muffin tin. Probably about a teaspoon or so to start. Grabbing either side of the tin, swirl the pan around to start moving the chocolate up the sides of each cup. Try to get it all the way up if you can. You can also use a pastry brush or spoon to push it up the sides, but I find just swirling it around works best. You can also line each cup with a paper mini-muffin liner and just paint the melted chocolate up the sides. Once it is evenly up the sides, you can add a little more chocolate to make sure that the bottom is covered, just don’t add too much, you need to save room for the filling and top.
Place the muffin tin into the freezer to allow the chocolate to set. Meanwhile, start making your filling. Add the almond butter, ground chia seeds, maple syrup and a pinch of sea salt to a small bowl. Mix very well to combine and allow it to sit about 5 to 10 minutes while the chocolate sets up in the freezer.
Once the chocolate has hardened, pull the muffin tin out of the freezer and add about 1 teaspoon of almond butter filling to each cup. Then take the remaining melted chocolate and spread it over top of the almond butter. I find using the back of a spoon is the easiest to give it a nice smooth surface. And if you are adding the sea salt on top, sprinkle a few pieces on top of each cup. Place the muffin tin back into the freezer to allow the chocolate to harden. This will probably only take about 30-minutes, total.
Once hardened, remove the muffin tin from the freezer and carefully pop or slide each chocolate mini-cup from the tin. Should happen very easily. Store these in the fridge or they will get pretty soft and melted.* NOTE about sweeteners: You can use whatever sweetener of your choice and as much as you would like. Traditional sugar will obviously work if that’s your thing, as would honey or other sugar alternatives. Use what you like. Everyone likes their chocolate at different sweetness levels. I prefer mine not too overly sweet. As mentioned above, you could also just melt semi-sweet chocolate chips that are already sweetened and skip adding your own sweetener and coconut oil. Same goes for sweetness in the almond butter filling.
[/print_this]
{this post contains affiliate links}
-
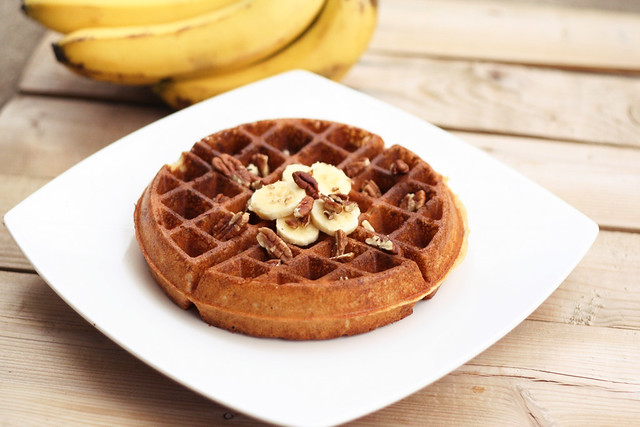
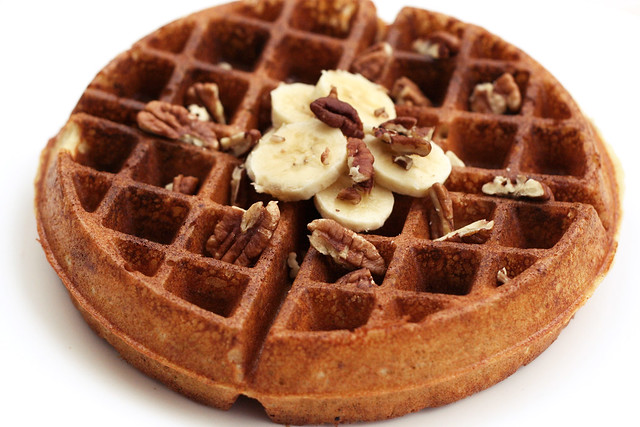
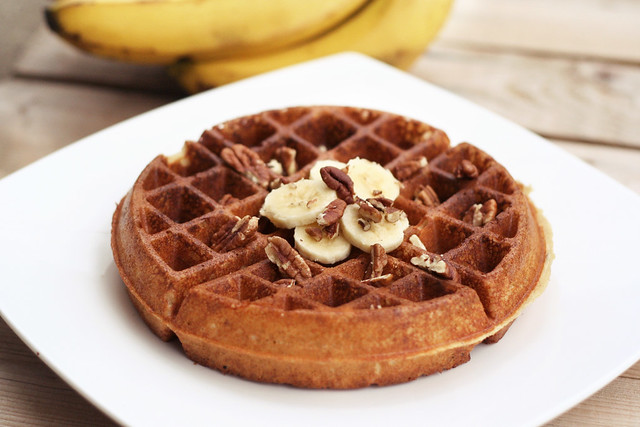
Banana Pecan Waffles – Gluten-free, Vegan + Refined Sugar-free
I am so so so excited about this recipe! I have been playing around with this recipe or some version of it for months. I made it once on a whim, first time I had ever tried and I didn’t measure too accurately and they came out perfectly. I have tried several times since to recreate it, each time without success. It has been a while since I tried, since I tend to get really frustrated when it’s just not working and I know it should. However, yesterday morning was my day! I went back to yoga first thing in the morning for an 8:30am vinyasa class, after a week off due to a slight injury and I couldn’t wait to get home to make these for breakfast. Fully expecting another crumbled, annoying mess, I didn’t really make a big deal about making these. But, alas, the stars aligned, I got my measurements on point and it all just worked! I love that.
Admittedly, one waffle, the first one, was sacrificed for the greater good of this recipe. I tried to open the waffle iron and take it out after just 3 minutes (which seems to usually be the sweet spot with my waffle iron) and it just wasn’t happening. The waffle stuck to either side of the iron and split into two halves when I opened it. That was when I realized I need to give it another minute or two. The remnants of that sacrificed waffle were still edible, so just know on your first time making these, you may lose the first one while learning that perfect time for your iron and this recipe.
I always have different gluten-free all-purpose flour blends on hand, whether pre-mixed or custom made with my own blends of flours and starches. This time I used Bob’s Red Mill since that is what I had on hand. It worked out perfectly. I cannot wait to try this again with one of my multi-grain blends, maybe something with teff, sorghum and/or buckwheat flours. I also can’t wait to try this with applesauce instead of banana for an apple cinnamon waffle.
These waffles are wonderfully fluffy with the perfect amount of golden browned crispiness to the outside. From what I have read about most waffle irons, that nice golden brown outside is achieved by using cooking oil instead of cooking spray to grease your iron. I used grapessed oil and I greased it right before I started and again in the middle of making these, after I made the first two. I decided to use some of the Pure Liquid Clear Stevia I received from NuNaturals, to lightly sweeten them. There is some natural sweetness that will come from the bananas, so if you want to skip a sweetener or use a little maple syrup or honey instead of stevia, that will work, too.
When serving, you can certainly drown these in your favorite local maple syrup and a pat of your favorite butter-alternative, or maybe some non-dairy whipped topping, (like whipped coconut milk). Or, you can just eat them as is, warm, topped with fresh bananas and chopped pecans. Feel free to use whatever your favorite nut is, or maybe try adding in some mini chocolate chips instead, or in addition to. This waffle would also be delicious sectioned into the little wedges and served warm, 1 or 2 of the wedges per person, topped with your favorite ice cream!
[print_this]Banana Pecan Waffles – Gluten-free, Vegan + Refined Sugar-free
makes 4 large Belgium style waffles – may make more depending on the size of your waffle iron- 1 large or 2 small organic banana(s), mashed – you are looking to get approximately 1 cup
- 1 3/4 cups unsweetened vanilla almond milk (or other non-dairy milk) – make sure it is room temperature, not cold
- 1/2 cup coconut oil, melted
- 10-15 drops liquid stevia (or you could use approx. 1 tablespoon of maple syrup or another liquid sweetener of your choice)
- 1 teaspoon vanilla extract
- 2 cups gluten-free all-purpose flour (I use Bob’s Red Mill)
- 1 1/2 tablespoons baking powder
- 1/4 teaspoon sea salt
- 1/2 teaspoon ground nutmeg
- 1/2 cup roughly chopped unsalted pecans (or any other nut of your choice. mini chocolate chips would be really good, too)
Topping:
- 1 banana sliced
- 1/4 cup of roughly chopped pecans
- butter, ghee or coconut butter
- maple syrup
- or anything else you might like.
Preheat your waffle iron. Make sure it is properly greased with cooking oil or non-stick spray. I drizzled a bit of grape seed oil on mine and made sure to spread it around. Cooking oil will give your waffles a nice golden outside that you won’t get with cooking spray.
In a large mixing bowl, whisk together the mashed banana, almond milk and melted coconut oil. Be sure your almond milk isn’t too cold or it will solidify the melted coconut oil. Add in your stevia and vanilla extract and give it a good stir.
Then add in the flour, baking powder, sea salt and nutmeg. Mix very well to combine, then fold in the chopped pecans or other goodies. Allow the batter to sit for 3-5 minutes.
Add 3/4 – 1 cup of batter to your hot waffle iron. Cook for 3-5 minutes, depending on your machine’s instructions. Mine took just over 4 minutes. Any less for me and the waffle would stick to either side of the iron and come apart in two when I opened it to check on it.
You can make as many waffles as you’d like and just store the remaining batter in an airtight container for up to 2 days in the refrigerator. You can also store any uneaten but already made waffles in an airtight freezer bag, either in the refrigerator or in the freezer and you can just heat one up in the microwave and/or toaster oven when you are ready to eat it.
[/print_this]
-
Wheat Free Meat Free: French Toast Baked Polenta Sticks – Gluten-free + Vegan
This next guest post comes from someone who should really call her blog “Wife of the Year”! Kalinda from Wheat Free Meat Free likely has the happiest and most spoiled husband around. Why, you ask? Kalinda’s husband Mike was diagnosed with Celiac Disease, so he can’t eat any gluten and he is also vegetarian. Kalinda does all the cooking and she is neither gluten intolerant, nor vegetarian. But in her words “She loves Mike, so she makes gluten-free vegetarian food for them to enjoy.” How adorable and insanely sweet is that? Not only does she cook for him, but she keeps a blog about it. As if the recipes and beautiful photos weren’t enough to make me stick around on Wheat Free Meat Free, once I read that sweet little detail right there, it sealed the deal for me. Although things are a bit opposite in our home, me having the gluten-intolerance and preferring to eat very little meat, etc – I did start my blog at my husband’s request, so he could “have a menu to choose from”. Ah, the things we do for our husbands.
Kalinda was kind enough to create a brand new, mouth watering recipe to share with all of you and I am seriously bummed that I won’t be able to make these until we get home from Austin. These look incredible. Check it out…

Like most of you, I think Beth and her blog are super duper. So I was quite flattered that she asked me to write a post for her while she’s off at SXSW and Flatstock.
Actually, I was flattered and intimidated because, oh man, that means I had better take some good pictures. And, you know, produce a stand-up recipe. I hope this qualifies.

[print_this]French Toast Baked Polenta Sticks – Gluten-free + Vegan
- 1 cup polenta (may also be called medium or coarse ground cornmeal or grits)
- 1 15-ounce can coconut milk
- 1 1/4 cups water
- 1 tablespoon ground cinnamon
- 2 tablespoons maple syrup
- 1 teaspoon vanilla extract
- sea salt
- Lightly grease a casserole dish. Put the coconut milk and water in a medium to large sized saucepan and place over high heat.
- Once simmering, reduce heat to medium. While stirring, slowly pour in the polenta. Once all the polenta is mixed in, stir in the cinnamon, maple syrup, vanilla extract, and a pinch of salt.
- Cook, stirring regularly, until polenta is thickened and will hold its shape. If it looks like the polenta is scorching, reduce heat to medium-low.
- Press into the casserole dish, spreading evenly, aiming for 1/2 inch thickness. Chill in the refrigerator for at least one hour.
- Preheat the oven to 450 degrees Fahrenheit. Lightly grease a baking sheet. Invert the polenta onto a cutting board, and slice into pieces around 3-4 inches long and about 1/2 inch wide.
- Arrange on the baking sheet, and bake for 10-15 minutes, flip the pieces, then continue baking another 10-15 minutes, until golden brown on the outside. Remove and serve with maple dipping sauce.
Maple Dipping Sauce
- 1/4 cup plain non-dairy yogurt
- 1 tablespoon maple syrup
- 1/4 teaspoon vanilla extract

Polenta cooking time will vary by the type. Mine was a rather coarse grind and took about 15 minutes. Finer grinds would take less time. Polenta sputters, especially in the first few minutes of cooking. Stirring helps, but be aware you might end up wearing some.
I used a 7″ x 11″ casserole dish to chill my polenta. That gave me the 1/2-inch thickness I wanted. It’s certainly OK to spread it out on a large baking sheet free form. If you wanted to make this for breakfast, the polenta can be prepared then chilled overnight.
I really wanted to use coconut milk yogurt to keep with the coconut theme, but I couldn’t find any. Soy yogurt it was. Plain old cow yogurt can be used for the dairy loving types.
Thanks to Beth for letting me stop in. Please come visit me sometime. [/print_this]

-
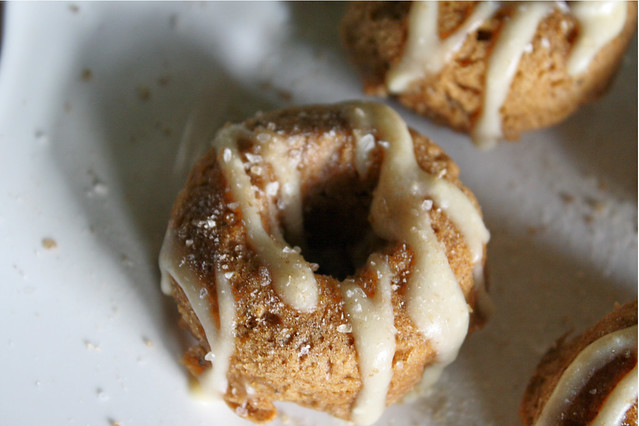
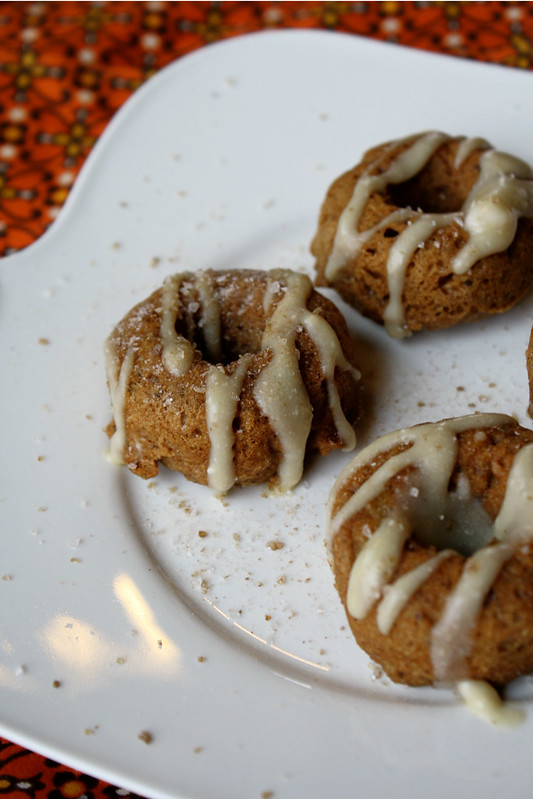
Tessa, The Domestic Diva: Maple Apple Cinnamon Donuts – Gluten-free + Vegan
As much as it saddened me to take nearly 2 weeks away from Tasty Yummies while we travel to Austin, Texas for SXSW and the Flatstock Rock Poster Convention, I am also very excited for the first time ever, to have a series of wonderful and very lovely guest bloggers holding down the fort while I am away. Right now I am in the car starting our journey from Buffalo, NY to Austin, TX, likely dreaming of these very doughnuts and all of the other delicious treats we have for you while I am gone. If only I could have found the time to make one of everything to take on the road with me, so I wouldn’t miss my kitchen too much.
I am excited that the first Tasty Yummies guest blogger, Tessa the Domestic Diva, made a very special donut recipe, just for you guys after reading about my own experience of making donuts for the very first time, not too long ago. Additionally she shares her three very popular donut recipes, which are all gluten-free and vegan. Tessa’s blog grabbed my attention recently both from the Allergy-Free Wednesday series she hosts with 5 other bloggers and more specifically with her Coconut Secret Bars, that inspired me to create my own Dark Chocolate Coconut Treats. I am so excited to have found her blog! All of Tessa’s recipes on her blog are free of gluten, dairy, and corn and each looks more delicious than the last. So now that you are drooling at the thought of even more donuts, please enjoy Donut Mania with Tessa the Domestic Diva!
When Beth asked me to do a guest post, I knew almost immediately I would like to create a donut for her. I enjoyed reading about her first donut adventure, and knew she would love some more spins to put that donut pan to good use, and that YOU all might too! I already had three donuts up on my blog, but the possibilities are really endless! (SSH!! Let me let you in on a little secret: baked donuts work well with most muffin batters! Add a hole and a little frosting, and you’ve created a crowd-pleasing donut! I won’t tell if you don’t!)
Donuts lend themselves to personal creativity and tastes very nicely. Think of a favorite flavor combo, and most likely you can make it happen. Go ahead, don that baker’s hat and start cooking! And if you are feeling less than adventurous (my sisters tease me all the time how I can whip things together in 10 minutes when it would take them 60), here is a recipe to get you started, and a few more to make sure you’re fully inspired and ready to bake!!
Here are some alternative donut recipes, with loads of frosting/topping options that can be used on ANY donut, all of which are wholesome, gluten-free, and vegan:Pumpkin Donuts
Healthy Cake Donuts (this post also talk about how to make donuts WITHOUT a donut pan!)
Banana Donuts
[print_this]Maple Apple Cinnamon Donuts, Vegan + Gluten-free
makes approximately 18 mini-donuts or 7-8 regular sized donuts (this depends on your pan)Wet:
- 1/2 cup applesauce
- 1/4 cup oil (I used melted coconut oil)
- 2 tablespoons chia meal/flax meal mixed w/ 3 tablespoons hot water
- 1/2 cup palm sugar (or other granulated sugar)
- 2 tablespoons maple syrup
- 1 teaspoon molasses
- 1 teaspoon vanilla
- 1/4 teaspoons maple extract (optional but yummy!)
Dry:
- 1/2 cup oat flour
- 1/2 cup teff flour (or brown rice)
- 1/4 cup potato starch (or tapioca)
- 1 1/2 teaspoons baking powder
- 1/2 teaspoon salt
- 1/4 teaspoon guar gum (optional)
- 1/2 cup finely diced tart apple
Maple Butter Glaze:
- 2 tablespoons Earth Balance (or butter)
- 2 tablespoons vegan cream cheese (Trader Joe’s has a new one made w/ coconut oil!)
- 2 tablespoons maple syrup to achieve desired consistency
Preheat your oven to 350 degrees. In a medium-mixing bowl, whisk the wet ingredients. Place the dry ingredients minus the diced apple, in order over the top. Whisk in to fully incorporate all ingredients. Fold in the diced apple.
Dollop spoonfuls of the batter into a greased donut pan. Fill about 2/3 full. Bake for about 8 minutes for mini donuts, and 12 for regular. You want the tops to be just done! I used a mini donut pan (12 holes) and made about 18 mini donuts.
Mix your glaze: Beat the cream cheese, butter, and maple syrup until smooth (I used an immersion blender to eliminate the lumps). Drizzle over the muffins. If you like your glaze thinner, you can add more maple syrup or milk of choice. If you like yours more like a spreadable frosting, reduce the amount of liquid!
[/print_this]
-
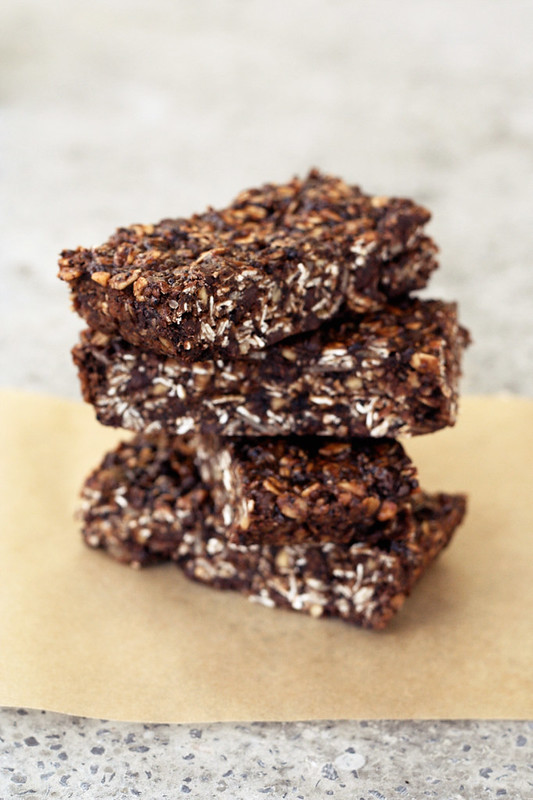
Chocolate Peanut Butter Road Trip Energy Bars – Gluten-free, Vegan + Refined Sugar-Free

We leave bright and early tomorrow morning for our big road trip to Austin, Texas for SXSW and Flatstock 33, where we will be selling our (Hero Design Studio) handmade goods and wares for 4 days in the convention center. Since I do my very best to maintain my eating lifestyle no matter where I am, I have packed a ton of food for the trip, both for the road trip down and maybe for the first few days we are there, depending how much eating happens in the car, then I plan to hit Whole Foods once we get there to stock up for the trip back. I have some almond milk and honey packed up, since I know those will both come in handy along the way. I also packed a few bottles of my homemade kombucha and to snack on, I have some nut and dried-fruit trail mix, stove-top popped butter-free spicy popcorn, gluten-free vegan jerky from Primal Spirit Foods and I made these delicious road trip energy bars. It is absolutely imperative that I have some type of chocolate available to me when I am on a road trip. For whatever reason, I always crave chocolate on very long drives. Who knows!
These energy bars were super easy to make. To be completely honest, I quickly wrote up a rough idea for a recipe, headed to the kitchen and just winged it, I assumed I would just figure it out as I went along. What I love most about these bars are how easily you could tweak them to make them your own. If you don’t want chocolate, leave out the cocoa and chocolate chips, maybe adding in some raisins or dried cranberries and some cinnamon instead. You can add whatever your favorite nuts or seeds are. The possibilities are really endless. I have made a few notes below with additional suggestions.
These bars are almost a bit sinful, with that addicting combo of peanut butter and chocolate. How can you resist? The car is gonna smell amazing. With just one bite of these chewy snacks, you will fall in love. My hubby, Mark, absolutely LOVES coffee and although I rarely drink a cup anymore, I do love the flavor and the smell of good coffee beans. So, I thought that would be a fun addition to these bars. Feel free to leave it out or substitute caffeine-free coffee if you can’t handle caffeine. I think the smell alone that the espresso powder gave these bars is worth it. I really cannot wait to bust into one of these tomorrow, I am sure I will be indulging in one before we even hit the Pennsylvania border.
Although I will be away from tomorrow until March 21, I have a wonderful group of amazingly talented guest bloggers to hold down the fort while I am away. They have some lovely guest posts and tons of great recipes to share with all of you, so I do hope you check back often to see what they have up their sleeves. I hope you like it and I cannot wait to get home and start cooking again.
[print_this]Chocolate Peanut Butter Road Trip Energy Bars – Gluten-free, Vegan + Refined Sugar-Free
Makes 8 bars (you can also cut them into smaller squares to 16 or more)- 1 ripe organic banana, mashed (try adding a second or third banana if you wish to make these sugar-free)
- 2 cups certified gluten-free rolled oats
- 1/4 cup gluten-free oat flour (or just process some gluten-free rolled oats into a fine powder)
- 1/2 cup mini chocolate chips, dairy free (I like Enjoy Life brand mini-chocolate chips)
- 1/4 – 1/2 cup maple syrup (you could also use honey, coconut nectar, brown rice syrup, etc or skip and add extra bananas)
- 1/2 cup organic natural peanut butter, chunky or creamy, (or any other nut or seed butter)
- 2 tablespoons organic baking cocoa
- 2 tablespoons chia seeds, (you could also use flax seeds, sunflower seeds, pepitas, etc)
- 1/4 cup almond slivers (or any other nut of your choice)
- 1 teaspoon vanilla extract
- 1 – 2 tablespoons espresso powder (optional)
- 1/4 teaspoon sea salt
* Note – Remember, you can easily make these energy bars your own, by adding, substituting and skipping ingredients as you’d like. To make these sugar-free replace the syrup with stevia or another banana. They could also easily be made nut-free by skipping the almonds and using sunflower seed butter instead of peanut butter. If you don’t like coffee, skip the espresso powder. Have fun with this recipe.
Preheat oven to 350º F. Grease an 8″ x 8″ glass baking pan very well, or line it with foil, leaving some overhang on two of the sides so you can easily pull it out of the pan to make cutting even easier (this is what I did).
In a large mixing bowl, add all of your ingredients. Mix and mash up very well until it is all well combined. Get your hands in there if you really want to.
Press the mixture firmly and evenly into your pan. Place the pan into the oven and bake for 20-25 minutes. Don’t worry if the bars seem a bit soft, they will firm up as they cool. After it has completely cooled, either lift the entire thing out of the pan and cut into bars or squares, or cut while it is in the pan.
These can be stored individually in the fridge or freezer. Since I made these two days ago, I stored them in the fridge and then wrapped each one individually in a little piece of parchment paper and a sandwich bag for easy eating in the car.
[/print_this]
-
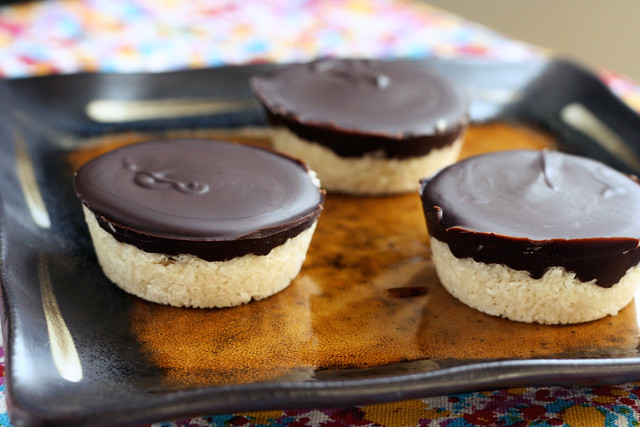
Dark Chocolate Coconut Treats – Vegan, Gluten-free + Refined Sugar-Free
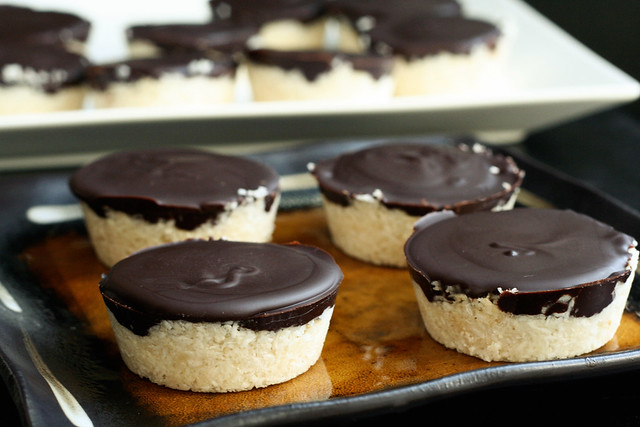
I know I have already mentioned that we are going away at the end of this week for the SXSW Music Festival and Flatstock Rock Poster convention, and that I didn’t know how many recipes I would get up before we go. But I HAD to make time to share this recipe with you guys. I threw this together the other night when I was craving something a little sweet but I wanted something different. I made a small batch as I was almost out of coconut, but I knew I would be making them again VERY soon once I could get more coconut, so I could perfect the recipe and share it with all of you. I do hope to get one more recipe up before I go, then I have a group of lovely bloggers that will be guest posting while I am away. I can’t wait!
I had come across this lovely healthy “Mounds” candy bar inspired treat from Tessa the Domestic Diva and it inspired me to make my own version in the first place. I honestly had forgotten how much I used to love Mounds Bars until I saw her recipe on Kalinda’s weekly Vegetarian, Gluten-free Round Up on Wheat Free Meat Free. The combination of coconut and dark chocolate is perfection and it has always been a favorite of mine, I wish I had started making these sooner.

Like Tessa’s version, I wanted to make a healthy homemade version that wasn’t too sweet and I really wanted to make it with a good quality dark chocolate. I used Dagoba’s Organic Unsweetened Chocolate, which is so delicious, their chocolates are some of my favorites, but you can use whatever your favorite is. And as I mention in the recipe below, if you’d rather just melt some dairy-free semi-sweet chocolate chips to make it even easier, you can do that, too. I just wanted to make these refined sugar free and lightly sweeten it myself. If you taste either the coconut filling or the chocolate topping and find you want it to be sweeter, just add a little more maple syrup or whatever sweetener you are using. You could also add an almond or two at the bottom or top to make it more like an “Almond Joy” instead of a “Mounds Bar”.
I used a regular sized muffin tin to create these little “bars” but you could really use whatever you want, a mini-muffin tin would be really fun, and you’d end up with even more treats. I almost bought one just for this recipe, but hubby told me I am cut off. In his words I “officially have too much kitchen stuff”. Hehe! If you have a candy mold, that would probably also work. This simple dessert treat is so easy to make, it’d be perfect dessert to make and share at a party if you know there will be a vegan or someone with food allergies and everyone else will enjoy it, too.
Even with these not being too crazy sweet, these are wonderfully rich and satisfying, I love that about dark chocolate. You may even want to cut one of these in half and share it and make them last even longer. In an effort to not eat all of these myself, plus with some gentle begging from one of my yoga teachers on Facebook after she saw a photo I put up, I plan to bring some of these to my yoga studio tomorrow morning. This is good, I fear if I keep these around I will eat them up in a day, they are so good.
Something I wanted to mention and almost forgot, I have avoided using maple syrup as a sweetener in recipes for a very long time, since I assumed the maple flavor would be so strong and would over power whatever I was making. I don’t know what gave me that idea, but sometimes the flavor of maple syrup on it’s own or maple flavored foods, can be a bit too much for me. Honestly it is really amazing what a great sweetener it is and you don’t get any of the maple flavor. I am not sure why, but you don’t. Maybe in larger quantities you might, but it is perfect in a recipe like this. Plus, maple syrup has many health benefits, including being known for it’s anti-inflammatory and anti-oxidant properties and being rich in trace minerals manganese and zinc. Of course sugar is still sugar, natural or otherwise, so don’t go consuming syrup or honey or other refined-sugar alternatives in huge quantities, but know that things like honey, maple syrup or coconut nectar are wonderful alternatives and much smarter choices then refined-sugars and synthetic syrups.Thought the bit about the flavor was worth mentioning though, in the event that you, like me, have been avoiding it for that reason.
[print_this]Dark Chocolate Coconut Treats – Vegan, Gluten-free + Refined Sugar-Free
Makes 12 cupsCoconut Filling:
- 2 1/2 cups unsweetened organic coconut, finely shredded
- 1/2 cup melted coconut oil
- 1/4 cup maple syrup (you could use honey, coconut nectar or any other liquid sweetener)
- 1 teaspoon vanilla extract
Chocolate Topping*:
- 6 ounces 100% unsweetened organic dark chocolate (aka bakers chocolate) I used this
- 1 tablespoon coconut oil
- 1/3 cup maple syrup (again any other liquid sweetener would work)
In a large mixing bowl, combine all of the coconut filling ingredients and mix together until well combined. Evenly divide up the filling between the 12 muffin cups, pressing it in very tightly, making sure it is even. Don’t worry they won’t stick. Place the muffin pan in the freezer make sure it is sitting flat, and freeze until hard, about 30 minutes.
While the coconut filling is cooling, melt the dark chocolate with the coconut oil. Either very carefully in a double boiler setup on the stove top or in small increments in the microwave. After the chocolate and coconut oil is melted and whisked together and well combined, remove from the heat (if you melted it on the stove), and add in the maple syrup. Stir well to combine. Give the chocolate topping a little taste to see if you want it any sweeter. Add more syrup, if you wish. Take the muffin tin with the frozen coconut mixture out of the freezer, and divide your chocolate mixture over it, spooning it on top and smoothing the chocolate out to make sure it totally covers the coconut.
Put the muffin tin back into the freezer, and freeze until the chocolate has set, about another 30 minutes or so. To get the treats out of the pan, slide a knife around the outside of the treat and it will very easily pop out.
After these are set, you could store them in the freezer and keep them really cold and solid or just in the fridge. I keep them in the fridge, myself. Just don’t leave them sitting out on the counter as they will get pretty melty.
*NOTE: if you aren’t worried about making this refined sugar free, you could just melt semi-sweet chocolate chips, I was just hoping to avoid the sugar, so I made my own chocolate topping.
[/print_this]
-
Gluten-Free + Vegan Carrot Cake Muffins
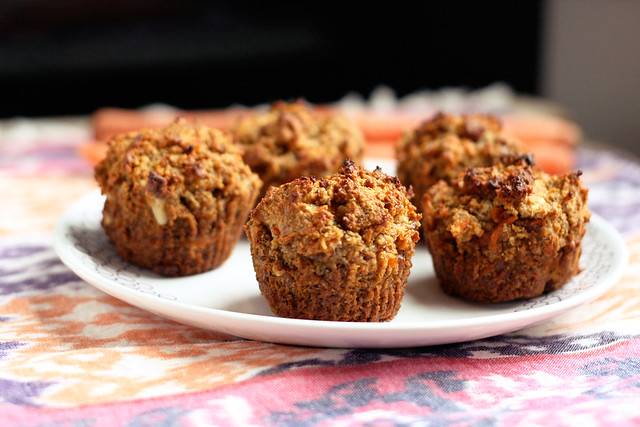
These delicious little treats were the second batch of muffins I made after the first batch ended up too soggy. They were very tasty, but I think that the carrot shreds have more water content than I gave them credit for, so the second time around I decided to add in some finely shredded coconut, since coconut is known to soak up moisture in recipes. You could also give coconut flour a try, but I am not sure if you would want the full 1/2 cup. Experiment.
The coconut flavor is subtle but it really compliments the rest of the flavors in this muffin quite nicely. The walnuts and golden raisins are both optional, but I would say unless you hate them, you should add them in. Their addition to this muffin reminds me of a slice of traditional carrot cake. These muffins are subtly sweet so they would be perfect for breakfast, dessert or even a little snack. Hubby was of course begging for some sort of cream cheese frosting.
I love how rustic these muffins ended up looking after baking, that is why I ended up taking off the papers before I photographed them. The outside of each muffin had such a beautiful toasted, golden brown hue with specs of the shreds of carrots shining through.
Normally when I am writing up a recipe or editing photos, I still have leftovers in the kitchen, so after I am done staring at the photos forever and craving another taste of whatever it is, I head downstairs and grab a little bite. Sadly, I made these muffins about 10 days ago, but we’ve been so busy getting ready for our pop-up shop this past weekend that I haven’t had a moment to edit the photos and write this up. So, now I think I am going to have to make another batch of these ASAP, I want them that badly.
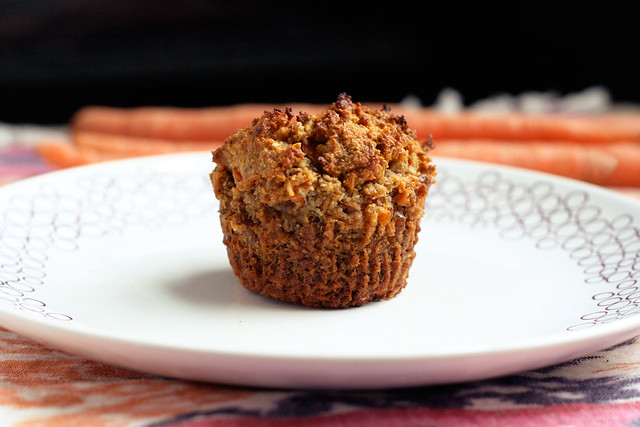
[print_this]Gluten-Free + Vegan Carrot Cake Muffins
Makes approximately 6 large muffins2 flaxseed eggs (or you could also just use two large eggs):
2 tablespoons ground flaxseed
6 tablespoons hot water2 cups blanched almond flour*
1/2 cup unsweetened finely shredded coconut
1 teaspoon baking soda
1/2 teaspoon sea salt
1/2 teaspoon nutmeg
1/2 teaspoon cinnamon
1/4 cup maple syrup (or honey)
1/4 cup olive oil (melted coconut oil or melted ghee)
1 teaspoon vanilla extract
1 cup shredded carrot
1/4 cup walnuts, roughly chopped (optional)
1/4 cup golden raisins (optional)Preheat oven to 350˚F. Line a muffin tin with paper liners.
In a small bowl, whisk together the ground flaxseeds and water, set aside and allow to get thick and gelatinous.
In a large bowl, whisk together the almond flour, baking soda, salt, nutmeg and cinnamon. Add in the shredded coconut, stir to combine.
In a separate bowl, combine the maple syrup (or honey), vanilla, oil and flax seed eggs and whisk until well combined.
Add the dry mixture to the wet, stirring until combined. Carefully fold in the carrots, walnuts and raisins.
Spoon the batter into the muffin tin, filling each cup to the top if you want a nice muffin dome. Bake for approximately 25 minutes or until the tops are golden brown and a toothpick inserted into the center comes out clean. Cool the muffin pan on a wire rack for five minutes. Gently pop the muffins out to continue cooling on the rack (don’t cool them longer than 5 minutes in the hot pan they’ll definitely get soggy). Enjoy a muffin after they have cooled 10 minutes, you know you want to.
I find storing muffins covered tightly in the refrigerator or freezer to be the best, especially in the heat of summer. Just pop one out as you want it, heat slightly in the microwave if you want to take the chill off and go.
*NOTE: Something I have learned from baking on my own and from reading Elana’s Pantry, is that not all almond flour (or meal) is created equal. Bob’s Red Mill makes an almond flour, though easy to find, that doesn’t seem to react quite the same as other almond flours. It doesn’t seem to rise as much and it just seems to leave recipes flat. On Elana’s recommendation I now buy Honeyville brand almond flour in a 5-lb bag from their website. [/print_this]
-
Gluten-free + Vegan Lentil “Meat” Loaf

Hey guys, sorry it was a bit quiet on here last week, we were getting ready for and working our (Hero Design Studio) Pop-Up Shop over the weekend. It went super well and I can’t wait to share some photos from the event with you guys. I am a bit behind on recipe posting from being so busy last week, so look for lots of new recipes this week!
I am super duper excited to not only share this new recipe with you, but to also be the guest blogger at Healthful Pursuit today! If any of you follow me on Twitter, Instagram or Facebook, you will probably remember my extreme excitement about 2-weeks ago when I finally got this Lentil “Meat” Loaf recipe right. I had messed around with a few different versions, but no matter how delicious my loaves tasted, they just didn’t want to stay together, they ended up being a crumbly, sloppy mess on the plate when I would serve them. I finally got it figured out and I couldn’t wait to share it with anyone who would listen, it’s that good.
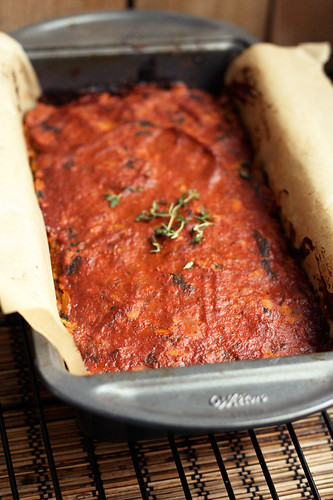
When Leanne, from Healthful Pursuit, contacted me to share a recipe on her blog with her readers while she is on an incredible trip to India, I was in the middle of experimenting with this recipe, so I knew this was the one to share. Plus, knowing it would be out there in front of even more people, it gave me an even more incentive to try to get it right and perfect.
Leanne’s blog has always been one of my favorites, I found her through her comments on my blog about a year ago and I was always so inspired by what she was making in her own kitchen. In addition to having a similar approach to health and well-being as I do, as a Holistic Nutritionist, Leanne, also has a wealth of knowledge when it comes to foods, eating and our health. Finding Healthful Pursuit brought a wonderful new breath to my cooking and has affirmed all of my decisions about food. I promise after just one visit to HP, you too will be adding it to your bookmarks.
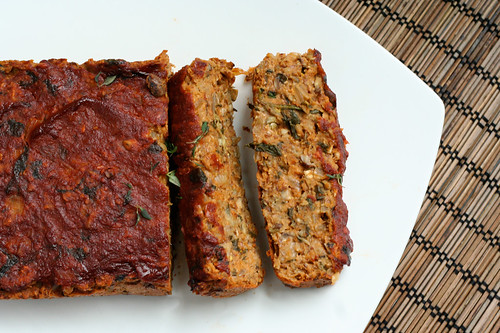
This Lentil “Meat” Loaf pretty much sums up so many of my feelings for food. It is healthy, comforting, satisfying and you won’t feel like you are missing out on a thing when you eat it. It is hearty without being heavy and it is packed full of foods that are great for you. In addition to all of that, the most important thing to me is that it stayed together when I sliced it and it looks beautiful, instead of a lumpy pile on the plate 🙂
This lentil loaf is almost a little meaty and is sure to satisfy even the meatiest of meat-lovers in your family, I promise. My hubby, Mark, LOVED it. He even made up a song for it. Reheat a slice or two of this loaf up in a cast iron skillet to get it a little toasted on the outside and toss it on your favorite gluten-free (or not) bread, with a little more BBQ sauce and some pickled red onions for a delicious “meat” loaf sandwich. The perfect hearty and healthy lunch.

In addition to the loaf, I also made a delicious and spicy vegan BBQ sauce to go on top. You could certainly use your favorite store bought BBQ sauce, but I urge you to try making your own, even if just one time. It is much easier than you think, you can skip all the gross refined sugar or corn-syrup laced store brands and you can tweak the ingredients to have a taste that is all your own. My BBQ sauce is a tad bit spicy (you can make it as spicy as you’d like), a little tangy and just a tad bit sweet. I love it.
This recipe was originally shared on Healthful Pursuit.
[print_this]Gluten-Free and Vegan Lentil “Meat” Loaf
Makes about 8 slices2 tablespoons ground flax seeds
6 tablespoons boiling water
2 cups cooked green lentils, cooled and split into 1 1/2 cups and 1/2 cup
1 cup mushrooms, diced
2 cups fresh baby spinach, roughly chopped
1 tablespoon olive oil
1 onion, diced
1 clove garlic, minced
1 tablespoon fresh thyme, roughly chopped
1 cup gluten-free rolled oats, split in half
1/2 cup almond flour
3/4 cup spicy vegan BBQ sauce (see below)Preheat the oven to 375º. Add the ground flax seeds to a small bowl, pour the boiling hot water over and stir to combine well. Set aside and allow it to thicken and cool.
Heat the olive oil in a large saucepan over a medium heat, add the onion and garlic and sauté for 5-8 minutes until the onions are tender. Add in the mushrooms and cook another 3 to 5 minutes until the mushrooms are tender, add in the thyme and spinach and cook until the spinach is wilted, about 2 minutes. Add in 1/2 cup of the BBQ sauce, stir to combine and turn off the heat, add salt and pepper to taste, if it needs it.
Process 1 1/2 cups of the cooked lentils and1/2 cup of the oats in the food processor until smooth (some whole bits may remain, that’s ok). Spoon the mixture into a large bowl, add in the remaining lentils and oats, plus the flax “egg”, almond flour and vegetable mixture. Stir really well to combine. Then get your hands in there, just like you would with a regular meat loaf or meatballs, and make sure it is mixed and mashed together really well.
Spoon the mixture into a parchment paper lined 9″ x 5″ loaf pan, (leave a bit of the parchment paper hanging over so you can easily lift the loaf out when it is cooked). Using your hands, you really want to press it in good. Brush on the remaining 1/4 cup of BBQ sauce over the top.
Bake uncovered for 35 to 40 minutes at 375º. Cool in the pan for about 5, pull the loaf out by grabbing the sides of the parchment paper and lifting up and allow it to cool for another 5 to 10 minutes on a cooking rack. Slice and serve.[/print_this]
[print_this]Spicy Vegan BBQ Sauce
Makes about 1 quart of sauce1 tablespoon olive oil
1 large onion, diced
3-4 garlic cloves minced
1 teaspoon celery seed
24-ounce jar of strained (or crushed) tomatoes (or a 28-ounce can)
7-ounce jar of tomato paste (or a 6-ounce can)
2 tablespoons Sriracha (if you don’t like spicy, you can skip this, add less or use just a pinch of two of red pepper flakes instead)
1/4 cup cider vinegar
1/4 cup whole grain mustard
1/4 cup maple syrup
1/4 cup blackstrap molasses
2 teaspoons liquid smokeHeat olive oil in a medium saucepan over a medium heat. Add the onion sauté for about 5 minutes, until the onion is slightly tender, add the garlic and saute for another minute or two. Add in the remaining ingredients and stir well to combine, reduce the heat to a medium-low and allow to simmer for 20 to 30 minutes, stirring often. Taste the sauce and make sure you don’t want more of anything, you may want it more sweet, spicy, sour, salty. I like my BBQ sauce tangy and smoky, so I added another 1/4 cup of vinegar and another teaspoon of liquid smoke. Remove from the heat, allow to cool for a few minutes, then puree until smooth in the food processor or blender.[/print_this]
-
Pumpkin Gingerbread Muffins with Dried Cranberries {Gluten-free, Vegan}
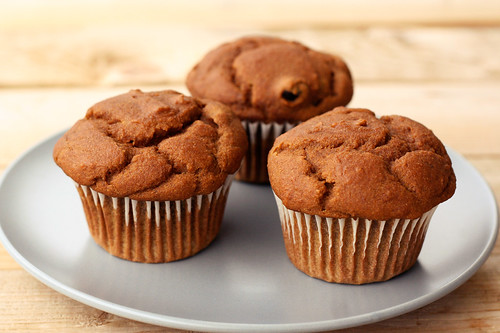
We’re leaving bright and early, hopefully before the sun rises, tomorrow morning for Kentucky to visit my husband’s family. We’re gonna celebrate Christmas a little late, ring in the new year and enjoy the last of the holidays. It’s about 8 or 9 hours to drive there, possibly longer with having the pooch with us, but it’s not too bad. I usually try to pack some healthy snacks and foods both for the drive and for when we get there.
So, this morning I baked a small pie pumpkin to purée to make these muffins, I toasted the seeds with a super spicy pepper blend and I also made dark chocolate bark with dried bing cherries, pistachios and grey sea salt (recipe soon).
I had to change my pumpkin muffin recipe a bit as I was nearly out of almond flour, so I turned to Gluten Free Goddess‘s pumpkin muffin for some changes and additions to my original recipe. I used the last of some coconut milk I had and since I wanted to skip the regular sugar, I decided use coconut sugar and some blackstrap molasses. The minute I smelled the molasses with the spices it gave me the idea to add additional flavors to create a “gingerbread” type muffin.
The gingerbread flavors went so well with the pumpkin and these turned out great, they are so moist and tender. These will be great for the drive and wonderful for breakfasts when we get there. Since hubby likes to cram in as much Southern junk and comfort food as he can while we’re down there, I’m usually on my own for food. I’m ok with it, I even encourage it, since he’s such a trooper all the time here at home and he usually only gets this food once a year. But, this does mean I am on my own while we are down there. I usually pack snacks and food to cook for myself while everyone else is having fried chicken and pizza from their favorite local joint.
I am making my tortilla soup for everyone on New Years night, and I’m super excited for them to try it for the first time.
What do you have planned for New Year’s Eve?
I hope everyone has a peaceful, safe and blessed New Years celebration, surrounded by loved ones. I am so excited for all the lies ahead in 2012. It promises to be a year full of wonderful adventures, big changes and so much more. We are planning a big move and we already have some super amazing projects lined up. I am so full of anticipation for the journey ahead. I am not sure I have ever looked forward to a new year, as much as this upcoming one.
[print_this]Pumpkin Gingerbread Muffins with Dried Cranberries – Gluten-free, Vegan
Adapted from my own pumpkin muffin recipe and Gluten-free Goddess’ recipe1 cup sorghum flour
3/4 cup almond flour
1/3 cup organic coconut flour
1/2 cup tapioca starch
1 1/2 teaspoons baking powder
1 teaspoon baking soda
1/2 teaspoon sea salt
1/2 teaspoon xanthan gum
1 teaspoon ground cinnamon
1 teaspoon ground ginger
1/2 teaspoon nutmeg
1/4 teaspoon ground cloves
1/4 cup blackstrap molasses
3/4 cup coconut sugar
1 1/3 cups fresh pumpkin puree (canned organic puree would also work)
1/4 cup light olive oil
2 large pasture-raised eggs, beaten (or 1 tablespoon Ener-G Egg Replacer whisked with 1/4 cup warm water)
1 teaspoon vanilla extract
1/3 cup coconut milk (or almond milk)
1/2 cup dried cranberries (you could also add raisins, dried cherries, nuts or chocolate chips here, instead or in addition to)Preheat oven to 375º F. Line a standard muffin tin with paper liners.
In a large mixing bowl whisk together all of the dry ingredients (up to and including the cloves). In a medium mixing bowl, whisk together the wet ingredients (up to and including the milk). Add the wet ingredients to the dry and mix very well by hand or with a stand mixer or hand mixer to incorporate the ingredients. The batter should be very smooth and not clumpy. Fold the cranberries into the batter by hand.
Divide the batter evenly among the muffin cups. Bake in the center of the preheated oven for 20 to 25 minutes until golden and firm to the touch. A wooden pick inserted into the center should emerge clean.
Cool the muffin pan on a wire rack for five minutes. Gently pop the muffins out to continue cooling on the rack (don’t cool them longer than 5 minutes in the hot pan- they’ll definitely get soggy). Enjoy a muffin after they have cooled 10 minutes.
Freeze any leftover muffins in tightly sealed freezer bags and pop one out for a quick and easy breakfast.[/print_this]
-
Apple Crisp (Gluten-Free and Vegan)
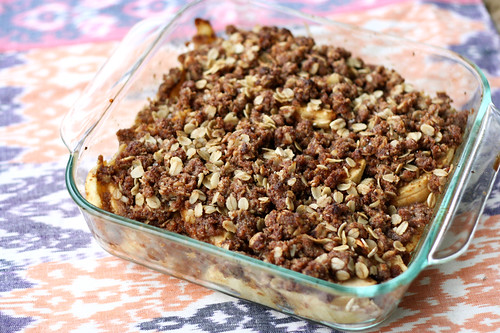
I absolutely love my mom’s apple crisp, it is one of my favorite things about fall! I have been making my own gluten-free version for a while now and it is so delicious. After I made the vegan apple cobbler two weeks ago with palm oil shortening instead of butter, I decided I wanted to make an updated and healthier version of the apple crisp, too. I’ve actually been calling it Apple Crisp 2.0, but I didn’t think that would make for a good title or dish name. This apple crisp is as healthy as dessert can get in my opinion – it is gluten-free, vegan, refined sugar-free, dairy free, egg free and corn free. Besides using organic all natural palm oil shortening in place of butter in recipes to make them vegan, I have also really fallen in love with baking with coconut oil. When solid, it makes a great replacement for butter in many baking recipes that call for cutting it in. The benefits of coconut oil are numerous and can be attributed to the presence of lauric acid, capric acid and caprylic acid, and its properties such as antimicrobial, antioxidant, antifungal, antibacterial, soothing, etc. It is great for your skin and hair when used topically and has been found to have anti-aging, regenerative effects. We even use it topically on and feed it to our dog, Seri, when she has itchy skin. She LOVES the way it tastes.
I was also excited to play with date sugar and maple syrup in this recipe instead of refined white or brown sugar. It turned out so perfectly sweet. Date sugar is totally unprocessed, unrefined and raw. It naturally contains fiber and is loaded with vitamins and minerals like calcium, iron, magnesium, phosphorus, zinc, iron, copper, manganese, and selenium. Because date sugar doesn’t melt the way sugar does, I knew I wouldn’t get that delicious syrup with the apples that I usually get with the brown sugar, so that is how I decided to add in the maple syrup. It was such a small amount, you can barely distinguish any maple flavoring, if any at all. Other options instead of the maple syrup would be rice syrup or molasses or if you aren’t vegan, you could also use honey. I am so excited about how this apple crisp turned out. It has so much flavor and I actually think it is better than any apple crisp I have made in the past.
You could serve this with your favorite vegan (or not vegan) ice cream or whipped topping. Something that I saw a while back on Healthful Pursuit that I have been meaning to try is coconut whip, which I think would be perfect on top of this recipe. I may just need to make that happen this week.
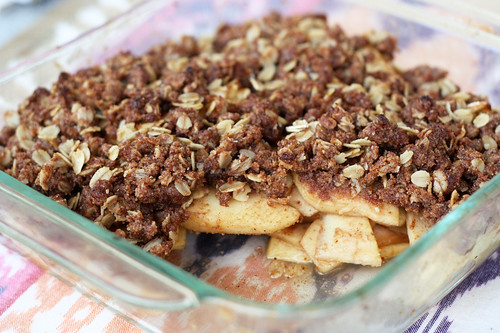

Gluten-free Apple Crisp (Vegan)
serves 6Filling:
- 4 cups of peeled and sliced apples (4 med)
- 2 teaspoon fresh lemon juice
- 1 tablespoon maple syrup
- 1 teaspoon vanilla
- 1/4 teaspoon ground cinnamon
- 1/4 teaspoon ground nutmeg
Topping:
- 1/2 cup blanched almond flour
- 1/2 cup certified gluten-free oats (I like Bob’s Red Mill Gluten Free Rolled Oats)
- 1 tsp ground cinnamon
- 1 tsp ground nutmeg
- 1/3 cup date sugar, coconut sugar or other granulated sugar of your choice
- 1 1/2 tablespoons maple syrup (1 for the topping and 1/2 to drizzle over the top)
- 1/3 cup coconut oil (make sure it is somewhat solid and not liquid)
Preheat oven to 375°F.
Place apples in an 8-inch square pan, pour lemon juice over. Add 1 tablespoon of maple syrup, spices and vanilla, toss around to combine.Mix almond flour, oats, spices, date sugar and maple syrup together in a medium sized mixing bowl. Cut in coconut oil in to make crumbly consistency.
Sprinkle over the apples, drizzle remaining 1/2 tablespoon of maple syrup over top and bake 30-40 minutes or until apples are tender and topping is golden brown. Serve warm.


