-
Chicken Pho (Vietnamese Noodle Soup)
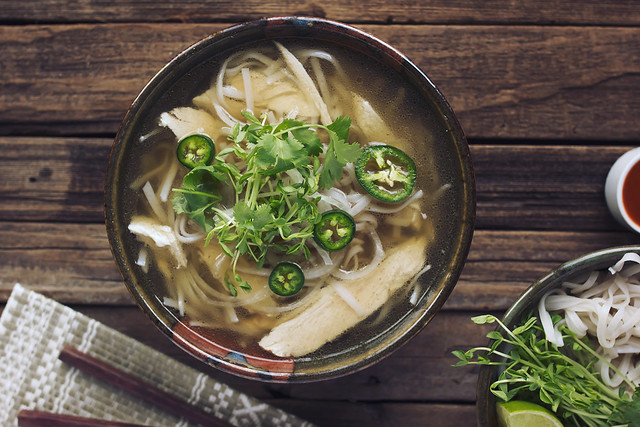
Despite the 80 degree whether we have had this past week, with the onset of November and the clock’s changing back, I start to crave comfort food something crazy this time of year. Soups, stews, crock pot meals, all of it! This homemade Chicken Pho (Vietnamese Noodle Soup) is something I find myself craving very often, this time of year. Even with several authentic vietnamese restaurants in the area, I find my homemade pho has been perfected to where it is the best I can find! (Horn tooted)
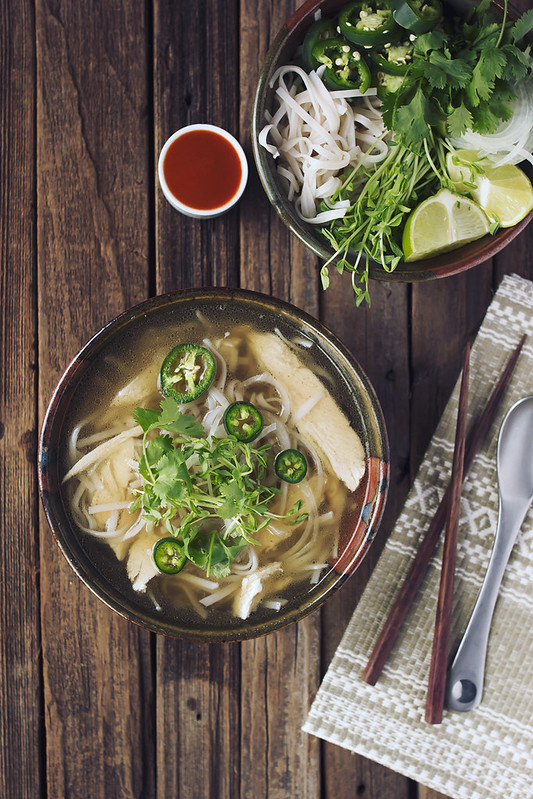
I make a mean Beef pho, which tends to be a bit more traditional, but I also really love making it with chicken, especially when we get one of the beautiful whole pasture-raised chickens from our farmer. Besides being hot and comforting, like any bowl of chicken noodle soup should be, the incredible warming spices in traditional pho not only warms the body, but I truly believe they have some sort of magical powers to warm the soul. To me, this is as close as you’ll ever be to getting a hug from your food.

Though it seems like there are many steps to homemade pho, it really is quite easy and once you’ve done the prep work, you can let the soup simmer all day and by the time dinner rolls around, it is done, ready and waiting for you to enjoy it!
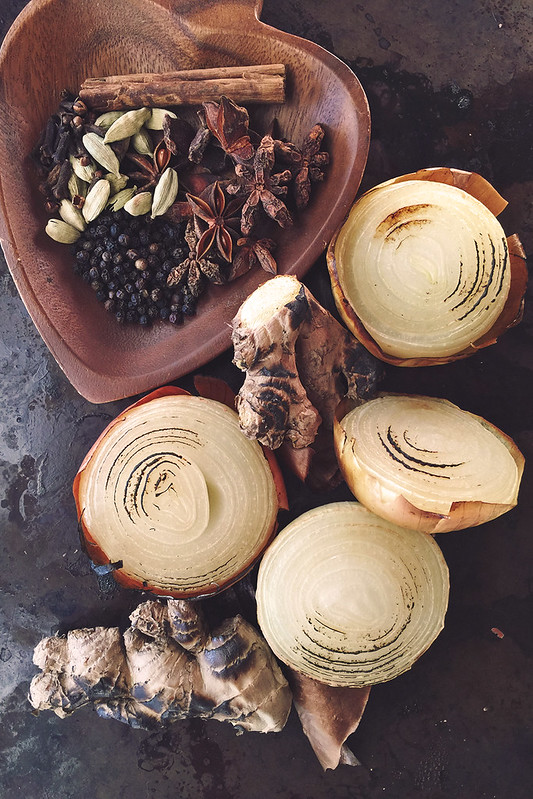
The best thing about a traditional dish like pho are the subtle nuances to the recipe, that bring the most incredible unique flavors. Charring the onions and ginger is just one of them. A simple and quick step that provides a depth of flavor so vital to this dish! Plus, it leaves the kitchen has the most beautifully pungent aroma, too!
-
Grilled Summer Veggie Gazpacho
I am super excited to share with you guys this amazing summery, chilled soup recipe, aka one of my most favorite ways, currently, to enjoy the flavors of the season. The whole idea for this Grilled Summer Veggie Gazpacho was inspired by one of my new favorite kitchen staples, vegan stocks and broths from Massel.
Earlier this year while at the Expo West Natural Products Convention, I had the pleasure of not only meeting the amazing Blender Girl, Tess Masters, who has quickly become one of my favorite people, but in meeting her I was also introduced to Massel, an amazing brand, new to America, hailing from her home country of Australia. Massel makes high-quality easy-to-use bouillons, stock cubes, seasoning granules and Concentrated Liquid Stock. All of their incredible all-natural products are gluten-free and vegan, so they can essentially be enjoyed by all, regardless of dietary restrictions. Massel never adds MSG and all of their ingredients are non-GMO. Besides all of that, the best part about their bouillons are how they taste just like homemade stocks.
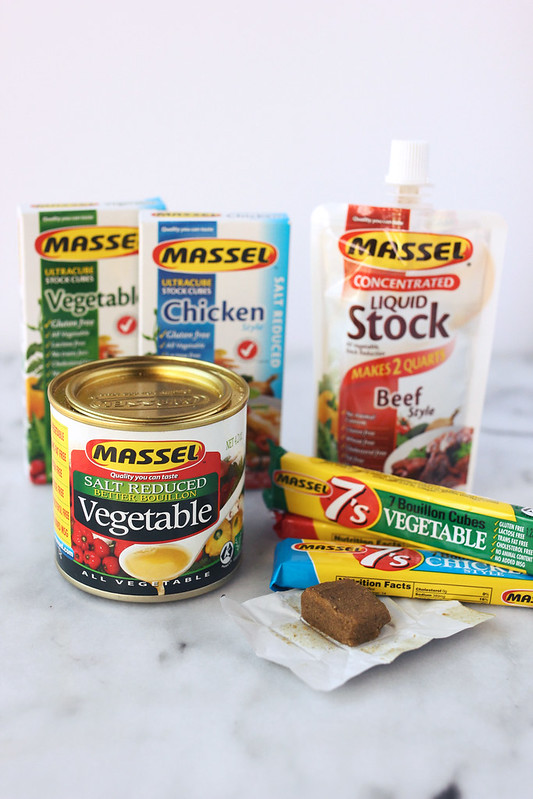
Though I am not strictly vegan or vegetarian myself, I do try to limit the amount of meat I consume. If I cannot get high-quality meat from our local farmer or at the farmers market, I much prefer to eat vegetarian. When it comes to homemade stocks and soups, I generally tend to use leftover bones from our grass-fed meat and/or whatever veggies I have on hand, to make a stock every other week or so. But this just isn’t always a possibility, sometimes I need quick and easy, but I still want healthy and real.
-
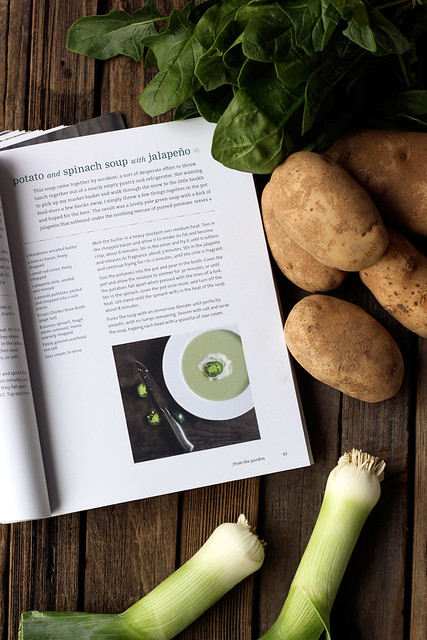
Potato and Spinach Soup with Jalapeño from the Nourished Kitchen Cookbook + Giveaway
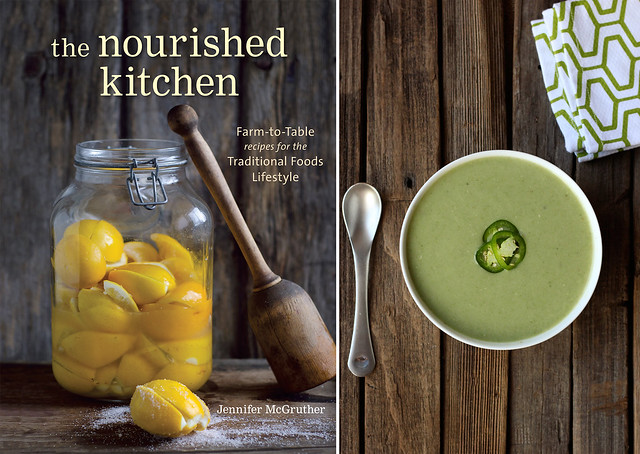
What a wonderful time it is for fantastic passion-filled cookbooks! So many incredible, drool-worthy books on the shelves right now, it is such a great time for us food lovers! I can tell you, this self-proclaimed cookbook junkie is in heaven, currently. You should see the many packages and envelopes that have been showing up here over the last month or two, each one filled with another stunning book that is exuding the incredible passion of the dedicated creator.Today, I am excited to bring you another book that I have been highly anticipating. The Nourished Kitchen: Farm-to-Table recipes for the Traditional Food Lifestyle, from the ever so talented, Jenny McGruther, is a book that I have been waiting to have in my very own kitchen, since the minute I heard that it was in production. I have followed Jenny’s blog, The Nourished Kitchen for many years now and she has always been an inspiration to me, how I cook and how I eat. Jenny’s blog was one of the first I found when I initially changed my diet.
For me, there is nothing more inspiring than flipping through the pages of a cookbook that I know was created with much love and passion. Regardless of the content of a cookbook, there is something so special about the ones where you can feel the author’s devotion to their craft and the immense amount of love and care that they put into every single dish that they created to share with us, the readers. The Nourished Kitchen is a fine example of this. Jenny’s words illustrate the profound love and joy she has for cooking and with each paragraph I read, I get more excited to get into my kitchen to start creating something beautiful. Although Jenny and this cookbook are not exclusively gluten-free, she and I share so many very similar views on food and eating. As the Jenny puts it:
“a fad-free approach to cooking and eating that emphasizes nutrient-dense, real food, and values quality environment, and community over the convenience of processed, additive-laden products that are the norm on grocery store shelves”
I couldn’t have said it better myself, really. For those of you that have followed Tasty Yummies over the 4 years I have been writing it, you know that I have chosen to not put any labels on my diet. Besides eating gluten-free, I choose to focus my efforts on a real food diet rich in nourishing whole foods that feed both my body and my soul. I eat intuitively, always listening to my body and feeding it with fresh, unprocessed, seasonal and whenever possible, local foods that are not just delicious and good for me, but that also fills me with happiness and joy.
You also probably know that despite my mostly plant-based diet, I do consume some meat. I consider myself a conscientious omnivore who prefers to only eat meat and other animal products, when I am given the opportunity to purchase it locally, from a farmer whom I can trust. This is something that has become increasingly more difficult for me, since we’ve moved to California last year. The cost of raising livestock on pasture and sustainably seems to considerably more expensive here, than it obviously is in New York. So, I have to say, I am very envious of Jenny’s amazing resources, living in the central mountains of Colorado.
With each recipe and every section in this beautiful book, you can see the incredible advantages of Jenny’s location, which provides her access to amazing traditional foods throughout the year. The Nourished Kitchen contains more than 160 recipes, inspired by the seasons, land and waters around her. Whether you are gluten-free or dairy-free, or you have other restrictions on your diet, there are still plenty of recipes in this cookbook for you and the best part is, because of the simple and traditional preparations and the approachable ingredients (many of which you can grow in your very own garden) – many of the recipes are easily adaptable to fit your own way of eating. Read the rest of this entry »
-
The Blender Girl Cookbook Giveaway and Creamy Cauliflower Soup

I am super excited to be sharing with you guys today, one of my favorite new cookbooks, The Blender Girl: Super-Easy, Super-Healthy Meals, Snacks, Desserts & Drinks. This drool worthy masterpiece is the debut cookbook from the beautifully talented Tess Masters, aka The Blender Girl. This comprehensive cookbook releases tomorrow and it is chock full of 100 gluten-free and vegan recipes!
I met Tess last month at Expo West and I knew immediately when I saw her shining smile and welcoming presence, that she was someone I could totally get down with! Tess is a health-conscious blogger with a love for food very much like my own. The recipes in her brand new cookbook are all plant-based and gluten-free and each one is created with the intent to not only tantalize your taste buds but to also nourish your body and your soul. I have already bookmarked several of these amazing recipes to make over the next few weeks! I cannot wait to cook my way through this beautiful book.
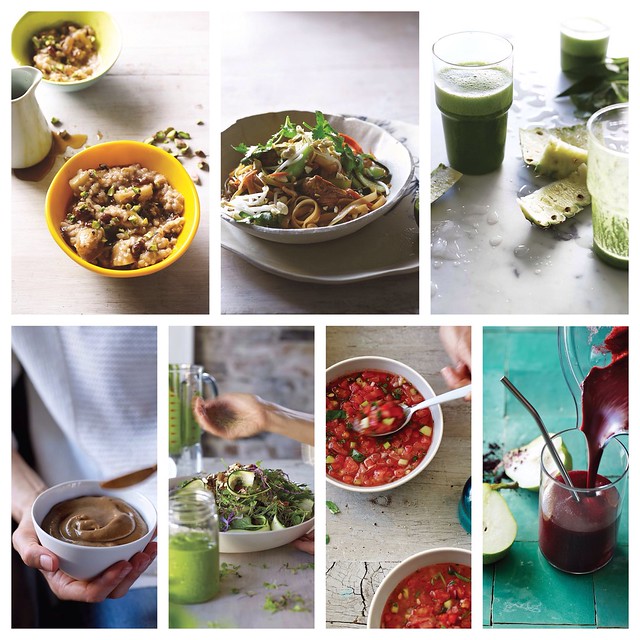
The Blender Girl Cookbook is loaded with nutrient-dense recipes that run the gamut of creativity. Sure there are the traditional blenders recipes you’d expect to see in a cookbook like this, such as smoothies, sauces, juices and soups but Tess takes what a high speed blender can do, to new limits creating recipes like:
A Flourless Triple-Pecan Mousse Pie
Creamy Mushroom Stroganoff
Pad Thai
Chai Rice Pudding
Vegan Cheezes
Watermelon Gazpacho
Alkaline Tacos
Tons of various salad dressings, dips, sauces and so so much more.
-
Photo Fun Day Friday
Hey friends!! Happy almost weekend and happy April to you all! 😉 I hope the spring is finally starting to show itself for you, wherever you are!! Here in Southern California, we actually had a chilly week and it was so welcomed and lovely! Here’s some photos from the last few weeks over here in my world! What’s going on in your world currently?
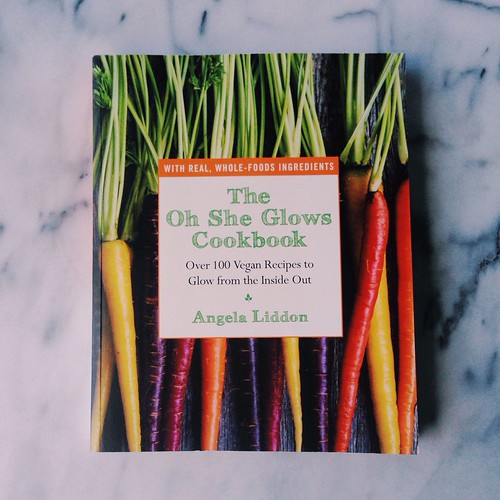
I was so super excited to get my hands on the beautiful new Oh She Glows Cookbook from Oh She Glows. As a fan of Angela’s blog for many years, I was really anticipating this book and it certainly lives up to the hype. So many wonderful vegan recipes!
My handsome Jpeg
I am just loving my new Little Moments mediation cards from the beautiful Kristen Hedges. They are currently sold out, but keep checking back, she will have them in stock again soon, I am sure.

I love getting letters from my niece, Teagan and nephew, Noah – back home in NY. This time around I got a beautiful new photo of Teagan, taken by Buffalo Baby Photography my friend Jess’ brand new business. How adorable is she??
A recent haul from our gardens!! Loquats and avocados.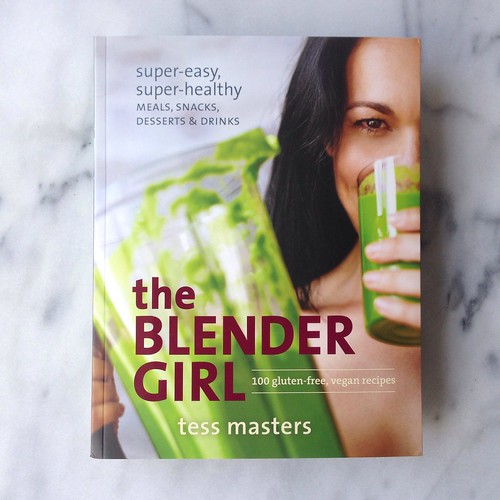
Got an advanced copy of the Blend Girl’s new book that officially releases on 4/8. Look for my full review and a giveaway this weekend! That’s me, just hangin’ out at the Pixies Hollow at Disneyland 😉
Some new tea towels hubby and I designed and hand silkscreen printed, they are also available as 8×10 prints. All are available in the Tasty Yummies store, now. -
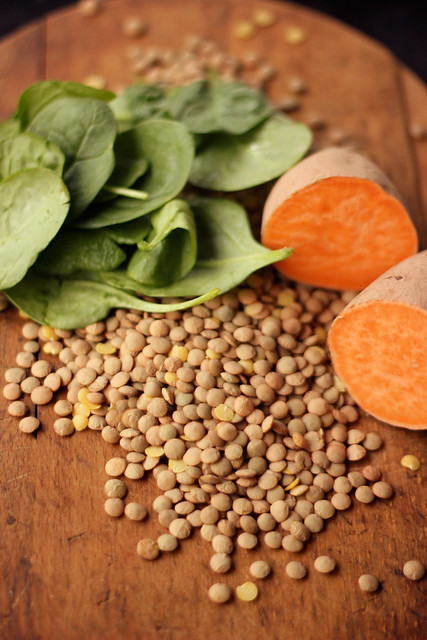
Spinach, Lentil and Sweet Potato Slow Cooker Soup {Gluten-free, Vegan}

This post is part of my ongoing restricted diets series with the Free People Blog BLDG 25.
Since it seems this winter is hanging on until the bitter end for a lot of folks this year, I decided it was the perfect opportunity for one last comforting winter meal, like this simple to make spinach, lentil and sweet potato slow cooker soup
OK, sure, I am in California and our idea of winter weather is the low 60s and some rain, but even with our (not so) cooler than usual winter weather — I want hot, comforting foods, that literally feel like a warm hug with every spoonful.
-
Chilled Carrot Ginger Coconut Soup – Gluten-free + Vegan

I am very excited to be sharing another recipe with the Free People Blog, BLDG 25. Today’s recipe is a simple but totally impressive chilled soup that is perfect for all of these hot weather days we’ve all been having.
When it is as hot as it has been, I find it hard to want to start up the stove or oven and then do all the prep work in a hot kitchen. Then, once I am really good and sweaty, that’s when dinner is ready. Nothing like eating a hot meal and feeling like you want to just pass out or jump in a pool.
The great thing about this chilled carrot soup is you can do the prep work the night before or early in the morning when the kitchen and the rest of your house still has a chill to it from the overnight cool down. You make the soup quick, puree it and then put it in the fridge until you are ready to eat. It makes a wonderful dinner or lunch with a simple side salad, or it would be wonderful as an appetizer.
But, if you are like my hubby, Mark, and chilled soups totally skeeve you out, you can enjoy this soup warm, room temperature or hot. Trust me, I may have taken many spoonfuls of it, while it was cooling and it was just as incredible.
This recipe was originally shared on the Free People blog.

[print_this]Chilled Carrot Ginger Coconut Soup – Vegan + Gluten-Free
serves 4-6- 1 tablespoon olive oil
- 1 onion, chopped
- 3 tablespoons finely chopped ginger
- 3 cloves garlic, minced
- 1 lb. organic carrots, peeled and chopped into 1-inch pieces
- 4 cups organic low sodium vegetable broth
- 1/2 teaspoon sea salt
- 1-2 teaspoons yellow curry powder (optional)
- 1/4 teaspoon red pepper flakes (optional)
- 1 cup full fat organic coconut milk
Heat olive oil in a large saucepan over a medium/high heat. Add in the onions and ginger, sauté for 4-5 minutes until the onions are beginning to get translucent and both the onions and ginger are fragrant. Add the garlic and sauté for another minute. Then pour in the broth, add in the carrots, salt, curry powder and red pepper flakes.
Bring to a boil, then turn the heat down and cover the pan and allow to simmer for 25-30 minutes until the carrots are nicely tender. Remove the pan from the heat (or just turn off) and allow the soup to cool, uncovered, for about 15-20 minutes.
Purée with an immersion blender or in batches using a regular blender or food processor*, until smooth. Return the puree to pot over a low heat. Pour in the coconut milk, stirring well to combine. Once combined, remove it from the heat and serve hot, or store it in the refrigerator and serve chilled, which is what I did. Top each bowl with some thinly sliced green onions.
*When puréeing hot soup in a blender or food processor, do so in small batches, filling the blender pitcher only about halfway. Put the lid on, but remove that small cap in the lid (if you have it) and hold the lid down tight with a towel, otherwise the steam will cause the lid to explode off, spewing hot liquid everywhere. This has never happened to me, but it can, so be careful. [/print_this]
While you are over there check out some of my other recipes: Roasted Balsamic Strawberry Mini-Tarts with Whipped Coconut Cream – Gluten-free + Vegan, No-Bake Banana Cream Pie – Gluten-free + Vegan, Blueberry Lavender Vanilla Ice Cream – Vegan, Gluten-free, Refined Sugar-free
-
Tom Kha Gai (Thai Coconut Soup) Gluten-free + Dairy-free, w/Vegan options

I am really obsessed with Thai food. I actually crave the flavors of Thai food quite often. Honestly, if we could go out for Thai food once a week, I would be totally content. However, we really try to not eat out very often, and I also really prefer to know what exactly is in my food. So, what better way to get what you want, then to just make it yourself. I started looking around at different authentic Thai recipes online and quickly learned to be able to really get the authentic flavors, I would need the proper ingredients. I planned to make Pad Thai and this Tom Kha Gai Soup over the weekend so I had to get all of my ingredients in order to do so. Seeing as a couple of the ingredients I was looking for didn’t exist in my regular circle of grocery shopping, this meant it was time for an adventure. I found there were two different Asian markets on Niagara Street in Downtown Buffalo, conveniently on my way home from yoga, so Saturday morning after my yoga practice, I took my little list and headed over to Niagara Street, feeling very intimidated.

First up, I stopped at A’Chau Oriental Food Market at 833 Niagara St., this is where I was able to grab most of what I needed to make my Pad Thai and Tom Kha Gai Soup, however they were out of fresh kaffir lime leaves. So, after really walking the aisles and grabbing some things not on my list, I headed over to Niagara Asian Market at 937 Niagara Street, where they had fresh kaffir lime leaves and a HUGE basement full of ingredients. In addition to the things I was looking for, I grabbed a few more that caught my eye. I actually picked up a HUGE 4-lb bag of gram flour aka chickpea flour, for just $4.99. I see lots of soccas in my near future! Both markets had so many ingredients I was already familiar with and so many that I had never heard of. They both had unlimited selections of rice noodles, rice flour, tapioca starches, palm sugar etc, available at very inexpensive prices. I could go nuts in those places for sure.

I also grabbed a bag of these Pandanus flavored Crispy Rolls from India, because they caught my eye only having 6 ingredients, coconut milk, tapioca starch, sesame, sugar, salt and pandanus extract. Naturally gluten-free and vegan, what isn’t to like? To be honest, I didn’t (and still don’t) really have a clue what pandanus is, but I didn’t care, I went for it. Some of the best foods and flavors I have discovered that I love are by completely chancing it and trying something totally new. These crispy rolls are super light and crispy, delicious and very satisfying, I love the crunch and the subtle sweetness. Looks like I will be stopping by these Asian markets a lot more than I had planned.
Once I got the few ingredients I couldn’t easily find – specifically the kaffir lime leaves and the galangal root, making this soup was an breeze. I ended up making it for lunch on Sunday! Tom Kah Gai soup has always been one of my favorites. Even when I know I am going to order some type of noodle dish at a Thai restaurant, which is more than enough food, I always feel obligated to order this soup, just because I don’t know when I will have the opportunity again. Now that I know how easy it is to make, I will just make it at home. The flavors in this soup are intense and so wonderful. The bright fresh flavor from the lemongrass is definitely the star of the show, but you get an equal burst of flavor from the keffir lime leaves. It is amazing what a punch those little guys pack! The galangal also brings a pungent flavor very similar to ginger, spicy with a little bit of bite. A little goes a long way with galangal. If you can’t find it easily, ginger will also work great here. Traditionally this soup is made with homemade chicken stock and along with diced or shredded chicken breast. I didn’t have any homemade stock at home so I went with some high quality organic low sodium chicken broth and skipped out on the meat and tofu. I just wanted to enjoy the best part, the delicious broth! To make this soup vegan you could substitute vegetable broth for the chicken and add in tofu or skip it like I did. It won’t be exactly the same flavor profile of traditional Tom Kha Gai soup, but it will still be absolutely delicious.
I am so glad I made the time to make some Thai food at home and explore the Asian markets. Look for my Pad Thai recipe, very soon! I made that Saturday night and both hubby and I were so excited with how it came out that we didn’t take a minute to stop eating so I could take pictures. Mark has already asked me when I will be making it again, so I should have that recipe up soon! Also, if you enjoy Asian foods of any kind (Thai, Chinese, Vietnamese, Japanese, Indian, etc) and you know of an Asian market in your neighborhood, I highly recommend checking it out.
What is your favorite type of Asian food? Do you have a favorite dish? Have you tried making it at home?

[print_this]Tom Kha Gai (Thai Coconut Soup) Gluten-free + Dairy-free, w/Vegan options
serves 44 cups organic free-range low sodium chicken broth (or vegetable broth)
1 15-ounce can full-fat organic coconut milk
1 stalk lemongrass, cut into 1-inch pieces and pounded to really release the flavors
6 kaffir lime leaves
6 thin slices fresh galangal root (or ginger)
1 cup sliced mushrooms
1 small red bell pepper, thinly sliced
1/2 medium red onion, thinly sliced
3 tablespoons fish sauce (or soy sauce)
2 tablespoons fresh lime juice
1/4 teaspoon chili flakes
1 cup firm tofu, diced (optional, you could also add in chicken or shrimp, etc)
1 tomato, diced
1/4 cup thai basil, roughly chopped (optional)
1/4 cup cilantro, roughly choppedBring the chicken broth to a boil in a large saucepan over a medium-high heat, add in the coconut milk, lemongrass, kaffir lime limes, galangal, mushrooms, bell pepper, red onion, fish sauce, lime juice, chili flakes and optional tofu (or meat or shellfish). Simmer for 15 minutes. Add in the diced tomato and stir. Just before serving add in the thai basil and cilantro. Ladle into bowls and serve immediately, topped with additional chopped cilantro, thai basil and maybe some thinly sliced green onions.
[/print_this]
-
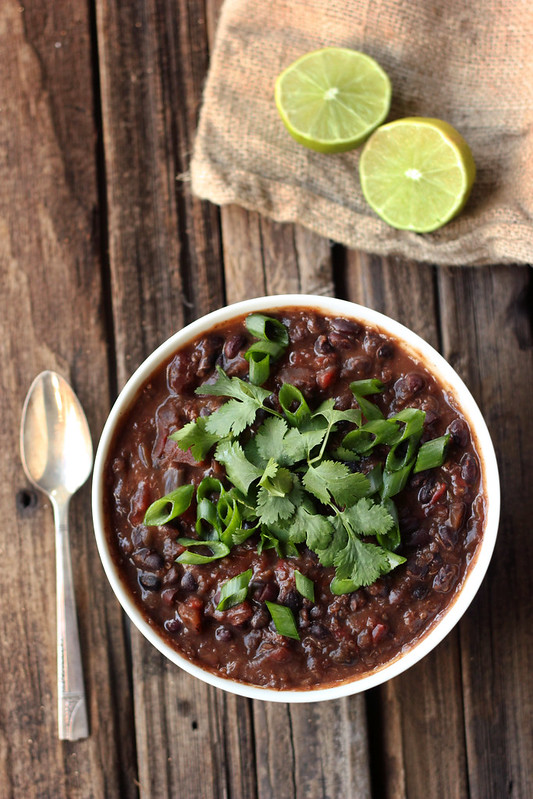
Chipotle Black Bean and Quinoa Crock-Pot Stew – Vegan + Gluten-free
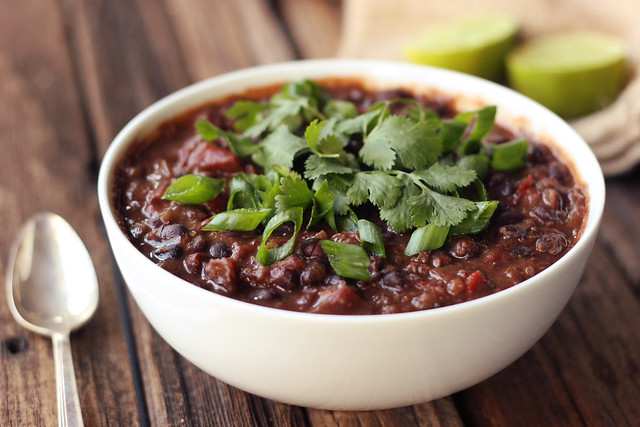
This post will be quick and easy, just like this recipe. Which is exactly what I need right now with everything going on. I made this the other night in an effort to make something hearty, healthy and satisfying without having to spend at least an hour in the kitchen. Since we are getting ready to hit the road this weekend for SXSW in Austin, every minute counts. This is where cooking dinner in a crock-pot comes in. No matter how busy I am though, I insist on eating as healthy as I can, especially at times like this. It is when you need nutritious goodies and healthy energy the most!
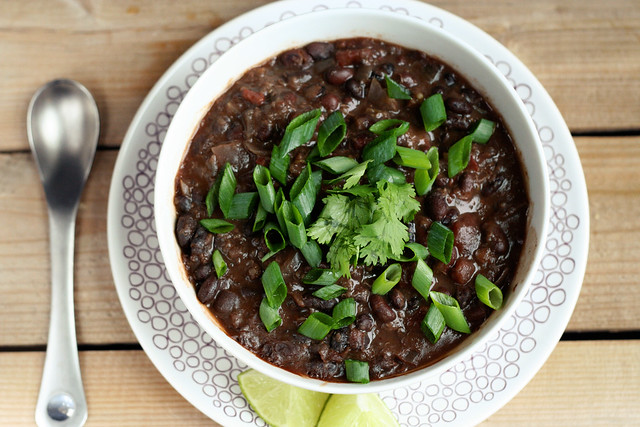
This stew was super easy to toss together and it made the house smell amazing all day long while it cooked. Plus, we’ve been enjoying the leftovers ever since. You can have fun with the toppings on this or keep it as simple as you’d like. Additionally, if you want to saute the veggies first, you can do that too, but I like keeping my crock-pot cooking as easy and quick as I can. After all, that is the entire point of it, in my opinion anyway.
This recipe is similar to my crock pot black bean soup, but I thought leaving the beans whole and adding in the quinoa and diced tomatoes would make it more stew-like and a fun change. The quinoa was a subtle addition but it was nice. I think I could actually get away with adding in 1 full cup, but I didn’t want the quinoa to steal the show! The bonus, this stew is naturally vegan and gluten-free. Feel free to play around with the spices making it to your liking, maybe adding in some cumin or leaving out the cinnamon, etc. Make it your own.
Do you have a favorite crock-pot meal? What do you like most about cooking in a crock-pot or slow-cooker?
[print_this]Chipotle Black Bean and Quinoa Crock-Pot Stew – Vegan + Gluten-free
serves 6-8- 1-2 dried chipotle peppers
- 1lb of dried organic black beans, rinsed and picked over, soaked overnight
- 3/4 cup uncooked quinoa, rinsed and picked over
- 1 28-ounce can organic diced tomatoes
- 1 red onion, diced
- 3 cloves garlic, minced
- 1 green bell pepper, chopped
- 1 red bell pepper, chopped
- 1 dried cinnamon stick
- 2 teaspoons chile powder
- 1 teaspoon coriander powder
- 1/4 cup fresh cilantro
- 7 cups water
- sea salt and pepper, to taste
for topping:
- cilantro
- green onions, thinly sliced
- lime wedges
- avocado
Load all of the ingredients, except the salt, into your slow-cooker, stir to combine. If you wish to saute the onion, garlic and bell pepper first, you can, but I like to make crock-pot cooking as simple and quick as possible. Cook on high for 4 to 6 hours, or on low for 8 to 10 hours, until the black beans are tender. The time to cook the beans can vary based on the strength of your slow cooker and also the freshness of your beans. Add the salt at the very end, as it will affect how the beans cook, if you add it at the beginning.
Remove the chipotles (if you don’t want a mouthful of a whole spicy pepper) and the cinnamon stick before serving. Ladle into bowls and serve topped with fresh cilantro, green onions, a squeeze of fresh lime juice, diced avocado, sour cream, hot sauce, tortilla chips, etc.
PLEASE NOTE:
It seems due to the varying cooking power and strengths of crock pots and other slow cookers, unfortunately the cooking time for the dried beans can vary significantly. For some, this time works great and for others the beans are still crunchy even after 12 hours. If your crock pot is older or is known for not being very strong, I would suggest soaking a bit longer and/or pre-cooking the beans first, before putting them in the crock pot. This time has always worked for me and my crock pot and I have made this recipe many many times. Sadly without being able to test it on other slow cookers, I have know way of knowing how much that time can vary.
Older beans can take longer to cook, so that is also something to keep in mind.
[/print_this]
-
Creamy Roasted Garlic and Cauliflower Soup (Gluten-free and Vegan)

Is anyone else as obsessed with soup as I am this time of year? I could eat it every single day. There is something so comforting about soup. Even though we have had a mild winter, no matter what, every day that it has been the slightest bit cold, I have craved some type of soup or stew.
Lately I have really been enjoying these simple to make creamy, but vegan pureed soups. Hearty, filling and so good for you! This soup might actually be my new favorite. It has so much delicious robust and deep flavor from the roasted cauliflower and garlic, with just a hint of heat from the red pepper flakes. It is creamy but still light and the depth of flavor is just incredible. What is even more incredible is how few ingredients it takes and how quick it is to make. I threw this together yesterday after lunch to be ready for dinner, and it was so quick and easy.
What is your favorite soup right now?

[print_this]Creamy Roasted Garlic and Cauliflower Soup
serves 41 large head (or 2 small) cauliflower (about 2 to 2 1/5 lbs) cut into 1-inch florets
3 tablespoons olive oil
1 whole head of garlic
1 medium onion, diced
4 cups veggie broth
1 1/2 teaspoons Herbes de Provence
a pinch of red pepper flakes (optional)
sea salt and black pepper
fresh thymePreheat oven to 425ºF
Peel away the outer layers of the garlic bulb skin, leaving the individual cloves intact and the bulb still whole. Cut off about 1/4 inch from the top of the cloves. Place the head of garlic in a small piece of foil, drizzle with a small amount of olive oil (just a teaspoon or two). Wrap the foil around the garlic head tightly.Toss the cauliflower with 2 tablespoons of olive oil on a baking sheet or in a roasting pan. Add the pan of cauliflower to the top rack in your oven and the garlic head wrapped in foil, on the bottom rack. Bake both for about 30-40 minutes. You can gently toss the cauliflower around, once or twice in that time.
You want the cauliflower to be a golden to dark brown color and the garlic head to be very fragrant and soft to the touch. Allow the garlic to cool so you can touch it. With your hands or a small knife, squeeze each of the roasted garlic cloves out of their skins into a small bowl, It should look like a thick paste. Set the cauliflower and garlic aside.
In a medium saucepan, heat the remaining olive oil over a medium-high heat and add the diced onion. Cook until soft and translucent, about 5-8 minutes. Add the cauliflower, roasted garlic, stock, Herbes de Provence and red pepper flakes. Allow to simmer for about 30 minutes, until the cauliflower is tender.
Purée with an immersion blender or in batches using a regular blender or food processor*, until smooth. Return puree to pot, bring to a simmer, salt and pepper to taste. Thin soup with more broth if desired. Ladle soup into bowls. Sprinkle with a pinch of fresh thyme.
* When puréeing hot soup in a blender or food processor, do so in small batches, filling the blender pitcher only about halfway. Put the lid on, but remove that small cap in the lid (if you have it) and hold the lid down tight with a towel, otherwise the steam will cause the lid to explode off, spewing hot liquid everywhere. This has never happened to me, but it can, so be careful.
[/print_this]
-
Butternut Squash and Roasted Red Pepper Soup (Vegan and Gluten-free)

I am super excited about how this soup turned out. This soup actually made me realize what a dork I am about good healthy food. It actually makes me stupid excited and I wanna dance around my kitchen! I love when you have an idea in your mind for a dish, you start experimenting, tasting and playing around and it just all falls perfectly into place. That happened with this soup. In fact, it actually came out better than I had imagined it would.
I topped this soup with a roasted red pepper puree that was inspired by a recipe I came across from Bon Appetit magazine in 2003 and I also drizzled some roasted butternut squash seed oil over top. I realize this oil is a very specialized product, and many of you may not have access to it, so you could certainly just use a good quality extra virgin olive oil, or just skip it altogether. The butternut squash seed oil that I have is from a company based in the Finger Lakes region of NY called Stony Brook Oils, I picked it up at Farmers and Artisans here in Buffalo. You can visit Stony Brook’s web site to get a listing of all of the stores you can buy their various squash seed oils at or you can even buy them online. Honestly, if you ever get a chance to try a pumpkin or a squash seed oil, do it. The flavors are incredible. It brings a unique nutty and roasted flavor to so many different dishes. I have never tasted anything like it.
I happened to be able to get my hands on some beautiful red bell peppers that I roasted on my stove top to use in this soup and for the puree on top. If the red peppers at your market aren’t looking so hot, just go with jarred roasted red peppers, they will work perfectly fine, too.
This naturally gluten-free and vegan soup is bursting with flavors and it is so beautiful and colorful. The roasted red peppers in the soup compliment the nutty flavor of the squash and the spicy, garlicky puree on top is a nice burst of bright flavor with a hint of spiciness. The puree was so delicious that I have been using it as a spread on sandwiches and on top of freshly steamed vegetables, etc. I feel like I always need to have a batch of this stuff on hand.

[print_this]Butternut Squash and Roasted Red Pepper Soup
serves 6-81 tablespoon olive oil
1 large butternut squash (about 2 to 2 1/2 lbs), peeled, seeded and cubed
1 large onion, diced
2 celery stalks, diced
2 cloves of garlic, minced
2 roasted red peppers, diced (here is a great page of different options on how you can roast your own red peppers at home, I roasted mine on my stove top)
1 tablespoon fresh thyme, roughly chopped
1/4 teaspoon of crushed red pepper flakes
1 teaspoon kosher salt
7 cups low sodium vegetable brothbutternut squash seed oil (or olive oil) for drizzling
Heat oil in heavy large pot over medium-high heat. Add onions, celery and butternut squash and sauté until the onions and celery are tender, about 10 minutes. Add garlic and roasted red peppers; stir 1-2 minutes. Add thyme, red pepper flakes, salt and vegetable broth; bring to boil. Reduce heat; cover and simmer until squash is soft, about 45 minutes.
Purée with an immersion blender or in batches using a regular blender or food processor*, until smooth. Return puree to pot. Thin soup with more broth if desired. Ladle soup into bowls. Top each bowl with 1 tablespoon of the roasted red pepper purée and a light drizzle of butternut squash seed oil. Sprinkle with a pinch of fresh thyme.
* When puréeing hot soup in a blender or food processor, do so in small batches, filling the blender pitcher only about halfway. Put the lid on, but remove that small cap in the lid (if you have it) and hold the lid down tight with a towel, otherwise the steam will cause the lid to explode off, spewing hot liquid everywhere. This has never happened to me, but it can, so be careful.
[/print_this]
[print_this]Roasted Red Pepper Puree
via Bon Appetit Magazine, November 20032 roasted red peppers (approximately 1 cup)
2-3 garlic cloves
1/2 tablespoon olive oil
1/4 teaspoon crushed red pepper flakesPuree all ingredients in processor until smooth. Season with salt and pepper.
[/print_this]
-
Gluten-Free French Onion Soup

I can admit that writing this recipe and editing the photos on this soup was a bit painful, in more ways than one. I’ll explain why…
For the last two weeks I have been feeling a bit under the weather. No cold or flu showed it’s face but I was just not feeling like myself. In addition to feeling a bit “off”, a few other symptoms arose and I was experiencing sharp and abnormal pains on my right side, near my kidney. It started in the back, then slowly made it’s way to the front to my upper abdomen then found it’s way to my lower right pelvis. I also noticed blood in my urine last Monday.
Being that both of my parents have kidney stones, and I myself was diagnosed with small kidney stones years ago, I decided to make my way to the urologist to rule out any type of infection or the passing of a stone, etc. The stones that I was diagnosed with years ago, were very very small at the time and have caused me no issues at all. Back when I was diagnosed, the doctor explained that it was likely hereditary and with a healthy diet I could keep them that small and probably never have to worry about them. So when I made it to the doctor this time around, they tested for infections and that came up negative but they did say I had a higher than normal level of blood in my urine. I say higher than normal because every time they have ever tested me, I have always had a small amount of blood. They tell me that this is somewhat normal for some people and that it was so microscopic, and normally it wasn’t anything I needed to be concerned with.
At first, based on my symptoms and the blood, they told me I was likely passing a stone or a stone had moved and caused some irritation and inflammation of my kidney, they tried to talk me into a CT scan, which I declined, sent me home with some pain meds and told me to come back in a few days. When I came back everything was about the same, but the pain had traveled to the front almost exclusively and I was now experiencing digestive issues and pain, the pain still very much only on the right side and now very low in my pelvis. I felt bloated, gassy and I was experiencing indigestion, all things I haven’t experienced in years. There have been other not so pleasant side-effects as well, but I will spare you all the details.
So, I began speaking with my good friend, Jane, a chiropractor who very much believes in an all-natural, holistic and homeopathic approach to symptoms, first, then looking at all aspects of your life – like diet, stress, etc. to determine the problem and the causes to the problem. Jane has been a part of my life since I was an infant, she and my mom went to high school together and reconnected after my mom had my older sister and I and was pregnant with my little sister and she was experiencing some health issues. Jane now lives in Colorado, so I explained my symptoms to her through email and she told me to have my Chiropractor here in Buffalo look at my ileocecal valve (which admittedly I had never heard of). I googled it before I even got in to see my chiropractor/yoga teacher Elyssa and many of the symptoms of a grumpy ileocecal valve sounded just like what I was experiencing. The ileocecal valve is situated at the junction of the small intestine (ileum) and the large intestine. Its critical function is to limit the reflux of colonic contents into the ileum.
After a brief examination by Elyssa, she confirmed Jane’s suspicions and I had an explanation – my ileocecal valve was definitely grumpy. The valve is supposed to function on it’s own – opening and closing to release what needs to go to the large intestine from the small, leaving behind what doesn’t need to and shouldn’t go. (You can definitely google and find out even more of the details, I just wanted to keep this brief – a good intro to your ICV can be found here). Our ileocecal valves can get stuck in the open or closed position. Elyssa believes that mine is stuck open. After discussing my diet and trying to determine what may have caused this, Elyssa asked if there had been any major changes in my diet and I told her “no”, I have maintained the same diet that I have for the last nearly 2-years. However, this is when I recalled the cheese that I ate on New Years Eve. I have pretty much completely cut-out dairy milk when I am both baking and cooking, etc and I have cut way way back on cheese. Admittedly and embarrassingly, I consumed a good amount of cheese on New Years Eve with Mark’s family in Kentucky (we were in the South and we did stop at Grandpa’s Cheese Barn in Ohio, afterall). Not really thinking what it could do to my system after not really eating much of it, just thinking about how I rarely eat it anymore and that I would enjoy it just this once. Well the joke is on me. Elyssa explained that because I hadn’t been eating much dairy and more specifically cheese, just eating it this once, it could have just shocked my system, causing my ileocecal valve to freak out!
Now, let me explain to you that I haven’t been to a medical doctor with the exception of a physical in over two years. I have managed to stay fairly healthy minus a cold or stomach bug here and there, which is far better than my health in the past. I am not one to post around on Facebook or Twitter about how I am feeling and complain complain complain instead of taking the necessary actions to improve my health, I try to stay very positive and not dwell since I really think that has an effect on your health and well being. So, the only reason I even chose to share this on here at all – was that first, I thought it to be an interesting diagnosis, one that I never would have imagined. I have always found my digestive tract to be quite sensitive so finding out I have a part of that system, that I didn’t even know existed, not functioning properly, doesn’t really shock me. Secondly, I wanted to explain why you may not see as many posts for the next week or so, or why some of the recipes may be drastically different and toned down. I am definitely going to take it easy with eating, give my system a break and be very mindful of what I consume as I allow my body to heal. In addition to the dairy, I also plan to cut out caffeine, alcohol, sugar and chocolate. I am still not quite sure of everything involved with the ileocecal valve and what has to be done to heal it to make sure it doesn’t happen again. So, I definitely plan to share more with you as I learn more and I will also share the recipes that I am creating as I figure out what to eat to combat this.
The reason that I decided to share this diagnosis with you on this recipe, besides that it was the next recipe that was waiting to be written up, is that the biggest thing that I am removing from my diet, at least for the next few weeks, if not for the long haul, is dairy and more specifically cheese, so you won’t be seeing anything else like this cheesy-topped soup, for a while. I have always seemed to have trouble digesting it, but knowing that it wreaked such havoc on my poor ileocecal valve really has me thinking if I should remove it from my diet altogether. I am definitely not making any rash decisions just yet (gosh, even though I know it’s bad, I really do love cheese), but I do plan to start exploring all of my options and to really investigate all of my diet, once again. I obviously made this soup before we could pinpoint that my troubles were digestion related and I was absolutely craving soup. Had I known that my poor body was pissed at the fact that I consumed so much cheese on NYE – I would have just skipped out on the cheese topping and just had the toast on top. The broth to this French onion soup is soo darn delicious on it’s own, you could honestly enjoy a bowl of this without the melted cheese and be just as content. I promise – I know you think I am crazy, but this soup is that good.
Being that we purchased and shared half of a pasture-raised cow this fall with my parents from Sojourner Farms in Olean, I wanted to use some of the soup bones and beef that we received with our order to make this stock from scratch, I took all the steps to make sure that it was the richest and most flavorful stock I could make. I roasted the bones before I boiled them to make the stock and the results were phenomenal. I have never done this before, but it produced the darkest and most robust beef stock that you could ever imagine. I used this recipe here from Simply Recipes. I enjoyed so many of the different flavors from this soup that I want to attempt it again but next time with a vegetarian or a mushroom stock. I think with the right flavors, possibly roasting the vegetables a bit first and maybe adding in some miso to round out the stock, I could make an equally delicious vegetarian version of this. Stay tuned, I am determined to try it out.
A note – I would have really enjoyed making a French-style gluten free bread for the top of the soup, but I was a bit limited in time, so I bought these beautiful and tasty gluten-free baguettes from Schär. They toasted up absolutely perfectly and retained a nice amount of that crunch even when floating on top of the soup. What a treat to find those at the store. It was a perfect finish to this incredible soup!
[print_this] Gluten-Free French Onion Soup
Adapted from Julia Child’s Recipe
Serves 6-85-6 cups yellow onions, thinly sliced (about 1 1/2 to 2 lbs)
1 tablespoon olive oil
2 tablespoons unsalted organic butter (if you wish to skip the butter, you can just add a bit more olive oil)
1/2 teaspoon raw sugar
1 teaspoon kosher salt
3 tablespoons gluten-free all purpose flour (whatever your favorite blend is, I used Bob’s Red Mill)
8 cups (2-quarts) beef stock* (preferably homemade stock made with pasture-raised beef – I used this recipe to make mine with bones from our pasture raised beef from Sojourner Farms in Olean, NY)
1/2 cup wine (dry red or white – I used dry white vermouth since that is what I had and it works wonderfully – do not skip this, it really makes the flavor of the soup)
1 bay leaf
1/4 teaspoon of dried thyme
salt and pepperFor finishing:
12 ounces swiss cheese, grated
4 ounces gruyere cheese, grated
1/2 raw yellow onion
2 -3 tablespoons cognac or brandy (optional – sadly I had neither of these on hand so I skipped it)
8 slices gluten-free French bread (cut about 1 inch thick), toasted until hardPlace heavy bottom stock pot or dutch over a medium-low heat. Add olive oil and butter to the bottom, melt. Add sliced onions and stir until they are evenly coated with the oil and butter. Cover and cook for about 20 minutes until they are very tender and translucent. Remove the cover and add the salt and sugar, mix. Raise the heat to a medium. Continue cooking the onions, stirring frequently, allowing them to caramelize and turn a deep golden brown. They will reduce significantly. This will take about 30 to 40 minutes. Don’t rush this step, you don’t want the onions to burn and the caramelization of the onions is what gives this soup it’s classic flavor.
Once caramelized, reduce heat to medium-low and sprinkle the flour over the onions. Brown the flour for about 2-3 minutes trying not to scorch it. (If the flour does not form a thick paste, you can add a bit more butter here). Stir constantly. Add in the wine, a bay leaf, the thyme and your stock, adding the stock a little bit at a time, scraping the bottom of the pan to get up all of the cooked-on brown bits. Add salt and pepper to taste (don’t add too much salt as the cheese will also add saltiness and you can always add more – you can’t take it away). Continue adding the rest of your stock. Stirring as you add. Simmer for 30 minutes. After simmering for 30 minutes, find the bay leaf and take it out.
You can certainly skip the crusty bread and melted cheese on top, this soup is really THAT good. But if you want to go further and enjoy this soup the way Julia fully intended, then keep reading.
To toast your bread, heat oven to 325º F. Bake the bread in the oven on a cookie sheet for about 15 minutes on each side (30 minutes total) or until golden brown and very hard, being careful not to burn it. Increase the temperature of your oven to 350º F.
To serve – either ladle the soup into individual oven-proof soup bowls or ramekins or one large casserole dish. I personally prefer individual servings. If you are adding raw onions, add that to the soup now and stir. Cover the soup with a single layer of the toasted bread and sprinkle with as much cheese as you’d like, I would say we probably went with about 1/4 cup of total cheese (a blend of the two cheeses). Place the bowls onto a baking sheet and place into a 350º oven for about 20 minutes. Then preheat your broiler and finish the soups under the broiler until the cheese is bubbling and golden brown. Remove from the broiler carefully, let cool for a minute or two and serve immediately.
*mushroom stock would make a great vegetarian substitution
[/print_this] -
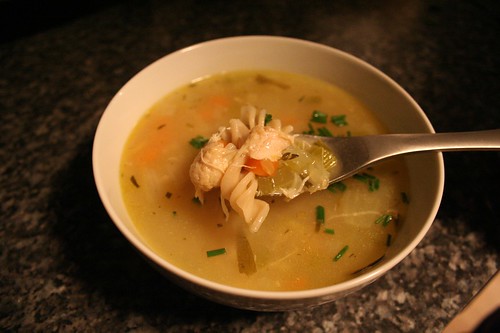
Thai Chicken Soup

I absolutely love Thai food! The layers of flavors and the spices are so amazing and there are so many naturally gluten-free options. One of my favorite things are the different soups. The flavors are always so distinct in Thai soups from the curry pastes, lemongrass, ginger, cilantro, etc. I have wanted to try making a Thai coconut milk soup at home with all the fresh herbs and spices. With the lingering chilly weather, last week was the perfect time. The original recipe I found was a bit basic, so I added in mushrooms, fresh ginger, fresh lemongrass and jarred kaffir lime leaves (which I was very excited to finally find), I also went with a light coconut milk instead of the full fat version and I used more of it, I find it is still quite creamy and it has a bit less fat and calories. I also added a bit more broth, curry paste, fish sauce and noodles so I would have more leftovers for lunches and dinners on some of the busy nights we have this week. Don’t worry if you can’t find lemongrass or the kaffir lime leaves, the soup will still be really great even without them. The curry paste really has a lot of flavor. I just find that adding those extra fresh ingredients makes this soup more authentic. I know from eating a lot of Thai food that lemongrass can be a bit annoying to eat, since they are a bit tough to chew, so I decided to cut the stalk in large pieces so that I could easily pull them out just before serving.
Since we normally buy whole chickens from the farm we get all of our meat from, I just grabbed two organic chicken breasts from Wegmans, I honestly can’t tell you the last time I bought meat from the grocery store. Thankfully Wegmans has a great selection of organic and grass-fed meats, though it just isn’t the same as getting it from a local farm. You could also roast a whole chicken or buy a rotisserie chicken and shred some of the cooked chicken and add it in to the soup at the end. This soup could also easily be made vegetarian/vegan with vegetable broth and by skipping the chicken or you could make a seafood version and add shrimp or scallops.
Serve the soup with lime wedges and maybe even a little Sriracha if you want a bit more heat. Enjoy, this soup really is incredible.
Thai Chicken Soup
serves 6
loosely adapted from Food Network Magazine1 tablespoon olive oil
1/2 lb of sliced mushrooms (I used baby bellas)
1 onion, thinly sliced
2 cloves garlic, minced
1 tablespoon fresh ginger, peeled and chopped finely
1 stalk fresh lemongrass, cut into 1-inch pieces
4 tablespoons green curry paste (If you don’t like spicy, start with 2 and go from there. It seems some curry pastes are spicier than others)
8 cups low-sodium organic chicken broth
2 15-ounce cans organic lite coconut milk
2 tablespoons fish sauce, plus more to taste
2 red bell peppers, thinly sliced
6 ounces thin rice noodles, broken into pieces
2 small skinless, boneless chicken breasts preferably local and hormone and antibiotic free (about 1 pound), very thinly sliced crosswise
1 tablespoon fresh lime juice, plus more to taste
1 tablespoon kaffir lime leaves (I used were jarred, you can also find them fresh or frozen, use about 3 or 4 leaves)
1 cup roughly chopped fresh cilantroHeat the oil in a large pot over medium-high heat. Add the mushrooms and cook, stirring often until they begin to soften and get a bit brown, about 5-7 minutes. Remove the mushrooms and set aside. Add a bit more oil if you need it and add the onion to the pot over medium-high heat and cook, stirring occasionally, until softened and lightly browned, about 8 minutes. Add the garlic, ginger, lemongrass and curry paste, cook, stirring, 1 to 2 minutes. Add the chicken broth, coconut milk and fish sauce; cover and bring to a boil.
Add the mushrooms, bell peppers and noodles and simmer, uncovered, until the noodles are al dente, about 3 minutes. Add the chicken and simmer until just cooked through, about 3-5 more minutes. Stir in the lime juice, kaffir lime leaves and cilantro. Remove the chunks of lemongrass just before serving. Add more fish sauce and lime juice, if desired.
-
Creamy Italian Sausage and Potato Soup

As you can probably tell from reading my recipes, we eat very little meat in our household. We aren’t vegetarians, but I would say we are mostly vegetarian. I consider myself to be a conscientious omnivore, I do eat meat occasionally, but only meat that I know where it comes from, how it was raised, what it ate, etc. At this point the only meat in our house comes from a local farm where it was all pasture-raised without the use of hormones, antibiotics or other chemicals. We have visited the farm, we have seen the animals and we have shaken the hand of the man who does it all. This is the only way I will ever buy meat for our home. It feels right. This fall we shared a pig with my parents. We have more pork that you can even imagine in our freezer. At home I would say we probably enjoy pork once or twice a month and chicken once a month. I have a good supply of this wonderful ground italian sausage that is unlike anything you can ever imagine. So tasty, sweet, subtly spicy and not too greasy, it is perfect. Without the ability to make patties and throw them on the grill (it is WAY too cold for that), I was trying to think of some winter friendly ways to enjoy the sausage. I thought a nice hearty soup would be perfect. I was torn between a tomato-based vegetable pasta sausage soup but then I thought something creamy and hearty sounded even better (though I plan to make that first soup soon).
This soup was really incredible, spicy and creamy with a nice green crunch from the spinach. The fresh herbs were wonderful, though dried will do if you can’t find fresh. I wanted it to be nice and brothy and wanted more servings so I used about 7 or 8 cups of chicken broth, you can certainly go with less, 5 or 6, if you want it to be a chunkier and less brothy soup. I also decided to go with half and half versus heavy cream to keep it a bit lighter per serving, but heavy cream would certainly be delicious and with less broth you would have a nice thick soup, just a bit fewer servings. Oh and the freshly grated parmesan cheese on top really sets this soup over the edge. It is the perfect finishing move.
*I am not at all crazy about the photo of this soup, it was hard to photograph with all the lovely bits, and I forgot to put the cheese on top for the photo, but you get the idea.
Creamy Italian Sausage and Potato Soup
serves 6-82 tablespoons of olive oil
1 large onion, diced
3 cloves garlic, minced
1 pound of ground Italian pork sausage, local, pasture-raised and free from hormones and antibiotics
6-8 cups of organic chicken broth, low sodium
5 small russet potatoes, washed and cut into 1 inch cubes with the skins still on
1/2 cup of fresh basil, roughly chopped
1/2 cup of fresh parsley, roughly chopped
1 teaspoon of red pepper flakes (more if you like spicy)
1/4 teaspoon freshly ground black pepper
1/2 teaspoon kosher salt
1 cup of organic half and half
2 cups of coarsely cut spinach
1/4 cup of freshly grated Parmesan cheesePlace the olive oil in a large pan over a medium-high heat. When the pan is hot add the onion and garlic and saute until the onion gets soft. At this point add the Italian Sausage and cook until its browned. Our sausage isn’t very greasy so I didn’t need to pour any out, if your sausage produces a lot of grease pour some off before adding the soup.
In a large stock pot over medium-high heat add in the chicken broth, potatoes, basil, parsley, red pepper flakes, pepper and salt. Bring to a boil. Reduce the heat and bring to a simmer, allow to simmer for 20 minutes.
After the soup has been simmering add the sausage, onion and garlic mixture and cook another 5-10 minutes. After it is done simmering, add in the half and half and stir. Reduce the heat and be sure it doesn’t boil. Cook another 2 minutes. Taste the soup, add more salt and pepper to taste. More red pepper flakes if you want it spicier.
Remove the soup from the heat, add in the spinach and cover. Let it sit for an additional 3-5 minutes until the spinach is cooked.
Ladle the soup in your bowls and sprinkle with a little parmesan cheese.
-
Creamy Broccoli Soup (Vegan)
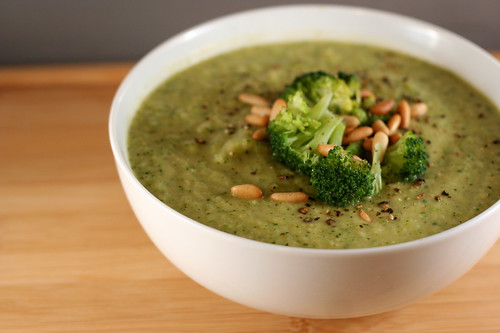
This soup was incredible! So much flavor and so very simple. It was a very quick throw-it together meal after we got home from the studio. I came across a recipe in Whole Living Magazine’s January/February issue where they featured their “28-day Action Plan”, a sort of cleanse / detox and fitness plan for the New Year. Their plan isn’t as limiting as the cleanse I am on, so I took this recipe and altered it slightly to make it vegan/cleanse friendly. The original recipe calls for chicken stock and shavings of fresh parmesan cheese, both of which I am sure would be delicious. I substituted vegetable broth for the chicken stock and left off the cheese. I also had Great Northern beans on hand and the recipe called for Cannellini beans, these worked just as well. Since the recipe called for salt and pepper to taste on each serving it was nice as I could easily leave out the salt for mine and Mark could add a sprinkle to his, as he wanted.
The soup was so thick and hearty, the creaminess achieved from the beans made it impossible to believe there wasn’t a bit of dairy in there. The toasted pine nuts were the perfect addition to complete this soup, those little guys have so much flavor and when toasted they just explode with taste. To top it all off, this dish is loaded with fiber and is very low in fat and calories. It took about 30 minutes to make from start to finish. This soup is very thick, which I loved, I actually ended up adding in a bit more vegetable broth than the recipe called for, if you like a thinner soup you could certainly add more stock to get the consistency to your liking. This really was a complete meal in a bowl and not only cleanse friendly, but hubby approved, too. (Though he couldn’t resist putting a light sprinkle of shredded extra sharp cheddar on top) I am telling you, if you love broccoli, you absolutely need to make this soup.
Creamy Broccoli Soup (Vegan)
adapted from Whole Living Magazine, January/February 2011
serves 41 head organic broccoli (1 pound), cut into florets, stems thinly sliced
2 tablespoons extra-virgin olive oil
1 yellow onion, diced
3 garlic cloves, thinly sliced
One 15-ounce can organic Great Northern beans, drained (Cannellini beans would work here as well)
2 1/2 cups vegetable broth
Kosher salt and freshly ground black pepper
1 tablespoon pine nuts, toastedSteam broccoli florets and stems until tender and bright green, about 3 minutes. Let cool slightly. Reserve 1/2 cup florets for garnish.
Heat oil in a medium pot over medium heat. Saute onion and garlic until translucent, about 6 minutes. Add beans and broth and bring mixture to a simmer. Remove from heat and add broccoli; puree in batches in a blender until smooth. Season to taste with salt and pepper. Garnish each bowl with broccoli florets, toasted pine nuts, and shaved Parmesan or cheddar cheese, if you wish.
-
Avgolemono Soup

This classic Greek soup reminds me of both my Mom and my late Yia Yia (Grandma), this is one of my all time favorite comfort foods. The perfect dinner on a cool night or when you have the sniffles. My husband, Mark, swears this is an acquired taste, I have been trying for 7 years to get him to like it, but he just isn’t a fan of the lemon. I personally think the lemon is what makes this soup and the more the better. Growing up in a Greek family, this soup was a winter staple and definitely something I would beg my Mom for when I was feeling under the weather.
I find some soups taste good enough made with store-bought stock, if you don’t have time to make your own, this soup isn’t one of those. It needs homemade stock, made from scratch, cooked for a few hours. It’s the only way. Whenever we make a whole roast chicken, I freeze the bones for stock, I love being able to make my own stock. I usually go very simple with the spices on my roast chicken so whatever is leftover is perfect for making stock with. I personally prefer to make each stock specific for each soup I make, since most times the ingredients that I add to the stock varies to each recipe.
This soup is a very simple to make, only a few ingredients. I like mine with a lot of fresh ground pepper and the perfect amount of rice. Too much rice and it isn’t brothy enough, too little rice and it’s just not quite right. Some people prefer orzo to rice, but I like the classic white rice much better. If it were possible, I would always have a fresh pot of this soup in the fridge, ready to be warmed up whenever I wanted it. Thickened with eggs and brightened with the lemon, there is really nothing like this. This is my family’s recipe and honestly, have tried other people’s Avgolemeno before and it just isn’t nearly as good, in my opinion.
Chicken Stock
2-3 quarts of water
Bones from a whole roast chicken 3-4 lbs (I prefer organic, free range and without hormones or antibiotics)*
1 large onion, quartered
2 garlic cloves, halved
2 teaspoons sea salt
2 teaspoons pepperIn a large stockpot, (use the strainer that fits in your stock pot if you have one) combine all the ingredients and bring to a gentle boil. Reduce the heat and simmer, uncovered, for 2 1/2 hours, skimming the surface occasionally to remove any foam that forms on the surface. I added a bit more water as it was cooking to keep the chicken and vegetables covered. The longer you cook the stock, the stronger the flavor will be, but 2 1/2 hours was more than adequate and the stock had a fantastic flavor to it.
Remove the meat and bones and reserve, any meat on the bones can be separated and added back to the soup. If you didn’t use the strainer when making the stock, strain the stock to remove all the vegetables and other bits and add back to the pot. Throw out the bones and vegetables. Use the stock immediately or let the stock cool completely, and refrigerate overnight. Skim any fat that forms on the surface. Keep refrigerated in airtight containers until ready to use, up to 3 days, or freeze for up to 2 months. Since I was using the stock immediately, I skimmed any visible fat off the top, made sure that it was strained of everything, and kept it on a low heat while I prepped everything for the soup. You will probably end up with about 48 ounces of stock when making it homemade (give or take). Use all of it.
*You could also use a whole chicken or chicken parts. Whatever you have and whatever works best for you.
Avgolemono Soup
serves 4-66 cups homemade chicken stock*
1/2 cup rice
kosher salt
fresh ground black pepper
2 eggs
juice from 2 lemonsBring the stock to a boil, stir in rice, salt and pepper. Bring to a boil, cover and cook for 20 minutes, or until the rice is cooked.
Meanwhile, separate the eggs. Beat the egg yolks in a small bowl, set aside. In a large mixing bowl, whip the egg whites until peaks form. Add in the egg yolks, stir until well blended. Add lemon juice, barely mix, just enough to combine (you don’t want to break the whites).
Slowly ladle the hot soup into your egg mixture until the mixture is warm, stir constantly. You want to do this slowly so as not to cook the eggs to fast. Pour the mixture back into the pot of soup very gently. Taste the soup, salt and pepper to your liking. Ladle into large soup bowls with a lemon wedge on the side, top with freshly ground black pepper.
*If you absolutely must use store-bought chicken stock, you most definitely can. The soup is still very good.
-
Chicken and Wild Rice Soup with Roast Garlic, White Beans and Kale
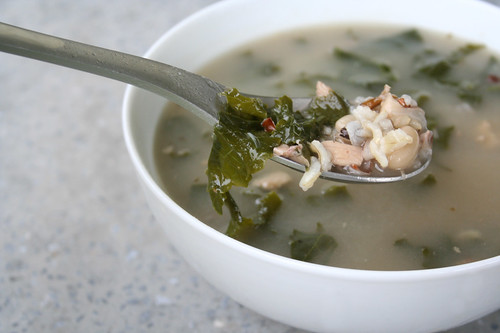
On Saturday, Mark and I took our nephew, Noah, apple picking at Becker Farms in Gasport, New York. It was the perfect Autumn day and we had a super fun time (look for some apple recipes very soon). The weather was perfect, there wasn’t a cloud in the sky and the drive out was beautiful. I hadn’t planned a dinner for when we got home, so I was scrambling to figure out a perfect Fall dinner. Soup sounded delicious so I took some of the bones from the freezer that I had from our Sojourner Farms whole chickens that we made over the last few weeks. I also took a peek at the garden and noticed I still had an abundance of kale growing, so I came up with this soup with things I had on hand. Wow, it was not only delicious, but the perfect end to the perfect October day. The wild rice has a beautiful nutty flavor, the roasted garlic is so tasty and not only does the “super-food”, kale, add a nice green color and TONS of nutrients to the soup, the slight crunch and flavor is the perfect finishing move.
You could use store-bought stock, if you don’t have any homemade on hand, but you may find you’ll want to add onions, celery and some fresh herbs to the soup to give it a bit more flavor.
Chicken Stock
4 quarts of water
1 fresh whole chicken 3-4 lbs, cut into pieces or 4 lbs assorted chicken bones (I prefer organic, free range and without hormones or antibiotics)
4 celery stalks, roughly chopped
1 large onion, quartered
2 garlic cloves, halved
2 bay leaves
5 sprigs fresh thyme
2 teaspoons sea salt
2 teaspoons pepperIn a large stockpot, (use the strainer that fits in your stock pot if you have one) combine all the ingredients and bring to a gentle boil. Reduce the heat and simmer, uncovered, for 2 1/2 hours, skimming the surface occasionally to remove any foam that forms on the surface. I added a bit more water as it was cooking to keep the chicken and vegetables covered. The longer you cook the stock, the stronger the flavor will be, but 2 1/2 hours was more than adequate and the stock had a fantastic flavor to it.
Remove the meat and bones and reserve, the meat can be separated and added back to the soup, used for chicken salad, etc. I prefer to add it back to the soup. If you didn’t use the strainer when making the stock, strain the stock to remove all the vegetables and other bits and add back to the pot. Throw out the bones and vegetables. Use the stock immediately or let the stock cool completely, and refrigerate overnight. Skim any fat that forms on the surface. Keep refrigerated in airtight containers until ready to use, up to 3 days, or freeze for up to 2 months. Since I was using the stock immediately, I skimmed any visible fat off the top, made sure that it was strained of everything, and kept it on a low heat while I prepped everything for the soup.
Chicken and Wild Rice Soup with Roast Garlic, White Beans and Kale
Serves 6-88 cups of homemade chicken stock
1 whole head of organic garlic
1 cup organic wild rice
1 15 ounce can of organic white beans, drained. (I used cannellini)
1 tablespoon fresh thyme, chopped
1 large bunch of kale, stems and center ribs discarded and leaves coarsely chopped
salt
freshly ground black pepperWhile your stock is simmering, preheat your oven to 400°F.
Peel away the outer layers of the garlic bulb skin, leaving the skins of the individual cloves intact. Wrap the entire head tightly in aluminum foil. Bake for 30-35 minutes or until the cloves feel soft. Allow the garlic to cool slightly.
Once your stock is ready, the bones have been removed and it has been strained, add back in any chicken that you’d like in the soup. After the garlic is cool enough to touch, take each clove of garlic from the head and squeeze it over a small bowl, removing the roasted garlic cloves out of their skins, or cutting it out. Add all of the roasted garlic to the soup. Stir to combine.
Add 1 cup of wild rice to the stock, bring to a boil, then cover and simmer for 35-40 minutes or until the rice is cooked. Add the beans and kale. Stir and allow the kale to wilt, about 5 to 10 minutes. Salt and pepper to taste. Serve and enjoy!
-
Vegetarian Faux Pho
This is a VERY thrown together version of traditional Pho, though there is little that is traditional about my version. Traditional Pho (pronounced “phuh”), is a staple of Vietnamese cuisine and culture. A hearty soup usually made with a clear beef or chicken broth that includes rice noodles and distinct flavors such as cinnamon, star anise, clove, basil, lime and more. There are many, many variations to this dish and it is often eaten as breakfast, lunch or dinner.
Last night, I had a head full of congested sinuses, wasn’t feeling so hot and I just wanted something hot, spicy and brothy. Pho was all I could think of, but I didn’t want to leave the house. I had to make it with what I had on hand in the refrigerator and pantry. I would have preferred to have included some tofu, star anise, bean sprouts and thicker more traditional rice noodles, but I made do with what I had. Mine was much thicker than traditional Pho is, since I cooked my rice noodles right in the broth, but the flavors were there, none the less. I have to say, it turned out pretty good, considering it was thrown together. Which is why I decided to share my faux recipe, to show you that you can always come up with something quick and fresh with what you have on hand.
Making this faux Pho, however has made me realize that I would really like to make a full on pot of traditional Pho very soon.
Vegetarian Faux Pho
Serves 2-41 tablespoon olive oil
1 small onion, diced
1 shallot, diced
2 cloves garlic, minced
1 small jalapeño, seeds and stem removed, minced
1 tablespoon ginger, minced
1 tablespoon cinnamon (I used ground because I didn’t have sticks)
1/2 tablespoon cloves (I used ground because I didn’t have whole cloves)
6 cups vegetable broth
3 tablespoons soy sauce (I use low sodium, gluten-free Tamari)
2 tablespoons basil, finely chopped
8 ounces rice noodles (all I had on hand was gluten-free rice spaghetti)
1 lime, cut into wedges
cilantro
scallions, sliced
sriracha chili pasteHeat olive oil in a large pot over medium-high heat, add onions, shallots, garlic, jalapeño, ginger, cinnamon and cloves, stirring occasionally until the vegetables turn clear and start to char a bit. Add the stock, soy sauce, basil and a squeeze or two of sriracha and bring to a boil over high heat. Turn the heat down to medium-low and simmer for about 25 minutes.
You can cook the rice noodles separately or if you are lazy like I was, just toss them right into the broth and cook them in there. By cooking the noodles in the broth, it made the broth very, very thick, but I didn’t care, I wanted fast and easy. I added the noodles, brought it to a boil then lowered the heat to medium-high and simmered until the noodles were cooked. About 10 minutes.
Ladle the broth and scoop a bunch of noodles out into large soup bowls. Serve topped with scallions, cilantro, a squeeze or two of lime juice and if you want it more spicy a bit more sriracha.
-
Chicken Soup for the Sniffles.
Yesterday morning, when I woke, I realized that what I thought was allergies the day before, turned out to apparently be an old-fashioned, end of the season, COLD. I had the sniffles and I was feeling off. I was also feeling guilty as it was a beautiful, warm and sunny day and I had a ton to do at the studio. For some reason being sick on cold and dreary days is much easier. I eventually realized it was far more important to take care of myself than to stay at work, so I left a few hours early, swung by the grocery store to buy supplies and headed home to make soup. I figured that, combined with everything else I was doing, was sure to make me well quicker. Now that I am eating clean, I am treating things like headaches and colds naturally, not that I was a big medicine person before, so I am attacking this cold with homeopathic syrup, vitamin C, cold care tea and zinc. I have to say, today is day two and I am actually feeling much better already.
I decided to make the stock for my soup from scratch, since there is really nothing like it. This is the first time I had meat in over 7 weeks, but chicken noodle soup was the only thing that I wanted, and I knew it would help my sniffles. Being that the chickens we ordered from the farm won’t be ready until mid-June, I settled on an organic whole fryer chicken from Wegmans and some good organic veggies, so it was perfect.
You can most certainly make this soup with canned or boxed broth or stock, but I am telling you, it just isn’t the same.
By the time the soup was ready to be served, a cold chill had come over the air, dark clouds moved in and the rain and thunder started. It was perfect soup weather. I started feeling better almost instantly and today I can tell that the cold is on its way out the door.
Chicken Stock
4 quarts of water
1 fresh whole chicken 3-4 lbs, cut into pieces or 4 lbs assorted chicken bones (I prefer organic, free range and without hormones or antibiotics)
4 celery stalks, roughly chopped
4 carrots, halved (I kept the skin on, but washed them)
1 large onion, quartered
2 garlic cloves, halved
1 cup fennel, chopped
2 bay leaves
5 sprigs fresh thyme
2 teaspoons sea salt
2 teaspoons pepper
1 tablespoon fresh tarragonIn a large stockpot, (use the strainer that fits in your stock pot if you have one) combine all the ingredients and bring to a gentle boil. Reduce the heat and simmer, uncovered, for 2 1/2 hours, skimming the surface occasionally to remove any foam that forms on the surface. I added a bit more water as it was cooking to keep the chicken and vegetables covered. The longer you cook the stock, the stronger the flavor will be, but 2 1/2 hours was more than adequate and the stock had a fantastic flavor to it.
Remove the meat and bones and reserve, the meat can be separated and added back to the soup, used for chicken salad, etc. I prefer to add it back to the soup. If you didn’t use the strainer when making the stock, strain the stock to remove all the vegetables and other bits and add back to the pot. Throw out the bones and vegetables. Use the stock immediately or let the stock cool completely, and refrigerate overnight. Skim any fat that forms on the surface. Keep refrigerated in airtight containers until ready to use, up to 3 days, or freeze for up to 2 months. Since I was using the stock immediately, I skimmed any visible fat off the top, made sure that it was strained of everything, and kept it on a low heat while I prepped everything for the soup.
Chicken Noodle Soup
Serves 6-84 quarts of chicken stock
chicken leftover from making stock or 2 chicken breast, already cooked, chopped or shredded
4 carrots, chopped
4 ribs celery, cut in half lengthwise, then chopped
1 onion, chopped
4 large cloves garlic, minced (you don’t have to use so much, but garlic is good for treating a cold)
1 tablespoon olive oil
1 tablespoon fresh rosemary, minced
2 tablespoon fresh tarragon, minced
2 1/2 cups of gluten-free noodles
1 bunch fresh chives, choppedIn a medium-sized pan, heat the olive oil over a medium heat and sautée the carrots, celery, onion and garlic. Stir occasionally, making sure they do not burn. After the onion has become translucent, but all the veggies still have a crisp, add the rosemary and tarragon, stir to mix the flavors.
Add the veggies back to the pot with the stock and bring the heat to a medium-high. Let the stock and vegetable simmer, until it comes to a gentle boil, continue to let boil for about ten minutes. After ten minutes, taste the veggies to be sure they are softening to your liking. Add the cooked chicken and stir to let all the flavors mix. Taste, then season to taste, I found it needed more salt and pepper and I added more tarragon.
At the end, add the gluten-free noodles. Make sure that you account for how much liquid you started with when deciding on an amount of noodles, if you add too many they will blow up and take in all the liquid. Cook the noodles until the are done, mine took about 10 mins or so, you want a bit of a bite to them. Ladle into bowls, add a sprinkle of your favorite salt, fresh ground pepper and top with some chopped fresh chives. I love a small sprinkling of freshly grated Parmigiano Reggiano over the top, as well. Enjoy.

-
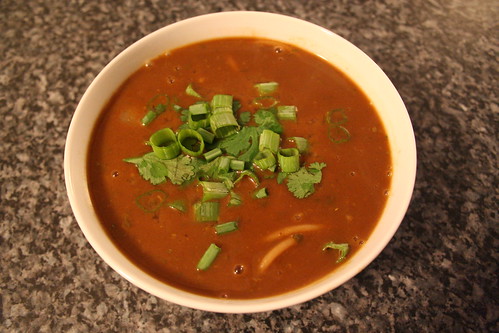
Black Bean Soup with Tortillas de Maíz

Three things I am very obsessed with: my slow cooker, soup and fresh corn tortillas! I have made black bean soup quite a few times, but this is hands down, the best it has ever turned out.
Black Bean Soup
Adapted from Bon Appetit and smitten kitchen
A big note about cooking times when using dried beans: The original recipe says 6 hours, smitten kitchen’s took 2 hours 45 minutes, mine took just over 4 hours. Not sure if it is a variation in the beans or slow cookers cook times.
Yields 6 main course servings
1 tablespoon olive oil
2 medium-size red onions, chopped
1 medium-size red bell pepper, chopped
1 medium-size green bell pepper, chopped
4 garlic cloves, minced (I only used 2 this time, as they were MASSIVE cloves)
4 teaspoons ground cumin
1 16-ounce package dried black beans
1 tablespoon chopped chipotle chiles from a can (this gives it a solid kick, dial back if you are wary, I LOVE spicy so I used even more than this)
7 cups hot water (I just used very hot tap water)
2 tablespoons fresh lime juice
2 teaspoons coarse kosher salt
1/4 teaspoon ground black pepper
1 avocadocilantro
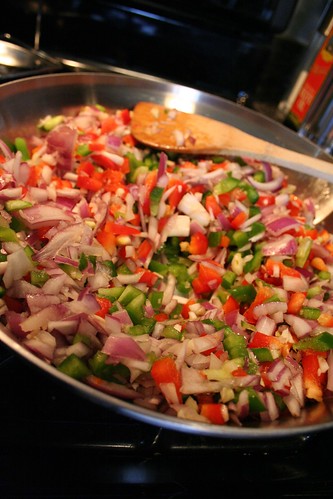
green onionsHeat olive oil in large skillet over medium-high heat. Add onions and both bell peppers and sauté until beginning to brown, about eight minutes. Add garlic and cumin; stir one minute. Transfer mixture to 6-quart slow cooker. Add beans and chipotles, then 7 cups hot water. Cover and cook on high until beans are very tender, about 3 hours. [See note up top.]
Transfer bean mixture to blender; puree until smooth. Return puree to the pot or a large serving bowl (the original recipe calls for just two cups of the soup to be pureed but I wanted a smooth and creamy soup this time). Stir in lime juice, salt, and pepper. Adjust seasonings to taste; we found we needed more salt. Ladle soup into bowls. Top with diced avocado and chopped cilantro and green onions.
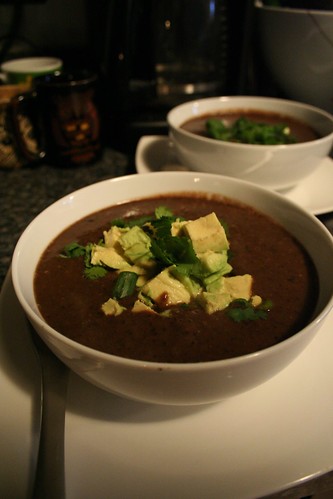
What goes better for dipping into your spicy black bean soup than warm, freshly made corn tortillas?? NOTHING. Being that I have an intolerance to gluten, I have found a love for corn tortillas and their many practical uses. They are delicious with soup, on tacos, for breakfast, the list just goes on and on. I would always get incredibly excited when I would go to a restaurant that made their own. Since so few did, I always assumed it was incredibly difficult or time consuming. Man, was I wrong. This was the first time I made them and it was a breeze. The most important thing to remember is that the more imperfect they are, the more “homemade” they look, so don’t stress about the perfection.


Handmade Tortillas de Maíz (Corn Tortillas)Yields 16 tortillas
2 cups masa harina (Mexican corn “flour” for making tortillas—Maseca brand is widely available in well-stocked groceries and Mexican markets)
1-1/4 to 1-1/3 cups of water- Mix the Masa Harina and the water; knead to form your masa (dough), you will be able to tell if it needs more water.
- Roll the dough with your hands into a long cylinder and equally divide it into 16 pieces
- Take one of the 16 pieces and roll it into a ball with your hands
- Set the masa on a piece of plastic in the tortilla press; cover with another piece of plastic (at the time I made this, I didn’t yet have a tortillas press and I had to use a combination of a coffee can and a rolling pin)
- Press the masa
- Transfer the tortilla to a hot, dry skillet
- Cook for about 50 seconds on one side; gently turn
- Cook for about 50 seconds (it should puff slightly); turn back to the first side and cook a few seconds longer if you think you need it. You’ll probably have to play with the time a bit to get it right.
- Remove and keep the tortilla warm in a tortillas warmer or on a cookie sheet in the oven (set to 250°F)


Here are some of the yummies we made in the days after with the corn tortillas. Veggie tacos with avocados, tomatoes, limes, lettuce, cilantro and green onions and a side of mexican rice (I am still perfecting that recipe so I will post it when I am happy with it).

And a quick egg taco for a tasty and fast breakfast. Just fry an egg quick, put it on a warm tortilla and top with cilantro, green onions, salt and pepper and whatever else you’d like. One of my favorites.