I have been wanting to make traditional Vietnamese Pho forever and finally made the time to do so this weekend. I can’t get over all the depths of flavor and how easy it is to make. I used two different recipes as reference and consulted a Vietnamese friend, who is an incredible chef, known for his world-class Pho. The two recipes I followed are both traditional and have just a couple of small differences. The first, which I followed the closest was from Viet World Kitchen, the other recipe that I used more for tips and a couple of spices that weren’t in the first recipe, was from an article about Pho, that was in the Washington Post back in 2005.
The only thing I would change next time around would be to possibly simmer the broth even longer, not that it needed it, but I can only imagine how much more intense those flavors would be with more simmering. Also, I really wish I had taken more photos of the process and all the beautiful ingredients, but I was way too excited to sit down and eat that I couldn’t be bothered with taking photos. Plus Saturday was a marathon cooking day in my kitchen, beside the Pho, I was making tomato sauce from scratch, gluten-free sandwich bread and I preserved Meyer lemons. (Recipes to follow on all of those)
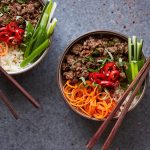
I was unable to get soup bones at the farmers market from Hanova Hills Farm, as I had liked, since they were sold out, but I was able to get both a beautiful piece of chuck for the broth and a 1lb cut of sirloin to slice thin for the bowls. I ended up buying the soup bones at Wegmans, I was happy at the great selection they had.

Beef Pho Noodle Soup (Pho bo)
serves 8
For the broth:
2 medium yellow onions (about 1 pound total)
4-inch piece ginger (about 4 ounces)
4-5 pounds beef soup bones (preferably marrow, knuckle and shin bones, with some meat on them)
6 star anise
6 whole cloves
3 cinnamon sticks
1 tablespoon cardamom pods
1 tablespoon black peppercorns
1 pound piece of beef chuck, rump, brisket or cross rib roast, cut into 2-by-4-inch pieces (weight after trimming)
1 tablespoon kosher salt, or to taste
4 tablespoons fish sauce
1 ounce (1-inch chunk) yellow rock sugar (I just used about 2 tablespoons of organic raw sugar)
For the bowls:
1 pound (16 ounces) rice noodles
1/2 – 1 pound raw eye of round, sirloin, London broil or tri-tip steak, thinly sliced across the grain (1/16 inch thick; freeze for 15 minutes to make it easier to slice) We bought a lovely 1 pound piece of grass-fed sirloin from the farmers market.
1 medium yellow onion, sliced paper-thin, left to soak for 30 minutes in a bowl of cold water
3 or 4 scallions, green part only, cut into thin rings
1/3 cup chopped cilantro
Ground black pepper
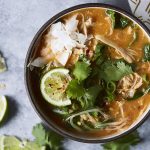
Optional garnishes arranged on a plate and placed at the table:
Sprigs of spearmint and Asian/Thai basil
Bean sprouts (about 1/2 pound)
Sliced green chili peppers (jalapeño or serrano)
Lime wedges
Red chili sauce (such as Tuong Ot Sriracha)
Prepare the pho broth:
Char onion and ginger. Use an open flame on grill or gas stove. Place onions and ginger on cooking grate and let skin burn. (If using stove, turn on exhaust fan and open a window.) After about 15 minutes, they will soften and become sweetly fragrant. Use tongs to occasionally rotate them and to grab and discard any flyaway onion skin. You do not have to blacken entire surface, just enough to slightly cook onion and ginger. You may also instead roast the ginger and onions on a baking sheet in a 400-degree oven for 30 minutes, this is what I did.
Let cool. Under warm water, remove charred onion skin; trim and discard blackened parts of root or stem ends. If ginger skin is puckered and blistered, smash ginger with flat side of knife to loosen flesh from skin. Otherwise, use sharp paring knife to remove skin, running ginger under warm water to wash off blackened bits. Set aside. (I’ll be honest, since I roasted the ginger in the oven, and it was far too hot to peel, I just halved the big piece in two and dropped it into the stock, peel and all.)
Parboil bones. Place bones in stockpot (minimum 8-quart capacity) and cover with cold water. Over high heat, bring to boil. Boil vigorously 2 to 3 minutes to allow impurities to be released. Dump bones and water into sink and rinse bones with warm water. Quickly scrub stockpot to remove any residue. Return bones to pot.
Simmer broth. Add 4 quarts water to pot, bring to boil over high heat, then lower flame to gently simmer. Use ladle to skim any scum that rises to surface. Add all remaining broth ingredients and cook, uncovered, for 1 1/2 hours. Boneless meat should be slightly chewy but not tough. When it is cooked to your liking, remove it and place in bowl of cold water for 10 minutes; this prevents the meat from drying up and turning dark as it cools. Drain the meat; cool, then refrigerate. Allow broth to continue cooking; in total, the broth should simmer a minimum of 3 hours, I simmered mine for around 6 hours. If I had the time, I would have simmered it even longer.
Strain the pho broth through fine strainer. If desired, remove any bits of gelatinous tendon from bones to add to your pho bowl. Store tendon with cooked beef. Discard solids.
Use ladle to skim as much fat from top of the pho broth as you like. (Cool it and refrigerate it overnight to make this task easier; reheat before continuing.) Taste and adjust flavor with additional salt, fish sauce and yellow rock sugar. The pho broth should taste slightly too strong because the noodles and other ingredients are not salted. (If you’ve gone too far, add water to dilute.)
Assemble pho bowls:
The key is to be organized and have everything ready to go. Thinly slice cooked meat. For best results, make sure it’s cold.
Heat the pho broth and ready the noodles. To ensure good timing, reheat broth over medium flame as you’re assembling bowls. If you’re using dried noodles, cover with hot tap water and soak 15-20 minutes, until softened and opaque white. Drain in colander. For fresh rice noodles, just untangle and briefly rinse in a colander with cold water.
Blanch noodles. Fill 3- or 4-quart saucepan with water and bring to boil. For each bowl, use long-handle strainer to blanch a portion of noodles. As soon as noodles have collapsed and lost their stiffness (10-20 seconds), pull strainer from water, letting water drain back into saucepan. Empty noodles into bowls. Noodles should occupy 1/4 to 1/3 of bowl; the latter is for noodle lovers, while the former is for those who prize broth. We used a thicker noodle, so I went with the package instructions which called for adding the noodles to boiling water, and to boil for 6-8 minutes until cooked to your desired doneness.
If desired, after blanching noodles, blanch bean sprouts for 30 seconds in same saucepan. They should slightly wilt but retain some crunch. Drain and add to the garnish plate.
Add other ingredients. Place slices of cooked meat, raw meat and tendon (if using) atop noodles. (If your cooked meat is not at room temperature, blanch slices for few seconds in hot water from above.) Garnish with onion, scallion and chopped cilantro. Finish with black pepper.
Ladle in broth and serve. Bring broth to rolling boil. Check seasoning. Ladle broth into each bowl, distributing hot liquid evenly so as to cook raw beef and warm other ingredients. Serve your pho with the garnish plate.
Note: Yellow rock sugar (a.k.a. lump sugar) is sold in one-pound boxes at Chinese and Southeast Asian markets. Break up large chunks with hammer.