Much like making homemade almond milk, which I have done for years now, preparing sprouts at home, has now become a weekly thing for me. I absolutely adore sprouted foods and all of their many benefits. But, I have to be honest when I tell you the sprouts they sell at the store creep me out, a bit. Knowing just how short their shelf life is, it makes it hard for me to believe they are fresh and that their exposure to harmful bacteria has been limited. I would much prefer to make my own at home, where I know how fresh they are and exactly how they were handled. I started doing this late last year and I have become obsessed.
Sprouting is a way of creating “living plants”, loaded with nutrients and vitamins such as Vitamin C, B E and carotene. Some believe sprouted foods contain up to 15 times as many nutrients as their unsprouted counterparts. Sprouting also helps the absorption of minerals due to their ability to be better digested. Some people refer to sprouted foods as “pre-digested”, for this reason.
Sprouting takes time, but it’s much more of a waiting game, it doesn’t require a ton of work. Sprouted foods simply requires you to have patience and to be paying attention, tracking their sprouting time and making sure to tend to them, when needed. That’s about it.
Why Sprout?
As we discussed in both the nut butter and nut milk posts – many nuts, seeds, legumes and grains contain natural chemicals that protect them while growing, both from sprouting prematurely and also from predators. These protectors also act as enzyme inhibitors to us, meaning we get much less of the crucial nutrients from these foods than we should be. Plus, this “armor”, of sorts, makes digesting them much more difficult. Soaking these foods releases these chemicals, helping you to absorb your food’s essential minerals and nutrients. Additionally, by soaking the nuts with the removal of these nutritional inhibitors and toxic substances, the flavor and taste is much more ideal and appealing.(read more in depth about these chemicals and why we soak, here)
So, we are back to the soaking idea again. Soaking is not only necessary for sprouting to occur, but we are also unlocking the full nutritional potential of these foods, as we did with the nut butters and nut milks. After soaking, when that natural protective armor has been removed, the sprouting process can then occur. So basically, if soaking is the first step of increasing the nutritional benefits of these foods, then sprouting is the incredible finishing move to creating the perfect nutritional superfood out of something that would otherwise leave us feeling bloated and tired, due to the strain they would typically put on our digestion.
Sprouted foods, also known as “activated foods” are incredibly nutrient dense foods, they encourage production of healthy bacteria that aids in our digestion and in turn, boosts our immunity. Sprouts are great on salads, on top of soups or stews, in stir fries, inside of wraps or sandwiches, in smoothies – really they are great in any dish that you want to add a nutritional boost to.
What Can you Sprout?
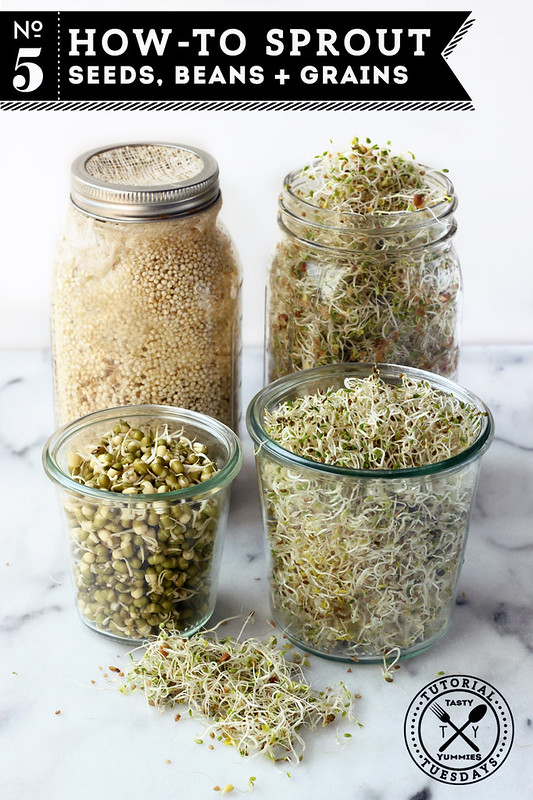
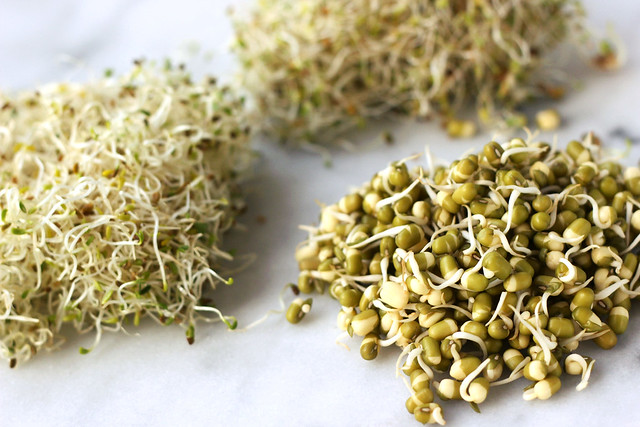
Most seeds, legumes, grains and some nuts will sprout, but be aware some will not. Because many nuts you find in the stores have been pasteurized or treated with heat in some way, they aren’t technically raw and although soaking can activate and allow us access to their nutrients, sprouting likely won’t happen. Oftentimes, when I am simply looking for traditional sprouts, I will buy premixed ready to sprout blends of organic seeds and legumes exclusively meant for sprouting. It gives me a nice wide variety and I know that, since everything in the blend is meant for sprouting, it will do just that. See the bottom of this post for pre-made sprouting blends that I recommend. For the step-by-step photos, I used this organic blend, Spicy Salad Mix, which contains lentils, alfalfa, red clover, radish and black mustard seeds.
Once sprouted, you can also cook grains and legumes, as you normally would. Sprouted quinoa cooked in place of regular quinoa, is one of my favorite things as are sprouted lentils. Once sprouted, grains and legumes not only cook quicker than their dried counterparts, but they are, as you now know, much easier to digest and taste much better, as well.
Contamination
Much like fermented or cultured foods, sprouted foods are susceptible to contamination from bacterial growth. If you take great care in keeping a clean environment, tools and hands, and you should be more than OK. I have never had an issue. In fact, I feel much better about consuming my own sprouts, where I am careful, rather than sprouts that sat on the shelf of the grocery store for who knows how long, traveling through god-knows what to get there. Always store your finished sprouts in the fridge, in a covered glass container and consume within a few days.
Some professionals recommend cooking your sprouts. I have never found this to be necessary.
Soaking and Sprouting Times
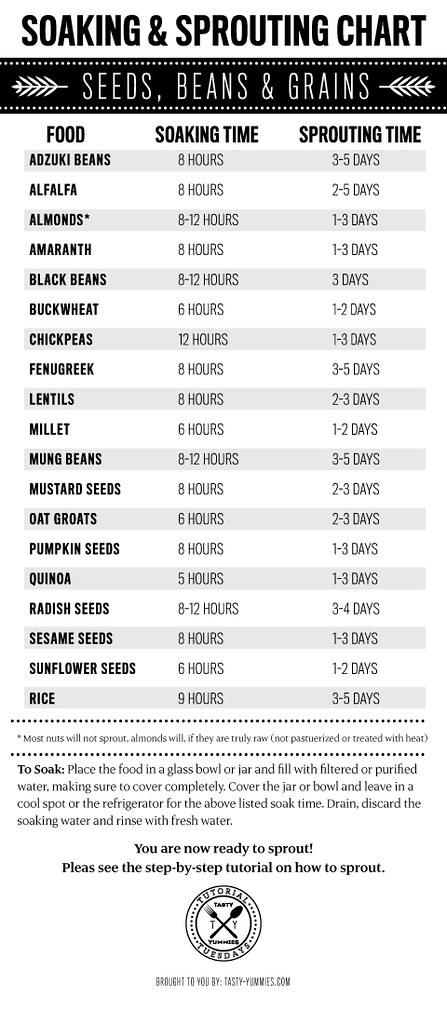
Much like the nut butter and nut milk posts, I wanted to provide you with a simple guide with soaking and sprouting times for various seeds, legumes and nuts. I am also including a few gluten-free grains on this list. Obviously there are many more foods than what is on this list, that can be sprouted. Also, as I mentioned above – most nuts, will not sprout, so I haven’t include nuts on this list, besides almonds.
How-to Sprout:
Soak
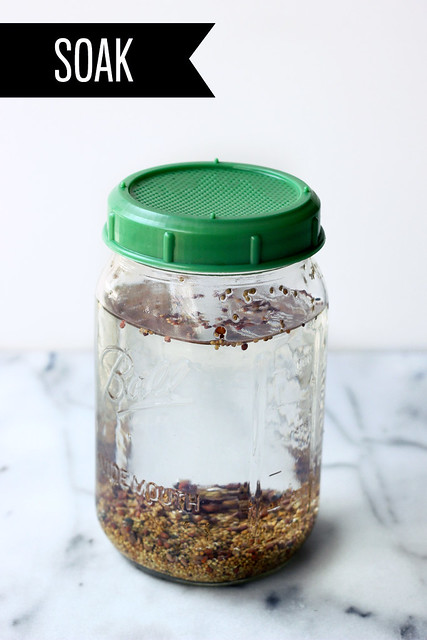
Soak your seeds (beans and/or grains) in a wide mouth mason jar with fitted with either a spouting lid, a sprouting screen or a piece of cheesecloth big enough to cover the opening, held on with the jar’s metal ring or a rubber band. Cover the goods you are sprouting with at least 2 to 3 times as much filtered water. When making sprouts for salads, I usually go with 1-2 tablespoons of a seed legume blend and approximately 2-3 cups water. Allow to soak for the appropriate time (see above chart) on the countertop. This blend, that I have been using, calls for soaking 8 hours, so I get it set up to soak overnight and do the remaining steps the next day.
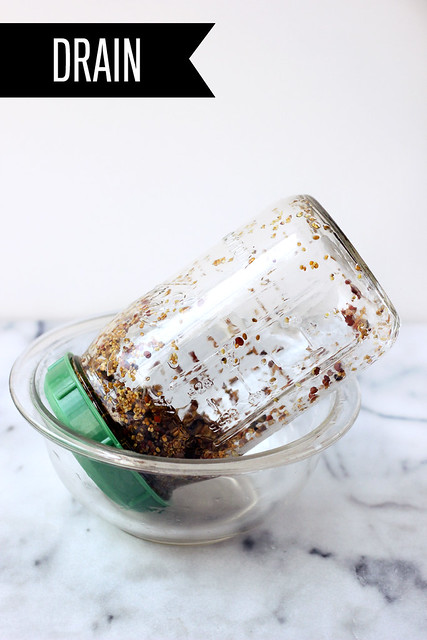
To drain, pour out the water through the cheesecloth or the sprouting lid, run fresh water through the lid and over the food, shake to rinse thoroughly. Drain again and repeat one more time.
After draining the water out, make sure the lid is fitted on securely and tip the jar upside down into a bowl, so any excess water drains out. I place my draining jar under a dark towel on the countertop, basically you just want it out of direct sunlight and at room temperature.
Continue this rinsing and draining process every 8 hours or so, or at least twice a day, until the food is done sprouting.
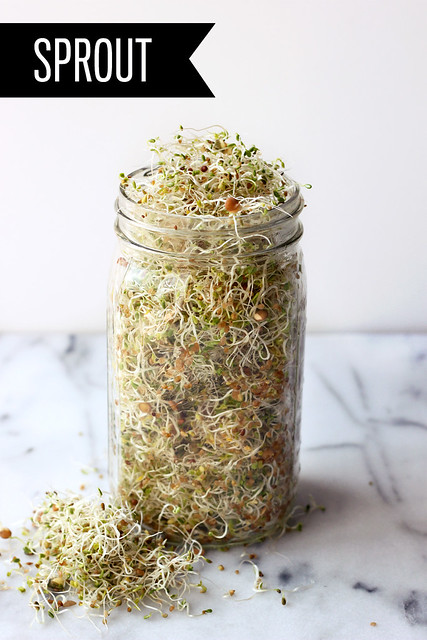
Most foods will start sprouting on day 1 and will be fully sprouted in 1 to 4 days. The sprouts are ready when you can see little tails, 1/8-inch to 2-inches in length. For grains and legumes, they that are about the same length as the original food, pre-sprouting. Once the sprouts are ready, I give them a final rinse and place the jar in a sun lit area for about an hour or so, to green them up a bit and make sure they are fully dry. Damp sprouts will spoil. Once dry, add the regular metal lid back to the jar and store in the fridge.
Storage
When sprouting grains, once they are ready – refrigerate them. Sprouts will keep 2 to 3 days. Enjoy on salads, on top of soups or stews, in stir fries, inside of wraps or sandwiches, in smoothies – really they are great in any dish that you want to add a nutritional boost to. You can also dehydrate the sprouted grains to grind into a homemade sprouted flour. This is something I haven’t tried yet, but I cannot wait to. Here is a great post from Nourished Kitchen on how to make sprouted grain flours.
NOTES: As an alternative to the jar with the sprouting lid or cheesecloth, for larger batches of sprouts many people use nut milk bags for sprouting. The process and the steps work the exact same way, but I personally find trying to come up with a way to hang the bag so the excess moisture will drain out, to be more of a pain that it’s worth, so I always opt for the jar.
Equipment
Sprouting lid or Sprouting Screen
Alternative to the jar and lid method: nut milk bag
Resources for Sprouting Seeds
High Mowing Seeds has an incredible selection of organic seed/legume blends for sprouting. A 4 ounce package makes you 8 batches of sprouts. A little goes a long way.
Cultures for Health has a nice selection of sprout mixes.
There is also a wide selection available on Amazon, Handy Pantry is just one of many brands selling organic sprouting seeds.
You can also find great options at your local organic grocer, oftentimes in bulk. If you are buying in bulk and are highly sensitive to gluten, please be wary of cross contamination. This is always a concern with bulk bins.
** I am not affiliated with High Mowing, Cultures for Health or Handy Pantry, in any way, these are simply products and brands I have used or am aware of and I can recommend. All thoughts are my own.**
Sprouted Recipes
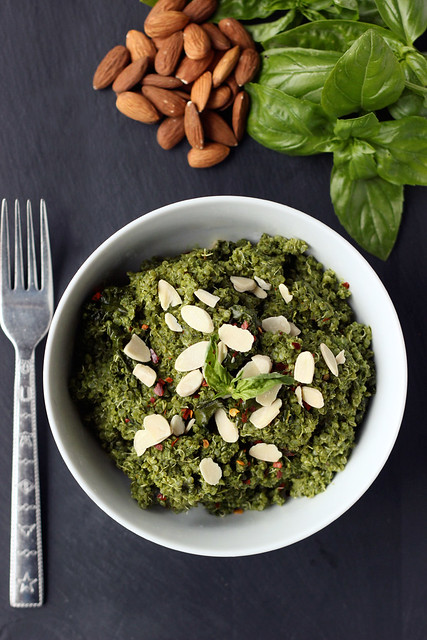
Sprouted Quinoa Bowl with Kale Almond Pesto
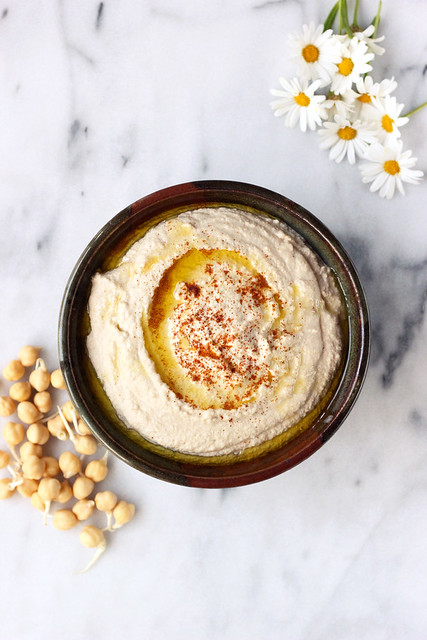
Sprouted Hummus
(plus a cute little Cucumber Cup appetizer idea)
Disclosure: This post contains affiliate links. If you make a purchase using these links – your cost remains the same, but I earn a small percentage to help support this blog. Thank you, your support is so appreciated.




44 Responses
You know I already love this tutorial series you’ve got going on – but girlfriend this one is my favorite yet. It’s so professional, so well written and will save me so much time teaching my health coaching clients about the benefits of soaking + sprouting. There isn’t a place on the interwebs right now that breaks it down like you have.
Sharing, sharing, sharing as far and as wide as I can!
XO SHERRIE
Thanks so much girl!! I sincerely appreciate all of that. You are the best, love. xoxox
Oh wow! I really thought there was more to it than that! Why haven’t I tried this sooner? Well, better late than never! I love how your tutorials just spell everything out for us simply. Some people like to make things seem a lot more complicated than they really are. You never leave me with any questions or missed information, I feel like I could just go in the kitchen and do it! Thank you, for making our lives easier AND healthier!! 🙂
Also, your photos and charts are fantastic! 😀
Nope simple as that. So easy. I am so happy you liked this post and the others, thanks for taking time to comment and leave the feedback, it means so much to me to know that people are really enjoying this series. Thank you, thank you!
Question from a real newbie – for the greening-up and drying-out phase, so you leave them in the jar or spread on a towel?
Thanks for this very informative post.
Hey Ouida. I leave them in the jar, set them in sunlight for a very short time, to green up and then if they are still damp I take them out of the jar, put them in a clean towel or a paper towel, pat them dry, dry out the jar and add them back in, put the lid on and put them in the fridge. When you put them in the sun, don’t leave them too long or they could actually start to cook and you will lose the wonderful benefits of them being raw and “alive”. Indirect sunlight is best, if you cannot keep a watchful eye on them. Thanks so much for reading and for the thoughtful question. I appreciate it.
Thank you! I’m on it…
This answers the question I had about the nutritional benefits of raw vs cooked sprouts–I assumed using them in cooking would decrease the value. Is it a lot?
Thanks for the info…I’ve been wanting to sprout for a long time but never liked the taste, esp. alfalfa sprouts, but I’m starting to like them and hope to LOVE them soon 🙂
Kim, I don’t have any exact numbers on how much it decreases the nutritional value, but I would say a decent amount, that said I would imagine that something that has been sprouted then cooked will still have more nutritional than a traditionally cooked version that hasn’t been sprouted, if you follow 😉
I hope you have fun, if you start sprouting.
Thank you for the reply…it makes sense:) BTW, I found that bringing bone broth to a simmer, slipping in an egg and poaching to desired doneness, putting in a bowl then topping with a big pinch of alfalfa sprouts is soooo delicious! Some of the sprouts get cooked and some stay raw; they’re like noodles only better (and healthier!) AND now I love sprouts!! Thanks again.
Love this, Beth! Just ordered my lid and seed kit, I’m so doing this! I bought sprouts recently and they went bad in like a day, it totally grossed me out, perfect timing with this post 🙂
woohoo Gina, time to get your sprouting on. Glad you enjoyed the post 😉
I love your Tutorial Tuesday posts. They are so well done! Every week I am amazed at the content and attention to detail.
I have been doing my own sprouting for years, but you have listed a few that I have yet to try, so I look forward to trying them soon.
Thank you for the inspiration!
Aww Abby, thank you so much. I appreciate it. I am so glad you have been enjoying this series, that makes me so happy.
Your Tutorial Tuesdays are amazing! I have always been interested in sprouting at home and had no idea it could be this simple.
Thank you so much Brandy!! I really appreciate that. It really is so so simple. I hope you find it as fun and easy as I do. Thanks for the comment.
Hi Beth,
Fascinating article! I have been growing my own alfalfa sprouts for a while now and really enjoy them in so many ways. I’ve been looking to expand my sprouting and your article gives me the information I need. Thank you for such an informative piece. I’ll be juicing more flavors of sprouts in the near future. Best wishes!
Thanks for the comment Rich. I am glad you find this all helpful, I hope you find yourself sprouting even more stuff, very soon 😉 Thanks for reading and for taking the time to comment.
Thanks again for another how-to post! This is a great resource to print and stick on my fridge.
Thanks so much Andrea and I am so glad you enjoy! xo
does what I sprout have to come from a package that says “sprout”? like the beans, lentils and chickpeas, can they be from the bin at whole foods, or are they something special? can i sprout alfalfa and red clover seeds that my uncle would buy in bulk (organic) to spread out on his pastures for his grass fed cows?
Hi there Kari. No, you don’t have to just buy “sprouting” seeds or beans. Any dried raw beans or seeds should sprout, including the ones in the bulk bins and I am sure the seeds your uncle gets, too.
Hello,
Writing here to add that you should not use seeds intended to be planted (like your uncle is doing in the pasture) for sprouting/eating because they may have been treated with fungicides or other protectant chemicals. Usually these treatments also have dye, so that you can tell, but you never know.
You should only sprout seeds which are intended to be consumed as food, (either specifically for sprouting or for eating uncooked or cooked), not sown and grown into plants.
I am inspired to try sprouted quinoa and garbanzos in addition to the more typical species commonly sprouted.
I did it! After you posted this, I bought seeds and sprouting lids (um, I have eleventy-billion Mason jars already…it’s a curse I bear) and I DID IT! Thank you.
Now, another question: Would you say mare about what to do with the sprouts, beyond sandwiches/wraps (since we’re grain free, those don’t happen much here) and salads? I especially would like to know about the sprouted quinoa that you mentioned in the post.
Thank you!
Ouida YAY!! This is amazing. I am so glad you were inspired to try this after my post, that makes me so so happy. (and girl, I get you on the eleventh-billion jars, same over here).
I have since updated the post, with a couple of recipes at the bottom to give you some ideas. A recipe for sprouted quinoa and another for sprouted hummus. Hope you enjoy! Thanks so much for taking the time to comment, BTW <3
Thank you for the recipe links. We luuurve hummus, so I can’t wait to try it sprouted.
Again, with another question: Do you know if cilantro (er, I suppose that would be coriander, as I mean the seed…but, it would be cilantro once sprouted. So confusing!) can be sprouted? I think it would make an amazing micro-green sort of thing, if that is even possible.
Thanks!
This is a great blog post, thanks for posting it. I have been sprouting pinto beans and kidney beans with lots of success. For some reason I can not get Navy beans to sprout. I have tried changing the soaking time, rinsing them more often but they just want to get slimy and smelly. I use organic beans as well. Any ideas would be appreciated. Thanks.
Kris, thanks so much!! Hmmm, that is very interesting. I haven’t tried navy beans yet, myself. Maybe navy beans don’t sprout? I have read that not all legumes, grains and nuts do sprout. Have you tried multiple sources for the navy beans? Maybe the ones you are getting aren’t truly raw or have been pasteurized or treated with heat in some way that is keeping them from sprouting? Wish I could help more.
Whats the soaking-sprouting time for Kidney beans? Thank you in advance.
I have never heard of this method before. Have always done it simply with paper towels. Or of o was low in those I have special kitchen towels called feed cloths that work extremely well. I am not sure on the rince and soak times but I thought it was shorter. We just leave the seeds or beans or what ever in the towels to sprout. Pull the top off into the sun every day for a few hours then when they have done their thimg, place on a bowl and refrigerate. Is this similar?
Same exact process yes, just a different way of doing it. I like the jar method myself, but I have sprouted in a nut milk/sprouting bag and had great results. Maybe the sprouting time is less because of the amount of oxygen they are exposed to in that way, versus being in a jar? I feel better about the jar sitting out because in my mind there is less chance of dirt, bacteria, insects, etc – contaminating it, but that’s just me.
I love this article. I couldn’t have come at a better time. Thank you! This is soo totally off topic, but where did you get the glass containers? I love them!
Thank you for the tips! I’ve sprouted broccoli and alfalfa before, but I’ve never tried grains or beans. After sprouting quinoa or chickpeas, for example, do you need to cook them before eating?
Oh, wow, what an informative post! Super impressed with your attention to detail. And that sprouted quinoa bowl looks so tasty!
Hi, I just found you today and love your site. Thanks for all you do.
I have been saving butternut squash and other squash seeds for my next garden, can I sprout and eat them?
Recently when I cut into a spaghetti squash some of the seeds had sprouted and I ate the growing part (not the actual seed part). It was only a few and I didn’t get sick but I thought I should check with someone before I make a large batch and get the family sick. LOL
Thank you!
Great post! I was just wondering though you didn’t mention kidney beans. I am wanting to soak and sprout them and was wondering if the times would be the same as some of the other beans?
So I’m brand new to this whole sprouting this and had a question or maybe just a clarification? On your soaking chart, at the bottom, it says to keep it in a cool place or the fridge, but I thought you needed to use warm water when soaking? Also, I’ve read some people use salt. Is that just a preference?
I have just started sprouting – made my first batch of broccoli sprouts
What I don’t get is how to remove the hulls – is that necessary
and how do you do it, if you would like them removed?
No need to remove the hulls!
So – can you eat sprouted squash seeds – or not?
Hi. Can I use boiled and cooled water rather than filtered water for soaking the beans. Also, why not just tap water.
I use a plastic jar and and old stocking for my sprouts. But they never taste as fresh and clean as the ones I buy from the grocery. What am I doing wrong?
Thanks,
Mary
I just wanted to say thank you for such a concise and well-written tutorial! Our vet happened to mention in passing that our fussy Cockatiel might enjoy sprouted food, so I happened to stumble across your article when looking into it. Not only is our bird going to be spoiled, you’ve convinced me to add it to our own diet as well! It’s not a common practice here in Australia, so I had never heard of anyone doing it themselves before. Beyond the bean sprouts you sometimes see at grocery stores, I didn’t even know they existed. I’m looking forward to trying them!
Thanks for a great, helpful post. I’ve been wondering about sprouting quinoa or rice, and appreciate you providing the answer. I started sprouting alfalfa and mung decades ago – for a long time I had been intimidated by the “equipment” one had to buy – cheesecloth, sprouting lids, mason jars, nut bags, etc. I finally started doing it when I discovered that an old spaghetti jar works just fine- covered in a paper towel or a disposable coffee filter with a rubber band. To drain, I just use a small kitchen sieve (I cup size) inverted over the opening of the jar. It’s nice to be able to start without investing in more equipment and supplies.