-
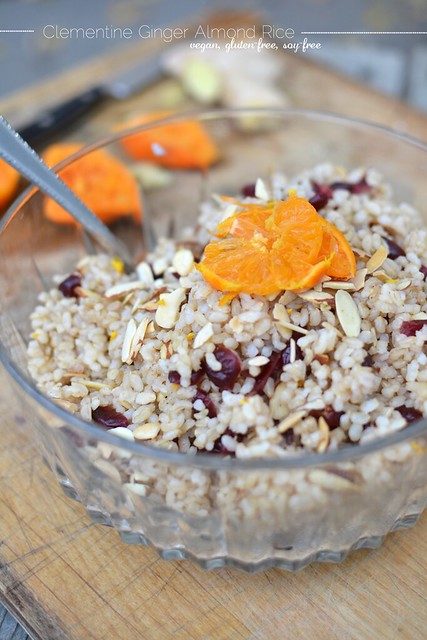
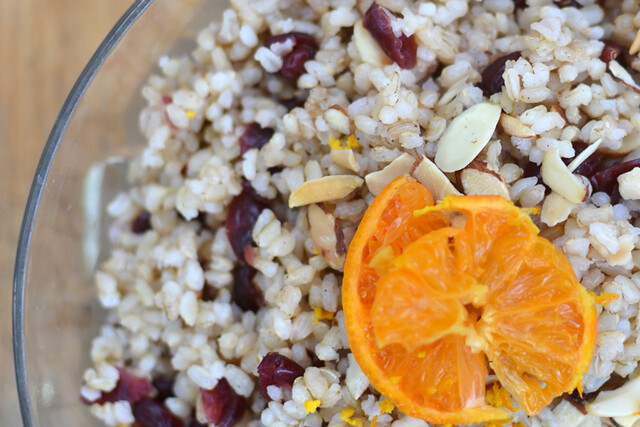
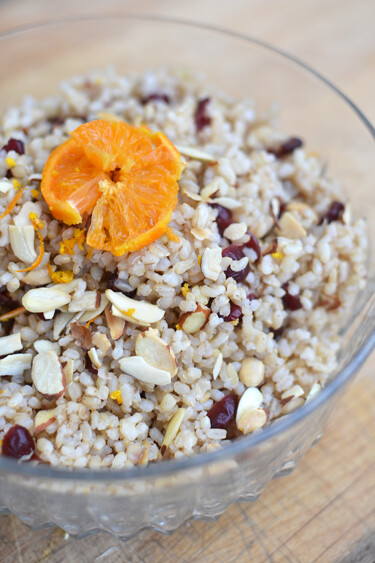
Clementine Ginger Almond Rice – Vegan, Gluten-free + Soy-free {Guest Post by Bring Joy}

Next up in our Thanksgiving series is a post from the very sweet and lovely Janae from bring joy. I found Janae’s blog not too long ago and I can’t even recall right now how I stumbled upon it. I was immediately excited as all of Janae’s recipes are both gluten-free and vegan AND she also has four kids. I find cooking something both my myself and my husband will equally enjoy, to be a challenging feat at times, the fact that Janae creates such beautiful meals and is feeding so many mouths at the same time is so impressive and admirable! Janae’s photos always make me want to reach through the screen and take a quick bite and on top of all of this, her posts are always so real, honest and from the heart, which I very much appreciate. Today Janae is sharing her recipe for Clementine Ginger Almond Rice with us. Enjoy.
• • • • • • • • • • • • • • • • • • • • • • • • • • • • • • • • • • • • • • • • • • • • • • • • • • • • • • • • • • • • • •
Growing up, Thanksgiving was a somewhat chaotic affair since I have six brothers & sisters. As you might imagine, things were loud. Things were never dull.
Now that I have four kids of my own, loud & chaotic Thanksgivings prevail, only difference is, now my Thanksgivings are meat & dairy-free (& gluten-free).
For many vegans, grain meats, such as tofurky or seitan are an vegetarian-friendly alternative to turkey. However, as a gluten-free vegan these grain meats aren’t an option. Which makes it even more important for me to have a variety of dishes to choose from that offer plenty of satisfying texture & flavor.
I’ve been vegan for going on 7 years now (gluten-free for almost a year), & this makes it my 7th meat-free Thanksgiving. In my pre-vegan days I was always more of a side-dish eater anyway, & taking out the turkey from the meal just makes room for traditional delicious side dishes, like this one, to take prominence.
This dish is a bit more sweet than savory, but there’s no added sugars, only the sweetness that comes from the cranberries & clementine juice.
[print_this]Clementine Ginger Almond Rice – vegan, gluten-free, soy-free
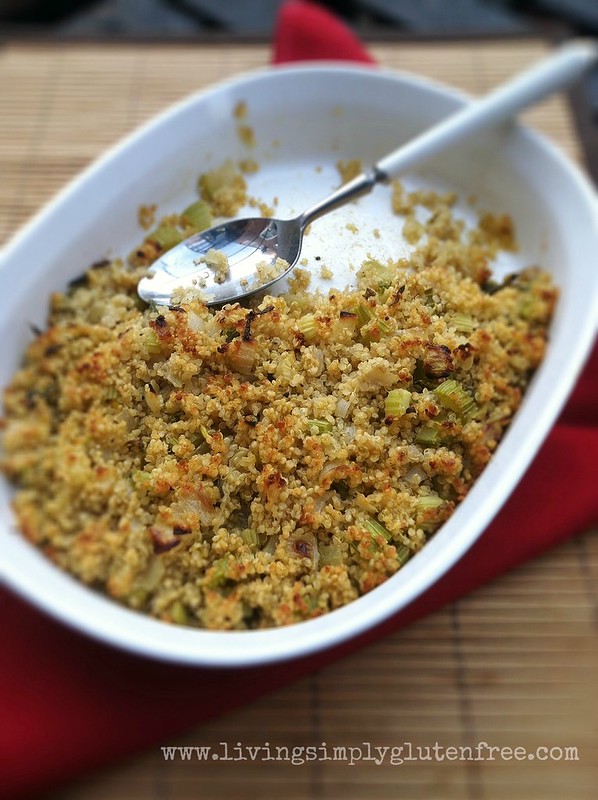
Serves 8This rice has a subtle mixture of several flavors. Infused with ginger, clementine, & a hint of cinnamon, the cranberries add texture & sweetness while the toasted almonds add a nutty crunch. A relatively easy dish to throw together, this rice compliments other Thanksgiving-themed dishes. I’m thinking squash would pair especially well.
Toasting the rice & almonds brings out the nutty flavors of both foods, adding another layer of flavor & depth to this humble dish. When you makes this for Thanksgiving dinner, your relatives may very well take one look at it & think, “oh, rice.” But once they have a bite, they’ll realize it’s much more flavor-packed than assumed.
{My kids actually ate this for breakfast one morning, topped with soy milk. My son said it “tastes like cake!” I suppose the subtle sweetness of the rice combined with the sweet nature of soy milk made for a cake-like experience.}
- 2 c. organic short-grain brown rice
- 3 1/2 c. water
- 1/4 tsp. cinnamon
- good pinch of salt
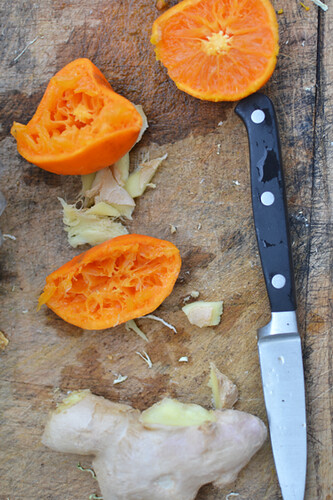
- 2 strips of peeled, fresh ginger (about 1 inch)
- juice of 2 clementines
- peel of 1 clementine, grated
- 1/2 c. sliced almonds
- 3/4 c. dried cranberries
- 1/2 tsp. grated fresh ginger
1. In a large cast-iron skillet on medium-high heat, toast brown rice. Stir periodically for 4-5 minutes, or until brown rice becomes aromatic & is visibly toasted (lower heat to avoid burning if your pan gets too hot).
2. Add water, cinnamon, salt, & ginger. Turn heat up to high & get water to a boil. Cover rice & turn heat down to medium-low. Cook for 50 minutes (& don’t go peeking under that lid–but you already knew that, didn’t you?).
3. While rice is cooking, boil 2 cups water. Place dried cranberries in a small bowl. Once water has reached a boil, pour water over cranberries & cover. Let sit for 20-30 minutes (or until cranberries are reconstituted). Drain excess water.
4. You’ll also want to toast your almonds. It’s super easy, don’t worry. Preheat your oven to 300 F. Spread almonds on baking sheet. Bake for 3-5 minutes (be careful not to burn). Remove from oven & let cool.
5. Grate ginger, & peel of one clementine (or grate peels of both clementines).
6. Once rice is cooked, remove from heat, fluff with a fork & let sit for 5 minutes.
7. Place rice in medium bowl & add cranberries, almonds, grated ginger, clementine peel & juice. Toss gently. Garnish with clementine slices. [/print_this]

Janae Wise is an Air Force wife, mother of 4 & is passionate about sharing with others ways in which to bring more joy to living. She is also a vegan & gluten-free recipe developer, writer, & yoga teacher/fitness instructor.
She is the founder of bring joy, where she shares her love for creating wholesome, fresh & simple food. Janae also writes about insights into family & home life, as well as occasionally shares fitness tips & videos. You can read more about Janae, here, & more about her family, here.
You can also find bring joy on facebook, twitter, & pinterest.
-
Quinoa Sage Stuffing – Gluten-free + Vegan {Guest Post by With Food + Love}
Kicking off our Very Tasty Thanksgiving series is the lovely Sherrie from With Food + Love. I found Sherrie and her blog, if I recall correctly, through Instagram, it really is amazing how hashtags can totally connect you to people that share your interests). I immediately began perusing her site and loved everything about it. Around the time I found her she was in the starting weeks of her CSA Project where every week of the season she shares the contents of her CSA share. Even if you don’t get a CSA, it’s so fun to see all that is available and in season. All of Sherrie’s recipes are gluten-free, obviously, but I really enjoy that she also has a love for what is in season and fresh, and that shows in her recipes. She cooks seasonally and unprocessed, which I can obviously appreciate! Today Sherrie is sharing a beautiful looking recipe for a Quinoa Sage Stuffing. Enjoy!
• • • • • • • • • • • • • • • • • • • • • • • • • • • • • • • • • • • • • • • • • • • • • • • • • • • • • • • • • • • • • •
Hi all – it’s Sherrie from, With Food + Love. I have been a fan of Beth’s blog for some time now and I love how she incorporates fresh seasonal foods into all of her recipes. This time of year is my favorite so I am honored and delighted to contribute to her, A Very Tasty Thanksgiving blog series.
Stuffing has always been and will always be my favorite side at the Thanksgiving table. Each year I make a gluten free stuffing with intent to share with my friends and family. But luckily for me no one at the table wants anything to do with this {gluten free} stuffing. Unluckily for me, I end up eating pretty much the entire bowl.
I, like most of you am on a lifelong commitment for an overall better health. And with each day going forward I strive to make simple changes in my diet to eliminate the processed foods and add whole, mostly plant based foods in their place. As I approach this coming holiday season plant strong, I wanted to see how delicious I could make this traditional stuffing taste without the processed junk, also known as gluten free bread. It seems crazy, right? I know. Since whole grains are all the rage in my home right now, I took my quinoa {the little power seed} into the kitchen with me and created this twist on traditional Thanksgiving stuffing.
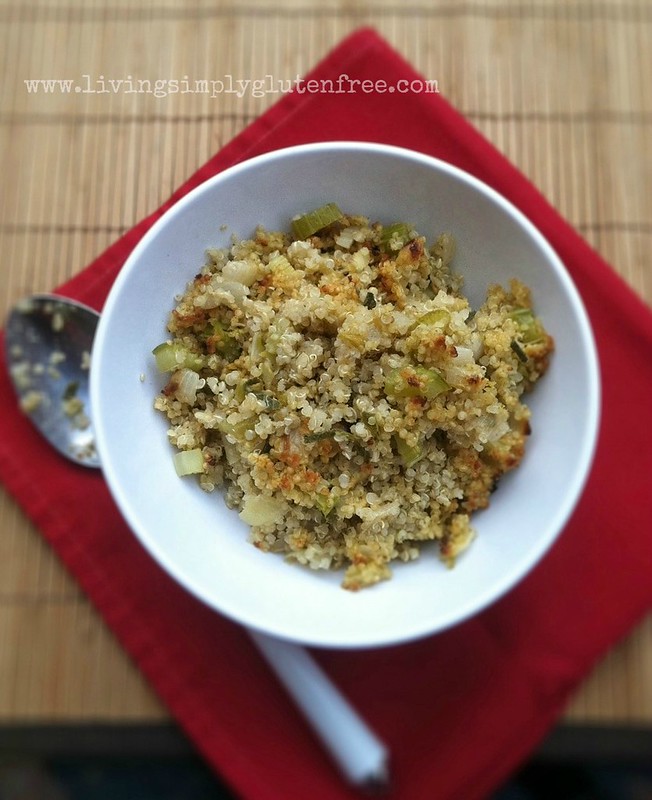
[print_this]Quinoa Sage Stuffing – Gluten-free + Vegan
{yields 6 servings}- Ingredients:
- 1 cup quinoa, rinsed well
- 2 cups organic vegetable broth
- 1 bay leaf
- 1 heaping cup of diced celery
- 1 medium white onion, diced
- small handful of fresh sage, chopped {about 2 tablespoons}
- 1/4 teaspoon garlic powder
- 1 tablespoon extra virgin olive oil
- sea salt
- fresh ground coarse pepper
Preheat your oven to 375 degrees.
In a medium sized pot bring 1 cup of vegetable broth to a boil. Add in the quinoa and bay leaf, salt, pepper and stir. Set to low heat and simmer with a lid on for 10 minutes. Turn off the heat {do not lift lid} and allow the quinoa to steam for another 10 minutes. When that is over, you will have picture perfect quinoa – trust me, no more soggy mess!
Heat the olive oil in a saute pan over low heat. Add in the chopped celery and onion. Cook until they begin to become clear, about 5-10 minutes. Turn the heat up to medium and add in the vegetable broth, sage, garlic powder and season with more salt and pepper if needed; simmer for a few minutes.
Combine the quinoa with the veggie mixture and add in the last 1/2 cup of vegetable broth, stir together well. Place the stuffing mix into a greased oven safe dish. Bake at 375 for 10 minutes. Then broil under a low flame until the top become golden brown.
t i p: I prefer my stuffing on the drier side so, this recipe will come out that way. If you like your stuffing to be on the moist side, feel free to add more broth into the quinoa mixture before it goes into the oven to bake. [/print_this]

Sherrie is the founder and author of With Food + Love where she creates naturally gluten free and seasonally delicious recipes. Currently she is in Nutrition School to become a Certified Holistic Health Coach. You can find her living in the heart of Philadelphia with her supportive fiance and sociable cat.
Visit Sherrie’s blog With Food + Love
You can also follow Sherrie on:
Facebook: www.facebook.com/withfoodandlove
Instagram: withfoodandlove
Twitter: @withfoodandlove
Pinterest: @withfoodandlove -
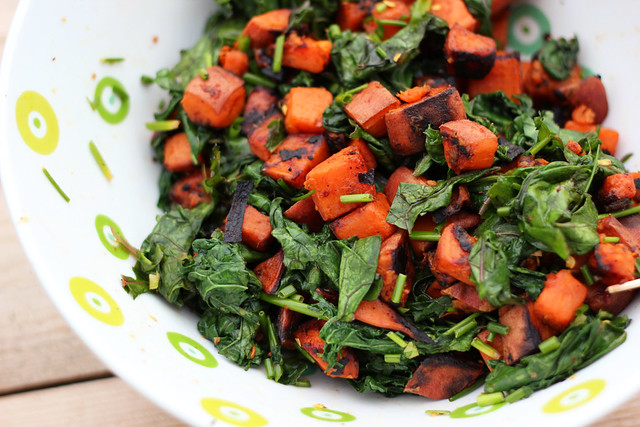
Grilled Sweet Potato and Wilted Kale Salad – Gluten-free + Vegan
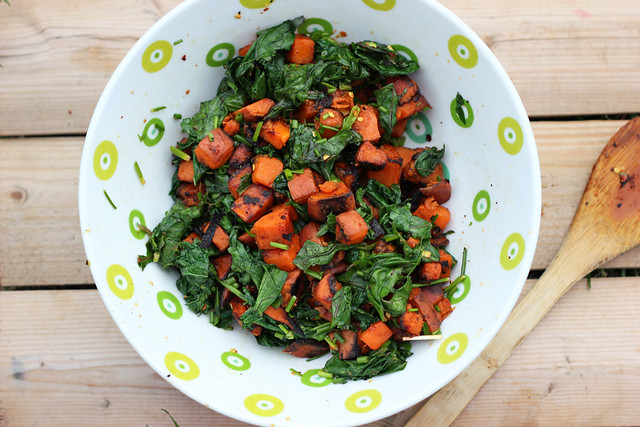
This time of year I am all about simple dinners that don’t require a ton of effort or heating up the kitchen. One of my favorite things to make are simple grilled vegetables or grilled potato salads. I was making this particular grilled potato salad a lot last summer, but recently I decided to change it up a bit and use sweet potatoes.
This salad is great as a meal on it’s own, or as a side to any grilled meat of your choice (local and grass-fed, of course). This salad has a wonderful tang from the vinegar, a little spice from the red pepper flakes plus a beautiful fresh and bright flavor from the kale. The kale’s subtle and satisfying almost spicy crunch is so nice paired with the tender and earthy flavor from the sweet potatoes.


Besides being packed with flavor, this salad is loaded with nutrients and vitamins and other goodness. Sweet potatoes are an excellent source of vitamin A, in the form of beta carotene, and vitamin C. Sweet potatoes also provide vitamin B6, potassium, fiber, manganese, copper and iron. Sweet potatoes are naturally sweet-tasting but their natural sugars are slowly released into the bloodstream, helping to ensure a balanced and regular source of energy, without the blood sugar spikes linked to fatigue and weight gain. Leave the skin on for a nutty flavor and even more nutrients.
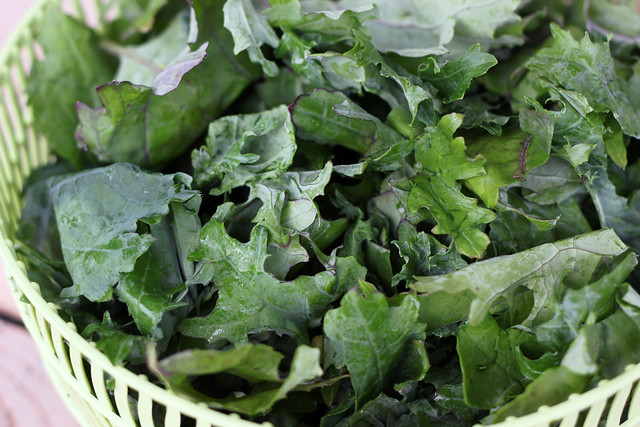
And then there is the kale. Talk about a nutritional powerhouse. One cup of kale contains 36 calories, 5 grams of fiber, and 15% of the daily requirement of calcium and vitamin B6 (pyridoxine), 40% of magnesium, 180% of vitamin A, 200% of vitamin C, and 1,020% of vitamin K. It is also a good source of minerals copper, potassium, iron, manganese, and phosphorus. Kale, as with broccoli and other brassicas, contains sulforaphane (particularly when chopped or minced), a chemical with potent anti-cancer properties. Honestly, I could probably create an entire post for just the health benefits and nutritional values of kale. So instead, I will just say “EAT KALE”. Eat it often and enjoy it. It is so tasty! I still have another bunch of it from the farmers market and as much as I want to make this salad again, I think I need to try something new!
What is your favorite way to enjoy kale?
What are some of your favorite things to grill?
[print_this]Grilled Sweet Potato and Wilted Kale Salad – Gluten-free + Vegan
serves 2-4- 2-3 organic sweet potatoes, cut into 1-inch cubes – I leave the skin on since I really like it, if you do, just be sure to scrub them extra good and remove any bruises and marks
- 2 cloves garlic, minced
- 3 tablespoons olive oil
- Salt and pepper, to taste
- 1 large bunch kale, 4 or 5 cups, washed, stems removed and roughly torn or chopped (I used some a bunch of beautiful red Russian kale that I grabbed at the farmers market)
- 1 -2 tablespoons champagne vinegar (or rice wine vinegar)
- Red pepper flakes
- 1 tablespoon fresh chives, minced
- Salt and pepper, to taste
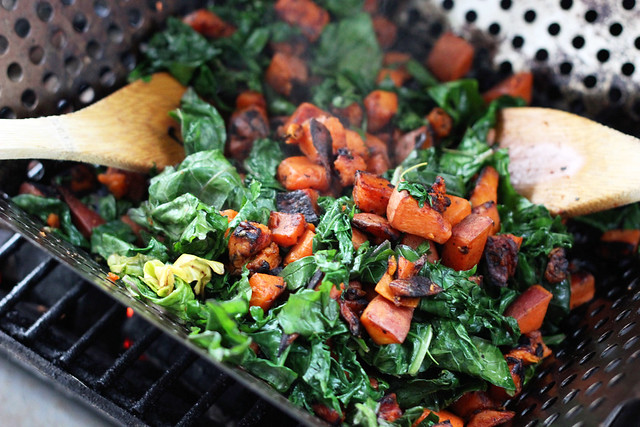
Preheat your grill. We have a charcoal grill, so we allow it to heat up for approximately 15 minutes. Place your grill basket or grill bowl onto the grill, and add the sweet potatoes. Tossing every 3-5 minutes allow the sweet potatoes to get tender and browned. But don’t toss them around too much, you don’t want to mash them up as they get more tender. Depending on the heat of your grill, it will take approximately 15-20 minutes. Be careful not to burn the potatoes, move the grill basket off of any large flames, if need be.
After the potatoes are tender and nicely browned, add the kale to the basket and continuously toss around to keep it from sticking. Cook for approximately 3-5 minutes until the kale is wilted. Remove the sweet potatoes and kale to a large serving bowl and toss with the vinegar, red pepper flakes and fresh chives. Salt and pepper, to taste. You can add more olive oil if you ‘d like, as well as some more minced garlic. Serve immediately while warm (which is my favorite way), or it would also be good room temperature or chilled. [/print_this]
-
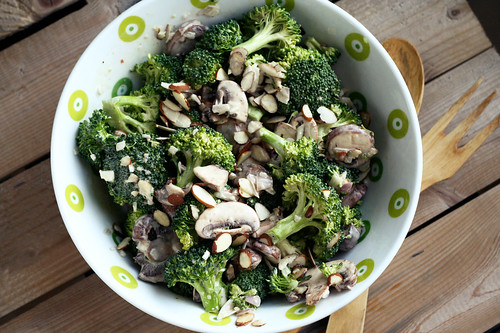
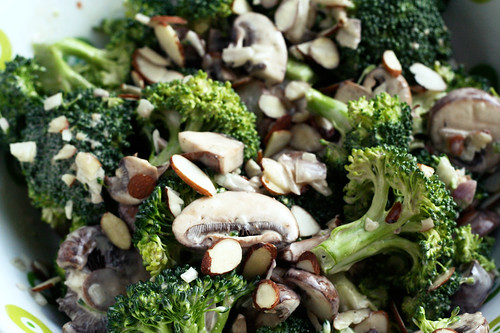
Creamy Vegan Broccoli Salad with Mushrooms and Almonds
Hey guys – I apologize for the lack of recipes right now, but I have had my head buried in work while we get ready for SXSW and the Flatstock Rock Poster Convention in Austin, Texas. We leave next Saturday for the long and fun road trip down there and we will be on the road for a total of 11 days. Many of you probably recall me talking about it last year at this time, it is such an enjoyable excursion that comes at the perfect time of year for us. We get to see so many of our wonderful and talented friends from all over the world, we eat lots of delicious Mexican food, plus some of the best BBQ food you will ever have, oh and we get to sell all of our handmade goods and wares to music fans from all over the world for 4 days! Plus, did I meantion it is usually somewhere in the 80s, with the sun shining every day. Ahhh, see it couldn’t come at a better time, it is the perfect break at the end of a dreary, grey and cold Buffalo winter. The only thing I dislike about this trip is how much time I am away from my own kitchen, the comforts of my own homemade foods and my daily yoga practice. In an effort to circumvent the lack of these daily comforts, I plan to pack a cooler full of my homemade Kombucha and some tasty snacks for the road trip down and I will most definitely have my yoga mat rolled up in a corner of the car somewhere so I can squeeze in some practice and meditation each day of the trip.
I plan to get a couple more recipes up here before I leave and if I can pull it together, I plan to get some guest posts together from some of my favorite bloggers! It is funny, this is the first trip I have taken that I am actually feeling weird about the lack of posting on here while I am away. I think because I am finally getting a really decent amount of visits each day, I don’t want people to get bummed when they stop by and nothing new has been added. Yup, my blogging obsession is officially official, I don’t wanna leave Tasty Yummies the way I don’t wanna leave my pets! haha
Anyhow, this recipe is one that I have been sitting on for a few days and I finally made time tonight to get the photos edited and the recipe fully written up. This salad is my take on a salad I had recently at local food shop/deli/cafe, Globe Market. They are located on Elmwood, literally right at the front door of my yoga studio, East Meets West Yoga. Though I rarely grab food after yoga, since I just head home and eat something light, I stopped in there one day after yoga, about two weeks ago to grab a quick gluten-free hummus and veggie sandwich before heading to a meeting. When he found out I was stopping there, Mark asked me to grab a serving or two of one of their delicious-looking side salads, for him to eat alongside sandwiches at lunch at home during the week. I opted for a creamy raw broccoli salad with red onions, bacon and almonds. That sounded just up his alley, healthy enough with some naughty stuff, too. Mark loved it, but truthfully I ate most of it. I couldn’t help it, it was so tasty, it was perfectly simple. It wasn’t even the bacon that got me, it was the delicious dressing and the combination of all of the ingredients.
So, I decided that it was a simple enough salad that I could make my own version at home, but with a Tasty Yummies twist. I wanted to make it vegan. I was determined to make it just as delicious without the bacon and with a delicious egg-free and dairy-free creamy dresssing. So I bought some Grapeseed Veganaise from Follow Your Heart, to make the dressing creamy and I went from there. I was honestly surprised that I pulled it off and was even happier with my own version that the bacon containing version from Globe. I decided to use shallots instead of red onions for a bit milder of a flavor and I added in some mushroom slices that I had on hand. This salad has been the perfect side dish with so many different lunches and dinner. I made sure to make a large enough batch that we could eat it throughout the week.
If you aren’t crazy about totally raw broccoli, feel free to blanch or steam yours for about 3-5 minutes. I love raw broccoli, myself, though I should probably consider steaming it to take down on the :ahem: gassy after-effects (sorry TMI, but it’s the truth)!
If you aren’t vegan, you can use your favorite mayonnaise and you could even consider adding in some crispy bacon crumbles. It really is quite complimentary.
[print_this]Creamy Vegan Broccoli Salad with Mushrooms and Almonds
Serves 6-8Dressing
1/2 cup grapeseed oil veganaise (or other vegan mayo)
2 tablespoons apple cider vinegar
1 tablespoon coconut sugar (you could also use brown sugar, maple syrup, honey or any other sweetener of your choice)
1 tbsp gluten-free unsalted whole grain mustard
kosher salt and freshly ground black pepper, to taste
1 clove garlic, mincedSalad
Approximately 8 cups of broccoli florets (about 2 pounds of florets)
2 shallots, chopped
9 ounces mushrooms, sliced
1/2 cup sliced toasted almondsIn a small bowl, whisk together all of the dressing ingredients, until well combined and smooth. Set aside.
Place the broccoli in a large serving bowl, toss with the shallots, mushrooms and almonds. Pour the dressing over the salad and toss well to combine. Serve.
This salad can be stored covered in the fridge for up to 3 days. Toss well before serving. You can serve this room temperature or cooled.
[/print_this]

-
Smashed Potato Puffs

I didn’t get a chance to get on here Thanksgiving Day to wish you all a Happy Day, like I had planned but I was cooking away in the kitchen and watching the parade, the dog show and football! I hope all of my American readers had an incredible day surrounded by people they love most and filled with delicious and tasty fresh foods made with so much love and care. If you aren’t in the US – I hope you have a beautiful Thursday, still!
Our day was perfect, I spent the day cooking in my kitchen and relaxing with hubby, we really needed a day like that, then we headed to my parents to see a ton of family for dessert. It is going to be an insane few weeks coming up so I was very happy to have the perfect balance of a quiet and calm day, with a bit of the usual holiday fare with the extended family.
Of course the best part of making a big feast for 2, is that we have a ton of leftovers. This is so perfect since we are leaving on Friday of this coming week to head to Chicago – so finding time to cook is probably going to be tough. Besides just reheating things, I plan to come up with all kinds of fun and creative ways to eat up the leftovers. This morning I saw a post on the Kitchn with this very topic – lots of great and delicious ways to eat up those leftovers! One of the hardest things to just simply reheat are the mashed potatoes, they are never as creamy and delicious as they are that night! You could certainly make a shepherd’s pie with them or potato pancakes of some sort, which I had planned on doing until I saw this post. The Kitchn had this delicious recipe for Mashed Potato Puffs that caught my eye instantly. Their puffs included ham and cheese, though this was a bit too rich for me after the two days of eating that I just had, so I skipped the cheese and ham and just added a small amount of turkey and some fresh chives from my garden. If you had a vegetarian Thanksgiving, these would still be equally as delicious without any meat at all. These adorable little puffs were super simple to put together and ready in 20 minutes. We had ours for breakfast and we put the leftovers in the fridge for either a side dish or another breakfast. They were puffy, had a slight crisp on the outside and were perfectly soft and creamy inside. I almost always make my mashed potatoes as garlic smashed potatoes, which I add a smidge of Nancy’s Organic Cultured Cream Cheese to for a little bit of creamy and tart flavor. I make my smashed potatoes with red potatoes, leaving the skins on – so my puffs were a bit more rustic and chunky than the original recipe, which I really liked. They can stick a bit when coming out of the muffin tin, at least they did for me, so make sure you grease your tin, even if it is non-stick. I personally didn’t care about that little bit of sticking – they were delicious regardless.
Well we’re off to the country to cut down our Christmas tree today and then to walk around beautiful Elicottville to really get even more into the Christmas mood! I cannot wait!
Tomorrow I plan to make a gluten-free turkey pot pie with some of the leftovers and I am going to cook down the bones to make a turkey stock for soup. What are you making with your leftovers?

Smashed Potato Puffs
makes between 12 and 24 puffs, depending the size of the pan used
Adapted from The Kitchn2 cups leftover smashed (or mashed) potatoes
3 large farm fresh brown eggs, beaten
1/4 cup minced fresh chives
1/4 cup shredded leftover turkey (optional)
Salt and freshly ground pepper, to tasteHeat the oven to 400°F and lightly grease the cups of a regular muffin tin or a mini-muffin tin.
Whisk together the smashed potatoes, eggs, chives, and turkey. Taste and season, if necessary, with salt and pepper.
Put a spoonful of the mixture in each muffin cup. Bake for 20-25 minutes, or until the potato cups are set, browned on top, and hot through and through. Serve immediately. -
Gluten-Free Mushroom Stuffing (Vegetarian)
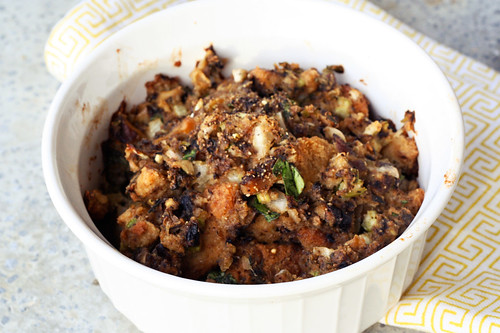

When I found out I was going to be a part of Book of Yum’s Gluten-free Vegetarian Thanksgiving Event – I was so excited. This is the first time I have had the pleasure of participating in something like this, but I have wanted to ever since I started my blog a year and a half ago. This one felt like the perfect place for me. Although I am not exactly a traditional vegetarian, I consider myself to be a “conscientious omnivore”, meaning I only eat meat that I feel good about eating that comes from a local farmer where it is raised humanely, free to roam, eat pasture and not be filled with hormones or antibiotics. We get all of our meat from Sojourner Farms in Olean, NY. This is the ONLY meat we ever have in our home and I feel like it is the right choice for us. We probably only eat meat anywhere from once a week to once a month at home, depending on what we have on hand and what we feel like. The rest of the time we eat completely vegetarian. I really love cooking vegetarian and find that eating a mostly vegetarian diet plus eating a small amount of local pasture-raised meat to have really changed my health immensely. I also feel like for me, it is a wonderful way for me to take a stand against the factory farming industry.
Sea, from Book of Yum, really wanted this event to not only make the transition into the first holiday season for newly diagnosed gluten-free folks to not seem so daunting, but to also highlight all of the wonderful options for those who are, or are cooking for those who are gluten-free and/or vegetarian (or vegan). Many of us find ourselves bringing our own food since many times the hosts are so terrified and paralyzed by what to cook, plus it alleviates the stress we have on wondering what we are even going to eat when we show up at someone else’s house. I love all of the wonderful recipes that have been featured so far, it’s such a great collection of classic dishes and new unique Thanksgiving options.
This year, like last, hubby and I are making the healthy and gluten-free Thanksgiving meal that we want and eating early in the day. After I get up and go to an early morning yoga class, while hubby takes our dog, Seri, to the park, we’ll spend the day cooking together, watching the parade and football and a enjoying a relaxing day at together at home without any work. After we are done eating, we will head over to my parent’s where they are having nearly 30 people for dinner (!) and we’ll join them for dessert, a cocktail or two and it will be the perfect way to have it all.
We took a nice long drive out to the country yesterday to pick up our Thanksgiving turkey from our farmer, Pierre, at Sojourner Farm in Olean. Since we will be having a turkey for our Thanksgiving dinner, I wanted to plan the rest of the meal without any meat. I was really excited to take on the challenge of making a meat free stuffing this year. So making it ahead of time for Book of Yum’s event was even more exciting since it was a test run of this recipe, for me. In the past I have sought out some type of healthy sausage to make my mom’s famous stuffing recipe that I had to have, but it always feels so redundant and unnecessary to have a side dish with meat in it, alongside the turkey. I really don’t need or want that much meat in one meal.
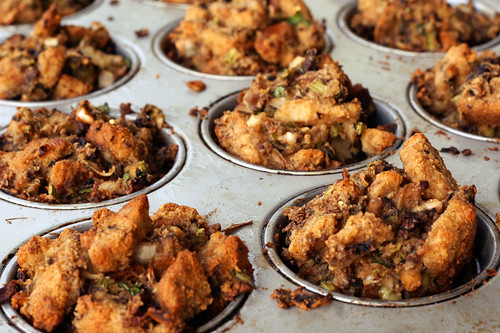
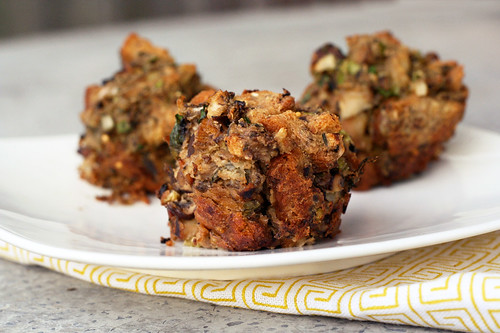
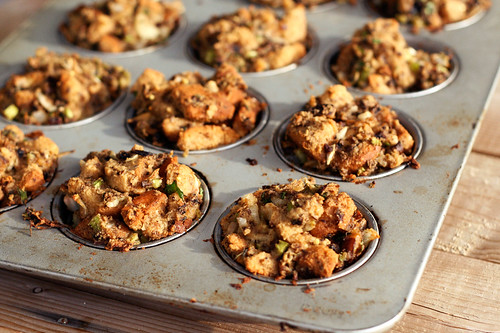
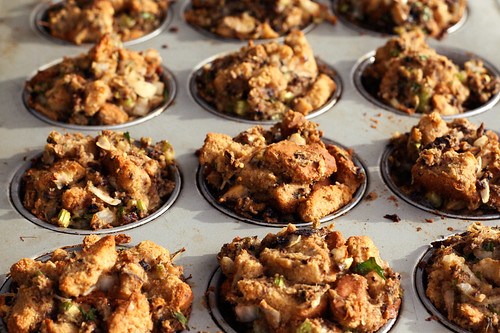
I decided on making mushrooms the stars of the stuffing this year. This delicious side dish is so full of rustic and earthy flavor, the mushrooms have a nice chewiness to them and the beautiful fresh thyme pulled it all together so nicely. Additionally, as you can see by the above photos, I also decided to experiment with making little individual stuffing “muffins”, if you will. I dreamt this up as a way to make sure that everyone gets lots of the crispy goodness that makes stuffing so darn delicious. Come on, admit it, you’ve gotten into with a family member on Thanksgiving over who get’s the edges. In our house, my hubby usually gets the crispy edges on anything that has them, by default. If you don’t care about the crispies (as my husband calls it) or don’t want to mess with a muffin tin, this will perfectly fit into a 9″ x 13″ baking pan. I ended up having a little bit leftover after filling the 12 muffin cups, that I put into a very small glass casserole dish. I didn’t want to call this recipe “Stuffing Muffins”, as I feared it would turn people off, since it does sound pretty disgusting, really. Even if you don’t try the stuffing “muffin” approach for this Thanksgiving, you have to try it soon, it is so worth it and I honestly cannot believe I didn’t think of it sooner.
This stuffing does have two eggs in it, so if you are vegan you could experiment with an egg replacer such as Ener-G or making your own flax-seed egg replacer (To replace one egg: 1 tablespoon ground flaxseeds plus 3 tablespoons hot water. Stir together until thick and gelatinous.) I have never made my stuffing vegan, but I am sure it would work perfectly. Please let me know if you try it out. Additionally, you will obviously have to make sure the bread you use is vegan.
Besides being very excited about how this recipe turned out, I am also very excited that I get to have stuffing twice in a week’s time, that isn’t a bad deal at all. Stuffing is one of my favorite things about Thanksgiving dinner, I don’t think I have it any other time during the year, so it always feels so special. Between that and the mashed potatoes, those are two things that will NEVER be missing from my Thanksgiving menu. For my husband, Mark, I always have to make him a single-serving of his Momo’s famous sweet potato casserole, complete with an ungodly amount of butter, brown sugar and yes, it is even topped with marshmallows. It’s not for me, but I can totally appreciate how it won’t be Thanksgiving for Mark without it, so I will always make it for him.
What dish will always be a part of your Thanksgiving dinner?
Gluten-Free Mushroom Stuffing (Vegetarian)
serves 6-81 loaf of gluten-free bread, dried and roughly torn into small pieces (I used a loaf of Rudi’s all natural gluten-free multigrain bread, you can use your favorite bread)
1 – 1 1/2 cups mushroom broth, vegetable broth or water
1 medium onion, finely chopped or grated
2 stalks celery, finely chopped
8 ounces fresh cremini mushrooms, roughly chopped
1 cup wild mushrooms, fresh or reconstituted from dried, roughly chopped
1 1/2 tablespoons fresh thyme, finely chopped
1 tablespoon fresh Italian parsley, roughly chopped
2 large farm fresh brown eggs
2 tablespoons olive oil
1/2 teaspoon kosher salt
1/4 – 1/2 teaspoon freshly ground black pepperPreheat oven to 350ºF. Crumble or tear the dried bread into small pieces and place into a 9″ x 13″ glass baking pan. Wet the bread with enough broth or water so it starts to get soft, but you don’t want it insanely soggy, either. If you add too much liquid, just pour it out. Mix with eggs, mushrooms, onions, celery, herbs, olive oil and salt and pepper. Don’t be afraid to get your hands dirty, roll your sleeves up and just get your hands in there to mix it all up, it’s the only way to do it. Once everything is evenly mixed in you can either leave it in the baking pan and bake it as is or start scooping with your hands, an ice cream scoop or a large spoon into a greased non-stick muffin pan. (I greased mine with a very small amount of vegetable shortening). If it doesn’t all fit into the muffin pan, scoop the remainder into a small glass casserole dish.
Place the glass pan or the muffin tin into the oven and bake for 45 minutes to an hour until the top(s) are browned and crispy. Let the stuffing “muffins” cool slightly before attempting to pop them out of the muffin tin and don’t worry if they don’t come out like a perfect muffin shape, most of mine didn’t, some even fell apart a little. Don’t worry, it’s stuffing, its rustic and it isn’t about the shape and look of them, it is all about the crispies!
Enjoy.
NOTE: since I didn’t want to dry my bread overnight or for a day or so, I placed the sliced loaf in a single layer on a baking pan in the oven at 200º for about an hour to dry it out.
-
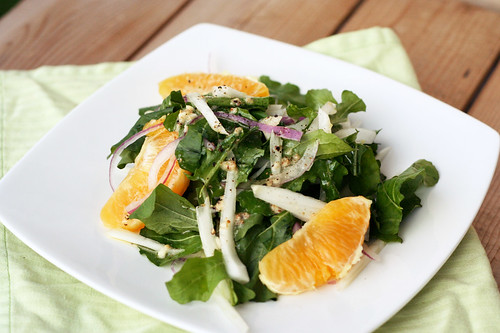
Arugula, Fennel and Orange Salad
Once the fall really sets in, I already start missing my green veggies. I know we are blessed with squash and root vegetables aplenty throughout the winter, but I really start missing all the beautiful local green stuff from the peak of the summertime. I love that at this point that we are still able to get our hands on arugula, kale, spinach and other leafy greens, but I know soon those will be hard to come by. So, I try to get in as much as possible. I grabbed the fennel, arugula and red onion at the farmers market this past weekend along with some potatoes, bok choy, peppers, beets, carrots and as many other vegetables as I could get my hands on. Gotta get it all in now.
I absolutely love salads, any type really. I rarely meet a salad I don’t love. This cool-weather winter salad has so much vibrant flavor. The peppery crisp from the arugula, the subtle hint of anise from fennel and the tangy sweetness of the oranges all come together perfectly. If I had some in the pantry, I would have topped this salad with some toasted walnut pieces.
What is your favorite fall/winter salad?
Arugula, Fennel and Orange Salad
serves 4Vinaigrette
1 small clove garlic, minced
1 teaspoon wholegrain or stoneground mustard, no salt added
1 1/2 tablespoons olive oil
juice from half an orange (or lemon) – approximately 1 1/2 tablespoons
1/2 teaspoon kosher salt
1/4 teaspoon freshly ground black pepperSalad
5 cups baby arugula, trimmed and roughly chopped
1 small fennel bulb, trimmed, cored and thinly sliced crosswise
1 1/2 oranges, peeled, white pith removed and cut into segments (use the remaining half for the vinaigrette)
1 small red onion, thinly slicedIn a small bowl combine all dressing ingredients and whisk to thoroughly combine, set aside.
Place the arugula in the bottom of a large serving bowl, scatter the orange segments, fennel slices and onions over the arugula; drizzle the dressing over the salad to serve, toss gently. Serve.
-
Spicy Roasted Cauliflower and Chickpeas with Pine Nuts
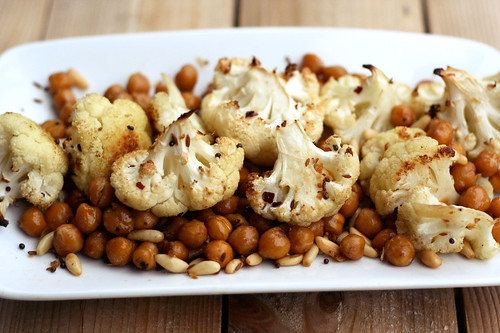
I know that I always carry on about my love of pasta on here, but you’d be surprised to know that for as much love as I have for those delicious carbs, I have an equal and unrelenting love for vegetables. I honestly cannot think of a vegetable that I don’t love. I love them raw, steamed, grilled, roasted, it doesn’t matter. After traveling and eating at restaurants, where many times the serving of vegetables on your plate, if they even give you one, is so tiny you can’t tell if it is an inedible garnish or a side dish, I come home with a craving for anything green, leafy or with a stem. One of my favorite things is to go to the farmers market and pick out new vegetables that I have never tried before and experiment with ways to cook them. This past Saturday we grabbed some of the usuals at the market, arugula, tomatoes, swiss chard, cauliflower plus this time I also bought a purple cauliflower, butter beets and a large bunch of perpetual spinach. The perpetual spinach and butter beets were both brought home for juicing and I haven’t yet decided what to do with the purple cauliflower, I will probably just make this dish again. After looking at all of those delicious veggies at the market, I wanted to come home and make a delicious vegetable feast for lunch, so I decided on this.
I love roasted cauliflower, even on its own with just olive oil, salt and pepper, it is so delicious. Add in one of my other favorites, chickpeas and you have a winner. Together with the spices, the high heat and a little olive oil, it gets beautifully browned, caramelized and it has a wonderful nutty and sweet flavor. This dish was inspired by all of the delicious spices I have been cooking with on this cleanse and I added in chickpeas for protein and fiber and the pine nuts for a nutty crunch, which I am a big fan of. We served this as a main dish, with nothing else so we ended up with 2 big servings, with a small amount leftover. This would be good just as side dish or for a real hearty meal, you could serve it over some brown rice, quinoa or even with some pasta.
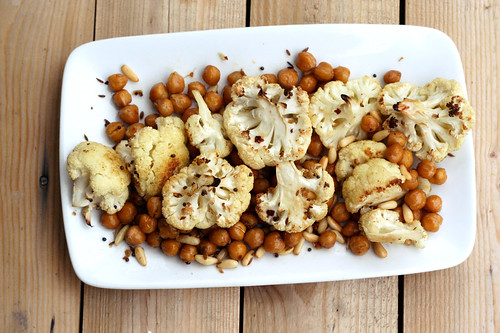
Spicy Roasted Cauliflower and Chickpeas with Pine Nuts
Serves 2 to 41 medium head organic cauliflower (about 2 pounds), cut into large florets
1/4 cup pine nuts
2 cups cooked organic chickpeas, drained and rinsed if canned
2 tablespoons olive oil
1 teaspoon whole cumin seeds
1 teaspoon whole mustard seeds
1 teaspoon finely minced, peeled fresh ginger
2 cloves garlic, finely minced
1/2 teaspoon sea salt
1-2 small red chiles, finely chopped, seeds removed for less heat (I used some dried korean heirloom red chiles from my garden)Preheat the oven to 450º.
Place the cauliflower, chickpeas and pine nuts on a large rimmed baking sheet. Add the spices, fresh ginger and garlic, salt and red chiles. Drizzle olive oil evenly over everything and toss gently to combine. Bake for 20 to 25 minutes tossing occasionally to ensure even cooking, bake until edges are golden brown, and the cauliflower is slightly tender,
Serve on its own, as a side dish or over rice for an entrée.
-
Vegan, Gluten-Free Fettucine Alfredo
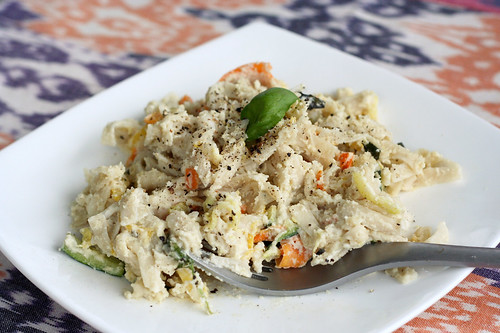
I have fully admitted to my love-affair with pasta on this blog, many times. It is something I cannot live without and is almost always included in my weekly menu planning. Not only are pasta dishes simple and fun to create but they can easily be made with ingredients you have in the pantry and your refrigerator and many times can easily be made healthy. Even with the healthiest of pasta recipes, to me it is a major comfort food, it always will be. Probably the number 1 comfort food on my list.
Although I am on a cleanse, I wanted to make sure to experiment with at least one cleanse-friendly pasta dish. Of course, as I mentioned in my post about my cleanse, there are many different types of cleanses out there and many different items you can remove from your diet when cleansing. Obviously this recipe may not work on every cleanse. For me already being on a totally gluten-free diet, removing gluten when cleansing is never a major hassle or issue, but it is very important to a cleanse and to detoxify your body. For me one of the biggest things I like to remove from my diet while cleansing is dairy. I am not a milk drinker and I rarely cook with it, but cheese is what gets me. I love cheese. So with that in mind, I wanted to come up with a cleanse-friendly pasta dish that would bring the comfort of any other gluten-free pasta dish I would make, but with cleanse friendly ingredients.
I love gluten-free pastas and find them to be much lighter compared to traditional wheat-based pastas. I personally prefer brown rice pastas and I love Tinkyada brand organic pastas. They have three or less ingredients, organic brown rice, rice bran and water. That’s it. When I cleanse the majority of what I eat is fresh vegetables, legumes and whole grains – I certainly cannot go without pasta. Brown rice pasta falls within the constraints of my cleanse and though I don’t eat a ton of it, a dish like this is a perfect way to forget you are even cleansing at all. If you don’t care much for brown rice pasta, there are also corn and quinoa based gluten-free pastas that are also quite delicious, as well.
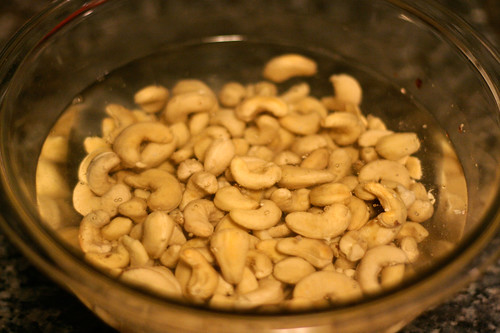
I decided when making this alfredo sauce rather than trying to experiment with different nut milks, which I knew wouldn’t give me the thick and creamy affect of an alfredo sauce, I would go the route of a raw nut based sauce. Cashews tend to be great for this. Even without excessive soaking, you can just add boiling hot water to cashews just before pureeing and get a delicious creamy sauce. I took the above photo the next day with the leftovers, since it was too dark to take photos the night we ate it. I honestly don’t think the image fully captures just how creamy the sauce really is, it is incredible. There isn’t an overwhelming nutty flavor to the sauce and by adding garlic, basil and some nutritional yeast, it’s very hard to tell that it is even dairy free. Beyond nutritional yeast’s nutty and cheesy flavor, is a great source of protein and fiber, it is rich in B-complex vitamins including B12 and it contains the glucose tolerance factor that helps in the regulation of blood sugar. If you are a vegetarian or vegan, it is definitely worth exploring adding it into your diet.
The beauty of this sauce is that it doesn’t actually need to be heated up, so if you like to eat raw, you could skip heating it up, use your favorite alternative raw noodle, like thinly sliced raw zucchini (or other raw vegetables), kelp noodles, etc and just pour the raw cashew cream sauce right over for a delicious and healthy raw meal.
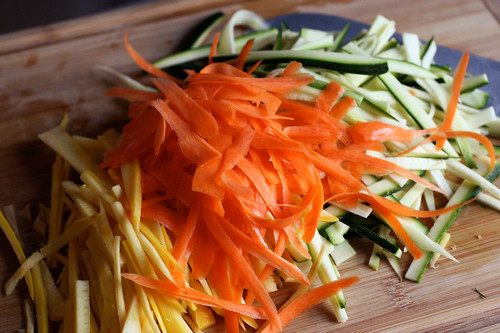
I had some beautiful zucchini and yellow squash that we picked up at a farmers stand on our drive home from NYC so I added that and a carrot to the dish for some additional health-benefits as well as the very lovely colors. You could play around with many different vegetables here including fresh spinach, peas, etc.
I had a small amount of sauce leftover that I put in the fridge, I figured it would be delicious on some steamed broccoli or over a baked potato, etc. I have a feeling you will fall in love with this healthy alfredo sauce.
Vegan, Gluten-Free Fettucine Alfredo
serves 61 1/2 cups raw, unsalted organic cashews
3 cloves garlic
1 cup warm water (you may need more)
3 teaspoons nutritional yeast
1/2 teaspoon kosher salt
1 teaspoon freshly ground black pepper
14 ounces of your favorite gluten-free fettucine or linguini, I use Tinkyada’s organic brown rice pasta
handful of fresh basil, roughly chopped
1 tablespoon olive oil
1 zucchini, julienned
1 yellow squash, julienned
1 carrot, peeled, julienned (or you can wash and peel the outside, then peel the entire carrot instead of julienning it, which is what I did)
kosher salt and freshly ground black pepper to tastePlace the raw cashews in a glass bowl, cover in water. Let soak as little as a few hours or overnight.
In a large saucepan bring your water to a boil and cook your pasta according to package directions.
Drain the soaked cashews and rinse well, place into your food processor with garlic, salt, pepper and 1 cup of water. You may find you need to add more water if the sauce is too thick, but you can always add more. Process until smooth and creamy. Once it is at your desired consistency, add in the nutritional yeast, pulse a few times to combine. Set aside until you are ready to heat it up.
While your pasta is cooking, heat olive oil in a skillet over a medium-high heat, add your julienned vegetables and sauté a few minutes until tender. Remove from heat.
Once the pasta is cooked, reserve 1/2 cup of your cooking liquid, drain and place in a large serving dish. Pour the alfredo sauce into the saucepan you used to cook your pasta and heat over a medium heat, stirring often to keep from sticking. Once warm, pour over the pasta.
Add the vegetables and fresh basil to the pasta and sauce. Toss to combine, adding some of the pasta cooking liquid if the sauce is too thick. Salt and pepper to taste. Serve immediately, topped with freshly chopped basil and a sprinkle of nutritional yeast, if you wish.
-
Rosemary Roasted Butternut Squash
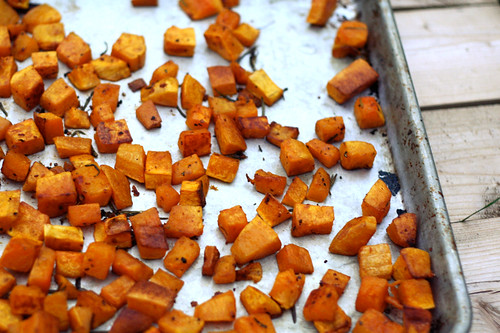
This is another cleanse-friendly recipe that I made as a side dish to my lentil soup. You could actually just toss the roasted squash cubes right into the soup just before serving if you wish, but Mark and I really wanted to savor the crispy brown little bites on their own.
Roasted butternut squash is super easy to throw together and it makes a delicious fall side-dish. You can also add it to soups, stews or even atop salads. Butternut squash is packed with nutrients and antioxidants, it is low in fat and it provides an ample dose of your daily fiber. You can read more about all the wonderful health benefits of butternut squash from Whole Living here.
Like most things that I tend to gravitate toward when cooking, what I love most about squashes are their versatility. You can roast butternut squash with a wide array of different spices and herbs, you can toss it with a bit of maple syrup or brown sugar and cinnamon, you can puree it for soup, the list goes on and on. Grab yourself some fall-harvest squashes this weekend at the market and get to playing, the possibilities are endless. We hit an adorable farmer’s stand on our way home from NYC and I nabbed two butternut squash, two acorn squash, a spaghetti squash and four pie pumpkins. I plan to grab even more this weekend at our farmers market.
I chose rosemary as the star of this show because my potted rosemary in the garden is looking wonderful and it pairs so wonderfully with fall and winter dishes like this. You can certainly play around with other herbs or spices, thyme and sage are both wonderful with squash, you can also try smoked paprika, cilantro, tarragon, the list goes on and on.
Rosemary Roasted Butternut Squash
serves 2-4 (depending on how large the squash is)1 medium butternut squash
1 clove garlic, finely minced
1 tablespoon fresh rosemary, chopped
Olive Oil (I probably used under a tablespoon, you can use more here if you wish, I was just trying to keep this very light)
Sea Salt and freshly ground black pepper, to tastePreheat the oven to 400ºF
Halve the squash lengthwise. Using a spoon, scoop out and discard seeds. Peel the squash with a vegetable peeler (if you can, this never works for me) or cut into big chunks and keep steady on the cutting board while cutting off the peel with a sharp knife.
Cut the squash into 1-inch cubes. Transfer to a large, rimmed baking sheet. Drizzle with oil, sprinkle with chopped rosemary, minced garlic, a small amount of sea salt and fresh ground pepper and toss to evenly combine. Spread out evenly in a single layer. Roast, tossing occasionally, until just tender and golden brown, about 30-40 minutes.
-
Gluten-Free Crispy Zucchini Rounds
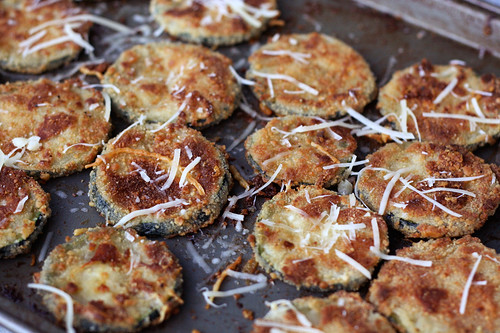
I have seen a number of crispy oven-baked zucchini recipes floating around online and in cookbooks, some as rounds, some as “fries”, but obviously all were made with regular wheat flour and breadcrumbs, so they weren’t gluten-free. However, with my insane love of zucchini, every single time I would see a photo of one of these recipes, I would instantly salivate, how couldn’t crispy oven-baked zucchini slices be delicious? I decided to experiment with making my own gluten-free version and I have to say for the first attempt, they turned out perfectly. I am so excited. I love when that happens.
The outside was so incredibly crispy, the inside was tender. Topped with a bit of freshly shredded parmigiano-reggiano and some fresh basil from the garden, each and every bite was full of flavor. I only sliced up one of the large zucchini we grabbed from the farmers market, but it was more than enough for the two of us as a side dish, with plenty leftover. It would be enough for 4 people, but if you like this as much as we did, it is actually a perfect sized side dish for two. We ended up eating seconds, since they were so delicious. I served this alongside some gluten-free penne with a delicious mint pesto .
These crispy zucchini rounds would also be wonderful as an appetizer. You could create a delicious creamy dipping sauce or even serve them with some hot marinara sauce. Though a dipping sauce would be delicious and fun, we went nude and enjoyed them as is. They were so full of flavor, they didn’t really need anything more.
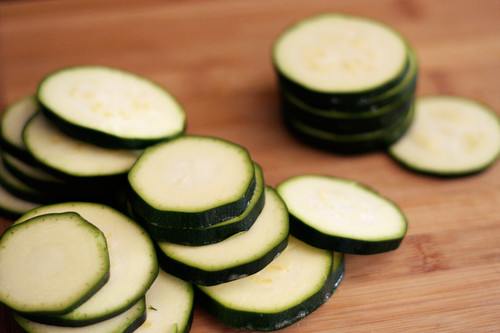
I ended up using my mandoline slicer to make sure each round was cut evenly, so they would cook evenly, but it isn’t necessary. You could simply cut by hand, doing the best to keep them generally at the same thickness.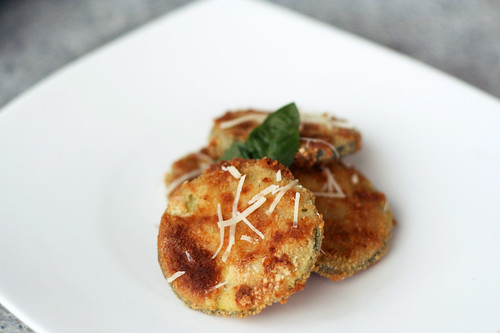
Gluten-Free Crispy Zucchini Rounds
serves 2-41 large zucchini, sliced into 1/4-inch to 3/8-inch thick rounds
2 large farm fresh brown eggs *see below note about making this vegan*
1/3 cup tapioca flour (sometimes called tapioca starch)
1 cup gluten-free bread crumbs, plus more if needed
1/4 cup shredded parmigiano-reggiano cheese
Olive oil for drizzling
sea salt and freshly ground black pepper, to taste
1/4 cup fresh basil, roughly choppedPreheat the oven to 450º and lightly grease a large baking sheet (or two smaller) with olive oil . On 2 separate plates, add tapioca flour and bread crumbs. Lightly beat 2 eggs in a medium bowl.
Dust both sides of zucchini rounds with the tapioca flour, dip in egg, and pat onto the plate of gluten-free bread crumbs. Place in a single layer on the baking sheet(s). Drizzle olive oil over the top, sprinkle with sea salt and a very small amount of the parmigiano-reggiano cheese. Bake in the oven for 15 minutes on the first side, using a spatula flip each zucchini round over (you can drizzle a bit more olive oil on this side, if you wish) and bake an additional 10 minutes until crispy and lightly browned on both sides.
Remove the baking sheets from the oven, sprinkle the remaining parmigiano-reggiano cheese and the fresh basil overtop of the rounds and serve immediately. Salt and pepper to taste.
*To Make This Vegan: After a request on Facebook, I decided to make these again, but this time I attempted to make them vegan. In place of the two eggs I used 3 teaspoons of Ener-G Egg Replacer with 1/4 cup of warm water. Stir together until fully mixed. You may find you need to make a bit more depending on how large your zucchini is, but that is a good starting point. Substitute the egg replacer for the eggs in the above recipe, do everything else the exact same and just skip the parmesan cheese. That’s it. They turned out just as delicious, with a perfectly wonderful crispy brown outside.
-
Chickpea, Tomato & Feta Salad
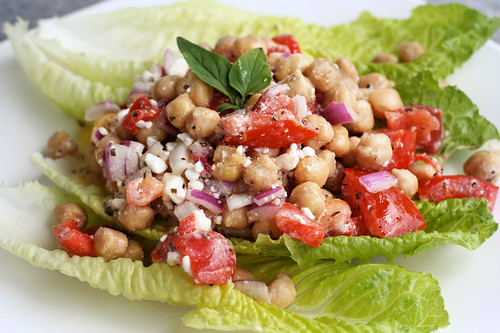
Now that we work from home, I love lunch time. My lunches at the store used to consist of leftovers or veggie burgers, even though I still eat and love both of those, a lot of days I can have more fun creating healthy lunches. Especially with my vegetable garden in full-force, I can just hop into the back yard, grab some lettuce and/or cucumbers, fresh herbs, etc and toss together a quick salad.
I saw a delicious recipe, a while back, for a Chickpea, Spinach & Feta Salad, on my friend Margaux’s blog that she keeps with her aunt, Sweet & Savory Kitchens. I couldn’t wait to play around with my own version. Such a simple, quick and healthy salad, why haven’t I been making this every single week?
I decided to use what I had on hand, so I cut up some red onion, a whole tomato, a roasted red pepper, some fresh oregano, etc and it was that easy. An incredible lunch salad in minutes. I served mine over some romaine lettuce, you could also add chopped up lettuce, spinach or other leafy vegetables like kale or arugula directly to the salad when mixing. Cucumbers would also be delicious. In Margaux and Aunt Suzy’s original recipe they included cooked broccoli which sounds like a tasty, crunchy addition. I think like most salads, the possibilities are endless with this one. This is definitely going to be a staple in my house at lunchtime and as a side at dinner. This would make a delicious dish to share at a picnic or party and with all of the beautiful colors, it’ll definitely impress everyone.
Chickpea, Tomato & Feta Salad
adapted from Sweet and Savory KitchensThe Dressing
1/4 cup extra virgin olive oil
2-3 tablespoons fresh lemon juice
1 tablespoon fresh oregano, roughly chopped
2-3 cloves garlic, pressed or minced
Salt and black pepper to tasteThe Salad
1 large or two small cans of chickpeas (about 3 cups cooked)
1 large tomato, diced
1 large roasted pepper, diced
1/2 large (or 1 small) red onion, diced
1/2 cup crumbled feta cheese, or more to tasteAdd all of the dressing ingredients to a small bowl, whisk thoroughly to combine. Set aside.
Drain and rinse the chickpeas if using canned. Combine all of the salad ingredients in a bowl, except the feta cheese. Add the dressing and gently stir to thoroughly blend. Add the cheese and stir again to blend.
-
Red Quinoa Salad with Currants, Dill, Zucchini and Sunflower Seeds
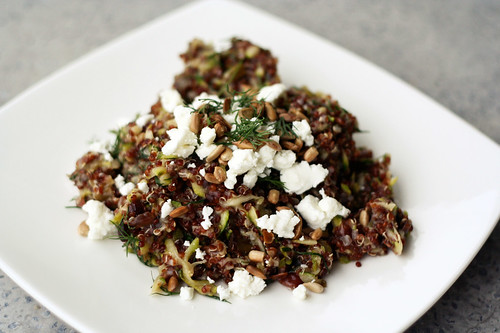
I am always on the lookout for a good grain-based salad, bonus points if the grain is my favorite superfood, quinoa. This salad is super simple, very versatile and loaded with flavors. It’s so nutritionally packed it would make a perfect entrée on its own, or it’s beautiful as a side-dish. I served it on the side of our lentil burgers and we were very pleasantly full afterwards.
To be honest, it has been a while since I made a good quinoa salad, I kinda forgot how amazing and simple they are. A recent post on my friend Margaux and her Aunt Suzy’s blog about quinoa salads, inspired me to make one. I need to try their recipe next!
You could use regular quinoa or red, I just happened to have red on hand and it felt like a good time to use it. The fresh herbs were so perfect and the subtle hint of sweet from the currants was very pleasant and the tart, saltiness from the crumbled feta finished it all nicely. The lemon juice and zest brings a brightness that pairs nicely with everything else. This can be made vegan by simply skipping the feta when serving. You can serve it warm, room temperature or even cold. I plan to take the suggestion of 101 Cookbooks and make patties with the leftovers, I absolutely love quinoa patties. According to the adapted recipe on 101 cookbooks, they simply added a few eggs and some breadcrumbs to the leftovers and voila – quinoa patties!
The original recipe called for toasted sesame seeds, but I wanted something with a bit more bite, so I went with sunflower seeds, you could play around with all different kinds of nuts or seeds. Same goes for the currants, you could also try cranberries or raisins and as usual you could play around with your favorite herbs. I love how some dishes are so adaptable it’s almost like playing dress-up with all the ingredients. You could make it over and over and it would never be the same salad twice. Have fun.
Red Quinoa Salad with Currants, Dill, Zucchini and Sunflower Seeds
Serves 6
Adapted from 101 Cookbooks, who adapted it from Maria Speck’s Ancient Grains for Modern Meals1 tablespoon extra-virgin olive oil
1 bunch green onions, chopped
3/4 teaspoons fine-grain sea salt
1 cup organic red quinoa, well rinsed and drained
2 cups water
1/4 cup dried currants
1 lemon
2 sm-med zucchini, grated on box grater
4 tablespoons toasted sunflower seeds
4 tablespoons chopped fresh dill
1 tablespoon chopped fresh mintoptional: feta cheese, crumbled – as much or as little as you like
Heat olive oil in a medium saucepan over medium heat. Add most of the green onions, a pinch of the salt, and cook until the onions soften, just a couple of minutes. Add the quinoa and cook, stirring occasionally, until the grains dry out and toast a bit, roughly another 3 minutes. Add the water, the currants, the remaining salt; bring to a boil. Turn the heat to a medium-low and simmer, covered, until the water is absorbed and the quinoa is just cooked through 15 minutes or so. Be mindful here, you don’t want to overcook the quinoa, and have it go to mush.
While the quinoa is cooking zest the lemon, and squeeze 2 tablespoons of lemon juice into a small bowl.
When the quinoa is cooked, remove the pan from the heat. Stir in the zucchini, lemon juice and zest, most of the sunflower seeds, the mint and most of the dill. Taste and adjust for salt.
Serve topped with crumbled feta, and the remaining green onions, sunflower seeds and dill.
-
Winter Squash Risotto with Radicchio
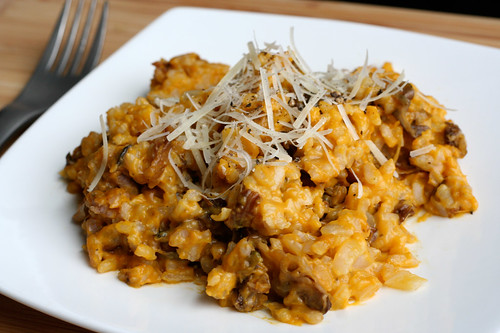
After a few months with our butts parked here in wintry Buffalo, it’s that time again, we are hitting the road. We leave Saturday morning for Austin, Texas for the South by Southwest Music Festival and Flatstock 29! I love this trip not only because we drive down, and I love a good road trip, but we also get a great dose of some much-needed sunshine and warmer weather plus great music, hang outs with our good friends, good food and so much more. As with all of our trips, though they are an escape from the every day and a bit of a vacation in that sense, they are very much about work and business, so the weeks leading up require a lot of long days and nights of prep. We have to wrap up any client projects we have on deck and we also have to pack and restock all of our handmade goodies, print stuff, sew stuff, etc. I have been trying in these two weeks before, to make meals that require one day of prep and cooking but gives us many meals. I have made pasta Bolognese, vegetarian shepherd’s pie, italian sausage, white bean and escarole soup, slow cooked black beans for tacos and this risotto. It’s been great because we have a ton of leftovers and we’ve been able to just focus on work and when need be, take breaks, heat up some dinner and then get back to work. I love it. Home cooked meals are most important to me when life gets busy and stressful.
This risotto is a nice, hearty winter dish that is comforting, while being light. I love all the different flavors, a good quality vegetable broth in itself has so many layers of flavors, the sweetness from the squash really compliments the sharp bitterness from the little bit of radicchio and the creaminess from the milk and the cheese finish it all off, perfectly. The rich, creaminess from the squash really makes this risotto feel sinful, but you can enjoy it, guilt-free. We served it as our main dish but it is light enough to be a side-dish. If you don’t care for radicchio you could add in baby spinach instead.
Winter Squash Risotto with Radicchio
serves 6
adapted from Cooking Light Magazine1 butternut squash (about 4 pounds)
6 cups organic low-sodium vegetable broth
1 tablespoon olive oil
2 1/2 cups sliced radicchio
1/4 teaspoon freshly ground black pepper, divided
1 1/2 teaspoons organic butter
1 small onion, finely diced
1 1/2 cups uncooked Arborio rice or other short-grain rice
1/4 cup dry white wine (I didn’t have any so I used dry vermouth)
3 tablespoons organic half-and-half or whole milk
fresh ground black pepper
kosher salt
3/4 cup (3 ounces) grated fresh Parmesan cheesePreheat oven to 375°F.
Cut squash in half lengthwise; discard the seeds and membrane. Place squash halves, cut sides down, on a baking sheet; bake at 375° for 50 minutes or until squash is tender. Cool. Peel squash; mash pulp. Set aside 1 1/2 cups pulp, reserving remaining pulp for another use.
Bring vegetable broth to a simmer in a large saucepan. Keep warm over low heat. Heat olive oil over medium-high heat until hot in a large pan or dutch oven. Add radicchio; sauté 2 minutes or until wilted. Place radicchio in a bowl. Sprinkle with 1/8 teaspoon each of pepper and salt, set aside. Melt butter in Dutch oven. Add onion; sauté 3 minutes or until lightly browned. Add rice; sauté 1 minute. Stir in wine and 1/2 cup broth mixture; cook 3 minutes or until the liquid is nearly absorbed, stirring constantly. Add 2 cups broth mixture, 1/2 cup at a time, stirring constantly until each portion of liquid is absorbed before adding the next (about 15 minutes total). Stir in squash pulp. Repeat procedure with remaining 1 1/4 cups broth mixture (about 9 minutes total). Stir in radicchio mixture and half-and-half. Season to taste with black pepper and kosher salt. Remove from heat; stir in cheese. Sprinkle with a bit more cheese and 1/8 teaspoon pepper.
-
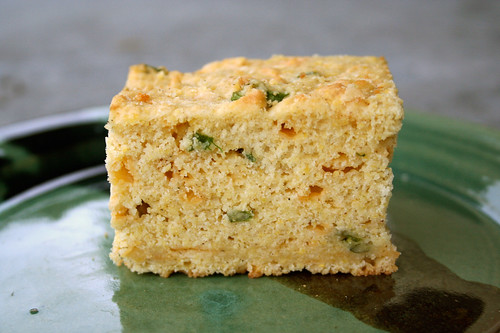
Gluten-Free Cheddar and Green Onion Cornbread
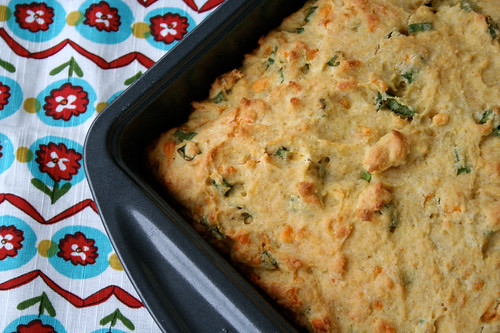
Here is another recipe from our Thanksgiving feast. This cornbread was great. It has been years since I have had cornbread. I wanted to have some fun with it, so I decided to go with a cheddar and green onion variation. It was so fantastic. Moist and fluffy, with the little bits of extra flavor from the cheese and green onions. As with most cornbread, it is best slightly warm with the smallest little pat of butter on top. I can’t wait to make this again. It was so easy and it made for great breakfasts the week following Thanksgiving.
I am remembering how amazing this cornbread was while writing this post and I think I am going to have to make it again this weekend. Hmm maybe this time with some jalapeños and cheddar. Yum. Enjoy.
Gluten-Free Cheddar and Green Onion Cornbread
serves 8
adapted from Gluten-Free Girl and the Chef1/4 cup sorghum flour
1/4 cup tapioca starch
1/4 cup potato starch
1/4 cup sweet rice flour
1 cup yellow cornmeal
2 tablespoons organic raw sugar
4 teaspoons baking powder
1 teaspoon salt
1 teaspoon xanthan gum
1/3 cup canola oil or melted butter
2 large farm fresh eggs, at room temperature
1 cup low-fat organic milk, at room temperature
1 cup thinly sliced green onions
1 cup shredded sharp cheddar cheesePlace rack in the middle of the oven and preheat oven to 400º. Generously grease a deep, 9-inch square baking dish with soft butter, oil or nonstick spray.
Sift the sorghum, tapioca, potato and sweet rice flours into a large bowl. Add the sugar, baking powder, salt and xanthan gum, mixing well. Add in corn meal, stir to combine.
Combine the eggs, milk and oil in a small bowl and beat with a fork. Pour the wet ingredients into the dry and mix on low-speed with your mixer until blended. Beat another 30 seconds with the mixer on high. Do not overmix. Add in the cheddar and green onions, stir gently to combine.
Pour the batter into the greased pan. Bake for 20 to 25 minutes, or until nicely browned and a toothpick stuck into the center comes out clean. Allow to cool for 5 minutes before cutting.
-
Cilantro Lime Sweet Potatoes with Honey
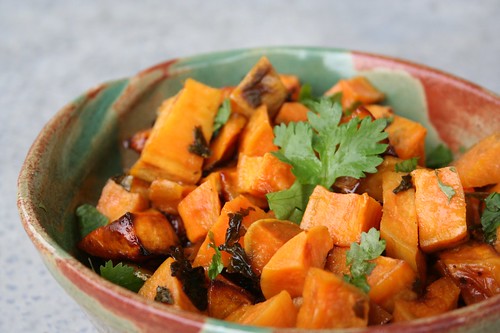
This is a lovely Autumn recipe that my good friend April shared with me years ago. It is a staple in our house once the cooler weather hits, perfect with so many meals. It is super easy to throw together and it’s very tasty. The sweetness from the honey, the salt and the tang from the lime all match-up so perfectly, then the distinct flavor from the cilantro finishes it off so nicely. If you are vegan and want to skip the honey, a nice organic brown sugar would be nice, too.
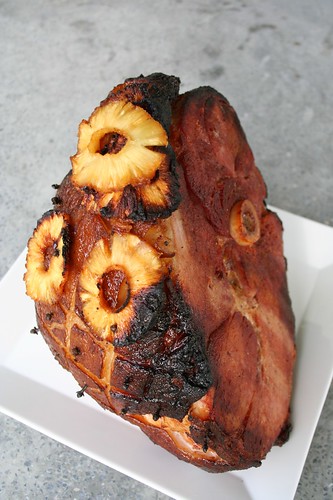
I had my parents over for a delicious Autumn dinner last night and this was the perfect side. Our entire meal was made from either our gardens, the farmers market or Sojourner Farms. We had a baked smoked ham from our pork share at Sojourner, these fantastic sweet potatoes, a green salad and southern-style green beans. My mom even made her delicious gluten-free apple crisp from the apples growing on the tree in their yard. (Recipe to follow).
Cilantro Lime Sweet Potatoes
serves 42 lb sweet potatoes, peeled and cut into 3/4-inch pieces (about 4-6 potatoes, depending on size)
3 tablespoons extra-virgin olive oil
3/4 teaspoon kosher salt
2 tablespoons honey (You can find great local honey from your farmers market)
1/2 teaspoon finely grated fresh lime zest
fresh lime juice from one lime
1/4 cup chopped fresh cilantroPut oven rack in lower third of oven and preheat oven to 425°F.
Toss sweet potatoes with oil, honey, lime juice and salt in a shallow baking pan. Top with lime zest. Arrange potatoes in 1 layer and roast, stirring halfway through roasting, until tender, about 30 minutes total. (You can taste halfway too to see if you need more of any of the ingredients – sometimes you may need a bit more of something) Remove potatoes from pan to a serving bowl, top with a bit more fresh cilantro, lime juice, lime zest and kosher salt to taste. Toss slightly and serve.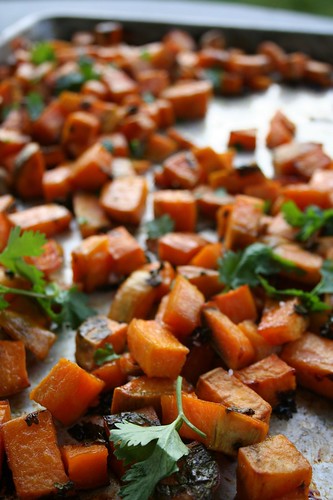
Here is a photo of the beautiful smoked ham that we baked from Sojourner Farms. Hands down, the tastiest ham I have ever had.
-
Thai Rice Noodle Salad
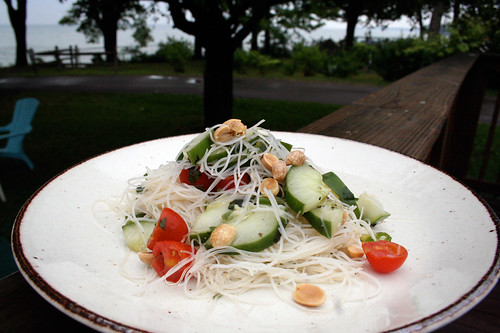
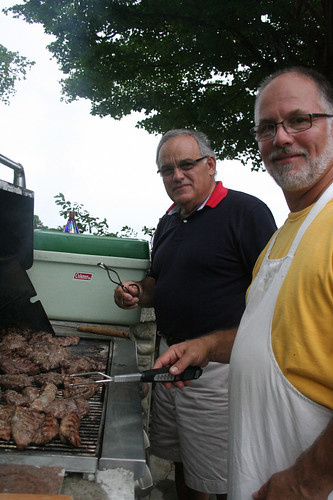
After all of our friends left the beach on Friday, Mark and I stayed and my parents came out to spend the weekend with us and for the big Greek Family reunion on Saturday. Though my Papou (My Grandfather) passed away 7 years ago and my Yia Yia (My Grandmother) 5 years ago, Papou’s remaining siblings, all the children, the grandchildren and the great-grandchildren all get together every summer at the beach. It is so amazing that we all still get together and are so close. We get tons of lamb, it marinates for days and then my Dad and his cousin Paul grill it up. Everyone brings a dish or a snack to share and everyone eats their faces off. So much delicious, authentic Greek food and other goodies.
I had all the ingredients on hand last week to make this salad for everyone at the beach house but never got around to it and although this dish has nothing to do with Greek food in the least, since I had everything with me and it was both vegan and gluten-free, I knew it was a good dish to share. If I had shredded carrots I would have added those, but it certainly didn’t need it. Additionally, I left out the fish sauce in the dressing, since I didn’t know if anyone was vegan, but normally I would have included it. Since there was so many people, I actually doubled this recipe and made huge serving of the salad, which was nice since I had leftovers.
*Also, I’ll be honest, the photo above makes this salad seem boring and blah, but it is anything but, the dressing has so much flavor and it’s damn delicious. I need to get better with the camera.
Paul and my Dad grilling the lamb
Cold Asian Rice Noodle Salad
Dressing:
1/4 cup rice wine vinegar
1 tablespoon sesame oil
1 tablespoon olive oil
3 tablespoons fish sauce (leave this out to keep it vegan)
2 cloves garlic, minced
1 teaspoon of ginger, finely minced
1 teaspoon crushed red pepper flakes
1 tablespoon organic raw sugar (or honey)
juice from 1/2 lime
1 teaspoon kosher saltWhisk it all together. Set aside.
Salad:
8 ounces thin rice noodles or rice stick noodles (the kind you just have to soak)
1/2 pint of cherry tomatoes, halved
1/2 cucumber, quartered lengthwise, and sliced 1/2-inch thick (I used a beautiful organic heirloom satsuki madori from my garden)
1 jalapeno pepper, chopped
1/2 cup of Thai basil, roughly torn or chopped up
1/2 cup of fresh mint, roughly torn or chopped up
*(you can also use fresh cilantro and/or regular basil)
3 or 4 scallions, thinly sliced
1/4 cup dry-roasted peanuts, chopped
1/2 lime
fresh ground black pepper, to taste
kosher salt, to tastePrepare the noodles according to package’s directions.
Drain and rinse with cold water. Drain well and pat dry. Add noodles, cucumbers, tomatoes, jalapeno, basil, mint, scallions, peanuts and whatever else, to a large bowl. Pour on the dressing, toss to combine. Squeeze the juice from the other half of a lime over the top. Garnish with a small handful more each of chopped peanuts and sliced scallions. Taste, add salt, pepper or more lime to taste. Serve room temperature or put in the refrigerator for an hour or two and serve cold. -
Beet, Orange and Walnut Salad
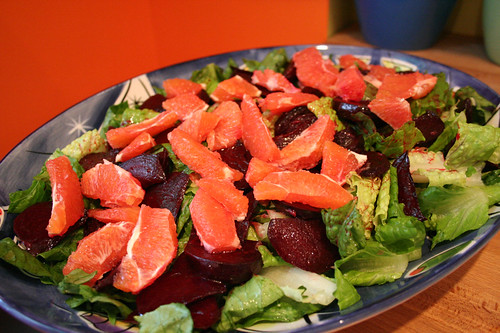
The finished salad without the preserved lemons since those made it on at the last-minute and the walnuts since we burnt them
Whenever we travel to Chicago for either Flatstock or the Renegade Craft Fairs, we are lucky enough to stay with our good friends Jason (of Delicious Design League), his lovely wife Margaux and their adorable 18-month old son, Desmond. They are always so incredibly gracious and welcoming to us and staying with them makes being on the road not so uncomfortable. Margaux always cooks or bakes for us, which is one of my favorite parts of our visit. I absolutely love traveling, but being away from my kitchen and home-cooked food is hard, especially since we spend so much time working when we travel, that we rarely get to go out and experience nice restaurants fit for a foodie, so it ends up being a lot of fast eating and festival food. That part of traveling exhausts me.
This trip, since Margaux and I both recently started our own cooking blogs, we decided to make something together, along with our good friend Anne, and post about it on our blogs. Check out Margaux’s blog, Sweet and Savory Kitchens, that she keeps with her Aunt Suzy. I love the way they post and comment on each other’s recipes or take inspiration from each other’s dishes and create their own.
Margaux had made some preserved lemons, when the Meyer lemons were in season this year and has been experimenting with a lot of different Moroccan dishes using them. She really wanted to make a Moroccan inspired dinner for us and I was all for it since I had never cooked Moroccan food. The dish we were both most excited about was this Beet, Orange and Walnut Salad which features the preserved lemons (which coincidentally, we almost forgot at the end). Since Meyer lemons are no longer in season, you could purchase premade preserved lemons from the store, make preserved lemons with regular lemons or you can skip them all together in this salad and it would still be great. Either way, you must try preserved lemons if you never have, they are incredible and bring a level of fresh and tangy flavor that I have never tasted before. I definitely plan on making some preserved lemons next year when they are in season. I can’t wait.
With this Beet, Orange and Walnut Salad, we also made a simple Oven Baked Chicken, which Margaux marinated beforehand with some delicious Moroccan inspired spices. As an additional side we made Margaux’s house staple, Green Rice, which I loved so much that I made it the first day we were home (look for a blog post about that soon).
Being with good friends and/or family, sharing food, cooking and spending time in the kitchen is most definitely one of my favorite things in the world and I cherish those memories and hold them close to my heart. I have memories from being a child and cooking with good friends of the family, with my Yia Yia, my Dad and so many other people whom I love. Those moments, whether you realize it at the time or not, have so much emotion attached to them that you can smell or taste something years later, that you cooked with someone you love and those memories just come flooding back. Preserved lemons will definitely do that for me and always remind me of Margaux and this dinner.
Check out Marguax’s post about this dinner here.Beet, Orange and Walnut Salad
The Beets

Me, cutting the beets, which by the way really leave your hands stained

1 lb. beets
olive oilWash beets, pat dry, peel and cut into wedges. Place in a baking dish and lightly coat with olive oil. Cover with foil and bake 45-60 minutes in a 375 degree oven until done. Cool and set aside. The original recipe called for baking the beets whole with the skin on, slipping it off after they come out and cutting them into wedges then. We decided it seemed easier to peel and cut them first.
The Walnuts

the walnuts, before they were burnt
1/2 cup walnut halves
pinch of sugar
1 tbsp walnut oil
salt and pepper to tasteToss all ingredients together and place on a baking sheet. Toast in the 375 degree oven for 5-7 minutes (keep a close eye on them after 5 minutes!!! (We had them on the bottom rack in with the beets and I was in charge of watching them. I definitely burnt them and we didn’t have extra, so had to go without in the salad). Cool. Chop coarsely and set aside.
The Dressing
5 tbsp fresh orange juice
1 tbsp walnut oil
2 tbsp olive oil
1 tbsp red wine vinegar
salt and pepperWhisk together.
Final Assembly
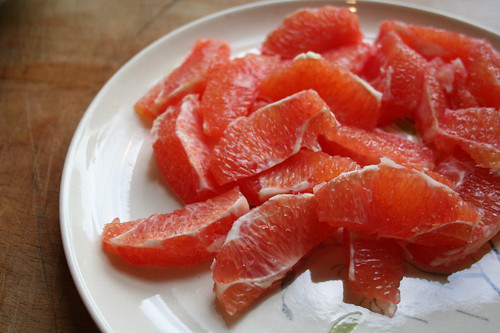
we ended up with blood oranges, which we didn’t know until we cut into them, but they were delicious and so beautiful
2 navel oranges
1/4 preserved lemon, diced (optional)
1 head romaine lettucePrepare the oranges by cutting off the top and bottom. Cut off the skins with a knife so that no white pith remains. Then cut into sections. Wash the lettuce and either tear or cut into pieces. Dry. Toss the lettuce with half the dressing and place on a platter. Toss the beets with the remainder of the dressing and place on top of the lettuce. Garnish with the orange sections, preserved lemon and walnuts.
Margaux and Anne in the kitchen

Desi being cute.
The spread
-
Goat Cheese Garlic Smashed Potatoes

I love mashed potatoes. My mom has always, hands down, made the best mashed potatoes in the world. One of her secrets? She always boils the whole garlic cloves with the potatoes and then leaves them in to get mashed up with the potatoes. And in our family, we don’t scrimp on the garlic, none of this one clove crap, you need at least two and they need to be huge.
I almost didn’t type this recipe up and include it, since to me, everyone knows how to make mashed potatoes and has a recipe. Then I got to thinking about all the mashed potatoes I have tried that weren’t very good. For such a simple dish, it requires a bit of a finesse, so as not to over mash, add too much milk, or undercook the potatoes, etc. I have definitely eaten mashed potatoes whose consistency mirrors that of joint compound that you use on dry wall. (I am not naming any names.)
The potatoes at the farmers market have been abundant, so I decided rather than another potato salad, mashed potatoes would be the perfect way to enjoy them. Since I had the goat cheese on hand, I decided to go with a twist on the classic. The goat cheese gives these chunky garlic smashed potatoes a delicious tangy flavor and the crisp, tasty chives on top is the perfect finish.
Goat Cheese Garlic Smashed Potatoes
serves 41 pound baby red potatoes, washed, skins left on
2 large cloves of garlic, whole, peeled
2 ounces goat cheese
1 cup organic milk (whole or skim, whichever you prefer)
1 tablespoon organic butter
kosher salt
freshly ground black pepper
small bunch of fresh chivesPlace potatoes and garlic in a large saucepan, cover with salted cold water by 1 inch. Simmer, covered, until tender – 15 to 20 minutes. Drain potatoes, return potatoes and garlic back to the saucepan.
Add the butter to the potatoes and garlic and slowly pour the milk in, a little bit at a time. Don’t add it all at once, in the event you don’t need it, otherwise you will have runny potatoes. As you add each bit of milk, mash the potatoes either with a fork, potato masher or electric hand-mixer. Continue adding milk as needed to get your desired consistency. I like my potatoes a bit on the chunky side, though there has to be the perfect balance of chunky and creamy. Crumble the goat cheese into the potatoes and add half of the chopped fresh chives; stir to combine. Season with salt and pepper and top with the remaining fresh chopped chives.
-
Green Bean and Tomato Salad
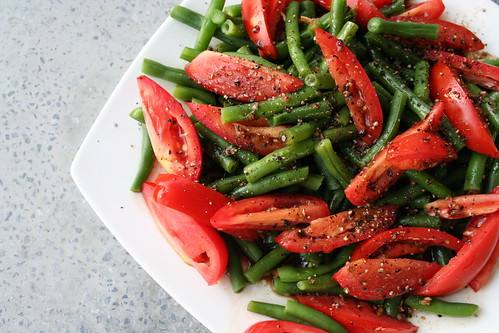
This is a very simple, fresh and quick summery salad, perfect side to so many summer dinners. You can serve it room temperature or make it ahead and serve it chilled. Had I had a red onion on hand, I probably would have thinly sliced a bit and included it, but it definitely didn’t need it.
Green Bean and Tomato Salad
serves 8 (approx 1 cup serving each)1 pound green beans, trimmed and cut into 2-inch pieces
3 plus tomatoes, cut into 1/2-inch thick wedges (or 1 pint of cherry or grape tomatoes, halved)
1/4 cup balsamic vinegar
1 large clove garlic, minced
1/2 teaspoon kosher salt
1/2 teaspoon freshly ground black pepper
3 tablespoons extra-virgin olive oilBring large pot of water to boil over high heat. Add green beans; cook 5 minutes or until crisp-tender. Drain and rinse well with cold water. Drain thoroughly and place in large bowl with tomatoes.
Combine vinegar, garlic, salt and pepper. Gradually add oil, stirring constantly with a whisk. Drizzle over bean mixture, toss gently to coat. Top with freshly ground black pepper.
-
Southwest Rice Salad
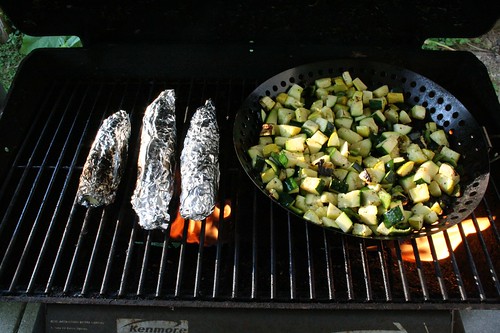
I came across this recipe a week or so ago while browsing on the Epicurious iPhone app (which I am obsessed with) and couldn’t wait to try out my version of it. I changed a few things around like using brown rice instead of white and I added some things that weren’t in the original recipe (the beans, banana pepper, green zucchini, etc). Also, considering the corn that we got at the farmers market this week was still very small and a bit early in the season, we didn’t have a lot of it in the dish. Later in the season, that part of the dish will be even better, so we will for sure have to make this again when the corn is tastier. I was very excited though, that we did get to include the first banana pepper of the season from our garden to add a little heat on top of the poblano that was already in there. I made a bit larger of a serving that what the recipe called for, so we could eat it for lunches throughout the week. For a side dish at one meal, you could probably get away with just making 1 cup of rice.
We decided to cook up the corn and other veggies on the grill, which we were already heating up, so we could get some of that lovely smokey grill taste in the dish. You could easily cook the veggies in a non-stick skillet over a medium heat on the stove top if that is easier. This dish was light and refreshing and was the perfect side to the pork steaks from Sojourner Farms that we were cooking up. It had a very subtle spicy kick from the peppers and a great bright flavor from the lime.
Southwest Rice Salad
serves at least 8 as a side dish, less if you are serving it as your main entree
adapted from Bon Appétit2 cups long-grain organic brown rice
1/3 cup fresh lime juice
4 tablespoons olive oil, divided
1 garlic clove, minced
1 1/2 cups fresh corn kernels (cut from 2 or ears) or frozen corn kernels, thawed
1 large fresh poblano pepper, diced
1 seeded spicy banana pepper, diced
1 medium zucchini, cubed
1 medium yellow squash, cubed
1 avocado, halved, peeled, diced
1 cup of canned organic black beans, drained and rinsed
3/4 cup thinly sliced green onions
3/4 cup chopped fresh cilantro
salt
freshly ground black pepperCook rice until just tender, follow directions on the package. Ours cooked for 50 minutes. Drain and rinse in cold water. Drain again. Meanwhile, whisk lime juice, garlic and 3 tablespoons of olive oil in small bowl. Season dressing to taste with salt and pepper.
Start your grill and get it to a medium-high temperature. Wrap the ears of corn in foil and place them on the grill. Toss the peppers, squash and zucchini with 1 tablespoon of olive oil and add to a grill pan. Sprinkle with salt and pepper. Place the grill pan on the medium-high grill. Cook the corn until it is done, approximately 10-15 minutes, cut off the cob once done and slightly cooled. Sauté the vegetables until they are just tender and starting to brown up a little, 15-20 minutes; scrape into a large serving bowl. Add rice, beans, green onions, cilantro, and dressing; toss to coat, top with avocado. Season with salt and pepper.


