-
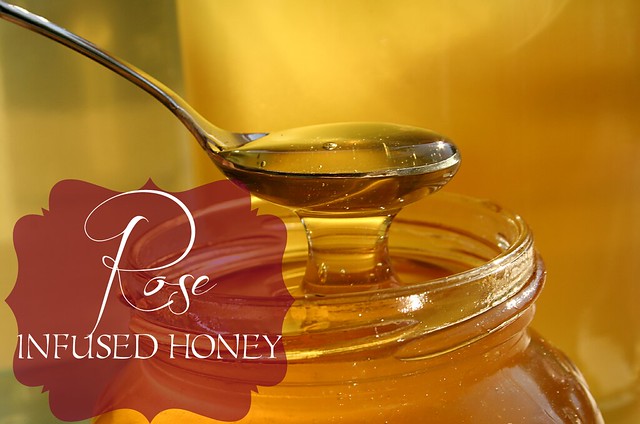
Rose Infused Honey {Guest Post by Homegrown & Healthy}
I am very excited to introduce you guys to Aubrey of Homegrown & Healthy today. Her site is an amazing curated collection of all that is healthy, homemade and fresh. Aubrey scours the internet to bring you healthy recipes and ideas, including her own recipes and crafts into the mix as well. If you want live healthier and be healthier without having to sacrificing your favorite foods or your budget, you have to check out her site. Today she is sharing a wonderful and simple recipe for Rose Infused Honey which couldn’t fit in more perfectly around here, since I only recently just share a recipe for homemade honey-sweetened ginger syrup. I have roses growing like crazy so I will be making this very soon, I love rose flavored soda water.
• • • • • • • • • • • • • • • • • • • • • • • • • • • • • • • • • • • • • • • • • • • • • • • •
“I’d rather have roses on my table than diamonds on my neck.” Emma Goldman
Roses: the iconic flower representing romance, love, beauty and appreciation. However, those beautiful, softly scented petals are for more than just show.
Did you know that roses are edible?
Not simply edible, but beneficial?
Roses having a soothing property and have long been regarded as a sedative, anti depressant, and all around stress reducer. From a nutritional standpoint it’s reassuring to know that roses are high in organic acids and nutrients, offering a ton of vitamin C.
(Of course, that doesn’t necessarily mean that you’ll want to eat every rose you come across. Especially avoid anything that comes from a florist–they cover those things in all kinds of chemicals–or eating flowers from a garden that utilizes pesticides or other chemicals. But you already know that, right?) Read the rest of this entry »
-
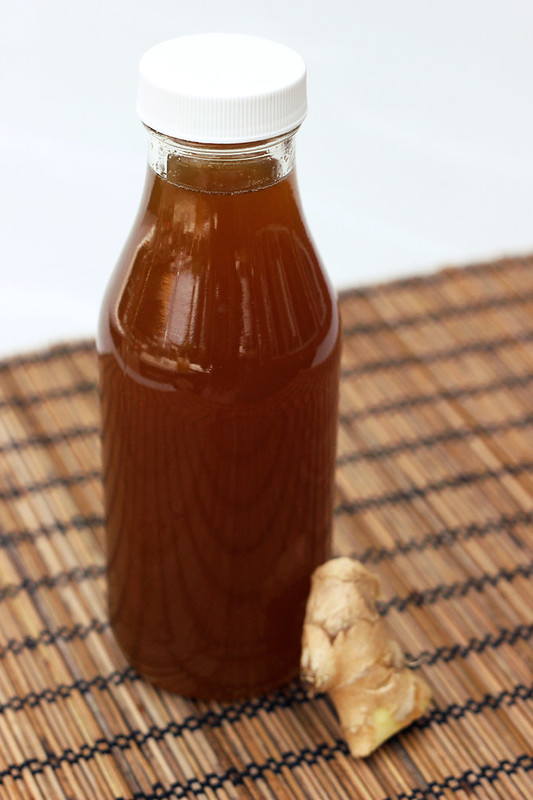
Homemade Ginger Ale – Honey Sweetened – Gluten-free with Vegan option

As part of our Six Month Mindful Living Challenge I am going to be sharing recipes that follow that compliment the theme of the month, when possible. This month, with our plastic consumption being the focus, I wanted to share a recipe that is simple to make at home that is not only delicious but can single handedly cut down on your plastic use.
This homemade ginger syrup has a great kick to it from the fresh ginger and it is full of beautiful, bright flavors. Not only is it great for this refreshing and delicious homemade ginger ale, but it would also be great drizzled over homemade ice cream and yogurt or even over your morning oatmeal or other cereal. I sweetened this with local raw honey, since honey provides a variety of amazing benefits, but I also just love the flavor. If you are vegan, play with your favorite sweetener, anything will work. Granulated sugars to liquid, they’ll all work just as easily. For some of the amazing benefits of raw honey, check out this post from Body Unburdened. See the notes at the end of the recipe if you wish to retain the full benefits of the raw honey in this recipe.
-
How-to Make Your Own Apple Cider Vinegar Facial Toner
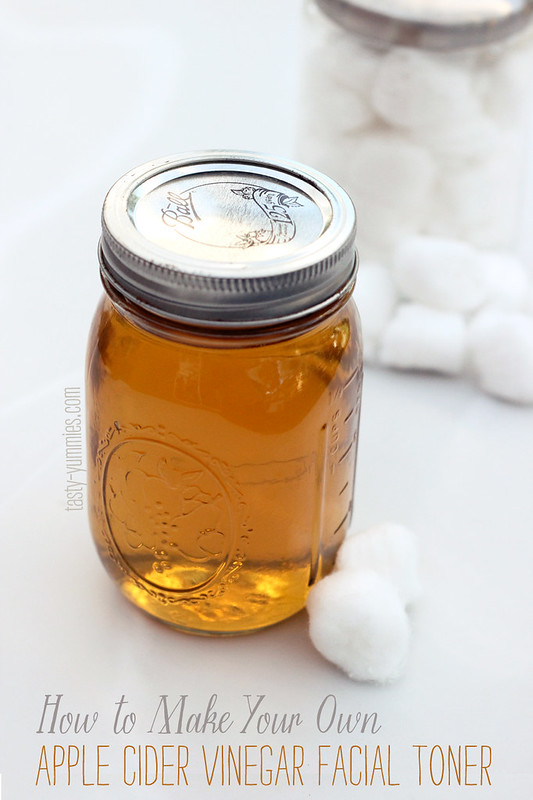
How to Make Your Own Apple Cider Vinegar Facial Toner:I am sure many of you keep apple cider vinegar in your kitchen pantry for a variety of different dishes, vinaigrettes, pickled whatevers and so on. But did you know it is also a great item for keeping in the bathroom medicine cabinet as an amazing all-natural beauty product, too?
For the past two months I have been using a mixture of apple cider vinegar and water as an all natural toner, every single morning and every single evening after I wash my face. I saw a noticeable change and improvement in my skin in just a weeks time. No joke.
This simple concoction can help improve your overall complexion by balancing and restoring your skin’s natural pH. Our skin is naturally acidic but when our levels are in balance our skin will live at the perfect level between oily and dry. When you pH levels are out of balance, that is when you break out, when your pores get clogged, you are too oily or too dry, your skin can be itchy or irritated, and the list goes on and on.
ACV has a pH of 3 and when diluted, the acidity from the toner helps bring your skin’s pH back to its normal levels. By restoring your skin’s balance, this apple cider vinegar toner helps your skin function optimally, warding off bacteria and shedding dead skin cells at the proper rate so your pores do not get clogged and your skin remains healthy.
I have noticed my skin tone has evened out significantly, my skin is softer and I have less dry and itchy red patches, plus less oiliness in my trouble spots. I no longer can see the tiny pores on my nose that seemed to always be there. I have also definitely noticed less everyday “regular” breakouts and a significant decrease in the amount and severity of my hormonal breakouts each month. I have observed that many of my previous breakouts were seemingly due to clogged pores and no matter how much I washed my face, I would still have that problem, this toner has seriously been the answer I was looking for.
-
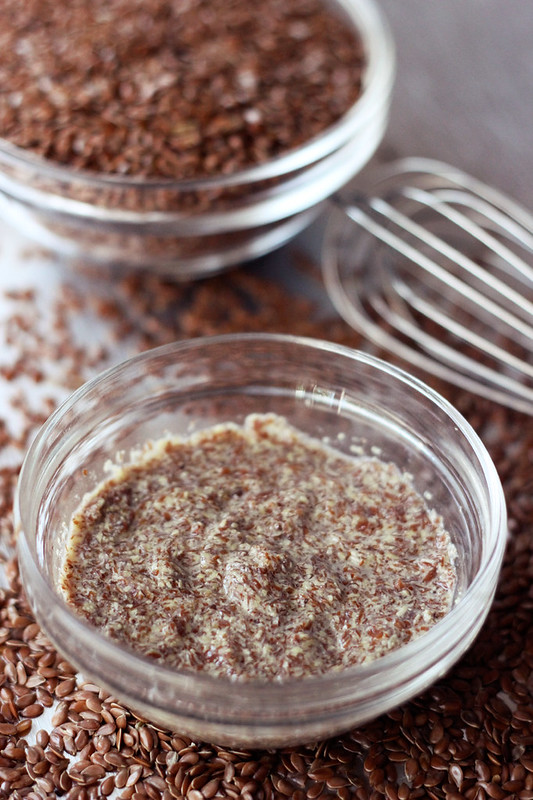
How to Make Flax Eggs
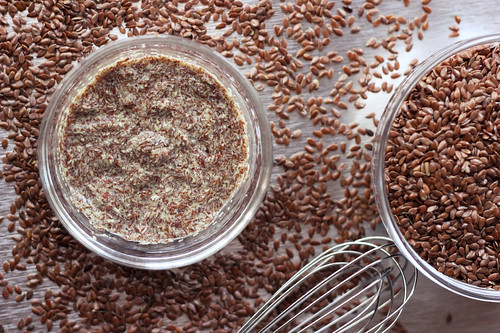
I myself am not allergic to eggs, but I don’t always have them on hand and I don’t necessarily always want to use them in a baking recipe. What I love about flax eggs, besides being a great replacement if you cannot eat eggs, is that they are full of wonderful nutritional benefits for anyone who chooses to add them into a recipe, no matter why.
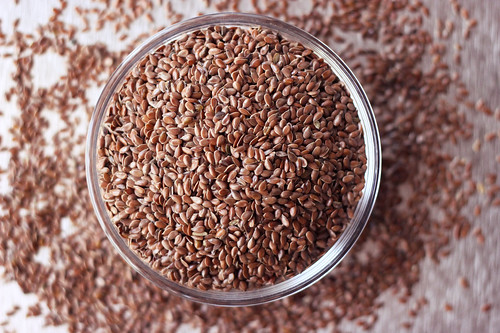
Flax “eggs” are an easy substitute in most recipes calling for just one or two eggs. They’re a great option for vegans and those allergic to eggs. However, you don’t have to be vegan or allergic to benefit from this great substitution! Flax seeds are a nutritional powerhouse and sneaking some into baked goods is an simple way to get some of their wonderful nutrients into your diet.
Flax seed eggs “bind.” They do not add lift or fluff as eggs would in some recipes, say for a sponge cake or a souffle. I have had pretty great luck using flax seed eggs in most baked goods that call for two eggs or less, like breads, muffins, oatmeal cookies or pancakes, plus they are great in homemade veggie burgers. To make flax seed eggs you you just need a grinder like a Magic Bullet or coffee/spice grinder for grinding the raw, whole flax seeds to a meal. You can buy already ground flax seed meal, but it is much more expensive than just doing it yourself and they are far more likely to go rancid, quickly (see notes below).
Flax seeds are rich sources of the essential fatty acid alpha-linolenic acid (ALA), a precursor to the omega-3 fatty acids. In comparison to regular eggs, flax eggs are packed with nutrition, including B vitamins, vitamin E, and important minerals such as manganese, potassium, calcium and iron. Each one even has two grams of fiber. They have no cholesterol and are very low in sodium. A flax seed egg has half the calories of a large chicken egg and much less fat — no saturated fat and half the total fat of an egg. Besides using flax seeds to make an egg replacement you can also enjoy the health benefits of flax seed by mixing it into your oatmeal or smoothies, it is great as a topping on yogurt or ice cream or added to baked goods like bread or muffins.
Store your flaxseeds in the refrigerator in a tightly sealed container to maximize their shelf life. Being a polyunsaturated fat, they can go rancid fairly quickly at room temperature.
How to Make Flax Eggs
Yields one “egg”
- 1 tablespoon flax seed meal
- 3 tablespoons lukewarm water
If you are starting with whole flax seed to prepare the flax seed meal, simply grind some flax seeds in a coffee grinder or magic bullet. Measure after grinding.
Place the flax seed meal in a bowl and add water, stirring/whisking as you go and place in the refrigerator for 10-15 minutes to allow the egg to set. Allow to stand until thick, gelatinous and egg-like. Use in baking as you would one egg. Make in larger batches and store in the refrigerator for up to one week.
NOTES:
– If you don’t want the dark color from the brown seeds, look for golden flax seeds.
– If you do buy pre-ground flax seeds, always store in the fridge or freezer. Flax seeds contain oils that are extremely perishable. When the flax seed is ground, the oil is exposed to oxygen and begins to oxidize almost immediately. This oxidization turns the oils rancid which makes them toxic and causes them to impart a linseed oil aroma and flavor to your food.
– Ground chia seeds also work in place of the flax seed meal.
-
Vegan Candy Cane Hot Cocoa Mix (Gluten-free)
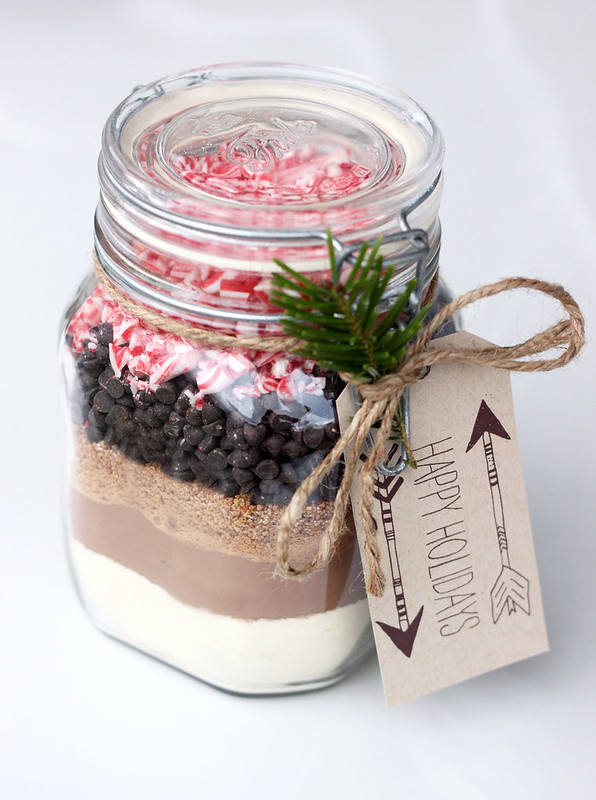
There a some flavor combinations that for me are the classic quintessential tastes of the holiday season. The combination of chocolate and peppermint this is definitely one of those. For my final giftable recipe this month in my series with Free People, I thought a handmade gift that was not only pretty, but tasted amazing would be the best way to end things. Hot cocoa is not just for kids, but also for the kids at heart.
Layer the delicious ingredients for this homemade candy cane hot chocolate in a jar and add some fun decorative touches like a fresh clipping of evergreen, wrap fabric over the lid, tie twine or ribbon and add a pretty tag. It not only looks beautiful, but it is so tasty, too! The bonus is this hot cocoa mix is vegan and gluten-free and depending on the ingredients you use, low in refined sugars, as well.
On it’s own or with a nice mug to compliment it, this simple DIY gift is sure to put a smile on anyone’s face! It’s a great hostess gift, it’d perfect for the secret santa giveaway, or just a thoughtful handmade gift for the chocolate loving vegan in your life. This simple ratio of ingredients can also be used to make a small batch for yourself, anytime you’d like!

[print_this]Vegan Candy Cane Hot Cocoa Mix
Fills a 1 quart jar, makes 12 servings- 1 cup powdered non-dairy milk, such as soy or rice (or powdered dairy milk, if you aren’t vegan)
- 1 cup unsweetened cocoa powder (be sure it is vegan)
- 3/4 cup coconut sugar (or raw cane sugar)*
- 1/2 teaspoon fine sea salt
- 1/2 cup miniature semi-sweet vegan chocolate chips
- 1/2 cup crushed vegan peppermint candy (these particular candy canes are great – no GMOs, no HFCS, no artificial dyes, etc )
Optional:
- 1/2 cup vegan mini marshmallows
- A few additional mini or full-sized candy canes
Layer the powdered non-dairy milk, cocoa powder, coconut sugar, salt, chocolate chips, and peppermint candy. If you’d like, you can add mini marshmallows to the top of the jar, if there is room or attach a plastic bag full to the jar. On the back of the gift tag, write:
“Mix all of the ingredients together in a large bowl. For each serving, place 1/4 to 1/3 cup cocoa mix in a mug and stir in 1 cup boiling water or non-dairy milk. Mix keeps in airtight container at room temperature for up to six months.”
OR
If you wish to leave the powdered milk out, shake all of the remaining ingredients together (you may want to increase the ingredients by 25-50% to fill up the jar without the powdered non-dairy milk). Once fully mixed, add it to the jar and layer marshmallows on top, if there is room. Change the directions on the gift tag to read:
“For each serving, heat 8 ounces of your favorite non-dairy milk in a small saucepan over medium heat until hot (alternatively, microwave 2-1/2 minutes at full power). Whisk in 1/4 to 1/3 cup hot chocolate mix. Mix keeps in airtight container at room temperature for up to six months.”
*Consider making a homemade vanilla sugar first, using my recipe for vanilla sea salt, replacing the salt with sugar. Use an equal amount of the vanilla sugar instead of plain sugar in in this recipe and it takes it to a whole new level!!
**Note: if your container is a different size, just keep the ratio of ingredients constant.**[/print_this]
This recipe originally appeared on the Free People blog BLDG 25.
-
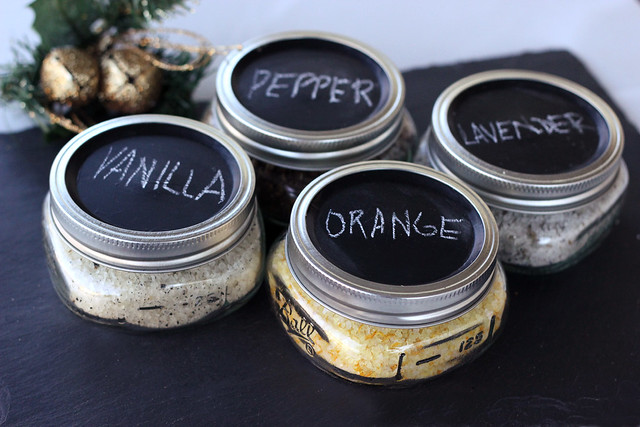
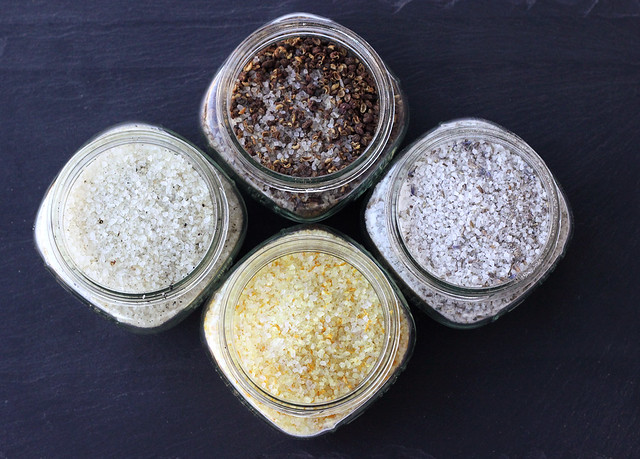
Flavored Finishing Sea Salts
Next in my ongoing series with for Free People of Giftable Recipes, is a simple adaptable recipe/DIY for homade finishing sea salts. These would make the perfect gift for any food-lover (dare I say, foodie, I kinda hate that word). You can really have fun with the flavoring on these, creating your own to suit the tastes of the recipient. Or change it up and make flavored sugars, too.
Plus, you can really have fun with the packaging on these. Package in cute jars, wrap paper or fabric around the lid, finish with ribbons or twine and make fun handmade tags or labels, to really personalize the gift. I kept it simple and just painted the lids with chalkboard paint so I could write what was inside. I plan to actually give these as gifts this year, so I will make some fun personalized gift labels for whoever these end up going to.
Flavored Finishing Sea Salts
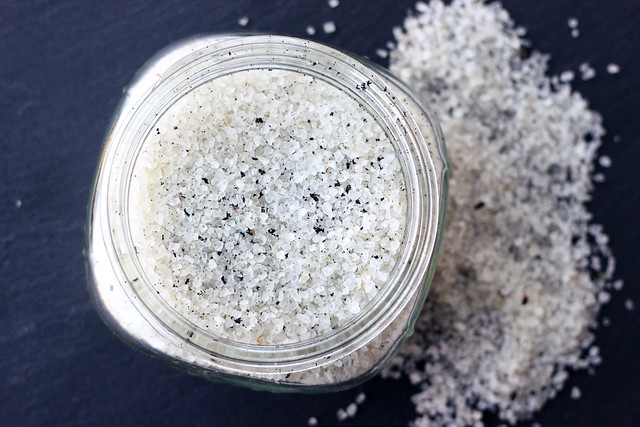
Vanilla Sea Salt
This smooth and aromatic salt would be great to rim drinks, for the top of truffles, caramels, cookies and other sweet treats, and don’t let it fool you, it would be great with savory items as well.
1/2 cup sea salt
2 vanilla beans, split lengthwise and scraped, seeds reserved
Remove beans from vanilla pod and mix thoroughly with sea salt. Package in an airtight container of your choice.
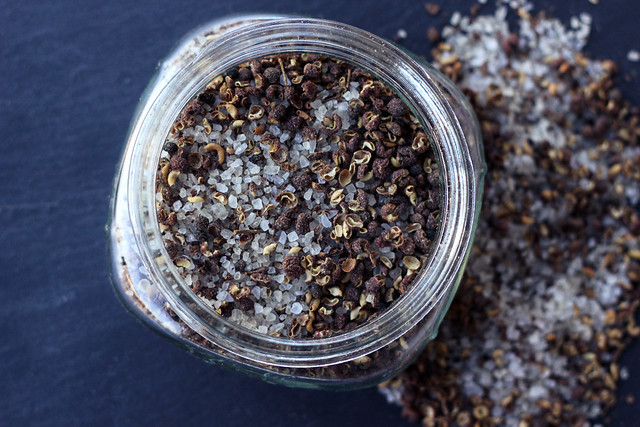
Sezchuan Peppercorn Sea Salt
This spicy salt has a kick plus a nice earthy rustic flavor and it would be great on grilled veggies, meat and seafood, popcorn, homemade chips, veggie burgers, stir-fries, etc.
1/4 cup Sezchuan peppercorns (aka Sichuan peppercorns) or any other peppercorn of your choice
1/4 cup sea salt
Dry roast the peppercorns over a medium/high heat in a dry skillet on the stove top for 3 to 5 minutes. Let cool then add to processor (a spice grinder or mortar and pestle would also work) and grind to the size of the sea salt, add the salt to incorporate, pulse a few more times. Package in an airtight container of your choice.
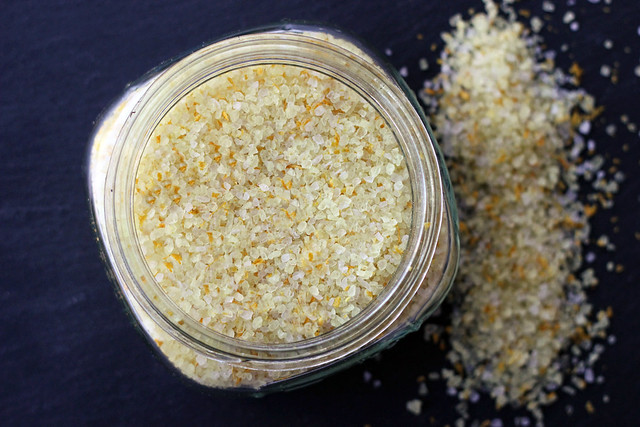
Citrus Sea Salt
This bright and fresh flavored salt would be great on vegetables, grilled or roasted chicken or seafood, shellfish, steamed rice, chocolates, cookies etc.
1/2 cup sea salt
1 tablespoon fresh citrus zest from well scrubbed fruit such as lime, orange, lemon, grapefruit or any combination of those (I used Organic Navel Oranges)
Mix together the zest and the salt, making sure there are no large clumps of the zest. Spread out evenly on a parchment paper lined baking sheet. Allow the citrus zest dry out in the oven at 200ºF for about 60 minutes. Once cooled, package in airtight container of your choice.
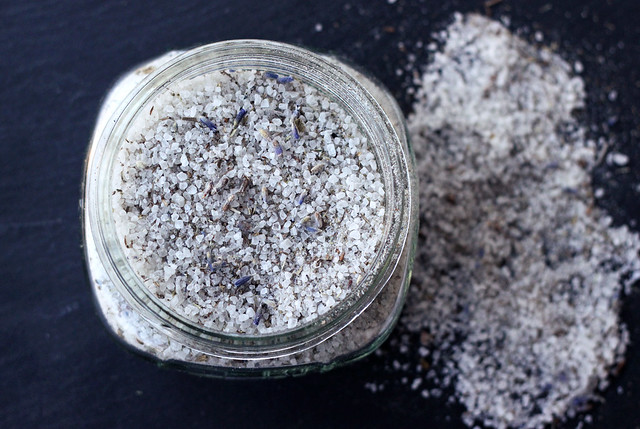
Lavender Sea Salt
This fragrant and flavorful salt would be great on sweet treats like truffles, chocolates, ice cream, shortbread cookies, scones, etc. Also try it in savory dishes like roasted squash, herbed flatbreads or with grilled chicken , lamb or salmon, etc.
1/4 cup dried lavender (make sure it is culinary grade lavender)
1/2 cup sea salt
Add the dried lavender to your food processor (a spice grinder or mortar and pestle would also work) to quickly chop the lavender, then add the sea salt, whir it together a bit, then package in an airtight container of your choice.
These recipes were originally shared on the Free People Blog BLDG 25. Share your thoughts below on how you would use these particular sea salts or what flavors you would try making yourself?
-
Homemade Chai Concentrate – Gluten-free (Vegan + Sugar-free Options)

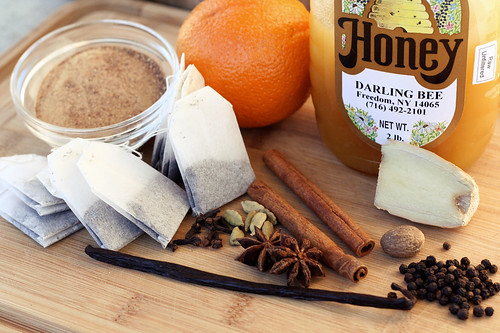
This month for my ongoing monthly series with the Free People blog BLDG25, our theme is giftable recipes. Tasty gifts you can make and give to your loved ones, a holiday party hostess, co-workers, neighbors, etc. What better way to say “Happy Holidays” than with delicious treats, right?
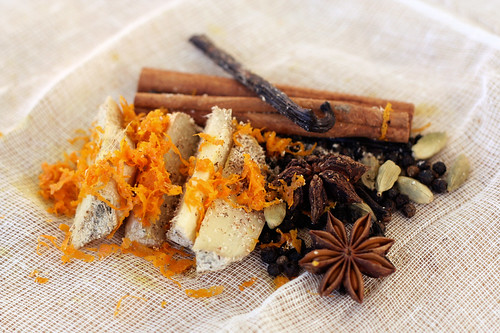
This first recipe is a classic Tasty Yummies recipe, that many of you have likely seen on here before, but it had to be shared again, as it is one of my most popular and it makes a wonderful gift. I myself have made and gifted it to quite a few chai lovers and it was very well received each time.
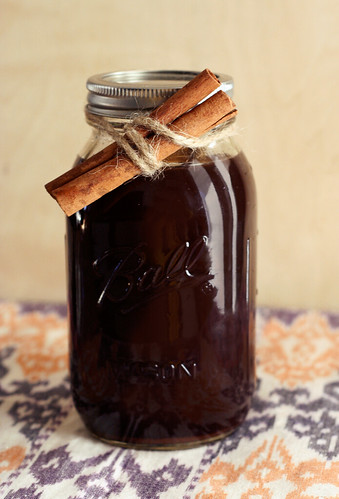
The great thing about this chai concentrate as a gift, is you can either make the finished concentrate and give it in a cute vintage bottle or jar with some cute twine or ribbon and a hand made tag, or if you are worried about giving a refrigerated item, you can out together a cute cheesecloth pouch full of the spices with the tea bags and wrap it all up with twine and print the instructions for the recipient to make their own batch when they are ready.
Head over to the Free People blog to see the full recipe and check back each week through the month of December for other giftable recipes.