-
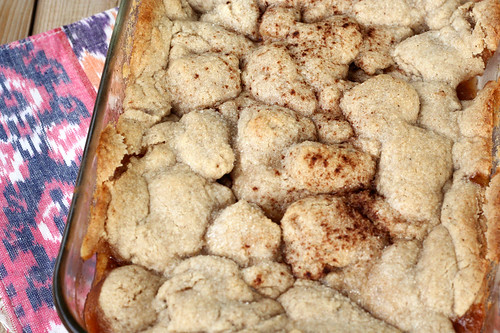
Gluten-free Vegan Apple Cobbler
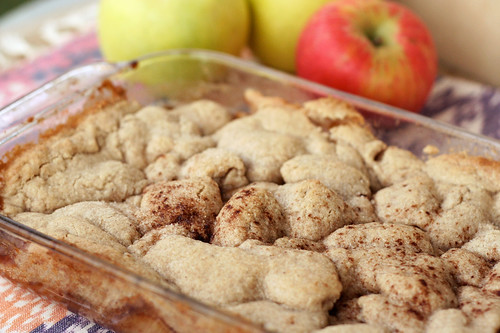
First off, I know the name makes this dessert sound so far off from the traditional cobblers that we all know and love. How can a cobbler be good without flour or butter? I am sure you are thinking this tastes like a healthy hippie dessert, made from sticks and dirt. WRONG. You really would never know that the gluten or the dairy is missing in this one. It is full of flavor and is so deliciously satisfying. My husband, Mark, is a southern boy who loves his cobbler. He actually gets angry at crisps and how “stupid they are” (in his words). Whenever we head down south, he seeks out cobbler on every trip. He loved this cobbler, he kept telling me he couldn’t believe it was gluten-free! He of course served a big ‘ol scoop of vanilla ice cream on top of it, but I can’t really blame him.
I honestly was playing around with this recipe thinking it would likely not work on the first try and I would have to try it again and again to get it right, so I am pretty shocked that it not only worked, but it was absolutely delicious. I plan to make it again in a smaller pan next time, so both the apple filling and the cobbler topping are a bit thicker, but that is just a personal preference. When I loaded the apples into the pan it looks like so much, but as it cooked down it definitely sunk in a bit, so maybe the answer is more apples. I liked that the cobbler topping got a bit brown and crisp and I love how beautiful it looked as it baked and sunk in around the apples pieces. The spices were perfect, the topping was crisp and perfectly doughy and the sweetness level was exactly where it needed to be. Obviously everyone’s personal sweet tooth is a little different plus the sweetness of the apples may affect how sweet the filling is, so taste your apple filling before you put the topping on, you may find that you want more sugar. I personally don’t like excruciatingly sweet desserts. Plus, since it isn’t disgustingly sweet it would also make a delicious breakfast, if you are into that sorta thing.
Speaking of sweet, feel free to play around with sweetener options too, I had wanted to use coconut sugar, but I finished off what I had in the pantry on the pumpkin bread. You could also play around with using honey or maple syrup as the sweetener in the apple filling. Just remember if you use a liquid sweetener in the cobbler topping, to adjust your flours accordingly. Also, if you aren’t vegan and you absolutely need to have butter in your cobbler, you could certainly substitute butter for the palm oil shortening. I just really wanted to try making this without butter. I am so excited that this cobbler came together and it’s so incredibly delicious, plus low in sugar (just a half cup in the whole recipe), no butter and gluten-free. I am so proud of this!

Gluten-free Vegan Apple Cobbler
serves 6Apple Cobbler Filling
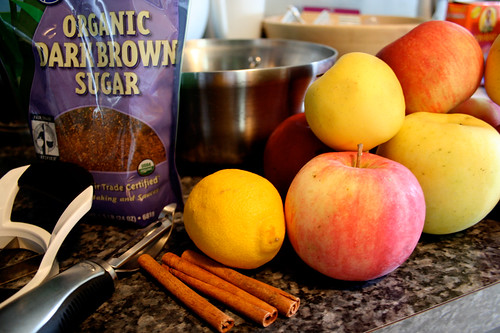
2 1/2 pounds (or more) peeled apples – I used a mix of Crispin’ and Honeycrisp apples
1/4 cup organic raw cane sugar or coconut sugar
1 tablespoon fresh lemon juice
1/2 teaspoon cinnamon
1/2 teaspoon nutmeg
1/4 teaspoon cloves
1 teaspoon vanillaCobbler topping
3/4 cup almond flour
1/4 cup sorghum flour
1/2 cup tapioca starch
1 teaspoon fine sea salt
1/4 cup organic raw cane sugar or coconut sugar (plus a little bit more to sprinkle on top)
1/2 teaspoon cinnamon, ground (plus a little bit more to sprinkle on top)
1/4 teaspoon nutmeg, ground
1/4 cup unsweetened organic almond milk, you may need less
4 tablespoons chilled organic palm oil shortening (you can use unsalted butter here instead, if you wish)Preheat the oven to 375º F.
Make the cobbler topping first. Combine almond flour, sorghum flour and tapioca start with the salt, sugar, cinnamon and nutmeg. Cut the pieces of shortening into the flour mixture until it comes together, it should be like coarse sand. Pour in the almond milk, a little at a time, continuing to stir until it all just starts to come together. You may not need all of the almond milk, so don’t add it in too quickly. It will feel a bit sticky, don’t worry.
Form the dough into a ball using your hands and wrap tightly in plastic wrap. Place it into the fridge while you peel the apples. Once the apples are peeled, core them and cut them into thin slices or small cubes, place them in your baking pan and drizzle them with the lemon juice and set them aside. (I used a 11″ x 7″ pan, but I think next time I would use my 8″ x 8″ pan.)
Take the dough out of the fridge, it should be a bit firmer now and roll it out between two pieces of parchment paper or plastic wrap. Don’t press too hard, just enough to flatten it out into a square the size of the pan. Place the rolled out square onto a baking sheet and place it into freezer, let it chill while you finish preparing the apple filling.
Add the sugar, spices and vanilla to the apples, toss gently to combine everything. Check on your dough, if it seems nice and firm and chilled, pull it out and gently lay it over the top of the apples, it is definitely a tricky maneuver but you can do it. I just peeled the parchment paper off of one side and flipped that size down on top of the apples, then I carefully peeled the other parchment sheet off the top. If any of the dough rips or peels off, hangs over, etc – you can just easily fix it up with your hands. The dough is really forgiving and it definitely doesn’t have to be perfect. If all else fails and your cobbler topping is being a jerk, or it’s too sticky, just spoon it on top biscuit style, it will still be totally delicious.
Sprinkle another teaspoon or so of sugar on top of the cobbler as well as a little sprinkle of cinnamon. Place the pan in the oven and bake the cobbler for 35-40 minutes, until the filling is bubbling and the topping is brown and firm. Cool for 5 to 10 minutes, then serve.
-
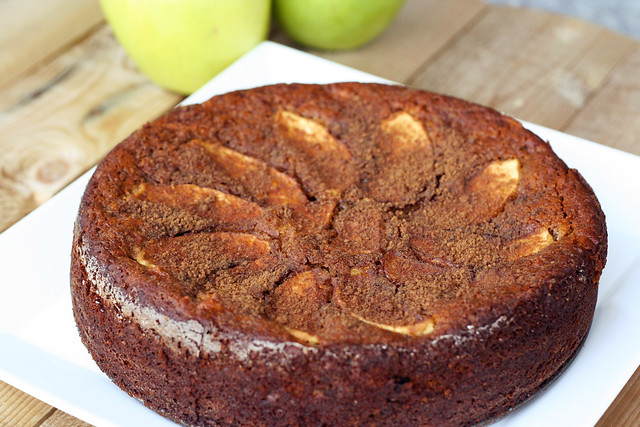
Gluten-Free Apple Spice Cake
This afternoon when I took a break from work to have lunch, I was struggling to figure out what to make since our fridge is looking a bit bare. We are leaving Monday morning to go to Birmingham for a job we are working on, so we are nearing the end of the planned meals and the groceries I bought earlier in the week. As I sat thinking for a minute, it came to me, I made a chickpea, kale, sun-dried tomato salad with goat cheese and a homemade multi-grain mustard vinaigrette, on the side I toasted up one of those delicious gluten-free multi-grain rolls I had made earlier in the week and topped it with a tad bit of garlic butter and small sprinkle of Parmigiano Reggiano. As I was “whipping” this all up, Mark sat down to eat his lunch, a peanut butter and jelly sandwich, and he started laughing at me and my creation. First he told me how jealous he was of my lunch and that he wished he had waited to see what I came up with. Then, he asked ‘what is your first memory of really loving good food. Like, at what age do you remember thinking, THIS is really good food?’
It was such a good question, I really had to think about it. I didn’t really have one solid memory, I just always remember loving good home-cooked food. Besides the traditional and super delicious Greek foods my dad and his family always made for holidays and the like, my parents cooked dinner every single night for us. My dad did the majority of the cooking, my mom most of the baking, but my mom had some really classic and comforting dishes, that I still think very fondly of now as an adult. One of my favorite memories growing up, that I always think of, was when my mom would make her homemade tomato sauce, totally from scratch, and the whole house would fill with the amazing smell of her sauce. I love my mom’s sauce so much. I used to come into the kitchen quite often while it would simmer away and grab the spoon and take a huge taste. I would sometimes grab a bowl from the cupboard and just ladle a ton of the sauce into it, maybe a meatball or two and just spoon it into my mouth like soup. It was so good. She never bought the jarred spaghetti sauce crap. It was that way for almost everything my family made. There was a major emphasis on homemade food. I am sure that is a large part of where I got my love of food and cooking from.
I asked Mark what he remembers and he told me about him being really young and biting into a really good ham sandwich and think “woah, this ham sandwich is REALLY really good” – haha. I can totally see a young, adorable little Mark all excited about his ham sandwich, likely served with some southern style sweet tea or orange soda on the side.
Can you remember the first time you really realized your love for good, home cooked food? Were you a kid? Or did you not really realize your love of food until you were an adult?
I made this cake yesterday morning. I was going to my sister’s apartment for a party in the evening and she asked everyone to bring a snack and something to drink. Since I knew there would be tons of savory snack options and wine, I decided I wanted to bring a healthy fall inspired dessert and some spiced rum and apple cider. At first I thought about making my gluten-free apple crisp (well really it’s my Mom’s recipe), but then I thought up the idea of an apple cake made with some of that great almond flour that I am obsessed with and just a tad bit of honey and dates as the sweetener. Look at me, all confident after my cookie recipe last week. I baked a cake, guys! My own cake with my own recipe.
The cake turned out great, I honestly have to say I was a little surprised, I had visions of the entire thing sinking in, or just being totally tasteless. It was the right amount of moist, which I honestly was a bit worried about, it seemed like so many wet ingredients to me. The spices all sang in perfect harmony with the apples and the dates and the small amount of honey surprisingly made it the perfect amount of sweet. I honestly hate super sweet cake, I think that is one of the reasons I don’t care for most cakes.
I cut into the cake to take photos to post the recipe here on the blog, but I didn’t taste it before I brought it to my sister’s. It seemed kinda tacky to show up with a whole cake, with one piece missing. So I served it up and crossed my fingers! Every one that tried it, loved it and some even asked for the recipe! Yay – success! This cake is gluten-free, dairy-free and egg-free, it is also easily made vegan by substituting maple syrup for the honey.

[print_this]Gluten-free Apple Spice Cake
Serves 8-10- 2 cups blanched almond flour (meal) – I like Honeyville
- 1/2 cup chickpea flour
- 1/2 cup tapioca starch
- 2 teaspoons baking powder
- 1 teaspoon baking soda
- 1 teaspoon ground cinnamon
- 1/2 teaspoon nutmeg
- 1/4 teaspoon ground ginger
- 1/4 teaspoon ground clove
- 1/4 teaspoon sea salt
- 1 cup apple cider (unsweetened) (you could also try unsweetened apple sauce)
- 1/4 cup grape seed oil
- 1/4 cup unsweetened almond milk (cow’s milks or other non-dairy milk should work as well)
- 1/2 cup honey (use maple syrup to make vegan)
- 2 tablespoons fresh lemon juice
- 1 teaspoon vanilla extract
- 2-3 peeled and chopped medium-sized apples, reserve half (or more) of one peeled apple to slice thinly for the top of the cake (I used two very large Crispin apples that we picked last weekend at Blackman Homestead Farm)
- 8 or so Medjool dates, pitted and finely chopped
Optional add ins:
- 1/2 cup chopped walnuts or other nut
- 1/2 cup raisins or craneberries
Topping:
- 1 tablespoon brown sugar or raw sugar
- 1/2 teaspoon ground cinnamon
- 1/4 teaspoon ground nutmeg
Preheat your oven to 350ºF. Grease and lightly flour (I used sweet rice flour) a 9″ springform pan.
In a large mixing bowl, add the almond flour, chickpea flour, tapioca starch, baking powder, baking soda, all the spices and the salt. Whisk together well so it’s all evenly mixed.
In a separate mixing bowl, whisk together well the apple cider, grape seed oil, almond milk, honey, lemon juice and vanilla. Add the apple pieces and the finely chopped dates. Mix well to incorporate.
Pour the wet ingredients into dry and stir by hand to combine. Be sure it is well mixed and there are no flour lumps.
Pour the cake batter into the prepared springform pan and top with the remaining apple slices in a circular pattern . Use as many or as few slices as you’d like. (I actually wish I had used a few more apple slices, but I was afraid to overdo it.) Mix together the sugar, cinnamon and nutmeg and sprinkle the mixture on top of the cake.
Bake the cake for about 60-70 minutes or until a tester or a very thin knife inserted in the middle of the cake comes out clean. Allow the cake to cool for about 15-20 minutes, or longer before removing the ring on the springform pan, you may need to loosen the cake from the sides of the pan with a think spatula or knife. Slice with a sharp knife and serve slightly warm or at room temperature. [/print_this]
-
Green Smoothie

I have to say, I am having fun experimenting with different things for breakfast. I am actually excited to get up in the morning and cook or prepare something. So many mornings I tend to feel stressed about what to have for breakfast and I get frustrated. This smoothie may be a turn off to some of you due to its color, though I think it is quite beautiful. Don’t be fooled, it is so much tastier and sweeter than you could ever imagine and such satisfying breakfast. Such a nice way to start your day, with that beautiful green color and a healthy drink. Again, you could really change this around so many different ways, it probably doesn’t need the peaches but I thought rather than ice cubes a few frozen peaches would be nice for another layer of flavor. The parsley gave it such a bright and fresh taste, certainly this can be left out too if you don’t have parsley or don’t care for it.
Green Smoothie
(serves 1)1 cup loosely packed organic baby spinach
3/4 cup organic white grape juice (no sugar added)
1 small organic granny smith apple, peeled, cored and cut into 1 inch cubes
1 small handful frozen organic peaches (about 5 or 6 wedges)
1 handful fresh parsley
(add water if necessary to thin)Add all ingredients to your blender, process until smooth. Add more ice or water as needed to get desired thickness.
-
Millet and Apple Salad with Curry Dressing

Yes, another millet salad. This is great warm, cold or room temperature. I ate it warm, just after the millet was done cooking. I have to say, tossing millet with fruits, veggies, nuts, etc, to create a salad, has to be one of my new favorite things. It works perfectly as a starter, side dish or in this case, a main course. I came home and wanted to throw something together quick for a dinner for just myself and I didn’t have a huge appetite. This has the perfect combination of so many great things, spicy, sweet and crunchy. The colors on this dish are perfectly beautiful. The curry flavor isn’t overpowering and is perfect with the fresh mint, which I was happy to be cooking with, we still have so much of it growing in the yard. This is another great vegan dish to take to a party to share or maybe even a Thanksgiving side.
Warm Millet and Apple Salad with Curry Dressing
Serves 4
adapted from Martha Stewart Living, October 20041/4 cup raw sliced almonds
1 cup organic whole millet
2 teaspoons olive oil
1 teaspoon honey (use maple syrup to make vegan)
1 tablespoon finely chopped shallot
1 1/2 teaspoons curry powder
1/4 teaspoon coarse salt
2 tablespoons fresh lemon juice
Freshly ground pepper
2 tablespoons extra-virgin olive oil
1/4 cup dried currants
1 small apple, cut into 1/8-inch-thick wedges
1/4 cup loosely packed fresh mint leaves, coarsely chopped, plus more for garnishPreheat oven to 375º. Spread almonds on a rimmed baking sheet; toast in oven until lightly toasted and fragrant, about 7 minutes.
In heavy skillet heat 1 tsp of oil, add the millet and toast gently until the grain is tan. Bring the water to a boil in saucepan, add remaining oil and grain. Stir; cover and simmer gently for 25 to 30 minutes to desired texture or until all of the water is absorbed.
Whisk together honey, shallot, curry powder, salt, and lemon juice in a large bowl. Season with pepper. Whisking constantly, pour in oil in a slow, steady stream; whisk until dressing is emulsified. Add millet, currants, apple, mint, and almonds; toss well. Garnish with mint.
-
Chunky Applesauce
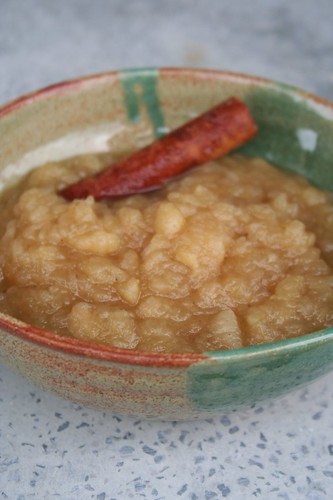
My friend Margaux, shared her family’s recipe for applesauce on her blog, Sweet and Savory Kitchens, a couple of weeks back and I haven’t been able to stop thinking about applesauce, since. The smell in your kitchen and that unremarkable old-fashioned taste, just reminds me of being a kid, for some reason. My mom must have made applesauce when we were kids. I would like to have homemade applesauce simmering on the stove everyday during Autumn, just so I could enjoy that lovely smell.
Applesauce is a great way to use up the apples that are maybe a bit too bruised and dinged up or that may have started to get a bit softer. We went apple picking a few weeks back and I was a feeling bit “appled-out”, I think I may have eaten one too many whole apples, so I thought this would be a great way to use up the last of them. This applesauce is great on its own as a side dish, it’s a wonderful and healthy snack or dessert, you can serve it over vanilla ice cream or yogurt, spread it on toast and you can eat it warm or cold. It’s just a great homestyle dish that is incredibly easy to make.
I like the flavor from the spices and how it pairs so nicely with the apples, if you are a purist and just want to enjoy the apple flavor, leave out the spices. I also tend to like my applesauce on the chunky side, so I hardly mash mine up, though some folks love a smooth pureed applesauce, whatever you like, this recipe is super simple and in no time your house will smell so good, you won’t want to leave.
Chunky Applesauce
3 to 4 lbs of apples, peeled, cored and sliced ( I think I used about 8 apples, a couple different varieties*, left over from apple picking)
Juice of one lemon
3/4 cup water
1/4 cup organic dark brown sugar
2 tablespoons organic pure cane sugar
3 whole cinnamon sticks (3-inch sticks)
2 whole star anise
1 teaspoon ground cloves
1/2 teaspoon saltAs you are slicing and peeling your apples, place them in a large saucepan. Once you have all of your apples in there, place the saucepan over a medium-high heat, add the lemon juice and water. Stir in the sugars and add in the spices and the salt. Stir to combine. Bring the mixture to a boil then lower to a low-medium heat and simmer for 25-30 minutes or until the apples are thoroughly cooked. They will start to mash-up and breakdown on their own. Once your apples are fully cooked, and soft, remove the pan from the heat and remove the cinnamon sticks and star anise. Mash it up with a potato masher or a large wooden spoon, it won’t take much. Leave your sauce as chunky as you would like. If you like a very smooth applesauce you can blend it in your blender or food processor. Serve warm or cool.
This applesauce will keep a few weeks, covered in the refrigerator or it can easily be stored in your freezer.
* Be sure to choose a good quality sweet cooking apple such as – Cortland, Empire, Gala, Golden Delicious, Granny Smith, HoneyCrisp, McIntosh, Pink Lady, Rome, Fuji, Ginger Gold or Jonathan. I think I used a combination of golden delicious and McIntosh, not entirely sure since I was apple picking with my high-energy 3-year old nephew, Noah.
-
Apple, Gruyère and Sage Muffins (Gluten-Free)
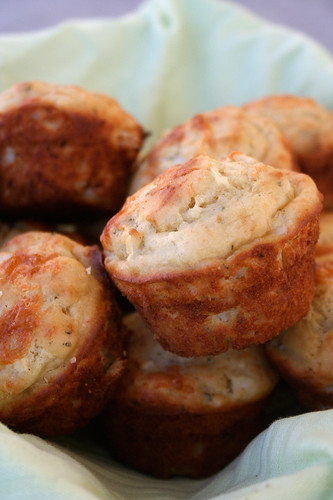
I would LOVE to take credit for this amazing recipe and all of it’s tastiness. But, I cannot. I simply saw the recipe, knew they would be amazing and made them. Now I am sharing it with you because you really need to make them yourself. Someone recently told me about Cannelle Et Vanille, a lovely food blog filled with some of the most beautiful photography I have ever seen. On top of all of that, the recipes are all gluten-free :swoon:!
I had been wanting to make some type of apple muffin or bread ever since we had gone apple picking last weekend, so when I came across this recipe, I knew it was perfect. Let’s be honest, apples and cheese together are definitely drool-worthy. I am a big fan of savory for breakfast instead of overly sweet, so these have been the perfect morning meal for me the last few days. I used a really nice aged Gruyère that brings a nice earthy flavor to these muffins that are a bit sweet, a bit salty and perfectly moist. The nice thing about this recipe is you could also make it in loaf form instead of muffins. Bake it at the same temperature at 40 minutes instead of 20.
Apple, Gruyère and Sage Muffins (Gluten-Free)
adapted from Canelle et Vanille
makes 12 muffins1 cup (150 grams) superfine brown rice flour
1/2 cup (75 grams)millet flour
2 tablespoons (30 grams) potato starch
2 tablespoons (20 grams) tapioca starch
1/3 cup (70 grams) cane sugar
1 tsp (8 grams) baking powder
1/2 tsp (3 grams) baking soda
1/2 tsp (5 grams) salt
1/4 tsp xanthan gum
1 tablespoons fresh sage, finely chopped
1 cup (55 grams) shredded Gruyère
1 egg
1 cup (250 ml) buttermilk
1/4 cup (55 ml) olive oil
2 apples, peeled and small diced
Extra shredded Gruyère for toppingPreheat over to 400ºF. Grease your muffin pan. In a large bowl, whisk together the first 11 ingredients. In a small bowl, whisk together the egg, buttermilk and olive oil. Add the wet ingredients to the dry and mix until combined. Fold in the diced apples.
Scoop batter into mold, sprinkle a bit of shredded Gruyère on each muffin. Bake for 20 minutes or until golden and firm to the touch. A wooden pick inserted into the center should emerge clean.

-
Gluten-Free Apple Crisp
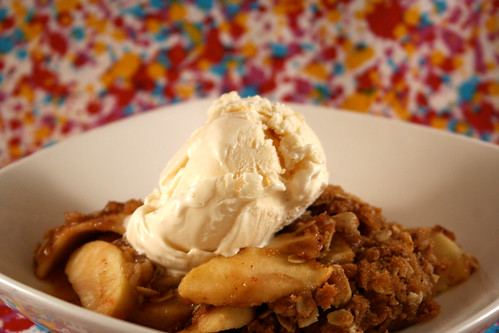
NOTE: I posted an updated version of this recipe – here! The new version is still gluten-free but it is also vegan and refined sugar free!
This is my Mom’s recipe, she is an incredible baker. My Dad does most of the cooking and my mom does all of the baking. Every Fall she whips up a pan of this just for me, with the freshly picked apples from the tree in their yard and it is the best. She made a big pan of it for dessert for the big dinner I made last night. This is what Autumn tastes and smells like! This recipe is super simple, I have made it a couple of times myself, though somehow it is never as good as when my mom makes it.
Gluten-Free Apple Crisp
4 cups of peeled and sliced apples (4 med)
2/3 – 3/4 cup packed brown sugar
1/2 cup gluten-free flour (your favorite all-purpose will work perfectly)
1/2 cup certified gluten-free oats (I like Bob’s Red Mill Gluten Free Rolled Oats)
3/4 tsp ground cinnamon
3/4 tsp ground nutmeg
1/3 cup butter softenedPreheat oven to 375°F.
Grease a square 8″ x 8″ pan. Place apples in pan.
Mix remaining ingredients cutting butter in to make crumbly consistency.
Sprinkle over the apples and bake 30 minutes or until apples are tender and topping is golden brown. Serve warm topped with fresh whip cream or your favorite vanilla ice cream.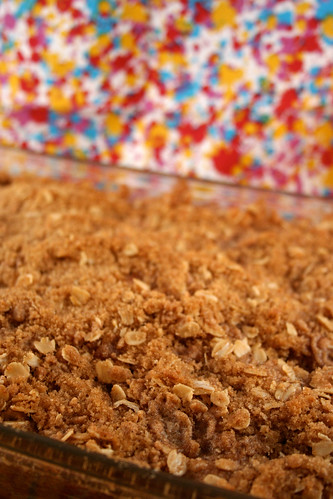
-
Roast Chicken, Apples, Leeks and Baby Potatoes

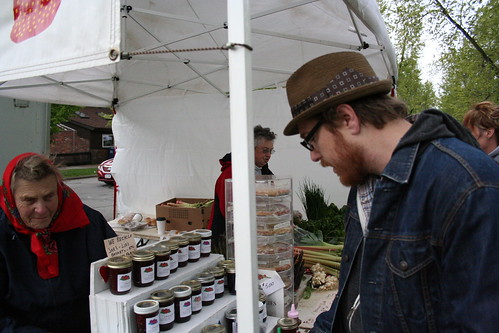
Yesterday was the first day of our big Farmers Market at Elmwood and Bidwell and I knew all week that the weather was doomed for it’s opening day. We decided to meet my parents there right at 9 am to possibly beat the rain and wind. It actually wasn’t too bad, though it felt more like a very cool Autumn Day, not Spring. We walked around, looked at everything, ran into friends and began to make a plan for what we wanted to buy. The sun even peaked out a time or two. Eventually dark clouds made their way overhead, the wind picked up and we knew we should probably make our purchases soon.
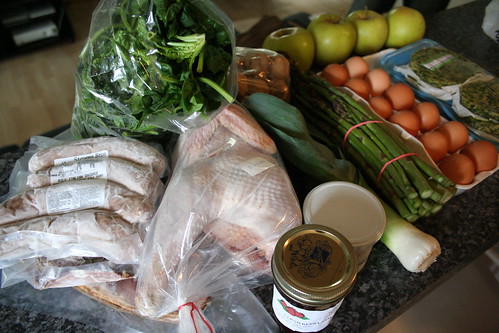
We got so much great stuff, apples, leeks, spinach, asparagus, baby potatoes, veggie burgers, yogurt leek sauce, homemade strawberry jam, fresh from the farm eggs, sausage, bacon, and a beautiful, whole, fresh Heritage chicken. I decided this would be dinner. A roast chicken. It was the perfect day for it, it was cold, rainy and windy and I just wanted to stay in. So, I took a look at everything else we bought and made a plan.

Roast Chicken, Apples, Leeks and Baby Potatoes
Serves 2 with leftover veggies2 medium apples (I used Crispin) chopped
1 leek (white and light green parts), chopped
1 pound of baby potatoes, halved
4 small sprigs fresh rosemary, chopped
olive oil
Sea salt and freshly ground black pepper
1 3 pound whole chicken – we had a farm raised, all natural, heritage chicken from Painted Meadows Farms in Franklinville, NYPreheat your oven to 350° F
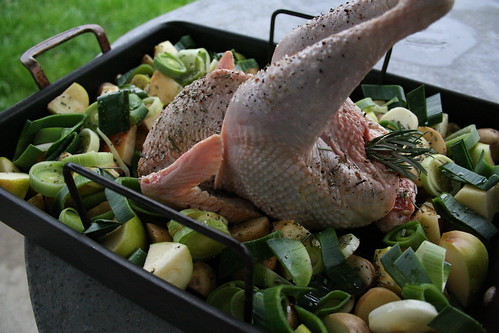
Rinse the bird, inside and out and pat dry. Place the potatoes, leeks and apples in the roasting tray of a large roasting pan, place the chicken in the center (breast side up). Drizzle olive oil over everything, making sure to get a good light coating over the whole bird to give you a crispy, perfectly browned skin. Sprinkle everything with rosemary, sea salt and freshly ground pepper. You can also sprinkle the inside of the bird with your spices as well, I did that plus I stuffed a couple of chopped leeks in there, as well as a whole sprig of rosemary. Toss the vegetables gently to make sure they are coated.
Roast the chicken until it is cooked through and the apples, potatoes and leeks are tender. I took the chicken out around 2 hours and the veggies could still use more time, so I took the chicken out to rest, took the vegetables out of the roasting tray so they could cook in the juices from the chicken and turned the oven up to 400° F. I wanted to get them really brown and crispy, the way we like them. Taste the veggies as they are done and season to taste with salt and pepper.
Allow the chicken to rest 10-15 minutes before cutting into it, this will allow the juices to redistribute. Serve with a nice helping of the apples, leeks and potatoes.
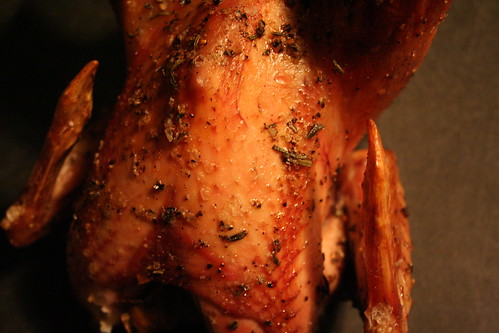
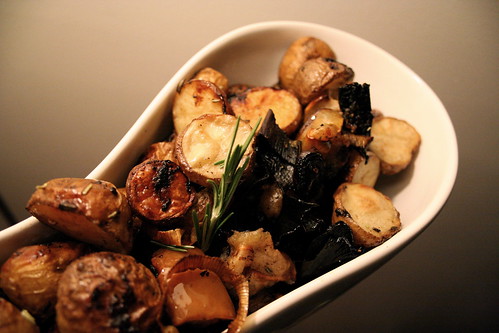
We found that the Heritage Chicken was much different from any other chicken we had ever roasted before, it had an incredible scent when it came out of the oven and it tasted so amazing, a much more rich chicken flavor than from the grocery store chickens. We found the dark meat to be very dark and slightly tougher (almost gamier), a bit more like a cornish hen. However, the breast meat was impeccable, what chicken should taste like, the best I have ever had. The skin, though I don’t typically eat it any way, was thicker than usual and tough to eat. Mark usually eats as much as he can before I start nagging him about the fat, but this time he couldn’t eat much. I’ll have to ask the women we bought the chicken from next week if there is a trick for cooking the Heritage birds, from what I had read it is best to cook these birds low and slow so as not to dry them out and toughen the meat. The legs on this bird seemed longer than I have ever seen and they were sticking straight up (!), but I didn’t have any kitchen twine to truss them, so I went without. I am curious if that could have been why the leg meat seemed tougher, maybe it was overcooked.
We ate dinner a bit later than normal last night, so by the time it was ready it was fairly dark and the pictures of the finished bird are not that great. Still working on a way around the night-time photos.
All in all, this was the perfect start to the farmers market season, I cannot wait to make more meals this week with the goodies we bought and of course to go back next week.


