-
Roasted Brussels Sprout Quinoa Salad – Gluten-free + Vegan {Guest Post by Queen of Quinoa}

Alyssa from Queen of Quinoa is joining us as today’s guest blogger in our Thanksgiving series, sharing a wonderful salad that features two of my favorites, roasted Brussels sprouts and of course, quinoa! I discovered Alyssa’s blog earlier this year and I was instantly happy, a blog dedicated to one of my favorite foods, quinoa! How could it not be great? It was instant love. Alyssa’s site features creative and delicious ways to use quinoa in all types of recipes, from sweet to savory, baked goods to soups and everything in between. I love Alyssa’s approach to eating and healthy foods, there is a definitely a classic comfort to the food she makes and you can feel the love that she puts into everything. This beautiful salad from Alyssa is full of vibrant colors and I am sure would make a perfect addition to any Thanksgiving or holiday feast. Enjoy.
• • • • • • • • • • • • • • • • • • • • • • • • • • • • • • • • • • • • • • • • • • • • • • • • • • • • • • • • • • • • • •
Hey guys! I’m Alyssa from Queen of Quinoa and I’m so excited to sharing this delicious holiday recipe with you today. When Beth asked me to guest post on Tasty Yummies, I was so excited. I absolutely adore her recipes and am always wowed by her amazing photography. Plus, it just gave me another opportunity to spread my love for quinoa!
The holiday season is all about thankfulness and giving. It’s a time where we reflect on our lives and share special moments with the ones we love. Much of this time of year is spent around the dinner table, surrounded with friends and family, enjoying delicious food and each other’s company. My holidays are filled with raucous Italian laughter and seriously good eats, sometimes wildly unhealthy, but still utterly delightful.
I make a point to bring a healthy dish with me to each holiday gathering, for two reasons. First, I’m sensitive to gluten, so bringing my own dish with me ensures I will have something safe to eat (especially since my family is Italian which equals gluten central). Second, to put it simply, the holidays are also a time to eat, like a lot. And to me it’s important to stay healthy, so I choose to bring something nutritious for others to enjoy as well.
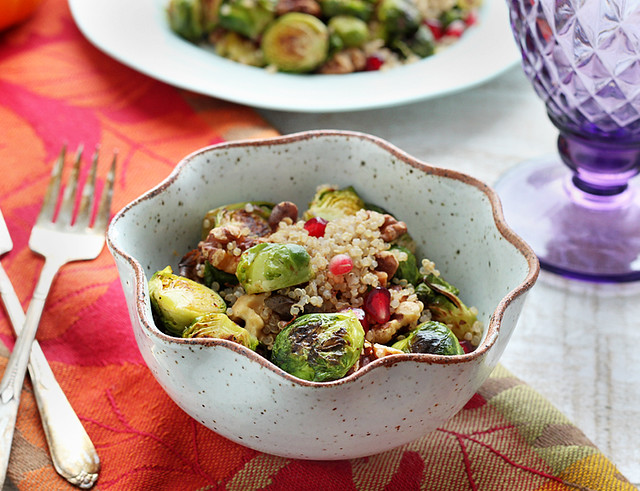
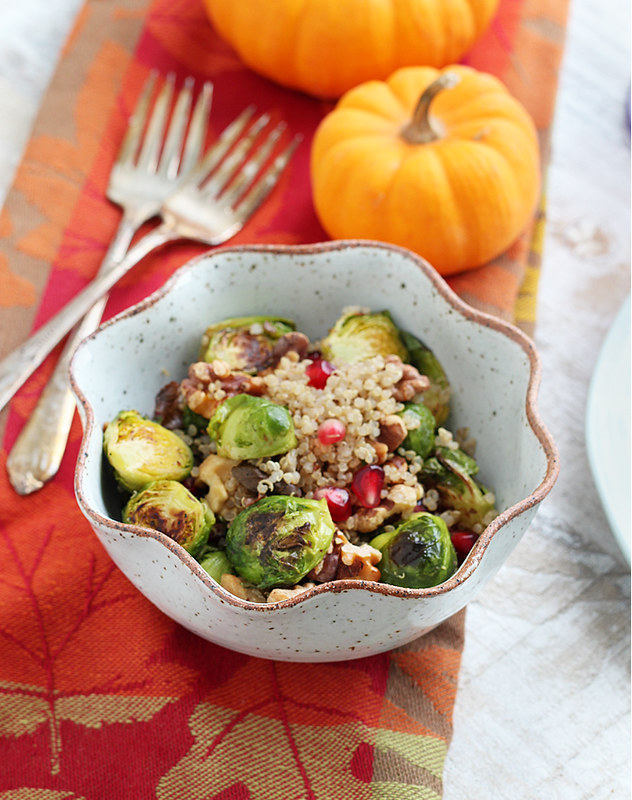
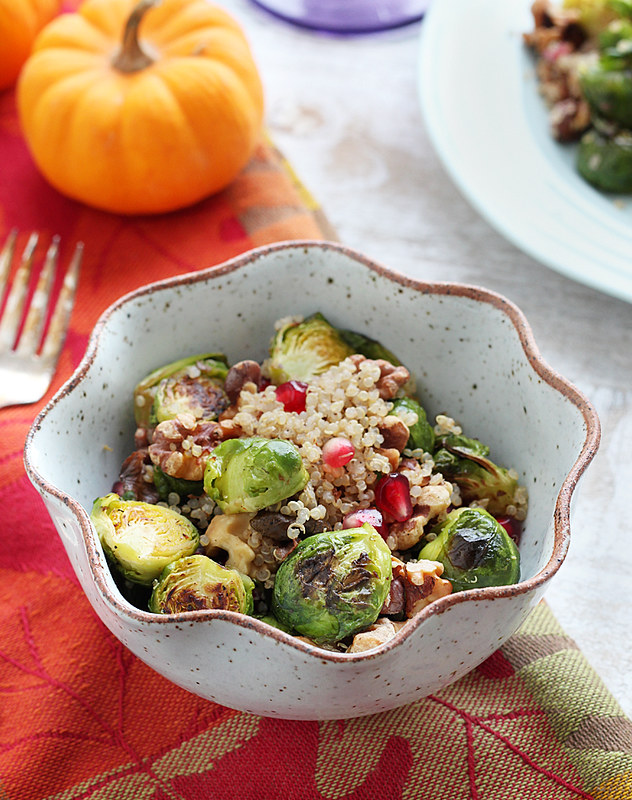
This salad is perfect for Thanksgiving, Christmas, Chanukah, or any other holiday you celebrate. Really, this salad is perfect for any day, it’s that good. The roasted brussel sprouts add a rich smoky flavor, which is complemented by the toasted walnuts. But when you throw pomegranate seeds into the mix, and the flavors are elevated to new levels. Those bright red gems are the little burst of sweetness this salad craves. And everything is tossed in my oh-so-lovely quinoa.
Perfectly balanced in flavor, sensational for the holidays and super healthy, this salad will definitely be at my dinner table this year. For me, the holidays have always needed something like this and you can be sure my family will be munching on this along side of me.
[print_this]Roasted Brussels Sprout Quinoa Salad – Gluten-free + Vegan
Ingredients:
- 1 lb Brussels sprouts
- 1 cup cooked quinoa
- 1 cup walnuts
- ½ cup pomegranate seeds
- 1 tablespoon olive oil
- Salt & pepper to taste
- Crushed red pepper flakes (optional, for a little heat)
Instructions:
- Preheat the oven to 400 degrees F. Spray a baking sheet with non-stick cooking spray and set aside.
- Cut the stems off the brussel sprouts, then slice them in half and add them to mixing bowl. Toss with olive oil and season with salt and pepper. Transfer the brussel sprouts to the baking sheet and roast in the oven for 15 – 20 minutes, until lightly browned and softened. Flip them over halfway through the cooking process to ensure even cooking.
- Transfer the brussel sprouts back to the mixing bowl and add the remaining ingredients. Toss to gently until the salad is fully combined. Season with more salt and pepper, and add the crushed red pepper flakes if using.
- Either serve the salad warm or let it completely cool. [/print_this]
Alyssa Rimmer is the quinoa-obsessed girl behind the gluten-free blog Queen of Quinoa. Alyssa loves experimenting with nutritious and whole-food ingredients and seeks to encourage the everyday home chef that cooking and eating gluten free can not only be healthy, but also delicious and fun. Hang out with her on Google+, like her on Facebook, follow her on Twitter and pin her on Pinterest. Alyssa is also releasing her first ebook soon, Baking with Quinoa, be sure to sign up for 20% off!
-
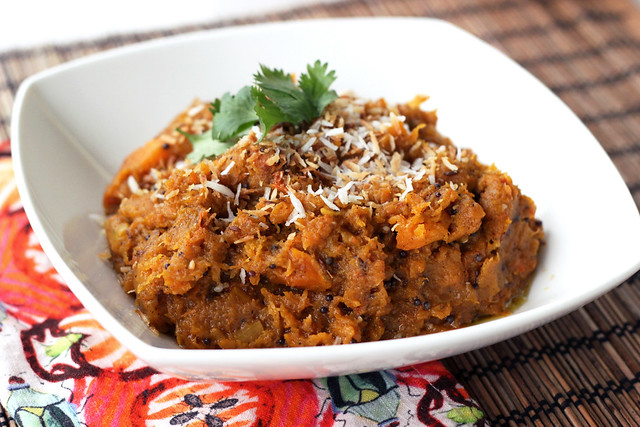
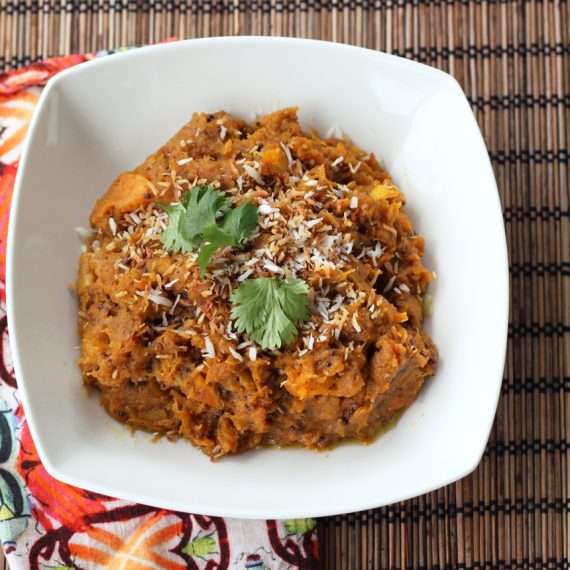
Indian-Spiced Butternut Squash Mash with Toasted Coconut (Gluten-free + Vegan)
This month as part of my ongoing series with Free People, I am sharing a series of healthy gluten-free and vegetarian Thanksgiving recipes. I absolutely love Thanksgiving, the entire holiday season really, and I get excited to start planning my Thanksgiving menu as soon as the fall season hits.
For this series, I will be sharing both classic recipes re-imagined and some unique and totally non-traditional recipes that you aren’t used to seeing amongst your traditional Thanksgiving spreads.
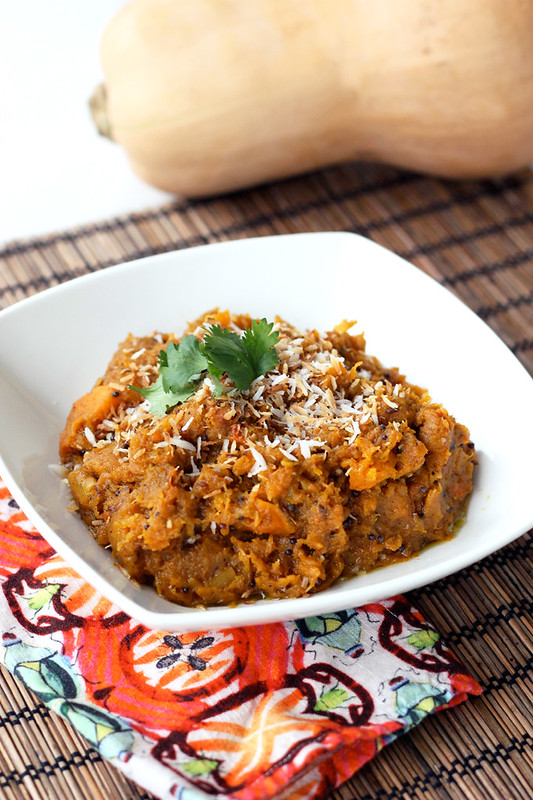
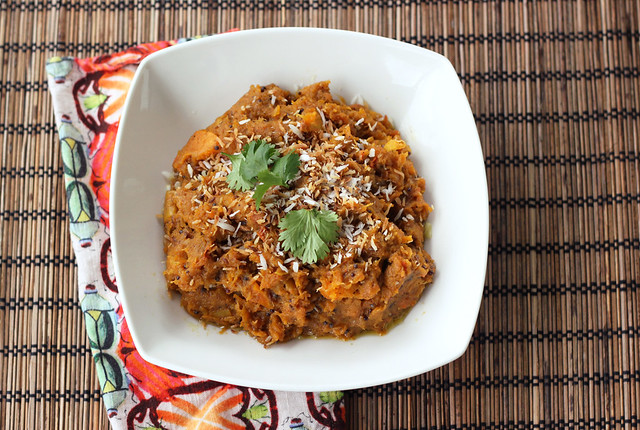
A blend of classic traditional Thanksgiving ingredients with a little non-traditional Indian inspiration, this butternut squash mash is sure to please everyone at your feast, but especially those who are gluten-free and/or vegan, who may likely have limited options. It is creamy, rustic and full of so many amazing flavors.
Head to the Free People blog BLDG 25, to get the full recipe and stay tuned throughout the entire month of November as I share a new gluten-free vegetarian Thanksgiving creation each week! Plus, make sure to check in here on Tasty Yummies starting later this week, where I have a really fun Thanksgiving series planned for you guys. More on that soon.
Indian-Spiced Butternut Squash Mash with Toasted Coconut (Gluten-free + Vegan)
Print Pin RateServings: 4 -6Ingredients
- 2-3 lb butternut squash, halved and seeded, peeled and diced into 1-inch cubes
- 1-2 tablespoons olive oil
- 2 tablespoons coconut oil
- 1 teaspoon mustard seeds
- 1 teaspoon cumin seeds
- 3 cloves garlic, minced
- 1 2- inch piece of fresh ginger, finely minced or grated
- 1 tablespoon garam masala powder, you can add more if you want the flavor to be even more powerful
- ½ teaspoon sea salt
- ¼ cup coconut milk, full-fat canned kind
- ⅓ cup finely shredded unsweetened coconut
- fresh cilantro for serving, optional
Instructions
- Preheat the oven 400º F.
- Toss the squash with oil, salt and pepper and spread out in a single layer on a rimmed baking pan. Roast, tossing occasionally, until just tender and golden brown, about 30-40 minutes. While the squash is roasting, arrange the raw coconut in a single layer on another baking sheet. Once the squash comes out, place the coconut in, bake for about 3 to 5 minutes, toss around and then bake another 3 to 5 minutes. Watch it carefully, as it can burn quickly.
- Once the squash and coconut are both ready and out of the oven, heat the coconut oil in a large saucepan over a medium heat, add in the mustard and cumin seeds, heat for a few minutes until the spices begin dancing around the pan, popping and jumping. Add in the garlic, ginger, garam masala powder and salt. Stir around for a minute or two, reduce the heat to low or off, add in the roasted squash cubes and coconut milk and mash by hand with a potato masher, until as smooth and creamy as you’d like it to be. Salt to taste, serve immediately topped with toasted shredded coconut and a little fresh cilantro, if you’d like.
-
Gluten-Free Crispy Zucchini Rounds
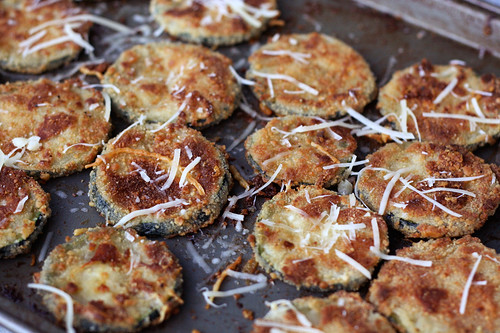
I have seen a number of crispy oven-baked zucchini recipes floating around online and in cookbooks, some as rounds, some as “fries”, but obviously all were made with regular wheat flour and breadcrumbs, so they weren’t gluten-free. However, with my insane love of zucchini, every single time I would see a photo of one of these recipes, I would instantly salivate, how couldn’t crispy oven-baked zucchini slices be delicious? I decided to experiment with making my own gluten-free version and I have to say for the first attempt, they turned out perfectly. I am so excited. I love when that happens.
The outside was so incredibly crispy, the inside was tender. Topped with a bit of freshly shredded parmigiano-reggiano and some fresh basil from the garden, each and every bite was full of flavor. I only sliced up one of the large zucchini we grabbed from the farmers market, but it was more than enough for the two of us as a side dish, with plenty leftover. It would be enough for 4 people, but if you like this as much as we did, it is actually a perfect sized side dish for two. We ended up eating seconds, since they were so delicious. I served this alongside some gluten-free penne with a delicious mint pesto .
These crispy zucchini rounds would also be wonderful as an appetizer. You could create a delicious creamy dipping sauce or even serve them with some hot marinara sauce. Though a dipping sauce would be delicious and fun, we went nude and enjoyed them as is. They were so full of flavor, they didn’t really need anything more.
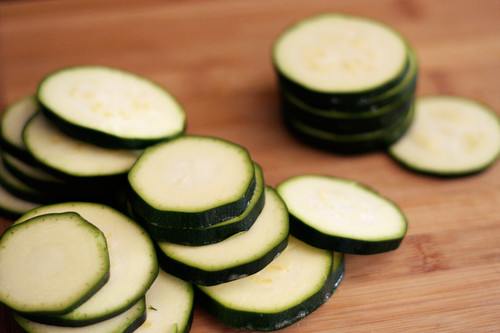
I ended up using my mandoline slicer to make sure each round was cut evenly, so they would cook evenly, but it isn’t necessary. You could simply cut by hand, doing the best to keep them generally at the same thickness.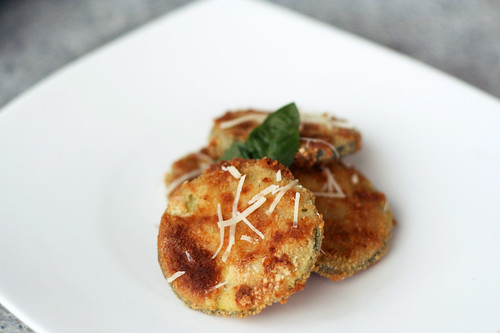
Gluten-Free Crispy Zucchini Rounds
serves 2-41 large zucchini, sliced into 1/4-inch to 3/8-inch thick rounds
2 large farm fresh brown eggs *see below note about making this vegan*
1/3 cup tapioca flour (sometimes called tapioca starch)
1 cup gluten-free bread crumbs, plus more if needed
1/4 cup shredded parmigiano-reggiano cheese
Olive oil for drizzling
sea salt and freshly ground black pepper, to taste
1/4 cup fresh basil, roughly choppedPreheat the oven to 450º and lightly grease a large baking sheet (or two smaller) with olive oil . On 2 separate plates, add tapioca flour and bread crumbs. Lightly beat 2 eggs in a medium bowl.
Dust both sides of zucchini rounds with the tapioca flour, dip in egg, and pat onto the plate of gluten-free bread crumbs. Place in a single layer on the baking sheet(s). Drizzle olive oil over the top, sprinkle with sea salt and a very small amount of the parmigiano-reggiano cheese. Bake in the oven for 15 minutes on the first side, using a spatula flip each zucchini round over (you can drizzle a bit more olive oil on this side, if you wish) and bake an additional 10 minutes until crispy and lightly browned on both sides.
Remove the baking sheets from the oven, sprinkle the remaining parmigiano-reggiano cheese and the fresh basil overtop of the rounds and serve immediately. Salt and pepper to taste.
*To Make This Vegan: After a request on Facebook, I decided to make these again, but this time I attempted to make them vegan. In place of the two eggs I used 3 teaspoons of Ener-G Egg Replacer with 1/4 cup of warm water. Stir together until fully mixed. You may find you need to make a bit more depending on how large your zucchini is, but that is a good starting point. Substitute the egg replacer for the eggs in the above recipe, do everything else the exact same and just skip the parmesan cheese. That’s it. They turned out just as delicious, with a perfectly wonderful crispy brown outside.
-
Heirloom Tomato Caprese Salad with Balsamic Reduction
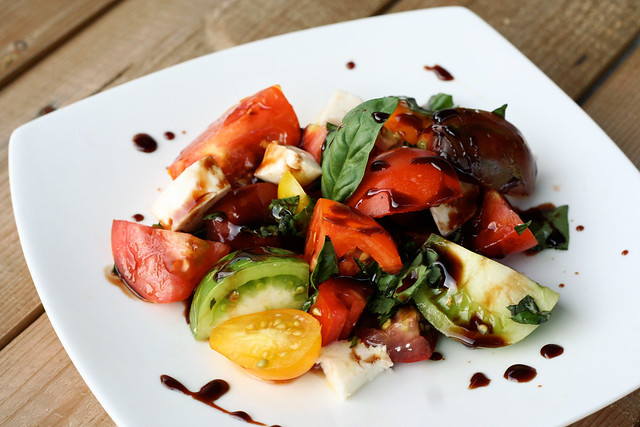
This recipe is a fast and simple twist on the original, with no accurate measurements needed. It’s all about taste. I grabbed a quart of colorful local heirloom tomatoes at the market and I couldn’t wait to pick some of the beautiful heirloom black cherry tomatoes from my own garden to make a big tasty salad with. Since the tomatoes themselves had so much flavor and the basil from our garden was abundant, I decided to not go crazy and put the full 8 oz of fresh mozzarella into the salad, it just didn’t need it. I also decided that by saving half of it, I could use it to add to an omelette with the next morning.
I wanted to get a nice sweet and tart punch from the balsamic, so rather than just pouring it on as is, I made a simple reduction syrup to drizzle over top the salad when serving. It is incredible how the concentrated flavors from the vinegar reduction really sing with the subtle sweetness. It is one of my favorite, simple kitchen tricks that works for so many dishes. In addition to drizzling over top salads like this one, the balsamic reduction is also wonderful drizzled over a steak, grilled fruit and so much more.
There is something about a good insalata caprese that just screams summer to me. But much like the balsamic, it is bitter-sweet, by the time the tomatoes in our gardens are ripe enough to start picking for the beautiful salad, summer is on the down-swing and definitely more than half over.
Heirloom Tomato Caprese Salad with Balsamic Reduction
serves 4Approximately 1 quart of mixed heirloom tomatoes, any variety. (Mine were all smallish – cherry and grape sized, some from our garden)
4 oz fresh mozzarella, cut into small cubes (you can use the full 8oz, but I was attempting to keep this light and much more about the tomatoes)
1/4 cup tightly packed fresh basil, roughly chopped
1/2 cup high quality balsamic vinegar
3 teaspoons brown sugar
A few tablespoons of good quality extra virgin olive oil
sea salt and fresh cracked black pepper, to tasteIn a small saucepan over a medium-high heat bring the balsamic vinegar and sugar to a boil, constantly whisking to prevent burning. Continue cooking until it is reduced by half, stirring often. Remove from heat, allow to cool. (The sugar is optional as the vinegar has a natural sweetness when reduced, but I find that just a little is nice to compliment the tartness of the vinegar)
Meanwhile, half or quarter the tomatoes and place in a large serving bowl. Add the fresh mozzarella and basil. Toss lightly to combine. Season the salad with a bit of salt and pepper to taste. Serve individual servings of the salad on small side plates, drizzle both the olive oil and the balsamic reduction over top each serving. Serve immediately.
-
Chickpea, Tomato & Feta Salad
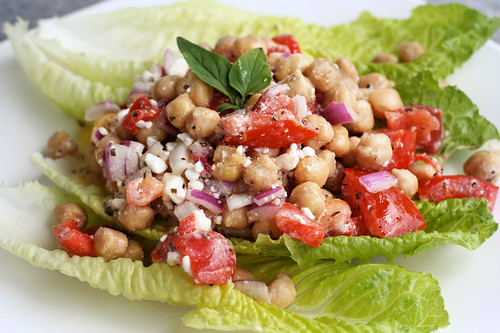
Now that we work from home, I love lunch time. My lunches at the store used to consist of leftovers or veggie burgers, even though I still eat and love both of those, a lot of days I can have more fun creating healthy lunches. Especially with my vegetable garden in full-force, I can just hop into the back yard, grab some lettuce and/or cucumbers, fresh herbs, etc and toss together a quick salad.
I saw a delicious recipe, a while back, for a Chickpea, Spinach & Feta Salad, on my friend Margaux’s blog that she keeps with her aunt, Sweet & Savory Kitchens. I couldn’t wait to play around with my own version. Such a simple, quick and healthy salad, why haven’t I been making this every single week?
I decided to use what I had on hand, so I cut up some red onion, a whole tomato, a roasted red pepper, some fresh oregano, etc and it was that easy. An incredible lunch salad in minutes. I served mine over some romaine lettuce, you could also add chopped up lettuce, spinach or other leafy vegetables like kale or arugula directly to the salad when mixing. Cucumbers would also be delicious. In Margaux and Aunt Suzy’s original recipe they included cooked broccoli which sounds like a tasty, crunchy addition. I think like most salads, the possibilities are endless with this one. This is definitely going to be a staple in my house at lunchtime and as a side at dinner. This would make a delicious dish to share at a picnic or party and with all of the beautiful colors, it’ll definitely impress everyone.
Chickpea, Tomato & Feta Salad
adapted from Sweet and Savory KitchensThe Dressing
1/4 cup extra virgin olive oil
2-3 tablespoons fresh lemon juice
1 tablespoon fresh oregano, roughly chopped
2-3 cloves garlic, pressed or minced
Salt and black pepper to tasteThe Salad
1 large or two small cans of chickpeas (about 3 cups cooked)
1 large tomato, diced
1 large roasted pepper, diced
1/2 large (or 1 small) red onion, diced
1/2 cup crumbled feta cheese, or more to tasteAdd all of the dressing ingredients to a small bowl, whisk thoroughly to combine. Set aside.
Drain and rinse the chickpeas if using canned. Combine all of the salad ingredients in a bowl, except the feta cheese. Add the dressing and gently stir to thoroughly blend. Add the cheese and stir again to blend.
-
Summer Squash Salad
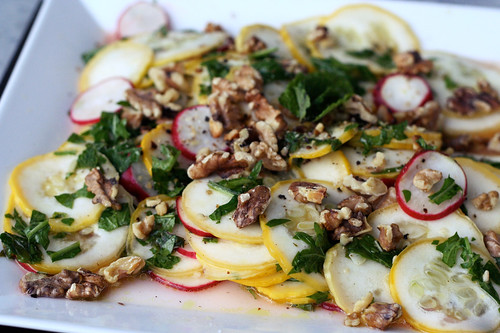
Zucchini and yellow squash are two of my favorites and both automatically come to mind when I think of summertime eating! They remind me so much of growing up, my parent’s always had an abundance of both growing in our garden. The last few years when I have planted them in my own garden, they take up a HUGE amount of real estate and never really produce much. They must not like my soil. I skipped out on planting them this year. Thankfully, my parent’s still grow both in their garden and never have a problem sharing with me.
After our family dinner this past week, I came home with a bag full of beautiful yellow summer squash and I couldn’t wait to start cooking with them. They are wonderful sliced and browned up on the grill, sauteed or roasted and added in salads or pasta, etc. Not only as a kid when my dad would cook with them, but now as an adult in my own kitchen, I always find myself eating the raw squash slices as I am cutting them to cook, so I decided I wanted to experiment with a raw salad.
When I was dreaming up this salad, I was so excited about it combining so many beautiful summery ingredients and flavors, some of my favorite ingredients. The soft and flavorful squash pairs so nicely with the crisp and spicy radishes and the peppery arugula rounded it all out with a refreshing bite. The fresh mint was a nice compliment to the light and refreshing dressing, the brightness from the lemon sings in your mouth with every bite and the toasted walnuts were a bonus crunch at the end. I couldn’t help but feeling like this salad is everything that summer is about, on one plate.
The other great thing about this salad are the many wonderful variations you could take, by changing out the herbs and going with fresh basil, oregano or chives. You can play with different nuts and seeds like toasted pine nuts, almond slivers or even sunflower seeds. You could even top the salad with cheeses like feta, goat cheese, fresh parmigiano reggiano, pecorino or asiago. I personally opted for no cheese since we wanted a vegan side-salad to accompany our vegan creamy avocado pasta. There is so much you can do with this salad. Keep in mind when picking squash that smaller, younger squashes are better since the larger squash tend to have larger tougher seeds and sometimes a tough skin.
Summer Squash Salad Recipe
serves 41 pound summer squash (yellow or green, or a mixture of both)
5 to 8 radishes (depending on how large they are)
3 tablespoons extra-virgin olive oil
2 tablespoons fresh lemon juice
1 large garlic clove, minced
1/4 teaspoon kosher salt
freshly ground black pepper, to taste
1/4 cup whole walnuts
1 bunch of baby arugula, roughly chopped
1/3 cup fresh mint leaves, roughly choppedToast the walnuts in a dry skillet, the oven or toaster oven and set aside and allow to cool, then roughly chop.
Slice the squash very thin slices using a mandoline or a steady hand and a sharp knife. Set aside in a large bowl. Do the same with the radishes. Add in the roughly chopped arugula.
Combine the oil, lemon juice, garlic and salt and pepper in a small bowl and whisk together. Pour the dressing over the squash, radishes and arugula, toss lightly. Let stand for at least 10 minutes. Add in the fresh mint and toasted walnuts, toss gently again to thoroughly combine.
Serve to individual salad plates or on 1 large serving platter, top with fresh mint and freshly ground black pepper. Enjoy immediately.
-
Millet and Apple Salad with Curry Dressing

Yes, another millet salad. This is great warm, cold or room temperature. I ate it warm, just after the millet was done cooking. I have to say, tossing millet with fruits, veggies, nuts, etc, to create a salad, has to be one of my new favorite things. It works perfectly as a starter, side dish or in this case, a main course. I came home and wanted to throw something together quick for a dinner for just myself and I didn’t have a huge appetite. This has the perfect combination of so many great things, spicy, sweet and crunchy. The colors on this dish are perfectly beautiful. The curry flavor isn’t overpowering and is perfect with the fresh mint, which I was happy to be cooking with, we still have so much of it growing in the yard. This is another great vegan dish to take to a party to share or maybe even a Thanksgiving side.
Warm Millet and Apple Salad with Curry Dressing
Serves 4
adapted from Martha Stewart Living, October 20041/4 cup raw sliced almonds
1 cup organic whole millet
2 teaspoons olive oil
1 teaspoon honey (use maple syrup to make vegan)
1 tablespoon finely chopped shallot
1 1/2 teaspoons curry powder
1/4 teaspoon coarse salt
2 tablespoons fresh lemon juice
Freshly ground pepper
2 tablespoons extra-virgin olive oil
1/4 cup dried currants
1 small apple, cut into 1/8-inch-thick wedges
1/4 cup loosely packed fresh mint leaves, coarsely chopped, plus more for garnishPreheat oven to 375º. Spread almonds on a rimmed baking sheet; toast in oven until lightly toasted and fragrant, about 7 minutes.
In heavy skillet heat 1 tsp of oil, add the millet and toast gently until the grain is tan. Bring the water to a boil in saucepan, add remaining oil and grain. Stir; cover and simmer gently for 25 to 30 minutes to desired texture or until all of the water is absorbed.
Whisk together honey, shallot, curry powder, salt, and lemon juice in a large bowl. Season with pepper. Whisking constantly, pour in oil in a slow, steady stream; whisk until dressing is emulsified. Add millet, currants, apple, mint, and almonds; toss well. Garnish with mint.


