-
The Top 11 Recipes of 2011
Instead of reflecting on 2011, I really should be downstairs putting away Christmas decorations, taking down the tree and putting away gifts. But, I have been sitting here at my desk working on illustrations for a pending deadline with a client and I feel like am fighting off some type of after-holiday sickness, so I am feeling a bit sluggish and tired. I have total faith that I am going to kick this thing in the butt before it ever gets me sick, so here’s hoping! For the last two days I’ve been loading up on supplements, green tea, water and rest when I can get it, and I have been living on a steady diet of hot soups, which I have no complaints about. I love soup! If you have any natural remedies for fighting off sickness, send them my way! I am determined to not let this through.
I’ll get to the tree and those Christmas decorations and I plan to get some new recipes up later this week, including this year’s holiday get-together favorite, Vegan Dark Chocolate Bark with Bing Cherries, Pistachios and Grey Sea Salt. But for now, I will continue attacking all of this work and the threatening sickness that I refuse to let through and I will keep reflecting on the year behind me and all that lies in front of me.
I rarely set any sort of personal New Years Resolutions, but I always promise myself that in the year ahead I will try to be the best possible me, yet! I don’t make any strict dietary guidelines (I have enough that are part of my every day choices, as it is), I don’t force myself to do things I don’t really want to, I just make a plan to continue being as happy and positive as I possibly can and to always make the right choices for me! I really try to enjoy every moment of my life and to cherish what I have, each and every day. At some point of every single day, I take a moment to express my gratitude for all that goodness in my life. It feels so good! Sometimes I catch myself saying “I am so very lucky for :blank: in my life” (ie, an amazing husband, a great job, a fun life, a great family, etc) and I then remind myself that it isn’t luck that allows me to have all of these wonderful things. Life is hard, relationships take work and love, and it takes energy to wake up every morning and see all the positive in my life. But it is all worth it! I would be lying if I didn’t say there are trying moments, there are days when things are hard, that I wanna say “why me?”, but I always tell myself that ‘it could always be worse’ and that ‘every experience is what you make of it’. I choose to wake up every day and see the bright side of things. No one makes me do that, I do it so I can have a better quality of life and it works! I am blessed to have all that I have, but I also know that I am even more blessed to be able to stay positive every day, so I can see it all for what it is and enjoy each and every moment I am alive.
There are two links I came across in the last couple of days that I really wanted to share with you guys – both come from Southern California yoga and climbing clothing company, prAna’s, blog. The first is a list of “12 Things Happy People Do Differently“. This article really hit home for me as most of the items on this list are things that I already make a part of my every day living. There are a few that I don’t always remember, that serve as great reminders to me, as I try to be the best version of me, that I can be! Everyone deserves to have the feeling of complete and utter happiness in their every day lives, there really is nothing like it! Happiness starts within and no one can give it to you, you can only give that gift to yourself. Read this and live this!
The second link, as if that first wasn’t inspiring enough, is a Handbook for Life 2012. This wonderful and encouraging list of reminders to be the best possible you this upcoming year, actually leaves me speechless! There isn’t much to say that isn’t said there. I plan to print this list out and keep a copy where I can see it every day, plus keep a digital version on my iPhone. Read this and embrace it all, that is all that I can say!
OK enough of the gushy, mushy feel-good positive stuff – let’s talk yummies! Here are the top 11 recipes from Tasty Yummies in 2011!
11) Blueberry Muffins with Almond Flour (gluten-free)

10) Sweet Potato and Black Bean Patties (Gluten-free and Vegan)
9) Creamy Broccoli Soup (Gluten-free and Vegan)
8 ) Chewy Pumpkin Oatmeal Raisin Cookies (Gluten-Free with vegan options)
7) Butternut Squash, Arugula and Goat Cheese Pizza -(gluten-free)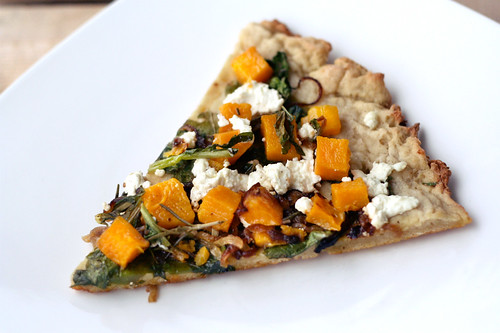
6) Butternut Squash & Chickpea Coconut Curry (Crock Pot Recipe – gluten-free and vegan)
5) Apple Crisp (Gluten-Free and Vegan)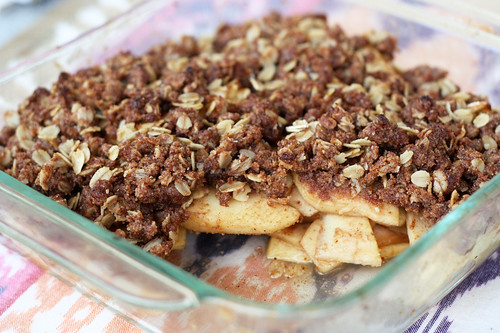
4) Vegan Pumpkin Spice Ice Cream (gluten-free)
3) Vegan Pumpkin Pie Smoothie (gluten-free)
2) Horchata (gluten-free and vegan)
1) Homemade Chai Concentrate – (gluten-free and vegan)
Do you have a favorite Tasty Yummies recipe from 2011? What do you want to see more of on Tasty Yummies in 2012?
What are your goals and/or resolutions for 2012?
-
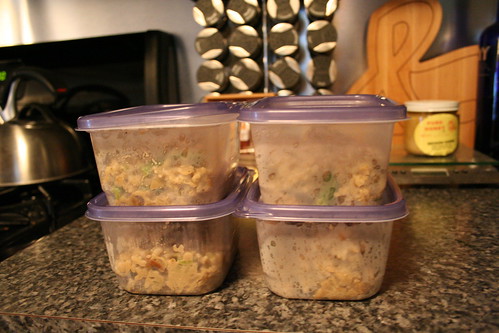
Peaches and Cream Smoothie

I have really been loving smoothies while I am on this cleanse. They have been the perfect morning breakfast, light, but still substantial enough to keep me going until lunch. A lot of mornings I get up and I am out the door before 7am for Mysore yoga (a self-led Ashtanga yoga practice) and I don’t eat beforehand. When I get home (or to the studio) I am hungry but pleasantly relaxed and not ravenous for a large breakfast. The smoothies are perfect. I have been playing around with all the different fresh and frozen organic fruit and fruit juices I have, some have almond milk, others don’t and I have added in the ground flax-seeds when I think I could use it (these can certainly be left out in this recipe or any of the others). This smoothie was so delicious. I am so obsessed and amazed with almond milk. I have never been a big milk drinker, but I really don’t care much for soy milk either, when I tried almond milk I knew that was the one for me.
This was yesterday’s smoothie, cleanse day number 7! I am now in week 2 and excited to experiment with new smoothies and other breakfast options. Got any smoothie recipes to share?
Peaches and Cream Smoothie
serves 11 cup organic unsweetened almond milk
1 cup frozen organic peaches
1/2 teaspoon organic vanilla
1 tablespoon ground organic flax-seed
small drizzle of honey (you can add more if you wish, I am trying to go very light with the sweeteners during the cleanse)Combine ingredients in blender and blend until frothy and smooth.
-
Sautéed Shredded Brussels Sprouts with Toasted Walnuts and Dried Currants

I am a huge fan of brussels sprouts, always have been. For some reason, getting one of those huge stalks at the farmers market, is one my favorite things in the world. There is something about that beautiful green stalk peaking out of your canvas bag, that feels so right. I had big stalk that I grabbed while I was at the market and I couldn’t decide what to do with it. I absolutely love oven roasted brussels sprouts, but I always prepare them that way, I wanted to do something different. So after a little looking around, I came across many many recipes for sautéed shredded brussels sprouts. This sounded perfect. I was also very happy to discover that my amazing food processor, has an attachment for shredding. Who knew? That made shredding all the brussels sprouts, a breeze, it took me far longer to cut each one off of the stalk then to shred them all.
I didn’t have a large and deep enough skillet to cook the amount that I had, so I just used a large pot. The key is to get whatever pan you are using hot, but not too hot. If the heat is too high, you will cook them too fast. You want them tender, with a tad bit of a brown crisp to the outside. I found that since I had so many sprouts and I was cooking them in a pot rather than a skillet, the key was to keep stirring them around, so they wouldn’t just sit there and steam, only the bottom ones getting browned. Stirring allowed them to cook evenly and for all them to brown up nicely.
This is definitely going to be a winter side dish staple in our house. Perfect with so many different meals and I promise, even those that swear they hate brussels sprouts, would enjoy this. Looking to add a little meat? A bit of smoked ham, bacon or pancetta would be beautiful with this.

Sautéed Shredded Brussels Sprouts with Toasted Walnuts and Dried Currants
serves 6-8
2 pounds brussels sprouts
4 tablespoons extra-virgin olive oil
1 large garlic clove, minced
Coarse kosher salt
Fresh ground black pepper
1/2 cup walnuts, toasted, chopped
1/2 cup dried currantsTrim root ends from brussels sprouts. Using sharp knife or processor fitted with coarse shredding disk, thinly slice brussels sprouts into shreds. (This can be done one day ahead, cover and chill)
Heat olive oil in large deep skillet (or large pot) over medium heat. Add garlic; stir 30 seconds. Add brussels sprouts; sauté until crisp-tender but still bright green, 5 to 7 minutes. Season with coarse salt and black pepper. Transfer to serving bowl. Toss with toasted walnuts and dried currants. Serve.
-
Frozen Yogurt

A couple of years ago, while in New York City with my cousin, after a long day of walking we took a cab to the 59th Street Bloomingdales just to have frozen yogurt from the fabulous 40 Carrots on the 7th floor before they closed. Andrea had raved about how great their frozen yogurt was and I am always game to try something new. Their plain frozen yogurt was the best frozen treat I have ever tasted, tangy and a little sweet, the perfect pairing. I have yet to find frozen yogurt to rival it, until now. I came across this recipe from David Lebovitz that many people swear rivals Pinkberry’s frozen yogurt, which I have yet to try myself.
This recipe was insanely easy to make. You could add vanilla or chocolate swirls if you wish, but I cannot recommend enough making it straight up. This might win out over ice cream, for me. You will be amazed at all of the flavor. I would definitely recommend using a high quality whole milk Greek yogurt. If you cannot find a good Greek yogurt, make 1 cup of strained yogurt, by lining a mesh strainer with a few layers of cheese cloth. Place 16 ounces or 2 cups of plain whole-milk yogurt into the cheesecloth. Gather the ends and fold them over the yogurt, then refrigerate for at least 6 hours. To make the 4 cups you would need for this recipe by straining 8 cups of yogurt.
The recipe calls for 3/4 cup of sugar, I went with a little bit less and I skipped the vanilla this time, to really get that tang that I love. You can use regular sugar if you wish, I prefer organic raw sugar. We served it with some fresh blackberries. So delicious.
Frozen Yogurt
makes about 1 quart4 cups Greek-style yogurt
3/4 cup organic raw sugar
1 teaspoon vanilla extract (optional)Mix together the yogurt, sugar, and vanilla (if using). Stir until the sugar is completely dissolved. Refrigerate 1 hour.
Freeze in your ice cream maker according to the manufacturer’s instructions.
-
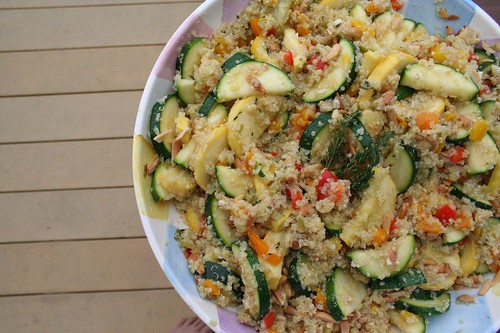
Quinoa Salad with Toasted Almonds
Again, sorry for the lack of posts. This time it wasn’t that I wasn’t cooking or away for work, Mark and I took a week “off” with 5 of our friends and spent some time at my family’s beautiful beach house on Lake Erie that we rented for an entire week. What a much-needed, relaxing time away. We got to just hang out and spend time together, no event to rush off to, no posters to be printed, just good a old-fashioned vacation. Sure most of us still had to pull the laptops out and get some work done, but being away from life, on the beach and with the people you love most, is one of the best ways you can spend your time.
We of course, planned meals and cooked and ate like kings and queens, ok and we may have drunk a bit, too. I had a handful of recipes I wanted to make and some that I wanted to try for the first time, what better group of people to use as guinea pigs than your friends.
Over the next couple of days I will be posting some of the recipes that I made. I did make a huge pot of my chili one night, but I never measure with that and of course forgot photos, but I make that often during the fall, so that will be posted soon.
The first recipe that I tried out was this delicious quinoa salad with toasted almonds. It was a great way to highlight all the lovely veggies that are in season and it was the perfect side to one of our butterflied grilled chickens from Sojourner Farms that Mark and I made for everyone. Since there were 7 of us, I multiplied the original recipe for this salad by 4, to serve 8, but I am posting it here to serve 2. Not only is this recipe gluten-free but also vegan.
It was so good, we were all eating it right after it was done cooking, right out of the bowl on the countertop and before it had fully cooled. It is always hard to please a large group of people with food, but surprisingly everyone loved this salad and the leftovers were perfect for lunch after enjoying some time in the sun and swimming. A couple of things that I had changed since I made such a large batch, was instead of 1 yellow pepper, since we needed so much more, I went with one each of yellow, red and orange peppers. I also went with green zucchini and yellow squash, since I had an abundance of both, and I loved all the color. Because we were at the beach house and our supplies were limited, I also skipped the celery when I made it, and instead of dried red pepper flakes (which we didn’t have), I went with a hot pepper oil from some hot pepper sandwich spread that Allison and Craig had bought for sandwiches, the subtle heat was so perfect. I have become a huge fan of quinoa and I love it’s versatility. It can be served like most grains, though it is actually a seed, it is perfect sweet or savory, hot or cold. It really is the super food, as they call it. It is packed with protein and loaded with fiber. Quinoa can be found with other grains in the natural or organic section at most supermarkets or at natural food stores.
This recipe came from the Whole Living website and it was featured in Body + Soul Magazine, March 2006. I have a subscription to Whole Living, and I really cannot recommend it enough, great recipes, articles and tips for clean and healthy living.
Quinoa Salad With Toasted Almonds
Serves 2
Adapted from Body + Soul Magazine, March 20061/4 cup slivered almonds
1/2 cup (3 ounces) quinoa
4 teaspoons olive oil
1 yellow bell pepper, ribs and seeds discarded, cut into 1/2-inch chunks
2 garlic cloves, minced
2 scallions, thinly sliced
1/8 teaspoon red-pepper flakes
1 teaspoon chopped fresh thyme, plus more for garnish (optional)
1/4 teaspoon coarse salt
1 medium zucchini, halved lengthwise and sliced 1/2-inch thick
1 large celery stalk, diced
1 lime, halvedPreheat oven to 350 degrees. Toast almonds until crisp, lightly browned, and fragrant, about 7 minutes. Remove from oven and set aside. Meanwhile, place quinoa in a fine sieve and rinse under cold running water until the water runs clear; drain well.
In a medium saucepan, heat 2 teaspoons olive oil over medium heat. Add yellow pepper, garlic, scallions, and red-pepper flakes; cook until the pepper is crisp-tender, about 5 minutes.
Stir in quinoa, thyme, 1 cup water, and 1/4 teaspoon salt. Bring to a boil, reduce to a simmer, cover, and cook 7 minutes. Stir in zucchini, cover, and cook until quinoa is tender but not mushy, 5 to 8 minutes longer. Remove the saucepan from heat.
Stir in celery, almonds, and remaining 2 teaspoons oil, season with salt, and fluff with a fork. Cool to room temperature before packing into two containers and refrigerating. When ready to eat, squeeze lime over salad, if desired. Serve with additional lime wedge and thyme, if desired.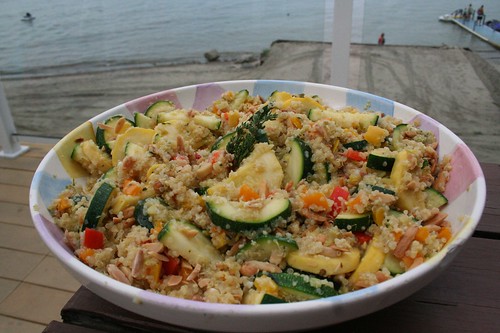
-
Penne with Deconstructed Zucchini Pistou

I came across a recipe recently for a classic Provencial dish, Penne with Zucchini Pistou, and I couldn’t wait to use the zucchini from our garden and make it. I had planned on making this dish last night after we got home from a long day at the studio, but I was so exhausted from all the late nights of work and travel. So, I instead decided I would simplify the dish and deconstruct all the bold flavors from the South of France that were featured in the original recipe and make it my way.
Pistou is to the French what pesto is to Italians, and I really love pesto, so I knew this recipe was a win. The only major thing missing from my recipe that was in the original was 1/4 cup of heavy whipping cream, which is also part of the reason I decided to change the recipe up. Since we didn’t have any on hand and I didn’t feel like hitting the grocery store, I decided to skip it. I, of course, made this with gluten-free pasta and I served it with a beautiful green salad, made completely from our garden. This was the first salad of the season and it made me so incredibly happy.
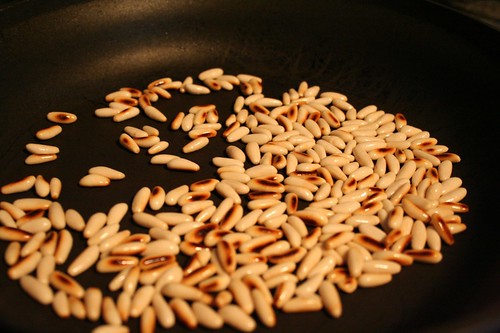
This is a fantastic vegetarian entree or would make a lovely side dish as well. I can’t wait to make it again from the original recipe, heavy cream and all! Yum. Oh and if you are even thinking about leaving the toasted pine nuts out, or skipping the toasting step, you are CRAZY! Those toasted pine nuts make this dish!!
Penne with Deconstructed Zucchini Pistou
serves 48 ounces uncooked organic brown rice penne pasta (or whatever pasta you prefer)
4 teaspoon extra-virgin olive oil
1/4 cup pine nuts
4 garlic cloves, minced
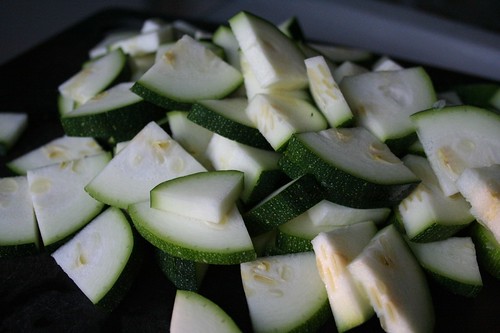
2 1/2 cups zucchini, sliced and quartered
1 cup packed fresh basil leaves, chopped roughly
3/4 cup Parmigiano-Reggiano cheese, shredded
2 teaspoons kosher salt
freshly ground black pepperBoil water with 1 teaspoon of kosher salt in a large sauce pan over high heat, cook pasta according to package instructions. Drain over a bowl and reserve 1/3 cup of the cooking liquid, rinse pasta in hot water, drain. Leave in colander.
Heat a large skillet over medium-high heat, add pine nuts and toast until golden brown, tossing often so they don’t burn. Remove from the pan and set aside in a bowl.
In the same large skillet heat 2 teaspoons of oil, over medium-high heat. Add 2 cloves garlic and zucchini to pan, saute 5-10 minutes until tender and golden. Salt and pepper to taste.
In a large serving bowl, add the pasta, zucchini, pine nuts, chopped basil, the last 2 cloves of minced garlic and 2 teaspoons of olive oil. Toss to combine and mix. Add the cheese to the pasta mixture and slowly add the reserved liquid as needed to coat the pasta and make it creamy. Toss again, salt and pepper to taste and top with a bit more shredded Parmigiano-Reggiano cheese.
-
Toasted Spicy Almonds

Sorry for the lack of posts – we have been very busy over here. We were in Chicago this past weekend for the Pitchfork Music Festival and Flatstock 26 and before that we were busting our butts designing and printed, getting ready for the festival. I have still been cooking, but pulling out the camera, trying out new recipes, etc., gets put on hold when life gets this crazy. Before we left town I did get a chance to make this delicious snack to munch on in the car on the road trip to Chicago. I know most of the reason I crave salty snacks in the car is due to boredom, but I have accepted that and I am happy to enjoy not having a mountain of work and a long to-do list, and to sit back watch the road and enjoy my hubby’s company. Rather than salty processed potato chips from a random gas station, I thought that these would be the perfect alternative. We also packed up some of the gluten-free blueberry muffins that I had previously made and froze and some chipotle hummus with sliced cucumbers from our garden. No reason to hit a drive-thru for lunch or to eat junk!
These almonds were so satisfying and easy to make. I started with roasted almonds since that is what I had on hand, but you could also start with raw almonds, and just toast them even longer. Mark and I both really love spicy food, so you can adjust the peppers accordingly. I used a premade salt-free Black and Red Spice mix from Penzeys, that was a mix of Tellicherry black pepper and hot cayenne red pepper.
We leave again in less than one week for San Francisco for the Renegade Craft Fair, then we are back home for a bit. Hoping to be able to cook a bunch and really use all the goodies we’re getting from the garden.
Toasted Spicy Almonds
1 tablespoon organic butter
8 ounces organic roasted almonds, unsalted
1/2 teaspoon black pepper
1/2 teaspoon cayenne pepper
1/2 teaspoon kosher saltSlowly melt butter in a non-stick skillet over medium-high heat. Add the nuts, peppers and salt. Toss with a rubber spatula to coat the nuts and spread them out in the pan in a single layer. Allow the nuts to start to brown a bit, then toss or stir to flip, allow them to continue to toast. This process only takes a few minutes (3-5), remove the pan from the heat when the desired amount of doneness is achieved. Adjust spices and salt to taste. Allow to cool before serving.
-
Potato Salad with Yogurt Cheese Dressing

I usually am not a fan of mayo based potato salad, something about most of them just never seems very appetizing to me. However, I had been meaning to experiment with a yogurt-based dressing as an alternative. I had bought some great yogurt cheese from White Cow Dairy at the farmer’s market and I thought that would be perfect for a potato salad dressing. White Cow Dairy is located in East Otto, NY where all of their cows enjoy a life full of grazing on their lush pastures. They make a variety of artisan products including custards, crème bulgares, thick yogurts, whey drinks, sauces and more. When sweetening is required, their products are flavored with maple found right on their own land, additionally they use wild leeks, onions, blueberries and apples all from the land on or surrounding their farm. I love that.
I really don’t know much about yogurt cheese, just that it is the creamy white cheese you get when liquid whey drains from yogurt. It has a great thick and rich consistency without the fat and it really gives a nice tang to all kinds of dishes. I have put it on everything from veggie burgers to fresh berries. It is quite versatile with either sweet or savory items. I will definitely be buying it again. I have also seen recipes for making your own yogurt cheese at home, though I am not sure I would bother considering the perfection that White Cow Dairy has achieved with theirs.
As usual, I threw this recipe together by taste, so I am not exactly sure on the measurements. I had a small bushel of baby potatoes from the market last week that needed to get eaten up, so I just pulled this together on the fly.
Potato Salad with Yogurt Cheese Dressing
serves 41 cup yogurt cheese
approx 1/4 cup organic milk to thin the cheese
approx 30 or so baby potatoes, (red or otherwise)
half of a medium-sized red onion, chopped
fresh herbs, dill, chives, etc (dried will work as well)
kosher salt
fresh ground black pepperIn salty water, boil the potatoes, cook until soft. Drain and allow to cool. Once cooled, you can peel and half them. I leave the peels on myself. Put the halved potatoes in a large serving bowl, add the chopped red onion, chopped fresh chives and dill (I went with dried dill as that was all I had). To prepare the dressing, take 1 cup of the yogurt and slowly add the milk, one tablespoon at a time, whisking. Add milk until the yogurt is thinned to your desired consistency. I left mine fairly thick, but not chunky. Add the dressing to the potato salad and season with salt and pepper. Mix to combine and coat, being careful not to mash the potatoes. Taste and add more seasonings as needed. Chill until you are ready to serve. Allowing this to chill for a good couple of hours really brings all the flavors together and all the ingredients get nice and cold. Serve with fresh chives and fresh ground pepper on top. Enjoy.
-
Strawberry Basil Mojito

The mojito is one of my go to summer cocktails. But, as with everything, I love all the variations on the classic. This is one of my favorites and considering we had grabbed some fresh picked strawberries while we were out in the country and my herbs are growing out of control in our yard, this was a no brainer.
I love the sweetness from the strawberries and the spiciness from the basil. It is perfectly light and refreshing, the perfect Springtime twist on an old classic.
Strawberry Basil Mojito
serves 15 strawberries, hulled
5 fresh basil leaves
1/2 tablespoon organic pure cane sugar (or 2 oz of simple syrup)
2 oz white rum
ice cubes
club sodaSlice the strawberries and place at the bottom of a tall glass along with the basil leaves. Add sugar or simple syrup and muddle the mixture. Stir in the rum and top with ice. Top off with club soda and garnish with strawberry slices and basil leaves.
-
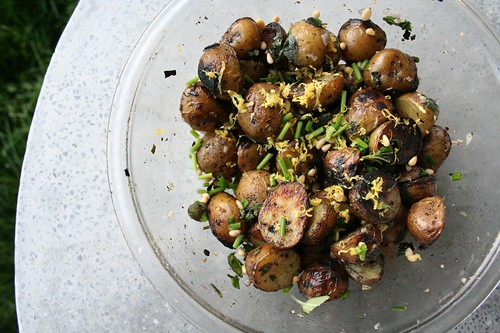
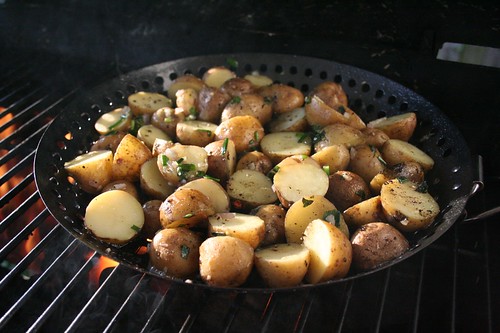
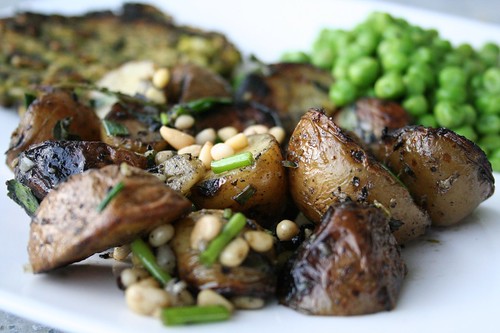
Grilled Herb Potato Salad
Last night after we left the studio, we had planned on throwing together something quick and heading to the grocery store to grab what we needed for the next week. By the time we got home, the sun was still shining and neither of us felt like grocery shopping, so instead I decided we could make do with what we had at home and put the grocery store off one more night. I am glad we did.
We had a bag of baby potatoes and some delicious handmade veggie burgers from the Farmers Market, so I decided we would be able to do something amazing with these plus some frozen organic peas. Both my oregano and chives came up on their own from last season and they are growing out of control, taking over my herb box, so I have been trying to take advantage and use them in almost everything I make. Since we were firing up the grill for the brown rice and spinach burgers, this sounded like the perfect way to make a side dish with the potatoes. They really turned out great. There was so much flavor from the fresh herbs and the crispy smoke flavor from the grill was perfect. I think we will be making this a lot this summer.
Grilled Herb Potato Salad
serves 430 baby potatoes, halved
coarse kosher salt
3 garlic cloves, halve two of the cloves, mince the third
olive oil
1 shallot, diced
1 bunch of fresh oregano, chopped
1 bunch of fresh chives, chopped
1/4 cup of pine nuts
freshly ground black pepper
2 teaspoons lemon zestStart by precooking the potatoes. Add the halved baby potatoes, a tablespoon of course salt, two cloves of garlic (halved) and enough water to cover the potatoes by 1-inch to a medium-sized pot over high heat. Bring it to a boil, then reduce heat and simmer for approximately 10-12 minutes or until the potatoes are just tender.
Drain potatoes in a colander and rinse with cold water to cool quickly and stop the potatoes from cooking.
Start your grill, preheat with the cover on for about 10 minutes on high. Lightly spray a grill pan with cooking spray to keep the potatoes from sticking (if you do not have a grill pan, you can also thread the potatoes onto skewers).
Meanwhile in a large bowl, combine 2 tablespoons of olive oil, the diced shallot, minced garlic, the chopped fresh herbs, plus 1 teaspoon of kosher salt and freshly ground black pepper. Mix the mixture to combine the ingredients and then remove half of the mixture to a small bowl, set aside. Add the potatoes to the large mixing bowl, and toss to coat the potatoes with the oil and herb mixture.
Pour the potatoes into the grill pan and set onto your hot grill, we got a bit of smoke because of the little bit of oil dripping, but it gave the potatoes a great smokey flavor. Give the potatoes a stir every few minutes to make sure they aren’t sticking. Once you are sure they aren’t sticking, you can stir them last which will allow them to get crispier. Cook them over a high heat for approximately 15-20 minutes until they are fully cooked and starting to brown and crisp up a bit. (This time will depend on how hot your grill is, we couldn’t get our grill super hot so it took a bit longer, it may only take about 10-15 minutes on a very hot grill). Remove the grill pan from the heat, and add the potatoes back to your large mixing bowl, add the remainder of the oil and herb mixture, the pine nuts, lemon zest and salt and pepper to taste. Toss gently to combine. Enjoy.
(This can also easily be made by roasting or broiling the potatoes in shallow baking pan in your oven. The potatoes can also be boiled 1 day ahead and kept in the refrigerator. Bring them to room temperature before boiling)
-
Vegetarian Faux Pho

This is a VERY thrown together version of traditional Pho, though there is little that is traditional about my version. Traditional Pho (pronounced “phuh”), is a staple of Vietnamese cuisine and culture. A hearty soup usually made with a clear beef or chicken broth that includes rice noodles and distinct flavors such as cinnamon, star anise, clove, basil, lime and more. There are many, many variations to this dish and it is often eaten as breakfast, lunch or dinner.
Last night, I had a head full of congested sinuses, wasn’t feeling so hot and I just wanted something hot, spicy and brothy. Pho was all I could think of, but I didn’t want to leave the house. I had to make it with what I had on hand in the refrigerator and pantry. I would have preferred to have included some tofu, star anise, bean sprouts and thicker more traditional rice noodles, but I made do with what I had. Mine was much thicker than traditional Pho is, since I cooked my rice noodles right in the broth, but the flavors were there, none the less. I have to say, it turned out pretty good, considering it was thrown together. Which is why I decided to share my faux recipe, to show you that you can always come up with something quick and fresh with what you have on hand.
Making this faux Pho, however has made me realize that I would really like to make a full on pot of traditional Pho very soon.
Vegetarian Faux Pho
Serves 2-41 tablespoon olive oil
1 small onion, diced
1 shallot, diced
2 cloves garlic, minced
1 small jalapeño, seeds and stem removed, minced
1 tablespoon ginger, minced
1 tablespoon cinnamon (I used ground because I didn’t have sticks)
1/2 tablespoon cloves (I used ground because I didn’t have whole cloves)
6 cups vegetable broth
3 tablespoons soy sauce (I use low sodium, gluten-free Tamari)
2 tablespoons basil, finely chopped
8 ounces rice noodles (all I had on hand was gluten-free rice spaghetti)
1 lime, cut into wedges
cilantro
scallions, sliced
sriracha chili pasteHeat olive oil in a large pot over medium-high heat, add onions, shallots, garlic, jalapeño, ginger, cinnamon and cloves, stirring occasionally until the vegetables turn clear and start to char a bit. Add the stock, soy sauce, basil and a squeeze or two of sriracha and bring to a boil over high heat. Turn the heat down to medium-low and simmer for about 25 minutes.
You can cook the rice noodles separately or if you are lazy like I was, just toss them right into the broth and cook them in there. By cooking the noodles in the broth, it made the broth very, very thick, but I didn’t care, I wanted fast and easy. I added the noodles, brought it to a boil then lowered the heat to medium-high and simmered until the noodles were cooked. About 10 minutes.
Ladle the broth and scoop a bunch of noodles out into large soup bowls. Serve topped with scallions, cilantro, a squeeze or two of lime juice and if you want it more spicy a bit more sriracha.
-
Spinach Salad with Gorgonzola, Walnuts & Grapes
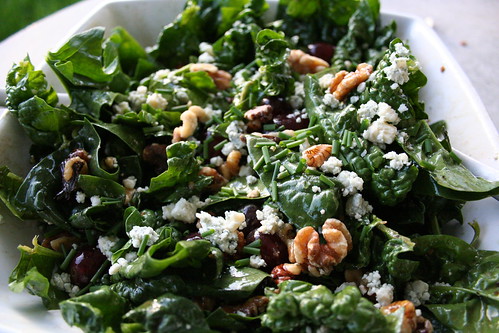
We bought two beautiful bags of fresh spinach at the farmers market last Saturday and I finally got to using some of it with our dinner Friday night. As soon as I saw the spinach, I planned on making a crisp and springy salad, so that is just what I did. This was perfectly crisp and super tasty, the grapes brought a sweet dimension, the walnuts brought the crunch and the gorgonzola gave a creamy tang. I whipped up a quick balsamic vinaigrette and that was it. Super easy and super satisfying. We enjoyed this salad as a side with some grilled Italian sausage we bought fresh from a farmer at the market.
Balsamic Vinaigrette
yields 1 cup1/4 cup balsamic vinegar
2 teaspoons honey
1 tablespoon chopped garlic
1/2 teaspoon salt
1/2 teaspoon freshly ground black pepper
3/4 cup olive oilBeat the vinegar in a bowl with the honey, garlic, salt and pepper until honey and salt dissolves. Then beat in the oil by droplets, whisking constantly. Taste and season to taste.
Spinach Salad with Gorgonzola, Walnuts & Grapes
serves 44 cups of fresh young spinach
2 handfuls of seedless red grapes
1 cup of chopped walnuts
2 oz of gorgonzola cheese, crumbled
4 tablespoons of balsamic vinaigrette
1 bunch of chives, chopped
pepperRemove the stems from the spinach and wash, drain and pat dry thoroughly. If the leaves are large you can tear them or chop them to make smaller. Place into a large mixing bowl. Add in grapes and walnuts. Toss to combine. Just before you are ready to serve, add half of the gorgonzola cheese, whisk up the vinaigrette, drizzle over the salad and gently toss to coat the entire salad with the dressing and to mix the cheese throughout. Taste, add more vinaigrette, if necessary. Top the salad with the remaining gorgonzola, freshly ground black pepper and fresh chives. Serve.
-
Black Bean Enchiladas


I find buying things just for the sake of a holiday to be silly, I don’t do it. I’d rather give something to someone I love because it reminds me of them, no matter what the day. Being that today was Mother’s Day, I decided that my gift to my mom would be to cook for her. We all get together at my parent’s house every Sunday and have a delicious dinner together, so I offered early in the week to be the one to do the cooking this week.
We were very lucky growing up, my parents always had a home cooked meal prepared for us for dinner every night, we would all sit down at the end of the day and have dinner together. Whether it was my mom cooking something in the crock pot or my dad concocting some random recipe, it was always there, it was always homemade and it always made with love. I am realizing now as an adult what an amazing gift that was, and just how lucky we were. I know this is where my love to cook comes from and why I love that feeling you get when you are able to share something you’ve made from scratch with the people you love the most. This meal was even better than me just cooking it alone for everyone, because we made it together and hung out all afternoon in the kitchen. My dad helped grill the veggies, made his famous Spanish rice and some delicious margaritas to go with the meal. My mom cooked the corn tortillas as I was pressing them and she helped assemble the enchiladas. My sister, Dana, hung out and kept us all company (I swear I will get you cooking Dana). My husband, Mark, and my nephew, Noah, watched movies, rough housed and played cars in the living room. A fun family day. Though we missed my sister, Vicky, her boyfriend, Nick, and my lovely niece, Teagan.

There are a few different elements to this recipe and they will all be in this post. I will post a separate entry for my guacamole, which we enjoyed as a side.
I started preparing the meal the day prior by soaking the beans for the slow cooked black beans, which I wanted to have a ton of flavor since they would be the main element of the enchiladas. I also grabbed a plain rotisserie chicken at the grocery store this morning since I knew my dad wouldn’t go for an entirely vegetarian meal, being the typical “meat and potatoes” guy and my older sister, Dana, doesn’t like beans. There really are so many ways you can make these enchiladas, adding different vegetables like zucchini, spinach or mushrooms, and different proteins like tofu or various meats, you can even go just cheese. The sky is the limit. This was what I thought sounded the best, so this is what I went with. They really turned out great. The enchilada sauce had so much flavor, I can’t believe I ever bought canned enchilada sauce in the past, this was so easy. The beans had a delicious smokey, slow cooked flavor that you won’t find in any can of black beans on the shelf at the grocery store. Definitely worth the extra time.
Slow cooked black beans
Adapted from Recipes for Health, New York Times, March 20091 pound dry organic black beans, washed and picked over
2 quarts water
1 tablespoon olive oil
1 medium onion
4 large garlic cloves, minced
1/4 cup cilantro, chopped
3 whole chipotles, dried
kosher saltSoak the beans in the water for at least six hours. Keep them in the refrigerator if you are soaking for a long time in hot weather.
Heat the oil over medium heat in a large soup pot and add the onion, stirring until it begins to soften. Add two cloves of the minced garlic. Cook until fragrant, about a minute. Add the beans and soaking water. Be sure the beans are covered by at least 1 inch of water, add more if necessary and bring to a boil. Reduce the heat to low and skim off any foam that rises. Cover and simmer one hour.
Add the salt, remaining two cloves of minced garlic, cilantro and the whole chipotles. Continue to simmer another hour until the beans are soft and the broth is thick and fragrant. Taste. Add more salt to taste, add more garlic if it needs it. Let sit overnight in the refrigerator for the best flavor. Heat back up over medium heat before making the enchiladas.

Enchilada Sauce
2 tablespoons olive oil
1 small onion, chopped
2 large garlic cloves, minced
2 small jalapeno peppers, chopped
6 medium tomatoes, coarsely chopped
2 teaspoons cumin
2 teaspoons chili powder
3 dried chipotles, whole
2 roasted red peppers, chopped
2 teaspoons saltHeat oil over medium heat in a large saucepan, add onion, garlic and jalapeno. Sauté, stirring until the vegetables begin to soften, about three minutes. Add tomatoes, cumin, chili powder, chipotles, roasted red peppers and salt, simmer on a low heat for at least 30 minutes, until the sauce has thickened and the tomatoes are very soft. Turn the heat off, remove the whole chipotles and add the sauce to a food processor, blend until smooth. Set aside.

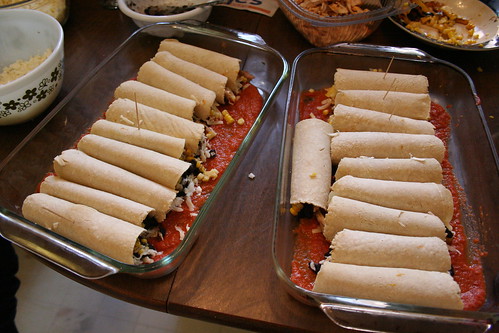

Black Bean Enchiladas
Serves 8-1020 fresh homemade corn tortillas, prepared, cooked and ready to be eaten
(if you used store-bought corn tortillas, you will need to heat these up to make them less breakable)
slow cooked black beans, see recipe above (or if you must, canned black beans)
enchilada sauce, see recipe above
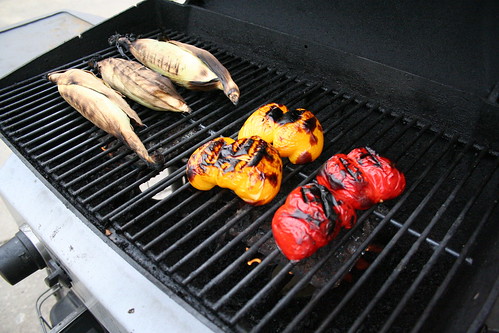
3 ears sweet corn, cooked thoroughly on the grill
2 bell peppers, roasted on the grill (red, orange, yellow or green), cut into strips
1 cup shredded queso blanco
1 cup shredded jack cheese
green onions
cilantro
sour cream
guacamole
shredded lettucePreheat your oven to 350° F
Prepare your corn tortillas, black beans and enchilada sauce ahead of time. Lightly coat the bottom of two 9″ x 13″ glass pans with the enchilada sauce, probably about 1/2 cup in each. Place a corn tortilla, flat in the palm of your hand (or on a flat surface) and put a spoonful of corn, black beans, a couple of peppers, and a sprinkling of each cheese in the tortilla, careful to not overfill it and to leave enough ingredients for the rest of the tortillas. Be sure to leave enough cheese to top the enchiladas as well. Carefully roll the tortilla up and place it with the open side down in the sauce lined pan. Repeat this with the rest. Because we made some with chicken and beans, some with just beans and some with just chicken, we marked them accordingly with toothpicks. You really can add anything to the filling of these, be creative. Pour the remaining sauce over the enchiladas and top with the remaining shredded queso blanco and jack cheese and chopped green onions and cilantro. Bake 25 – 30 minutes until the cheese is melted, browning and bubbling. Top with (or serve on the side) sour cream, lettuce, and/or guacamole or any other favorite garnishes.

With love.
-
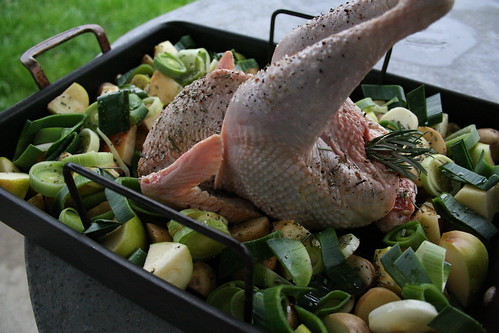
Roast Chicken, Apples, Leeks and Baby Potatoes

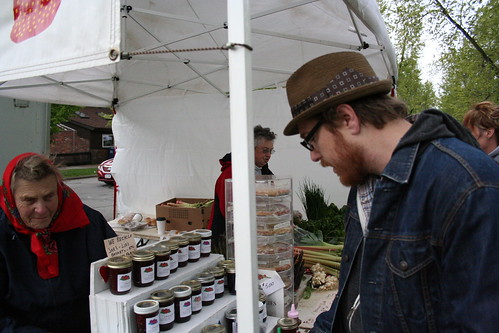
Yesterday was the first day of our big Farmers Market at Elmwood and Bidwell and I knew all week that the weather was doomed for it’s opening day. We decided to meet my parents there right at 9 am to possibly beat the rain and wind. It actually wasn’t too bad, though it felt more like a very cool Autumn Day, not Spring. We walked around, looked at everything, ran into friends and began to make a plan for what we wanted to buy. The sun even peaked out a time or two. Eventually dark clouds made their way overhead, the wind picked up and we knew we should probably make our purchases soon.
We got so much great stuff, apples, leeks, spinach, asparagus, baby potatoes, veggie burgers, yogurt leek sauce, homemade strawberry jam, fresh from the farm eggs, sausage, bacon, and a beautiful, whole, fresh Heritage chicken. I decided this would be dinner. A roast chicken. It was the perfect day for it, it was cold, rainy and windy and I just wanted to stay in. So, I took a look at everything else we bought and made a plan.
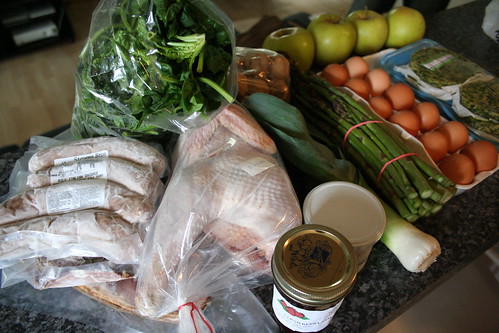

Roast Chicken, Apples, Leeks and Baby Potatoes
Serves 2 with leftover veggies2 medium apples (I used Crispin) chopped
1 leek (white and light green parts), chopped
1 pound of baby potatoes, halved
4 small sprigs fresh rosemary, chopped
olive oil
Sea salt and freshly ground black pepper
1 3 pound whole chicken – we had a farm raised, all natural, heritage chicken from Painted Meadows Farms in Franklinville, NYPreheat your oven to 350° F
Rinse the bird, inside and out and pat dry. Place the potatoes, leeks and apples in the roasting tray of a large roasting pan, place the chicken in the center (breast side up). Drizzle olive oil over everything, making sure to get a good light coating over the whole bird to give you a crispy, perfectly browned skin. Sprinkle everything with rosemary, sea salt and freshly ground pepper. You can also sprinkle the inside of the bird with your spices as well, I did that plus I stuffed a couple of chopped leeks in there, as well as a whole sprig of rosemary. Toss the vegetables gently to make sure they are coated.
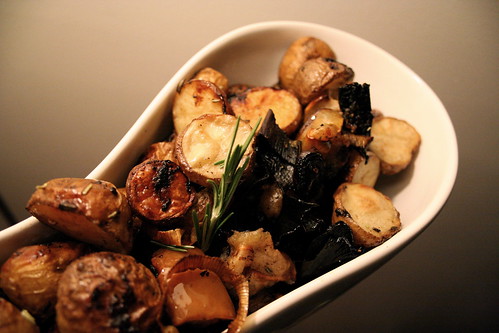
Roast the chicken until it is cooked through and the apples, potatoes and leeks are tender. I took the chicken out around 2 hours and the veggies could still use more time, so I took the chicken out to rest, took the vegetables out of the roasting tray so they could cook in the juices from the chicken and turned the oven up to 400° F. I wanted to get them really brown and crispy, the way we like them. Taste the veggies as they are done and season to taste with salt and pepper.
Allow the chicken to rest 10-15 minutes before cutting into it, this will allow the juices to redistribute. Serve with a nice helping of the apples, leeks and potatoes.
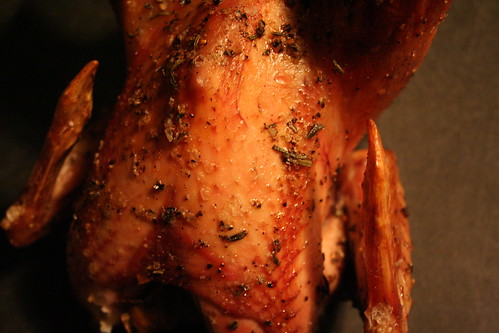
We found that the Heritage Chicken was much different from any other chicken we had ever roasted before, it had an incredible scent when it came out of the oven and it tasted so amazing, a much more rich chicken flavor than from the grocery store chickens. We found the dark meat to be very dark and slightly tougher (almost gamier), a bit more like a cornish hen. However, the breast meat was impeccable, what chicken should taste like, the best I have ever had. The skin, though I don’t typically eat it any way, was thicker than usual and tough to eat. Mark usually eats as much as he can before I start nagging him about the fat, but this time he couldn’t eat much. I’ll have to ask the women we bought the chicken from next week if there is a trick for cooking the Heritage birds, from what I had read it is best to cook these birds low and slow so as not to dry them out and toughen the meat. The legs on this bird seemed longer than I have ever seen and they were sticking straight up (!), but I didn’t have any kitchen twine to truss them, so I went without. I am curious if that could have been why the leg meat seemed tougher, maybe it was overcooked.
We ate dinner a bit later than normal last night, so by the time it was ready it was fairly dark and the pictures of the finished bird are not that great. Still working on a way around the night-time photos.
All in all, this was the perfect start to the farmers market season, I cannot wait to make more meals this week with the goodies we bought and of course to go back next week.
-
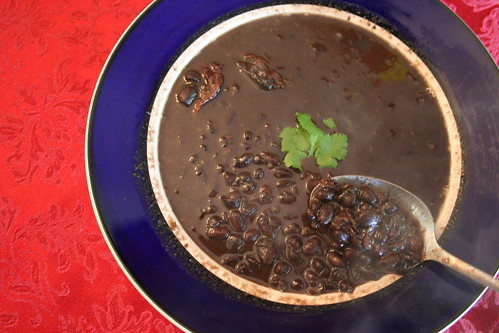
Chicken Soup for the Sniffles.

Yesterday morning, when I woke, I realized that what I thought was allergies the day before, turned out to apparently be an old-fashioned, end of the season, COLD. I had the sniffles and I was feeling off. I was also feeling guilty as it was a beautiful, warm and sunny day and I had a ton to do at the studio. For some reason being sick on cold and dreary days is much easier. I eventually realized it was far more important to take care of myself than to stay at work, so I left a few hours early, swung by the grocery store to buy supplies and headed home to make soup. I figured that, combined with everything else I was doing, was sure to make me well quicker. Now that I am eating clean, I am treating things like headaches and colds naturally, not that I was a big medicine person before, so I am attacking this cold with homeopathic syrup, vitamin C, cold care tea and zinc. I have to say, today is day two and I am actually feeling much better already.
I decided to make the stock for my soup from scratch, since there is really nothing like it. This is the first time I had meat in over 7 weeks, but chicken noodle soup was the only thing that I wanted, and I knew it would help my sniffles. Being that the chickens we ordered from the farm won’t be ready until mid-June, I settled on an organic whole fryer chicken from Wegmans and some good organic veggies, so it was perfect.
You can most certainly make this soup with canned or boxed broth or stock, but I am telling you, it just isn’t the same.
By the time the soup was ready to be served, a cold chill had come over the air, dark clouds moved in and the rain and thunder started. It was perfect soup weather. I started feeling better almost instantly and today I can tell that the cold is on its way out the door.
Chicken Stock
4 quarts of water
1 fresh whole chicken 3-4 lbs, cut into pieces or 4 lbs assorted chicken bones (I prefer organic, free range and without hormones or antibiotics)
4 celery stalks, roughly chopped
4 carrots, halved (I kept the skin on, but washed them)
1 large onion, quartered
2 garlic cloves, halved
1 cup fennel, chopped
2 bay leaves
5 sprigs fresh thyme
2 teaspoons sea salt
2 teaspoons pepper
1 tablespoon fresh tarragonIn a large stockpot, (use the strainer that fits in your stock pot if you have one) combine all the ingredients and bring to a gentle boil. Reduce the heat and simmer, uncovered, for 2 1/2 hours, skimming the surface occasionally to remove any foam that forms on the surface. I added a bit more water as it was cooking to keep the chicken and vegetables covered. The longer you cook the stock, the stronger the flavor will be, but 2 1/2 hours was more than adequate and the stock had a fantastic flavor to it.
Remove the meat and bones and reserve, the meat can be separated and added back to the soup, used for chicken salad, etc. I prefer to add it back to the soup. If you didn’t use the strainer when making the stock, strain the stock to remove all the vegetables and other bits and add back to the pot. Throw out the bones and vegetables. Use the stock immediately or let the stock cool completely, and refrigerate overnight. Skim any fat that forms on the surface. Keep refrigerated in airtight containers until ready to use, up to 3 days, or freeze for up to 2 months. Since I was using the stock immediately, I skimmed any visible fat off the top, made sure that it was strained of everything, and kept it on a low heat while I prepped everything for the soup.
Chicken Noodle Soup
Serves 6-84 quarts of chicken stock
chicken leftover from making stock or 2 chicken breast, already cooked, chopped or shredded
4 carrots, chopped
4 ribs celery, cut in half lengthwise, then chopped
1 onion, chopped
4 large cloves garlic, minced (you don’t have to use so much, but garlic is good for treating a cold)
1 tablespoon olive oil
1 tablespoon fresh rosemary, minced
2 tablespoon fresh tarragon, minced
2 1/2 cups of gluten-free noodles
1 bunch fresh chives, choppedIn a medium-sized pan, heat the olive oil over a medium heat and sautée the carrots, celery, onion and garlic. Stir occasionally, making sure they do not burn. After the onion has become translucent, but all the veggies still have a crisp, add the rosemary and tarragon, stir to mix the flavors.
Add the veggies back to the pot with the stock and bring the heat to a medium-high. Let the stock and vegetable simmer, until it comes to a gentle boil, continue to let boil for about ten minutes. After ten minutes, taste the veggies to be sure they are softening to your liking. Add the cooked chicken and stir to let all the flavors mix. Taste, then season to taste, I found it needed more salt and pepper and I added more tarragon.
At the end, add the gluten-free noodles. Make sure that you account for how much liquid you started with when deciding on an amount of noodles, if you add too many they will blow up and take in all the liquid. Cook the noodles until the are done, mine took about 10 mins or so, you want a bit of a bite to them. Ladle into bowls, add a sprinkle of your favorite salt, fresh ground pepper and top with some chopped fresh chives. I love a small sprinkling of freshly grated Parmigiano Reggiano over the top, as well. Enjoy.

-
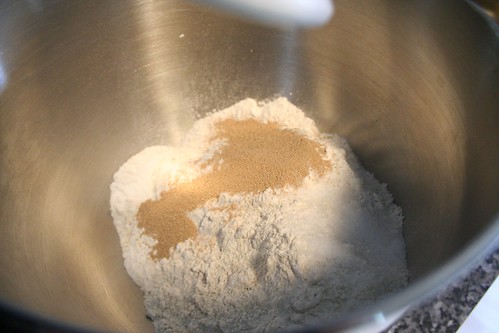
Gluten-Free Crusty Rosemary Boule Bread
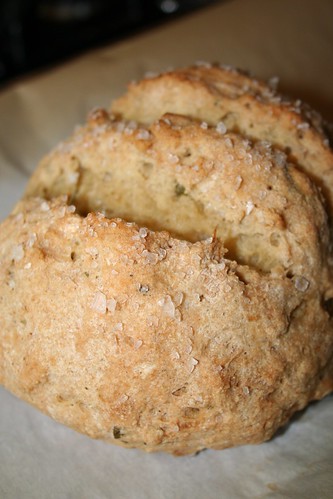
I have never been much of a baker, I am not one for precise and exact anything. That is what I love about cooking, measuring and pouring by taste and sense. Once I learned I have to eat a completely gluten-free diet, I swore I would never bake again since most gluten-free recipes for baking have so many strange ingredients and odd flours. To be honest, it just seemed like far more work than it was worth since most of the gluten-free baked goods that I had tried were just plain gross. I finally decided that I should at least try baking something gluten-free completely from scratch, especially since I am really trying to avoid anything processed and only eat whole and fresh. That is when I saw the recipe for this bread posted on Gluten Free Girl & The Chef, I decided to give it a whirl, and boy am I glad I did.
It is the real deal! Crusty, grainy, delicious bread. And yes, I will say it again, it is gluten-free! I have served it to a number of people who don’t eat gluten-free and they have all loved it. Besides the crusty outside, the inside is light and airy, unlike most gluten-free breads that end up dense and heavy. It is great on sandwiches, lovely for breakfast, it is just amazing! What can I say, I am in love. I have made this bread so many times now and each time it gets better.

Gluten-Free Crusty Rosemary Boule Bread
adapted from Healthy Bread in Five Minutes a Day, by Jeff Hertzberg and Zoë Francois via Gluten Free Girl & the Chef
Makes enough dough for two 1-pound loaves1 cup brown rice flour
3/4 cup sorghum flour
1 1/2 cups tapioca flour
1 tablespoon granulated active dry yeast
1 1/2 teaspoons kosher salt
1 tablespoon xanthan gum
1 1/3 cups lukewarm water (heated to 110°F)
2 large eggs, at room temperature*
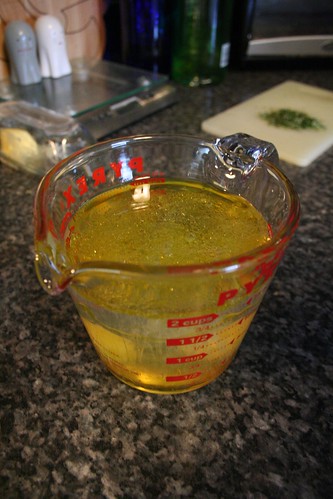
2 tablespoons + 2 teaspoons olive oil
1 tablespoon honey
2 sprigs fresh rosemary, taken off the stem and finely chopped
olive oil
coarse sea salt*A note about the eggs: The first two times I made this bread I didn’t totally make sure that the eggs were adequately at room temperature, then I read somewhere that making sure they are at room temperature is very important because if they are too cold it will keep the yeast from doing it’s job. So this time, I put the eggs in a lukewarm bath for about 10 minutes to bring them to room temperature, and wow what a difference it made in the final dough.
Mix together the brown rice flour, sorghum flour, tapioca flour, yeast, salt, and xanthan gum in the bowl of your stand mixer (or a large bowl, if you are doing this by hand).
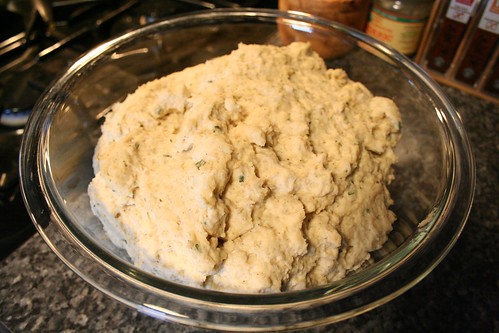
Add the water, eggs, oil, and honey to the dry ingredients. Mix with the paddle attachment (or with a large spoon if you are mixing by hand) for a few moments until the dough has fully come together. It will be soft. It will sort of slump off the paddle. Don’t worry. That’s the right texture. Add the rosemary and mix one more time.
Put the dough in a large, clean bowl and cover it with a clean towel. Put the dough in a warm place in your kitchen, then leave it alone to rise about 2 hours.
You can now use the dough. Or, you can refrigerate it in a large container with a lid. The dough stays good for a week. Even just refrigerating overnight seems to improve the flavor, as well. I usually leave one loaf overnight and bake it the next day and keep the other loaf for 1 week and then bake it.
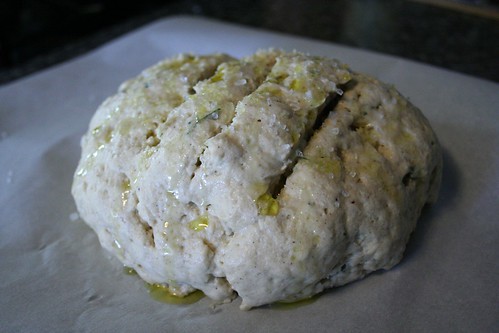
When you are ready to bake, take about 1 pound of the dough (1/2 of the total amount) out of the container and place it on parchment paper, using wet hands form it into a squat oval shape or small ball. Cover with plastic wrap. Let the dough rest for 40 minutes. (If you are pulling the dough out of the refrigerator, let it rest for 1 1/2 hours before baking it.)
Half an hour before you will put the bread into the oven to bake, turn on the oven to 450°.
(I bake this bread on a pizza stone, when you turn your oven on to preheat, slide the pizza stone in the oven. You can also bake this bread in a 5 1/2 quart dutch oven. Please make sure both are never before used for items containing gluten, if you are gluten-free.)
Before baking, make 1/4-inch-deep cuts with a serrated knife to the top of the dough. Pour on a bit of olive oil and sprinkle with coarse sea salt.
Put the dough and the parchment paper onto the hot pizza stone and return it to the hot oven. Close the oven door and bake the bread until the top has lightly browned and the bread feels firm, about 35 minutes. (Also, the internal temperature of the bread should be at least 180°.)
Now here is the hard part: Take the bread out of the oven and let it cool at least 15 minutes before slicing.

In love.
-
Springtime Mushroom and Asparagus Risotto
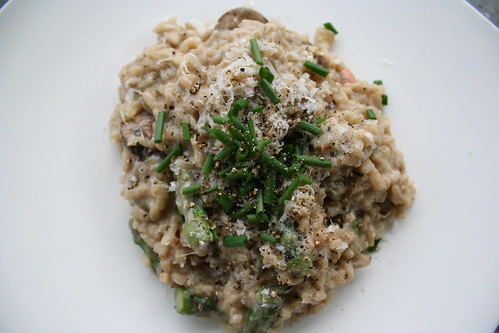
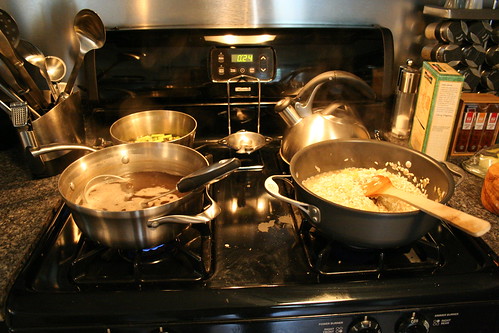
I have been making some variation of this risotto for years, changing the ingredients around by the season and to what I have on hand, sometimes adding shrimp, scallops or crab meat, sometimes with chicken stock, others with vegetable broth. White wine, peas, mushrooms, squash, there are so many possibilities. Looking at the list of ingredients and directions may seem daunting, but it really is fairly simple. You just need the time to dedicate and a good parking spot in front of your stove. The perfect recipe for a Sunday night.
This particular version of my risotto showcases some of the lovely ingredients in season right now, asparagus, fennel and chives. I thought about adding peas, but I didn’t want to over do it. I recently saw a recipe, on an episode of Barefoot Contessa, where Ina Garten added mascarpone cheese at the end of her risotto to add creaminess. This was the first time I tried it and wow, what a delicious finishing move it is. This will remain a part of my recipe moving forward.

Springtime Mushroom and Asparagus Risotto
Serves 61 1/2 tablespoons of olive oil
1 tablespoon of butter
1 cup fennel, chopped
1 small white onion, chopped
1 large clove garlic, minced
2 cups Arborio rice
6 to 7 cups simmering mushroom broth (I like Pacific Foods Organic Mushroom Broth)
1/2 pound of asparagus
1 cup of baby bella mushrooms, sliced
.5 oz package of dried porcini mushrooms (equals 2 ounces fresh)
1/2 tablespoon of freshly grated lemon zest
Kosher salt and freshly ground black pepper
2 tablespoons freshly squeezed lemon juice
2 teaspoons fresh thyme
1/3 cup mascarpone cheese
1/2 cup freshly grated Parmigiano Reggiano, plus extra for serving
1 small bunch of fresh chives, choppedPlace the dried mushrooms into a bowl and cover with warm water. Allow to sit for about 30 minutes or until all the mushrooms are soft and pliable.
Bring the broth to a simmer in a heavy medium saucepan. Keep the broth warm over very low heat.
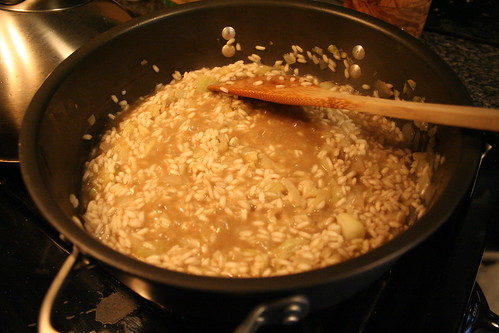
Heat the olive oil and butter in a large saucepan over medium heat. Add fennel, onion, garlic and a pinch of salt, saute for 5 to 7 minutes, until tender. Add the rice and stir for about 3 to 5 minutes to coat with the vegetables, oil, and butter or until the rice is transparent around the edges. Careful not to brown the rice or the vegetables. Add the mushroom broth, 2 ladles at a time, stirring almost constantly and waiting for the stock to be absorbed before adding more liquid, just enough to cover the rice and continue stirring or moving as before. This process should take 30-35 minutes.
Meanwhile, cut the asparagus diagonally in 1-inch lengths and discard the tough ends. Blanch in boiling salted water for 4 to 5 minutes, until al dente. Drain and cool immediately in ice water.
When the risotto has been cooking for 15 minutes, drain the asparagus and add it to the risotto with both the baby bella and the dried mushrooms, lemon zest, 2 teaspoons salt, 2 teaspoons pepper and the fresh thyme. Continue cooking and adding stock, stirring almost constantly, until the rice is tender but still firm.
Whisk the lemon juice and mascarpone together in a small bowl. When the risotto is done, turn off the heat and stir in the mascarpone mixture and the Parmigiano Reggiano. Taste and season, to taste, with salt and pepper, and serve hot with a sprinkling of chives and more Parmigiano Reggiano.
And here is the best part – LEFTOVERS!