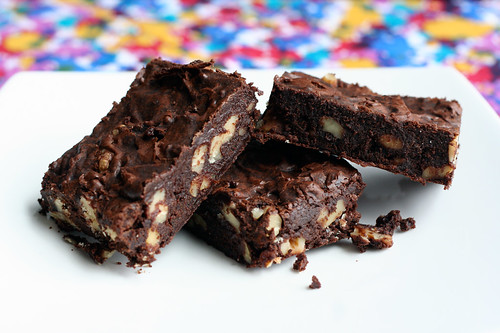
I made mention of the February issue of Bon Appétit magazine on Facebook last week and a gluten-free friend of mine told me I just HAD to try the cover recipe for the brownies pictured. Ironically, I had just finished drooling over the recipe, seconds before. She mentioned to substitute gluten-free all-purpose flour for the regular flour in the recipe, which I had on hand along with all the other ingredients. We had a friend over helping us with some dry wall work on the house so I decided right then, with tarp and ladders in the kitchen and all, to give this recipe a try. Despite its name, this is a very simple brownie recipe, that rivals the brownie recipe I posted a few weeks back. These brownies are a bit different, not only because they include flour but because the star of the show this time is the browned butter. It brings a beautiful rich and almost nutty flavor. They are so wonderfully fudgy and chewy with a bit of a crust on top. The walnuts are the perfect addition, but you could certainly use pecans or almonds instead of walnuts or skip the nuts altogether. If you aren’t gluten-free, just use regular all-purpose flour in place of the gluten-free flour and skip the xanthan gum. The original recipe called for unsalted butter and a generous 1/4 teaspoon of sea salt. I personally adore a dessert with a salty/sweet combo, even more when it includes chocolate, so I went with salted butter and 1/2 teaspoon of sea salt. Why not, right? I definitely didn’t find the salt overpowering, in fact I expected to taste the salt a bit more.
My favorite part of this recipe is that my mixer didn’t even need to get brought out. I made the entire recipe in the pot I browned the butter in. Simple. Once the dry wall work was done and we had cleaned up, I made sure the brownies were cooled and we sat and enjoyed a small sliver before dinner, we couldn’t wait. Just when I thought I couldn’t make my husband any happier, I saw his face with one bite of this brownie, I did it again! I love when he loves gluten-free desserts I make, not only because I love cooking and baking for him, but if he loves it as much as me, this means I won’t get stuck eating an entire pan of brownies. I have someone else to help. I also have to mention, I have been very happy with how well these have kept. I made these last Saturday and we still have 4 brownies left, nearly a week later. I cut the pieces up and simply covered the pan with plastic wrap, they haven’t dried out and have kept the lovely fudgy chewiness that makes them so great, something a lot of brownie recipes cannot say for themselves.
Cocoa Brownies with Browned Butter and Walnuts (Gluten-Free)
Makes 16 brownies
Adapted from Bon Appétit Magazine – February 2011
10 tablespoons (1 1/4 sticks) salted organic butter, cut into 1-inch pieces + a bit extra to grease the pan
1 1/4 cups organic pure cane sugar
3/4 cup natural unsweetened organic free-trade cocoa powder (I used Equal Exchange)
2 teaspoons water
1 teaspoon organic vanilla extract
1/2 teaspoon of sea salt
2 chilled local brown eggs, cage-free and pasture raised
1/3 cup plus 1 tablespoon gluten-free all-purpose flour (I used Bob’s Red Mill)
1/2 teaspoon xanthan gum (do not add this if it is included in your gluten-free all-purpose flour mix)
1 cup walnut pieces
Position rack in bottom third of oven; preheat to 325°F. Grease a 8x8x2-inch glass baking pan with softened butter. Melt 10 tablespoons of butter in medium saucepan over medium heat. Continue cooking until butter stops foaming and browned bits form at bottom of pan, stirring often, about 5 minutes. Remove from heat; immediately add sugar, cocoa, 2 teaspoons water, vanilla, and 1/2 teaspoon (generous) salt. Stir to blend. Let cool about 5 minutes (it will still be hot). Add eggs to hot mixture 1 at a time, beating vigorously to blend after each addition. When mixture looks thick and shiny, add flour and stir until blended. Beat vigorously 60 strokes. Stir in nuts. Transfer batter to prepared pan.
Bake brownies until toothpick inserted into center comes out almost clean (with a few moist crumbs attached), about 30-35 minutes*. Cool in pan on rack. After the brownies have fully cooled (a few hours) cut into 16 square pieces and enjoy. Store airtight at room temperature.
*Don’t be alarmed if it takes a bit longer than this, I had read some reviews of this recipe online and some people mentioned it took them over 40 minutes to be fully baked.


5 Responses
These look… SO GOOD! Yum 🙂
Brownies, Brownies, Yum, Yum, YUMMY! One for the pail, and the rest for the tummy!!!! 😉
Those look so delicious! 😀
xoxo
Kathleen
[…] Chronicles, Try Anything Once, Culinary Covers, In Good Taste, and even a Gluten Free version at Tasty Yummies..just to name a small handful that popped up on a Google search. I am just bringing this recipe to […]
Hi, I love the looks of these brownies…I cant have dairy…Can I sub the butter for fake butter????
thnx, Nikki
Nikki, I haven’t yet tried it myself but I am not exactly sure as I don’t think that fake butter will burn and brown the way real butter does. I suppose it would be worth a shot though. Since I have cut out dairy as of January, I would love to know how it turns out if you try it. Please do let me know. Thanks.