-
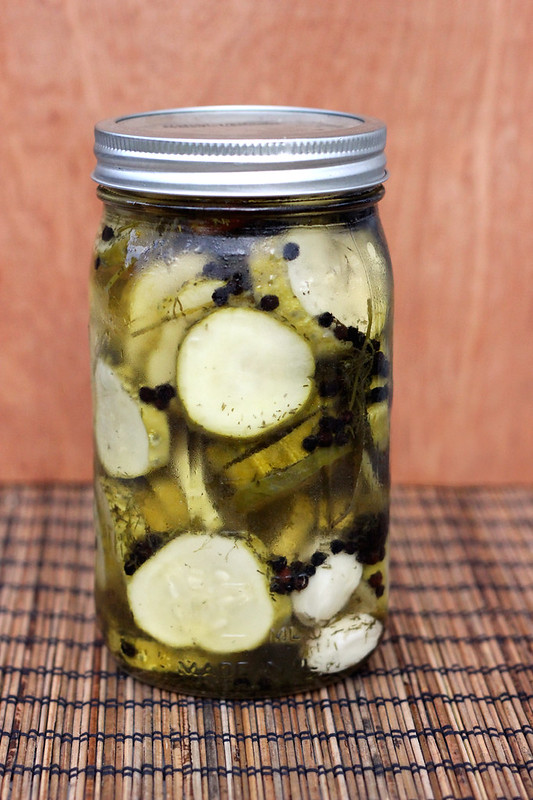
Refrigerator Garlic Dill Pickles – Gluten-free, Vegan + Refined Sugar-free
If you have ever been to a restaurant with my husband Mark and I, for a quick bite at a diner, or any type of place that serves sandwiches or burgers, we have a bit of a ritual. Since I am obviously rarely able to order a sandwich at a restaurant, but Mark obviously can and does quite often, we have a little rule where the pickle on his plate is always saved for me. He likes pickles, but he knows how much I love them, so he will gladly gobble up his turkey club and then hand the delicious briney pickle spear or round over to me. Even when I haven’t noticed that he even had a pickle, let alone save it for me, there it is, at the end, waiting for me. What a great hubby I have – he totally supports my obsessive LOVE of pickles!!
I also have been known to order a side order of pickles if a restaurant is known for having delicious ones. There is a place near Austin, Texas that everyone loves to go to for BBQ, it’s called the Salt Lick. They have delicious food, but since I am not a huge meat eater, I usually get a small order of smoked turkey with all the fixins’ and a huge side of pickles. I usually make a small dent in the food and then eat the pickles until I can’t eat them anymore. I have been to Disneyland in California twice now, and thanks to my friend Summer, getting one of the large dill pickles from one of the fresh food carts there is part of the whole experience. They are so delicious and they are best when eaten very slowly, to savor each and every bite. I seriously could eat pickles until my tongue hurts from all the vinegar. They are the best. But not all pickles are created equal. It is very rare that I buy pickles from the grocery store and just eat them at home, they are never quite good enough. A couple of weeks ago, I bought a jar of pickles from a girl at the farmers market and they were incredible. It was then that I realized that I should really just be making my own at home, especially now that cucumbers are in season.
Most summers I usually make a batch or two of pickled peppers with the different hot peppers we grow in our garden, but since I didn’t plant any this year, I am not sure I will be doing it. But when I saw the delicious local gherkin cucumbers at the market a few weeks ago, I knew I HAD to buy some and make refrigerator garlic dill pickles. How could I not?
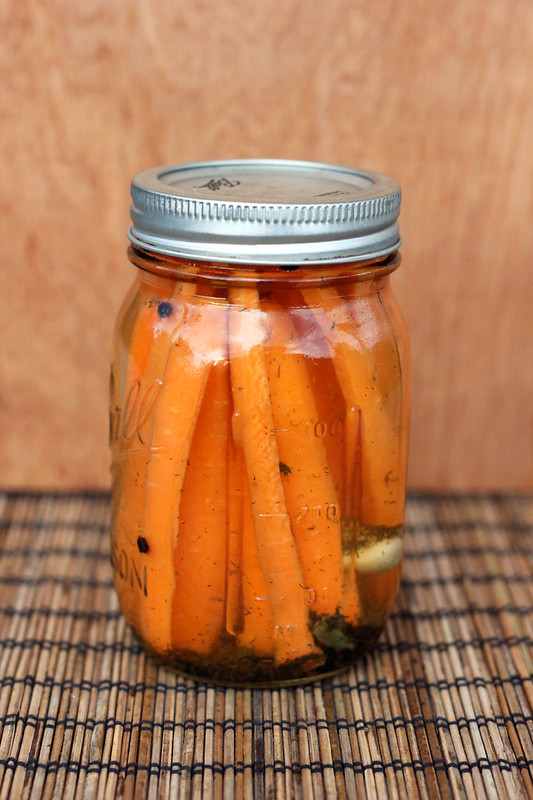
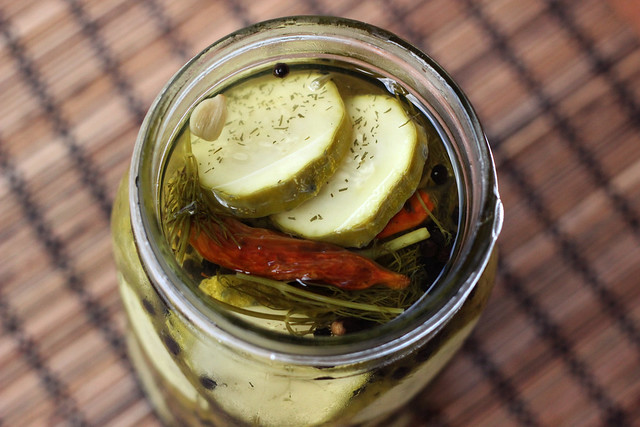
You can play around with the spices in this recipe, too. I added my usual favorites and also tossed in a couple of dried super spicy thai peppers that I had dried out from our garden last year. They brought a very subtle spicy heat, that I really loved. You can omit the peppers all together or add a teaspoon or so of dried red pepper flakes if you don’t have whole dried pepper. Plus, you can use this same brine to pickle other things like peppers, cauliflower or carrots, which I did, since I had some leftover brine. The carrots were amazing and I think I may have eaten them between two sittings.
OK, so who else is obsessed with pickles? I know I am not alone in my love.
[print_this]Refrigerator Garlic Dill Pickles – Gluten-free, Vegan + Refined Sugar-free
Makes a couple of jars (depends on the size of your cucumbers and your jars, etc)- 2 pounds local gherkin cucumbers (you can also use any other small firm cucumber of your choice)
- 2 1/2 cups water
- 2 1/2 cups white distilled vinegar
- 3 tablespoons raw cane sugar or other sweetener of your choice
- 3 tablespoons coarse kosher salt
- 2 bay leaves
- 2 tablespoons whole coriander seeds
- 4 cloves garlic, peeled
- 2 tablespoons black peppercorns
- a couple of sprigs of fresh dill (or a couple of teaspoons of dried dill)
- Optional spicy add-ins: 1 or 2 spicy dried peppers, red pepper flakes or you can add some sliced jalapeños in with the cucumbers.
Clean the cucumbers very well and slice them as thin as you would like them, I would say I cut mine to about 1/4″ thick rounds. You could also cut them into spears or leave them whole depending on their size. Place them in a large glass preserving jar or two smaller jars.
In a non-reactive saucepan, bring the other ingredients to a boil, then reduce the heat and simmer for five minutes.
Remove from heat and pour the brine over the cucumbers. Place the lid on the jar and let cool. Once cool, refrigerate. You can start enjoying them the next day, but obviously they are better after a couple of days. They’ll keep for about 2 months in the fridge.
* This brine is great on lots of other veggies, like carrots, cauliflower, peppers, etc. You can also add onion slices to the jar with the cucumbers, if you wish. Play with the recipe and make it your own.
[/print_this]
-
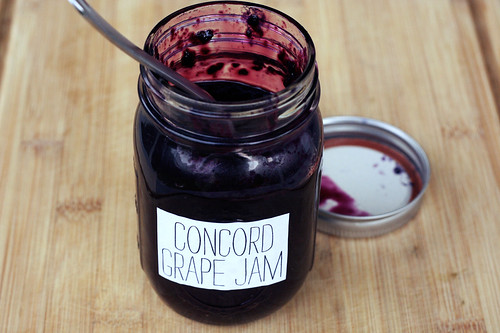
Concord Grape Jam
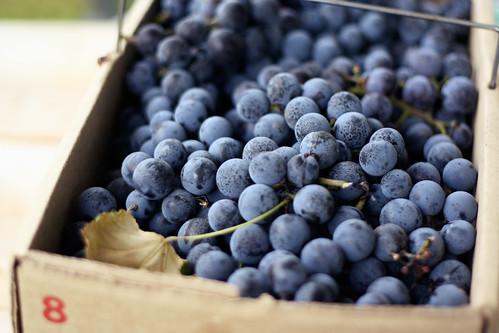
I got an email a few weeks ago from Farmers & Artisans, an amazing local shop that features produce, dairy and meat from local farms. They were offering 4 and 8 quart baskets of Concord grapes from Blackman Homestead Farm in Lockport. I decided with how much I am in love with my juicer right now, I need to buy the 8 quart basket, so I could experiment with making juice and trying to make jam for the first time. I never buy jam at the store because I hate all the preservatives, but occasionally I will buy a jar from the farmers market. I was a little concerned about the jam making since I had never done it before and I really didn’t have a great way to remove the seeds as I don’t have a food mill. I made jam twice, trying out two different methods to see which would work best. The first way, I added the grapes whole to the food processor, with the sugar and pulsed them a few times to break them down and mash em up. Then I cooked the jam down, allowing it to thicken. Once it seemed like it had cooked down enough and was quite thick, I ran it through a strainer to remove the seeds. The only problem with this method is that not only did it remove the seeds, but it also removed the thick hunks of gooey goodness (the natural pectin) that makes jam what it is. I ended up with more of a Concord Grape sauce or thinner jelly. I tried adding it back to the saucepan to allow it to thicken more, but it just didn’t do it. The jam needed bits of the skins and more of the natural pectin. All was not lost, I have been spooning the first batch of jam over granola and oatmeal, it would also be great drizzled over ice cream or yogurt or in a smoothie.
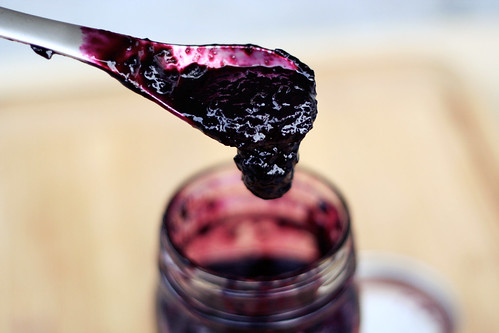
So, the second time around I decided to separate the skins from the flesh or pulp (and therefore the seeds) of the grapes, one by one. It sounds kinda tedious, and I guess it kinda was, but I didn’t mind, I knew it would be worth it. Then I pulsed the skins with the sugar in the food processor and cooked that down on its own, cooking the pulp down in a second saucepan by itself, mashing every so often to break it down. Once the skins had cooked down quite a bit and really gotten thick and jam-like, I strained the pulp from the other saucepan through the strainer to get as much of the juice and added it to the beautiful skin mixture. It was surprising how easy the whole process was. From what I have read Concord grapes are a slip-skin variety grape so I suppose that is what made that part of the process so much easier than I had anticipated.
You could certainly make a larger batch and go through the hassle of canning and preserving if you wish. I am not versed at all in preserving and honestly am quite intimidated by the whole process. Maybe some day when I have a huge kitchen and tons of storage space I will experiment with it.
This jam is preservative free and is full of intense grape flavor. It is perfectly sweet and tart. I am sure you could experiment with using honey as a sweetener instead of sugar, I just wanted to go the traditional route for my first time. If I get around to experimenting with honey, I will report back.
Obviously if you have a food mill you can simply process the grapes whole with the sugar, then use your mill to remove the seeds and cook down the mixture in one pan, no need to strain.
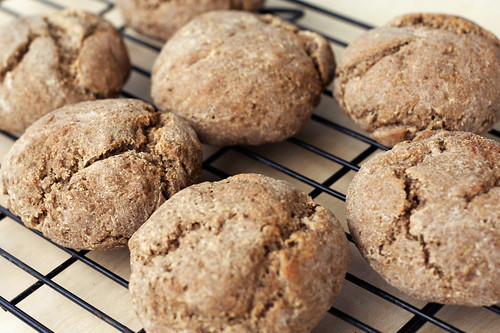
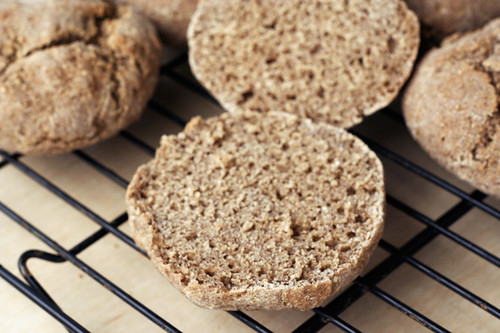
I decided to fully enjoy this jam I needed to make some delicious gluten-free multi-grain rolls. I couldn’t just slop it on any ol’ store-bought bread or roll, it seemed sacrilegious. I used gluten-free girl’s recipe with a few subtle substitutions. I used tapioca starch instead of potato flour and I made my own oat flour since I couldn’t find any that was certified gluten-free. I highly recommend this recipe. These rolls are incredible and I love that the recipe is gum free (no xanthan or guar gum). They are super crusty on the outside and soft and chewy on the inside. These rolls are perfect as is with a little jam, toasted with a veggie burger, etc. The same recipe with make two boules instead of the rolls, if you wish. I thought I was in love with gluten-free girl’s previous bread recipe, but this one blows it out of the water. Try it!
Oh and by the way, I have a very small amount of grapes left – not enough to really do anything major with – so I plan to soak them in vodka to make some tasty Concord grape infused vodka!! Come on, how could it not be good?
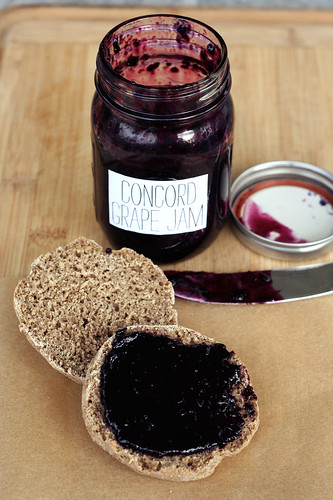

Concord Grape Jam
makes about 1 cup
Inspired by Healthy Green Kitchen and a handful of other recipes I came across2 lbs fresh local concord grapes, about 5 1/5 cups or so (if you can find them seedless YAY – I wasn’t that lucky)
2/3 cup organic raw sugar plus 1 tablespoon
juice from 1/2 lemonSeparate the skin from the pulp of each grape, by applying pressure to the grape with your thumb and index finger, shooting the pulp right out. It’s fun and very simple to do.
Process the grape skins with the sugar in your food processor or blender until mostly smooth but still a tad bit chunky. If you want your jam super smooth, process longer. Transfer to a medium saucepan and add the juice of half a lemon. Bring to a boil over medium heat. Watch it carefully and stir often so it doesn’t stick or scorch. Once boiling, reduce the heat and simmer for approximately 25 minutes until it has reduced down and thickened.
Meanwhile in a smaller saucepan cook the grape pulp (insides) and 1 tablespoon of sugar over a medium-high heat, bring to a boil and mash the pulp as it cooks to break the down. Once bowling reduce the heat and allow to simmer as long as your grape skins do. Once the grape skin mixture has thickened, remove the pulp from the heat and strain through a strainer or cheesecloth to remove the seeds. Add the juice that drained out to the grape skin mixture.
Allow the jam to continue cooking another 10 minutes until thick. Taste for sweetness and add more sugar if it isn’t sweet enough for you. This was plenty sweet for me. The jam will continue to thicken as it cools. Trust me. It also thickens a bit more once in the refrigerator, so down cook it down too much.
Allow the jam to cool before pouring it into a well cleaned and tightly sealing jar. This jam will keep in the refrigerator for approximately 1 month.
NOTE: I have to apologize for the lack of process photos with this post, I had intentions of showing step by step photos of the entire process. However, the morning I was making this jam it was very dark and stormy. The lighting in my kitchen was horrible and with the yucky wind and rain, I wasn’t able to tote things out to the back patio as I usually do. If you have any questions regarding the process, please don’t hesitate to ask.


