
I have been meaning to try making my own dairy-free yogurt for some time now and I just kept putting it off. From what I have heard and read from many people, it can be frustrating at times and can require some trial and error. I have also learned that there really are lots of different ways you can do it. I decided to just dive right in and do some trial and error of my own for this How-to Make Coconut Milk Yogurt tutorial, so I can share my thoughts and results with you guys.
The differences in the various results aren’t quite distinguishable enough in photos, so I decided against a side-by side comparison as I did with the whipped coconut cream, instead I thought giving you the details on all the many options and sharing my thoughts and results would be just as effective. Of course, there are many more options than I even share here, but these are the ones that I tested. That said, I really do recommend trying things out for yourself, yogurt is funny that way, what works for one person, may not work for another, whether it be the type of milk you choose, the starter, the temperatures you are culturing at, etc. So, play around, find what works for you and go with it. I hope I gave you enough information and options here to help start you down the fun road of educated guesses when yogurt making.
I do have to say that I am not vegan, nor am I allergic or highly sensitive to milk. I just choose to limit my dairy intake. When selecting a yogurt starter or probiotic powder, please always check with the manufacturer on the origin of the culture, most are made on dairy and therefore will contain trace amounts of dairy that will not work if you have a severe dairy allergy/intolerance or if you are vegan. Cultures for Health makes a certified vegan/dairy-free yogurt starter and I really love their products and customer service. Likewise, many probiotic powders and capsules can contain dairy, so be careful there too, though it is quite easy to find those that are dairy-free/vegan. If you are ever unsure it is always best to check directly with the manufacturer.
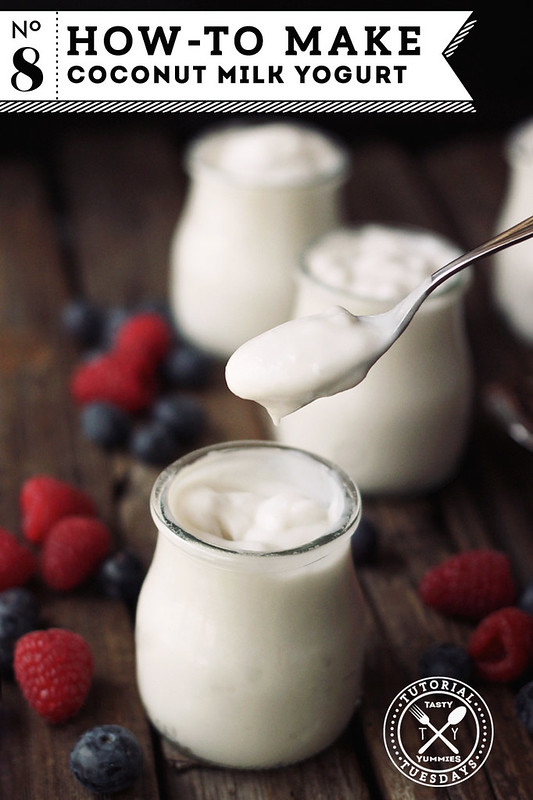
OK let’s get into it… How-to Make Coconut Milk Yogurt
Choose a Coconut Milk:
- canned organic full fat coconut milk without any additives (thickeners like guar gum are OK) Thai Kitchen and Native Forest both produced great results as did Natural Value
- homemade coconut milk (see my recipe at the bottom of this post)
My thoughts: I found that the canned milk produced the creamiest and richest results (I am sure because of the guar gum that is added). But, I really liked the taste of the homemade coconut milk and I loved knowing that it was super fresh and I knew exactly what was in it. Ultimately I would say the canned organic coconut milk would be my pick, but I am going to keep experimenting with the homemade milk, too. Play around and find what you like best. Do not use boxed coconut milk “drinks” it will not work.
Choose a Sweetener:
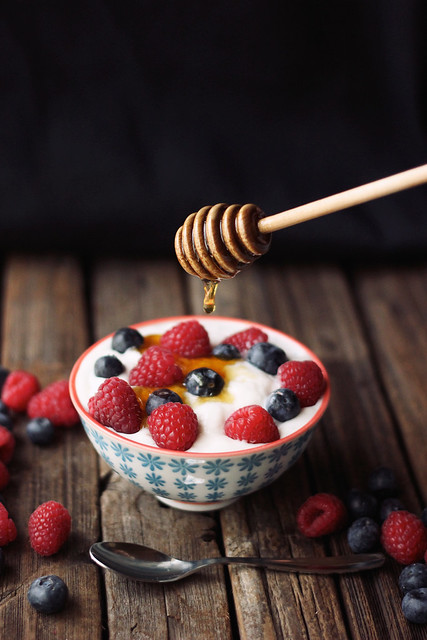
unlike animal milk, coconut milk doesn’t have much natural sugar. Adding sweetener promotes fermentation, as the bacteria needs something to feed on to allow the culturing process to take place. 1 tablespoon per 1 quart (4 cups) of milk should do.
- raw sugar
- honey
- maple syrup
My thoughts: I used both raw sugar and honey, both worked just fine. You can certainly try without any sweetener if you’d like, many recipes don’t call for it, I did not test it without.
Choose a Starter:
if vegan or dairy intolerant be sure to choose a certified dairy-free option
- yogurt starter
- probiotic powder (must contain one of these strains – Lactobacillus bulgaricus, Streprococcus thermophilus, Bifidobacterium lactis or Lactobacillus acidophilus)
My thoughts: I found using 1/2 – 1 teaspoon of probiotic powder (that is the filling from between 4 and 8 of my probiotic capsules*) per 4 cups of coconut milk or two packets of this yogurt starter per 4 cups of coconut milk produced the tangiest and best results (this dairy-free/vegan yogurt starter would work the same). That said, I have seen recipes where people used as few as 1 capsule of probiotic powder and most call for just 1 packet of yogurt starter per 4 cups of milk, much of this depends on the potency/strength of the probiotics or yogurt starter. You kinda have to play around with ratios to find your personal desired tanginess. I have also read that you can simply use a small amount of dairy yogurt or even kefir as a starter, but I haven’t tested either of these methods.
NOTE: I have read that unlike animal milk yogurt, you cannot reuse non-dairy milk yogurt as a starter for the next batch. However a few folks have commented to say that it does work for them, so it is worth exploring.
*I currently take CVS brand probiotics, nothing fancy, but they are certified gluten-free, soy-free and vegan and not too pricey.
Choose a thickener (optional):
dairy-free coconut milk yogurt can be quite thin, which is totally OK, but, if you are like me and you enjoy a thicker more traditional yogurt, you may want to add a thickener. Which I prefer to do.
- grass-fed gelatin
- agar agar flakes or powder
- starch (like tapioca or arrowroot) – I didn’t test this method
My thoughts: I found using 2 teaspoons of gelatin per 4 cups of canned coconut milk produced the thickest and creamiest results. Whether using canned coconut milk or not, if you add too much gelatin you will end up with more of a cultured panna cotta than a yogurt, but it’s still quite tasty. As far as vegan options go, I could only get my hands on the agar agar flakes, not the powder and while 2 teaspoons really thickened 4 cups of milk, I found it to be a bit less smooth and creamy than the gelatin, but it did thicken quite well. It was my first time using it, so it is possible I may not have dissolved it thoroughly or that the powder would be better.
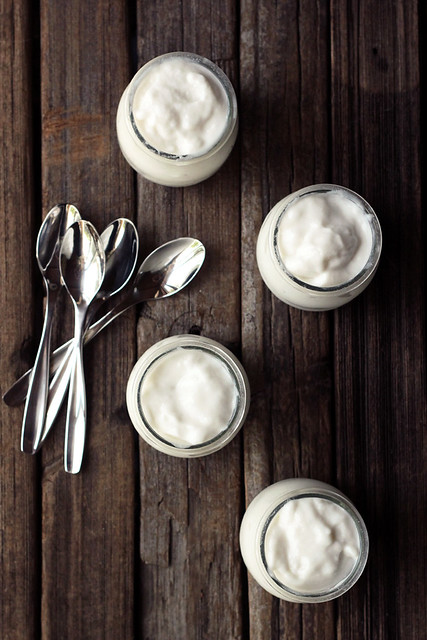

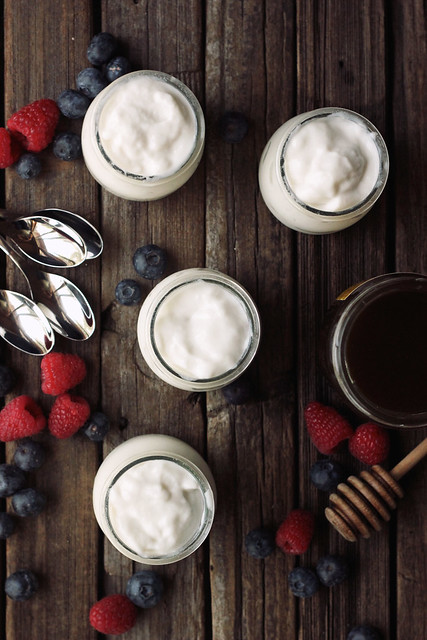
How-to Make Coconut Milk Yogurt
makes 1 quart yogurt
- 4 cups coconut milk
- 1 tablespoon sweetener
- yogurt starter or probiotic powder (this amount can vary)
- optional thickener
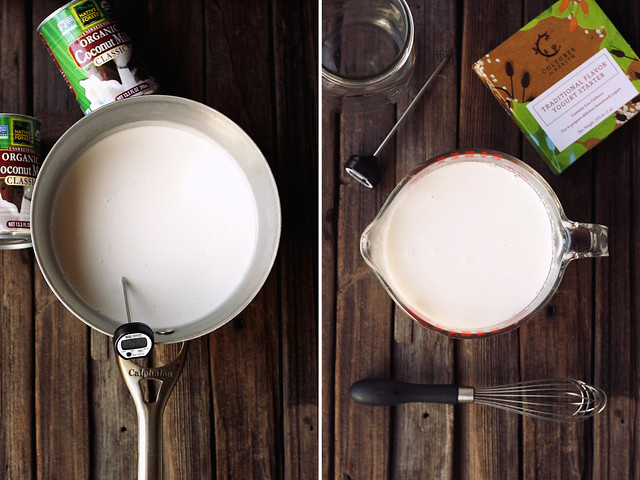
1) Heat the coconut milk and sweetener to barely a boil and remove from heat. In a glass bowl, allow the milk to cool to 115º F. While the coconut milk is cooling, if using, dissolve the thickener in another bowl using the necessary method. (A small amount of cool water for the gelatin, hot water for the agar agar and so on.) Once fully dissolved, add the thickener to the warm coconut milk. Stir well to combine.
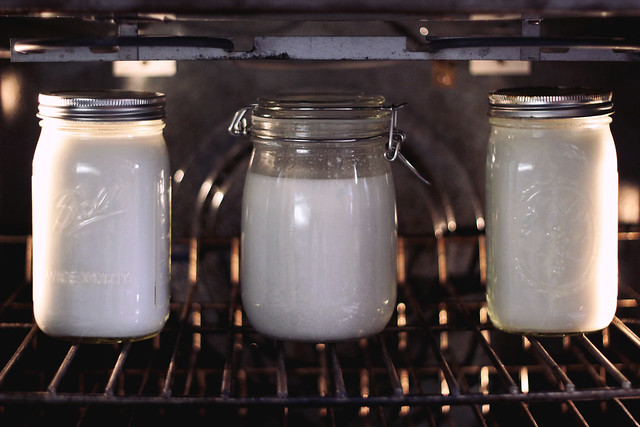
2) Once the coconut milk reaches 115ºF add the yogurt starter (or probiotic powder), stir to combine. Pour the mixture into a very clean glass jar with a tight fitting lid (either washed with super hot, soapy water or run through the hottest cycle in your dishwasher). Cover and place in either your yogurt maker or an oven that is totally off with just the light on, the door shut and a towel wrapped around the jars of yogurt for extra insulation. I have a proofing setting on my oven that allows me to set it to 100ºF and that worked perfect. You can also keep the jars of yogurt in a cooler filled with hot water, on a low temperature heating pad, etc – basically you are looking to keep it at approximately 105ºF – 115ºF for the entire time it is culturing.
3) Allow the coconut milk yogurt to culture for at least 8 hours but likely much longer, I personally find I like the flavor best when it has cultured for 16-24 hours. I like my yogurt tangy. This time may require some trial and error on your part to find what works best for you and your setup.
4) It will still be relatively thin at this point. Once ready, cover tightly and place in the fridge for at least 6 hours. This halts the fermentation, it will thicken as it cools, whether or not you added a thickener, obviously more so, however, if you added a thickener of some kind.
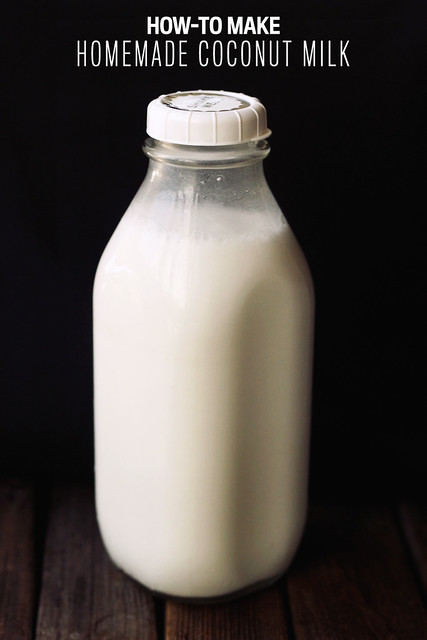
How to Make Your Own Coconut Milk
- 2 cups unsweetened shredded organic coconut
- 4 cups boiling water
1) Pour the 4 cups of boiling water over the shredded coconut and allow it to soak for 15-30 minutes. Then add the mixture to your blender and blend until smooth. Make sure the mixture it isn’t hot when you blend it or allow the lid to vent or you will have a hot coconut explosion all over your kitchen. You may want to blend in batches.
2) Strain the coconut meat from the milk using a nut milk bag, strainer or cheesecloth. The nut milk bag produces the best results. If using a strainer or cheesecloth, you may need to do a few separate passes. Discard the pulp and you are left with yummy coconut milk.
Disclosure: This post contains affiliate links. If you make a purchase using these links – your cost remains the same, but I earn a small percentage to help support this blog. Thank you!
I am in no way affiliated with Cultures for Health. I just like and use their products.


113 Responses
Yum! This looks amazing Beth! Really hope I can try this out soon 🙂
http://youtube.com/addalittlefood
Thanks so much Millie!! I hope you enjoy it when you do.
I love your tutorial Tuesdays! They’re always so helpful 🙂
Thanks so much Joni, that makes me soo happy!!
What a fun project! My kids will go crazy for this. All of the images are so helpful too!
Thanks so much, Catherine! This would be so fun to make with kids, for sure!!
Does additional straining work the same way as for dairy yogurt to make a thicker Greek-style?
Sally, possibly yes, if you didn’t add a thickener. If you add a thickener, it kinda binds with/soaks up (however you wanna say it) any excess liquid and there is nothing to drain off once it has set. I tried. I plan to try it sometime by not adding a thickener, though!
I use my leftover coconut yogurt as a starter and it works great. It’s the same bacteria so there is no reason why it wouldn’t work;)
Krista, hmmm, that’s good to know. I have heard varying things on this, but it seemed like the consensus with the reading that I did, is that it wouldn’t work. Thanks for taking the time to share that, I will have to experiment with it.
How much left over yoghurt do I need to add to this recipe? Thanks 🙂
Ps. Love the coconut milk recipe
And maybe putting the starter in the hot mixture would kill the good bacteria? I don’t know, but maybe that’s why it didn’t work the second time.
thanks!
I actually never tried using leftover yogurt, this was simply based on reading many many recipes and posts about making non-dairy yogurt, so I will have to give it a try for myself, now that I know it’s possible.
Awesome I am definitely going to try the coconut milk. Not a huge fan of the taste of coconut but it’s a great way to replace dairy with something so full of health benefits.
Awesome Jen, hope you like it if you try it!
Hi Beth
I have been making my own coconut yoghurt for a while now. I use the Cultures for health vegan starter … Great product and really helpful staff… And I use Palmonas pectin as a thickener.. I also add some calcium powder to the mix because coconut doesn’t have much… I make mine from an organic reduced fat tinned product and have great results..
Hey Jenni, thanks for the comment, I agree Cultures for Health is just great. I love the idea of using pectin as a thickener too, great ideas and adding calcium is brilliant, thanks for sharing! I am also glad to hear that reduced fat milk also works!! Yay you are a bundle of good info! Thanks for sharing!
I look forward to trying the yogurt due to already indulging in the wonders of homemade coconut milk.
yay! I hope you enjoy if you do make it, Melissa.
I’ve been on the lookout for a good coconut milk yogurt recipe for a while. Every time I make it, it’s so watery. I’ll have to give your recipe a try!
Also wanted to say that you don’t have to discard the pulp from making the coconut milk. I dehydrate it and grind it into coconut flour. 🙂
http://homegrownandhealthy.com/how-to-make-coconut-flour-a-tutorial/
Thanks Raia, I hope you like it if you make it. I have to say adding a thickener really is the way to go.
Great idea of making coconut flour with the pulp.
After doing a Paleo Whole30 in February, I’ve found that eating dairy, even just milk in my coffee, makes my eyes sticky and gooey, so dairy-free it is. But I have really missed yogurt.
Your yogurt recipe sounds really delicious – this is going to be FUN.
I’ve been trying to cut dairy, but I haven’t been loving the dairy-free yogurt options, as someone who lives in parfaits for breakfast – I NEED my yogurt! This looks like a totally fun project and sounds like it makes delicious results. Thanks for soo much information – definitely pinning to try out soon.
I now make very creamy homemade coconut milk after following (sort of) your instructions for coconut butter. I pour the liquified butter into the vitamix and get it even smoother. I save all but 1/2 cup in a glass jar in the fridge. That warm last 1/2 cup gets blended with about 1 tablespoon maple syrup, 900 mL water and a heaping tablespoon of organic sunflower lecithin. I blend it up, it gets frothy and I get 1 quart of delicious coconut creamer. Chill it. It stays thick. A couple spoonfuls in my coffee in the morning is fantastic!
I am going to try making my yogurt from this happy accident. Thanks for the inspiration.
I have an electric yogurt maker. Can I use that?
I have a Luvelo-Elite-Yoghurt-Maker which I use for making soy yogurt. It is so easy. I use 1/2cup of previous batch as starter.
Hi, I’ve commented on this before, so forgive me, but I keep seeing posts with people having difficulty. I just wonder if my experience will help.
I now routinely make coconut milk yogurt so that I’m never without it and it succeeds every time. I didn’t have such good results at first but I was determined…… I bought a very simple electric yogurt maker, very cheap. I also bought some batches of starter. I tried two companies. One starter did not work, the other, from a company called Homestead farm supplies, worked brilliantly. They encourage you to retain some of your live yogurt to start the next batch, and this actually makes the best yogurt.
The important thing is to follow the instructions that come with the starter …….. I use Beth’s recipe but add 60g coconut milk powder as well as 12g gelatine to get a really thick yogurt. I use full fat coconut milk with the highest percentage of coconut that I can find. You’d be surprised at how little coconut is in some makes – price does not always mean better! In fact the best I’ve found is from the specialist Asian supermarkets, and it’s also the cheapest.
The instructions I follow are – heat the coconut milk and powder to 90 degrees C and keep it there for 10 minutes, then plunge into cold water to crash cool till it reaches 40 – 44 deg C. Whisk in the gelatine (pre mixed in a little coconut milk) and the starter. Put in the yogurt maker (I preheat this).
I find that if I use the commercial starter it may be 20 hours before I’m happy with the tartness of the yogurt, but with my reserved starter (I always take it from the freshly made yogurt and seal it in a sterilised jar, it will keep in the fridge for weeks) it takes less time and makes better yogurt.
The yogurt will appear quite thin at first but after 12 hours in the fridge it will thicken up. Separation sometimes occurs – shake the jar periodically – if it still separates just shake it up before you use it – it won’t hurt and the yogurt is not a failure. It’s just one of those things.
I’m sorry this is really long, but maybe if you post it, it will encourage everyone who just thinks they can’t do it. You can!
I’m in the UK by the way, but apart from temperatures (C rather than F!) and suppliers, the principle stays the same.
Thanx i have picked up a cheap yogurt maker and am going to try making it as cows milk yogurt does upset my tummy and i enjoy coconut yogurt but its so expensive.
Oh i am in Australia . Thanx again 🙂
I love making my own coconut milk yogurt…and I do it very similarly to you Beth! I use a super potent probiotic capsule (25 billion), so one or two is enough. I often leave the thickener out too for a sort of kefir coconut milk/buttermilk! Thanks for sharing!
I can’t wait to make this! I’ve seen tutorials that use young coconuts to make yogurt, and it expanded in size in the jar overnight. Does this recipe grow in size since it is canned coconut milk and not fresh?
[…] with everyone here this how-to on making Dairy-Free Cultured Coconut Cream Cheese, inspired by the coconut milk yogurt she shared earlier this […]
This may sound like a silly question but should I be using the red or green can of great lakes gelatin for this recipe?
Ann-
You have probably already figured this out but you want the red can because it “gels” up. The green can is great for getting the gelatin benefits when you aren’t wanting jello. I toss it in chia pudding, smoothies, soup, etc, because it does not gel at all!
Hi Beth! Can’t wait to try this out. I’m not familiar with probiotic powder and capsules, so when I went to my local natural food store I got overwhelmed by all the options. Any suggestions that could help guide me to a good choice?
Hi Beth,
One thing I really missed was yogurt, so when I saw your tutorial I had to give it a go. Where I live in North Wales UK it’s not so easy to source yogurt starter or the right kind of probiotics, so I used live yogurt from the local supermarket as a once only experiment. It worked so well that now I’ve sent for a non-dairy yogurt starter, as I prefer to avoid dairy if I can. I made it in an EasyYo maker – only boiling water required as a heat source.
My yogurt isn’t quite as thick as I’d like but it has a really great taste, so that even my family are impressed! I flavoured it first with my Aunt Ulla’s blackcurrant cordial , which was lovely, and then with my own elderflower cordial with added fresh berries., which was even better (I recommend it highly!)
By coincidence I found a new product- a commercially made coconut yogurt which is very thick and although pleasant it’s quite bland. In fact it’s not a patch on the yogurt I just made at home (and costs as much for a tiny pot as one litre of my home-made).
Without your blog I would never have known this was possible……. thank you SO much!
Wow Jacqui I am so happy to hear this!! It is definitely a process to find what works best for you and your setup but once you do, it is soo wonderful to be able to have such a delicious treat at home, for a fraction of the cost of the store-bought stuff that isn’t even that good, as you said. Thanks for taking the time to comment and thanks for reading, I sincerely appreciate it! xo
Hello Beth,
I’m trying to make coconut yoghurt for a while now, but it is always a big fat fail. I leave mine in the oven with the lights on too and in the next morning it always separates, there is a layer of creamy coconut and a layer of a liquid.
Any guess what I’m doing wrong?
Many thanks
Agnes
P.S. Your blog is cool 🙂
I found that the best way for me was to buy a yogurt maker. I didn’t bother with one that has separate pots, but went for one large container. It was very inexpensive (I got a new one from eBay- it seemed to be a model that the suppliers of yogurt starters were also selling), and I found it took the guess work out of the process. Also getting a reliable starter was important. I’m in rural UK and getting supplies for paleo and gluten free is quite difficult. I found two suppliers of yogurt starters, one worked and the other didn’t. I have no idea why.
It took a bit of trial and error, which is very frustrating, but it’s great when it works!
Hey, I live in the UK. Can you tell me which starter worked and which one didn’t? I am unsure as to which one to buy! Thanks!
I made this recipe last night in my oven with the light on and I pulled it out this morning to notice it had separated for me as well. The thick white coconut part is floating above a layer of clearing liquid. I’m not sure if I should stir it in or strain it off? Any suggestions?
Carly, just give it a good stir to combine before you put it into the fridge to thicken up.
I make my own coconut milk, and it always separates in the fridge unless I shake it every few minutes for the first hour or two that it is refrigerated. After that it seems to stay together. I am wondering if doing that first before you starting the yogurt process would keep it from separating. I haven’t tried it yet, cause then I would have to reheat my coconut milk (which it nice and warm now from the blender now) again. 🙁
Hi and thank you for your work, is very useful ! please tell me, if i can not use yogurt starter,
pro biotic powder or yogurt from the supermarket, what should i use? Lemon, vinegar, something else?
I’ve been making yogurt with almond milk with so-so results. I just tried your recipe using canned coconut milk and it’s amazing! I’m so happy :). I used a tsp Pectin for thickener and whisked in some vanilla bean powder & maple syrup for flavoring. Put in the yogurt maker for 19 hours and it came out wonderful. Thank you for this post!
Thank you for posting this recipe. I am keen to try it ASAP.
When I used to drink milk, I would make buttermilk using the leftover buttermilk. But one day a funky black mould started growing in it. Put me off making homemade yogurt/buttermilk.
Then I met an Indian friend who makes yogurt every few days. She boils the milk first to kill off any unfriendly bacteria. Then, once the milk has cooled down to the required temperature, she adds the culture.
So when I make some coconut yogurt, I will definitely be boiling the milk first.
Hello! I made this yogurt this week and want to troubleshoot what went wrong. I followed the recipe and then used a yogurt maker. It came out with almost solid yogurt in a thinnish layer on top and lots of whey underneath. I’d like to try again but I am wondering if I let it go too long. I did 15 hours. The recipe said it could go even more but that was the highest setting. What do you think? Thank you.
sounds good to me . you should start your own business with this new product. People always looking for new healthy things to eat and drink. Now that coconut oil is back in the market thats all I buy. COCONUT YOGURT is a win win product. Have a bless day.
Hi there! I made a beautiful batch of coconut milk yogurt with my Easiyo yogurt maker. Used the least processed brand of coconut milk I could find, which is Aroy-D here in Germany. Filled half of the container with the coconut milk, added one tablespoon of inulin and two tablespoons of dried coconut milk powder and yogurt culture (Labida); then closed and shook the container vigorously to blend all ingredients; then topped up with coconut milk to about 5 mm to the rim – shook again. Filled the thermos part of the Easiyo with boiling water to the top of the baffle and then placed the container inside. 12 hours later I placed the container in the fridge which really firmed it up and produced a lovely, really thick (quark-like) yogurt. Very rich!
Thank you so much for this recipe on making yogurt with Aroy-d coconut milk.(It is my favorite coconut milk because it tastes like fresh coconut and is so creamy and smooth. I buy it on Amazon, here in the USA) I have a EuroCuisine Yogurt maker and plan to try your recipe as soon as I locate powdered coconut milk. My goal is to replicate some COYO yogurt from the UK. It is incredible, but pricey; creamy and thick like Greek Yogurt.
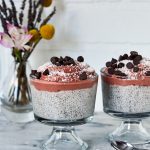
hi! I was wondering if you would mind telling me where you got those adorable jars? Or what they’re called. I need these!
I actually bought some fancy expensive organic yogurt at the store (they had peel off foil tops), then made my hubby eat it and then kept them for these photos 😉
JARS – Those jars look similar to Weck canning jars, a German company. They are more expensive than Ball jars. They have a number of attractive shapes – this looks like their Tulip shape.
MAKING COCONUT MILK – I also have a question – when making coconut milk with shredded coconut, which I’ve never done, has anyone blended up the contents well and then not squeezed out the pulp? Offhand I can’t see the harm in leaving the pulp in especially when making yogurt with it. I’ve used flaxseed meal (couple of tablespoons) as a thickener so I have little bits in there already.
can i use a normal yogurt to be the starter and i don’ t have a thermometer how do i know that the milk it 115F
I wouldn’t recommend making this without the use of a thermometer, the temperature is very important to the culturing of the yogurt.
Hi I´ve tried this recipe twice and it´s come out too thin and watery!! The second time I added more gelatin but it has still separated while culturing in the oven?! I used pure coconut milk which has a thick layer of cream on top and then watery underneath. Should I not be using the cocounut water in the tin and only the cream?? I´ve done everything else as per your recipe and am dying to get this right!! Thanks for your help:-)
Charlie, I used canned coconut milk and make sure it is well mixed and I include everything from the can, water and all. Make sure to mix it very very well.
How much gelatin did you use? Maybe given your set-up, you might just need more for some reason (could be the type of coconut milk, could be the gelatin, could be the temperature, there are so many variables that could affect the thickness.
I wish I could offer more concrete advice.
Hi i really love your receipes their great. I just wanted to point out that coconut milk should never be heated. Coconut milk is rich in good fat but once heated it becomes bad fat and thus bad cholesterol in our body. So never try to boil or heat coconut milk.
Hi and thanks for the recipe! Last night I was dead keen on getting started and had already warmed the coconut milk and opened the starter when I realised that my oven isn’t capable of holding a steady, low temperature. So I ended up wrapping the jars in a duvet and putting them on a radiator set to low and lo and behold, it set! YEAH! I cannot wait to taste it!!!
Mine looks like it is separating the water and the coconut in the dehydrator. I’m guessing it isn’t supposed to do that. Any suggestions?
Great tutorial, Beth! I hope you don’t mind that I borrowed one of your photos and linked back to your blog, to share with my readers. I have had questions about making coconut milk yogurt and did not have experience or a good reference to give them. This information is great, and exactly what they were asking for, so I am sending my readers to you! Thanks again for the effort that went in to this!
Soap taste alert!!!! heheh It’s the second time I try it. Two different coconut milks an after 5-6 hours it has a very horrible taste like soap. It’s like it turned rancid or something… Do you have any insight on this? I would love to be able to make it work! Thanks 🙂
Mine too! Smelled super rancid and soap like. ???
Hi guys, I’m sorry that it didn’t turn out for you. I’d like to help troubleshoot. What type of coconut milk did you use? Did you use your oven? What starter?
Did you use a thickener? If so, which?
I need to know a bit more about your process to be able to help troubleshoot.
I found the problem, its was the probiotics I was using. Probably one type of bacteria was producing this rancid taste. Now I use this one and it works perfectly :http://www.amazon.com/Nutrition-Now-Pb-Pro-biotic-Acidophilus/dp/B005P0NZVG/ref=sr_1_2?s=grocery&ie=UTF8&qid=1435811680&sr=8-2&keywords=Nutrition+Now+-+Pb+8+Acidophilus%2C+120+Capsules
Is it true that coconut milk should never be heated (based on the January 25 post/comment above). How come coconut oil can be heated up to 350 temp which is the smoking point. I thought the fat in the product was supposed to be the same. By the way, great post! I finally understand how to make coconut yogurt!!
Hi,
This might be a silly question but would this recipe still work if you used 1 (or more) Yakults as a yoghurt starter?
Tks,
Sophie
Hi there, when fermenting the yoghurt how do you keep it warm enough? Say in the oven, would you just leave the oven on low for the whole 8-16 hours? Just worries me that the oven will be on for that long.
Thanks 🙂
Awesome blog by the way!
I have the same question did you get any answer?
When making coconut milk, KEEP the powdery leftover coconut! You can make coconut flour out of the powder!
Hi, I made the coconut milk with your recipe and was wondering if it should be refrigerated? I did put it in the refrigerator, but it separated and part of it became solid and remained solid even after vigorous shaking. Any suggestions?
Thanks!
Mine is culturing right now! I can’t wait to see what happens (:
I have some packets of Simply Thick Thickening Gel (Ingredients: Water, xanthan gum, citric acid, potassium sorbate). 1 packet would go into 32 ounces of liquid and I was going to use coconut milk. Do you think this would work as a thickener?
HELP! I followed this recipe for Coconut yogurt. I used my new Eurocuisine yogurt maker. I double-checked the temperature several times during the 22 hours of processing. When it was ready to put in the fridge, each individual jar had separated — thick creamy top over liquid on the bottom. It had a thin skin also on the top. Any suggestions as to why, or what I need to correct on my next batch? Thanks!
Thanks a lot for this great recipe and instructions! So far, I’ve always used normal milk but I’m certainly going to try out this coconut milk recipe. We eat so much yogurt in our family and I like to try out different recipes! I’ll let you know the outcome!
Thanks, Caroline.
Thank you for the tutorial…. My first attempt at making coconut milk yogurt was an epic fail. I used the box kind…..should have looked at your site first. ….here goes my second try. For a thicjener I’m trying cream of tartar…. Um after I reconstituted the unflaver gelatin… I was nauseated by the smell….ugh. So all I had left was the cream if tartar. It seemed to be wirking when I filled my little jars. We shall see
What did you use for sweetener? I would prefer to use honey but am wondering if it will work. Has anyone tried it?
You can also “age” your culture using a Thermos bottle. I pre-heat mine with boiling water (also sterilizes it), and add the pre-yogurt mixture once it cools to 115 degrees. Then, I shake the Thermos once per hour for 7 hours. Letting it go longer results in a thicker, more tangy yogurt, but I’ve decided I love the flavor of the 7 hour yogurt. Thanks for sharing the coconut milk version!
I bought a yogurt maker yesterday just so I could make coconut yogurt! 😀 I used 2 tsp gelatin, coconut milk without any additives and added the other ingredients you mentioned, and let it go for 12 hours because I already liked the taste. But it was just as thin as when I poured it in there. I know you said it’s thin at this point, but should it be that thin? I’ve chilled it for almost 6 hours now and it hasn’t thickened at all. If it doesn’t thicken in a few more hours, do you think I can add some more gelatin? This is my first time using gelatin so I have no idea how that works. Or maybe it’s better just to use the coconut milk mixture for cooking? Totally clueless here. 😉
I really like the format of your site, and like that you explain the methods of trial and error. It makes it easier to figure out what might work best for each individual whether it be in regards to dietary requirements or what you have available to you. I was thinking about making Coconut Yoghurt to add to smoothies, but now I can say I will definitely be doing some trial and error of my own. ThanX
So I have to let my oven on for 8 hours? Or how do I keep the milk at the right temperature while culturing?
Thanks
Hi, I have tried this recipe 3 times, and I just cannot seem to get it right. I use a yoghurt maker that has 12 small jars. The first attempt I made as per your instructions, but it did not get thick, and did not taste very good. The 2nd time I thought maybe insulate the yoghurt maker as it was pretty cold, but again, it stayed a thin consistency and even had separation in most jars. I was not sure if I could eat this… Now the 3rd batch shows separation again… Is it possible that the batch maybe got too hot with the towel around the yoghurt maker? How much water do you use to dissolve the gelatine and for how long do you let it dissolve? Not sure what I am doing wrong and hope you can help me out. Thanks so much!
did you use any particular honey? I wonder if I can use manuka honey?
Beth;
You recommend the red label? I would have thought it would make everything gel…
Yes exactly, it provides a nice thick texture so that the yogurt is thick and not watery or runny. Not necessary but it makes it much more like a traditional yogurt.
My girlfriend and I are also “conscientious omnivores” who eat a mostly plant-based diet, juice, drink green smoothies, and try to live as toxic free as possible. We eat 95% organic and have been, for a while, wanting to incorporate fermented foods into our diet. As I was searching for recipes on homemade coconut yogurt, I found yours.
Great post and thank you! But I do have a suggestion regarding the sweetener used in the yogurt. We should all be avoiding refined sugar (including organic raw cane) as it IS a cancer feeder and exacerbates any health issue one might have. It’s acidic to the body (as you must know acidity=health issues). It also creates chemical reactions in the brain to keep you craving more, hence why so many people find it difficult to pull away from their favorite processed foods, junk drinks, and restaurant foods. Sugar is in everything!—to keep people coming back for more. In fact, there are studies that show sugar has the same effect on the brain as heroin. This is bad stuff.
So rather than adding sugar to the yogurt, how about adding organic coconut sugar, which is a much healthier choice. 🙂
I’ve tried the recipe twice with no luck. The second time I added a littlw extra thickened too. Any suggestions?
hi,
i really want to try this, without the sweetener will it work.
may i know from where did you get those small cute jars, does it have a lid on it.
thank you so much for the wonderful explanation
I get separation when i make this, with a thick creamy top and watery bottom. I’ve seen many other people have commented on this problem also, but no reply. How do you prevent this, and is it safe to just stir it back together before putting it into the refrigerator?
Some natural separation can occur, this depends on many different factors, the type of milk used, the cultures, the thickener, etc. Yes, definitely give it a good stir to combine it all before placing into the refrigerator to thicken up, then you should be good. Let me know if you have any issues.
A couple of things. first ….I don’t think that canned coconut milk is a great choice, as it is not fresh, and who knows how it is really made. and the metal that the can is made from is pretty strange, and when I used a can of coconut milk (a LONG time ago) I could see swirls of the metal in the milk. just pointing that out. and second, ..to make fresh coconut milk, just get a brown coconut , take the meat out and chop it up, and use WARM water, not boiling, as boiling water of course kills the rawness….I’ve used the warm water method for years now, and it works just great, then you still have a nice raw, creamy, milk …You can make a couple of quarts of milk from one coconut….or if you want it creamier, one coconut to 5 cups warm water. k.
So I made this the other night using homemade coconut milk and gelatin for thickener but it separated. The top half is delicious creamy yogurt and the bottom half is clear yet thick ??? Do you know why this happened? Do you think the bottom clear part has probiotics in it? Thanks!
so frustrated. i’ve been making this yogurt for some time and the last 2 or 3 batches have been compromised with the pink bad moldy mess, I’ve had to throw out whole batch.
is it that i’m not properly sterilizing the jars or is it the honey I’m adding? I don’t know what changed……
Just made a batch and it tasted…..awful. Not sure if there was another bacteria in the jar (it was clean!).
Upon opening the jar it smelled, well, like flatulence.
Did you have any success? Did you find out what the issue was?
Can you strain this to make greek yogurt or yogurt cheese the same way that you can with the dairy kind? It changes it to a thick cream-cheese like constancy.
Chia seeds work nicely as a thickener 🙂
Hi
I made a batch of coconut cream yoghurt a couple of days ago and sweetened it with raw sugar, very impressed that I can now use coconut sugar.
Put mine in the oven with the light on all night and then popped it into the fridge and left it until it set, it did separate, but the top part was wonderful but with a bit of a lemon tang!! Wonder if it came from the probiotic powder, hope I can get that taste next time.
Can’t wait to go to town again and buy more coconut cream, have even dug out my old yoghurt maker so hope it works. I am going to taste the watery bit and see if it is OK to pour over my chia seeds, may try to set with them also. Didn’t use anything last time but will try the agar agar as well next time.
I scrolled through all the comments very quickly and have read numerous coconut yogurt recipes. I am not FOR SURE, if you drain the “water” part out of the full fat can or not?
HELP…want this to succeed but just not sure….do you drain it or not? because I have had 2-3 cans in my fridge for awhile and it seems with just the “white harder stuff” it wouldn’t make as much.
Need to know before I attempt this!
Thanks!
I don’t drain mine, no. That’s why it isn’t in the instructions. I don’t mind that it is on the thinner side, since the gelatin will thicken it more. If you want an even thicker yogurt, you can refrigerate the cans and scoop off the thick, fatty cream layer for making your yogurt and skip the water (save it for smoothie). Obviously this will make less yogurt.
I am happy I found this page on your blog! I just made the coconut milk and tomorrow I am making the yogurt. I can’t wait to try it. I found Guar Gum in the co-op that I belong to, so I am going to try that for the thickener. After reading that it is made from a bean, I thought “why not, how bad can it be?”. I’ll let you know how I make out. 😉
Has anyone made this in their Instant Pot? I just got one and wanted to try this recipe. Any tips? Thanks!
Hi Beth! Thanks so much for this post. It’s really helpful. I’m going to try your recipe next time I try to make this.
If my coconut milk didn’t turn into yogurt, can I just move it to the fridge and use it anyways? I don’t want to throw any food out.
Let me explain: I tried making coconut milk yogurt last night with regular drinking coconut milk and probiotics. I now realize it was way too thin to work out. Also, as I don’t have a yogurt maker or anything like that, I had to leave it in my over with the light on. I had a thermometer in there and this morning noticed it was marking 89F, so less then it should’ve been. 12h of incubation and the milk still looks and smells the same as before.
I might just start a new recipe now, but I don’t want to throw this milk out, I rather use if for a recipe or something. Do you know if this is ok? I couldn’t have spoiled being left between 89F – 112F for the whole 12 hours, right?
Thank you!!
2 questions:
First, I sort of “forgot” my yogurt and let it ferment for about 30 hours. When I opened it up, there was a small white furry blob about the size of nickel on top. I assumed it was mold and threw it out, but later wondered if I could have just spooned out that section and saved the rest.
Second, I saw a recipe on another site that said heating coconut milk wasn’t necessary because, unlike dairy milk, there weren’t potentially harmful microbes or bacteria to kill. She went on to explain possible contamination when using raw dairy milk. I followed your recipe, but I wondered if there is any truth to eliminating the heating step for coconut milk.
I also read about not heating the coconut milk and tried making the yogurt that way and it came out great. So now, I just heat the coconut milk to 105-115 degrees, add thickener and probiotic, and culture it. I don’t even add a sweetener.
After the culturing time (20 hours) there is a separation of coconut & gelatin. What am I doing wrong?
I have tried to make coconut milk yogurt 2 times, mine came out so thin in a yogurt machine. I used probiotics and yogurt starter. But no luck do I need gelatin?
The gelatin definitely helps if you are looking for a thicker yogurt, yes.
Not sure if this has been asked but could you just soak the coconut overnight in room temp water instead of boiling water? Seems like it would be healthier if not boiled.
Hey
Thanks for the great tutorial! Two comments. You can also sterilize your jars by putting them on the oven at 200° for about 20 mins. It’s nice because they just sit in there, nice and warm and sterile and dry, waiting for you to be ready for them. Also instead of throwing out the pulp, it’s great to dehydrate (in the oven on low heat with door cracked, or in dehydrator) and you have a nice gluten free high fiber coconut flour (which is pretty expensive to buy).
Christina
Mine had a pink discoloration on top. I removed it, is it ok to eat?
Did you try it? Mine did the same thing but underneath it smells fine
Thanks for sharing!
Just a note – I used to make homemade coconut milk using packaged shredded coconut and really enjoyed it.
However, a friend talked with me about sulphites and I stopped buying anything with sulphites.
All the best!
Can I use whole milk Greek yogurt as a starter for this? Obviously, it would make it non-dairy.
Yes, that should work just fine, but I haven’t ever tried it myself.