-
Green Bean and Tomato Salad
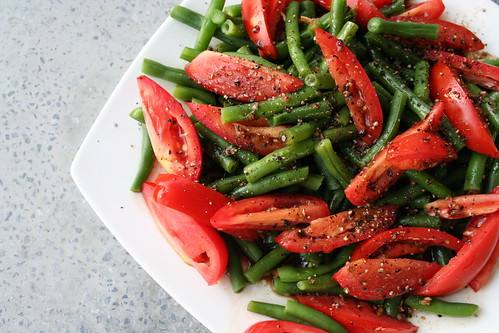
This is a very simple, fresh and quick summery salad, perfect side to so many summer dinners. You can serve it room temperature or make it ahead and serve it chilled. Had I had a red onion on hand, I probably would have thinly sliced a bit and included it, but it definitely didn’t need it.
Green Bean and Tomato Salad
serves 8 (approx 1 cup serving each)1 pound green beans, trimmed and cut into 2-inch pieces
3 plus tomatoes, cut into 1/2-inch thick wedges (or 1 pint of cherry or grape tomatoes, halved)
1/4 cup balsamic vinegar
1 large clove garlic, minced
1/2 teaspoon kosher salt
1/2 teaspoon freshly ground black pepper
3 tablespoons extra-virgin olive oilBring large pot of water to boil over high heat. Add green beans; cook 5 minutes or until crisp-tender. Drain and rinse well with cold water. Drain thoroughly and place in large bowl with tomatoes.
Combine vinegar, garlic, salt and pepper. Gradually add oil, stirring constantly with a whisk. Drizzle over bean mixture, toss gently to coat. Top with freshly ground black pepper.
-
Penne with Pistachio Pesto, White Beans and Arugula
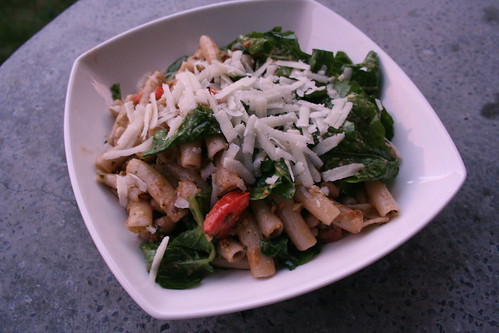
I am not super crazy about this photo, but it was late and I was hungry so I did my best.OK, so it is fair to say my pasta addiction is probably very obvious by now. It has always been one of my favorites and it is definitely both my go-to quick dinner option and my favorite comfort food. When I learned of my gluten intolerance, the loss of pasta in my life is what scared me most, then I discovered Tinkyada’s rice pastas. They are so amazing!! They are light and tasty. I much prefer them to regular pasta, any day, though I really don’t have much choice. Mark actually really loves rice pasta and always mentions how much lighter it is in your ‘gut’.
We got home late from work last night and we were both very tired from a long day of printing and other projects, so while I was contemplating dinner, Mark pulled a Wegman’s pizza out of the freezer for himself. I had pulled this recipe from a recent issue of Cooking Light and had all of the ingredients for it on hand, since it seemed so easy and quick, I decided to make it. In the time it took the oven to preheat and for the frozen pizza to cook and cool, I had made this pasta dish, served it, photographed it and I was finishing up eating, just about the time Mark was sitting down to eat his pizza. Granted, I produced WAY more of a mess and tons more dishes, but I would say cooking from scratch and eating fresh foods wins again!!
The pesto had an amazing flavor to it from the pistachios and the arugula had that lovely peppery crisp that just added to the creaminess from the beans. I was a bit unsure on the beans, but I thought they were really nice and was glad I decided not to omit them. Admittedly, I don’t usually buy romano cheese, as I tend to go for parmigiano-reggiano every time, but the romano had a stronger taste that went perfectly with these flavors, a bit saltier and sharper. I will definitely be buying more of it for pasta dishes.
Penne with Pistachio Pesto, White Beans and Arugula
serves 4
adapted from Cooking Light Magazine, July 20108 ounces uncooked organic brown rice penne pasta (any pasta will do)
1 cup packed fresh basil leaves
1/4 cup roasted shelled pistachios
6 garlic cloves
2 tablespoons olive oil
1 1/2 cups chopped seeded tomato
1 teaspoon freshly ground black pepper
3/4 teaspoon kosher salt
1 (15-ounce) can organic great northern beans, rinsed and drained
2 cups arugula
1/4 cup shredded fresh pecorino Romano cheeseCook pasta according to package direction. Drain and rinse with cold water. Drain.
Combine basil, nuts and garlic in a food process; process until finely chopped.
Heat large skillet over medium heat. Add olive oil to pan, and swirl to coat. Add basil mixture, cook for 2 minutes, stirring frequently. Stir in pasta, tomato, and next 3 ingredients (through beans); cook for 2 minutes or until thoroughly heated, tossing to combine. Remove from heat. Add arugula to pan, and toss slightly to wilt.
Place about 1 1/4 cups pasta mixture in each of 4 bowls and top each serving with 1 tablespoon of cheese.
-
Pasta Salad with Arugula, Tomatoes and Raw Milk Cheese
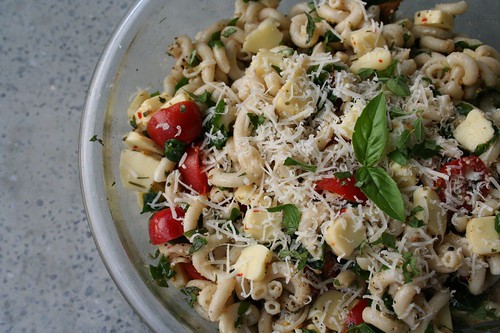
We did some serious local food shopping this past weekend and we made a feast on Saturday night with all of our goodies. I had grabbed a bunch of beautiful arugula from Native Offerings at the Elmwood Bidwell Farmers Market and a small container of spicy italian raw milk cheddar cheese curds at Five Points Bakery from Lapp Dairy and I knew I wanted to make some sort of pasta dish with it. I decided a pasta salad would be the perfect easy side dish to pair with the grilled chicken. The raw milk cheese curds were fantastic, they had a subtle spice that was just perfect with the tomatoes, arugula and fresh herbs. The crisp, peppery taste from the arugula was such a nice addition to the pasta salad, I will be adding that to a lot of pasta salads this summer. As usual, I used an organic brown rice pasta, but feel free to use your favorite pasta. I served the pasta salad at room temperature but it was equally good the next day, cold right out of the refrigerator.
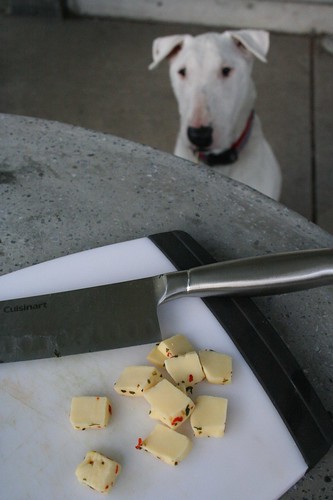
This is our lovely pup, Derby. She loves nothing more than to hang by my side when I cook. She especially loves the nights we cook and eat outside on the patio.
Pasta Salad with Arugula, Tomatoes and Raw Milk Cheese
serves 412 ounces organic brown rice pasta (I used fusilli)
2 cups fresh arugula, roughly chopped
1 pint cherry or plum tomatoes, halved
3 tablespoons olive oil
1 tablespoon fresh basil, chopped
1 tablespoon fresh oregano, chopped
1 clove garlic, minced
4 ounces spicy italian raw milk cheese curds, cut into cubes
wedge of fresh parmigiano-reggiano
kosher salt
freshly ground black pepper
red pepper flakesCook pasta in pot of boiling salted water until just tender but still firm to bite. Rinse the pasta in warm water and drain. After pasta has been drained, move it to a large serving bowl. Add the roughly chopped arugula, halved tomatoes, minced garlic, herbs and olive oil. Carefully toss the pasta to combine all the ingredients, salt and pepper to taste and top with the cubes of cheese curds, lightly toss to mix the cheese throughout. Top with shredded parmigiano-reggiano and fresh herbs.
-
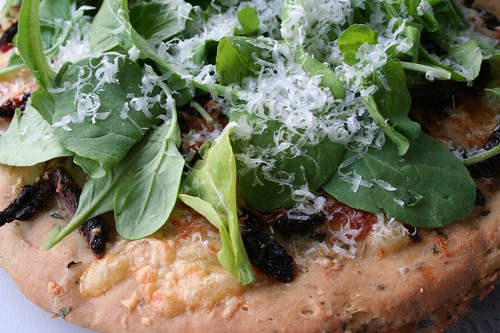
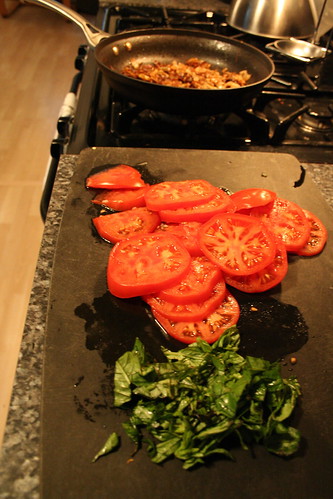
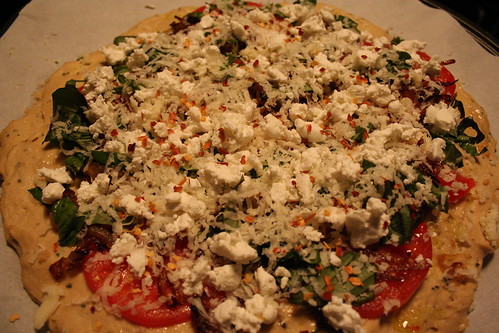
Sun-Dried Tomato, Mozzarella, Fontina & Arugula Pizza (Gluten-Free)
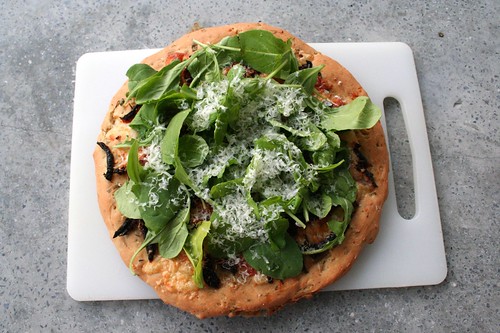
I am a big fan of homemade pizza, my Mom always made it when we were kids, with homemade pizza dough and all. I love how much fun you could have with toppings. This pizza turned out perfectly, it had so many lovely subtle flavors and the arugula finished it off nicely with a little bite. I used the same pizza dough recipe from my Caramelized Onion & Goat Cheese Pizza, but I am going to include it again here so you don’t have to look it up. Since I made this recipe up on the fly and also was making a second non-gluten-free pizza for Mark, my measurements may not be exact, so feel free to just improvise and go with what you think on the toppings. The only thing I would like to find a way to change is, some of the sun-dried tomatoes started to really blacken up as the pizza baked, it seemed to only be the ones not covered by cheese, so maybe I just need to add more cheese next time (oh darn!).
I took one leftover piece of this pizza this morning, toasted it up in the toaster oven and topped it with one fried egg. Oh my gosh was that amazing. The perfect breakfast to start a very busy day.
Sun-Dried Tomato, Mozzarella, Fontina & Arugula Pizza (Gluten-Free)
serves 2-3Gluten-free Pizza Crust
1 tsp sugar
1 1/2 tsp quick-rising yeast
3/4 cup warm water (about 110° F)
3/4 cup brown rice flour
1/4 cup garbanzo bean flour
1/4 cup tapioca flour
1/4 cup potato starch
1 1/2 tsp xanthan gum
1 tsp salt
3 tablespoons olive oil
2 eggs
1/2 tsp balsamic vinegar
2 tsp fresh rosemary, basil or oregano (I went with basil and oregano)Line a baking sheet with parchment paper or lightly grease.
In a small bowl, combine warm water, sugar and yeast. Stir until just dissolved. Cover with a kitchen towel and set aside in warm are for 10 minutes. Mixture will form a foam head of about 3/4″.
Using your food processor (which is how I did it and it worked surprisingly well), add all dry ingredients: flours, potato starch, xanthan gum and salt, directly into the processor bowl. Blend in the processor, about 1 minute. If using a mixing bowl, combine dry ingredients, and whisk together until well combined.
In another small bowl, whisk olive oil, eggs, and vinegar until blended. Add egg mixture and yeast mixture to dry ingredients, mix until combined.
Blend dough in the food processor for 2-3 minutes. Dough will be sticky and soft, it doesn’t seem much like dough at all. Add in the herbs and gently pulse or mix to combine.
Transfer the dough to the prepared baking sheet. Dip your hands in water or olive oil and shape the dough into a round shape about 1/4″ thick. Place in a warm, draft-free area and let rise 40 minutes. Dough should double in size.
Brush top with olive oil and sprinkle with a pinch of course salt.
This recipe can also be used to make gluten-free focaccia if you spread it to 1″ instead of 1/4″.Toppings
1 clove garlic, minced
1 tablespoon of chopped fresh herbs, I went with basil and oregano from my garden
2 ounces of sun-dried tomatoes, sliced very thin
1/2 cup of shredded mozzarella (I used organic)
1/2 cup of shredded fontina
red pepper flakes
2 cups of fresh baby arugula
fresh parmigiano-reggianoPreheat the oven to 400° F
After you have brushed a bit of olive oil on the crust and sprinkled with a bit of salt (see above), sprinkle the minced garlic all over the crust. Next, evenly sprinkle the fresh herbs and sun-dried tomatoes all over the crust. Add both cheeses and a pinch of red pepper flakes. Bake the pizza. Place the baking sheet in the middle of the oven and bake for 20-25 minutes until the crust is a golden brown and the cheese is melted. After you pull the pizza out, top the entire pizza with the baby arugula. Lightly grate fresh parmigiano-reggiano on top. Cut pizza into wedges, serve immediately.
-
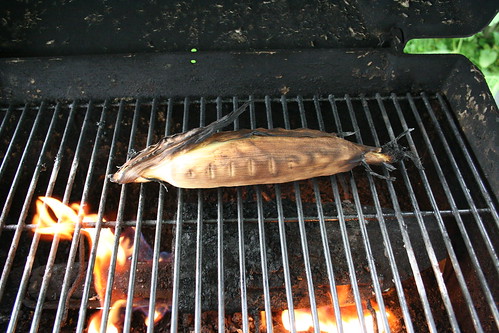
Fish Tacos with Chipotle Cream
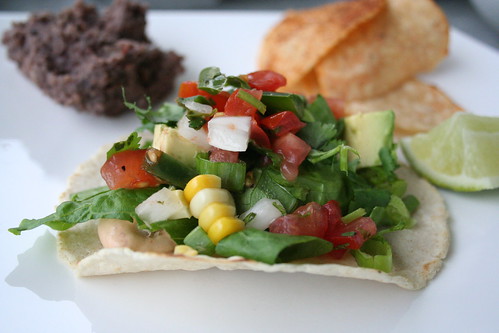
This is one of my favorite meals, so light and so fresh. The perfect summer-time meal and it was the best thing for our first patio dinner of the season. We were able to do all the cooking outside and enjoy the beautiful weather. I love the sneak up heat from the chipotle cream and the freshness from the grilled corn and the fresh pico de gallo, these three ingredients should not be skipped, they set these tacos apart from most that I have had. We served this with a small dollop of organic refried black beans and a few fresh corn chips from the farmer’s market on the side.
Fish Tacos with Chipotle Cream
serves 4Chipotle Cream
via Ellie Krieger, Food Network6oz of lowfat greek yogurt (if you cannot find greek yogurt, drain regular yogurt using a strainer and a paper towel)
2 tablespoons of mayo
2 teaspoons chipotle pepper, in adobo sauce (use just sauce if you want it less spicy, include a chopped pepper or two if you like the spice)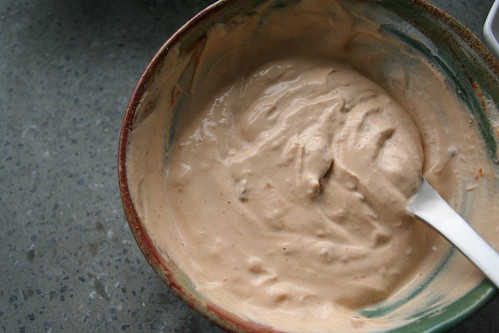
Fish
1 pound white flaky fish, such as cod, tilapia or halibut
1 tablespoon of olive oil
freshly squeezed juice, from 1 lime
1/4 teaspoon salt
freshly ground black pepper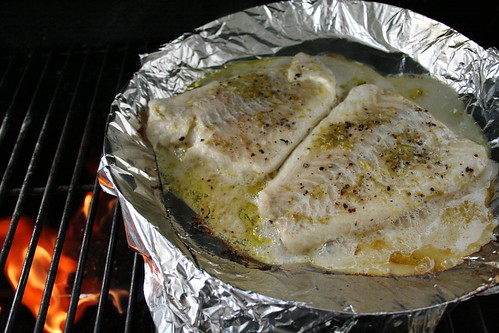
For the tacos
8-12 fresh homemade corn tortillas
chipotle cream (see recipe above)
shredded lettuce or cabbage
freshly grilled ear of corn, taken off the cob after it cools
cilantro, chopped
green onions, thinly sliced
avocado, diced
pico de gallo (I usually make by own from scratch, but we found some delicious homemade fresh pico de gallo at the Farmer’s Market)
lime wedgesTo make the chipotle cream, add the yogurt, mayo and chipotles into small bowl and stir to combine. This can be made ahead of time and chilled until you are ready to eat.
Lay the fish flat in a glass baking pan, cover in olive oil, lime juice, salt and pepper. Let marinade for at least 30 minutes.
Start your grill and after it reaches a medium-high heat add the corn and cook until done, about 15-20 minutes. We put the corn right on the grill in the husk after we soaked it a bit, you can also take it out of the husk and cook it in foil.
Meanwhile, chop and prep all of your ingredients for the tacos and place in bowls for serving.
Make the dough for your corn tortillas, press and cook them, store in a warm oven or in a tortilla warmer until you are ready to eat.
Remove the fish and add it to a foil lined grill pan on your hot grill, cook for approximately 3-5 minutes per side until cooked through, opaque and flaky. Set fish aside for 5 minutes. Flake the fish with a fork.
Top each tortilla with 1 tablespoon of chipotle cream. Top with fish, lettuce, corn, cilantro, green onions, pico de gallo, avocado and/or any other items that you would like. Serve with lime wedges.

-
Penne with Chickpeas, Feta & Tomatoes
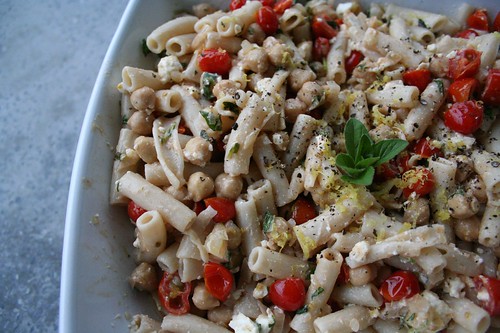
This is a quick and delicious vegetarian dinner that is full of Greek inspired flavors, perfect for any weeknight. The salty tang from the feta, the sweetness of the tomatoes and the nutty chickpeas all pair together to make for a hearty pasta dish. I was so happy to be able to walk into the yard and grab a fistful of our fresh oregano that has been growing like crazy, it gives it such a fresh and peppery taste to the flavors. I made this with gluten-free organic brown rice penne, but you can cook it with whatever your favorite pasta happens to be.
Penne with Chickpeas, Feta & Tomatoes
Adapted from Cooking Light, March 2010
Serves 48 ounces uncooked gluten-free penne (or if you aren’t gluten-free, regular penne)
2 tablespoons olive oil
1/2 cup chopped shallots
3 garlic cloves, minced
1 (15-ounce) can organic low sodium chickpeas (garbanzo beans), rinsed and drained
3 cups halved cherry tomatoes
3 ounces crumbled feta cheese
1/3 cup fresh oregano leaves, chopped
1/2 teaspoon salt
1/2 teaspoon lemon zest
1/4 teaspoon freshly ground pepperCook pasta according to directions, drain in a colander, reserving 1/4 cup of the cooking liquid. Heat a large skillet over medium-high heat. Add oil to the pan, make sure it coats the pan. Add shallots and garlic; sauté for 45 seconds, stirring constantly. Stir in chickpeas; sauté 2 minutes, stirring occasionally. Add tomatoes; sauté 2 minutes. Stir in pasta and reserved cooking liquid; cook 2 minutes or until thoroughly heated. Remove from heat and put in a serving bowl. Add feta, oregano, salt, lemon zest and pepper; toss to combine.

-
Caramelized Onion & Goat Cheese Pizza (Gluten-Free)
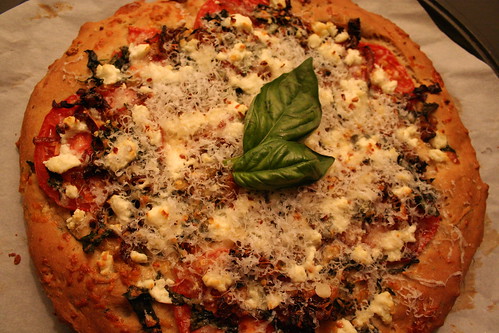
It has been hard to find good pizza crust since I have gone gluten-free, I have found a couple that come close, but most are thin and end up very crispy. I don’t mind that style of crust, but I have just missed a good thick and hearty crust. This was the first time I have ever made gluten-free pizza crust, completely from scratch. This crust was just that, thick, doughy and airy. So good. I came across this recipe in a book called The Gluten-Free Italian Cookbook by Mary Capone. I picked it up at this adorable, locally owned shop in Loveland, Colorado called Granny’s Gluten-Free Zone, I strolled in their randomly looking for this book after my friend Jane told me about it. I wish the crust had a bit more crisp to it, but I also think I probably could have left it in the oven just a few minutes longer, I was just way too excited and didn’t want to over bake it.
This toppings for the Caramelized Onion and Goat Cheese Pizza are perfect, I have made this so many times. I don’t like a lot of stringy, melty cheese on my pizza, which is how this pizza came about in the first place. The goat cheese gives the perfect the tang, the caramelized onions and shallots add an almost sweet element and of course the tomatoes and basil are a classic combo.
Caramelized Onion & Goat Cheese Pizza (Gluten-Free)
Serves 2-3Gluten-free Pizza Crust
1 tsp sugar
1 1/2 tsp quick-rising yeast
3/4 cup warm water (about 110° F)
3/4 cup brown rice flour
1/4 cup garbanzo bean flour
1/4 cup tapioca flour
1/4 cup potato starch
1 1/2 tsp xanthan gum
1 tsp salt
3 tablespoons olive oil
2 eggs
1/2 tsp balsamic vinegar
2 tsp fresh rosemary, basil or oregano (I went with basil and oregano)Line a baking sheet with parchment paper or lightly grease.
In a small bowl, combine warm water, sugar and yeast. Stir until just dissolved. Cover with a kitchen towel and set aside in warm are for 10 minutes. Mixture will form a foam head of about 3/4″.
Using your food processor (which is how I did it and it worked surprisingly well), add all dry ingredients: flours, potato starch, xanthan gum and salt, directly into the processor bowl. Blend in the processor, about 1 minute. If using a mixing bowl, combine dry ingredients, and whisk together until well combined.
In another small bowl, whisk olive oil, eggs, and vinegar until blended. Add egg mixture and yeast mixture to dry ingredients, mix until combined.
Blend dough in the food processor for 2-3 minutes. Dough will be sticky and soft, it doesn’t seem much like dough at all. Add in the herbs and gently pulse or mix to combine.
Transfer the dough to the prepared baking sheet. Dip your hands in water or olive oil and shape the dough into a round shape about 1/4″ thick. Place in a warm, draft-free area and let rise 40 minutes. Dough should double in size.
Brush top with olive oil and sprinkle with a pinch of course salt.
This recipe can also be used to make gluten-free focaccia if you spread it to 1″ instead of 1/4″.Toppings
2 teaspoons olive oil
salt
1 small onion, sliced
1 shallot, sliced
1 small clove garlic, minced
2 tomatoes, sliced thinly
1/2 cup fresh basil, sliced
2 oz goat cheese, crumbled
2 oz mozzarella, shredded
red pepper flakes
fresh parmigiano-reggianoPreheat the oven to 400° F
Caramelize the onions and shallots. Heat olive oil in a medium skillet over medium-high heat, add the thinly sliced onion and shallots, stir to coat them with oil. Spread the onions and shallots out evenly in the pan, stirring occasionally. After 10 minutes, sprinkle salt over the onions. Let cook for 20-30 minutes. Stirring as they stick, being careful to not let them burn. If you stir them too often, they will not brown. When they are caramelized, remove the pan from the heat.
Build your pizza. Sprinkle the minced garlic over the oiled pizza crust. Place a thin later of tomatoes on top of the crust, then lay a thin layer of the caramelized onions and shallots down. Sprinkle the fresh basil evenly over the top of that and then evenly sprinkle the shredded mozzarella, you just want a very light layer. Crumble the 2oz of goat cheese evenly over the top and sprinkle on faa pinch or two of dried red pepper flakes.
Bake the pizza. Place the baking sheet in the middle of the oven and bake for 20-25 minutes until the crust is a golden brown and the cheese is melted. Cut into 8 wedges. Lightly grate fresh parmigiano-reggiano on top, garnish with fresh basil.
-
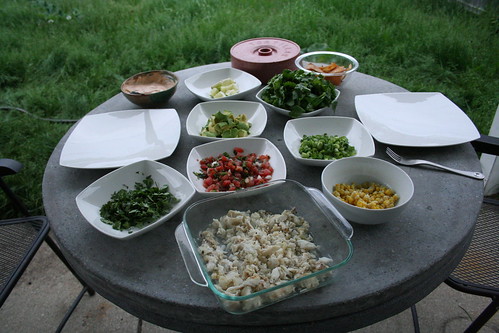
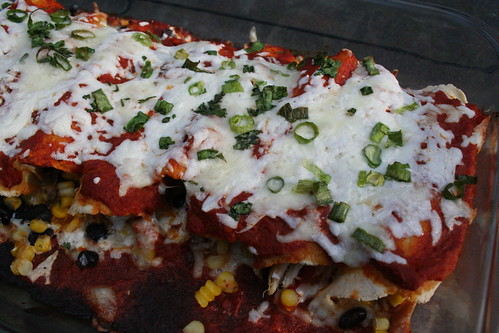
Black Bean Enchiladas

I find buying things just for the sake of a holiday to be silly, I don’t do it. I’d rather give something to someone I love because it reminds me of them, no matter what the day. Being that today was Mother’s Day, I decided that my gift to my mom would be to cook for her. We all get together at my parent’s house every Sunday and have a delicious dinner together, so I offered early in the week to be the one to do the cooking this week.
We were very lucky growing up, my parents always had a home cooked meal prepared for us for dinner every night, we would all sit down at the end of the day and have dinner together. Whether it was my mom cooking something in the crock pot or my dad concocting some random recipe, it was always there, it was always homemade and it always made with love. I am realizing now as an adult what an amazing gift that was, and just how lucky we were. I know this is where my love to cook comes from and why I love that feeling you get when you are able to share something you’ve made from scratch with the people you love the most. This meal was even better than me just cooking it alone for everyone, because we made it together and hung out all afternoon in the kitchen. My dad helped grill the veggies, made his famous Spanish rice and some delicious margaritas to go with the meal. My mom cooked the corn tortillas as I was pressing them and she helped assemble the enchiladas. My sister, Dana, hung out and kept us all company (I swear I will get you cooking Dana). My husband, Mark, and my nephew, Noah, watched movies, rough housed and played cars in the living room. A fun family day. Though we missed my sister, Vicky, her boyfriend, Nick, and my lovely niece, Teagan.

There are a few different elements to this recipe and they will all be in this post. I will post a separate entry for my guacamole, which we enjoyed as a side.
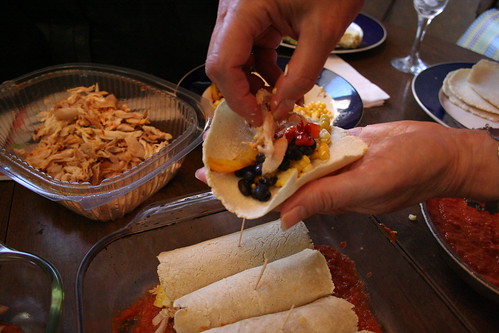
I started preparing the meal the day prior by soaking the beans for the slow cooked black beans, which I wanted to have a ton of flavor since they would be the main element of the enchiladas. I also grabbed a plain rotisserie chicken at the grocery store this morning since I knew my dad wouldn’t go for an entirely vegetarian meal, being the typical “meat and potatoes” guy and my older sister, Dana, doesn’t like beans. There really are so many ways you can make these enchiladas, adding different vegetables like zucchini, spinach or mushrooms, and different proteins like tofu or various meats, you can even go just cheese. The sky is the limit. This was what I thought sounded the best, so this is what I went with. They really turned out great. The enchilada sauce had so much flavor, I can’t believe I ever bought canned enchilada sauce in the past, this was so easy. The beans had a delicious smokey, slow cooked flavor that you won’t find in any can of black beans on the shelf at the grocery store. Definitely worth the extra time.
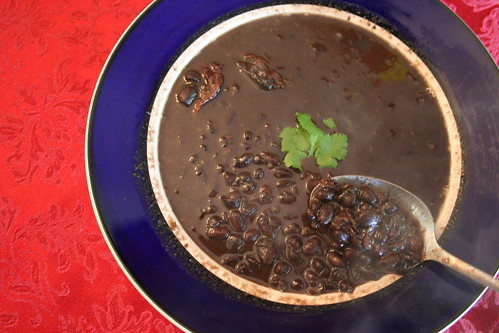
Slow cooked black beans
Adapted from Recipes for Health, New York Times, March 20091 pound dry organic black beans, washed and picked over
2 quarts water
1 tablespoon olive oil
1 medium onion
4 large garlic cloves, minced
1/4 cup cilantro, chopped
3 whole chipotles, dried
kosher saltSoak the beans in the water for at least six hours. Keep them in the refrigerator if you are soaking for a long time in hot weather.
Heat the oil over medium heat in a large soup pot and add the onion, stirring until it begins to soften. Add two cloves of the minced garlic. Cook until fragrant, about a minute. Add the beans and soaking water. Be sure the beans are covered by at least 1 inch of water, add more if necessary and bring to a boil. Reduce the heat to low and skim off any foam that rises. Cover and simmer one hour.
Add the salt, remaining two cloves of minced garlic, cilantro and the whole chipotles. Continue to simmer another hour until the beans are soft and the broth is thick and fragrant. Taste. Add more salt to taste, add more garlic if it needs it. Let sit overnight in the refrigerator for the best flavor. Heat back up over medium heat before making the enchiladas.

Enchilada Sauce
2 tablespoons olive oil
1 small onion, chopped
2 large garlic cloves, minced
2 small jalapeno peppers, chopped
6 medium tomatoes, coarsely chopped
2 teaspoons cumin
2 teaspoons chili powder
3 dried chipotles, whole
2 roasted red peppers, chopped
2 teaspoons saltHeat oil over medium heat in a large saucepan, add onion, garlic and jalapeno. Sauté, stirring until the vegetables begin to soften, about three minutes. Add tomatoes, cumin, chili powder, chipotles, roasted red peppers and salt, simmer on a low heat for at least 30 minutes, until the sauce has thickened and the tomatoes are very soft. Turn the heat off, remove the whole chipotles and add the sauce to a food processor, blend until smooth. Set aside.

Black Bean Enchiladas
Serves 8-1020 fresh homemade corn tortillas, prepared, cooked and ready to be eaten
(if you used store-bought corn tortillas, you will need to heat these up to make them less breakable)
slow cooked black beans, see recipe above (or if you must, canned black beans)
enchilada sauce, see recipe above
3 ears sweet corn, cooked thoroughly on the grill
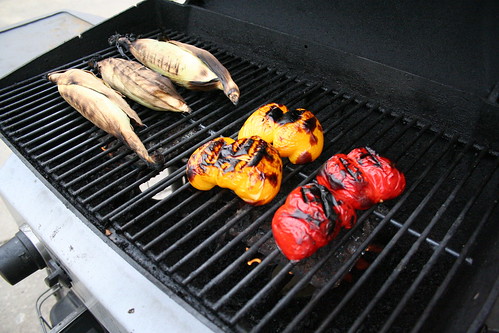
2 bell peppers, roasted on the grill (red, orange, yellow or green), cut into strips
1 cup shredded queso blanco
1 cup shredded jack cheese
green onions
cilantro
sour cream
guacamole
shredded lettucePreheat your oven to 350° F
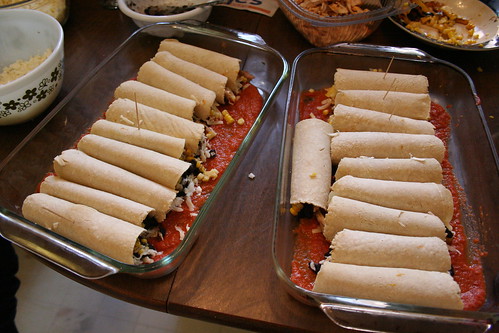
Prepare your corn tortillas, black beans and enchilada sauce ahead of time. Lightly coat the bottom of two 9″ x 13″ glass pans with the enchilada sauce, probably about 1/2 cup in each. Place a corn tortilla, flat in the palm of your hand (or on a flat surface) and put a spoonful of corn, black beans, a couple of peppers, and a sprinkling of each cheese in the tortilla, careful to not overfill it and to leave enough ingredients for the rest of the tortillas. Be sure to leave enough cheese to top the enchiladas as well. Carefully roll the tortilla up and place it with the open side down in the sauce lined pan. Repeat this with the rest. Because we made some with chicken and beans, some with just beans and some with just chicken, we marked them accordingly with toothpicks. You really can add anything to the filling of these, be creative. Pour the remaining sauce over the enchiladas and top with the remaining shredded queso blanco and jack cheese and chopped green onions and cilantro. Bake 25 – 30 minutes until the cheese is melted, browning and bubbling. Top with (or serve on the side) sour cream, lettuce, and/or guacamole or any other favorite garnishes.

With love.
-
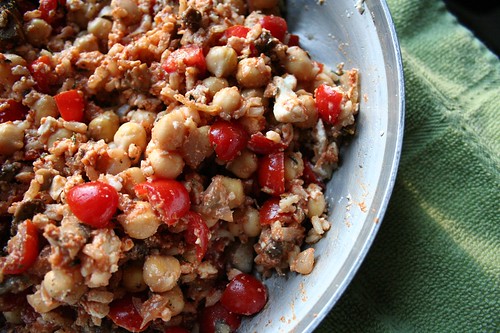
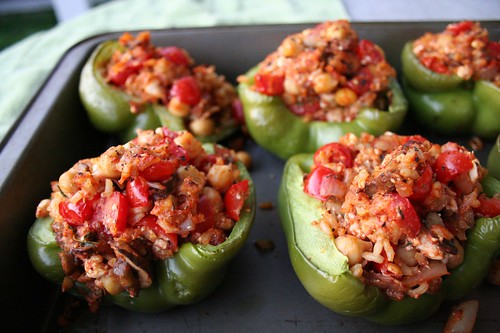
Brown Rice & Garbanzo Stuffed Green Peppers
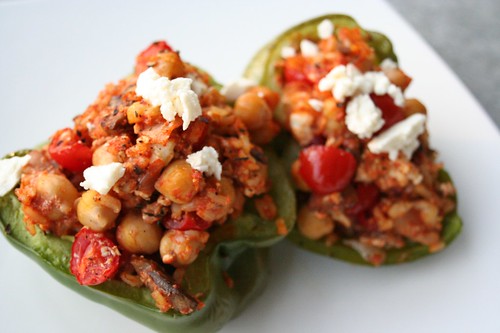
Growing up in a Greek family, there was no shortage of delicious, traditional and Greek inspired dishes at mealtime. My mom has an amazing recipe for greek style rice and ground beef stuffed peppers and tomatoes that are one of my favorite meals. Her recipe calls for the rice to be added to the stuffing uncooked and then it’s baked for a long time, to where the peppers get very soft. I came across this recipe and was excited to try it as it sounded very similar but without the meat, and it adds in garbanzos and feta. It cooks a short time, so I figured the peppers would retain some of their crunch, which I prefer.
This was so tasty and quite filling, I couldn’t finish my two halves. The garbanzos bring an almost meaty texture and the chunks of tomato are so sweet and they burst in your mouth. Of course, the feta was a perfect addition as my mom always serves feta on the side with her stuffed peppers, which I like having with almost every bite. I am for sure going to make this again, playing around with the different filling elements and possibly stuffing tomatoes with it as well. I was thinking that some chopped kalamata olives would go great in the stuffing as well. Yum.
Brown Rice & Garbanzo Stuffed Green Peppers
serves 3-6
Adapted from Fresh3651 c brown rice, cooked
3 large organic bell peppers
2 t olive oil
1 small onion, chopped
2 large garlic cloves, minced
1 cup of baby bella mushrooms, chopped
2 t fresh thyme leaves
1/2 t salt
1 c plum tomatoes, quartered
3 T tomato paste
15.5-oz can organic low sodium chickpeas, drained and rinsed
1 c crumbled feta cheesePreheat oven to 350F. Cook your brown rice according to package directions. While rice is cooking, cut the peppers in half length-wise, remove the stems and scoop out the seeds. Place peppers cut side up in a non-stick baking dish, drizzle with olive oil and roast for 25 minutes.
In a large skillet, heat oil and add onion, garlic, mushrooms, thyme, and salt. Cook, stirring frequently, 5 minutes or until vegetables are softened. Remove from heat and stir in the tomatoes, tomato paste, chickpeas, cooked rice and feta. Season to taste with salt and pepper. Fill roasted peppers with the vegi-rice mixture. Bake 10-15 minutes. Sprinkle remaining feta on top.
Serve 1 half as a side or 2 halves as a main course.
-
White Bean and Avocado Salad
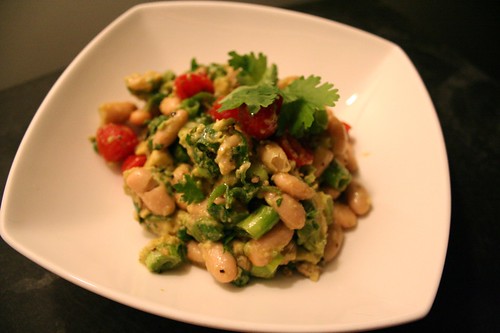
This is my idea of “fast food”. When I have a long, busy day and I am not getting home until late, I don’t crave take out, a drive thru or a restaurant – I want my home, my kitchen and my ingredients. I have been known to come home from a very busy day and whip together a full on pasta dish with fresh veggies and things I have in the pantry. This recipe is something I threw together randomly, last week after my Thursday night yoga class with things I had on hand and it was so good I went for it again this week. I don’t get home until almost 9pm on Thursdays, so after a long work day and a 90 minute yoga practice I want something light, tasty and quick.
Since avocados are in season right now, I have been buying a few every time I go to the market since I could eat them daily. The last time I made this salad I had some leftover dried great Northern beans that I had soaked for a soup I had made and they were even better than the canned beans I used this time. Unfortunately, for as much as I prefer dried beans over canned, they are just not as quick to prepare and therefore not ready on the drop of a dime. Any white bean will do for this recipe, great Northern, cannellini, navy or even lima beans.
This salad is light, refreshing, adequately filling and it has the perfect balance of crunch and creaminess. I had a small piece of toast on the side. This makes a great main course dish or a it can be substituted for your typical green salad.
White Bean and Avocado Salad
serves 2-4 (depending on how you are serving it)1 can of white beans (15.5 ounces) cannellini, great Northern, etc
1 avocado diced
1 handful of cilantro, chopped
4 or 5 green onions, chopped
juice from 1/2 lime
salt
fresh ground pepper
2 T olive oil
handful grape tomatoes, halvedDrain and rinse the beans. Place the beans, tomatoes, avocado, green onions and cilantro into a mixing bowl. Drizzle with the olive oil and lime juice, season to taste with salt and pepper. Gently toss until combined. Don’t worry if the avocado starts to mash-up a bit, mine did this time as the avocado was very ripe, it still tastes delicious. Serve immediately as main dish or side dish. Refrigerate leftovers.


