-
Whole-Grain Hummus Pizza – Gluten-free + Vegan
I feel like life has been a bit of a whirlwind lately, so I apologize for the lack of posts. Besides all of the work we have going on with the design studio, we have been so wrapped up in getting stuff done on the house to get it on the market (the realtor came by on Friday, we have just a few small things to do and then we are ready – YAY!) and we have had a ton of summertime social activities going on. Life has been insanely fun and exciting, but the last couple of days I am feeling it all catching up to me. My head is spinning and I am not sure which way is up some days. The biggest problem with how busy we have been is I just can’t seem to squeeze time in to cook. When I do, I am so focused on getting healthy and delicious food made and then having time to eat and enjoy it, that I am forgetting to slow down enough to share the recipes. I actually made this pizza almost a week ago, I had the time to take photos and everything and then I totally forgot to share it with you guys! I actually forgot completely about it, until I was going through my photos today. Ooops. You can see where my head is at these days. This week seems to be a bit calmer so I hope to have some other recipes to share with you.
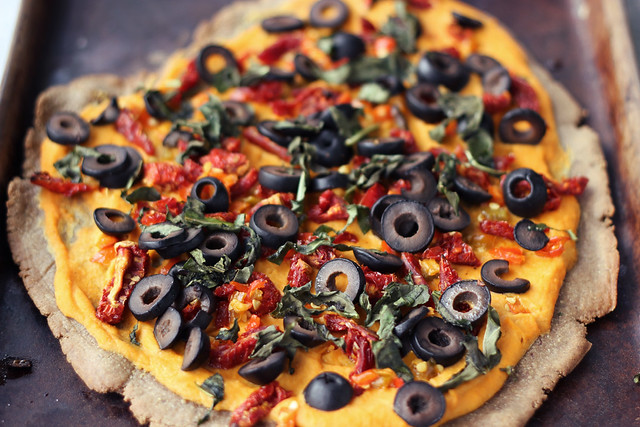
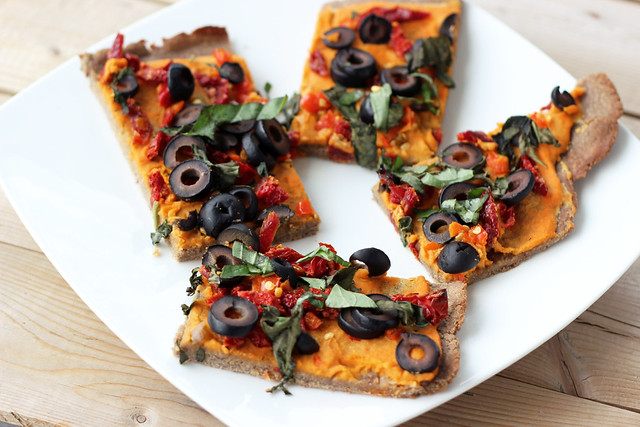
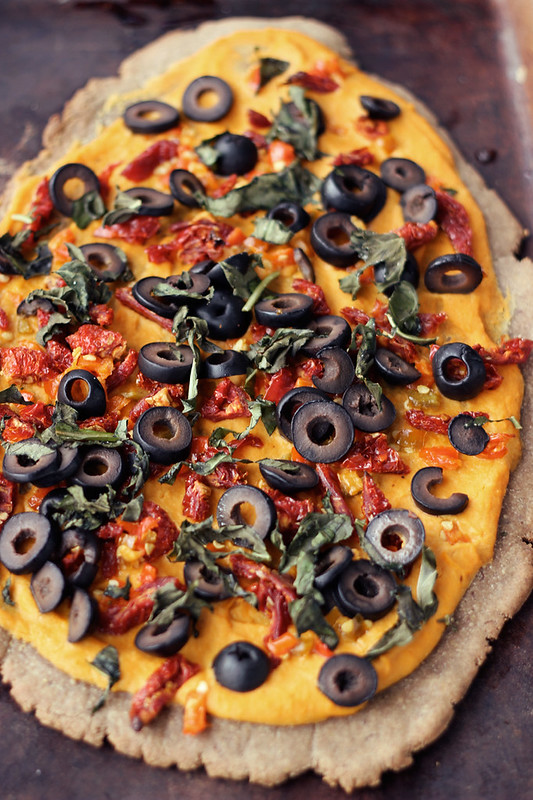
This recipe is something I have made before and it is really quite simple and it is so delicious. You can really play around and use whatever toppings you love, these are just some of my favorite toppings and what I easily had available. I had made up a quick batch of roasted red pepper hummus the other day using my chipotle hummus recipe (I substituted 1 large roasted red pepper for the chipotles), so that is what I used on this pizza. Feel free to use store bought hummus, that works just as well and I have done it plenty of times. I love how creamy the hummus is, it is the perfect base to whatever your favorite toppings are. I honestly don’t miss the cheese one bit when I eat one of these pizzas. This pizza is also great with a variety of toppings like roasted eggplant, zucchini, fresh tomatoes, broccoli, red onions, asparagus, mushrooms, arugula and so on and on and on. I have made this so many different ways. So have fun with this recipe and your toppings!
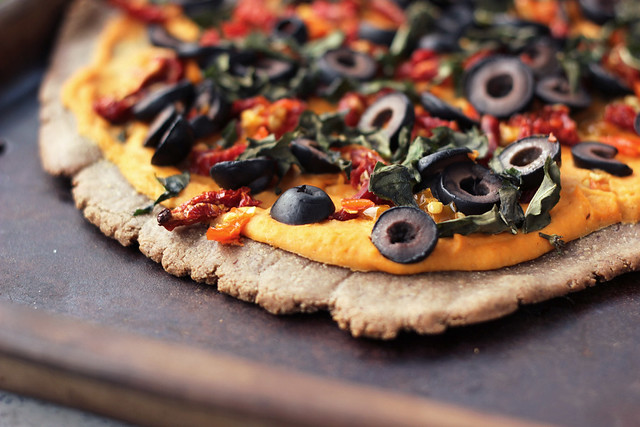
As far as the crust goes, if you don’t want to make your own crust, you can simple use whatever pre-made gluten-free crust or dough that you like. I really enjoy this whole-grain crust from Gluten-Free Girl because I can easily tweak it based on what flours and starches I have on hand and I love that it is vegan and gluten-free and most importantly VERY simple. I really enjoy using flours like millet and buckwheat in this crust, because besides their beautiful flavor, I really love how they give the crust a beautiful rustic, brown color and it browns very nicely and the crust has a lovely chewy texture that is just absolute perfection. Make sure to check out this post on Gluten-free Girl and the Chef on how to create your own multi-grain all purpose flour blend using whatever your favorite flours and starches are. I know I have shared it on here before, but it is a wonderful guide with a very simple ratio. I usually mix up 1000 grams at a time, 700 grams of a variety of different flours plus 300 grams of a starch or two.
[print_this]Whole-Grain Hummus Pizza – Gluten-free + Vegan[/print_this]
*Note the quantity of ingredients below is for just 1 small 8-inch (or similar sized) pizza, double the ingredients if you plan to make one large 16-inch pizza or two small pizzas.- 1 small (approx 8-inch) gluten-free and vegan whole-grain pizza crust (see the recipe for the whole-grain crust that I used, below)
- 1/2 cup roasted red pepper hummus (or whatever your favorite hummus flavor is)
- 1/2 cup black olives, thinly sliced
- 1/2 cup sun dried tomatoes, roughly chopped
- 1/4 of fresh basil, roughly chopped
- 1 clove garlic, very finely minced
- 1/4 cup hot pepper spread or your favorite pickled hot pepper, such as banana peppers, peppadew, jalapeños, etc – roughly chopped
- kosher salt and fresh ground pepper
- 1 tablespoon of olive oil
Preheat the oven to 350º. Spread your pre-baked crust with with the hummus, top with sun dried tomatoes, hot peppers, fresh basil, olives and garlic. Season to taste with salt and pepper. Drizzle the olive oil over top of everything. Bake for 8 to 10 minutes until the toppings are warmed and the edges of the crust are lightly browned and crisp.
[print_this]Gluten-free Whole-Grain Pizza Crust
From Gluten-free Girl and The Chef
Makes 2 8-inch pizza crusts or 1 16-inch pizza crust. (I made two crusts, they weren’t exactly round since my pan is rectangular, but you get the idea)- 1 tablespoon ground flaxseed or ground chia seeds
- 500 grams whole-grain gluten-free flour mix (I used a combination of millet, buckwheat, sorghum and arrowroot starch)
- 1 1/2 teaspoons kosher salt
- 4 teaspoons active-dry yeast
- 1/4 cup extra-virgin olive oil
- 1/2 to 1 cup warm water, about 110*
- olive oil for brushing on top of the crust
Mix the flaxseed (or chia seed) into a bowl. Pour 2 tablespoons of boiling-hot water over the seeds. Whisk immediately and quickly until you have a thick paste. Let this set aside and cool down.
Put the gluten-free flours and the salt into the bowl of a stand mixer. Mix them up together.
Put the yeast, olive oil, and half the warm water into a small bowl. Stir gently. Let them sit for a moment to activate the yeast.
Add the flaxseed slurry to the dry ingredients and mix for a moment. Pour the yeasty water into the dry ingredients. With the mixer on medium, whirl for a few moments, until the dough comes together into a soft ball around the paddle of the stand mixer and feels soft and pliable. If the dough feels too dry, add more of the warm water in small amounts until the dough feels right. (You might not need all the water. You might need more. Yeast doughs can differ from kitchen to kitchen.) Set the dough aside in a warm place and let it rise for 1 hour.
Preheat the oven to 450°. (If you feel comfortable with heat, take it up to 550°. Just watch the dough in the oven, carefully.) If you have a pizza stone, make sure it is in the oven. If not, sprinkle a pizza tray or baking sheet with gluten-free cornmeal.
Grab 1/2 of the dough (or all of it if you are making one large crust) and put it between 2 pieces of parchment paper. Through the paper, roll out the dough to your desired thickness.
Pre-bake the dough. Take the parchment paper off the dough, then transfer the dough to the pizza stone or prepared pizza tray. Brush the top with olive oil. Bake until the dough has started to crisp up and browned at the edges, about 8 to 10 minutes. (It will take less time if you have the oven cranked up to 550°!)
Take the crust out of the oven. You now have a pre-baked pizza crust. Top with whatever you’d like and bake until the toppings are cooked through.[/print_this]
-
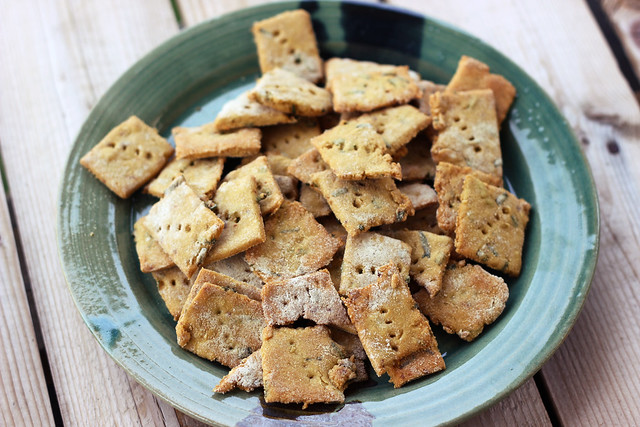
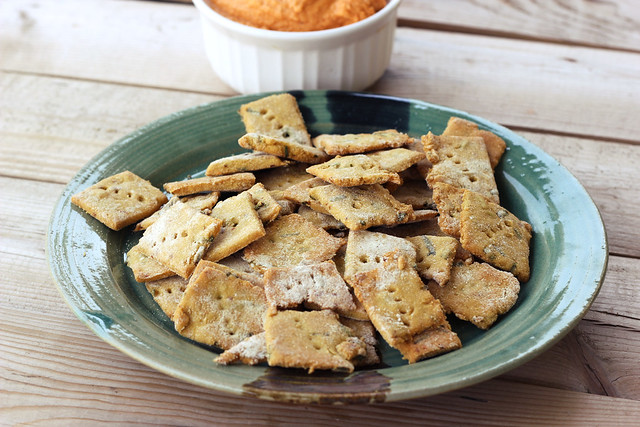
Spicy Chickpea Crackers with Chives – Gluten-free + Vegan
I hope everyone had a wonderful holiday weekend, or just a wonderful weekend if you are outside of the US. We had a very busy one, filled with so much fun, great friends and my amazing family! Short of being away on vacation, I don’t know if I have ever had that much fun, that many days in a row. Some of the highlights of those 5 days was a super relaxing Thursday night massage after work at my good friend Erika’s newly opened place here in Buffalo, Phoenix Rising and a nice dinner at Trattoria Aroma with my hubby. Friday night after work we had dinner with some of my absolute most favorite people at La Tee Da in Allentown. Saturday, after yoga I took my first trip to the farmers market of the season with my friend Dana, my sister Vicky and my niece Teagan. Then Mark and I had a little cookout at home in the evening. Sunday morning, I woke up early to take a trip, with some very lovely ladies, to Rochester to take two yoga classes in a row taught by our friend Lyndsey at Breathe Yoga. In June, she is moving to Africa for 6 months to teach yoga, so I am so glad we were able to see her before she left. Sunday night there was a super fun and chill Memorial Day party at our friend Sarah and Brian’s and we got to spend time with some of my favorite people. Monday we were able to beat the insane heat with with a super fun afternoon pool party at our good friends, Karen and Vinnie’s house, which was so relaxing. After a few hours in the pool with sun beating down on us, we followed it up with a nice weekend-ending BBQ and some super quality hang time with my parents, my sisters and my niece and nephew! Seriously it was non-stop awesome.
So yeh, I am not sure anyone besides me will even read that last paragraph, but I was on such a happiness high all weekend, that I had to share. We usually spend this time of year traveling for work or getting ready to hit the road, that I forgot how amazing this time of year can be. For once, going back to work yesterday after a 3-day weekend, was a little bit challenging, normally I cannot wait to get back to it all. It is so rare that we allow ourselves that time away from our work, but we decided with our pending move, that we wanted to enjoy our time here as much as we could! However, since we had so much going on and it was insanely hot, I also decided to not worry to much about cooking or baking over the weekend. When we were actually home, we threw veggies or some of our local meat on the grill and we ate out on the patio. It was really nice and super simple.
I did find time to pull together a really tasty Mexican quinoa salad to take to our friends BBQ, which I will have to make again so I can share it with all of you. I also made these simple crackers for snacking. I grabbed a copy of LA Yoga Magazine when we were out in California a few weeks ago and they had a simple recipe for some chickpea crackers that intrigued me. I wanted to add some things to the crackers to really make them my own, so I added some red pepper flakes, because I love spicy thing and I also added some fresh chives from my garden. These crackers are great on their own, or even better with some salsa, hummus or whatever your favorite dip is. You could even crumble these up a bit and use them as a topping on a salad. I am calling my crackers “rustic”, because they weren’t perfect little squares like I am sure they should be. I kinda dislike perfection with food. I want my food to look like someone made it with their hands and lots of love. Besides, it was so insanely hot in the kitchen when I was making these that I didn’t have the patience to be meticulous. If you want fun little shapes, like animals, stars or triangles, you could use small cookie cutters or cut any other shapes with your hands.
These crackers would be great for a snack or even better, package them up in little zip lock bags as a perfect travel snack. You could play around with different spices and herbs, maybe adding things like small diced up sun dried tomatoes, etc.
[print_this]Spicy Chickpea Crackers with Chives – Gluten-free + Vegan
adapted from LA Yoga Magazine, May 2012
makes about 40 crackers- 1 cup sifted chickpea flour
- 1/4 cup nutritional yeast
- 1/2 teaspoon baking powder
- 1/2 teaspoon sea salt
- 1/8 – 1/4 teaspoon red pepper flakes (add as much or as little as you’d like or leave this out, if you don’t want the heat)
- 1-2 tablespoons fresh chives, roughly chopped
- 2 teaspoons extra-virgin olive oil
- 2-4 tablespoons water (you may need more)
Preheat the oven to 350°F. Lightly oil a baking sheet and set aside.
Combine the flour, nutritional yeast, baking powder, sea salt, red pepper flakes and chives in a medium sized bowl. While stirring, add the olive oil to the flour mixture, then begin adding the water 1 tablespoon at a time until a dough forms that can hold together. Knead the dough several times until smooth and firm, adding more flour or more water, as needed. Shape into a ball, cover with plastic wrap, and let rest for 10 minutes.
Divide the rested dough in half. Place one of the halves on a clean work surface that is dusted with chickpea flour. Flatten the dough a bit with the palm of your hand and sprinkle the top with more chickpea flour. Using a rolling pin that has been dusted with flour, roll out the dough to about 1/4-inch thickness. With a sharp knife, cut the dough into 1-inch squares, or whatever your desired shape, and arrange on the prepared baking sheet.
Repeat with the remaining dough. Before baking, prick the tops of the squares with the tines of a fork to prevent them from blistering and bubbling up as they bake. Bake for 15 – 20 minutes, or until the tops are golden brown. Remove the pan from the oven and let the crackers cool on the sheet. As they cool, they will become crisp. (Test one after it cools. If it isn’t crisp, return the pan to the oven for a few more minutes.) Store in an airtight container up to a week. [/print_this]
-
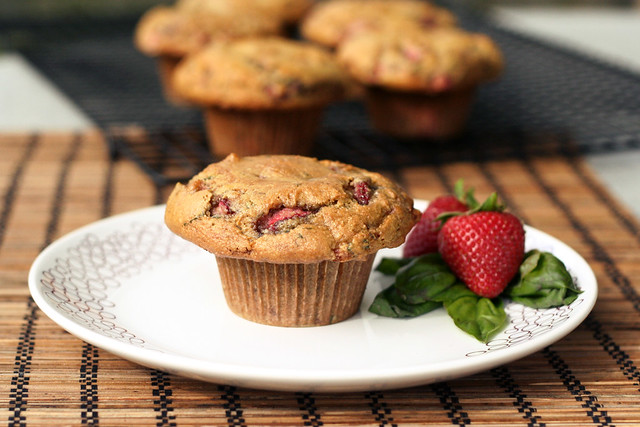
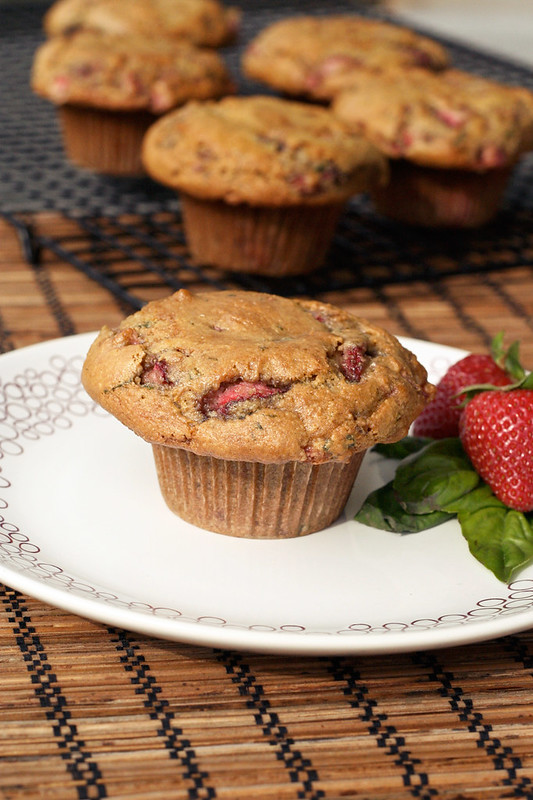
Strawberry Basil Almond Flour Muffins – Gluten-free, Dairy-free, Refined Sugar-free
Before I get into chatting about muffins, I wanted to take a minute to thank all of you for your amazing, inspiring and humbling comments on my two year blogiversary post. Besides hearing about how many of you read Tasty Yummies and have been inspired by it, reading all of your touching comments about what makes you happy, seriously moves me. I have read each and every comment and so many of them brought tears to my eyes. So, even though I haven’t responded to all of you, thank you all from the bottom of my heart!
The last week has been a really great one for me, between all the inspiring comments about happiness on my post, meeting a new friend and the wonderful week of yoga I had, I am seriously on cloud nine. I have managed to get to a ton of yoga classes this past week (6 in the last 7 days) and despite my injury a few weeks back, I seem to have found a really sweet spot in my yoga practice, at least it really feels that way to me. Every time I think I couldn’t possibly enjoy the practice of yoga and everything it brings, any more than I already do, I have a breakthrough week. This week that feeling came a few different ways, the first is that I got to spend some time with a fellow student that I have practiced alongside many times. Upon hearing the news that she would be moving back to Rochester tomorrow, after nearly a year of living in Buffalo, before heading off to Africa to teach yoga, we decided we had to get together before she left. We grabbed some food and had a couple drinks and just hung out and got to know each other better. I rarely meet people whom I feel that instant of a connection to, and it was yoga that brought us there. I know that although Lyndsey will be far away and I am relocating to California later this year, we both agreed we will stay in contact and who knows where that connection will take us. I feel there are people in this world that we are meant to meet and even though we wish the circumstances would be different or that they lived closer, etc, it is incredible how powerful it can be that we find one another despite all that. Life is pretty amazing. Besides all of the amazing teachers at East Meets West Yoga that I have gotten to know and love, there are so many other great people that are there, like me, to practice, that I have shared such meaningful conversations with, or even just a warm hello! I feel like I have never ever felt that sense of community anywhere else in my life.
The other thing that made this week of yoga a special one is that I was able to get into three different arm balances that I hadn’t quite been able to master before. I had gotten close on all three in the past at different times, and maybe popped up into them once or twice (likely in happenstance), but it was like I hit a light switch this week and found something that I hadn’t found before. It felt amazing! That is what I love most about yoga, it is ever changing and ever growing. I can’t believe there was ever a time I told myself that I would never be “better” then where I was at that point and that I just couldn’t get into certain poses. Once I let go of that frustration and fear, it not only became so much more enjoyable, but I also found myself doing things I never thought I could. I can honestly say that yoga has changed me both on the mat and off and I will be forever grateful for that.
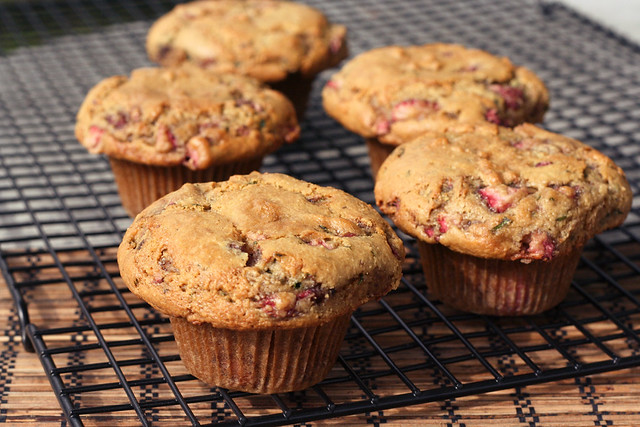
OK, let’s talk muffins! Strawberry basil is one of my absolute favorite flavor combos! I discovered it a few summers back when I was obsessed with mojitos. I started playing with basil instead of mint and adding in strawberries instead of lime. It makes for a great adult drink if you add rum, or a refreshing non-alcoholic drink if you just muddle the two together and top it off with a little sparkling water. They are so perfect together, the tart and subtle sweetness from the strawberries paired with the sweet, almost peppery flavor from the basil. If you aren’t a fan of basil, you can add in fresh mint to these muffins, or just skip it altogether. But I highly recommend trying the two together if you haven’t yet, it is a wonderful surprise for your palette.
These muffins are bursting with flavor and are also quite healthy for you. They are not only gluten-free, but they are totally grain-free, they are also dairy-free and refined sugar-free. I haven’t yet played with using an egg replacer to make these vegan, but I don’t see why it wouldn’t work. If you do try it out, please do let me know what you think. This recipe makes 6 large muffins. I fill the batter all the way to the very top and as you can see in the photos, that gives you the lovely puffy muffin tops, if you want more muffins, just fill the cups up less and keep an eye on your bake time, it may take a little less time.
Thank you again guys for your wonderful blogiversary wishes and if you haven’t yet entered the contest, please do. You have 5 different opportunities to enter and the giveaway closes on Wednesday.
[print_this]Strawberry Basil Almond Flour Muffins – Gluten-free, Dairy-free (vegan option)
makes 6 or 7 large muffins- 2 1/4 cups blanched almond flour*
- 1 teaspoon baking soda
- 1/2 teaspoon sea salt
- 2 local farm fresh large brown eggs (you can try an egg replacer here, I haven’t yet however)
- 1/4 cup maple syrup (or honey)
- 1/4 cup coconut oil, melted
- 2 teaspoons vanilla extract
- 1 cup fresh strawberries, hulled and roughly chopped
- 1/4 cup fresh basil, finely chopped
Preheat oven to 350˚F. Line a muffin tin with paper liners.
In a medium bowl, whisk together the almond flour, baking soda, and salt. In a separate bowl, beat the eggs. Add in the honey, vanilla and oil and whisk until well combined. Add the dry mixture to the wet, stirring until combined. Carefully fold in the strawberries and basil.
Spoon the batter into the muffin tin, filling to the top if you want a nice muffin dome, or as us ladies know it “muffin tops”. Bake for 25 to 30 minutes or until the tops are golden brown and a toothpick inserted into the center comes out clean. Cool the muffin pan on a wire rack for five minutes. Gently pop the muffins out to continue cooling on the rack (don’t cool them longer than 5 minutes in the hot pan they’ll definitely get soggy). Enjoy a muffin after they have cooled 10 minutes, you know you want to.
I find storing muffins covered tightly in the refrigerator or freezer to be the best. Just pop one out as you want it, heat slightly in the microwave if you want to take the chill off and go.
*Something I have learned from baking on my own and from reading Elana’s Pantry, is that not all almond flour (or meal) is created equal. Bob’s Red Mill makes an almond flour, though easy to find, that doesn’t seem to react quite the same as other almond flours. It doesn’t seem to rise as much and it just seems to leave recipes flat. On Elana’s recommendation I now buy Honeyville brand almond flour in a 5-lb bag from their website.
[/print_this]
-
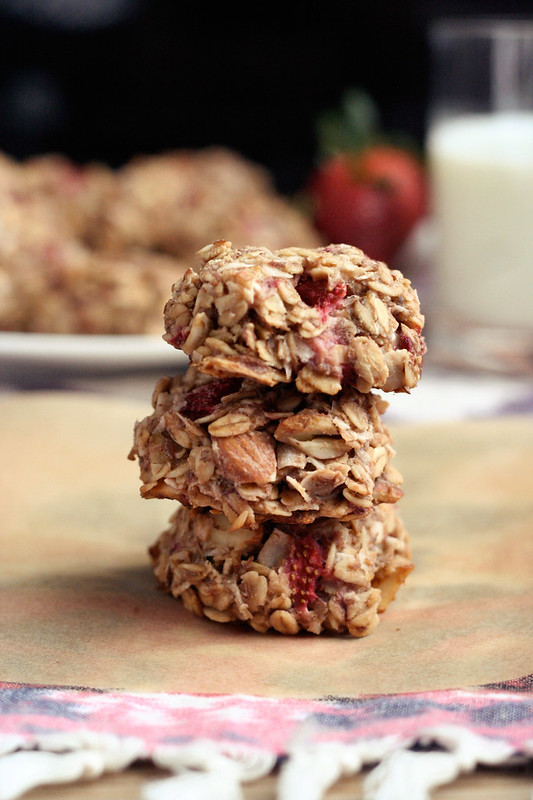
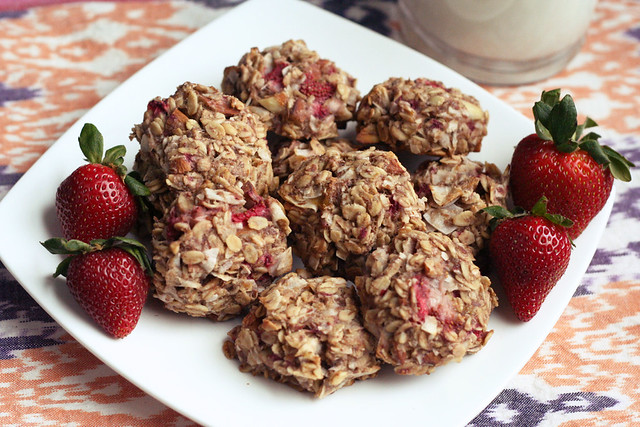
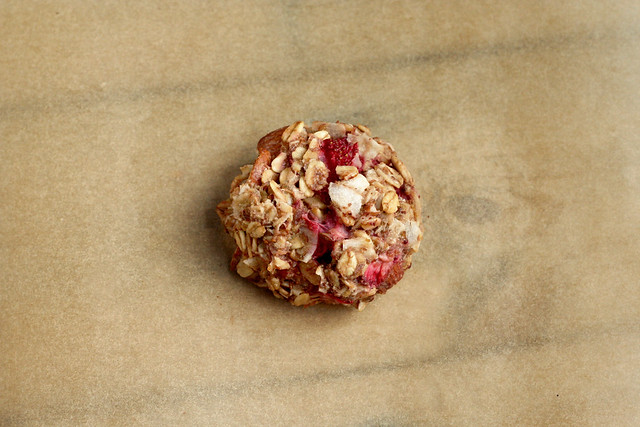
Strawberry Coconut Breakfast Cookies – Gluten-free + Vegan

Since I made my chocolate peanut butter energy bars last month for our road trip to Austin, I have made them a couple more times, sometimes the same exact way, other times tweaking the ingredients a bit to what I had on hand. But, I have been thinking of lots of different things I could do with the recipe since it is so versatile. I had planning to make strawberry almond bars this week until I came across this recipe for breakfast cookies made with dried blueberries. It gave me the idea to instead take the bar recipe I had thought up, and turning it into cookies, to end up with more and smaller servings. Plus, I loved the idea of having cookies for breakfast, even if it is the exact same recipe. Who doesn’t love a cookie for breakfast?
These cookies were so simple to make and they are bursting with flavor! They are subtly sweet from both the bananas and maple syrup and the strawberries bring a bright, fresh and tangy bite. You could definitely substitute your favorite fresh berry in this recipe, raspberries, blackberries, blueberries, etc. You could also use dried fruit, just skip the oat flour and maybe use a little less oats (obviously the fresh berries contain more liquid that dried would, so that is why the difference). Also, you can add your favorite nut, walnuts, pecans, pistachios, etc. Originally I had planned to use almond butter instead of the coconut oil, but I really loved the combination of the strawberry and coconut, two of my absolute favorites, together!
I made these delicious breakfast cookies late last night after we got home from grocery shopping. I, of course, had to have one when they were still a little bit warm, and it was delicious. Then I grabbed one on the way out of the house first thing this morning on my way to yoga. It was the perfect quick little treat. The nice thing about these cookies are they aren’t too sweet, so you don’t have to feel any guilt eating them for breakfast. It’s just like having a granola bar, but better! But they are sweet enough that they are great as a healthy dessert, too!
Do you ever have cookies for breakfast?
[print_this]Strawberry Coconut Breakfast Cookies – Gluten-free + Vegan
makes 18-24 cookies- 2 cups of certified gluten-free rolled oats (I use Bob’s Red Mill)
- 1/4 cup certified gluten-free oat flour (or just process some gluten-free rolled oats into a fine powder)
- 1 cup unsweetened coconut flakes
- 2 tablespoons ground chia seeds or ground flaxseeds
- 1/2 cup almonds, roughly chopped
- 1/4 teaspoon sea salt
- 2 organic bananas, mashed
- 2 tablespoons maple syrup (or honey)
- 1/4 cup coconut oil, melted
- 1 cup fresh organic strawberries, roughly chopped
- 1 teaspoon vanilla
Preheat the oven to 350º F. Line a baking sheet or two with unbleached parchment paper. In a large bowl combine oats, oat flour, coconut, chia seeds, almonds and salt. Stir in bananas, strawberries, coconut oil, maple syrup and vanilla. I use my clean bare hands to mix it all up so I can really get in there and get everything well mixed. You can of course just use a large spoon or spatula.
Form the dough into 2 1/2 inch balls/discs with your hands and place into even rows with just a little room in between them. Press them down very gently to flatten them a bit.
Bake at 350° for 25-30 minutes or until fragrant and golden. Cool on pan for a few minutes than transfer to a cooking rack. Enjoy for breakfast, dessert or an anytime snack.
[/print_this]
-
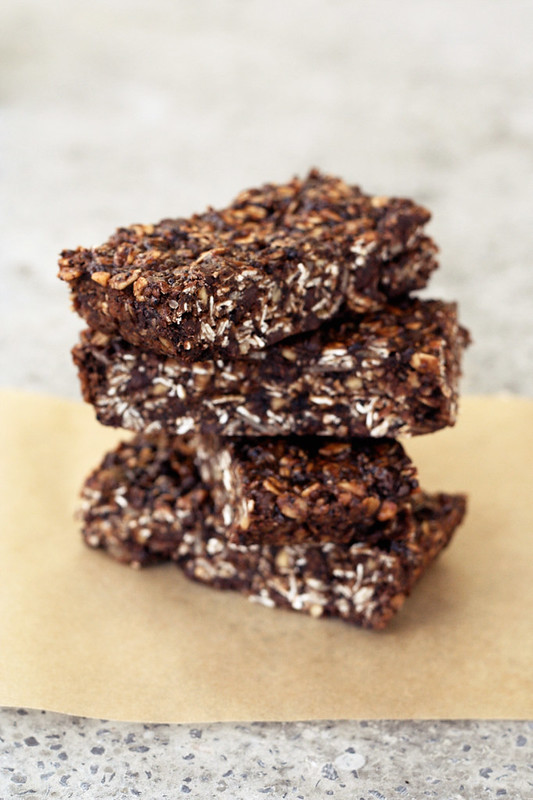
Chocolate Peanut Butter Road Trip Energy Bars – Gluten-free, Vegan + Refined Sugar-Free

We leave bright and early tomorrow morning for our big road trip to Austin, Texas for SXSW and Flatstock 33, where we will be selling our (Hero Design Studio) handmade goods and wares for 4 days in the convention center. Since I do my very best to maintain my eating lifestyle no matter where I am, I have packed a ton of food for the trip, both for the road trip down and maybe for the first few days we are there, depending how much eating happens in the car, then I plan to hit Whole Foods once we get there to stock up for the trip back. I have some almond milk and honey packed up, since I know those will both come in handy along the way. I also packed a few bottles of my homemade kombucha and to snack on, I have some nut and dried-fruit trail mix, stove-top popped butter-free spicy popcorn, gluten-free vegan jerky from Primal Spirit Foods and I made these delicious road trip energy bars. It is absolutely imperative that I have some type of chocolate available to me when I am on a road trip. For whatever reason, I always crave chocolate on very long drives. Who knows!
These energy bars were super easy to make. To be completely honest, I quickly wrote up a rough idea for a recipe, headed to the kitchen and just winged it, I assumed I would just figure it out as I went along. What I love most about these bars are how easily you could tweak them to make them your own. If you don’t want chocolate, leave out the cocoa and chocolate chips, maybe adding in some raisins or dried cranberries and some cinnamon instead. You can add whatever your favorite nuts or seeds are. The possibilities are really endless. I have made a few notes below with additional suggestions.
These bars are almost a bit sinful, with that addicting combo of peanut butter and chocolate. How can you resist? The car is gonna smell amazing. With just one bite of these chewy snacks, you will fall in love. My hubby, Mark, absolutely LOVES coffee and although I rarely drink a cup anymore, I do love the flavor and the smell of good coffee beans. So, I thought that would be a fun addition to these bars. Feel free to leave it out or substitute caffeine-free coffee if you can’t handle caffeine. I think the smell alone that the espresso powder gave these bars is worth it. I really cannot wait to bust into one of these tomorrow, I am sure I will be indulging in one before we even hit the Pennsylvania border.
Although I will be away from tomorrow until March 21, I have a wonderful group of amazingly talented guest bloggers to hold down the fort while I am away. They have some lovely guest posts and tons of great recipes to share with all of you, so I do hope you check back often to see what they have up their sleeves. I hope you like it and I cannot wait to get home and start cooking again.
[print_this]Chocolate Peanut Butter Road Trip Energy Bars – Gluten-free, Vegan + Refined Sugar-Free
Makes 8 bars (you can also cut them into smaller squares to 16 or more)- 1 ripe organic banana, mashed (try adding a second or third banana if you wish to make these sugar-free)
- 2 cups certified gluten-free rolled oats
- 1/4 cup gluten-free oat flour (or just process some gluten-free rolled oats into a fine powder)
- 1/2 cup mini chocolate chips, dairy free (I like Enjoy Life brand mini-chocolate chips)
- 1/4 – 1/2 cup maple syrup (you could also use honey, coconut nectar, brown rice syrup, etc or skip and add extra bananas)
- 1/2 cup organic natural peanut butter, chunky or creamy, (or any other nut or seed butter)
- 2 tablespoons organic baking cocoa
- 2 tablespoons chia seeds, (you could also use flax seeds, sunflower seeds, pepitas, etc)
- 1/4 cup almond slivers (or any other nut of your choice)
- 1 teaspoon vanilla extract
- 1 – 2 tablespoons espresso powder (optional)
- 1/4 teaspoon sea salt
* Note – Remember, you can easily make these energy bars your own, by adding, substituting and skipping ingredients as you’d like. To make these sugar-free replace the syrup with stevia or another banana. They could also easily be made nut-free by skipping the almonds and using sunflower seed butter instead of peanut butter. If you don’t like coffee, skip the espresso powder. Have fun with this recipe.
Preheat oven to 350º F. Grease an 8″ x 8″ glass baking pan very well, or line it with foil, leaving some overhang on two of the sides so you can easily pull it out of the pan to make cutting even easier (this is what I did).
In a large mixing bowl, add all of your ingredients. Mix and mash up very well until it is all well combined. Get your hands in there if you really want to.
Press the mixture firmly and evenly into your pan. Place the pan into the oven and bake for 20-25 minutes. Don’t worry if the bars seem a bit soft, they will firm up as they cool. After it has completely cooled, either lift the entire thing out of the pan and cut into bars or squares, or cut while it is in the pan.
These can be stored individually in the fridge or freezer. Since I made these two days ago, I stored them in the fridge and then wrapped each one individually in a little piece of parchment paper and a sandwich bag for easy eating in the car.
[/print_this]
-
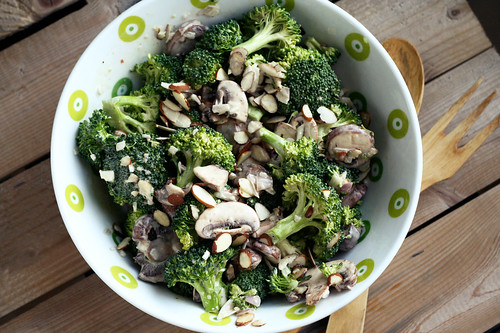
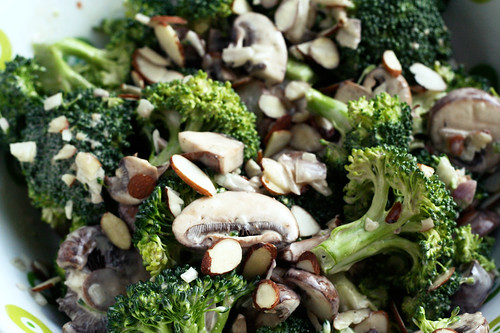
Creamy Vegan Broccoli Salad with Mushrooms and Almonds
Hey guys – I apologize for the lack of recipes right now, but I have had my head buried in work while we get ready for SXSW and the Flatstock Rock Poster Convention in Austin, Texas. We leave next Saturday for the long and fun road trip down there and we will be on the road for a total of 11 days. Many of you probably recall me talking about it last year at this time, it is such an enjoyable excursion that comes at the perfect time of year for us. We get to see so many of our wonderful and talented friends from all over the world, we eat lots of delicious Mexican food, plus some of the best BBQ food you will ever have, oh and we get to sell all of our handmade goods and wares to music fans from all over the world for 4 days! Plus, did I meantion it is usually somewhere in the 80s, with the sun shining every day. Ahhh, see it couldn’t come at a better time, it is the perfect break at the end of a dreary, grey and cold Buffalo winter. The only thing I dislike about this trip is how much time I am away from my own kitchen, the comforts of my own homemade foods and my daily yoga practice. In an effort to circumvent the lack of these daily comforts, I plan to pack a cooler full of my homemade Kombucha and some tasty snacks for the road trip down and I will most definitely have my yoga mat rolled up in a corner of the car somewhere so I can squeeze in some practice and meditation each day of the trip.
I plan to get a couple more recipes up here before I leave and if I can pull it together, I plan to get some guest posts together from some of my favorite bloggers! It is funny, this is the first trip I have taken that I am actually feeling weird about the lack of posting on here while I am away. I think because I am finally getting a really decent amount of visits each day, I don’t want people to get bummed when they stop by and nothing new has been added. Yup, my blogging obsession is officially official, I don’t wanna leave Tasty Yummies the way I don’t wanna leave my pets! haha
Anyhow, this recipe is one that I have been sitting on for a few days and I finally made time tonight to get the photos edited and the recipe fully written up. This salad is my take on a salad I had recently at local food shop/deli/cafe, Globe Market. They are located on Elmwood, literally right at the front door of my yoga studio, East Meets West Yoga. Though I rarely grab food after yoga, since I just head home and eat something light, I stopped in there one day after yoga, about two weeks ago to grab a quick gluten-free hummus and veggie sandwich before heading to a meeting. When he found out I was stopping there, Mark asked me to grab a serving or two of one of their delicious-looking side salads, for him to eat alongside sandwiches at lunch at home during the week. I opted for a creamy raw broccoli salad with red onions, bacon and almonds. That sounded just up his alley, healthy enough with some naughty stuff, too. Mark loved it, but truthfully I ate most of it. I couldn’t help it, it was so tasty, it was perfectly simple. It wasn’t even the bacon that got me, it was the delicious dressing and the combination of all of the ingredients.
So, I decided that it was a simple enough salad that I could make my own version at home, but with a Tasty Yummies twist. I wanted to make it vegan. I was determined to make it just as delicious without the bacon and with a delicious egg-free and dairy-free creamy dresssing. So I bought some Grapeseed Veganaise from Follow Your Heart, to make the dressing creamy and I went from there. I was honestly surprised that I pulled it off and was even happier with my own version that the bacon containing version from Globe. I decided to use shallots instead of red onions for a bit milder of a flavor and I added in some mushroom slices that I had on hand. This salad has been the perfect side dish with so many different lunches and dinner. I made sure to make a large enough batch that we could eat it throughout the week.
If you aren’t crazy about totally raw broccoli, feel free to blanch or steam yours for about 3-5 minutes. I love raw broccoli, myself, though I should probably consider steaming it to take down on the :ahem: gassy after-effects (sorry TMI, but it’s the truth)!
If you aren’t vegan, you can use your favorite mayonnaise and you could even consider adding in some crispy bacon crumbles. It really is quite complimentary.
[print_this]Creamy Vegan Broccoli Salad with Mushrooms and Almonds
Serves 6-8Dressing
1/2 cup grapeseed oil veganaise (or other vegan mayo)
2 tablespoons apple cider vinegar
1 tablespoon coconut sugar (you could also use brown sugar, maple syrup, honey or any other sweetener of your choice)
1 tbsp gluten-free unsalted whole grain mustard
kosher salt and freshly ground black pepper, to taste
1 clove garlic, mincedSalad
Approximately 8 cups of broccoli florets (about 2 pounds of florets)
2 shallots, chopped
9 ounces mushrooms, sliced
1/2 cup sliced toasted almondsIn a small bowl, whisk together all of the dressing ingredients, until well combined and smooth. Set aside.
Place the broccoli in a large serving bowl, toss with the shallots, mushrooms and almonds. Pour the dressing over the salad and toss well to combine. Serve.
This salad can be stored covered in the fridge for up to 3 days. Toss well before serving. You can serve this room temperature or cooled.
[/print_this]

-
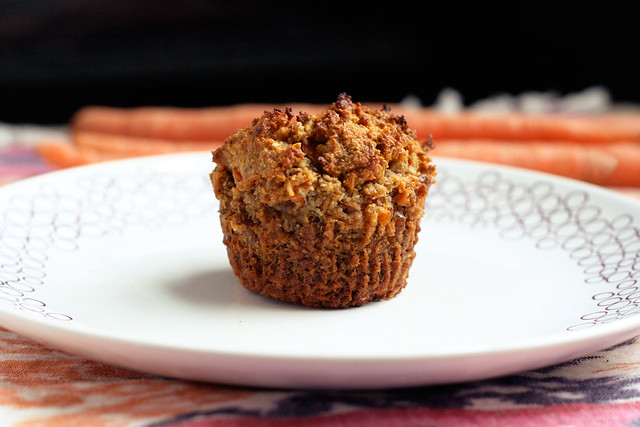
Gluten-Free + Vegan Carrot Cake Muffins
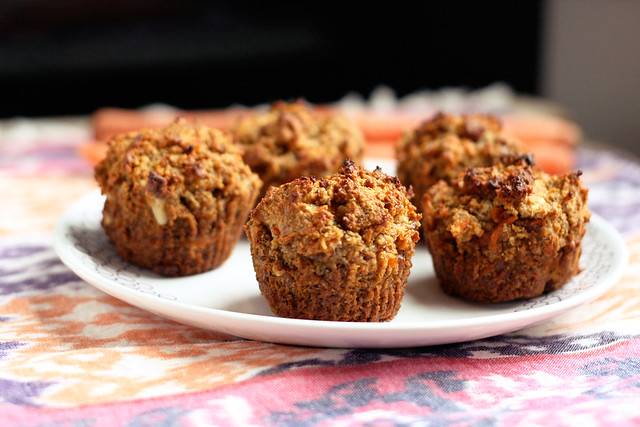
These delicious little treats were the second batch of muffins I made after the first batch ended up too soggy. They were very tasty, but I think that the carrot shreds have more water content than I gave them credit for, so the second time around I decided to add in some finely shredded coconut, since coconut is known to soak up moisture in recipes. You could also give coconut flour a try, but I am not sure if you would want the full 1/2 cup. Experiment.
The coconut flavor is subtle but it really compliments the rest of the flavors in this muffin quite nicely. The walnuts and golden raisins are both optional, but I would say unless you hate them, you should add them in. Their addition to this muffin reminds me of a slice of traditional carrot cake. These muffins are subtly sweet so they would be perfect for breakfast, dessert or even a little snack. Hubby was of course begging for some sort of cream cheese frosting.
I love how rustic these muffins ended up looking after baking, that is why I ended up taking off the papers before I photographed them. The outside of each muffin had such a beautiful toasted, golden brown hue with specs of the shreds of carrots shining through.
Normally when I am writing up a recipe or editing photos, I still have leftovers in the kitchen, so after I am done staring at the photos forever and craving another taste of whatever it is, I head downstairs and grab a little bite. Sadly, I made these muffins about 10 days ago, but we’ve been so busy getting ready for our pop-up shop this past weekend that I haven’t had a moment to edit the photos and write this up. So, now I think I am going to have to make another batch of these ASAP, I want them that badly.
[print_this]Gluten-Free + Vegan Carrot Cake Muffins
Makes approximately 6 large muffins2 flaxseed eggs (or you could also just use two large eggs):
2 tablespoons ground flaxseed
6 tablespoons hot water2 cups blanched almond flour*
1/2 cup unsweetened finely shredded coconut
1 teaspoon baking soda
1/2 teaspoon sea salt
1/2 teaspoon nutmeg
1/2 teaspoon cinnamon
1/4 cup maple syrup (or honey)
1/4 cup olive oil (melted coconut oil or melted ghee)
1 teaspoon vanilla extract
1 cup shredded carrot
1/4 cup walnuts, roughly chopped (optional)
1/4 cup golden raisins (optional)Preheat oven to 350˚F. Line a muffin tin with paper liners.
In a small bowl, whisk together the ground flaxseeds and water, set aside and allow to get thick and gelatinous.
In a large bowl, whisk together the almond flour, baking soda, salt, nutmeg and cinnamon. Add in the shredded coconut, stir to combine.
In a separate bowl, combine the maple syrup (or honey), vanilla, oil and flax seed eggs and whisk until well combined.
Add the dry mixture to the wet, stirring until combined. Carefully fold in the carrots, walnuts and raisins.
Spoon the batter into the muffin tin, filling each cup to the top if you want a nice muffin dome. Bake for approximately 25 minutes or until the tops are golden brown and a toothpick inserted into the center comes out clean. Cool the muffin pan on a wire rack for five minutes. Gently pop the muffins out to continue cooling on the rack (don’t cool them longer than 5 minutes in the hot pan they’ll definitely get soggy). Enjoy a muffin after they have cooled 10 minutes, you know you want to.
I find storing muffins covered tightly in the refrigerator or freezer to be the best, especially in the heat of summer. Just pop one out as you want it, heat slightly in the microwave if you want to take the chill off and go.
*NOTE: Something I have learned from baking on my own and from reading Elana’s Pantry, is that not all almond flour (or meal) is created equal. Bob’s Red Mill makes an almond flour, though easy to find, that doesn’t seem to react quite the same as other almond flours. It doesn’t seem to rise as much and it just seems to leave recipes flat. On Elana’s recommendation I now buy Honeyville brand almond flour in a 5-lb bag from their website. [/print_this]
-
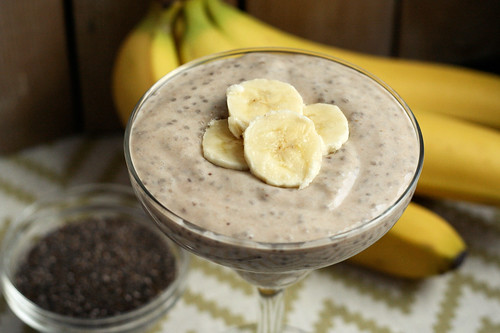
Banana Cream Chia Pudding (gluten-free, vegan, refined sugar-free)
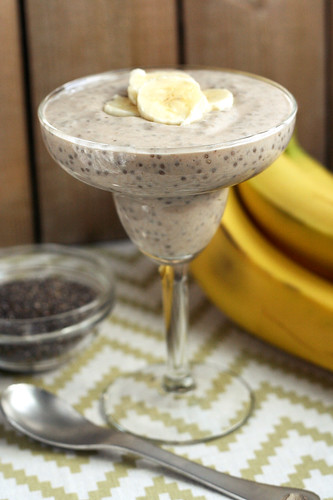
This creamy and delicious pudding turned out way better than I ever dreamt it could, I love when that happens. This was another one of those kitchen creations that had me doing the “yum yum dance”. You know exactly what I am talking about, you take a bite before you even sit down, and with the spoon or fork still in your mouth, your hips and butt start swaying and without thinking, you start some version of a song where the only lyrics are “yum”, “mmmmm” and/or “ooooh”. I swear this is something we are born with, I have seen babies under a year do this dance. It’s the best!
I have been working on a recipe for a healthy gluten-free and vegan banana coconut cream pie and I had to take a detour when I thought of this tasty breakfast treat. Fear not though, the pie recipe is still in the works and I cannot wait to play around with it.
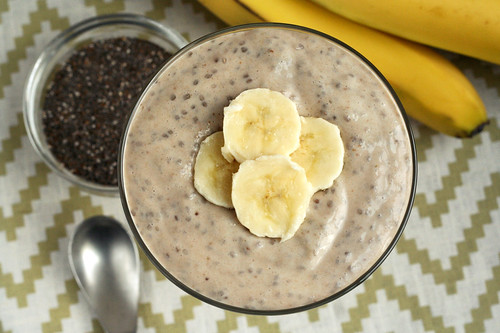
I had a serving of this for an after-yoga breakfast treat this morning and it kept me full for many hours, I love that. This perfectly and naturally sweetened pudding would also be great for a dessert or mid-day snack when you are craving something a little sweet. It’s amazing how wonderfully sweet this is without adding any sugar or sweetener besides the dates. I love that! The creaminess from the coconut milk, almond milk and bananas are all so amazing that most people wouldn’t believe there isn’t any dairy in this. It’s treats like this that keeps me from being intimidated about removing dairy from my diet. I would never miss dairy if I had this pudding once or twice a week.

This week has been a bit crazy and stressful and it’s only Thursday. Hubby had to take a quick and unexpected flight home to Kentucky to be with his Grandmother who is very ill. We have been working many evenings, so we’ve been eating a lot of quick dinners and we’ve been eating up leftovers, so I am starting to get that urge to cook and bake since it’s been a couple of days. We have a weekend full of work ahead of us, but I need to find time to attempt this banana coconut cream pie that I have created in my head. After making this pudding I am starting to think that ground-up chia seeds may be the perfect ingredient to make my pie filling thick and luscious. Hmmm… I can’t wait to get to experimenting.
How has your week been going? Have you had time to make meals this week? Do you have any cooking and baking plans for the weekend?
[print_this]Banana Cream Chia Pudding (gluten-free, vegan, sugar-free)
serves 2-4 – makes approximately 3 cups1 cup lite coconut milk (the canned kind)
1 cup unsweetened almond milk
2 bananas
2 teaspoons vanilla
3 medjool dates, pits removed
2 tablespoons chia seedsPuree everything but the chia seeds in a blender until smooth, combined and thick. You may see a few little bits of the dates still, it’s OK. Pour the mixture into a glass bowl or a mason jar, stir in the chia seeds. Make sure to stir well to combine. Cover the bowl or put the lid on the jar. Keep in the refrigerator overnight or for at least 4 hours.
Spoon or pour into bowls, top with fresh banana slices or banana chips, if you wish. Serve.[/print_this]

-
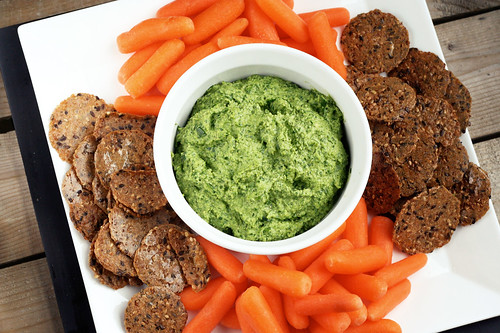
Creamy Dairy-Free Spinach Dip (vegan, gluten-free)
I am having a lot of fun making different dishes and snacks dairy-free. For the most part, as with my gluten-free or even vegan cooking, I have just been cooking around it, enjoying things that are naturally such, I don’t usually make tons of substitutions with weird processed things like fake cheeses or fake meats, etc. Even though I think that some dairy-free cheeses (like Daiya) might be nice for the occasional special treat if I really feel like I am missing out or want some cheese, I usually just get really creeped out by how much weird stuff are those types of foods. Many times you read the package and you don’t even know what the ingredients are, you can’t pronounce them, etc.
I was craving a delicious Italian-style pasta dish the other night, so I made gluten-free penne with a creamy roasted tomato and basil sauce. No cheese or dairy! The creaminess came from soaked cashews and I added in a little nutritional yeast for the nutty/cheesy flavor it brings. It was so perfectly delicious and it really hit the spot. I didn’t miss the dairy one bit. There is always the option of using nut milks instead of dairy milk in recipes, which I have been doing for a long time when making, but it doesn’t always give you that super creamy cheese-like texture when cooking, so that is where raw nuts have been coming in handy for me.
I did some serious cooking, baking and making over this weekend. I made my first ever batch of Kombucha, which I cannot wait to try, I love that stuff. I also made gluten-free, dairy-free refined sugar-free chocolate donuts for breakfast yesterday in my new donut pan (recipe coming soon) and all of my Super Bowl treats. We watched the Super Bowl last night at my parents’ with my family and some friends, so I decided to experiment a little with my Super Bowl snacks, making things that not only I would eat, but that would still appeal to everyone else. So, I made three different things: this creamy spinach dip, a creamy eggplant and roasted red pepper dip and Thai Meatballs (made from some grass-fed beef from our local farmer) with a red curry peanut sauce. I will be posting the eggplant dip likely tomorrow so look for that. As for the meatballs, I basically just altered this recipe to be gluten-free and I used some of our lean grass-fed ground beef from the half cow that we shared with my parents. I was really excited to find a meatball recipe that wouldn’t need any cheese of some sort, since I was initially playing with the idea of making regular Italian style meatballs. They were so delicious! I really recommend that recipe.
I served the two dips with tons of fresh cut raw veggies, regular whole grain crackers and some Mary’s Gone Crackers Black Pepper Crackers for me. Both the dips were enjoyed by everyone and the meatballs FLEW off the plate. This particular dip is so creamy, you would swear it had ricotta cheese in it. It has a nice flavor from the garlic and the nutritional yeast brings an almost “cheesy” taste. Nutritional yeast is low in sodium and it is one of the few non-animal sources of B-12, it is rich in folic acid and many other nutrients and amino acids. This is not your typical yeast and is free of the Candida Albicans strain, making it safe for those concerned with candida. Per ounce nutritional yeast packs in 14 grams of protein and 7 grams of fiber.
I’ll be honest, I did a lot more gabbing and snack-eating then football watching last night. We did manage to keep quiet through the half-time show, which I thought was just so-so. I love old-school Madonna and was excited to hear some of the old hits but that is about it. I was a bit let down, it didn’t do it for me. Though I did make it a point to listen to all of her old albums today on Spotify to make up for it!
Did you watch the Super Bowl? What did you think of the half-time show? What foods did you make or eat?

[print_this]Creamy Dairy-Free Spinach Dip (vegan, raw, gluten-free)
1 cup raw unsalted cashews, soaked for 1 to 3 hours and drained
2 cloves garlic
1 tablespoon nutritional yeast
1-2 tablespoons of water
4 cups baby spinach (split to 3 cups and 1 cup, roughly chop the 1 cup)
1/4 teaspoon kosher saltAdd the cashews, garlic and nutritional yeast to the food processor, puree until thick, creamy and smooth. You can add a tablespoon or two of water to the mixture as needed to make it more creamy. Add 3 cups of the spinach and continue pureeing until smooth. Fold in the remaining chopped spinach and stir by hand to combine. Pour the creamy spinach mixture into a serving dish and serve with fresh cut raw veggies, tortilla chips, crackers, toasted bread, etc.
[/print_this]
-
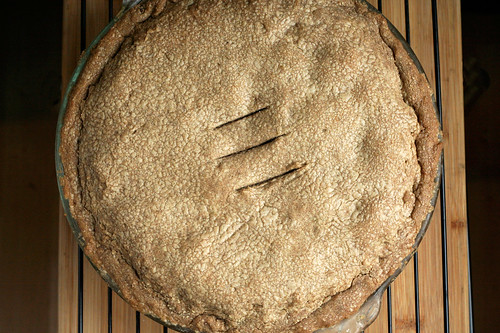
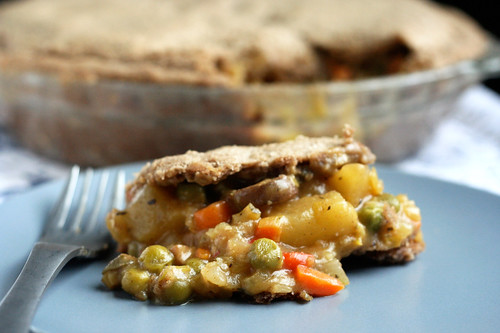
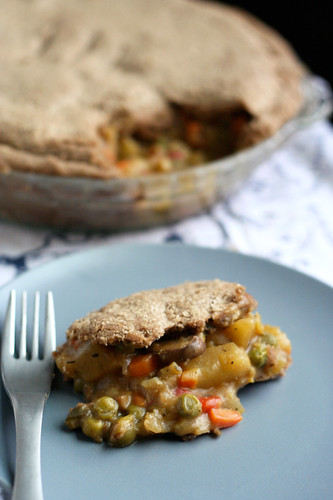
Gluten-free & Vegan Vegetable Pot Pie
I am super excited to share this recipe with you. I know it seems complicated and like a lot of steps, but it really isn’t that bad. If you want to buy a store bought pie crust or mix, and just make this filling, I say go for it. If you aren’t gluten-free and you wanna make this filling, just sub in your regular flour. Just looking for vegetarian not vegan, use butter and regular milk. But whatever you do, make time to make this pot pie. It is so delicious!
I have really come to love baking and even though I am not quite at the point with my baking where I can completely, on my own, create a complicated recipe yet, like a vegan gluten-free pie crust, I still really love doing it. Having a beautiful and perfect recipe for a pie crust from a true pro like Shauna (Gluten-free Girl), is seriously a blessing. It is a great jumping off point for recipes like this one and I am truly grateful for people like her that can find the perfect ratios, keep their cool while experimenting and destroying things and come up with the perfect pie crust! It is so damn admirable.
I keep my own gluten-free whole-grain flour blend on hand (that I make using Gluten Free Girl’s suggestions on flours, starches and ratios) in a large quantity for use in lots of different recipes. I used Shauna’s pie recipe after Thanksgiving to make a turkey pot pie and I made it exactly as the recipe calls for, with the same flour blend that she uses and with butter. It turned out perfectly. Since I have since cut out dairy, I was very excited to try it all again but making the pie dough vegan and using a whole-grain blend of flours instead. The crust was definitely a bit flakier with the butter than the vegan butter sticks, but I have to say I am extremely excited and impressed with both the crust on this pie and the delicious vegan filling. The pie crust was tender and it had a beautiful tasty crisp and even a slight flakiness to it. The filling is thick, hearty and even a bit creamy. It amazed even me that there wasn’t a bit of dairy in this whole pie. Since it has been nearly 3 weeks since I have had any dairy, I kept feeling like I was doing something wrong when I was eating this. But I made the entire thing myself, not a drop of dairy in the whole thing. Considering my meat and cheese loving hubby, Mark, not only at this, but went back for seconds – I knew I had struck gold!
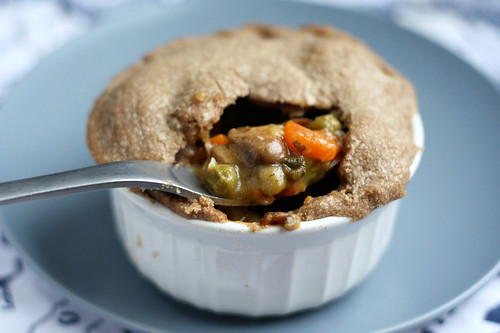
When making the large pie, I was afraid to overload it with too much filling, so I had a little bit leftover after putting the top crust on (though I realized after I should have just mounded it all in there), I also ended up with the smallest piece of extra pie dough since I had over rolled it just a tad, so I made the tiniest little mini-pot pie in a ramekin. I was actually really excited that it worked out this way, since I wanted to see how it would turn out if I made mini pot pies instead. It was perfect! The only thing I would change for the next time is to load all of the filling in, even though it seems like a lot. The filling does cook down a bit, so there is more room there than you think. I just had visions of veggie filling overflowing all over my own and ruining the pretty picture-perfect pie I had made.
You can have some fun with your pot pie fillings and add or take away any of your favorite or not so favorite ingredients. Turnips or parsnips would be good, asparagus or butternut squash, chives instead of sage. Play with your ingredients depending on what is in season. You could add some tofu. Have fun with this!
[print_this]Gluten-free & Vegan Vegetable Pot Pie
serves 6-8This pot pie has a top and bottom crust, which is how my husband requires his pot pies! If you wish to only have a top crust or if you wish to make smaller pot pies in ramekins with just top crusts, make sure to halve the pie dough recipe.
Gluten-Free Vegan Whole-Grain Pie Dough:
Adapted from Gluten-free Girl350 grams all-purpose gluten-free whole-grain flour (or your favorite gluten-free AP flour) – I used Shauna’s ratio and flour suggestion list to make my own whole-grain flour mix. My blend included a combination of almond flour, buckwheat, teff, sorghum, arrowroot and potato starch.
1/2 teaspoon kosher salt
226 grams (2 sticks) Earth Balance Vegan Buttery Sticks (you can use two regular sticks of butter if you aren’t vegan)
1/2 cup ice-cold water, plus a few splashes moreGluten-Free Vegan Veggie Pot Pie Filling:
1 tablespoon olive oil
1 medium onion, diced
1 leek, white and green parts only, diced
1 clove garlic, minced
3 carrots, peeled and diced into 1/2-inch pieces
2 stalks celery, diced into 1/2-inch pieces
1 red bell pepper, diced into 1/2-inch pieces
1 sweet potato, diced into 1-inch cubes
1/2 cup dry white wine
1/2 cup gluten-free flour
2 cups vegetable broth (mushroom stock would also be good)
1 cup non-dairy milk (almond, cashew, coconut, etc)
1 cup frozen peas
1 tablespoon fresh sage, roughly choppedCut the buttery sticks into one-inch cubes. Place them on a plate in the freezer for 15 minutes.
Put the flour and salt into a large food processor. Pulse them together a few times until the flour is fluffy and aerated. Add the butter cubes. Pulse ten times. Your flour mixture should now look sandy, with some butter chunks still visible.
Pour in the ½ cup of ice-cold water. Pulse five times. Look at the dough. If it still looks a bit dry, add a splash more water, not exceeding another ¼ cup. The finished dough should like curds of dry cottage cheese. Do not add anymore water.
Forming the dough into a disk. Dump the dough onto a clean, cool surface. I work on a piece of parchment paper on the counter top. Gently gather all the dough together in your hands. Working quickly, take half the dough, make it into a ball, then flatten it into a plump disk, about 2 inches tall. Wrap it in plastic wrap and let it rest in the refrigerator for 30 minutes. Do the same with the remaining dough.
While the dough is chilling you can make your pot pie filling. Heat 1/2 of the olive oil in a large saucepan over a medium-high heat. Add in the carrots, celery, onion, garlic, bell pepper, sweet potato and leek. Stir frequently and allow to cook for 5 minutes. Add in the white wine and turn the heat down to medium-low, cover and allow the vegetables to simmer and steam for about 15-minutes, stirring frequently. Meanwhile heat a medium pan over a medium-high heat and add the remaining olive oil. Add in the mushroom and saute until they are browned and tender, about 10 minutes.
Add the mushrooms to the other vegetables and sprinkle the flour over the vegetables, stir to evenly distribute and add the vegetable broth, sage and frozen peas. Stir to combine and break up the flour clumps, it should immediately start to thicken. Add in the non-dairy milk. Stir. You can add more broth if the mixture gets too thick. Allow to simmer on low for another 5 minutes, to cook the peas, then turn off the heat.
Once the filling is done, set it aside to cool slightly.
You are now ready to assemble your pot pie. Take the pie dough disks out of the refrigerator and let them sit out for 15 minutes or so, so they are still slightly chilly – but a wee bit closer to room temperature and preheat the oven to 425°. (Honestly, this time around I forgot to let the dough sit and it rolled out just perfectly.)
For rolling out the dough you can either work on a floured countertop, a floured marble pastry board, or two pieces of parchment paper (I go this route and I still add a tad bit of flour). I would love to one day make my pies with a marble pastry board!
Gluten-free dough is definitely stickier than regular gluten dough. Be sure to use plenty of gluten-free flour on your surface when rolling it out. When I use two pieces of parchment paper, I lightly dust a bit of flour down on each side of the dough before I place it between the sheets of parchment paper. Shauna recommends very, very lightly oiling the parchment paper, to try to prevent sticking. (I have never done it this way)
could try really hard to explain in detail exactly how to do these next steps, or I could quote Shauna’s beautiful and incredibly descriptive words on rolling out the dough and prepping it to place in the pie pan. Honestly I wrote this part out in my own words so many times and it just never sounded as good as how Shauna put it. Somehow she makes rolling out a pie dough sound like a graceful dance. Seriously, you’ll see what I mean…
“Pat down the disk and put the rolling pin on it. Now, imagine that the dough is the face of a clock. Roll out once at 12 o’clock. Then, lift the pin and roll at 12:10. Moving in “ten-minute” increments, roll out the pie dough to slightly larger than your pie pan. Be patient. Think of this as meditation. Roll out the dough evenly.
Now, if you have worked with the parchment paper, lift the top paper, put the pie pan on top of the dough, and flip it over. Carefully, strip away the parchment paper. Go slowly. Voila! Pat the dough down into the pan.
Now, if some of the pie dough has stuck onto the parchment, do not despair. Simply peel it off and pat into the rest of the pie dough. With a gluten dough, this might make a crust tough. Guess what here? No gluten! No problem. Pat away.
(If you have used the marble board or countertop, roll the dough onto your rolling pin and transfer to the pie pan. Again, if it sticks, no worries.)
Crimping the edges. Crimp the edges of the pie pan by working with floured fingers. I press from the inside of the pie pan with my thumb and first finger on the left hand, then press between those with the first finger of my right hand from the outside. (That’s a lot of words. Try to visualize it. This will make sense.) This is one of my favorite activities in the world. Go slowly and enjoy it.
Fill the pie with the filling. Pat it down.
Roll out the remaining dough the same way. Lay it onto the pie gently, like you’re putting a blanket on a sleeping child. And if the dough sticks and breaks, just pat the pieces together. (That’s what happened with both the finished pies you see here. They didn’t suffer.) Tuck the edges into the crust.”
I will be honest, crimping the edges of a pie crust just isn’t my thing, not because I don’t like it or think it is pretty, I just find myself getting frustrated and wanting to just get it in the oven and then eat it. I guess I just go with the rustic look. I make sure all the edges are sealed and tucked in and go with that! Maybe some day I will have the patience and the eye for pretty pastry techniques.
It is now time to bake the pot pie! YAY! Cut a few slits into the top crust. Place a sheet pan on the bottom rack of the oven, under the rack where the pie pan will be, to catch any potential drip overs. Place the pie pan into the oven and bake for 15 minutes at 425ºF, then turn the temperature down to 375°F. Bake until the juices are bubbling out of the pie (this may or may not actually happen depending on how juicy or thick your pot pie filling is) and the crust is browned, about 45 to 55 minutes.
Allow the pot pie to cool 10 to 15 minutes before serving. Enjoy!
Please note, instead of one large pot pie with a top and bottom crust, you could certainly halve the dough recipe and make mini-pot pies in 6 – 10 ounce oven-safe ramekins. Just cut the dough into 6 rounds that are slightly larger than the circumference of the ramekins. Lay the dough onto the filling and bake the same way. I had a little extra filling and some extra pie dough, so I made one this way to try it out. It was perfect and super adorable.[/print_this]
-
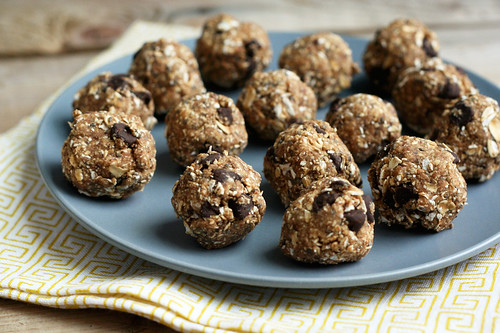
No-Bake Oatmeal Chia Chocolate Chip Cookie Balls (Vegan and Gluten-free)
So yeh, that name is definitely a mouthful, but I promise you, it is a very tasty mouthful! I have been craving a little something sweet for the last day or two, but for the last two weeks I have been laying off sugar, caffeine, dairy and all that stuff, attempting to give my digestion a bit of a break.
Today marks two weeks, I have no more pains, I feel less bloated, I am full of energy and I have dropped about 10lbs! I am attributing most of this to removing dairy from my diet, since that is what I believe to have caused the upset in the first place. So for now, I am continuing on this path of no dairy! I am actually quite excited about this discovery and revelation, I think my body has probably been trying to tell me this for sometime now. I really wasn’t consuming much dairy before all of this, but probably when I did have even the littlest amount, it was just too much for me. Ironically this month also marks the 7-year anniversary since I went gluten-free, so I suppose it is fitting that I make another huge dietary change. Why not, right?
So I decided as a little treat to myself to celebrate the two weeks and my new discovery and as a treat to my amazing hubby, Mark, who has been a trooper though all of this, we needed a healthy mid-day energy-boosting sweet. Who wouldn’t love that?
Since I have avoided chocolate for the last two weeks to give my tummy a break (caffeine is a stimulant and can be a bit rough on an already upset digestive tract), I wanted just the littlest taste today! I didn’t wanna go hog wild and get myself sick, so I thought adding them to a cookie ball like this, in the smallest amount possible, would be perfect. I have made many versions of these cookie balls, but I rarely measure and I usually just make do with what ingredients I have in the pantry and go with what I am craving. Since I knew I wanted to feature this recipe, I decided to measure this time. However, I still find that with a recipe like this, it is best to eye-ball it and go with texture. Some dates can be a bit drier than others, so you may have to soak yours first or add some water to get the consistency just right. I added about 2 tablespoons of water to my dough since I didn’t soak mine, but I could tell when the texture was just right for rolling. If you are ever unsure, just take a glob of the dough in your hands and feel it. You will know if it is too crumbly and dry or if it is too wet and goopy. Adjust your ingredients accordingly.
I added in chia seeds this time, but you could certainly leave them out if you don’t have them or don’t want them. I like the crunchiness that they bring and I also love that chia is a power-food known for being high in fiber and great for digestion. Chia seeds also increase your energy levels, so these cookie bites are the perfect afternoon pick me up. I love that these little treats are naturally vegan and sugar-free, they are gluten-free if you make sure to use gluten-free rolled oats and they are the perfect treat to get you through the middle of the day! Have fun with this recipe, I have made these with raisins or dried cranberries before, you can add banana and peanut butter, cocoa power, nuts, coconut, etc. These have become my go to treat when I want something sweet but I don’t want sugar and other junk.
What is your favorite mid-day snack?
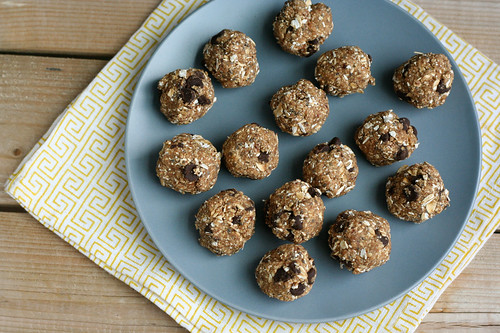
[print_this]No-Bake Oatmeal Chia Chocolate Chip Cookie Balls (Vegan and Gluten-free)
makes about 15 cookie balls1/3 cup Medjool dates, pitted and roughly chopped (about 5 dates – soak if they are very dry)
1 teaspoon vanilla extract
1 1/4 cups gluten-free rolled oats (you can use regular rolled oats if you aren’t gluten intolerant)
1 tablespoon chia seeds
1 – 2 tablespoons water (you could need more, you could need less, just go by how your dough feels)
1/4 cup dairy-free chocolate chipsAdd the medjool dates and vanilla to a food processor or high powered blender (like a Vitamix). Process until a thick paste forms, you may want to add some water here if it is too dry. You will also want to take a spatula and scrape down the edges. Add in 1 cup of the rolled oats and the chia seeds, process until the oats are no longer whole and it all comes together into a thick dough. Again, add water if it is super dry (just don’t add too much water). Add in the remaining 1/4 cup of oats and the chocolate chips and pulse just a few times to bring it all together. Take a small amount of the dough into your hands to make sure it will roll and stay together. If the dough is crumbling a bit, add more water, if it is too goopy and wet, add more oats.
Taking 1 tablespoon of the dough at a time, roll the dough, in the palm of your hands, into about 15 balls. Set on a plate and place it into the fridge for about 15 minutes to all them to chill. Then enjoy!
[/print_this]
This recipe is featured in the Allergy Friendly Lunchbox Love.


