-
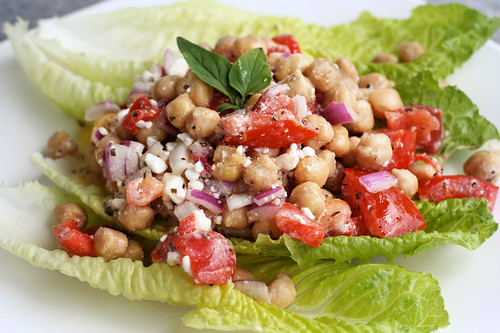
Chickpea, Tomato & Feta Salad
Now that we work from home, I love lunch time. My lunches at the store used to consist of leftovers or veggie burgers, even though I still eat and love both of those, a lot of days I can have more fun creating healthy lunches. Especially with my vegetable garden in full-force, I can just hop into the back yard, grab some lettuce and/or cucumbers, fresh herbs, etc and toss together a quick salad.
I saw a delicious recipe, a while back, for a Chickpea, Spinach & Feta Salad, on my friend Margaux’s blog that she keeps with her aunt, Sweet & Savory Kitchens. I couldn’t wait to play around with my own version. Such a simple, quick and healthy salad, why haven’t I been making this every single week?
I decided to use what I had on hand, so I cut up some red onion, a whole tomato, a roasted red pepper, some fresh oregano, etc and it was that easy. An incredible lunch salad in minutes. I served mine over some romaine lettuce, you could also add chopped up lettuce, spinach or other leafy vegetables like kale or arugula directly to the salad when mixing. Cucumbers would also be delicious. In Margaux and Aunt Suzy’s original recipe they included cooked broccoli which sounds like a tasty, crunchy addition. I think like most salads, the possibilities are endless with this one. This is definitely going to be a staple in my house at lunchtime and as a side at dinner. This would make a delicious dish to share at a picnic or party and with all of the beautiful colors, it’ll definitely impress everyone.
Chickpea, Tomato & Feta Salad
adapted from Sweet and Savory KitchensThe Dressing
1/4 cup extra virgin olive oil
2-3 tablespoons fresh lemon juice
1 tablespoon fresh oregano, roughly chopped
2-3 cloves garlic, pressed or minced
Salt and black pepper to tasteThe Salad
1 large or two small cans of chickpeas (about 3 cups cooked)
1 large tomato, diced
1 large roasted pepper, diced
1/2 large (or 1 small) red onion, diced
1/2 cup crumbled feta cheese, or more to tasteAdd all of the dressing ingredients to a small bowl, whisk thoroughly to combine. Set aside.
Drain and rinse the chickpeas if using canned. Combine all of the salad ingredients in a bowl, except the feta cheese. Add the dressing and gently stir to thoroughly blend. Add the cheese and stir again to blend.
-
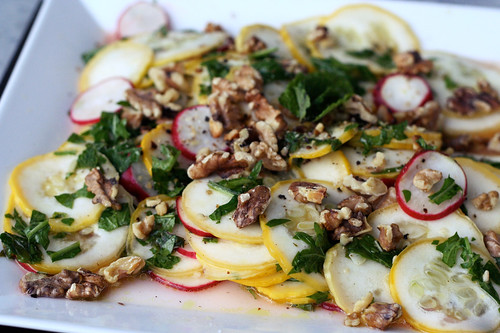
Summer Squash Salad
Zucchini and yellow squash are two of my favorites and both automatically come to mind when I think of summertime eating! They remind me so much of growing up, my parent’s always had an abundance of both growing in our garden. The last few years when I have planted them in my own garden, they take up a HUGE amount of real estate and never really produce much. They must not like my soil. I skipped out on planting them this year. Thankfully, my parent’s still grow both in their garden and never have a problem sharing with me.
After our family dinner this past week, I came home with a bag full of beautiful yellow summer squash and I couldn’t wait to start cooking with them. They are wonderful sliced and browned up on the grill, sauteed or roasted and added in salads or pasta, etc. Not only as a kid when my dad would cook with them, but now as an adult in my own kitchen, I always find myself eating the raw squash slices as I am cutting them to cook, so I decided I wanted to experiment with a raw salad.
When I was dreaming up this salad, I was so excited about it combining so many beautiful summery ingredients and flavors, some of my favorite ingredients. The soft and flavorful squash pairs so nicely with the crisp and spicy radishes and the peppery arugula rounded it all out with a refreshing bite. The fresh mint was a nice compliment to the light and refreshing dressing, the brightness from the lemon sings in your mouth with every bite and the toasted walnuts were a bonus crunch at the end. I couldn’t help but feeling like this salad is everything that summer is about, on one plate.
The other great thing about this salad are the many wonderful variations you could take, by changing out the herbs and going with fresh basil, oregano or chives. You can play with different nuts and seeds like toasted pine nuts, almond slivers or even sunflower seeds. You could even top the salad with cheeses like feta, goat cheese, fresh parmigiano reggiano, pecorino or asiago. I personally opted for no cheese since we wanted a vegan side-salad to accompany our vegan creamy avocado pasta. There is so much you can do with this salad. Keep in mind when picking squash that smaller, younger squashes are better since the larger squash tend to have larger tougher seeds and sometimes a tough skin.
Summer Squash Salad Recipe
serves 41 pound summer squash (yellow or green, or a mixture of both)
5 to 8 radishes (depending on how large they are)
3 tablespoons extra-virgin olive oil
2 tablespoons fresh lemon juice
1 large garlic clove, minced
1/4 teaspoon kosher salt
freshly ground black pepper, to taste
1/4 cup whole walnuts
1 bunch of baby arugula, roughly chopped
1/3 cup fresh mint leaves, roughly choppedToast the walnuts in a dry skillet, the oven or toaster oven and set aside and allow to cool, then roughly chop.
Slice the squash very thin slices using a mandoline or a steady hand and a sharp knife. Set aside in a large bowl. Do the same with the radishes. Add in the roughly chopped arugula.
Combine the oil, lemon juice, garlic and salt and pepper in a small bowl and whisk together. Pour the dressing over the squash, radishes and arugula, toss lightly. Let stand for at least 10 minutes. Add in the fresh mint and toasted walnuts, toss gently again to thoroughly combine.
Serve to individual salad plates or on 1 large serving platter, top with fresh mint and freshly ground black pepper. Enjoy immediately.
-
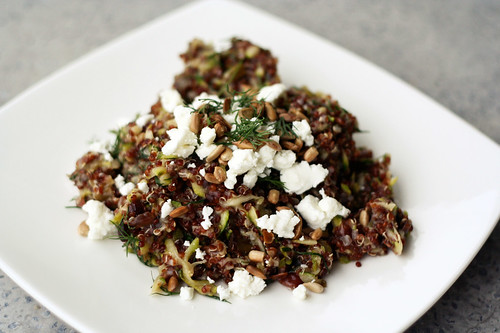
Red Quinoa Salad with Currants, Dill, Zucchini and Sunflower Seeds
I am always on the lookout for a good grain-based salad, bonus points if the grain is my favorite superfood, quinoa. This salad is super simple, very versatile and loaded with flavors. It’s so nutritionally packed it would make a perfect entrée on its own, or it’s beautiful as a side-dish. I served it on the side of our lentil burgers and we were very pleasantly full afterwards.
To be honest, it has been a while since I made a good quinoa salad, I kinda forgot how amazing and simple they are. A recent post on my friend Margaux and her Aunt Suzy’s blog about quinoa salads, inspired me to make one. I need to try their recipe next!
You could use regular quinoa or red, I just happened to have red on hand and it felt like a good time to use it. The fresh herbs were so perfect and the subtle hint of sweet from the currants was very pleasant and the tart, saltiness from the crumbled feta finished it all nicely. The lemon juice and zest brings a brightness that pairs nicely with everything else. This can be made vegan by simply skipping the feta when serving. You can serve it warm, room temperature or even cold. I plan to take the suggestion of 101 Cookbooks and make patties with the leftovers, I absolutely love quinoa patties. According to the adapted recipe on 101 cookbooks, they simply added a few eggs and some breadcrumbs to the leftovers and voila – quinoa patties!
The original recipe called for toasted sesame seeds, but I wanted something with a bit more bite, so I went with sunflower seeds, you could play around with all different kinds of nuts or seeds. Same goes for the currants, you could also try cranberries or raisins and as usual you could play around with your favorite herbs. I love how some dishes are so adaptable it’s almost like playing dress-up with all the ingredients. You could make it over and over and it would never be the same salad twice. Have fun.
Red Quinoa Salad with Currants, Dill, Zucchini and Sunflower Seeds
Serves 6
Adapted from 101 Cookbooks, who adapted it from Maria Speck’s Ancient Grains for Modern Meals1 tablespoon extra-virgin olive oil
1 bunch green onions, chopped
3/4 teaspoons fine-grain sea salt
1 cup organic red quinoa, well rinsed and drained
2 cups water
1/4 cup dried currants
1 lemon
2 sm-med zucchini, grated on box grater
4 tablespoons toasted sunflower seeds
4 tablespoons chopped fresh dill
1 tablespoon chopped fresh mintoptional: feta cheese, crumbled – as much or as little as you like
Heat olive oil in a medium saucepan over medium heat. Add most of the green onions, a pinch of the salt, and cook until the onions soften, just a couple of minutes. Add the quinoa and cook, stirring occasionally, until the grains dry out and toast a bit, roughly another 3 minutes. Add the water, the currants, the remaining salt; bring to a boil. Turn the heat to a medium-low and simmer, covered, until the water is absorbed and the quinoa is just cooked through 15 minutes or so. Be mindful here, you don’t want to overcook the quinoa, and have it go to mush.
While the quinoa is cooking zest the lemon, and squeeze 2 tablespoons of lemon juice into a small bowl.
When the quinoa is cooked, remove the pan from the heat. Stir in the zucchini, lemon juice and zest, most of the sunflower seeds, the mint and most of the dill. Taste and adjust for salt.
Serve topped with crumbled feta, and the remaining green onions, sunflower seeds and dill.
-
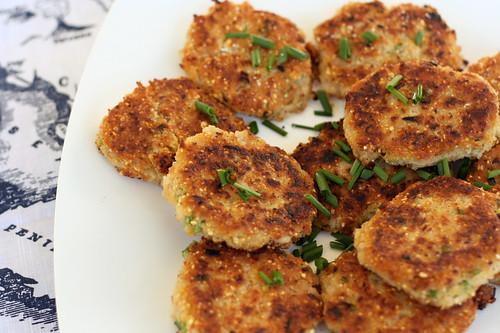
White Bean and Chive Patties
Since we’ve closed the store and now work from home, I really look forward to the time of day when I can take a break from working and prepare a healthy dinner for us. Many nights we finish dinner, do up the dishes, feed the pets and then return up to our offices to work for a few hours, which is something we never did before, but somehow it is all so much more relaxing and laid back. Working from home has allowed me to really play with my schedule, make it more flexible and find even more time for yoga, dog walks and other fun and physical activities. I think the pressure of having to be at the studio set hours because of the store really put an unnecessary amount of self-imposed stress on both of us. We were always very happy and content before and we definitely miss the store some days, but I really find myself loving my life and my job more now than ever before. I feel so lucky.
One of my other favorite things about the new schedule is being able to take on more involved dinners during the week, that require more prep time or even down time for things to cool or set, etc. Now during the “wait times” in recipes, I can just walk upstairs and get more work done. Both last night’s dinner, Spring Pizza with Asparagus and Eggs that featured a homemade gluten-free multi-grain pizza crust and tonight’s Spring Pea and Goat Cheese Tart, with a homemade tart dough, are perfect examples of that. (Don’t worry those recipes are coming soon.) This particular recipe isn’t nearly as involved or time-consuming, but having to pan fry the patties in batches can take time and patience and it is certainly something I wouldn’t have made after a long day of work at the store and getting home around 7pm.
These patties are simple, healthy and full of flavor. They have a wonderful crispy crunch on the outside and a nice soft inside. They are naturally gluten-free and vegan, too. The original recipe features them with sage instead of chives and amidst a delicious spring brunch menu topped with a roasted tomato sauce. I thought the sauce would take away from the lovely crisp, so I instead envisioned them atop a lovely mix of baby spring greens salad as a meal in and of itself. I made a quick lime cilantro vinaigrette and served it as dinner.
You could definitely play around with different herbs and even different veggie additions, the big thing to keep in mind is to make sure the patties aren’t too moist or dry to where they will fall apart in the pan and to make sure you have your pan is hot enough to get that initial “searing” to create a nice crust on the outside and to keep the patties together. Use a spatula to look at the face-down side before you flip to make sure it is adequately browned before you flip.
We tossed some baby spring greens with the vinaigrette, put the patties on top and drizzled those with a bit more dressing and topped everything with more fresh chives. A perfect spring-time dinner.

White Bean and Chive Patties
makes 12 patties
Adapted from Whole Living, June 20111 19-oz can organic white beans
1 shallot, finely diced
1 small carrot, finely grated
1/3 cup yellow cornmeal
1 tablespoon chopped fresh chives, plus more for serving
Coarse salt and freshly ground black pepper
1/4 cup extra-virgin olive oilDrain beans, reserving 2 tablespoons liquid. Transfer to a bowl and mash. Stir in shallot, carrot, cornmeal, and chives. Season with salt and pepper. Add 1 tablespoon reserved liquid. If mixture is too dry, add the other.
Heat a large skillet over medium-high heat. Add 2 tablespoons oil. Form mixture into 12 patties (about 2 1/2 inches diameter each) and saute in batches until golden brown and crisp, 2 to 3 minutes per side. Repeat with remaining oil and patties. Serve topped with a tasty dressing, yogurt sauce or atop a salad.
-
Citrus Quinoa Salad with Toasted Almonds
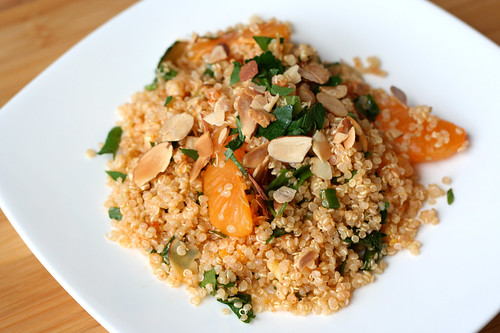
I have sung quinoa’s praises many, many times on this blog, so I think you know by now how I feel about it. It really is a super food and incredibly versatile. This salad caught my eye while I was searching the web last week, looking at recipes. I couldn’t wait to make it as a side for dinner and to enjoy the leftovers throughout the week for lunch. I ended up doubling the recipe so we had extra for leftovers.
This salad has a bright and sunny taste to it and it was the perfect side with the grilled pork steaks from Sojourner Farms that we were making. It was even more perfect being that it finally warmed up a bit here. It was a balmy 42º when we were getting ready to start dinner last night and rather than heating up the oven and cooking inside, we decided it would be the perfect night to fire up the grill. Honestly, it felt a bit like a heat-wave, it has been such a brutal and frigid winter here. I am actually calling “Uncle” on the 2010/11 Winter season, officially here and now! I am done, I want to see the sun, some lovely flower buds and the beautiful green grass and trees. We have been buried since early December in so many feet of snow. Don’t get me wrong, I love the snow and I still, after all these years of living here, get excited with each and every flake that falls and even the major storms, but this year I have hit my limit. Thankfully Spring is just around the corner and with the Spring comes more green and more fresh produce, which I am equally missing.
Oranges and other citrus are in season right now, but I have never been a big orange eater. However, I have been trying out different types of oranges and tangerines and I am liking them more each time, I particularly like them in dishes instead of just plain. The tangerines in this salad were perfectly juicy and sweet but not too overpowering. You could certainly use your citrus of choice, oranges would be just as good. The fresh scallions and parsley were both perfect, I changed the original recipe a bit by adding garlic and adding a bit more sriracha, since I like spicy, though even with increasing the sriracha it was still a very subtle spiciness, not intense by any stretch of the imagination. This salad is best served room temperature and it was perfect with the grilled pork and green beans with pine nuts that I also made. This salad was great as a side, but would also be great as the main dish or an appetizer. Additionally, it would be a nice vegan dish to bring to a party. If you double the recipe as I did, just top each individual serving with the toasted almonds and keep them on the side, this way they won’t lose that lovely crunch by sitting in the fridge with the salad. Just top each serving individually as you serve them.
Citrus Quinoa Salad with Toasted Almonds
Serves 4
adapted from Cooking with Amy1 tangerine, peeled, seeded and cut into chunks (remove as much of the membranes as you can)
1 cup organic quinoa, rinsed well
1 3/4 cups water
1/2 teaspoon kosher salt, plus more for serving
1/2 lemon, preferably organic
2 tablespoons extra-virgin olive oil
2 garlic cloves, minced
2 medium scallions, thinly sliced
2 tablespoons Italian parsley, minced
1/2 tablespoon sriracha, or more to taste
2 tablespoons thinly sliced toasted almondsToast your almond slices ahead of time and set aside.
Rinse the quinoa thoroughly, then toast it in a dry medium saucepan, over medium heat for a few minutes until it is fragrant.
Add the water and salt to the quinoa, and bring to a boil over a high heat. Cover and reduce the heat to medium, and simmer until the water is absorbed and the quinoa is tender, 10 to 15 minutes. Spread the quinoa out on a baking sheet to cool to room temperature quicker, while you prepare the salad.
Before cutting the lemon, finely grate the zest and then squeeze the juice into a large serving bowl. Add the olive oil, garlic, scallions, parsley and sriracha. Once the quinoa has cooled and is room temperature add in the quinoa and tangerine pieces, season to taste with salt and top with almonds and a bit of fresh parsley just before serving.
-
Millet and Apple Salad with Curry Dressing

Yes, another millet salad. This is great warm, cold or room temperature. I ate it warm, just after the millet was done cooking. I have to say, tossing millet with fruits, veggies, nuts, etc, to create a salad, has to be one of my new favorite things. It works perfectly as a starter, side dish or in this case, a main course. I came home and wanted to throw something together quick for a dinner for just myself and I didn’t have a huge appetite. This has the perfect combination of so many great things, spicy, sweet and crunchy. The colors on this dish are perfectly beautiful. The curry flavor isn’t overpowering and is perfect with the fresh mint, which I was happy to be cooking with, we still have so much of it growing in the yard. This is another great vegan dish to take to a party to share or maybe even a Thanksgiving side.
Warm Millet and Apple Salad with Curry Dressing
Serves 4
adapted from Martha Stewart Living, October 20041/4 cup raw sliced almonds
1 cup organic whole millet
2 teaspoons olive oil
1 teaspoon honey (use maple syrup to make vegan)
1 tablespoon finely chopped shallot
1 1/2 teaspoons curry powder
1/4 teaspoon coarse salt
2 tablespoons fresh lemon juice
Freshly ground pepper
2 tablespoons extra-virgin olive oil
1/4 cup dried currants
1 small apple, cut into 1/8-inch-thick wedges
1/4 cup loosely packed fresh mint leaves, coarsely chopped, plus more for garnishPreheat oven to 375º. Spread almonds on a rimmed baking sheet; toast in oven until lightly toasted and fragrant, about 7 minutes.
In heavy skillet heat 1 tsp of oil, add the millet and toast gently until the grain is tan. Bring the water to a boil in saucepan, add remaining oil and grain. Stir; cover and simmer gently for 25 to 30 minutes to desired texture or until all of the water is absorbed.
Whisk together honey, shallot, curry powder, salt, and lemon juice in a large bowl. Season with pepper. Whisking constantly, pour in oil in a slow, steady stream; whisk until dressing is emulsified. Add millet, currants, apple, mint, and almonds; toss well. Garnish with mint.
-
Warm Quinoa Salad with Kale and Arugula
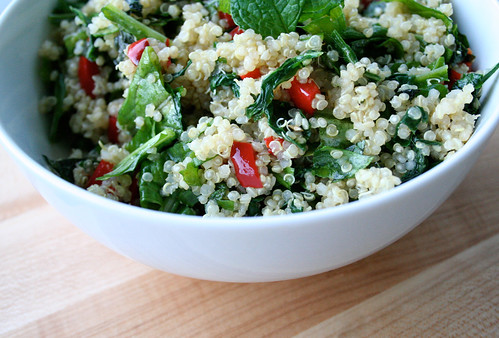
One of my favorite ways to create a recipe is to hit the farmer’s market, buy what looks best, go through the garden at home grabbing what’s ready and then I look through the pantry. The arugula and bell peppers at the farmers market looked so amazing and my kale and mint at home are both growing like crazy, so I wanted to come up with a meal using these things. I thought a warm quinoa dish would be perfect. I decided to cook up the kale to wilt it, since it can be tough and bitter, but I left the arugula raw since it would wilt with the warmth of the quinoa and veggies, plus I wanted a little bit of crunch. YUM! this salad had so much flavor going on. We had this as our main dish, it was light but filling and delicious and equally as pretty to look at. This dish would work great as a side dish or your main, as we did. It’s also great cold, right out of the fridge for a quick snack or lunch. Another great vegan dish, perfect for a dinner party or BBQ.
Warm Quinoa Salad with Kale and Arugula
serves 41 cup quinoa
1 large bunch kale, stems removed, finely chopped
3 cloves garlic, minced
1 red bell pepper, chopped
1/4 cup olive oil plus 2 teaspoons
1 medium onion, diced
1 lemon, zested
1-2 lemons, juiced
1 bunch of arugula, stems removed, finely chopped
1 bunch fresh mint, stems removed, finely chopped
kosher salt
freshly ground black pepperCook quinoa according to the package directions. Meanwhile, in a large skillet, heat 2 teaspoons of olive oil over a medium-high heat. Add onion and red pepper, saute until onions are translucent. Add garlic, cook for 1-2 minutes. Add kale and lemon zest. Cook for 5-7 minutes, until the kale is wilted. Remove from the heat.
In a small bowl add 1/4 cup of olive oil, the juice from 1-2 lemons, 1 minced garlic clove, salt and pepper. Whisk together.
After the quinoa is cooked (about 15 minutes), add to a large serving bowl and fluff with a fork. Add the kale mixture, fresh arugula and fresh mint, toss to combine. Pour the dressing over the top, toss again to combine. Taste, add more salt and pepper if needed. Serve. This can be served warm, room temperature or cold.
-
Thai Rice Noodle Salad
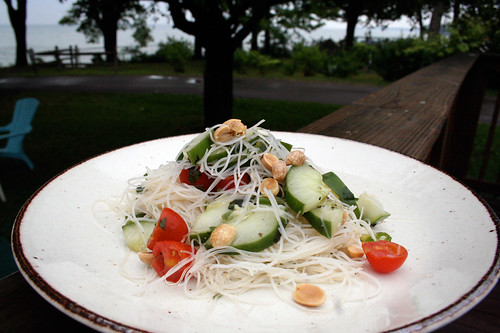
After all of our friends left the beach on Friday, Mark and I stayed and my parents came out to spend the weekend with us and for the big Greek Family reunion on Saturday. Though my Papou (My Grandfather) passed away 7 years ago and my Yia Yia (My Grandmother) 5 years ago, Papou’s remaining siblings, all the children, the grandchildren and the great-grandchildren all get together every summer at the beach. It is so amazing that we all still get together and are so close. We get tons of lamb, it marinates for days and then my Dad and his cousin Paul grill it up. Everyone brings a dish or a snack to share and everyone eats their faces off. So much delicious, authentic Greek food and other goodies.
I had all the ingredients on hand last week to make this salad for everyone at the beach house but never got around to it and although this dish has nothing to do with Greek food in the least, since I had everything with me and it was both vegan and gluten-free, I knew it was a good dish to share. If I had shredded carrots I would have added those, but it certainly didn’t need it. Additionally, I left out the fish sauce in the dressing, since I didn’t know if anyone was vegan, but normally I would have included it. Since there was so many people, I actually doubled this recipe and made huge serving of the salad, which was nice since I had leftovers.
*Also, I’ll be honest, the photo above makes this salad seem boring and blah, but it is anything but, the dressing has so much flavor and it’s damn delicious. I need to get better with the camera.
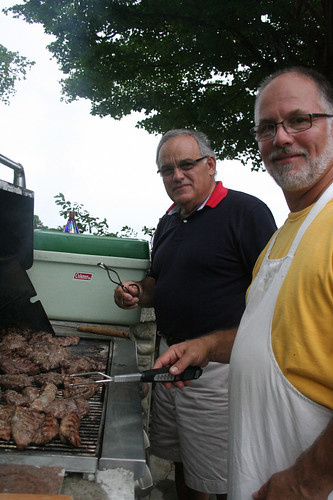
Paul and my Dad grilling the lamb
Cold Asian Rice Noodle Salad
Dressing:
1/4 cup rice wine vinegar
1 tablespoon sesame oil
1 tablespoon olive oil
3 tablespoons fish sauce (leave this out to keep it vegan)
2 cloves garlic, minced
1 teaspoon of ginger, finely minced
1 teaspoon crushed red pepper flakes
1 tablespoon organic raw sugar (or honey)
juice from 1/2 lime
1 teaspoon kosher saltWhisk it all together. Set aside.
Salad:
8 ounces thin rice noodles or rice stick noodles (the kind you just have to soak)
1/2 pint of cherry tomatoes, halved
1/2 cucumber, quartered lengthwise, and sliced 1/2-inch thick (I used a beautiful organic heirloom satsuki madori from my garden)
1 jalapeno pepper, chopped
1/2 cup of Thai basil, roughly torn or chopped up
1/2 cup of fresh mint, roughly torn or chopped up
*(you can also use fresh cilantro and/or regular basil)
3 or 4 scallions, thinly sliced
1/4 cup dry-roasted peanuts, chopped
1/2 lime
fresh ground black pepper, to taste
kosher salt, to tastePrepare the noodles according to package’s directions.
Drain and rinse with cold water. Drain well and pat dry. Add noodles, cucumbers, tomatoes, jalapeno, basil, mint, scallions, peanuts and whatever else, to a large bowl. Pour on the dressing, toss to combine. Squeeze the juice from the other half of a lime over the top. Garnish with a small handful more each of chopped peanuts and sliced scallions. Taste, add salt, pepper or more lime to taste. Serve room temperature or put in the refrigerator for an hour or two and serve cold. -
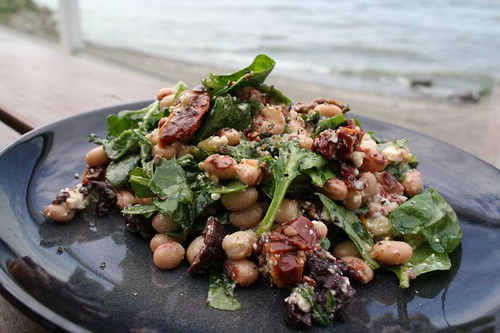
Greek Black-Eyed Peas Salad
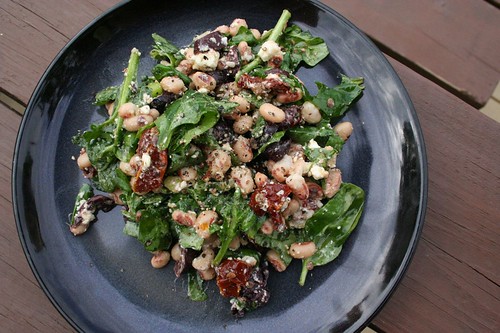
Here is another dish I made out at the beach house for everyone. I am on a big black-eyed peas kick right now (and no, I am not referring to the terrible pop group). I made that Hoppin’ John Salad, not too long ago, which is an Southern tradition brought over from Africa, so, I was surprised to see the beans used in this Greek style salad, as I most definitely think of the South when I think of black-eyed peas. Being a Greek girl, that loves ALL Greek foods, I was excited to try this variation on the classic Greek flavors that I know and it really sounded like the perfect side for an outdoor dinner. Even my cousin Andrea, who doesn’t like beans typically, told me she liked this salad. SCORE!
I was also super excited about using the sun-dried tomatoes preserved in oil, since I always buy them dry and have been looking for an excuse to experiment with these. You won’t want to use the dry ones in this recipe, as you need to be able to slice them and you need the oil in the salad. You can definitely use fresh tomatoes, if you have those on hand, just add a little bit of olive oil to the salad. Since I have so much fresh oregano in my yard, I did add a bunch of fresh chopped oregano to the salad, I really couldn’t resist as it was a perfect match.
I really would prefer to be cooking with dried black-eyed peas, but I have yet to find them locally, so I have been using canned beans. I went ahead and posted the recipe using the dried beans, since that is what I would prefer. If you are substituting canned black-eyed peas for the dry peas, use approximately two 15-ounce cans. Rinse thoroughly. Skip step 1 and step 3 in the instructions. Another tip from Elise on this recipe: Don’t add the lemon juice until you serve the salad: It helps keep the greens bright.
Greek Black-Eyed Peas Salad
Serves 8-10
Adapted from original recipe on Simply Recipes by Hank Shaw of Hunter Angler Gardener Cook2 cups dry black-eyed peas
Salt
1 package of feta cheese, about 7 ounces
1 jar of sun-dried tomatoes in oil, about 8 ounces, sliced
1 cup black olives, preferably Kalamata or oil-cured, roughly chopped
1 finely chopped green onion
1 finely chopped garlic clove
1/2 cup fresh oregano, roughly chopped
1 large bunch of baby spinach, about 1 pound, washed, roughly chopped
Zest and juice of a lemon
Freshly ground black pepper1. Bring a medium pot of water to a boil. Add enough salt to make the water taste like the sea. Turn the heat down to low and add the black-eyed peas. Let them cook slowly, uncovered, until they are done, anywhere from half and hour to an hour, depending on how old the peas are. Don’t let the water simmer.
2. Add the spinach to a large bowl. Crumble the feta cheese into the bowl and add all the other ingredients except the lemon juice. Mix well.
3. When the black-eyed peas are done, pour them into a colander and spray them with cold water to stop the cooking. Pick through and discard any loose skins or mashed peas; you’ll find a few, but hopefully not many.
4. Add the black-eyed peas to the salad, mix well. Squirt some lemon juice over and top with freshly ground black pepper. Serve.
-
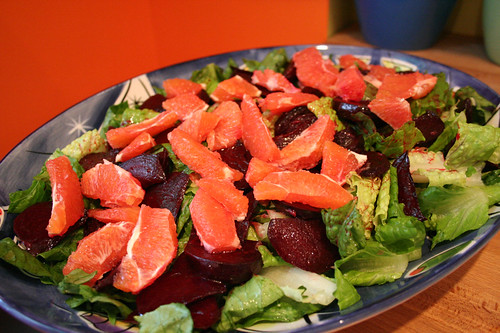
Beet, Orange and Walnut Salad
The finished salad without the preserved lemons since those made it on at the last-minute and the walnuts since we burnt them
Whenever we travel to Chicago for either Flatstock or the Renegade Craft Fairs, we are lucky enough to stay with our good friends Jason (of Delicious Design League), his lovely wife Margaux and their adorable 18-month old son, Desmond. They are always so incredibly gracious and welcoming to us and staying with them makes being on the road not so uncomfortable. Margaux always cooks or bakes for us, which is one of my favorite parts of our visit. I absolutely love traveling, but being away from my kitchen and home-cooked food is hard, especially since we spend so much time working when we travel, that we rarely get to go out and experience nice restaurants fit for a foodie, so it ends up being a lot of fast eating and festival food. That part of traveling exhausts me.
This trip, since Margaux and I both recently started our own cooking blogs, we decided to make something together, along with our good friend Anne, and post about it on our blogs. Check out Margaux’s blog, Sweet and Savory Kitchens, that she keeps with her Aunt Suzy. I love the way they post and comment on each other’s recipes or take inspiration from each other’s dishes and create their own.
Margaux had made some preserved lemons, when the Meyer lemons were in season this year and has been experimenting with a lot of different Moroccan dishes using them. She really wanted to make a Moroccan inspired dinner for us and I was all for it since I had never cooked Moroccan food. The dish we were both most excited about was this Beet, Orange and Walnut Salad which features the preserved lemons (which coincidentally, we almost forgot at the end). Since Meyer lemons are no longer in season, you could purchase premade preserved lemons from the store, make preserved lemons with regular lemons or you can skip them all together in this salad and it would still be great. Either way, you must try preserved lemons if you never have, they are incredible and bring a level of fresh and tangy flavor that I have never tasted before. I definitely plan on making some preserved lemons next year when they are in season. I can’t wait.
With this Beet, Orange and Walnut Salad, we also made a simple Oven Baked Chicken, which Margaux marinated beforehand with some delicious Moroccan inspired spices. As an additional side we made Margaux’s house staple, Green Rice, which I loved so much that I made it the first day we were home (look for a blog post about that soon).
Being with good friends and/or family, sharing food, cooking and spending time in the kitchen is most definitely one of my favorite things in the world and I cherish those memories and hold them close to my heart. I have memories from being a child and cooking with good friends of the family, with my Yia Yia, my Dad and so many other people whom I love. Those moments, whether you realize it at the time or not, have so much emotion attached to them that you can smell or taste something years later, that you cooked with someone you love and those memories just come flooding back. Preserved lemons will definitely do that for me and always remind me of Margaux and this dinner.
Check out Marguax’s post about this dinner here.Beet, Orange and Walnut Salad
The Beets

Me, cutting the beets, which by the way really leave your hands stained

1 lb. beets
olive oilWash beets, pat dry, peel and cut into wedges. Place in a baking dish and lightly coat with olive oil. Cover with foil and bake 45-60 minutes in a 375 degree oven until done. Cool and set aside. The original recipe called for baking the beets whole with the skin on, slipping it off after they come out and cutting them into wedges then. We decided it seemed easier to peel and cut them first.
The Walnuts

the walnuts, before they were burnt
1/2 cup walnut halves
pinch of sugar
1 tbsp walnut oil
salt and pepper to tasteToss all ingredients together and place on a baking sheet. Toast in the 375 degree oven for 5-7 minutes (keep a close eye on them after 5 minutes!!! (We had them on the bottom rack in with the beets and I was in charge of watching them. I definitely burnt them and we didn’t have extra, so had to go without in the salad). Cool. Chop coarsely and set aside.
The Dressing
5 tbsp fresh orange juice
1 tbsp walnut oil
2 tbsp olive oil
1 tbsp red wine vinegar
salt and pepperWhisk together.
Final Assembly
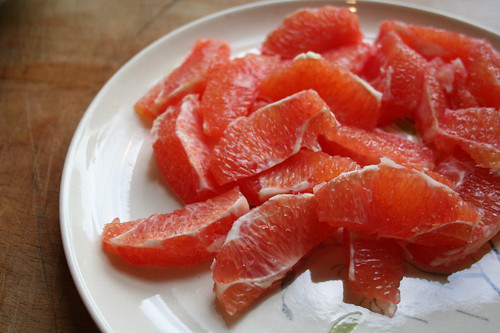
we ended up with blood oranges, which we didn’t know until we cut into them, but they were delicious and so beautiful
2 navel oranges
1/4 preserved lemon, diced (optional)
1 head romaine lettucePrepare the oranges by cutting off the top and bottom. Cut off the skins with a knife so that no white pith remains. Then cut into sections. Wash the lettuce and either tear or cut into pieces. Dry. Toss the lettuce with half the dressing and place on a platter. Toss the beets with the remainder of the dressing and place on top of the lettuce. Garnish with the orange sections, preserved lemon and walnuts.
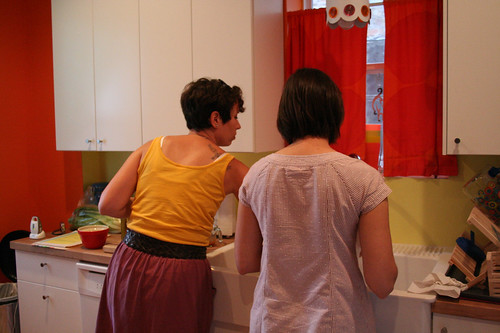
Margaux and Anne in the kitchen

Desi being cute.

The spread
-
Green Bean and Tomato Salad
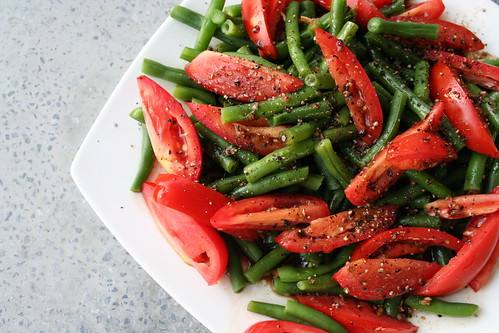
This is a very simple, fresh and quick summery salad, perfect side to so many summer dinners. You can serve it room temperature or make it ahead and serve it chilled. Had I had a red onion on hand, I probably would have thinly sliced a bit and included it, but it definitely didn’t need it.
Green Bean and Tomato Salad
serves 8 (approx 1 cup serving each)1 pound green beans, trimmed and cut into 2-inch pieces
3 plus tomatoes, cut into 1/2-inch thick wedges (or 1 pint of cherry or grape tomatoes, halved)
1/4 cup balsamic vinegar
1 large clove garlic, minced
1/2 teaspoon kosher salt
1/2 teaspoon freshly ground black pepper
3 tablespoons extra-virgin olive oilBring large pot of water to boil over high heat. Add green beans; cook 5 minutes or until crisp-tender. Drain and rinse well with cold water. Drain thoroughly and place in large bowl with tomatoes.
Combine vinegar, garlic, salt and pepper. Gradually add oil, stirring constantly with a whisk. Drizzle over bean mixture, toss gently to coat. Top with freshly ground black pepper.
-
Southwest Rice Salad
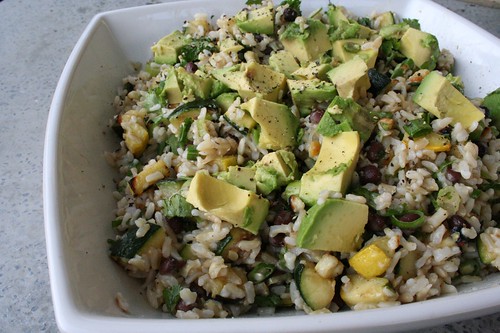
I came across this recipe a week or so ago while browsing on the Epicurious iPhone app (which I am obsessed with) and couldn’t wait to try out my version of it. I changed a few things around like using brown rice instead of white and I added some things that weren’t in the original recipe (the beans, banana pepper, green zucchini, etc). Also, considering the corn that we got at the farmers market this week was still very small and a bit early in the season, we didn’t have a lot of it in the dish. Later in the season, that part of the dish will be even better, so we will for sure have to make this again when the corn is tastier. I was very excited though, that we did get to include the first banana pepper of the season from our garden to add a little heat on top of the poblano that was already in there. I made a bit larger of a serving that what the recipe called for, so we could eat it for lunches throughout the week. For a side dish at one meal, you could probably get away with just making 1 cup of rice.
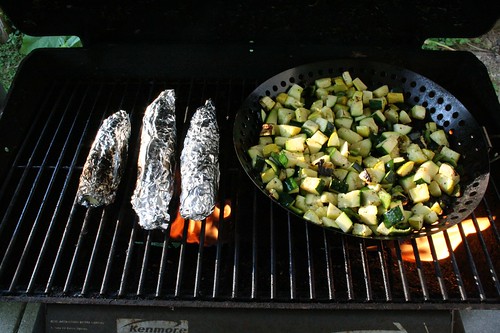
We decided to cook up the corn and other veggies on the grill, which we were already heating up, so we could get some of that lovely smokey grill taste in the dish. You could easily cook the veggies in a non-stick skillet over a medium heat on the stove top if that is easier. This dish was light and refreshing and was the perfect side to the pork steaks from Sojourner Farms that we were cooking up. It had a very subtle spicy kick from the peppers and a great bright flavor from the lime.
Southwest Rice Salad
serves at least 8 as a side dish, less if you are serving it as your main entree
adapted from Bon Appétit2 cups long-grain organic brown rice
1/3 cup fresh lime juice
4 tablespoons olive oil, divided
1 garlic clove, minced
1 1/2 cups fresh corn kernels (cut from 2 or ears) or frozen corn kernels, thawed
1 large fresh poblano pepper, diced
1 seeded spicy banana pepper, diced
1 medium zucchini, cubed
1 medium yellow squash, cubed
1 avocado, halved, peeled, diced
1 cup of canned organic black beans, drained and rinsed
3/4 cup thinly sliced green onions
3/4 cup chopped fresh cilantro
salt
freshly ground black pepperCook rice until just tender, follow directions on the package. Ours cooked for 50 minutes. Drain and rinse in cold water. Drain again. Meanwhile, whisk lime juice, garlic and 3 tablespoons of olive oil in small bowl. Season dressing to taste with salt and pepper.
Start your grill and get it to a medium-high temperature. Wrap the ears of corn in foil and place them on the grill. Toss the peppers, squash and zucchini with 1 tablespoon of olive oil and add to a grill pan. Sprinkle with salt and pepper. Place the grill pan on the medium-high grill. Cook the corn until it is done, approximately 10-15 minutes, cut off the cob once done and slightly cooled. Sauté the vegetables until they are just tender and starting to brown up a little, 15-20 minutes; scrape into a large serving bowl. Add rice, beans, green onions, cilantro, and dressing; toss to coat, top with avocado. Season with salt and pepper.
-
Shaved Asparagus and Parmesan Salad
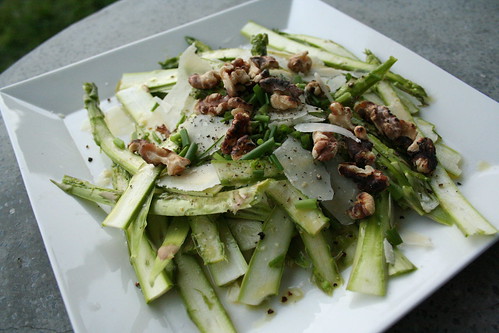
It was unseasonably hot in Buffalo today, mid-eighties and muggy. I am certainly not complaining, I love it. However, the last thing I wanted to do was come home and cook, it was far too hot for that. So, I took out a bunch of the beautiful asparagus that we grabbed on Saturday at the farmer’s market and made this delightful raw Spring salad. I served it with a piece of gluten-free focaccia and it perfectly complimented this bright and beautiful, sunny Spring day.
Shaved Asparagus and Parmesan Salad
serves 21 lemon
2 tablespoons of olive oil
1 teaspoon of kosher salt
freshly ground black pepper
1/4 cup walnuts
1 pound bunch of asparagus spears, trimmed
1 bunch fresh chives, snipped
wedge of Parmigiano-Regiano cheese, for shavingIn a small bowl whisk together the juice from one lemon, olive oil, salt and pepper. Whisk until combined. Set aside, whisk together again just before serving. In a dry pan over medium-high heat, toast the walnuts until they are lightly browned, set aside to cool. Using a mandoline, set over a cutting board, shave the asparagus lengthwise. Add the dressing to the asparagus on a large platter, let sit 5 minutes. Just before serving, top the salad with the toasted walnuts, chives, shavings of the Parmigiano-Reggiano and freshly ground black pepper. Enjoy.
-
White Bean and Avocado Salad
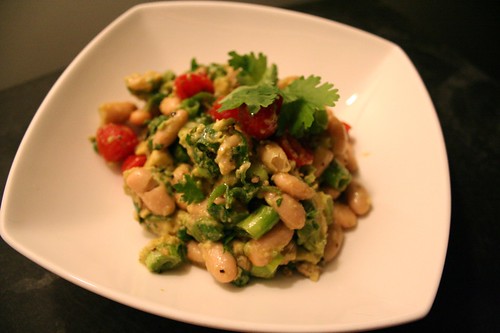
This is my idea of “fast food”. When I have a long, busy day and I am not getting home until late, I don’t crave take out, a drive thru or a restaurant – I want my home, my kitchen and my ingredients. I have been known to come home from a very busy day and whip together a full on pasta dish with fresh veggies and things I have in the pantry. This recipe is something I threw together randomly, last week after my Thursday night yoga class with things I had on hand and it was so good I went for it again this week. I don’t get home until almost 9pm on Thursdays, so after a long work day and a 90 minute yoga practice I want something light, tasty and quick.
Since avocados are in season right now, I have been buying a few every time I go to the market since I could eat them daily. The last time I made this salad I had some leftover dried great Northern beans that I had soaked for a soup I had made and they were even better than the canned beans I used this time. Unfortunately, for as much as I prefer dried beans over canned, they are just not as quick to prepare and therefore not ready on the drop of a dime. Any white bean will do for this recipe, great Northern, cannellini, navy or even lima beans.
This salad is light, refreshing, adequately filling and it has the perfect balance of crunch and creaminess. I had a small piece of toast on the side. This makes a great main course dish or a it can be substituted for your typical green salad.
White Bean and Avocado Salad
serves 2-4 (depending on how you are serving it)1 can of white beans (15.5 ounces) cannellini, great Northern, etc
1 avocado diced
1 handful of cilantro, chopped
4 or 5 green onions, chopped
juice from 1/2 lime
salt
fresh ground pepper
2 T olive oil
handful grape tomatoes, halvedDrain and rinse the beans. Place the beans, tomatoes, avocado, green onions and cilantro into a mixing bowl. Drizzle with the olive oil and lime juice, season to taste with salt and pepper. Gently toss until combined. Don’t worry if the avocado starts to mash-up a bit, mine did this time as the avocado was very ripe, it still tastes delicious. Serve immediately as main dish or side dish. Refrigerate leftovers.


