-
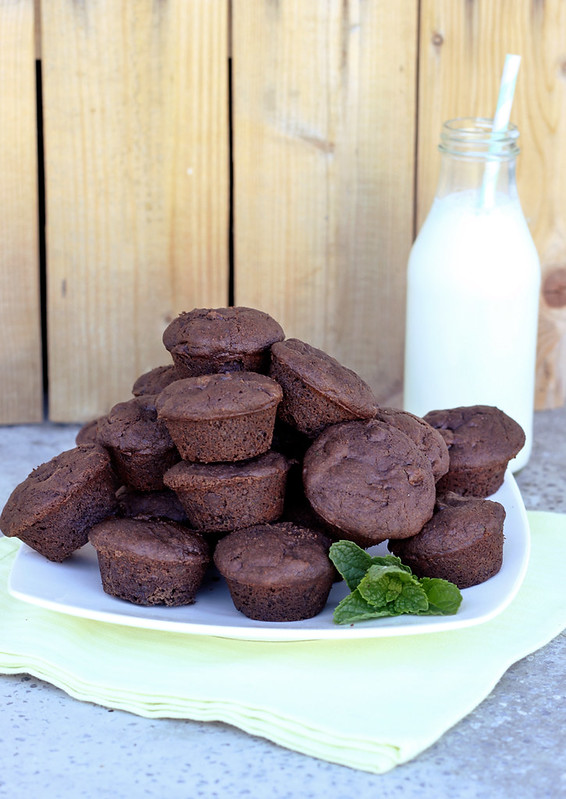
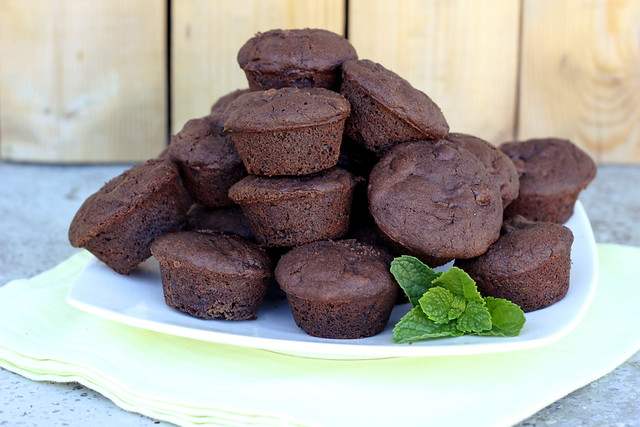
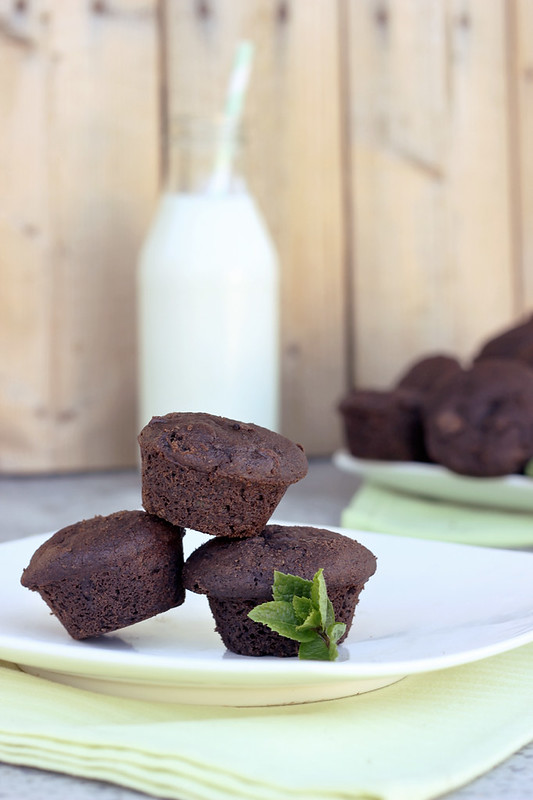
Mint Chocolate Chip Brownie Bites – Gluten-free + Vegan
I feel a little bad, because I really haven’t addressed the running thing in about two weeks. So many of you offered really great advice and I was really feeling great about it all. I went on a total of three runs and I really took each one very easy, trying not to go too hard too fast. Because I was using an iPhone app that basically was helping me ease into running, it had me on a program where I would walk for about 90 seconds then run for 45 and so forth, including a warm up and a cool down. The workouts were 30 minutes long and I was “running” about 2 miles each time. After my third run I was experiencing some very severe inner knee pain almost immediately afterward. I hesitate to even call it knee pain, as it was far more like leg pain, than knee pain. I wasn’t having any pain in my knee caps, I could kneel on them, etc. It was more any amount of pressure was seriously irritating both of my inner legs near the knee. Going up and down the stairs was horrid. I decided I need to take a break from running before I did any major damage to my body. Shortest running career, EVER! I kept up with my daily yoga practice and I did a ton of icing and I was taking ibuprofen, as needed. All of those things helped, but it took a solid 2 weeks for my legs and knees to stop hurting as much as they were. I wouldn’t say that now I am back to the way I was before this happened, but I am very close. So yeh, that was seriously upsetting and totally a let down. It is partially why I haven’t really mentioned it, because I was a little let down that only 3 runs in, I was already forced to take a break.
In talking with my friend Elyssa, who is also my amazing chiropractor and one of my yoga teachers, and in her looking at my knees, she explained that it seemed to be a tracking issue. My knees just aren’t tracking straight, so when I bend them, they tend to want to fall in, instead of staying in line over my toes. Not caused by the running, something that was already there, but aggravated by the running. Now that I am aware of this, I notice all of these things I do, even in yoga, where I allow my knees to fall in. So she gave me some strengthening exercises to do and I haven’t given up all hope, just yet. I do feel like I need to do some work on my body before I jump back into running. That knee pain honestly scared the crap out of me and made me quite sad that I was never going to be able to enjoy running.
At any rate, the running stuff really has very little to do with these brownies, but I felt the need to share the status on my newfound and short love affair with running, since I had left everyone high and dry after you all offered so much incredible advice and encouragement. Thank you again, seriously and hopefully I will need more of that advice again soon, when I feel ready to go back.
I guess what these brownies do have to do with this story is that I made them over the weekend for a Sip ‘N See party for Elyssa, her husband Aaron and their brand new baby boy, Oliver! The party was a bit of baby shower, but everyone got to meet the amazing Oliver and welcome him to the world. Elyssa and Aaron adopted baby Oliver and the party was one of the nicest celebrations I have ever been to. It was a very casual and laid back get together with lots of people from our yoga studio and obviously some of their other family and friends. Everyone just got to visit, swoon over the baby and just enjoy each other’s company and lots of yummy food. Since a handful of other people there are also gluten-free, a few are vegan, some are just dairy-free or just vegan, etc – my friend Kathleeen (hi, Kathleen! 🙂 ) asked me to make something sweet for a dessert! I was all over that. I love making sweets for people, especially when I know they will appreciate them being gluten-free and vegan!
It took me a couple of days to decide what to make for a good amount of people, in a casual grab-it and go kinda setting. It had to be small, bite-sized and easy to just pick up and eat. I was thinking about cupcakes for a while, but I am not much for the decorating part of cupcakes. It just isn’t my thing. That’s when I realized a brownie bite would be perfect. When I made these for the party, I wasn’t sure everyone would love the addition of mint, so I made half of them mint and half just classic chocolate. It could have been their placement on the plate, or coincidence, but the mint ones went so quickly. They were gone long before the classic ones. Since it was the first time I had made them, for the party, I did decide that I wanted to change a couple things about the recipe, so I made them again a few days later, to try to perfect them. The second time was definitely the charm, I seemed to get the ratios more on point and they were exactly right.
The fact that I have an overabundance of fresh mint growing in my yard, is the reason why I
wanted tohad to include some fresh mint in these brownie bites. I couldn’t resist. If you don’t have any on hand, no worries, you can simply leave it out. If you don’t like mint flavor, just leave out the fresh mint and the mint extract and add in a little more vanilla and you are left with classic chocolate chip brownie bites.These tasty little nuggets are filled with flavor, they are the perfect size, they are easy to eat and the mint and chocolate combination is really to die for! They are fluffy and moist, while being chocolatey and gooey from the chocolate chips and for me, they are the right amount of sweet.

[print_this]Mint Chocolate Chip Brownie Bites – Gluten-free + Vegan
makes approximately 30 brownie bites
Loosely adapted from this recipe- 1/2 cup coconut oil, melted, plus a little more for the pans
- 1/2 cup garbanzo and fava bean flour
- 1/2 cup almond flour (aka almond meal)
- 1/4 cup potato starch
- 2 tablespoons arrowroot starch
- 1/2 cup maple syrup
- 2 1/2 teaspoons baking powder
- 1/2 teaspoon baking soda
- 1 teaspoon salt
- 3/4 cup unsweetened cocoa powder
- 1/2 cup mashed ripe bananas
- 1 tablespoon pure vanilla extract
- 1/4 – 1/2 teaspoon mint extract (I used just about 1/2 teaspoon and the mint flavor was perfect, not too overpowering at all)
- 1/4 cup hot water
- 10 ounces vegan, gluten-free semi-sweet chocolate chips (mini chocolate chips would also be good)
- 1/4 cup firmly packed, fresh mint, very finely chopped
Preheat oven to 325 degrees. Brush 3 dozen mini-muffin pans with oil; set aside. You can also just use one pan and wait until each batch cools to unfold them and then regrease the pan to make the next batch (this is what I did).
In a medium bowl, whisk together garbanzo and fava bean flour, almond flour, potato starch, arrowroot, baking powder, baking soda, salt, and unsweetened cocoa powder; set aside. In a large bowl, mix together banana, maple syrup, coconut oil, vanilla and mint extract. Slowly add flour mixture, stirring to combine. Stir in water until it forms a batter. Fold in chocolate chips and fresh mint.
Place approximately 1 tablespoon batter into each prepared muffin cup, you want them about 3/4 of the way filled. Transfer muffin pans to oven, and bake until a toothpick inserted into the center comes out clean, 18 to 22 minutes. Let cool completely in the pan on a wire rack before unmolding.
[/print_this]
-
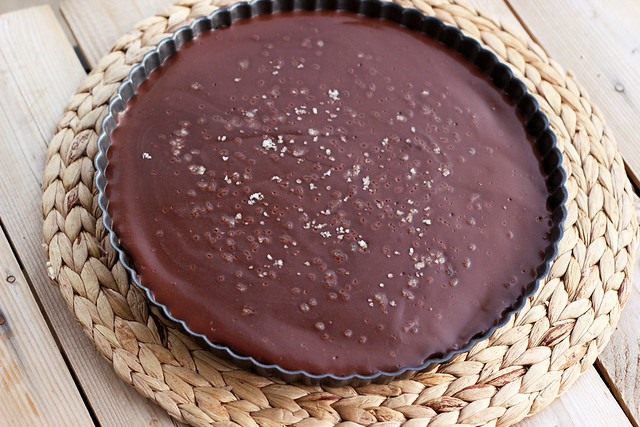
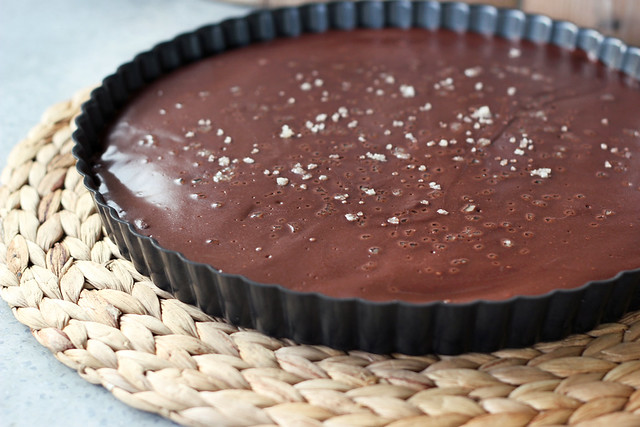
Salted Chocolate Tart – Gluten-free, Grain-free + Vegan
When you are craving something very specific and you want it just how you envision it in your own head, there is nothing left to do but to just figure out how to make it yourself.
I had been wanting a delicious but not too rich simple chocolate dessert, with just a touch of saltiness. There is nothing better than a good quality chocolate treat and tad bit of good quality sea salt. Yum, one of my very favorite things. I decided to just write up a recipe first, that I thought would work and just play it by ear, adding things as I went if I thought it needed it and then hope for the best. I find this to be one of the best ways to cook and bake and I am pleasantly surprised at how often it actually works out.
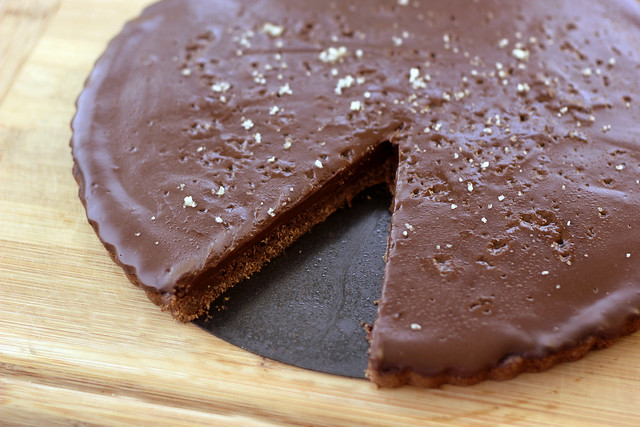
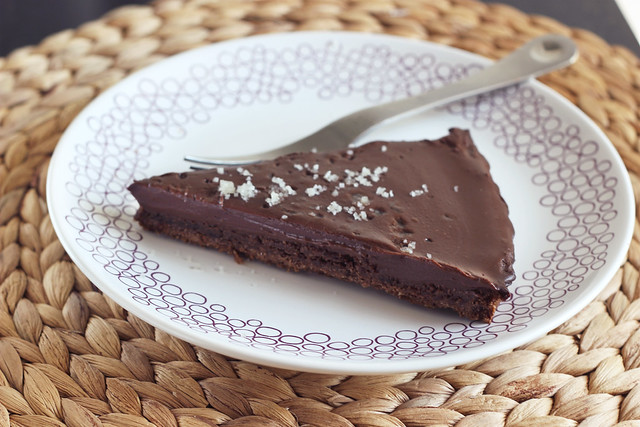
This tart was super simple to make and it was exactly what I was looking for. A slightly crunchy and nutty crust that needs the littlest bit of baking and a super creamy and velvety filling that is the perfect amount of richness, without going overboard and crossing into the world overly heavy and too rich. One of my biggest complaints of so many desserts. The sea salt on top is so perfect, both in how it looks on top of the glossy chocolate and the delicious treat that it provides your taste buds.
I ended up melting some dairy-free semi-sweet mini chocolate chips (from Enjoy Life) that I had on hand in my pantry, but you can also just use your favorite bittersweet chocolate, coarsely chopped for melting. If you want to make this refined sugar free, you could also try melting unsweetened bakers chocolate, and sweeten it to your liking with whatever you choose, such as stevia, maple syrup, palm sugar, etc.
I am super excited at how simple the crust was on this tart, I definitely plan to make some really fun tarts this spring and summer with this recipe
[print_this]Salted Chocolate Tart – Gluten-free, Grain-free + Vegan
serves 8 to 10Crust
- 2 cups almond flour, aka almond meal
- 2 tablespoons flax seed meal
- 2 tablespoons maple syrup
- 2 tablespoons cocoa powder
- 2 tablespoons coconut oil, melted
- 1/4 teaspoon baking soda
- 1/8 teaspoon salt
Filling
- 10 ounces non-dairy bittersweet chocolate, coarsely chopped (or dairy-free mini semi-sweet chocolate chips)
- 1 1/2 cups unsweetened non-dairy milk (I used a blend of coconut and almond milk)
- 1 tablespoon arrowroot starch (You could also use tapioca starch or corn starch)
- 2 tablespoons coconut oil
- 1 teaspoon vanilla extract
- High quality sea salt for topping (see below note)
Preheat oven to 350º. Lightly grease a 9 or 10-inch tart pan. In a large bowl, add all of the crust ingredients and mix very well. Add the crust mixture to the tart pan and press down firmly into the pan, going up the sides just a tad bit. Bake for 15-20 minutes until golden brown.
Meanwhile, place the chocolate into a glass bowl and set aside. In a small saucepan, add the non-dairy milk and arrowroot starch and whisk very well to combine and remove any lumps. Over a medium-high heat, heat until it just barely starts to boil. Remove from the heat and add in the coconut oil and stir well to melt the coconut oil (if it wasn’t already) and to combine well. Pour the milk mixture over the chocolate and let sit a few minutes until the chocolate is melting, add in the vanilla extract, then stir very well for a few minutes, until the mixture is smooth, glassy and creamy.
Pour the chocolate mixture into the prepared crust and allow it to cool completely. Cover with plastic wrap and place in the refrigerator for at least 4 hours or until fully set. Pop the ring from the tart pan off, sprinkle with a small amount of high quality sea salt, cut into slices and serve chilled.
NOTE: Sprinkle the sea salt on just before serving. If you sprinkle the salt on before the tart has fully set, it will start to dissolve into the surface, I had sprinkled a small amount on after it had chilled a bit, but before it was fully set, since I didn’t really think about that happening. It did start to dissolve a bit, so I just sprinkled just a tad a bit more on top before serving and for taking photos.
[/print_this] -
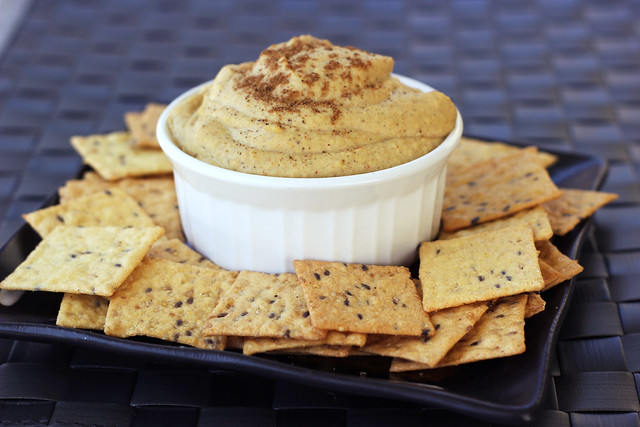
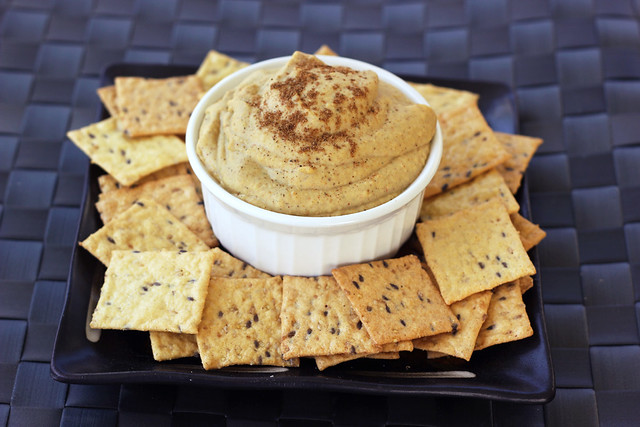
Creamy Indian-Spiced White Bean Dip – Gluten-free + Vegan
I am back home from our trip to California, we landed late last night and I am feeling insanely invigorated. We spent nearly a week out there, exploring neighborhoods and all the different towns, we went to the beach, we celebrated our 5-year wedding anniversary at Disneyland and fell even more in love with everything Southern California has to offer! This was the trip we needed to light that fire under our behinds to get the last few things done before we get our house on the market here in Buffalo and move out west! It is looking like our new home is going be in Long Beach, in a quaint little neighborhood by the beach. We cannot wait to start seriously looking for a house and to get this party started!
We are headed back to California in less than 2 short months for our good friends’ Patrick and Summer’s wedding, so who knows, maybe even by then we will have sold the house and be ready to start the whole process. I really hope so.
Ever since we decided to move out there, I told myself that given we would be living somewhere that has beautiful weather all year long, that I was going to be way more active outdoors. I want to get into running and biking as part of my weekly fitness routine, since both feel like a wonderful compliment to my daily yoga practice. Rather than waiting to get out there to start anew with so many things, I decided on the plane ride home that I was going to get started right away, particularly with the running since I have never really given it a serious shot. I have always found running to be painful and not my favorite way to sneak in exercise. But, the more I have read about running and getting started on a serious plan, it is best to ease your body into it and not try to do too much, too soon, which is probably what I have always done. So, I am going to take advantage of the beautiful spring and summer weather here in Western New York and start my training now, so I can hopefully just hit the ground running (pun intended) whenever we finally get out to the west coast.
Tonight is my first run, I have a good pair of Nike+ running shoes that I bought years ago and only ever wore to the gym, I have a couple of iPhone apps downloaded to help me properly ease into running, so they can tell me when and how I should be running and walking and for how long. I even have a running partner, my hubby, who is ready to get back into running himself. Now, the only thing I have to fear is my annoying low back issues. I tend to keep that all at bay with yoga and an incredible chiropractor, but I am a bit concerned on how the running will affect my back. I have a herniated disc in my low back that is known to cause me issues now and again and from what I have read about running, the pressure and the shock from it can sometimes be a bit hard on that type of injury. Here’s hoping I have strengthened my core and stretched my muscles enough from yoga, that my body can handle it. I really want it to work for me since running seems like the perfect compliment to my lifestyle, especially when we will be living so close to the beach.
My plan, if running and my body can agree on it, is to continue with my daily yoga practice, and getting to at least five 90-minute yoga classes a week, and now adding in 3 days of running. So, every day I will have some type of physical activity going on and on only a couple of days will I have to manage getting to the yoga studio and squeezing in a run, too. Even though yoga doesn’t always have to be a 90-minute thing, I really do prefer to have a practice that is that long and I really enjoy going to the studio. I practice at home on occasion, but I find since I work at home, it can be hard to focus on yoga and not get distracted by everything else around me. That is one thing about running I think I am most drawn to, the change of scenery, being outside and engulfed by nature and the elements and being in control of when, where and how it happens. As long as the weather cooperates and there is a safe and somewhat smooth surface, it seems like you can run virtually anywhere.
Do you like running? Have any tips for someone that is just getting started?
OK, so onto the dip… I made this dip this afternoon as a light snack. With us being gone for a week, I couldn’t wait to get home and get back to eating foods that I prepared. The food is the only downside to traveling for me, eating unprocessed foods that are gluten-free and as often as I can find, also vegetarian, can get a bit tricky when you are away. I did the very best I could and found so many great options, but I still ate so much different than I would ever eat at home. I debated doing a juice cleanse for a couple days after returning home, but with me wanting to start training for running, I didn’t think both were such a good idea, so I decided to start the running and just eat extra light this week. Now that our local farmers market is open for the season, I will definitely be stocking up there on Saturday and doing a lot of juices, smoothies and salads this week. This morning, I made a version of my banana almond butter smoothie for breakfast, adding in a scoop of ground flaxseeds and a scoop of cocoa powder and it kept me full all day. About 3:30pm I realized I hadn’t eaten anything since the smoothie and I had cleaned the whole house and totally unpacked my suitcase. I decided I would make a simple mid-afternoon snack and a creamy white bean dip was calling my name. The bold flavors from the Indian spices were so perfect and subtle and the garlic gave it all a great punch. The white beans made for an incredibly smooth and creamy dip that was delicious on some gluten-free crackers. I wish we had some fresh raw veggies, those would also be great in this dip. That is the other bad thing about traveling, coming home to an empty fridge. If you don’t love garam masala, substitute some yellow curry or another one of your favorite spices. If the heat from the garam masala and the raw garlic is enough, skip the chili powder.
I will check back in tomorrow with a new recipe and to let you know how the running went this evening.
[print_this]Creamy Indian-Spiced White Bean Dip – Gluten-free + Vegan
makes about 1 cup of dip- 1 can white beans
- 1/2 teaspoon garam masala powder
- 1/4 teaspoon turmeric powder
- dash of chili
- 1 clove garlic, peeled and very roughly chopped
- 1/4 teaspoon sea salt
- 1 tablespoon fresh lemon juice
- 1/4 cup olive oil
Add of the ingredients, except the olive oil, to the food processor. Start pureeing and slowly drizzle in the olive oil while the processor is running, until it is all added. Puree the dip until smooth and creamy. Serve immediately or store in refrigerator and serve chilled. Keeps in the refrigerator for up to 3 days.
[/print_this]
-
Double Fudge Candy Cane Cupcakes – Gluten-free, Dairy-free

I know Christmas has come and gone now, but I still wanted to share these delicious cupcakes with you. I made these for Christmas Eve dinner and they were a huge hit, my 2-year old niece took one bite of the one I was about to eat and ran off with it before I even took a bite! They are super fluffy and moist with a perfect balance of chocolate gooey-ness inside and a bright peppermint burst from the peppermint extract inside and the candy cane bits on top. I told you I have been on a chocolate peppermint kick! I adapted Elana’s Almond Fudge Cupcake recipe from her cupcake cookbook, substituting peppermint extract for the almond extract. I really wanted a strong peppermint flavor so I kept it at the 1 tablespoon, but I actually think it could use a bit less (use your judgement). I cannot get over how incredible and simple Elana’s cupcake recipes are, in terms of flours and starches, these delicious treats only had almond flour and coconut flour, that’s it – no gums, no starches, no oil or butter, it is so simple. I, once again, also used Elana’s vegan chocolate frosting recipe from her cookbook, because I absolutely love how simple it is to make and I almost always have everything on hand to just whip it up quickly. If you are gluten-free and you don’t own Elana’s Gluten-free Cupcakes cookbook, you need to get it ASAP!
I want to note that I have almost completely stopped baking with agave nectar since I learned a few months ago that even though it is an unrefined vegan sugar-alternative, naturally coming from a cactus plant and having a low-glycemic index, it has been discovered it is very high in fructose and it’s affects on the body are very similar to that of high-fructose corn syrup. Yes it is true that sugar is sugar no matter what the source and I know everyone has their own opinions on all sugars and sugar alternatives and it is also true that no sugar is truly good for you, per se. I just personally try to limit my sugar intake (no matter what the source) and be smart when I do use sugar and sugar alternatives, choosing things that I know work for me, like dates or bananas to sweeten things like smoothies, cookies and muffins, naturally whenever possible or choosing coconut sugar, honey or maple syrup when those won’t work in baking, etc. There are times when a recipe is best made with sugar and I will obviously go that route and in this particular recipe since I was adapting a recipe from Elana’s Pantry, who uses agave nectar quite often, I decided rather than experimenting, to just keep the recipe as is in that way and use the remaining agave I had in the pantry from before. I figured it was best to keep the recipe with it’s original ratios, to avoid a Christmas eve cupcake failure. Leanne from Healthful Pursuit has a wonderful video here about healthy alternative sweeteners.
The holiday celebrations continue for us until New Years Day, so I hope to be making other goodies in the next few days. We have dinner with the family tonight, a big Greek feast with souvlaki and avgolemono soup, I am not doing any of the cooking or baking for tonight, but we are heading down to Kentucky later this week to visit with Mark’s family and celebrate Christmas and New Years there, so I plan to make some healthy treats for us all to munch on then.
I hope everyone had a wonderful Christmas Day, hanukkah or whatever you celebrate! Did you make any special treats for the holidays? Are your holiday celebrations continuing this entire week, like ours?
[print_this]Double Fudge Candy Cane Cupcakes – Gluten-free, Dairy-free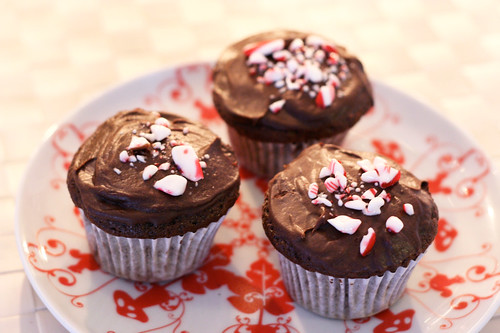
makes 12 cupcakes
Adapted from Elana Amsterdam’s Almond Fudge Cupcake recipe from “Gluten-Free Cupcakes – 50 Irresistible Recipes Made with Almond and Coconut Flour”1 cup blanched almond flour
2 tablespoons coconut flour
2 tablespoons unsweetened cocoa powder
1/4 teaspoon sea salt
1 teaspoon baking soda
4 large farm-fresh brown eggs
1/2 cup honey (maple syrup or agave nectar
1 tablespoon peppermint extract (use less here if you want the peppermint flavor to be subtle)
1/2 cup dairy-free mini dark chocolate chips (73% cacao)
1/4 cup crushed candy canes (corn syrup free, if you can find them)Preheat the oven to 350ºF. Line 12 muffin cups with paper liners.
In a large bowl, combine the almond flour, coconut flour, cocoa powder, salt and baking soda. Set aside.
In a medium bowl, whisk together the eggs, agave nectar, and peppermint extract. Blend the wet ingredients into the almond flour mixture with a handheld mixer until thoroughly combined, then stir in the mini chocolate chops.
Scoop 1/4 cup of the batter into each prepared muffin cup.
Bake for 20 to 25 minutes, until a toothpick inserted into the center a cupcake comes out with just a few moist crumbs on it. Let the cupcakes cook in the pan for 1 hour, then frost (see below recipe), sprinkle with candy cane bits and serve.
Chocolate Frosting
6 ounces dark chocolate chips (73% cacao) (about 1 heaping cup)
1/2 cup Spectrum all-vegetable shortening (I use Spectrum sustainable organic palm oil shortening)
1/4 cup raw honey (maple syrup or agave nectar)
1 tablespoon vanilla extract
2 tablespoon water
Pinch of sea saltHeat the chocolate in a medium saucepan over a very low heat, melt until it is smooth. (You can also melt them in the microwave in a medium glass microwave-safe bowl). Allow the pan or bowl to rest on the counter for 5 to 10 minutes to cool the chocolate to room temperature.
With a handheld mixer, blend in the shortening, then blend in the agave nectar, vanilla extract, water and salt until smooth. Place the saucepan in the refrigerator for 3 to 8 minutes, until the frosting is spreadable.
If the frosting gets too stiff to work with, reheat the pan very briefly over a low heat and stir until it is softened. If the frosting is too runny, place it back in the refrigerator until it firms up.
Use the frosting immediately or store in a glass Mason jar in the refrigerator for up to 3 days.
[/print_this] -
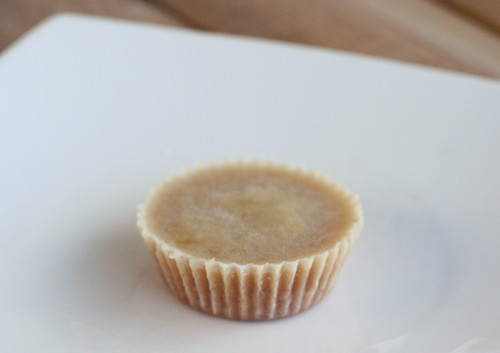
Pooch Friendly Ice Cream

This is a little bit different of a post. It is still gluten-free, unprocessed and healthy, but this one isn’t for humans, it’s for our little furry baby, Seri, who turned one yesterday! I decided as a little treat, I had to make her something special to celebrate. In the past I used to bake different goodies for our last dog, Derby, like whole wheat peanut butter treats and one time I even made her a special dog-friendly birthday carrot cake. I decided to do something a little different this time because Seri is on a grain-free diet. Yes, even my dog is gluten-free. Also like me, she doesn’t eat any processed foods. In addition, she eats a fully raw meat diet all of the time. Seri has had some minor itchy-skin/allergy issues in the past, nothing major at all, but enough for us to want to make sure she was eating THE very best. After consulting with a holistic vet and our breeder and some trial and error with different foods and ingredients, we have found the things that work for Seri and those that don’t. We always make sure to avoid anything that could upset her little body, whether it be her daily food, an unnecessary medication or even a little treat. It’s incredible how much unnecessary processed junk is in most dry kibbles and biscuits, even the best brands are loaded with useless fillers and crap that they just don’t need. Just like us, it’s so bad for their health. Dogs are carnivores and they need meat.
Since Seri eats raw bison for breakfast and dinner every day and her treats are usually some other type of dehydrated raw meat, it was really hard to think of something super special for her birthday as a treat. Since I couldn’t really bake any treat from grain, I decided to experiment with ingredients that I knew were safe for her.
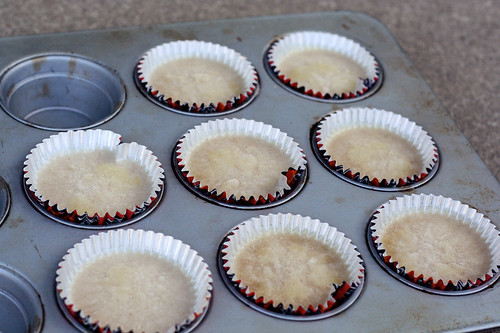
I didn’t want her to get a large portion of whatever special treat I was going to make, so I made small little muffin-cup sized portions, so I could control how much fat she would consume, since we all know what can happen if a dog gets a lot more fat than usual.
Since dog’s are unable to process the lactose in milk, I made the base of the ice cream from almond milk. (If you know your dog has a sensitivity to nuts, or you aren’t sure, you can just go with a simple chicken or beef broth.) I included the coconut oil because in moderation, it is so great for your dog’s health. There have been many studies and countless articles written about the healthy benefits of coconut oil, for both humans and dogs. Additionally, it is great for dogs with allergies and itchy skin. It can also be used topically on any hot spots they may develop. We alternate the coconut oil with salmon oil on Seri’s food each night. If your dog is sensitive to fats, consider skipping the oil or going with a very small amount. Seri goes absolutely nuts for coconut oil, she loves it! That and peanut butter. She rarely gets peanut butter so it was another nice treat for her birthday ice cream.
Seri absolutely loved her birthday ice cream. She couldn’t eat it fast enough! I love now that with having the individual servings, ready in the freezer, whenever I want to give her a little treat, they are ready.
I realize this post may make me seem like a crazy dog person, but in our family, our pets are our life, we would do anything for them and we are willing to make sure they get the very best. I know not everyone is like that, so you may think I am insane. I am pretty ok with that.
Pooch Friendly Ice Cream
makes approximately 8 muffin-sized frozen dog treats2 cups organic unsweetened unflavored almond milk (you can certainly use homemade here, just skip the sugar and vanilla when you make it)
1 tablespoon organic unrefined virgin coconut oil
2 tablespoons organic natural creamy peanut butter
(you could have fun with other dog-safe ingredients like shredded carrots, beef or chicken broth, pieces of their favorite unflavored/unspiced meat, etc)Line a regular sized muffin tin with foil or paper muffin cup liners. Depending on how full you fill them, you can make more or less than this recipe calls for.
Combine all of your ingredients in a large mixing bowl. If the peanut butter was in the refrigerator and is a bit solid, microwave it for about 10-15 seconds to soften it up a bit, to make mixing easier. Using a hand mixer or stand-up mixer, thoroughly combine the three ingredients. Ladle the ice cream mixture into each muffin cup, filling to about 3/4 of the way full. (Again, if you want more, smaller treats, fill them up less or use a mini-muffin tin. If you want less, larger treats, fill them up more.) Place the entire muffin tin in the freezer and allow the mixture to freeze until solid, about 8 hours or so.
When the ice cream treats are frozen solid, you can pop one of out of the tin, peel of the paper muffin cup and give it to your dog. You can remove the remaining treats from the muffin tin and put them in a freezer safe ziplock bag or plastic container.
** Obviously I am not a veterinarian, so please don’t take any of what I am feeding our own dog as a medical advice for your pooch. We just know what works and what doesn’t with Seri. Every dog’s sensitivities are different. If you know your dog cannot have one of these ingredients, go with something else **


