-
How-to Make Homemade Nut Butters

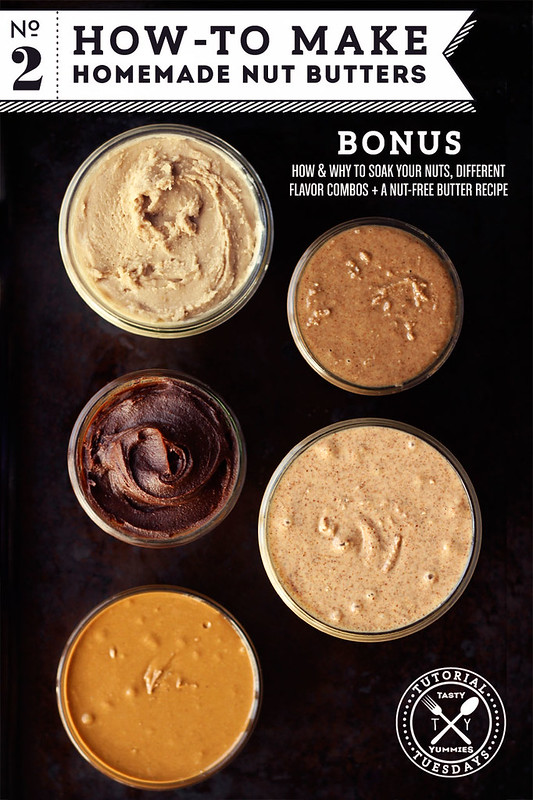
How-to Make Homemade Nut Butters
I am so excited about this next post in the Tutorial Tuesday series. It has been quite the undertaking sampling, soaking, dehydrating and playing with different flavors but it is so easy and so totally worth it to make your own homemade nut butters. OK, so I may have gone a little overboard, but hopefully all of your nut butter questions have now been answered.
Besides the simple how-to instructions, I wanted to include some insight as to why I recommend soaking your nuts and seeds, how to also dehydrate them after you have soaked them and all of the various times for doing so. Plus, you will find some various flavor combinations that I love and even a nut-free sunflower seed butter recipe. Hope you guys enjoy.
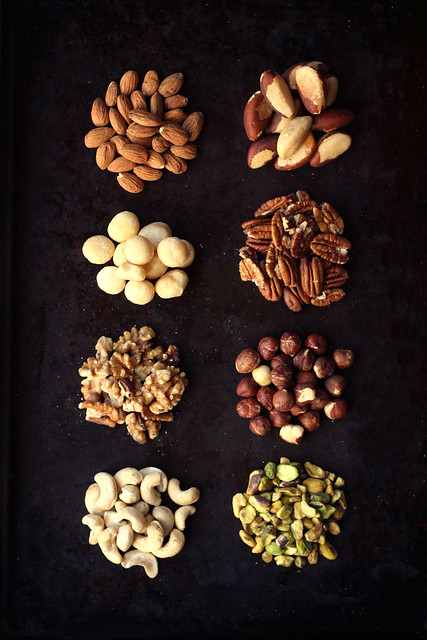
What Nuts?
Basically if it’s a nut (and even many seeds) and you like it, you can make a butter out of it. I have sampled so many different types of nut butters and the sky is the limit. I wish I could afford to buy enough of each of the nuts pictured to sample making nut butters with all of them for you guys, but that is certainly out of the budget when buying organic. So for this tutorial, I just went with a couple of my personal favorites. Almond, cashew, pecan, hazelnut (in a homemade nutella) and I even made a nut-free sunflower seed butter for you.
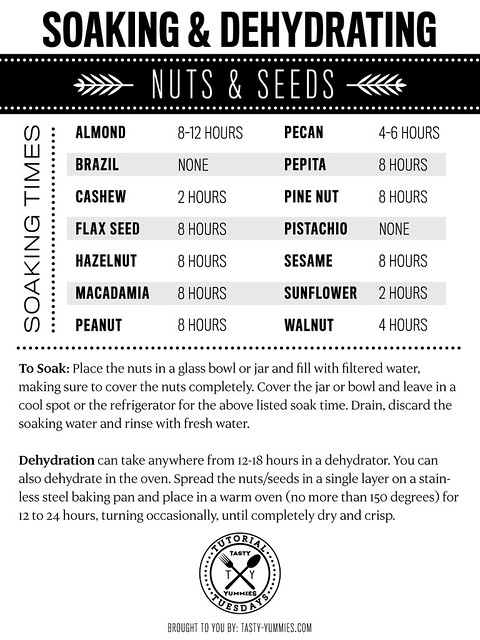
To Soak or Not To Soak.
Why I Choose to Soak: Most nuts, seeds, grains and beans are covered in natural chemicals – enzyme inhibitors and toxins – that protect them while growing, both from sprouting prematurely and also from predators. These nutritional inhibitors and toxic substances are enzyme inhibitors, phytates (phytic acid), polyphenols (tannins), and goitrogens. Once harvested, those same chemicals, the major one being phytic acid – are indigestible to the human body and must be broken down before consumption. When food containing phytic acid is consumed, the acid combines with important minerals like calcium, magnesium, copper, iron and especially zinc in the intestinal tract and blocks their absorption which inhibits our digestive systems’ ability to break the nut down properly.
The very simple process of soaking releases these chemicals, helping you to absorb your food’s essential minerals and nutrients. Additionally, by soaking the nuts with the removal of these nutritional inhibitors and toxic substances, the flavor and taste is much more ideal and appealing.
To summarize: Soaking nuts and seeds makes them easier to digest and improves their flavor. Read the rest of this entry »
-
Homemade Honey Lemon Lavender Face Scrub
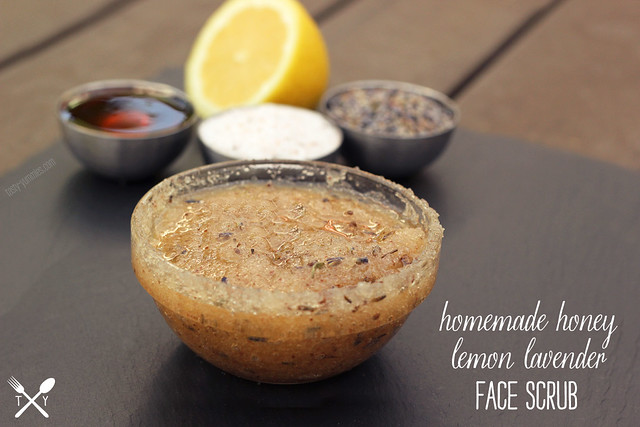
As I mentioned in my recent post, I have switched to a brand new skin care regimen with Peacock Apothecary that is all natural, handmade to order, all of their products are free of any chemicals and preservatives and locally sourced when possible, etc. Additionally, as part of my routine I am still using my homemade apple cider ginger toner every time I wash and I added in a homemade exfoliant that I use twice a week, at the recommendation of the girls at Peacock Apothecary.
This recipe is something I can put together very quickly and simply. I make up this small batch and keep it in the shower for the week. I have been loving how my skin feels after this gentle scrub, it is smoother than ever and I feel like my skin is as clean as it ever could be. It is super gentle and the scent is so soothing and calming.
Here is my current skin care routine:
Daily in the morning:
Wash with Coconut Milk cleanser from PA,
Tone with homemade apple cider vinegar toner
Moisturize with citrus serum from PADaily in the evening: Wash, toner, serum (same products as above)
Twice a week I use this scrub in the evening (or morning if that works better with my schedule) and at least once a week, more if needed, I make a probiotic mask.
Also, when using my face cleanser, twice a week, in the evening, on opposite days of when I use this face scrub, I use my Clarisonic Mia.
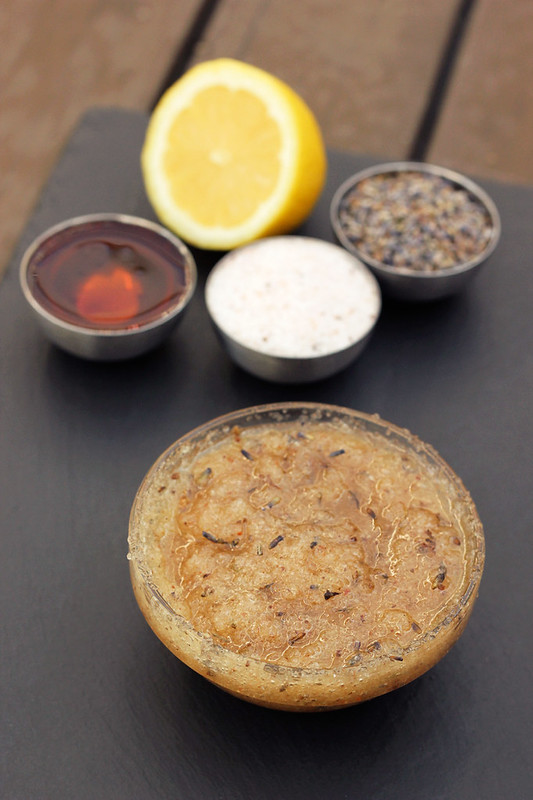
[print_this]Homemade Honey Lemon Lavender Face Scrub
- Juice from 1/2 organic lemon
- 1 tablespoon honey (I used local raw honey, in its liquid state)
- 1/4 cup sea salt (I used pink Himalayan sea salt)
- 2 teaspoons dried lavender
- 15 drops lavender essential oil
Add all of the ingredients to a small bowl, mix well to combine. To use: Mix the ingredients until well blended and massage on a damp face. Rinse well with warm water and finish with a splash of cold. Though the scrub’s nicest when used fresh, you can keep leftovers for up to a week or so.
[/print_this]
-
How-to Make Homemade Essential Oil Insect Repellent Spray
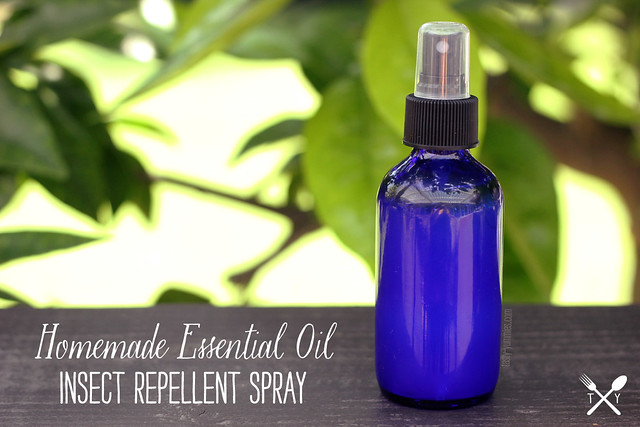
I am not sure why, but I seem to be one of those people that always gets bit up by bugs, even when no one else is. I can be in a group of 5 or 6 other people and I will seemingly be the only one. I must taste really good. It must be all that healthy, real food! After getting bit up pretty good, the first few weeks of summer, I was determined to do some research and make my own homemade essential oil insect repellent spray.
There are many essential oils, known for being excellent natural insect repellents.Here are just some of them: Citronella, Clove, Lemongrass, Lemon Eucalyptus, Cedarwood, Rosemary, Tea Tree, Eucalyptus, Cedar, Catnip, Lavender, Peppermint, Basil, Rose Geranium, Cinnamon Oil, Thyme, Lemon, Orange, Pine
Many of these different essential oils work especially well for specific pests, according to the research I have done, here are some of the more well known pests and essential oils that work as repellents for them:
Mosquitos – citronella, lemon eucalyptus, peppermint, lemon, eucalyptus, catnip, basil, clove, thyme, lemongrass, geranium, lavender
Fleas – cedarwood, citronella, eucalyptus, tea tree oil, lemongrass, lavender, orange, pine,
Ticks – rose geranium, juniper, rosewood, thyme, grapefruit, oreganoSome studies have also shown, additional effective ingredients include: Neem Oil, Soybean Oil, Vodka, Garlic and Vanilla Extract
-
Joyful Almond Coconut Chocolate Bites – Vegan + Gluten-free (Refined Sugar-free Option)

This month for my ongoing series with the Free People Blog, BLDG 25, in celebration of Halloween I am sharing a series of healthy sweet treats. I always feel like the sugary stuff haunts me this month with Halloween looming on the calendar, it seems everywhere I turn there is some sweet treat lurking in the darkness.

I really don’t find myself actually craving sweets very often, but boy, this month I do. There are halloween inspired sugary treats everywhere you turn and most all of them are terrible for you, loaded with refined sugars, high fructose corn syrup and other processed junk and fillers.
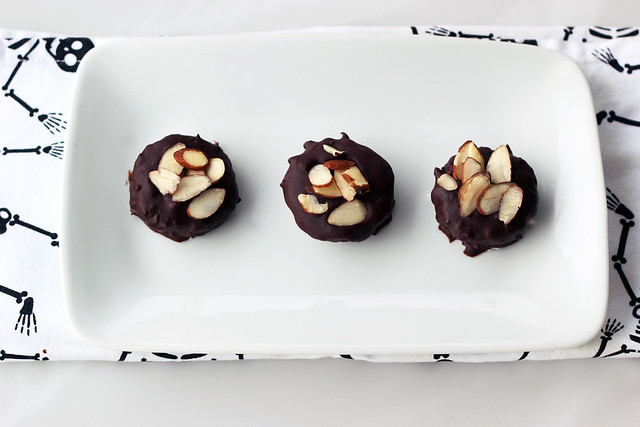
So, why not have your cake and eat it, too? Or candy, or fudge, or whatever! First up in the series, I reimagined a classic candy bar that I have always loved. The combination of coconut, chocolate and almonds is a favorite of mind. It’s a joy to eat, if you catch my drift.
These treats bear a spooky resemblance to the original, but without all the yuckiness that will haunt you later. See, all treats, no tricks! What more can you ask for to kick off Halloween month?
And truly, is there anything better than dark chocolate and coconut together? I think not. A marriage made in heaven!! These Joyful Almond Coconut Chocolate Bites may have been inspired by Almond Joys, but they are so so much better!!


Joyful Almond Coconut Chocolate Bites - Vegan + Gluten-free (Refined Sugar-free Option)
gluten-free, paleo, vegan, dairy-free, egg-free, nut-free option, keto-optionPrint Pin RateServings: 12 treatsIngredients
Coconut Filling:
- 1 ¼ cups unsweetened organic coconut, finely shredded
- ¼ cup melted coconut oil
- 2 tablespoons maple syrup, you could also use honey, a few drops or stevia or liquid monkfruit
- 1 teaspoon vanilla extract
Dark Chocolate Coating*:
- 10 ounces of high quality dark chocolate, 85% dark is my choice*
Optional:
- Plus: approximately 1/3 cup toasted almond slices
Instructions
- Lightly grease a nonstick mini-muffin tin with a little coconut oil and set aside. In a medium-sized mixing bowl, combine all of the coconut filling ingredients and mix together until very well combined. Evenly divide up the filling between the 12 mini-muffin cups, pressing it in very tightly, making sure it is somewhat even. Don’t worry they won’t stick. Place the muffin pan in the freezer make sure it is sitting flat, and freeze until the filling is solid, about 30-45 minutes.
- Take the muffin tin with the frozen coconut mixture out of the freezer, carefully remove each coconut treat out of the pan, running a thin knife around the edge to loosen and pop them out. Place them on a parchment or wax paper lined baking sheet, if you want to place the pan back in the fridge to keep them cool while you melt the chocolate, you can do that.
- Once you are ready to coat the treats with the chocolate you can carefully melt the chocolate using a double boiler setup on the stove top or you can carefully melt it in small increments in the microwave, stirring often. (Definitely use the double boiler if you are making the refined sugar-free version with the bakers chocolate).
- Turn off the heat on the stove and keep the bowl of chocolate over the pan, remove the coconut treats from the fridge. Place one coconut treat on a fork and slowly lower it into the chocolate, spoon additional chocolate over it to fully coat it. Lift the fork out and gently shake to release any of the excess chocolate. Scrape the bottom of the fork along the side of the bowl and place on the lined baking sheet. Sprinkle a few toasted almond slices on top into the chocolate. Repeat until all of the treats are coated in chocolate and have almonds on top. If the chocolate gets too thick, you just turn on the flame and heat slightly to melt it again.
- Put the tray back in the fridge and let them harden for about 45 minutes.
- After these are set, you could store them in the freezer to keep them really cold and totally solid or of course, you can just store them in the fridge or even at room temperature if it isn’t too hot out.
Notes
*NOTE:
You can also use semi-sweet or bittersweet chocolate chips or stevia sweetener dark chocolate or chocolate chips.
Or n place of chocolate chips or dark chocolate, you can instead melt 10 ounces of a good quality 100% unsweetened organic dark chocolate (aka bakers chocolate in bar form) with 1 tablespoon coconut oil in a double broiler and whisking in 1/3 cup maple syrup, honey (or other liquid sweetener of your choice, a few drops of stevia, etc) after it is removed from the heat. You can then add more sweetener to your liking, if needed.This recipe was originally shared on the Free People Blog.


