-
How-to Make Roast Chicken in the Slow Cooker

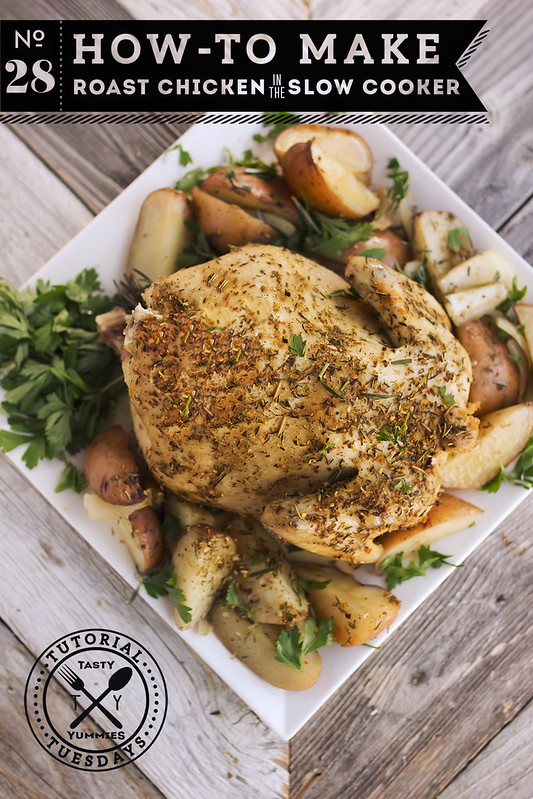
This tutorial falls under the category of simple, yet sweet. Or should I say, simple, yet savory! This is the perfect weeknight meal solution and as of recent, it is a near weekly occurrence in our house. I grab a fresh 3-4 lb whole pasture-raised chicken at the farmers market or Whole Foods, I rub it down, season it up, pile it atop some root veggies in the Crock Pot and voila, 4 hours later, dinner is ready.
The best part of a weekly whole chicken is how many meals we get from it. The meal from the whole roasted chicken is good for at least 2-3 meals, we enjoy it with the potatoes, as chicken salad, on top of big green salads, etc. Then I make a big pot of stock from the leftover bones and we get another 2-3 meals from that. This is truly a must for any busy family.
The seasonings on your chicken can vary with your preference and your mood. Generally I use this all-purpose herb and seasoning blend, that I love, occasionally I will opt for a spicy, chile pepper rub, it’s also great with lemon zest, garlic and freshly ground black pepper. The possibilities are endless. Seriously, you will never buy that rotisserie chicken from the store, again.
-
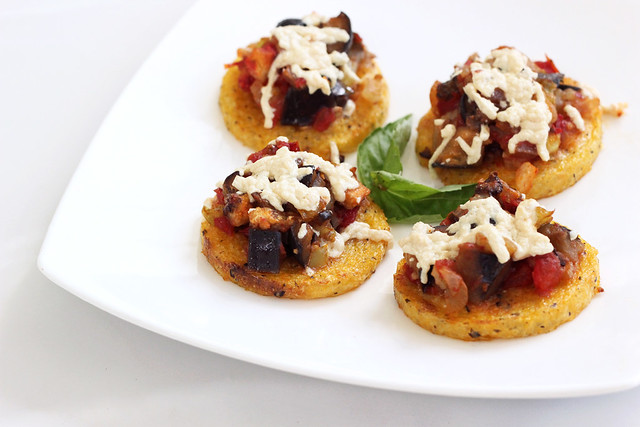
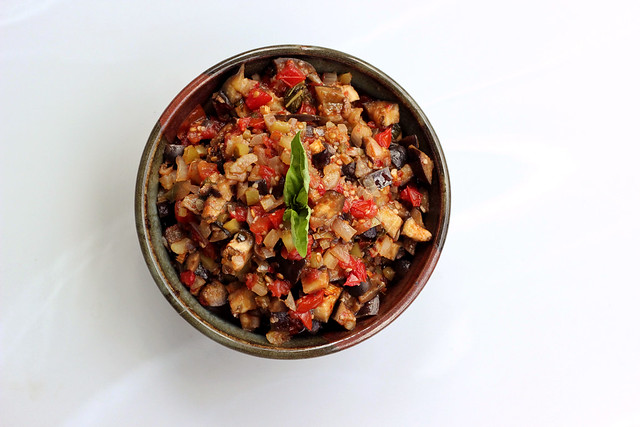
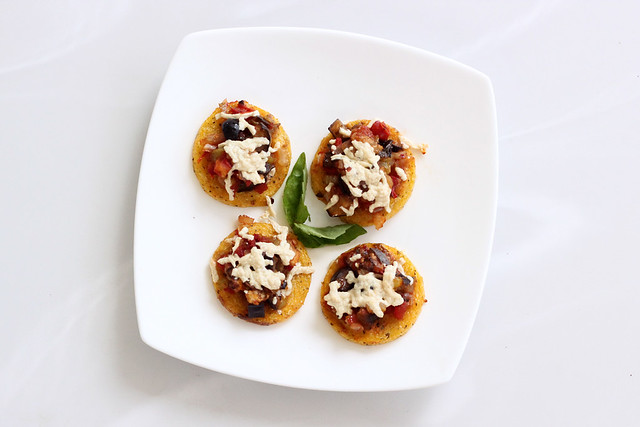
Polenta Rounds with Eggplant Caponata – Gluten-free + Vegan
I am excited to be guest-posting another series of recipes on the Free People blog BLDG 25. This month the theme just so happens to be gluten-free, so I get to really go nuts!
All of the recipes I am sharing will celebrate the seasonal foods of now with simple, easy to make delicious foods! The first recipe is simple and comforting polenta rounds with a flavorful eggplant caponata. I made them vegan by just using a small sprinkle of vegan Daiya “cheese” on top, if you aren’t vegan or dairy-free, feel free to use parmesan or mozzarella.
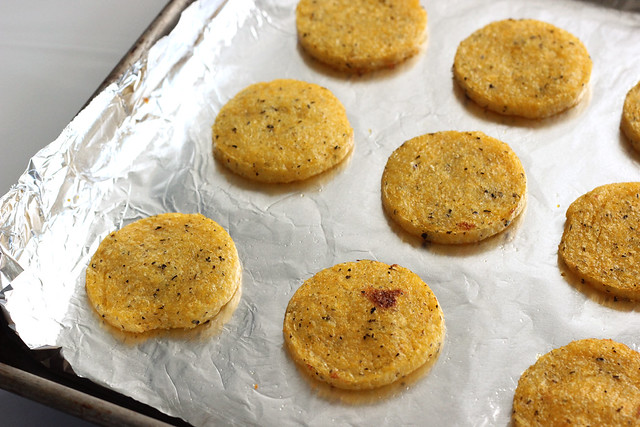
These polenta rounds are a perfect bite sized snack or appetizer or they are also great as a meal with a delicious green salad on the side. The eggplant caponata is also delicious tossed with pasta or layered as a sauce on a pizza. There is a bit leftover when you make these, so you can get creative!!
Head on over to the Free People blog now to get the full recipe for these Polenta Rounds with Eggplant Caponata
-
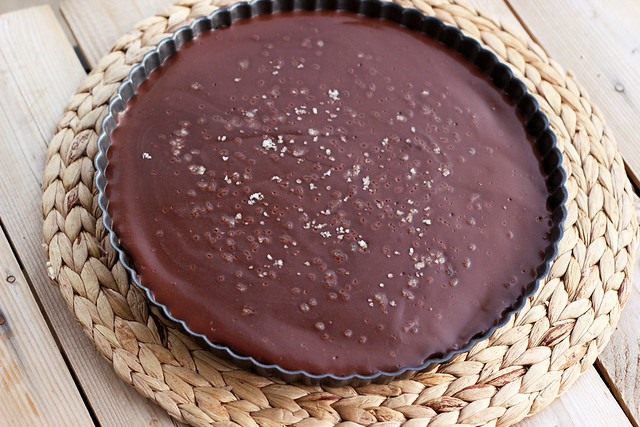
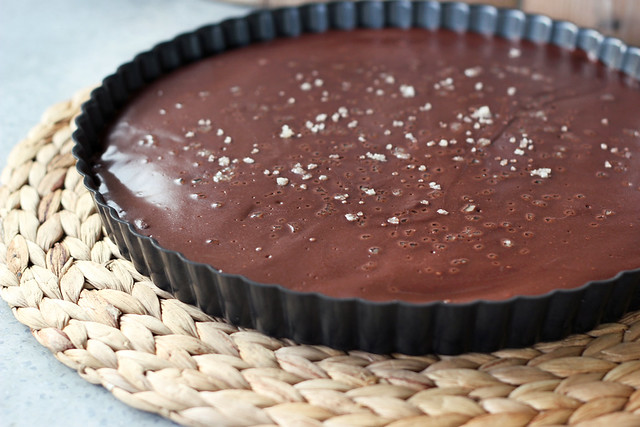
Salted Chocolate Tart – Gluten-free, Grain-free + Vegan
When you are craving something very specific and you want it just how you envision it in your own head, there is nothing left to do but to just figure out how to make it yourself.
I had been wanting a delicious but not too rich simple chocolate dessert, with just a touch of saltiness. There is nothing better than a good quality chocolate treat and tad bit of good quality sea salt. Yum, one of my very favorite things. I decided to just write up a recipe first, that I thought would work and just play it by ear, adding things as I went if I thought it needed it and then hope for the best. I find this to be one of the best ways to cook and bake and I am pleasantly surprised at how often it actually works out.
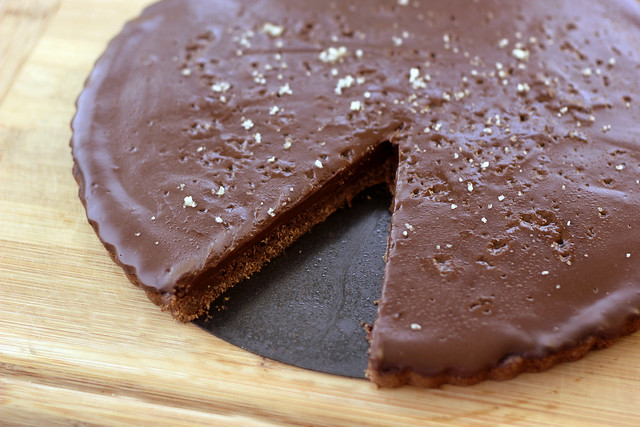
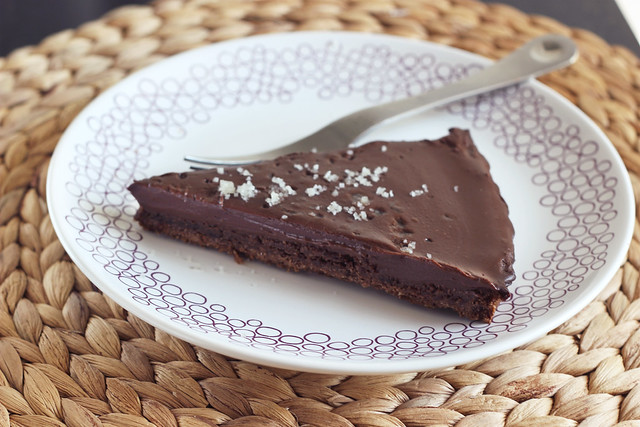
This tart was super simple to make and it was exactly what I was looking for. A slightly crunchy and nutty crust that needs the littlest bit of baking and a super creamy and velvety filling that is the perfect amount of richness, without going overboard and crossing into the world overly heavy and too rich. One of my biggest complaints of so many desserts. The sea salt on top is so perfect, both in how it looks on top of the glossy chocolate and the delicious treat that it provides your taste buds.
I ended up melting some dairy-free semi-sweet mini chocolate chips (from Enjoy Life) that I had on hand in my pantry, but you can also just use your favorite bittersweet chocolate, coarsely chopped for melting. If you want to make this refined sugar free, you could also try melting unsweetened bakers chocolate, and sweeten it to your liking with whatever you choose, such as stevia, maple syrup, palm sugar, etc.
I am super excited at how simple the crust was on this tart, I definitely plan to make some really fun tarts this spring and summer with this recipe
[print_this]Salted Chocolate Tart – Gluten-free, Grain-free + Vegan
serves 8 to 10Crust
- 2 cups almond flour, aka almond meal
- 2 tablespoons flax seed meal
- 2 tablespoons maple syrup
- 2 tablespoons cocoa powder
- 2 tablespoons coconut oil, melted
- 1/4 teaspoon baking soda
- 1/8 teaspoon salt
Filling
- 10 ounces non-dairy bittersweet chocolate, coarsely chopped (or dairy-free mini semi-sweet chocolate chips)
- 1 1/2 cups unsweetened non-dairy milk (I used a blend of coconut and almond milk)
- 1 tablespoon arrowroot starch (You could also use tapioca starch or corn starch)
- 2 tablespoons coconut oil
- 1 teaspoon vanilla extract
- High quality sea salt for topping (see below note)
Preheat oven to 350º. Lightly grease a 9 or 10-inch tart pan. In a large bowl, add all of the crust ingredients and mix very well. Add the crust mixture to the tart pan and press down firmly into the pan, going up the sides just a tad bit. Bake for 15-20 minutes until golden brown.
Meanwhile, place the chocolate into a glass bowl and set aside. In a small saucepan, add the non-dairy milk and arrowroot starch and whisk very well to combine and remove any lumps. Over a medium-high heat, heat until it just barely starts to boil. Remove from the heat and add in the coconut oil and stir well to melt the coconut oil (if it wasn’t already) and to combine well. Pour the milk mixture over the chocolate and let sit a few minutes until the chocolate is melting, add in the vanilla extract, then stir very well for a few minutes, until the mixture is smooth, glassy and creamy.
Pour the chocolate mixture into the prepared crust and allow it to cool completely. Cover with plastic wrap and place in the refrigerator for at least 4 hours or until fully set. Pop the ring from the tart pan off, sprinkle with a small amount of high quality sea salt, cut into slices and serve chilled.
NOTE: Sprinkle the sea salt on just before serving. If you sprinkle the salt on before the tart has fully set, it will start to dissolve into the surface, I had sprinkled a small amount on after it had chilled a bit, but before it was fully set, since I didn’t really think about that happening. It did start to dissolve a bit, so I just sprinkled just a tad a bit more on top before serving and for taking photos.
[/print_this] -
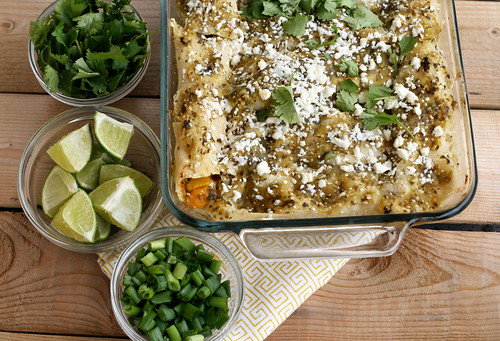
Butternut Squash Enchiladas with Tomatillo Sauce

Having a creative job means that sometimes you just can’t work. I know that sounds like an excuse, but when you are supposed to be creating something and you just don’t have any ideas, it’s quite hard to “work”. I am very lucky that we now work from home, so some days when that “creative block” happens – if I can’t find some silly administrative task like updating our webstore, shooting photos of new products or responding to emails, I can just walk away from my computer and get into any number of different things that are completely unrelated to work, like taking the dog for a walk, heading to a yoga class, watching TV, reading a book or magazine and my most favorite distraction from work… cooking! This week I have been feeling a bit stressed and the ideas just haven’t been flowing as freely. It has been a bit frustrating to say the least. We have a ton of work on the books right now, so it is no time to screw around or to just stare at a blank sketch pad. Wednesday, I decided rather than sitting at my desk with my sketchpad, that I would make our dinner early, so we could enjoy it for lunch and I could take photos when it was freshly cooked instead of trying to shoot them without daylight or shooting the leftovers the next day!
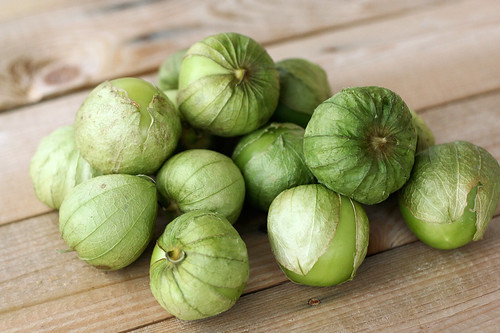
So, I got up at my usual 7am and started prepping the squash and the tomatillos for the sauce. Then I went upstairs for a few hours, it was the perfect boost that I needed and I started working on a poster design that I was stuck on and I made some major headway! It felt great. When lunchtime came, I scooted downstairs, preheated the oven, heated up the sauce and started assembling the enchiladas. I popped them in the oven and went back upstairs to work for a bit. When the buzzer rang, I ran down, took some photos and served my husband and our assistant the best lunch we’ve had since we moved the business home. It was actually really fun to eat a bigger meal in the middle of the day. It felt like the right time to eat that way.
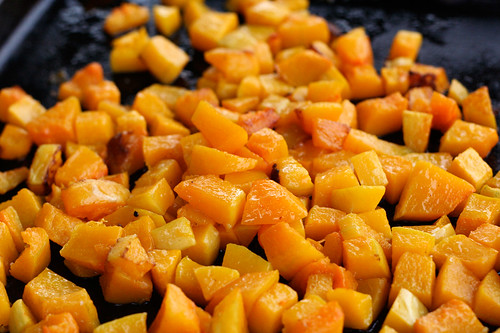
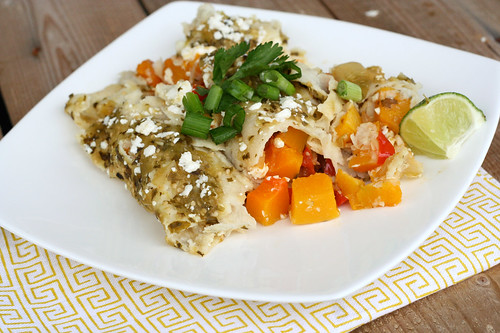
These enchiladas, besides being a burst of beautiful colors, are so full of delicious and bright flavors. The squash has a bit of a rustic nuttiness, the tomatillo has a bright almost citrus flavor to it, with a little bit of heat from the lemon drop peppers I added. I thought about adding black beans inside of the enchiladas, but ended up deciding against it since I thought they would just be bursting open. I think even though it would taste incredible, it would be too many things inside with the big hunks of squash. But I will likely make them that way at some point. I used a simple traditional Mexican crumbly white cheese called queso fresca, it was the perfect compliment and didn’t make the dish too heavy and gooey cheesy, which can be a bit too much for me, sometimes. They were delicious topped with a fresh squeeze of lime juice, fresh green onions and cilantro and a little dollop of organic low-fat sour cream. If you are vegan, you could definitely leave out the cheese or substitute Daiya for the queso fresco. Or if you can’t find queso fresco, you could go with a small amount of good quality sharp cheddar cheese.
I have made homemade tortillas in the past when making enchiladas and it is most definitely worth it, but since I didn’t really have an unlimited amount of time to make these, I decided to go with a high quality corn tortilla from the store. The key to making enchiladas keep their shape, is to steam the tortillas first, otherwise they will break apart a bit. I know this and I steamed mine, but I think they should have been steamed a bit more, some definitely fell apart just a tad when I rolled them up. I decided to just go with it, since I knew it would all taste the same, but some would just fall apart when I served them. Of course, the two that I decided to take a photo of did just that when I served them, but I kinda liked how rustic they looked and I love how you could see the color from the squash exploding out. So I said, screw perfection and just went with it! Life isn’t perfect, I’m not perfect and my enchiladas aren’t perfect – and I am OK with ALL of it! I embrace it.

Yesterday afternoon I had another one of those moments where I hit a creative road-block, for some reason this one hit me harder than ever. I actually felt sad over it and I let it beat me, a bit. I was working on a project that is seemingly very simple and should have an easy solution, but I was struggling. It broke me! I cried. I decided to take a step away “virtually” and move over to another project and then to editing the photos for this post. It definitely helped and today I am looking at it again with fresh eyes and I am ready to tackle it again. So I wanna hear from you….What do you do when you hit a creative roadblock?
Do you find cooking and baking to be a good escape from everyday life and your work or does it stress you out too much?
I’d love to hear your thoughts on how you get through when you are feeling stumped with a problem, creatively or otherwise. Share away!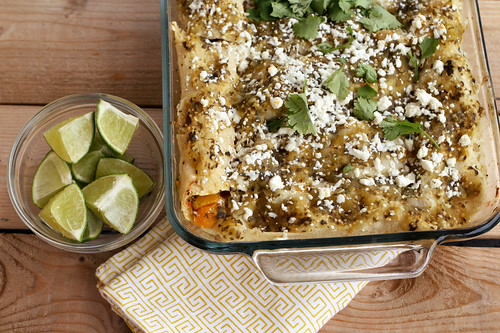
Butternut Squash Enchiladas with Tomatillo Sauce
serves 6Tomatillo Sauce
1 1/2 pounds of fresh whole tomatillos, husked and rinsed
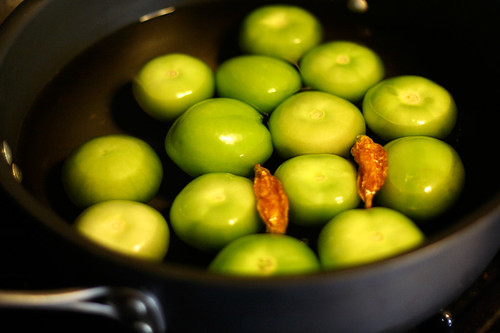
2 hot chiles of your choice, stems removed (I used dried lemon drop peppers from my garden) – you can skip this or just use one if you want it less spicy
enough water to cover the tomatillos
3 whole cloves garlic, peeled
1 handful of fresh cilantro (about 1/4 cup)
1/2 teaspoon kosher saltAdd your tomatillos and chiles to a large saucepan and cover with water. Bring to a boil over a medium-high heat, then reduce the heat and allow to simmer for approximately 5-7 minutes until the tomatillos are soft but still whole. If they aren’t all totally soft, no worries, still remove them from the heat and drain. Add the tomatillos and chiles to a food processor and add 2 cloves of garlic, fresh cilantro and salt, puree all the ingredients together and set the sauce aside.
Butternut Squash Enchiladas
1 – 2lb butternut squash, peeled, seeded and diced into 1-inch cubes
1 tablespoon plus 1 teaspoon extra virgin olive oil
1 red bell pepper, diced
1 yellow onion, diced
1 large garlic clove, minced
6-8 ounces queso fresco, crumbled (you can skip the cheese or use Daiya to make this vegan) – reserve approximately 1/4 cup for the topping
12 corn tortillasfresh lime wedges
fresh cilantro, roughly chopped
fresh green onions, thinly sliced
organic sour creamPreheat the oven to 400º, place the squash cubes on a rimmed baking sheet toss with 1 tablespoon of the olive oil and place into the oven to roast for 30-40 minutes until tender and lightly browned. Set aside when done.
While the squash is baking, add the onion, garlic, red bell pepper and a dash of salt to the teaspoon of olive oil in a medium pan over a medium-high heat, sauté. Cook for 5-8 minutes until the onion is translucent and both the onion and pepper are tender. Remove the vegetables from the pan and set aside in a bowl.
Use the same pan from the onion and pepper mixture to heat up your tomatillo sauce. Bring it to a simmer over a medium-heat and allow it to heat through and slightly thicken. Just about 5 minutes.
Once the squash is done, you are ready to start assembling your enchiladas.
Start by spooning a small amount of the tomatillo sauce into the bottom of a 9 x 13 inch baking dish (I used an 8.5 x 11 pan and it was a bit crowded, but it worked) – just enough to cover the bottom with a very thin layer.
You will need to steam the corn tortillas so that they don’t break when rolled. Moisten two paper towels, working in batches of 3 or 4 tortillas at a time, wrap the tortillas in the damp paper towels and microwave them for approximately 30-45 seconds. Once microwaved, dip each tortilla into the tomatillo sauce, one at a time, making sure both sides get coated in the sauce. Scoop a small amount of butternut squash cubes (probably about 2 tablespoons), the onion and pepper mixture and cheese, keeping in mind how much to use so that you can roll the enchiladas shut and also so you have enough to fill 11 more. Place the enchilada, seam side down, in the baking dish. Repeat until you’ve made as many enchiladas as you want or have filling for (this recipe made 12, with a small amount of squash and pepper mixture leftover).
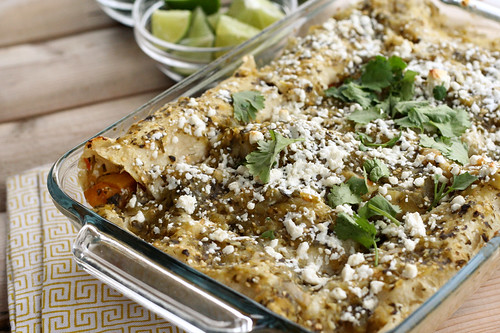
Spoon the remaining tomatillo sauce overtop all of the enchiladas and top with the remaining 1/4 cup of queso fresco.
Place the pan in the oven and bake for 30-40 minutes until the cheese is slightly melted, golden brown and everything is bubbling. Pull it out of the oven, sprinkle a bit of fresh cilantro on top to make it even prettier and allow it to cool for 5 minutes. Serve your enchiladas warm with fresh cilantro, fresh green onions and a squeeze of fresh lime juice, you can also add a dollop of organic sour cream, if you wish.
-
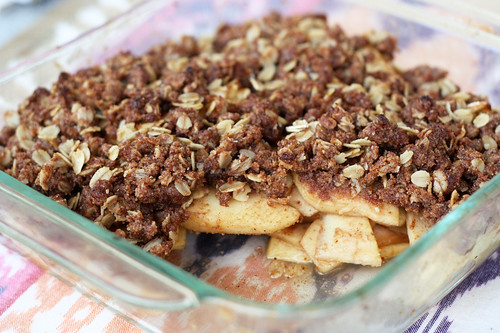
Apple Crisp (Gluten-Free and Vegan)
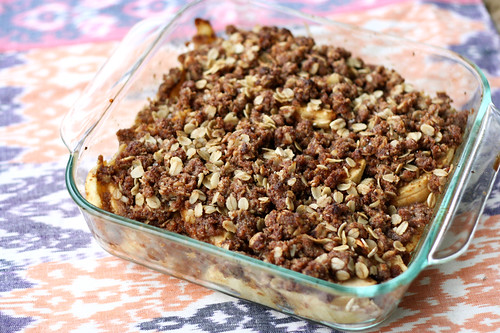
I absolutely love my mom’s apple crisp, it is one of my favorite things about fall! I have been making my own gluten-free version for a while now and it is so delicious. After I made the vegan apple cobbler two weeks ago with palm oil shortening instead of butter, I decided I wanted to make an updated and healthier version of the apple crisp, too. I’ve actually been calling it Apple Crisp 2.0, but I didn’t think that would make for a good title or dish name. This apple crisp is as healthy as dessert can get in my opinion – it is gluten-free, vegan, refined sugar-free, dairy free, egg free and corn free. Besides using organic all natural palm oil shortening in place of butter in recipes to make them vegan, I have also really fallen in love with baking with coconut oil. When solid, it makes a great replacement for butter in many baking recipes that call for cutting it in. The benefits of coconut oil are numerous and can be attributed to the presence of lauric acid, capric acid and caprylic acid, and its properties such as antimicrobial, antioxidant, antifungal, antibacterial, soothing, etc. It is great for your skin and hair when used topically and has been found to have anti-aging, regenerative effects. We even use it topically on and feed it to our dog, Seri, when she has itchy skin. She LOVES the way it tastes.
I was also excited to play with date sugar and maple syrup in this recipe instead of refined white or brown sugar. It turned out so perfectly sweet. Date sugar is totally unprocessed, unrefined and raw. It naturally contains fiber and is loaded with vitamins and minerals like calcium, iron, magnesium, phosphorus, zinc, iron, copper, manganese, and selenium. Because date sugar doesn’t melt the way sugar does, I knew I wouldn’t get that delicious syrup with the apples that I usually get with the brown sugar, so that is how I decided to add in the maple syrup. It was such a small amount, you can barely distinguish any maple flavoring, if any at all. Other options instead of the maple syrup would be rice syrup or molasses or if you aren’t vegan, you could also use honey. I am so excited about how this apple crisp turned out. It has so much flavor and I actually think it is better than any apple crisp I have made in the past.
You could serve this with your favorite vegan (or not vegan) ice cream or whipped topping. Something that I saw a while back on Healthful Pursuit that I have been meaning to try is coconut whip, which I think would be perfect on top of this recipe. I may just need to make that happen this week.

Gluten-free Apple Crisp (Vegan)
serves 6Filling:
- 4 cups of peeled and sliced apples (4 med)
- 2 teaspoon fresh lemon juice
- 1 tablespoon maple syrup
- 1 teaspoon vanilla
- 1/4 teaspoon ground cinnamon
- 1/4 teaspoon ground nutmeg
Topping:
- 1/2 cup blanched almond flour
- 1/2 cup certified gluten-free oats (I like Bob’s Red Mill Gluten Free Rolled Oats)
- 1 tsp ground cinnamon
- 1 tsp ground nutmeg
- 1/3 cup date sugar, coconut sugar or other granulated sugar of your choice
- 1 1/2 tablespoons maple syrup (1 for the topping and 1/2 to drizzle over the top)
- 1/3 cup coconut oil (make sure it is somewhat solid and not liquid)
Preheat oven to 375°F.
Place apples in an 8-inch square pan, pour lemon juice over. Add 1 tablespoon of maple syrup, spices and vanilla, toss around to combine.Mix almond flour, oats, spices, date sugar and maple syrup together in a medium sized mixing bowl. Cut in coconut oil in to make crumbly consistency.
Sprinkle over the apples, drizzle remaining 1/2 tablespoon of maple syrup over top and bake 30-40 minutes or until apples are tender and topping is golden brown. Serve warm.
-
Spicy Roasted Cauliflower and Chickpeas with Pine Nuts
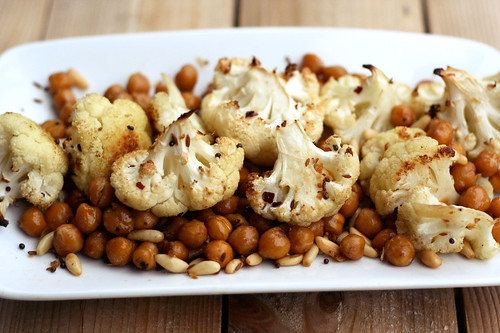
I know that I always carry on about my love of pasta on here, but you’d be surprised to know that for as much love as I have for those delicious carbs, I have an equal and unrelenting love for vegetables. I honestly cannot think of a vegetable that I don’t love. I love them raw, steamed, grilled, roasted, it doesn’t matter. After traveling and eating at restaurants, where many times the serving of vegetables on your plate, if they even give you one, is so tiny you can’t tell if it is an inedible garnish or a side dish, I come home with a craving for anything green, leafy or with a stem. One of my favorite things is to go to the farmers market and pick out new vegetables that I have never tried before and experiment with ways to cook them. This past Saturday we grabbed some of the usuals at the market, arugula, tomatoes, swiss chard, cauliflower plus this time I also bought a purple cauliflower, butter beets and a large bunch of perpetual spinach. The perpetual spinach and butter beets were both brought home for juicing and I haven’t yet decided what to do with the purple cauliflower, I will probably just make this dish again. After looking at all of those delicious veggies at the market, I wanted to come home and make a delicious vegetable feast for lunch, so I decided on this.
I love roasted cauliflower, even on its own with just olive oil, salt and pepper, it is so delicious. Add in one of my other favorites, chickpeas and you have a winner. Together with the spices, the high heat and a little olive oil, it gets beautifully browned, caramelized and it has a wonderful nutty and sweet flavor. This dish was inspired by all of the delicious spices I have been cooking with on this cleanse and I added in chickpeas for protein and fiber and the pine nuts for a nutty crunch, which I am a big fan of. We served this as a main dish, with nothing else so we ended up with 2 big servings, with a small amount leftover. This would be good just as side dish or for a real hearty meal, you could serve it over some brown rice, quinoa or even with some pasta.
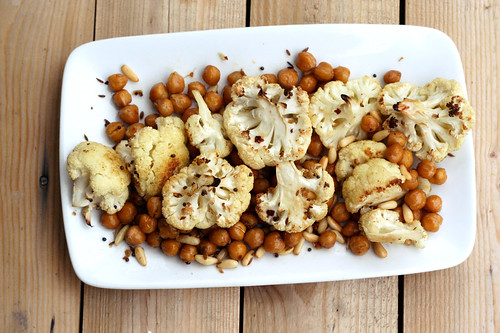
Spicy Roasted Cauliflower and Chickpeas with Pine Nuts
Serves 2 to 41 medium head organic cauliflower (about 2 pounds), cut into large florets
1/4 cup pine nuts
2 cups cooked organic chickpeas, drained and rinsed if canned
2 tablespoons olive oil
1 teaspoon whole cumin seeds
1 teaspoon whole mustard seeds
1 teaspoon finely minced, peeled fresh ginger
2 cloves garlic, finely minced
1/2 teaspoon sea salt
1-2 small red chiles, finely chopped, seeds removed for less heat (I used some dried korean heirloom red chiles from my garden)Preheat the oven to 450º.
Place the cauliflower, chickpeas and pine nuts on a large rimmed baking sheet. Add the spices, fresh ginger and garlic, salt and red chiles. Drizzle olive oil evenly over everything and toss gently to combine. Bake for 20 to 25 minutes tossing occasionally to ensure even cooking, bake until edges are golden brown, and the cauliflower is slightly tender,
Serve on its own, as a side dish or over rice for an entrée.
-
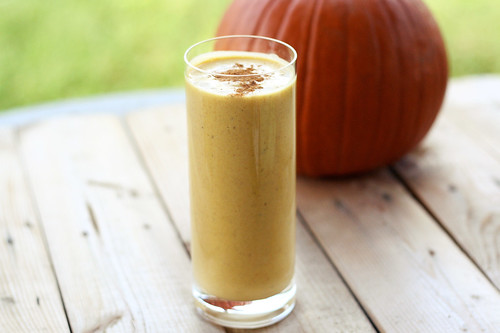
Vegan Pumpkin Pie Smoothie
I have to be honest with this post, I have been a little sad this week. I’ll tell you why in a moment, but first I have to preface with this – I try really, really hard to not complain. I despise relentless complainers and people who are negative. I have realized how hard it is to be around people who are constantly in that state, it’s both draining and sad. I have hit that point in my life before and I truly think it’s a downward spiral, it can affect both your mind and spirit and I firmly believe it affects your health. Nowadays, when I start drifting in that direction, I try to acknowledge when I am feeling sad or negative, to pinpoint where it is coming from, deal with it, let it out privately (and maybe a little to Mark) and move on. Sitting around and complaining about things you are unhappy about doesn’t change them or you, it simply makes it all seem so much worse. It also starts to push the people who love you, away. You are the only one that can control your life and the decisions you make, if you are unhappy with a situation, a person or how you are feeling, doing something to change it. Even what seems to be the littlest, most insignificant action is better than doing nothing at all.
So back to why I am feeling sad, Saturday afternoon I was in my kitchen at home, baking pumpkins from the market, so that I could puree and freeze the flesh and toast the seeds for a yummy fall snack. As the last pumpkin was finishing baking, I was loading the dishwasher with all the dishes I had used, I hate a messy kitchen. As I was bent over the dishwasher and was standing up, I sneezed so violently at that same moment and instantly felt pain in my low back. It was excruciating. So much so that I had to call Mark into the room to help me down to lay on the floor of the kitchen. I don’t think I am a wuss about pain, I try really hard to be tough. Prior to this, probably the worst injury I can recall is when I broke my foot in college and I cried much, much harder when this happened to me on Saturday afternoon. Saturday and Sunday were quite rough, I needed help standing up, sitting down and getting up the stairs. I couldn’t roll over in bed. It sucked, there really is no other way to say it.
I emailed my amazing chiropractor, Elyssa, shortly after it happened, who is also one of my yoga instructors and she gave me some instructions on what to do to ease the pain and get through the worst of it and I made an appointment to see her first thing Monday morning. By Monday morning I was already feeling a bit better, though with every sneeze, I took two steps backward again (if you know me, you know how much I sneeze, so this part sucked). After the appointment with Elyssa, I already felt a bit better, some of the muscular tension around the pain had lessened and I just felt less stressed and sad. I have been doing some gentle cat and cow poses along with baby cobra. Each day it’s a bit better and I can tell I am on the mend. The hardest part right now is that I can move and twist, I can even get into downward dog, I am sleeping better, but I still can hardly bend forward at my waist, it is just so painful.
I am sad because all of this means at the minimum I have to take at least a week away from my yoga practice and cooking has been slowed down quite a bit, it’s hard to stand over the kitchen counter and cut vegetables and it’s quite painful to bend over to get stuff out of the oven. Don’t get me wrong, I still managed to make a huge pot of vegetable soup Monday night and I roasted a batch of Roma tomatoes to freeze last night, but I have had to slow everything down and not overdo it and make things worse. I know I am lucky that because of my daily yoga practice and the way I eat, I am healing much quicker than if I was without these things, but it is still hard for me to have to sit still and not be active. Over the last few days, not only am I thankful for all the leftovers we have in the fridge, but I am super thankful that I have an amazing husband that makes everything easier. He has had to pick up the slack on doing dishes (I am a little afraid of that dishwasher now), cleaning cat boxes and other things. Because my job requires me to sit at a computer all day, I have had to suck it up and just power through all of this. We have too much work on the books for me to just go lay in bed all day and feel sorry for myself. I am just working with a big pillow behind my back, lots of ice packs and making sure I get up often and move around and stretch. I am getting there.
The reason I decided to share this with you is because when this happened, I was on day 6 of my cleanse. I instantly wanted to just quit the cleanse, have a glass of wine, something sweet and maybe some cheese, yeh cheese would make me feel better. I wanted comfort and sadly I actually thought for a bit that food would give it to me. Thankfully, I sat down and really thought about it, I know that alcohol, sugar are dairy are all inflammatory foods and no matter what they would or wouldn’t do to me physically, I knew it wouldn’t fix this, if anything it would make it worse. (Read this list of the top 10 inflammatory foods, strangely all things I am avoiding while on this cleanse, so luck is on my side in that sense, I didn’t have to remove anything from my diet to ease the healing.) Ultimately, I ate some leftover vegan fettucine alfredo for dinner that night and made my way to bed before 9:30pm, since I knew a good night sleep would do me good.
Sunday morning I was still wanting something more than fresh vegetable juice, so I decided to make this smoothie. It felt naughty, but it was totally cleanse-friendly and with my extreme obsession with all things fall, I knew it would lift my spirits. And, that it did.
It actually tastes like pumpkin pie in a glass. It’s creamy, thick and full of the perfect pumpkin pie spices. It was so filling that I went right through lunchtime and never felt hungry. I love to eat and hate missing meals, so I knew this smoothie was magical. It’s thick just like a milkshake and the sweetness from the dates is incredible.
As much as food can be comfort and this isn’t a bad thing in the least, it’s also quite exciting when you can shift your mindset away from the really bad stuff to find that comfort in other, healthier foods. I made it through the worst of this back pain, I stuck with my cleanse, I didn’t take a single medication and I am proud of myself. I have another appointment with my chiropractor tomorrow and I am hoping that maybe next week I can get myself to a gentle/restorative yoga class.
Vegan Pumpkin Pie Smoothie
serves 23/4 cup cooked pumpkin (you can use canned, but fresh is much better)
1 1/2 cups unsweetened organic vanilla almond milk
1/2 teaspoon cinnamon
1/4 teaspoon nutmeg
1 teaspoon fresh ginger, finely minced
2-3 Medjool dates, pits removed (soak first if they aren’t soft)
(You can add honey or maple syrup if you wish for it to be sweeter)
*you can experiment with adding a small handful of raw pecans to make it even more creamy and to get a nice lovely taste. I have done this when I have them on hand and it’s so delicious.Add all of your ingredients to the blender. Puree until smooth and creamy.
If your pumpkin and/or almond milk isn’t cold, you could add a handful of ice. I decided not to, so it would stay as creamy as possible. You can also add a splash of water or additional almond milk if your smoothie is too thick. Top with a sprinkle of cinnamon and/or nutmeg.
-
Red Quinoa with Spaghetti Squash, Spinach, Fresh Herbs and Toasted Pumpkin Seeds
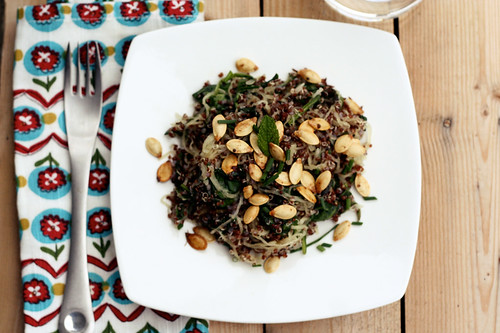
Today is day 9 of my cleanse and I am feeling incredible. Besides feeling lighter, clearer and more awakened when cleansing, I really love the opportunity to play around with new dishes. I love the challenge of making fun cleanse-friendly, vegan meals that are loaded with whole, fresh ingredients and of course, flavor. I especially enjoy doing so this time of year, when there is so much exciting produce to play around with.
I am not going to sing the praises of quinoa once again, if you read my blog regularly you know what a nutritional powerhouse it is. I will tell you however, if you haven’t yet experimented with spaghetti squash, you must. It is such an amazing vegetable (well technically it’s a fruit, but whatever) and it is so versatile in vegan cooking. Many people like to eat spaghetti squash in replace of traditional pasta in recipes, I personally love pasta too much to do this on a regular basis, but I have before and it’s good. I had some for lunch today with a bit of the leftover vegan alfredo sauce that I made and it was delicious. Spaghetti squash is especially good simply tossed with butter or olive oil, garlic, fresh sage and some salt and pepper. Much like a pumpkin, you can also toast the seeds from a spaghetti squash, one of my favorite fall snacks. You could certainly use those on top of this recipe, just cut the squash in half before baking, scoop out the seeds and rinse them before toasting. I personally didn’t feel like hacking through the raw squash before baking, which is much harder than cutting into it when fully cooked, so I baked the squash whole. Plus I already had toasted pumpkin seeds from earlier in the day, on hand, ready to be used.
This meal is full of flavor and it quite hearty. Beyond the nutty crunch of the quinoa and the fall flavor from the squash, I love the taste and aroma from the fresh herbs, the slight crunch from the spinach, the subtle heat from the chile and the brightness of the lemon juice at the end. The crispy toasted pumpkin seeds on top were the perfect finish to the dish. For a dish that is incredibly healthy and light, this dish filled both Mark and I up perfectly. The leftovers are also just as delicious as a room temperature or cold salad.
Feel free to play around with whatever fresh herbs you happen to have on hand, sage would be nice here as well as rosemary, parsley, basil, oregano or whatever fresh herbs you can easily get your hands on. You could also use arugula instead of spinach which would bring a lovely peppery flavor to the dish.
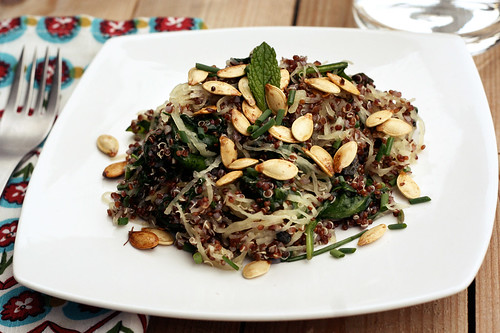
Red Quinoa with Spaghetti Squash, Spinach, Fresh Herbs and Toasted Pumpkin Seeds
serves 4-61 cup red quinoa (you could also use regular quinoa here)
1 1/2 cups water
1 large peeled whole garlic clove
1 spaghetti squash
1/4 cup fresh herbs, I used chives and mint
1 spicy hot chile pepper, finely chopped, seeds removed for less heat (I used an heirloom lemon drop pepper, you could also use a jalapeno or dried red pepper flakes)
2 cloves garlic, finely minced
2 cups organic baby spinach, roughly chopped
1/2 lemon
salt and pepper to tastePreheat oven to 375º.
Place the whole spaghetti squash in a shallow baking pan, pierce with a knife or skewer and place in the center of the oven (this is a must so it doesn’t explode). Baked for 45 minutes to an hour, until you can easily pierce it with a paring knife.While the squash is cooking, rinse quinoa well and place in a medium saucepan with 1 1/2 cups of water and garlic clove. Bring to a boil, then reduce the heat and simmer for 20 minutes, until all the water is absorbed and it’s fully cooked. Fluff with a fork and place the cover on the pan until the squash is finished baking.
Meanwhile, cut up your fresh herbs, mince the garlic and pepper and add all to a large serving dish.
Once the squash is cooked remove it from the oven and allow to cool slightly, enough so that you can handle it. At this point, if your pumpkin seeds are raw you can increase the oven temperature to 400º and put them in to be toasted.
When cool enough to handle, cut the spaghetti squash in half lengthwise with a serrated knife. Scoop out the seeds and fibrous strings from the center of the cooked spaghetti squash. Gently scrape the tines of a kitchen fork around the edge of the spaghetti squash to shred the pulp into strands. Add the spaghetti squash to the serving bowl. Remove the whole garlic clove from the cooked quinoa and add the quinoa to the serving dish. Add in the fresh spinach and toss everything together to combine. Your spinach will wilt a bit from the heat of the quinoa and squash. If you want the spinach fully cooked, you can quickly saute it in the pan you cooked your quinoa in. I personally like the crunch from the fresh spinach. Squeeze the juice from half a lemon over the dish. Salt and pepper to taste and serve immediately topped with fresh herbs and a small handful of toasted pumpkin seeds.
-
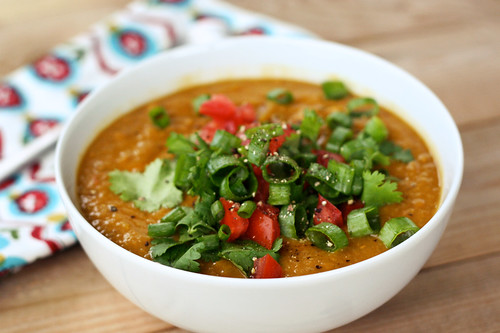
Lentil Soup – Info on My Cleanse
Well it is official, this past Friday marked the Autumn Equinox, so that means we are officially amidst my favorite season – Fall! Besides all the beautiful weather, cooler temperatures and lovely leaves – we are also blessed with some of my favorite foods of the year. Squashes, pumpkins, apples, brussels sprouts…pies, crisps, soups, stews, roasts…the list goes on and on. As much as I want to enjoy every single one of these things, after a long summer of traveling and the indulgences that goes along with it, I decided to once again mark the shift of the seasons with a cleanse. We were in NYC this past weekend, so rather than starting my cleanse on the equinox as I would have liked, I started on Monday. That was our driving home day, so it was definitely a bit tricky, but I was able to pack some snacks ahead of time for the car rides, like kale chips, roasted chickpeas and unsalted cashews. Plus our gracious hostess in Brooklyn, Karen, made me a delicious glass of fresh kale, apple, celery and cucumber juice before we hit the road. I made a delicious batch of kitchari (recipe coming soon) as soon as I got home and was able to make it through day 1, without a hitch.
I am doing a minimum of 2-weeks this time around, but definitely shooting for a full 28-days if my schedule allows. As with the cleanses I have done in the past, I am loosely following the Ayurvedic traditions, along with the items I tend to have issues with, personally. I am very excited to have a group of 25+ friends on Facebook that are all following along and participating in their own matter. It’s so amazing to have other people to motivate me and as a support system, it makes it even easier. Since I have had quite a few people ask me about how I cleanse, I thought I would put a very loose description of what I personally do in this post. If you have any additional questions about what I am doing, please contact me and I will do my best to help.
I am avoiding the following things:
Dairy*
Eggs
Sugar
Excess Salt (I will use a very small amount when cooking)
Caffeine
Alcohol
Meat (chicken, beef, pork, etc)
Fish and Shellfish (shrimp, scallops, mussels, etc)
Gluten (wheat, barley, oats, rye, etc)**
Soy
Corn
Foods with preservatives, additives or chemicals, and foods grown in an environment laced with chemical fertilizers or pesticides, and canned, frozen or processed foods.***Ayurveda doesn’t restrict dairy, but I personally seem to have issues with it, so besides ghee, I am avoiding all dairy during my cleanse.
** these are both things that I avoid on a regular basis, but are very important to a cleanseSo you are probably wondering what exactly I am eating, then…
What I am eating:
Fresh organic fruit. I am going light on the fruit because of the sugar and I am focusing on suggested fruits that are best for digestion such as apples, pears, figs, prunes, papaya, etc.
Fresh organic veggies. Some of the best for digestion are leafy greens, cabbage, celery, brussels sprouts, broccoli, etc
Whole organic grains such as brown rice, quinoa, amarynth, buckwheat, millet
Beans like lentil, mung beans, etc
Vegetable juice and broth
Soups and stews made with vegetables, legumes and grains.
I am cooking with a small amount of olive oil and/or ghee (indian clarified butter that is GREAT for detox)
Raw honey (sparingly)
lots of luke warm water with lemon and/or ginger
detox tea (I like Yogi brand Detox tea)
I am also taking probiotics in the morning after breakfastI plan to get as many recipes on this blog throughout the cleanse, so you can see a good example of how I eat when I am cleansing.
Here are some additional tips that I have learned along the way:
Some of the differences with an Ayurvedic cleanse vs a regular cleanse is that it teaches you to avoid or focus on foods specific to you and your body-mind type (or your dosha) and it’s needs. Also, although you should be eating TONS of fresh fruits and veggies, you shouldn’t eat them raw during this cleanse. Raw foods are harder on your digestive tract, so you should be heating and/or boiling your veggies and eating them warm.Eat whole, fresh, natural foods, organic if you can get it. Buy your produce fresh, and consume it quickly.
Also avoid ICE cold water and beverages, it can disrupt the “fire” needed in your digestive tract.
Cook with digestion-enhancing, detoxifying spices such as turmeric, cumin, coriander, clove, ajwain, fenugreek, dried ginger, Chinese cinnamon and fennel. Add the turmeric to foods as they are cooking, and sauté other spices in ghee or olive oil and pour over prepared dishes for the best therapeutic benefit.
According to Ayurveda, each meal should be a feast for all of your senses. When your plate reflects an appealing variety of colors, textures, flavors and aromas, your digestive juices start freely flowing in anticipation and your body, mind and heart are all fulfilled by the eating experience.
As I mention above, normally I avoid raw vegetables and fruit since it can disrupt your digestive tract and it is harder to digest, however this time around, I am including juices that I am making from fresh, organic vegetables and fruit. I decided to include this, as most mornings I go to yoga from 9:30 – 11:00am, I do not eat before I practice yoga and by the time I get home around 11:30, I am not quite ready for lunch but I am slightly hungry. The juices have been a great and fast way for me to get much-needed nutrients without having to prepare an involved breakfast, plus it is light enough that I am ready for lunch a couple of hours later.
I made this lentil soup for dinner last night and served it with some roasted butternut squash with rosemary, on the side. It was so delicious and perfectly satisfying. I love lentil soup because it can be quite versatile, every time I make it, it is a bit different from the last. You can experiment with different spices and flavors, you can add many different types of vegetables, including leafy greens like spinach or kale and if you aren’t on a cleanse, you could even top it with a delicious homemade yogurt sauce.
When I made this particular pot, I wanted to make sure to include some cleansing spices and I also wanted to get some smokey spice from a couple of dried chipotles. If you don’t like the spices I used, experiment with your own, there are so many possibilities, you could use smoked paprika, yellow curry powder, chile powder, dill, etc – the flavor combinations are endless. For a real hearty pot of lentil soup, you could add some brown rice or other grains to this soup, which I have done in the past and it is delicious. Just add the uncooked rice with the lentils, and skip the pureeing at the end. You could also roast the butternut squash (recipe coming soon) with spices to match your soup and just add it to the pot just before serving. Honestly, I debated this for quite sometime, but ultimately I really wanted to savor and enjoy the crispy browned bites of squash on their own, it felt like such a treat.
Sometimes I like my lentil soup smooth with just a few whole lentils, which is how I made it this time. If you wish to have a chunkier, heartier soup, simply skip the pureeing step and serve the soup, as is.
Lentil Soup
serves 6-82 tablespoons of ghee or olive oil
1 teaspoon cumin seeds
1/2 teaspoon turmeric
1-2 dried chipotle(s)
1 medium organic red onion, diced
2 cloves of organic garlic, minced
1 organic celery stalk, diced
1 organic carrot, peeled and diced
1 organic green bell pepper, diced
a dash of sea salt (I used very little since I am cleansing)
3 cups of lentils (you don’t have to presoak lentils, but I do as it is supposed to lessen the gassy after-affects)
8 cups of low-sodium organic vegetable broth or water (you may need to add more if your soup gets too thick)
1 large organic tomato, diced (you can just use a can of organic diced tomatoes here, if you wish)For serving:
1 small tomato, diced
1 small bunch cilantro, roughly chopped
1 green onion, thinly slicedIf you wish to soak your lentils, rinse them well, sort through to pick out any small stones and place in a large glass bowl. Cover the lentils in water and allow to soak a few hours. Once you are ready to make your soup, drain the lentils and rinse again. If you aren’t soaking your lentils, just rinse well, pick through to remove any small stones and allow to drain.
In a large stock pot, heat the ghee (or olive oil) over a medium-high heat, add the cumin seeds, turmeric and dried chipotles, stir until fragrant and the cumin seeds begin dancing around the pot. Add in the onion, garlic, celery, carrot, bell pepper and a dash of salt, saute for approximately 7 minutes until the vegetables are translucent and soft.
Add in the lentils, vegetable broth (or water) and diced tomato, turn the heat to high. Bring to a boil, then reduce the heat to a medium-high, cover and allow to simmer for approximately 45 minutes, stirring often. Cook until the lentils are tender. This may take less time, it may take more time, it depends on the lentils you are using and it depends if you soaked them first. You also may need to add more broth or water if the soup becomes too thick. Salt and pepper the soup to taste. You can leave the soup chunky as it is, or if you wish for it to be smooth and creamy, remove the dried chipotle pepper(s) and puree 2/3 of the finished soup in batches, in a blender, adding it to a large bowl as you go and then adding it all back to the pot when you are finished. Stir to combine. Serve the soup topped with freshly diced tomatoes, chopped fresh cilantro and green onions, or whatever your toppings of choice may be.
NOTE: the above information about my cleanse is not meant to be taken as medical advice. Every individual is different, this is just what I have found works for me. There are obviously different ways of thinking and a gazillion different types of cleanses. I have done this particular style of cleanse many times over the last two years and have always had great results. Please acknowledge what is right for you, your own body and health and take this all into consideration when embarking on a journey like this.
-
Gluten-Free Heirloom Tomato and Goat Cheese Tart
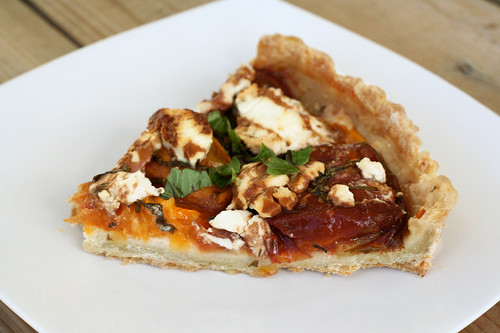
I love the abundance of tomatoes this time of year. I only had room to plant one heirloom Paul Robeson tomato plant and an heirloom black cherry tomato plant this year, so whenever I need more tomatoes than what I can produce at home, I just pick some up at the farmers market. This past Saturday I bought 8 quarts of Roma tomatoes and roasted them all. I made sauce out of half of them and froze the other half for soup or sauce later in the fall or winter. I have been wanting to experiment with making an heirloom tomato tart with some of the tomatoes coming from my garden and some from the farmers market. After making the delicious pea and goat cheese tart this spring using Gluten Free Girl’s delicious tart shell recipe, I couldn’t wait to make another beautiful and tasty savory tart with it.
I wanted many layers of fresh flavors, so rather than an egg/dairy based tart like the pea tart I made, I decided to start by roasting a whole head of garlic to spread on the bottom of the tart shell before laying on the tomatoes, I then added a handful of flavorful, freshly cut herbs from the garden (I am trying to use those as much as possible, while I still can). I finished the tomatoes with the light, creamy and tart goodness from the goat cheese, that gets slightly browned and crisp on top, while retaining the soft center (thanks for the wonderful idea David Lebovitz) and I also decided this would be the perfect time to make another balsamic reduction syrup to drizzle over the top of it all. You could also take a tip from David Lebovitz and just drizzle a good honey in place of the balsamic reduction.
The only thing I regret about this tart is that because I made it on a weeknight when I was done with work, by the time I roasted the garlic, blind-baked the shell and finished the tart, it was far too late and dark out, to take a good quality photo of the tart as a whole. I knew that my silly little light box and lighting would never do all the beautiful colors justice, so rather than setting it all up, getting frustrated and delaying dinner, I decided I would have to settle for a photo of a single slice of the tart the next day. Small price to pay, but I think you can see from just that one slice just how beautiful and colorful this tart was and you can also see how deliciously crumbly and flakey the gluten-free tart shell is.
* A note about this tart shell recipe: For those of you that are gluten-free bakers, I know most of these gluten-free baking recipes can at first seem daunting because of the seemingly long list of flours that you have never heard of, compared to a traditional recipe that just has one type of flour and that’s it. That being said, after you start baking more and more, you just learn what flours you like to bake with and those that you will use over and over, so you should always have them on hand in your pantry. I now have my go-to flours and as soon as I run out of one, I pick it up on my next grocery trip, so they are always on hand, it’s as easy as that. It can get pricey the first time you make something and have none of the items on hand, but thereafter they run out at different paces and you are just picking one type of flour up, here and there. No biggy. I actually had all of these flours on hand, since I always do, so this recipe was super simple. Also, in a lot of ways, this tart shell recipe is easier than the traditional since without the gluten you can’t over work it and you can easily mend any tears with your hand, no harm done. I really cannot recommend it enough, even if you don’t make it with this tart recipe, you should try it out.
Gluten-Free Heirloom Tomato and Goat Cheese Tart
serves 8-10Tart Shell
adapted Gluten Free Girl and The Chef – A Love Story (I added in the cheese for this particular recipe)1/2 cup (63.5g) sorghum flour
1/2 cup (60g) tapioca flour
1/2 cup (96g) potato starch
1/2 cup (102g) sweet rice flour
1/4 teaspoon salt
8 tablespoons (1 stick) frozen organic butter
1/4 cup Parmigiano Reggiano, grated
1 large local farm fresh brown egg
1/4 cup of ice-cold water(if making a sweet tart, instead of savory, include 2 tablespoons sugar and 1/4 teaspoon cinnamon)
Sift the sorghum flour, tapioca flour, potato starch, and sweet rice flour into a large bowl. Stir in the salt (sugar and cinnamon if making a sweet tart). Sift into another bowl.
Grate the frozen butter directly into the dry ingredients. The butter will fall into the flours in soft swirls and start to melt in as soon as you stir. Add in the Parmigiano Reggiano. Work with your hands to mix everything, until the dough feels like cornmeal or large pieces of sand.
In a small bowl, whisk the egg and water together with a fork. Make a well in the center of the flours. Stir in the liquid, working from the inside out. Feeling the dough for soft suppleness, instead of stiffness or sogginess. Feel free to use your hands at the end.
Refrigerate the dough for at least 1 hour, or overnight if possible.
Preheat the oven to 375ºF. Butter and flour an 11-inch tart shell, I used sweet rice flour as the original recipe suggested. Pull the dough from the refrigerator and allow it to come to room temperature, about 1 hour. While your tart dough is coming to room temperature, and your oven is preheated to 375º, roast your garlic. Place garlic on a piece of aluminum foil. Drizzle with 1 tablespoon oil. Wrap to enclose garlic in foil, and place on the rack in the center of your oven. Bake until soft, the outside will be golden brown and the flesh will be soft, about 45 minutes. Remove from oven; set aside.
Roll out the dough between 2 pieces of parchment paper, to the approximate shape of the tart pan. (this way you don’t have to flour your countertop and add more flour to the dough).If the dough falls apart or breaks a bit, don’t worry – there is no danger of the crust becoming tough by overworking it, which can happen with gluten dough. Press the dough into the pie pan and repair it that way.
Place the tart shell into the freezer until the crust is frozen, approximately 1 hour.
Butter a piece of aluminum foil approximately the size of the pie crust. Place it butter side down, onto the tart crust and fit snuggly against the sides. Bake pressing down any puffed up spots with a spoon until the shell has a good color, about 15 minutes. The tart should look and feel flaky, rather than sticky. Prepare the filling while the tart is blind baking.
Tomato and Goat Cheese Tart Filling
1 large head of garlic
1/2 cup Parmigiano Reggiano, grated
2-3 large ripe heirloom tomatoes (I like to use a variety of colored tomatoes, since it is just all so beautiful together)
2 tablespoons olive oil
a large handful of chopped fresh herbs, I used basil, chives and oregano
8 ounces fresh goat cheese, sliced into rounds
1/2 cup balsamic vinegar
1 tablespoon organic light brown sugar
sea salt
freshly ground black pepperPreheat your oven, roast your garlic and blind bake your tart shell, all the details can be found above with the tart recipe. When the garlic is cool enough to touch, with either your hands or a utensil, squeeze the cloves out of their skins and into a small bowl; mash with a fork, and set aside.
In a small saucepan over a medium-high heat bring the balsamic vinegar and sugar to a boil, constantly whisking to prevent burning. Continue cooking until it is reduced by half, stirring often. Remove from heat, allow to cool.
After the tart comes out from being blind baked, evenly spread the roasted garlic over the tart shell’s bottom. Sprinkle the Parmigiano Reggiano over the garlic. Slice the tomatoes and arrange them over the garlic and cheese in a single, even layer. Drizzle the olive oil over the top, season with salt and pepper. Sprinkle the fresh herbs over the tomatoes, reserving some to put on top. Arrange the slices of goat cheese rounds over the tomatoes. Drizzle the balsamic reduction overtop of everything and sprinkle the remaining herbs on top.
Bake the tart for 30-45 minutes or so, until the dough is fully cooked and slightly browned, the tomatoes are tender, but retain their shape and the cheese on top is nicely browned. Transfer to wire rack to cool for 15-20 minutes, serve warm with a bit more freshly chopped herbs and a bit of freshly grated Parmigiano Reggiano, if you wish.
-
Curry Kale Chips

I fell in love with kale chips last summer. I had grown kale in my garden and had an abundance, so I decided to try my hand at the healthy snack that I kept hearing about. However, I never really got to eat very many of the ones I made. Unfortunately the day I decided to make them was the day after we had to rush our dog Derby to the emergency animal hospital, she had to stay the night so they could run tests and give her fluids. At the time I started making the chips, I was waiting to hear some good news about our little girl, so I was trying to pass the time and keep my mind busy since I couldn’t help but think the worst and just sit at home crying. Cooking and baking always provides that escape for me, a great way to “get away” and just create in the kitchen. Little did I know that by making those silly little kale chips on that very day, I would never ever be able to look at them the same way again.
I have found, at least for me, that food is always a great reminder of past times. Good or bad. The simple smell or taste of a dish can take you back to being a kid, remind you of a loved one, an amazing dinner party and so many other things. While that first batch of kale chips were baking last summer, my phone rang and it was the vet, they told me Derby had taken a turn for the worse and that we should come right there. After a series of many, many tests and an emergency surgery, Derby passed away later that same night. It was all so quick and it was all so completely unexpected. The kale chips sat on top of my stove, on the very pan they were baked on, for days. I couldn’t eat them, I had no appetite, but for some reason I couldn’t throw them out either. They reminded me of a time when I had hope that Derby was going to make it, I was baking them to pass the time until the vet called to say I could pick her up. I eventually threw the chips out, but I had been unable to make them since, which I know sounds totally crazy, but it was true. The mere thought of making them could just bring on the tears.
I know this is a completely, ridiculously sad back story for a food blog post about silly old kale chips, but I didn’t feel honest telling some wonderful and happy story about how I came to make these kale chips, it just didn’t feel right. I honestly kept thinking about what I would write when I was making them. I finally made the chips now, because after the one year anniversary of Derby’s death passed us in July, I promised myself that I would find the time to make these again. It most likely sounds silly to you, but I just wanted to wait and do it when I felt like I could handle it. I didn’t want to get over it or forget, I just wanted to be able to handle it and grow from it. I know, they are just kale chips, but it was about the healing for me.
The other ironic part about the kale that I planted and grew last summer, is that it somehow lived under the 3+ feet of snow the covered my garden this winter. At the first major melt, this past spring, the plant peaked through what snow was left and it was still green somehow with leaves still on it and immediately began growing again. Once the snow had melted and our new puppy Seri could get into the garden, she made a B-line for the kale and would steal the leaves off the plant and run around the yard, eating as much as she could. That dog absolutely loves kale. So much so, that many times she prefers that to any fancy meat treats we buy her. The entire time I was cutting up the raw kale to make these chips, Seri was under my feet, looking at me, waiting for any bit to fall. It was exactly what I needed. Maybe it wasn’t irony at all.
These chips are a perfectly crispy and healthy snack that is perfect for all you chip lovers. I personally have always loved a good crunchy or crispy savory snack. I honestly could eat an entire bag of kettle chips in one sitting, if I didn’t know better. Thank god I do. The kale chips are light and airy and you don’t even get a hint of the bitterness that kale can be known for. They are a tad bit spicy, the flavor from the curry is so perfect and the coconut flavor is very subtle but I felt like it would round it all out nicely. If you don’t like spicy, leave out the cayenne pepper or you can even leave out the curry powder and coconut flour and just go with a little freshly ground black pepper and kosher salt. Honestly, the flavor possibilities with kale chips are endless. You could use garlic powder, smoked paprika, cumin, etc. If you aren’t vegan, parmesan cheese would also be delicious on these. Play around. You will definitely be addicted once you make these, so you’ll have plenty of opportunities to try different flavors.
Curry Kale Chips
1 large bunch of kale, torn by hand into bite-sized pieces, stems removed
1 1/2 teaspoons yellow curry powder
1 1/2 teaspoons coconut flour (if you can’t find coconut flour, just blend coconut flakes into a fine meal in your blender)
1/4 teaspoon cayenne pepper
2 tablespoons of extra virgin olive oil (you may need more or less depending on how large your bunch of kale is)
1/2 teaspoon sea saltPreheat oven to 375º F. Clean the kale very good, after removing the stems and tearing into bite sized pieces, allow the kale to air dry or spin it dry in your salad spinner. Lay the dry kale pieces in a single layer on two baking sheets (you may need more or less baking sheets depending on how much kale you have). Since I had two baking sheets covered in kale, I drizzled one tablespoon of olive oil over each. Toss the kale around with your hands to evenly coat it all in the olive oil. In a small bowl mix together the curry powder, coconut flour, cayenne pepper and sea salt. Sprinkle half of the spice mixture over one pan and half over the other. Toss the kale gently with your hands to evenly distribute the spices.
Place the pans in the oven and bake for approximately 15 minutes until the edges of the kale pieces are brown and they are crispy. Keep an eye on them. Be careful not to burn them. Once done, place the baking sheet on a rack to allow it to cool. I find storing the kale chips in a tightly closed paper bag, the best way to make sure they remain crispy.
FYI – kale chips are also wonderful crumbled up and sprinkled over popcorn.
-
Gluten-Free Crispy Zucchini Rounds
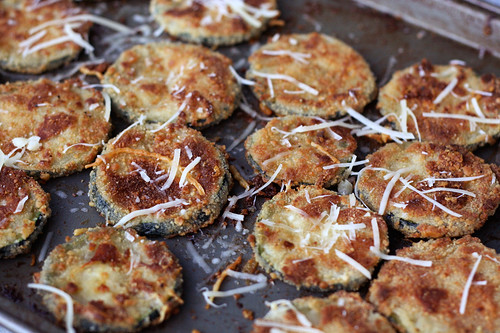
I have seen a number of crispy oven-baked zucchini recipes floating around online and in cookbooks, some as rounds, some as “fries”, but obviously all were made with regular wheat flour and breadcrumbs, so they weren’t gluten-free. However, with my insane love of zucchini, every single time I would see a photo of one of these recipes, I would instantly salivate, how couldn’t crispy oven-baked zucchini slices be delicious? I decided to experiment with making my own gluten-free version and I have to say for the first attempt, they turned out perfectly. I am so excited. I love when that happens.
The outside was so incredibly crispy, the inside was tender. Topped with a bit of freshly shredded parmigiano-reggiano and some fresh basil from the garden, each and every bite was full of flavor. I only sliced up one of the large zucchini we grabbed from the farmers market, but it was more than enough for the two of us as a side dish, with plenty leftover. It would be enough for 4 people, but if you like this as much as we did, it is actually a perfect sized side dish for two. We ended up eating seconds, since they were so delicious. I served this alongside some gluten-free penne with a delicious mint pesto .
These crispy zucchini rounds would also be wonderful as an appetizer. You could create a delicious creamy dipping sauce or even serve them with some hot marinara sauce. Though a dipping sauce would be delicious and fun, we went nude and enjoyed them as is. They were so full of flavor, they didn’t really need anything more.
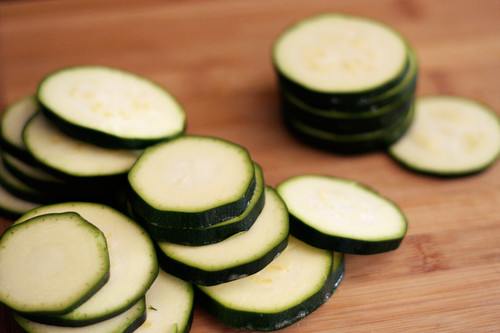
I ended up using my mandoline slicer to make sure each round was cut evenly, so they would cook evenly, but it isn’t necessary. You could simply cut by hand, doing the best to keep them generally at the same thickness.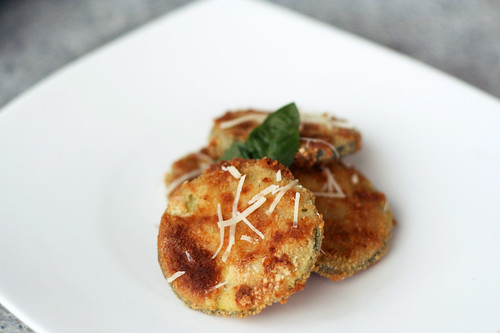
Gluten-Free Crispy Zucchini Rounds
serves 2-41 large zucchini, sliced into 1/4-inch to 3/8-inch thick rounds
2 large farm fresh brown eggs *see below note about making this vegan*
1/3 cup tapioca flour (sometimes called tapioca starch)
1 cup gluten-free bread crumbs, plus more if needed
1/4 cup shredded parmigiano-reggiano cheese
Olive oil for drizzling
sea salt and freshly ground black pepper, to taste
1/4 cup fresh basil, roughly choppedPreheat the oven to 450º and lightly grease a large baking sheet (or two smaller) with olive oil . On 2 separate plates, add tapioca flour and bread crumbs. Lightly beat 2 eggs in a medium bowl.
Dust both sides of zucchini rounds with the tapioca flour, dip in egg, and pat onto the plate of gluten-free bread crumbs. Place in a single layer on the baking sheet(s). Drizzle olive oil over the top, sprinkle with sea salt and a very small amount of the parmigiano-reggiano cheese. Bake in the oven for 15 minutes on the first side, using a spatula flip each zucchini round over (you can drizzle a bit more olive oil on this side, if you wish) and bake an additional 10 minutes until crispy and lightly browned on both sides.
Remove the baking sheets from the oven, sprinkle the remaining parmigiano-reggiano cheese and the fresh basil overtop of the rounds and serve immediately. Salt and pepper to taste.
*To Make This Vegan: After a request on Facebook, I decided to make these again, but this time I attempted to make them vegan. In place of the two eggs I used 3 teaspoons of Ener-G Egg Replacer with 1/4 cup of warm water. Stir together until fully mixed. You may find you need to make a bit more depending on how large your zucchini is, but that is a good starting point. Substitute the egg replacer for the eggs in the above recipe, do everything else the exact same and just skip the parmesan cheese. That’s it. They turned out just as delicious, with a perfectly wonderful crispy brown outside.
-
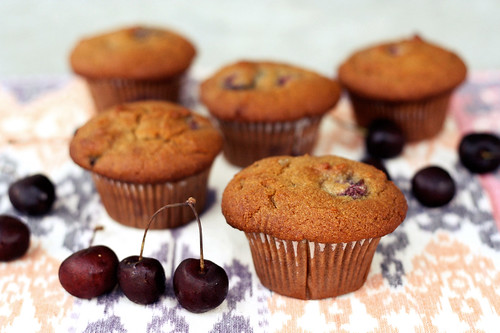
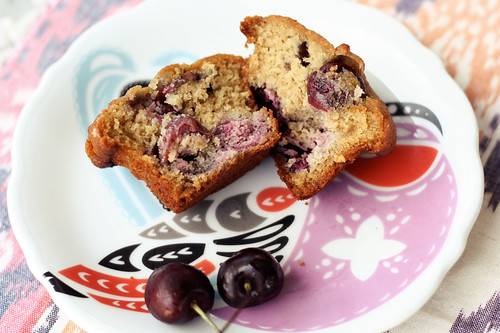
Cherry Almond Flour Muffins
This may seem a bit off topic, but I have a massive obsession with Pinterest. Holly, a friend of mine sent me an invite a few weeks ago, since she knew I would love it, and she couldn’t have been more right. Basically, as you come across images on the web, you can virtually “pin it” onto your different boards on Pinterest. The appeal is that not only does it act like virtual inspiration boards, but it also works as a way to remember and store links to projects, recipes and other fun things you want to try out. I like that I can access my pins and boards from any computer or device. I have been coming across some super fun images for inspiration and a ton of exciting and easy to do DIY projects for both work and for fun. Not that I don’t already have enough to do, but I love a good crafty project, especially once the weather cools down. You can also see other people’s boards and you can repin their items into your boards. It is so addicting.
This recipe is one that caught my eye on my daily internet travels a week or so ago, but when I had come across it, I didn’t have the time to make it, but I really wanted to remember it. Rather than print the recipe out, waste paper and have it get lost in a sea of papers in my office, I “pinned it” to my recipe related board on Pinterest. A few days later I hit the farmers market, grabbed some cherries and was ready to get baking.
These muffins were bursting with flavor and were so easy to make. I have fallen in love with almond flour, it is so easy to bake with, you don’t need to add tons of other flours or any gums, and on top of it, it has a lovely nutty taste. The other bonus is that almond flour is protein packed and low in sugar. I love by keeping the cherries in halves you get a big burst of tart, sweet flavor in every bite.
If you are on Pinterest you can follow my boards here. If you are looking for an invite, post your email address and I will send you an invite.
Cherry Almond Flour Muffins
makes 6 large muffins2 cups blanched almond flour*
1/2 teaspoon baking soda
1/2 teaspoon sea salt
2 local farm fresh large brown eggs
1/4 cup honey (or maple syrup)
1/4 cup grape seed oil (or olive oil)
2 teaspoons vanilla extract
1 cup fresh sweet cherries, pitted and halvedPreheat oven to 350˚F. Line a muffin tin with paper liners.
in a medium bowl, whisk together the almond flour, baking soda, and salt.
In a separate bowl, beat the eggs. Add in the honey, vanilla and oil and whisk until well combined.
Add the dry mixture to the wet, stirring until combined. Carefully fold in the cherries.Spoon the batter into the muffin tin, filling to the top if you want a nice muffin dome, or as us ladies know it “muffin tops”. Bake for 25 minutes or until the tops are golden brown and a toothpick inserted into the center comes out clean. Cool the muffin pan on a wire rack for five minutes. Gently pop the muffins out to continue cooling on the rack (don’t cool them longer than 5 minutes in the hot pan they’ll definitely get soggy). Enjoy a muffin after they have cooled 10 minutes, you know you want to.
I find storing muffins covered tightly in the refrigerator or freezer to be the best, especially in the heat of summer. Just pop one out as you want it, heat slightly in the microwave if you want to take the chill off and go.
* Something I have learned from baking on my own and from reading Elana’s Pantry, is that not all almond flour (or meal) is created equal. Bob’s Red Mill makes an almond flour, though easy to find, that doesn’t seem to react quite the same as other almond flours. It doesn’t seem to rise as much and it just seems to leave recipes flat. On Elana’s recommendation I now buy Honeyville brand almond flour in a 5-lb bag from their website.
-
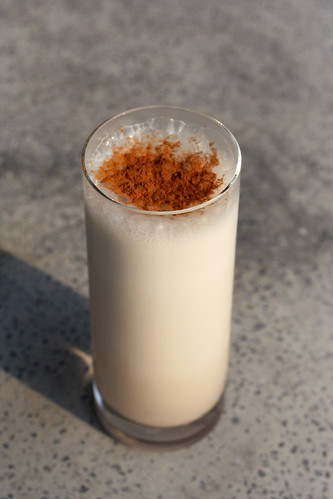
Horchata
It has been a hot summer in Buffalo. One of the hottest that I personally can recall. We’ve been traveling a ton and trying to enjoy every last-minute of the heat and sun while we are in town. We don’t leave again for another month so we hope to get the bikes out a few times, head to the beach and maybe even squeeze in some hiking or camping or something. Now that we are working from home, we really want to take advantage of the summer months while we can and enjoy the beautiful weather, before the snow and cold set in.
One of my favorite things about the short-lived summertime in Buffalo, is playing around with refreshing drink recipes. Admittedly, I planted mint in my yard, just to make mojitos and this summer I even infused my own liquors after reading this article in Bon Appetit magazine. Now that I made my first two batches and they turned out great, I plan to write-up a post about them. Don’t worry though, it isn’t just “adult beverages” I like to create, I love making fresh smoothies in the morning, iced teas, flavored sparkling waters and the like. Naturally, when I came across a post on David Lebovitz’s blog about making homemade horchata, I couldn’t wait to try it. There is nothing better than an ice-cold refreshing glass at an authentic mexican restaurant. OK, so maybe it is a close second to a good margarita, but it’s still incredible. It’s light, full of delicious flavors and it is perfect on ice on a hot summer day. There are few “authentic” Mexican restaurants here in Buffalo, (as far as I am concerned, none of them are authentic) and definitely no taquerias, so the chances of finding horchata here, are slim to none. I usually reserve my mexican indulgences for when we travel, rather than being let down, so when we aren’t traveling and I am craving Mexican, I tackle it myself at home. It isn’t nearly the same, but I still find it to be better than any of the Mexican restaurants here. I make my own tortillas, pico de gallo and guacamole, which is already a step above most places. We are actually having black bean tacos at home this week and I cannot wait.
When I saw how easy this horchata recipe was, I knew that this would be another Mexican treat worth trying at home. It is quite simple, you will spend more time waiting for the rice to soak then all of the prep time combined. You definitely want to make sure you strain in through cheese-cloth so you get all the rice bits, otherwise it will settle to the bottom of the pitcher in the fridge.
In addition to David’s recipe, I also checked out Rick Bayless’ recipe and many others. I came across many variations on the recipe, some include almonds, lime zest, etc. I decided to alter them all slightly and go with my own combination and I was very happy with the results. Oh and definitely try a glass with a shot of good rum stirred in, YUM!
Another fun twist you can take with the horchata is something that I have now learned is called a “Cochata”: Iced Coffee + Horchata. I made this apparently trendy drink in accidental desperation the morning after making the horchata. I wanted an iced coffee and realized after it was poured that we were out of any milk or cream, so I poured in a large glug of the horchata and was instantly in love. You have to try it.
On a side note, I apologize for the lack of posts and recipes on here, we just got home from nearly 2 weeks on the west coast. So I am hoping to get more recipes up here in the next few weeks as we are home for a month straight, finally. It has been a busy summer, full of travel and events, so I am excited to have some time at home.
Horchata
Makes 7 servings
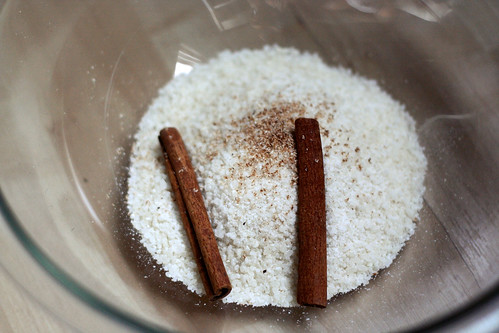
Adapted from recipes from Rick Bayless and David Lebovitz2/3 cup white rice
2 cinnamon sticks
Pinch of freshly ground nutmeg
3 2-inch strips of lime zest (colored rind only) 3/4 inch wide
3 cups of hot water
3/4 – 1 cup sugar
3 cups of cold waterGrind the rice in a blender or spice grinder into fine pieces. Transfer to a medium-sized bowl and add in the cinnamon sticks, nutmeg and lime zest. Stir in 3 cups of hot tap water, cover and let stand at least 6 hours or preferably, overnight.
Remove the cinnamon sticks and pour the mixture into a blender and blend for 3 to 4 minutes, until it no longer feels very gritty. Add 2 cups of water, and then blend for a few seconds more. Set a large sieve over a mixing bowl and line with 3 layers of dampened cheese cloth. Pour in the mixture a little at time, gently stirring to help the liquid pass through. Squeeze the cheese cloth firmly to extract as much of the rice flavor as possible.
Add 1 cup of water and stir in your desired amount of sugar, mix until the sugar is dissolved. Taste, and adjust sweetness, if necessary. If the consistency is too thick, add additional water. Cover and refrigerate until you’re ready to serve. Stir before pouring. Serve over ice with a sprinkling of ground cinnamon on top.
-
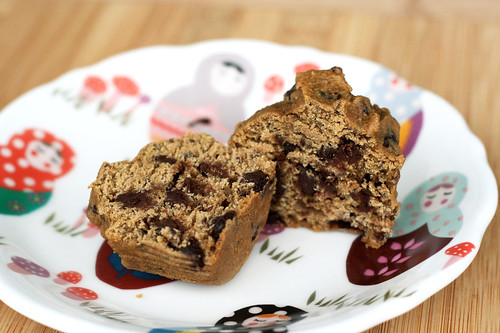
Gluten-Free Chocolate Chip Flax-Seed Muffins
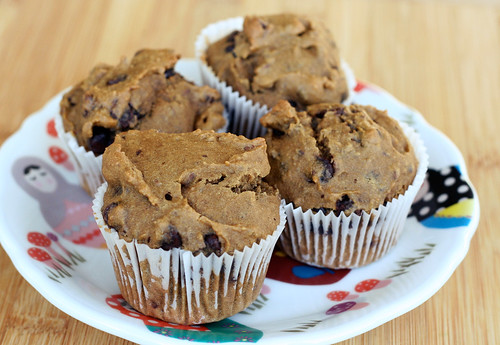
Yes, my muffin obsession continues. I can’t stop playing with recipes and trying out new ingredients. But, don’t be fooled, it isn’t all fun and tasty games, even though you don’t see it, there have been some epic muffin failures. Last week I attempted to make strawberry rhubarb muffins with a cinnamon crumble top and they turned out to be a sunken in soggy mess, boo! They were so delicious and full of flavor, but it appears my measurements weren’t correct and they just plain failed. So, we ate the soggy muffins and I vowed to redeem my muffin-loving self with a new recipe this week.
I have been craving a sweet breakfast muffin that was a little bit healthy and a little naughty. I mean, really who doesn’t love the concept of chocolate for breakfast. I actually usually prefer savory over sweet for breakfast but I had been craving something a little sweet, so I went with it. Since I added in chocolate chips, I took the sugar down to a mere 1/2 cup. I figured by taking down the sugar and adding in the flax-seeds, it would balance out the fact that I would be eating chocolate for breakfast. These muffins are perfectly moist and subtly sweet in my opinion. I left the flax-seeds whole, so there would be a nice little nutty crunch, you could grind them first or if you want to skip the flax-seeds altogether, you could just add in your favorite chopped nut or go without. I liked the idea of the flax-seeds since they add in fiber and some of those lovely, healthy Omega-3 fats.
Mark cannot get over that these muffins are gluten-free and every chance he gets, tells me they are better than any gluten-containing muffin like it that he has had. Talk about an ego boost!
*If you wish to skip the eggs to make these muffins vegan, replace the egg whites with 1 tablespoon Ener-G Egg Replacer whisked with 1/4 cup warm water till frothy.
Gluten-Free Chocolate Chip Flax-Seed Muffins
makes 12 muffins1 1/3 cups almond flour
1 cup sorghum flour
1/2 cup potato starch or tapioca starch
1 teaspoon baking powder
1/2 teaspoon baking soda
1/2 teaspoon sea salt
3/4 teaspoon xanthan gum
1/2 cup organic sucanat (dried cane juice)
2 tablespoons light olive oil
1/2 teaspoon vanilla
2-3 organic free-range egg whites (depending on the size, you are looking to get 1/4 cup of liquid), beaten until frothy*
1/2 cup warm water, more as needed, up to 3/4 cup
1/3 cup organic flax seeds, (I used them whole, you could certainly grind them first)
9 ounces of organic, semi-sweet chocolate chipsPreheat oven to 375º F. Line a standard muffin tin with paper liners.
Whisk together the first 7 ingredients (up to and including the xanthan gum). Beat in the sugar, olive oil, vanilla, egg whites and warm water. Beat until it is smooth and like a thick cake batter.
Add in the flax seeds and chocolate chips. Stir briefly, until thoroughly combined.Divide the batter evenly among the muffin cups. Bake in the center of a preheated oven for 20 to 25 minutes, until golden and firm to the touch. A wooden pick inserted into the center should emerge clean.
Cool the muffin pan on a wire rack for five minutes. Gently pop the muffins out to continue cooling on the rack (don’t cool them longer than 5 minutes in the hot pan they’ll definitely get soggy). Enjoy a muffin after they have cooled 10 minutes, you know you want to.
Freeze any leftover muffins in tightly sealed freezer bags and pop one out for a quick and easy breakfast.
*See above note about making these vegan.
-
Gluten-Free Lentil Burgers
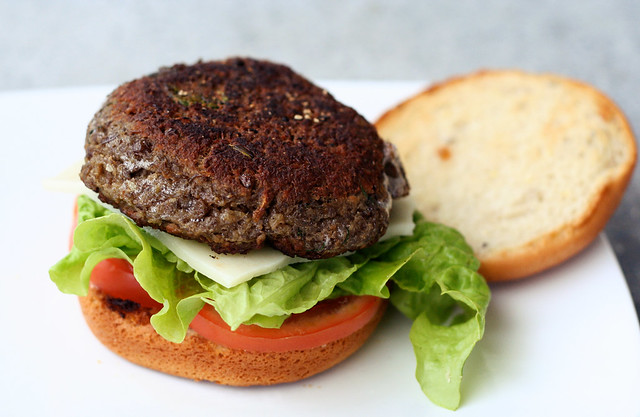
I absolutely love veggie burgers, but finding good ones that aren’t overly processed and loaded with chemicals, fillers, preservatives and other junk, is really hard on its own, but then add in the additional challenge of finding them gluten-free, it’s damn near impossible. Since I have cut processed foods out of my diet, whenever I want a veggie burger, I have been enjoying organic garden herb burgers from Sunshine Burgers that are not only gluten-free, but they only have 5 ingredients, sunflower seeds, brown rice, carrots, herbs and salt, that’s it. I am quite impressed with how delicious they are, but as with everything, I get bored and I want to figure out how to make my own, since, I really hate buying packaged foods.
I decided I wanted to experiment with making homemade lentil burgers. I had seen quite a few recipes in different cookbooks and online, and I was excited to see if using lentils as opposed to brown rice or other grain-based fillers, would hold up better and not fall apart. In my experience, that seems to be the biggest challenge with homemade veggie burgers. I was also excited to finally have a good reason to use the delicious toasted gluten-free breadcrumbs that I picked up when I was in Colorado earlier this year. The company that makes them is called, Outside the Breadbox and I found them by visiting Granny’s Gluten Free Zone in Loveland. I need to email them about having them shipped to me, they are THAT good. Finally I decided this is the recipe where I would use the beautiful dried Greek green lentils that I picked up a few weekends ago at the Greek Festival here in Buffalo. By the way, a little side note about me, most people buy souvenirs like t-shirts or key chains to remember certain events or trips, not me, I buy food, ingredients, cooking tools, etc. What better way to remember a place or a day then by remembering and recreating the food or cuisine. If a taste or a smell can’t take you back somewhere, I don’t know what can. I have actually been stopped at security in an airport before trying to take olive oil in my carry-on. (oops) Obviously you can make your own homemade breadcrumbs and use those, too.
Now that I have played around with this recipe, I am excited to make it again and again, there are so many variations you could take on the recipe. You could play around with different lentils, change-up the fresh herbs, add in some crumbled feta or other cheeses. Maybe try adding in some sunflower seeds or gluten-free rolled oats or shredded vegetables like zucchini or carrots. I think as long as you adjust your moisture content and breadcrumb content to account for the different ingredients, the sky is the limit with this recipe. Obviously if you aren’t gluten-free you can use your favorite gluten-containing, toasted breadcrumbs.
I served mine on a Rudi’s gluten-free whole grain hamburger bun. This is definitely the best packaged gluten-free roll I have found, yet. I am sure I can make a better gluten-free hamburger roll at home, but I have yet to experiment with a recipe. That is on my to-do list for this summer. If you have a recipe to share, send me a link.
** Vegans – if you don’t want to mess with packaged egg replacers, do some looking around online, there are ways to use even more ground flax-seeds mixed with water to create a paste that acts as an egg replacer. I have done something similar with a pizza crust recipe, so I know it works. The general ratio is 1 tablespoon of ground flax-seed mixed with 3 tablespoons of water = 1 egg, but do some looking around for recipes and do some experimenting. It’s pretty incredible.
Enjoy.
Gluten-Free Lentil Burgers
Makes 8 burgers3 1/4 cups cooked green lentils (follow package directions to cook)
4 large local farm fresh brown eggs (**to make vegan, use your favorite egg replacer or make a flax-seed egg substitute, see above)
1/2 teaspoon kosher salt
1 medium onion, grated with box grater or diced very small
1 clove garlic, finely minced
2 tablespoons fresh mint, finely chopped
1 tablespoon fresh dill, finely chopped
1/2 teaspoon freshly ground black pepper
1 tablespoon ground flax-seed (you can skip this if you don’t have any on hand, it isn’t necessary to the recipe, just a nice way to add in some Omega-3 essential fatty acids and even more fiber)
1 cup toasted gluten-free bread crumbs
1-2 tablespoons olive oilCook your dried lentils according to package directions and allow to cool slightly. Combine 3 cups of the cooked lentils, eggs and salt in a food processor or sturdy blender. Puree until well blended and mostly smooth. Put the mixture in a large mixing bowl and add remaining whole lentils, onion, garlic, fresh herbs and black pepper. Stir to combine. Add in the ground flax-seed and then begin adding in the breadcrumbs slowly, a little at a time and stir to combine. You may not need all the breadcrumbs and you may need more, so go slowly so you can get the consistency right.
You should have a moist mixture that you can easily form into patties. If you need more moisture, you can add more egg or a bit of water. If it needs to be drier you can add more breadcrumbs. Form eight – 3-1/2 to 4-inch patties and set on a plate.
Heat one tablespoon of the oil in a large skillet over medium heat. Add two patties at a time and cook for 8 to 10 minutes until the face down side begins to brown and get a crispy crust on the outside. Flip the burgers and allow to cook on the second side for another 8 to 10 minutes until browned and crisp, add more oil as you cook the additional burgers, if you need to. Remove the finished burgers from the skillet and serve, or if cooking the remaining patties allow the cooked patties to cool on a wire rack while you finish. You can store the uncooked patties in the refrigerator for up to a week, so pull them out whenever you are ready for a quick bite.
Place the cooked lentil burger on your favorite gluten-free roll and top with your favorite toppings. We kept it simple and just went with lettuce from our garden, tomato slices and a slice of organic swiss cheese. These burgers are so good, you could also just skip the roll and serve on their own, topped with your favorite things or served over a bed of baby greens.
-
Gluten-Free Whole Grain Spring Pizza with Asparagus, Parmesan and Eggs
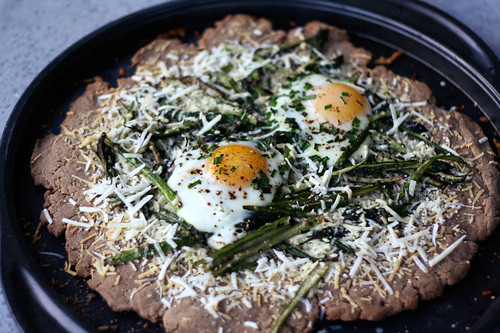
I’ve been using the same gluten-free pizza dough recipe for sometime now and though I do like it, I wanted to try something a little different and without the gums. I came across this recipe on Gluten Free Girl and The Chef a while back and when I saw that it contained no gums and it was flexible with the flours you can use, I was very intrigued. Shauna has a formula she created to make your own gluten-free all-purpose flour without gums and by weight instead of volume, plus it is very easy to make it a whole-grain mix by using different flours. Here is the original post about their pizza recipe that they changed a bit since their book came out. There are a few different flours you can choose from if you have sensitivities to things like corn or potato. I used their whole grain flour mixture that they featured in their post for whole grain muffins. I don’t have a ton of experience with baking, it is something I have only learned to love in the last year or so, but with the little bit I have done, I find that weighing your dry ingredients as opposed to measuring really gives you a consistent result, time and time again.
I decided a nice way to try out this new pizza dough recipe was to really let it shine, by not loading it with ingredients and sauces. I wanted a simple, tasty spring pizza that featured asparagus and eggs. The only thing I may change next time would be to use some mozzarella in addition to the parmesan to give it a bit more melty of a cheese base since the parmesan tends to not get super melty, however the dough was so delicious it honestly didn’t need it. Overall it was full of flavor from the asparagus and the fresh chives and the eggs were a wonderful compliment on top. The runny yolk was perfect for dipping the delicious crust into. You’ll be so surprised when you taste this crust at how it tastes just like real pizza crust – you’ll never know it’s gluten-free.
I know this post is large and contains a lot of info – but I promise it is all worth reading through. I am happy to finally have a good all-purpose flour mix to have on hand for different things and an even better pizza dough recipe. Play around with different toppings and flour combinations and please feel free share, I’d love to hear what you come up with.
GLUTEN-FREE GIRL’S ALL-PURPOSE FLOUR MIX
Here is the original information on the all-purpose flour mix (all content and info contained in both the flour mix and the pizza recipes is copyright of Gluten Free Girl and The Chef)
Want to make a whole grain AP mix in your kitchen? Here’s how.
We’re working with 70% whole grains/30% starches. We might someday go to all whole grains for some baked goods, but this blend works well for us now.
If you want to make a big batch for all the baking in your kitchen?
Choose 700 grams of any combination of the following flours:
Almond
Amaranth
Brown Rice
Buckwheat
Corn
Millet
Oat
Quinoa
Sorghum
Sweet Brown Rice
Teff
Almond is not a grain, but it is a whole flour, so I’ve thrown it in there. You might notice that I have not put in garbanzo (I don’t like it) or coconut (I don’t like the way it tastes or the way it sucks all the moisture out of a baked good) or soy (I’m having a hard time finding a good gluten-free one). You might like those. Substitute if you want.
This means that you can make your own blend. If you are allergic to corn, and you know you can’t eat the certified gluten-free oats, blend up 100 grams each of almond, brown rice, buckwheat, corn, millet, sorghum, and teff. (I want to write more about this later, but the flavor you find by blending all these different taste is fascinating. It’s amazing how boring regular AP flour seems after you use this.) Find your own favorite combination.
And then throw in 300 grams of any combination of the following:
Arrowroot
Cornstarch
Potato Starch
Tapioca Flour
White Rice Flour
We like using 150 grams each of arrowroot and potato starch, at the moment.
Combine the 700 grams of whole-grain flours with the 300 grams of starches in a big container. Shake it all up. You have whole-grain flour mix.
———————————————————————————————————————————————————-
For my AP mix I went with 175 grams each of Almond, Millet, Sorhum and Teff flours and 150 grams each of potato starch and tapioca flour. It was super simple to mix up and it made 1000 grams of all-purpose flour so I have enough to make pizza again.
The flours brought so much flavor to the crust and it was perfectly crispy on the outside and soft and chewy inside. This was by far the best crust I have ever made at home and it was simple. I’ve noticed that some gluten-free crusts get abnormally puffy and airy and don’t taste like usual pizza, others are so thin and crusty that it’s almost like eating a large cracker. I also really love
GLUTEN-FREE GIRL’S WHOLE GRAIN PIZZA CRUST
1 tablespoon ground flaxseed or ground chia seeds
500 grams whole-grain gluten-free flour mix
1 1/2 teaspoons kosher salt
15 grams (4 teaspoons) active-dry yeast
50 grams (1/4 cup) extra-virgin olive oil
85 to 190 grams (1/2 to 1 cup) warm water, about 110º
olive oil for brushing on top of the crust
Making the flaxseed or chia slurry. Mix the flaxseed (or chia seed) into a bowl. Pour 2 tablespoons of boiling-hot water over the seeds. Whisk immediately and quickly until you have a thick paste. Let this set aside and cool down.
Combining the dry ingredients. Put the gluten-free flours and the salt into the bowl of a stand mixer. Mix them up together.
Activating the yeast. Put the yeast, olive oil, and half the warm water into a small bowl. Stir gently. Let them sit for a moment to activate the yeast.
Making the dough. Add the slurry to the dry ingredients and mix for a moment. Pour the yeasty water into the dry ingredients. With the mixer on medium, whirl for a few moments, until the dough comes together into a soft ball around the paddle of the stand mixer and feels soft and pliable. If the dough feels too dry, add more of the warm water in small amounts until the dough feels right. (You might not need all the water. You might need more. Yeast doughs can differ from kitchen to kitchen.) Set the dough aside in a warm place and let it rise for 1 hour.
Preparing to bake. Preheat the oven to 450°. (If you feel comfortable with heat, take it up to 550°. Just watch the dough in the oven, carefully.) If you have a pizza stone, make sure it is in the oven. If not, sprinkle a pizza tray or baking sheet with gluten-free cornmeal.
Rolling out the dough. Grab 1/2 of the dough and put it between 2 pieces of parchment paper. Through the paper, roll out the dough to your desired thickness. (We like super-thin crust around here. You might like it thicker.)
Pre-baking the dough. Take the parchment paper off the dough, then transfer the dough to the pizza stone or prepared pizza tray. Brush the top with olive oil. Bake until the dough has started to crisp up and browned at the edges, about 8 to 10 minutes. (And less if you have the oven cranked up to 550°!)
Take the crust out of the oven. You now have a pre-baked pizza crust. Top with anything you fancy and continue baking until the cheese is bubbly and melty.
Makes 2 – 8-inch pizza crusts or 1 – 16-inch pizza crust. I went with 1 large round pizza. Don’t worry too much about the shape, enjoy the rustic wonkiness of handmade pizza dough.
SPRING PIZZA WITH ASPARAGUS, PARMESAN AND EGGS
Makes 1 large pizza or 2 small pizzasGluten-free Girl’s Whole Grain Pizza Dough Recipe (above)
Olive oil
Kosher flake salt
Black pepper
10 asparagus stalks
1 clove garlic, minced
1 – 1 1/2 cups freshly grated Parmigiano-Reggiano or mozzarella (or both)
1 bunch of fresh chives, chopped
2-4 local farm fresh brown eggs (I put 2 eggs on one large pizza, but you could certainly put 2 eggs each on 2 small pizzas)Prepare dough according to above instructions (or whatever instructions come with your dough recipe). Preheat oven to 450ºF.
Rinse the asparagus, snap off the tough ends and cut in half or thirds depending on how long they are. You want to end up with 20-30 3-inch pieces. Take each 3-inch piece, cut in half on the long side, and then again to quarter. Heat a tablespoon of oil over medium-high heat , saute the asparagus slivers and the minced garlic with black pepper and a large pinch of kosher salt until tender and still bright green. Remove the asparagus from the heat and set aside.
Brush the pre-baked pizza crust (pre-bake according to above directions) with olive oil. Sprinkle the crust with the cheese, reserving a small amount for sprinkling on top. Arrange the asparagus in a single layer over the cheese. Crack two eggs into the center of the pizza, sprinkle fresh chopped chives over everything and top with another light sprinkle of cheese. (If you are making two small pizzas, divide all the ingredients in half over the two crusts and arrange in the same order)
Bake for about 10-15 minutes, or until the egg whites are cooked and the pizza is golden brown. Allow to cool slightly for a few minutes, then cut and serve while still warm.
-
Baked Sweet Potato Chips
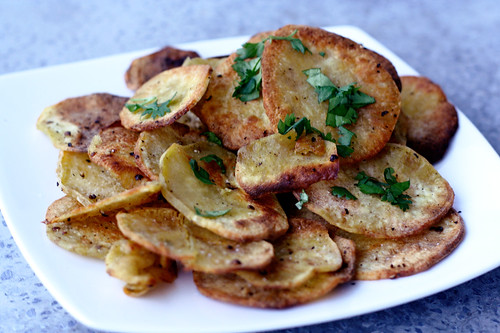
This is a super easy and healthy treat you can make at home that is perfect for a mid-day snack or for the road trip munchies. I made these for our drive to NYC a couple of weekends ago, they were perfect for the car.
You can certainly leave the peels on, though the potatoes that I had on-hand were looking a bit rough, so I decided to peel them. I used organic white sweet potatoes but any sweet potato or regular potato would work just as well. You can have fun with spices, oils and other flavors. I kept it simple with just salt and pepper and a good olive oil and topped them with a squeeze of lime and a bit of chopped cilantro. You could add chili powder, cinnamon or any other spice or herb you desire. I made these again today, for a mid-afternoon snack, and this time I used applewood smoked sea salt! WOW, it was incredible.
Once you get into making your own chips, you’ll really laugh at the thought of eating them out of a bag. These are so much more filling and have a great flavor. You will still have the great crunch but without the insane amount of fat from frying and all the chemicals and preservatives.
Once thing I recommend highly when it comes to making your own chips at home is to slice the potatoes (or whatever you are making the chips from) with a mandoline slicer. This ensures a consistent thickness on all the chips so they will cook evenly, plus it is incredibly easy to use. You can go-it by hand with a sharp knife and a steady hand, but it isn’t easy.
Baked Sweet Potato Chips
serves 42 medium organic sweet potatoes, scrubbed well or peeled, sliced about 1/8 inch thick
1 tablespoon olive oil
1/2 teaspoon coarse sea salt
1/2 teaspoon freshly ground black pepperlime wedges for serving
fresh chopped cilantro for servingPreheat oven to 400º F.
In a large bowl, add the potato slices, olive oil, salt and pepper. Toss gently to evenly coat.
Place the potato slices on two rimmed baking pans, drizzle with olive oil and sprinkle with salt and pepper. Gently toss to coat evenly. Arrange in a single layer between the two pans.
Bake uncovered for 20 to 25 minutes until the potato slices are golden brown, crisp and cooked thoroughly, turning a couple of times to crisp evenly. Sprinkle with a bit more salt and pepper a squeeze of lime juice and the chopped cilantro just before serving.
-
Spring Mushroom Risotto with Leeks and Sweet Peas
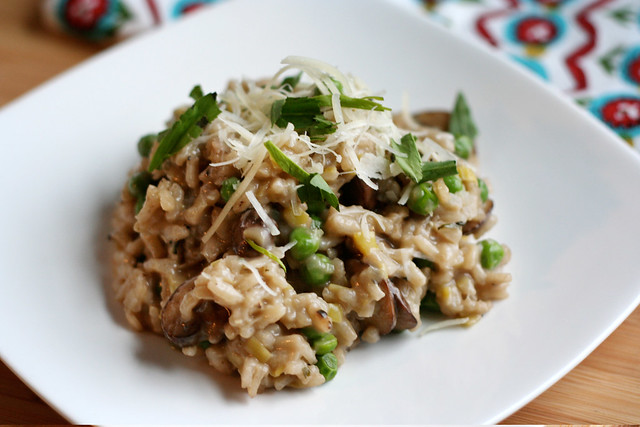
I am so ready for it to just be spring already. This chilly, dreary weather is getting a tad bit old and we’ve gotten a taste of the warm weather already, so I just wish it would stay. It was near 80º when we were in NYC last weekend and apparently it was in the 70s here in Buffalo at the same time. Today it is in the low 30s and it’s snowing again. Don’t get me wrong, I love the snow and the change of seasons, but this has been one of the longest and nastiest winters I can ever recall here.
I guess since the weather isn’t cooperating the only thing to do is to bring the spring to our bellies via delicious spring inspired dishes like this one! Once again this risotto, like the pasta recipe I posted yesterday, was inspired by what looked best in the produce section when we went to the market. I had actually hoped to find fresh sweet peas, but I guess it is still a bit early, so I went with frozen organic sweet peas. You can certainly substitute fresh peas here, you’d just want to quickly blanch them first.
This risotto is so creamy and satisfying it is hard to believe it is healthy. There is very little cheese and really since arborio rice creates such a creamy risotto, if you wanted to make this vegan you could simply leave out the cheese and it would still be incredible. The leeks bring a nice fresh but subtle onion flavor, the mushrooms a nice rustic earthy aroma and taste and the peas are a nice burst of brightness to finish it all off. The fresh tarragon was the perfect unique compliment to all of these flavors, bringing subtle scent and taste reminiscent of anise. You can play with adding in some white wine or vermouth as well as different cheeses, mascarpone or heavy cream, different herbs, lemon zest, etc. There are so many variations on classic risotto and you really can’t go wrong.
I had a dozen local farm fresh eggs that I picked up and want to use while they are at their freshest so I decided to fry up an egg for each of us to serve on top of the risotto. I had never done this before, but I knew it would be incredible and I was right. Such a nice way to finish it off. The yolk was a tad runny and it was just perfect.
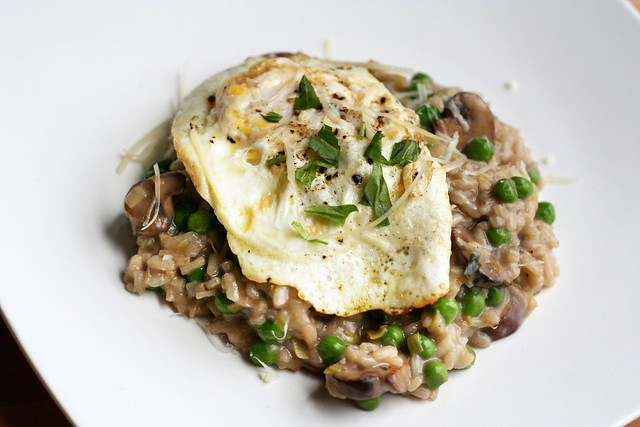
Spring Mushroom Risotto with Leeks and Sweet Peas
serves 4-65-6 cups of organic mushroom broth
2 tablespoons organic olive oil
1/2 lb sliced mushrooms, I used baby bellas
2 leeks, rinsed very well, slice thinly white and green parts only*
1 clove garlic, minced
1 1/2 cups arborio rice
1 1/2 cups frozen organic sweet peas (I would have preferred fresh, but they weren’t yet at the market)
1 tablespoon fresh tarragon, chopped
kosher salt
freshly ground black pepper
1/2 cup freshly grated Parmigiano-ReggianoBring the broth to a simmer in a heavy medium saucepan. Keep the broth warm over very low heat.
Heat 1 tablespoon olive oil in a large saucepan over medium-high heat. Add the sliced mushrooms and a sprinkle of salt, sauté until tender and beginning to brown, 3 to 4 minutes. Transfer to a bowl and set aside.
Add the remaining tablespoon of oil to the pan over a medium-low heat. Add the leeks and garlic, sprinkle with salt. Sauté until the leeks are tender, about 5 minutes. Add the rice and increase the heat to medium. Stir until the edges begin to look transparent, careful not to brown the rice or leeks. Add the mushroom broth, 2 ladles at a time (or approximately 3/4 cup); stirring constantly and waiting for the stock to be absorbed before adding more. Always adding enough just to cover the rice. Continue stirring and adding broth, waiting for it to absorb and then adding more. Cook about halfway, which should be about 10-15 minutes. Stir in the sautéed mushrooms. Continue adding broth until the rice is tender but has a bit of a firm bite and the risotto is creamy, another 10-15 minutes. Add the frozen peas and fresh tarragon with just a few minutes remaining, stir to combine. The peas will cook very quickly. Once cooked, turn off the heat. Taste the risotto and salt and pepper to taste.
Stir in approximately 1/4 cup of the parmigiano-reggiano cheese, reserving the remaining for serving. Transfer the risotto to a serving bowl, top with fresh ground black pepper and a pinch or two of freshly chopped tarragon. Serve with the remaining grated parmigiano-raggiano. This risotto is incredible with a fried farm-fresh egg served on top. If the yolk is just a tad bit runny, it is absolute perfection! Trust me, try it.
* a quick note on cleaning leeks: leeks tend to have a lot of dirt and grit in them. If you aren’t careful when cleaning them, you may think they are totally clean, start cooking with them and find your entire dish has a nasty grittiness to it. This can ruin a dish After trimming off the ends (called the beards) and the dark green tops (save these for stocks). You can run them under cold water at this point, or even better, you can submerge the leeks in a large pot of cold water. Swirl them around to really remove all the grit and dirt. Drain well and then cut.

Oh and one last thing to mention, this is what was going on outside my kitchen window while I crafted up this beautiful spring dinner. Ironic, isn’t it?
-
Spicy Spring Pasta with Roasted Asparagus and Baby Arugula (Gluten-Free)
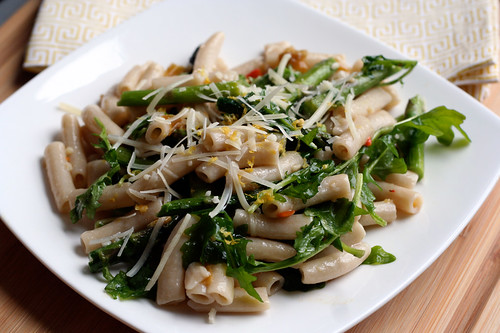
Pasta is definitely my go-to comfort meal, it rarely disappoints. I almost always have a couple of pounds of dried gluten-free pasta in the pantry and enough ingredients to throw together a tasty and seasonal dish with it. Plus, I really love how little effort it takes. In the time it takes to preheat the oven and make a horrible processed frozen pizza, you can have a delicious main-course pasta made with fresh ingredients. With all the traveling we’ve had going on and how busy we’ve been I have been craving one of my homemade pasta creations, so last week after we got home from NYC and before we left again for Pittsburgh, I thought up this dish and threw it together for us.
Besides the beautiful spring produce that is finally showing itself at the grocery store, what inspired this dish was a jar of hot pepper spread from Wegmans in my refrigerator. We always have it on-hand for things like sandwiches, soups, eggs, pizza etc. It has a mere 5 ingredients, all natural, and it’s the perfect condiment. It caught my eye the other day and I realized that I had never made a pasta dish with it. I decided to take a trip to the grocery store and let the fresh produce decide the rest. I was definitely craving a spring inspired dish! Though the choices are still limited and it isn’t all necessarily local, I was happy to see more green in the produce section. It feels like we are finally through the winter and onto brighter things, literally.
The asparagus and baby arugula both jumped out at me in the produce section and I thought paired with the spicy peppers, a nice parmigiano-reggiano and some lemon, they would be perfect. Certainly skip the hot pepper spread if you don’t care for spicy or if you can’t find anything like it, or you can substitute it with a teaspoon or two of red pepper flakes. Have fun with it and always start out slow with the spicy ingredients if you don’t like the heat, you can always add more. This pasta just explodes with fresh flavors, the heat from the hot pepper spread brings a nice zing, but it’s not too overpowering, the subtle peppery crunch from baby arugula is fresh and welcomed after a long winter, along with the brightness from the lemon. It is a very light and healthy, but certainly satisfying, spring dinner. If you are looking for a nice vegan spring pasta dish, just leave off the cheese or substitute with your favorite cheese substitute, it will still be delicious.
After a winter of root vegetables, frozen vegetables and just plain ‘blah’ produce, it really is nice to start seeing better fresh produce options again at the grocery store. The farmers market opens in less than 3 weeks (I am counting down the days) and shortly thereafter I will be starting our garden.
Here’s to the spring, more green and a lot sunshine!! (FYI – as I type this, it is snowing)
Spicy Spring Pasta with Roasted Asparagus and Baby Arugula (Gluten-Free)
serves 4-61 lb asparagus
3 tablespoon organic olive oil
kosher salt
fresh ground black pepper
1 lb organic gluten-free brown rice pasta (you can use any shape you’d like and certainly you can use regular pasta here, as well)
2 cups organic baby arugula roughly chopped or torn
2 cloves organic garlic, minced
1 tablespoon hot pepper spread (I buy Wegmans brand, but you can also substitute 1 teaspoon of red pepper flakes or leave it out)
1/2 cup freshly grated Parmigiano-Reggiano
Lemon zest
fresh lemon juicePreheat the oven to 400º F.
Clean your asparagus and snap off the tough ends. Cut into 2-inch pieces and toss with 1 tablespoon olive oil, a sprinkle of kosher salt and fresh ground black pepper. Arrange in a single layer on a baking pan and place in the preheated oven. Roast for 15-25 minutes until tender, but still a bit crisp.
Meanwhile, cook your pasta according to package directions. Once the pasta is cooked to al dente, reserve approximately 1/4 cup of the cooking liquid, drain the pasta and rinse in hot water. Place the rinsed pasta in a large serving bowl, immediately add the baby arugula and toss, so it begins to wilt. Then add the minced garlic, hot pepper spread (or red pepper flakes), 2 tablespoons of olive oil and as much cooking liquid as necessary to make the pasta a bit creamy. Toss carefully to combine all the ingredients, add more cooking liquid as needed. Once the asparagus is done, add this to the pasta along with most of the parmigiano-reggiano cheese, reserving a bit for serving. Squeeze a bit of lemon juice over the pasta, taste the pasta and salt and pepper to taste. Toss everything carefully one last time. Plate the pasta individually and top each serving with fresh lemon zest and the remaining cheese.
-
Banana Almond Butter Smoothie
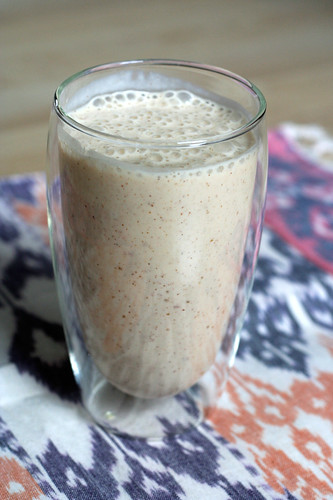
You all know by now that I am on a two-week cleanse and have become obsessed with smoothies in this time. I have been having so much fun experimenting with different flavor combinations and new ingredients. This past week, the first week of my cleanse, I discovered the magic of dates!! Now I know why they call them “nature’s candy”. Sweet enough to pop in your mouth whole to conquer any cravings, but all natural, fresh and cleanse friendly. My new-found love of dates came by accident, I happened across a container of something called “organic date coconut rolls” in the bulk section at Lexington Coop and became intrigued when I noticed they looked like little cookies and had only two ingredients: organic dates and organic coconut flakes. That’s it. Both ingredients are cleanse-friendly, so I bought them. They are incredible and so delicious, so much flavor and perfectly sweet. I have enjoyed maybe one a day or one every other day and they have been the perfect way to handle any sweet cravings I may have. Yesterday, when I went to the Coop to stock up on some things I needed for this week, I grabbed a pound of fresh organic Medjool dates to use in smoothies, eat on their own and to possibly experiment making my own date coconut rolls with. I thought tossing one date in a smoothie would be a nice natural and whole way to add a bit of sweetness. I was right. It was the perfect bit of sweet in this delicious smoothie. If you don’t like dates or can’t find them, you could certainly substitute a tablespoon of maple syrup, honey or agave syrup to your smoothie.
I also bought a jar of unsweetened almond butter for a recipe I am excited to try after my cleanse is over, but while in the shower this morning (yes, I think about food in the shower) I thought it would be great in a banana almond butter smoothie. So, I decided to experiment a bit this morning and wow, I am glad I did. This smoothie is the best one I have made yet, it has the perfect amount of sweetness and it is so wonderfully creamy that you actually feel like you are having a milkshake. I had meant to freeze a banana last night but forgot, so I just added a handful of ice cubes, if you use a frozen banana you can leave the ice cubes out. Frozen bananas are amazing in smoothies, such a brilliant way to get the chilly frostiness!
Do yourself a favor and make this smoothie, you will be amazed that something so good for you can taste so sinfully delightful.
Banana Almond Butter Smoothie
serves 11 cup organic unsweetened almond milk
1 organic banana (preferably frozen)
2 tablespoons unsalted, unsweetened organic almond butter
1 fresh Medjool date, pit removed and cut in half
1 teaspoon organic vanilla
Whole nutmeg, grate a small amount into the blender just before blending
A small handfull of ice cubes (if your banana wasn’t frozen)Add all the ingredients to your blender and process until smooth!


