-
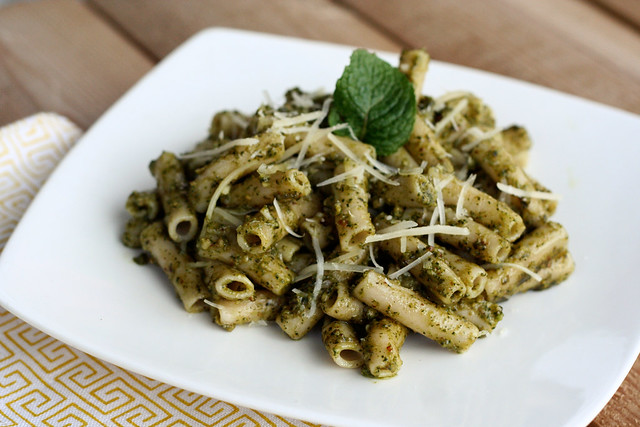
Mint Pesto

Last summer I made, what I later learned, to be a big mistake – I planted mint in our yard, not in any pot or planter, just in the dirt on the side of the yard near my vegetable and herb gardens. I originally planted it because I absolutely LOVE fresh homemade mojitos in the summer time. There is nothing more refreshing. The reason my planting of said mint turned out to be a mistake, was the fact that it has grown out of control and it is taking over that section of the yard. Because I have never grown it in my own yard, I didn’t realize how quickly it grows and how far it can spread. We travel so much, that getting into the yard and weeding my gardens gets increasingly difficult as the summer goes on. I know I should get out there more, but I don’t, so I always try to plant things that need very little upkeep. Well, mint definitely falls into that category. Early in the summer I took a look out in the yard to see the progress of things and I was floored at how the mint was spreading. It was crazy. So I made a lot of mojitos this summer. I also decided I needed to find other things to do with the mint. I mentioned something on Twitter and Kelly from Design Crush made the wonderful suggestion of mint pesto. I had never thought of that. So, earlier this summer I played around and made mint pesto to serve with gluten-free penne. It was sooo good that we ate it all up and I forgot to write-up my recipe or photograph it. Ooops. That just meant I needed to make it again. Darn.
This time around, I again served this over delicious organic gluten-free penne with some gluten-free crispy zucchini rounds on the side. We both were in heaven with this meal. This pesto, much like the original that we all know, is bright and light but chock full of flavors. I like my pestos garlicky, which gives a bit of a spicy kick, you can certainly take it down to one clove if you don’t like a lot of garlic (shame on you). I also love playing around with different nuts in my pestos. Most original basil pesto recipes call for pine nuts, which I really love, but they can be hard to find sometimes and many times are insanely expensive. I have played with both toasted almonds and walnuts in pesto recipes, both of which are absolutely equally delicious, if not more. I think any one of those nuts would be great in this mint pesto. I went ahead and still included some basil in this mint pesto, since I also grow that in my yard and I thought it would round out the flavor of the mint nicely, so it wouldn’t be too overpowering. Also, it should be noted, it is crucial to use a good quality olive oil in your pestos, since the sauce is left raw and is never cooked, the olive oil flavor remains in the forefront of the flavors, so you want it to be a good one.
In addition to all the usual dishes that pesto is great in; pasta, sandwiches, pizza, in soup, over a baked potato etc, – you could definitely use this mint pesto for other non-traditional uses as well, such as a marinade or served over-top grilled lamb or steak, etc, you could just skip the basil and cheese, maybe add some lemon juice and red pepper flakes and make it more of a Chimichurri style condiment. Have fun with it and make sure if you plant mint of any kind in your yard plant it in a pot, unless you are looking to be able to make enough mojitos and pesto to serve a small country.
Mint Pesto
makes approximately 1 cup2 cups fresh mint
1 cup fresh basil
1/4 cup toasted sliced almonds (walnuts or pine nuts would also be great)
2 medium-large cloves garlic
1/2 cup extra-virgin olive oil
1/4 – 1/2 cup parmigiano reggiano, shredded (plus more for serving)
1/4 teaspoon sea salt
freshly ground black pepperPlace mint, basil, almonds, garlic and salt in a food processor; pulse a few times, and process until everything is finely chopped and combined. With the processor running, gradually pour the olive oil in and process until smooth. Use a rubber spatula to scrape down the sides to get all the little bits. Add the parmigiano reggiano and pulse again until blended and smooth. Season with additional salt, if needed, and freshly ground black pepper to taste.
If you are serving this immediately, keep the sauce at room temperature and pour it over your cooked pasta (I used my usual gluten-free organic brown rice penne) and quickly stir to combine, top it with fresh parmigiano reggiano and serve immediately. I always recommend reserving approximately 1/4 cup of the cooking liquid from your pasta so you can add it in to the final dish, if need be, to thin the sauce if it is too thick.
If you aren’t serving this immediately, it can be stored in a tightly closed container in your refrigerator for up to 3 days.
Notes:
To toast sliced almonds, cook them over a medium-low heat in a small dry skillet, stirring and tossing constantly, until fragrant and lightly browned, this will take less than 5 minutes.
If you’d like to freeze your pesto, leave out the parmigiano reggiano. When you’re ready use the pesto, defrost it first, then stir in the cheese.

Seri hiding out in the mass amount of mint in our yard, earlier this summer
-
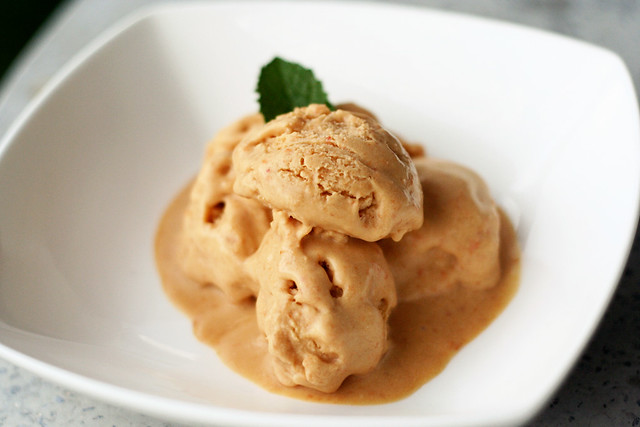
Vegan Coconut Apricot Ice Cream
It has been a hot summer in Buffalo. After the long winter we had this year, it’s definitely welcomed, but it has been hot, none the less. It’s hard to get motivated to cook or bake some days, but I have been doing the best I can. I can’t say that every meal is necessarily blog worthy, some nights I just toss together a leafy green salad with all the goodies from our garden and we just pop home-made pre-frozen veggie burgers in the toaster oven, not exactly cooking but a healthy home-made meal either way.
I am still really trying to enjoy creating and “cooking” any way I can, even if that means never turning the oven or stove top on. One of the best things about the summer are the fun sweets you can make with all the fresh fruit at the farmers market. Besides the muffins and smoothies, there really is nothing better in the summer heat than an icy cold, sweet ice cream treat. As much as I love a classic, custard based ice cream, sometimes I just don’t have the time, patience and energy for all of it. Plus, I tend to have a bit of guilt after enjoying a bowl of it. Sure the ice cream I make at home is all fresh and local ingredients, organic and healthier than the gross dairy queen stuff that they can’t even call ice cream, but it’s a lot more fat than I would prefer to have on a regular basis.
This is where vegan ice cream steps in. I have made quite a few versions of my vegan ice creams and each time I make one I am just as amazed as the first time at the amount of flavor and the creaminess of the ice cream, considering there isn’t a bit of dairy or any egg in there.
This recipe is a bit different from the others that I have made since it is just coconut milk, I didn’t add in almond milk or any other non-dairy milk. I really wanted the coconut flavor this time.
The key is to use the full-fat coconut milk, not the reduced fat kind. You want the creaminess from the fat. The fresh slightly tart apricot flavor was so perfect with the creamy coconut flavor. If you wanted to take the time you could chop up some fresh apricot to add in just before you add the ice cream to the maker and you could also toast up some shredded coconut to top each serving with. I was far too hot and lazy to do either of these things. It was unnecessary either way, but would make for a nice presentation if you are making this for dinner guests.
It was so hot on the day that I was photographing this ice cream, that it was melting much faster than I could take the photos. I took the photos as quickly as I could, then promptly sat down and ate the bowl of ice cream. Guilt free.
Ironically as I typed up this recipe, it was one of the coolers days we’ve had in some time. It has been a lovely cloudy and rainy day, that I was quite happy to see. I am sure my veggies growing out back were likely just as happy as I was to see some rain fall.
Vegan Coconut Apricot Ice Cream
2 – 14 ounce cans organic full-fat coconut milk
1 pound fresh apricots, pitted and halved
1/2 cup honey or agave syrup (you could also use organic raw cane sugar)
1-2 tablespoons vodka*Place the coconut milk, apricots and honey in a blender and puree for about 1 minute until fully blended.
Pour the mixture in a large bowl, stir in the vodka. Cover and refrigerate for at least 2 hours until fully chilled. Once chilled, make according to your ice cream maker‘s instructions. I find that putting the ice cream in the freezer for at least an hour after to allow it to get a bit harder is best. Pull it out a few minutes before serving, scoop and enjoy!
* this keeps the ice cream from over-freezing and being completely hard, a little tip I learned from David Lebovitz – you can substitute any other un-flavored liquor, or have fun with flavored liquor like Grand Marnier or Armagnac, etc.
-
Honeydew Almond Milk Smoothie
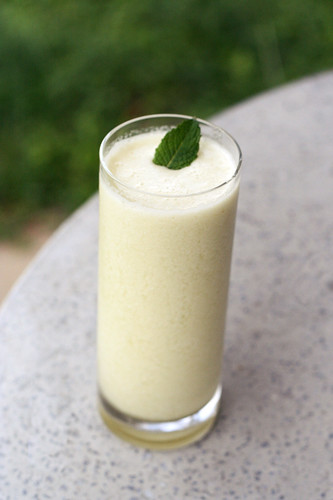
After our nearly 2-week long trip that we took mid-July to California for the Renegade Craft Fairs in San Francisco and Los Angeles, I am so happy to be home for a stretch and back into a more normal routine. It seems to take a week or two for things to settle down and feel calm again after a trip that big and with how crazy we were before we left. Besides being able to cook and bake in my own home, one of the most important things for me is to get right back into my daily routine of yoga. I try to get to 5 or 6, 90-minute classes a week. I tend to prefer the morning classes, since I can just come home after I practice and get right to my desk and work for the rest of the day. I don’t eat before I leave for yoga, I usually have a kombucha after I practice, so most times when I get home I am not looking for a large meal, just something light to hold me over until lunch. Many mornings I whip up a quick smoothie and head up for my office. So I can “eat” and work. This past week I was just making up smoothies as I went along, trying out new flavor combinations and just exploring. This honeydew almond smoothie is probably my favorite discovery of the week. It was simple, very light and had a unique and bright flavor. The honeydew that I cut up was so sweet on it’s own I didn’t even have to add any sweetener. If your honeydew leaves a bit to be desired in the sweetness department, feel free to add in a tablespoon of agave syrup or honey.
We don’t leave home again until August 24, when we had back to NYC for another event with the Metropolitan Museum of Art. We are doing a poster for St. Vincent who is playing on the rooftop of the Met. I am so excited to be going back to the city again but I am trying not to count down the days to that trip so as not to rush our time at home, but it is hard. I am hoping to accomplish a ton in the time before we leave again. Beside all of the work we have on the schedule, I have a ton of cooking and baking I want to do, a few crafty projects and some work around the house. Here’s hoping I can be that productive.
Honeydew Almond Milk Smoothie
serves 22 cups honeydew, diced (this was half of a melon for me)
2 cups, organic unsweetened almond milk
1-2 cups of iceAdd all of the ingredients to the blender and process until smooth. Serve immediately.
-
White Bean and Chive Patties

Since we’ve closed the store and now work from home, I really look forward to the time of day when I can take a break from working and prepare a healthy dinner for us. Many nights we finish dinner, do up the dishes, feed the pets and then return up to our offices to work for a few hours, which is something we never did before, but somehow it is all so much more relaxing and laid back. Working from home has allowed me to really play with my schedule, make it more flexible and find even more time for yoga, dog walks and other fun and physical activities. I think the pressure of having to be at the studio set hours because of the store really put an unnecessary amount of self-imposed stress on both of us. We were always very happy and content before and we definitely miss the store some days, but I really find myself loving my life and my job more now than ever before. I feel so lucky.
One of my other favorite things about the new schedule is being able to take on more involved dinners during the week, that require more prep time or even down time for things to cool or set, etc. Now during the “wait times” in recipes, I can just walk upstairs and get more work done. Both last night’s dinner, Spring Pizza with Asparagus and Eggs that featured a homemade gluten-free multi-grain pizza crust and tonight’s Spring Pea and Goat Cheese Tart, with a homemade tart dough, are perfect examples of that. (Don’t worry those recipes are coming soon.) This particular recipe isn’t nearly as involved or time-consuming, but having to pan fry the patties in batches can take time and patience and it is certainly something I wouldn’t have made after a long day of work at the store and getting home around 7pm.
These patties are simple, healthy and full of flavor. They have a wonderful crispy crunch on the outside and a nice soft inside. They are naturally gluten-free and vegan, too. The original recipe features them with sage instead of chives and amidst a delicious spring brunch menu topped with a roasted tomato sauce. I thought the sauce would take away from the lovely crisp, so I instead envisioned them atop a lovely mix of baby spring greens salad as a meal in and of itself. I made a quick lime cilantro vinaigrette and served it as dinner.
You could definitely play around with different herbs and even different veggie additions, the big thing to keep in mind is to make sure the patties aren’t too moist or dry to where they will fall apart in the pan and to make sure you have your pan is hot enough to get that initial “searing” to create a nice crust on the outside and to keep the patties together. Use a spatula to look at the face-down side before you flip to make sure it is adequately browned before you flip.
We tossed some baby spring greens with the vinaigrette, put the patties on top and drizzled those with a bit more dressing and topped everything with more fresh chives. A perfect spring-time dinner.

White Bean and Chive Patties
makes 12 patties
Adapted from Whole Living, June 20111 19-oz can organic white beans
1 shallot, finely diced
1 small carrot, finely grated
1/3 cup yellow cornmeal
1 tablespoon chopped fresh chives, plus more for serving
Coarse salt and freshly ground black pepper
1/4 cup extra-virgin olive oilDrain beans, reserving 2 tablespoons liquid. Transfer to a bowl and mash. Stir in shallot, carrot, cornmeal, and chives. Season with salt and pepper. Add 1 tablespoon reserved liquid. If mixture is too dry, add the other.
Heat a large skillet over medium-high heat. Add 2 tablespoons oil. Form mixture into 12 patties (about 2 1/2 inches diameter each) and saute in batches until golden brown and crisp, 2 to 3 minutes per side. Repeat with remaining oil and patties. Serve topped with a tasty dressing, yogurt sauce or atop a salad.
-
Fried Black Rice with Ginger Tofu and Baby Arugula
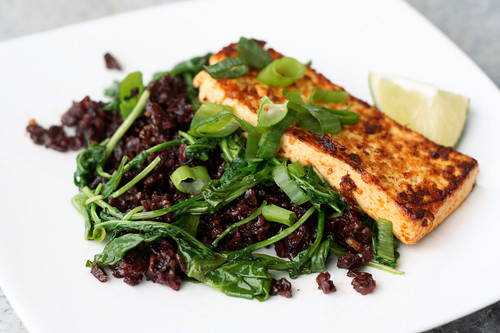
I came across this recipe in a recent issue of Whole Living and couldn’t wait to make it. I love black rice so much, it is full of flavor. I always keep a pound or two of Black Japonica in the pantry, a unique field blend of medium grain black and short grain mahogany rice. It’s so nutty and sweet, perfect in many different dishes.
This recipe is so healthy and fresh, simple to make and full of so many flavors. The original recipe called for spinach but since I still had some baby arugula on hand, I figured that would work just as well. I was pleasantly surprised how much more delicious the rice was after frying it up in the pan, it grabbed all the little bits of ginger and garlic and the Sriracha left in the pan from the tofu. The tofu had a nice crisp outside and it was full of flavor from the ginger and Sriracha and the arugula brought a beautiful peppery crunch. I hope to plan spinach and/or arugula in our garden this year so I have a feeling we’ll be eating this dish a lot this summer.
Fried Black Rice With Ginger Tofu and Baby Arugula
Adapted from Whole Living, March 2011
Serves 4-63/4 cup black rice (I used a blend of black and mahogany rices)
1 1/2 cups water
1 bunch organic baby arugula, rinsed and roughly chopped (spinach will work here, too)
3 tablespoons olive oil
2 cloves garlic, minced
3 tablespoons finely chopped fresh ginger
3 scallions, thinly sliced, white and green parts separated
1 pound extra-firm tofu, cut into six 1/2-inch-thick rectangles
2 tablespoons Sriracha sauce
Lime wedges, for servingBring rice and water to a boil in a small saucepan. Reduce to a simmer, cover, and cook until rice is tender and liquid is absorbed, about 45 minutes. Let stand 5 minutes. Fluff with a fork and set aside.
Steam baby arugula, covered, in 1 tablespoon oil over medium-high heat for 2 minutes; set aside. Saute garlic, ginger, and scallion whites in remaining oil until fragrant, about 1 minute. Add tofu and Sriracha and cook until tofu is golden, about 6 minutes per side. Remove and set aside.
Add rice to skillet and cook over medium-high heat until crisp, about 2 minutes. Serve with baby arugula and tofu. Garnish with scallion greens and serve with lime. Add more Sriracha when serving, if you like.
-
Spicy Spaghetti with Fennel and Herbs (Gluten-free)
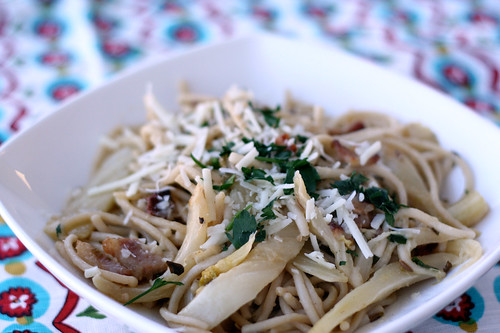
Yes, yet another pasta dish. I am a pasta-aholic, I can admit it. I cannot get enough of the stuff and I am always excited to try out new recipes. The possibilities really are endless and it’s rare that I meet a pasta dish that I don’t love. This recipe is no exception. I came across it a while back and couldn’t wait to try it with a few subtle changes. Even with the bacon and cheese, it is still very light and healthy pasta dish. See you can have your bacon and eat it, too!
The subtle crunch and bold flavor from the fennel is so wonderful and the heat from the chilies is what I live for in a spicy dish. The original recipe calls for red jalapeños, though I could only find green, I think the red would have really been nice for a pop of color. It also called for seeding the chilies, but I left them in, when I tasted the peppers while I was cutting they didn’t have too much heat, and I really wanted a good kick. It is rare that I find something to be too spicy. If you want a more subtle spice, certainly leave the seeds from the chilies out and you can always make it spicier at the end, if it needs it, by adding in some red pepper flakes. The recipe also called for adding in crushed fennel seeds untoasted, I felt like toasting the whole seeds first would give a much better flavor by releasing it during toasting, not only did it taste great, the house smell amazing. Additionally, the original recipe called for pancetta instead of bacon. Since we buy all of our pork from Sojourner Farms, a local pasture-raised farm, I decided to use some of the delicious bacon that we purchased from them, instead. I would advise not to substitute dried herbs for the fresh stuff in this dish, it would surely be missed. It is also important to use a low-sodium broth, as you will reduce the broth down and you will also be getting some salt from the bacon (or pancetta), you can always add more salt to taste, before serving. I am a big fan of using the pasta water to thicken and bring back liquid to a pasta dish, just go slow so you don’t add too much, but don’t leave this step out, it can make or break a dish without sauce, like this one. Obviously, I also changed the original recipe by substituting gluten-free spaghetti, if you aren’t gluten-free you can use whatever your favorite pasta is, a nice whole-wheat spaghetti would be great, I am sure.
If you wanted to make this vegetarian you could easily leave out the bacon and use a vegetable broth instead of chicken, you may just want to add in a bit more fresh herbs to bump up the flavors. It would still be very tasty and hearty.
Spicy Spaghetti with Fennel and Herbs
serves 8
Adapted from Bon Appétit Magazine6 slices of farm fresh local, pasture raised bacon, chopped
1 tablespoon olive oil
3 garlic cloves, chopped
2 large jalapeño chiles, finely chopped – remove seeds if you want less heat
2 large fennel bulbs, stalks trimmed, cut into thin wedges with some core attached
1 1/2 cups low-salt organic free-range chicken broth
4 tablespoons finely chopped fresh Italian parsley, divided
2 tablespoons fresh lemon juice
11/2 teaspoons fennel seeds
1 pound gluten-free organic brown rice spaghetti (or whatever your favorite pasta is, gluten-free or not)
2 tablespoons extra-virgin olive oil
1 1/2 cups finely grated Pecorino Romano or Pecorino Toscano cheese, dividedToast the fennel seeds in a large dry skillet over high heat, until slightly brown and fragrant. Remove the seeds and set aside. Sauté bacon in the same large skillet over medium heat until golden and a bit crispy. Using slotted spoon, transfer bacon to paper towels and set aside. Add 1 tablespoon oil to the bacon drippings in skillet. Add garlic and chiles; sauté over medium heat 1 minute. Add the fresh fennel; cook until beginning to soften, 5 minutes. Mix in broth, 2 tablespoons parsley, lemon juice, and the toasted fennel seeds. Bring to boil. Reduce heat to low, cover, and cook until fennel is very tender, 20 minutes. Remove from heat. Season to taste with salt and pepper.
Cook pasta until tender; drain. Reserve 1 cup cooking liquid. Transfer pasta back to the pot or a large serving bowl.
Uncover skillet with fennel mixture and return to high heat. Cook until almost all liquid is absorbed, about 4 minutes. Add fennel to pasta. Stir in 2 tablespoons oil, 1/2 cup cheese, and pancetta. Add cooking liquid by 1/4 cupfuls if it’s too dry. Toss pasta; transfer to serving bowl if it was in a pot. Season to taste with salt and pepper. Sprinkle 2 tablespoons parsley over. Serve with cheese. -
A New Year’s Cleanse – Banana Pom-Berry Smoothie
Happy New Year to you all!! I am so incredibly excited to dive head first into 2011! 2010 was a wonderful, blessed year filled with many great moments and though I experienced a few tough and trying moments in 2010, I have tried my best to look at all of those experiences as times where my strengths are tested and I learn just what I am capable of. I personally decided to make 2010 the year I tried to relax and not take everything so seriously, to take each moment for what it is and to love myself more. I have always made sure to see the positive in things and to realize things could always be worse, 2010 was the year I really made certain to keep that mindset in the forefront. I have also decided to focus on all that I have and how lucky I am to be healthy, happy and loved. I truly feel that each day is special and that I am lucky to have a loving husband, an incredible family, and a job and career that I not only love, but am immensely proud of. For us, both personally and professionally, 2011 is already shaping up to be an incredible year and I am elated for each and every moment to come!
One of the things I accomplished in 2010 that I am quite proud of, besides shedding 30lbs of excess weight, is the ability to be so in tune with my body and my health that I can sense when it is off-balance and needing a clean-up. I kept with my lifestyle and eating habits through the holidays, but it is inevitable that you are just consuming more food and drink than any other stretch of time throughout the year, at least for me anyhow. It is a week of excess, in all facets of life. I knew just before New Year’s eve, when I felt some sniffles coming on and I was feeling a bit more sluggish than usual, that I was in need of a good cleanse. I decided I would do a 2-week cleanse beginning today.
There are many different cleanses and detoxes out there, some are VERY intense and limited to just liquids, others aren’t nearly as strict, still allowing poultry and fish. I think the type of cleanses I practice, fall somewhere in the middle. I always avoid added sugar and salt, meat, fish, dairy, eggs, caffeine, and alcohol. Of course my cleanses also always include my usual no gluten and no processed foods. This time around I am also avoiding soy and corn. To most people this sounds limiting and difficult, but I actually look forward to it and think it is an exciting time. I love the focus on fruit, vegetables, legumes, whole grains, herbs and spices. Life tends to get crazy and meals get rushed and these important elements often get forgotten and overlooked.
I find that these cleanses allow my body to not only detox but to also get back to a clear digestive tract that is able to do its job at it’s fullest. I have also done a bit of reading on Ayurvedic healing and learning to avoid or focus on foods specific to you and your body-mind type (or your dosha) and it’s needs. When I cleanse, I don’t follow the Ayurvedic cleanses per se, I just include that general focus on food types, herbs and spices and the importance of yoga and meditation when cleansing. There is big emphasis on digestion-enhancing, detoxifying spices in Ayurvedic healing such as turmeric, cumin, coriander, clove, ajwain, fenugreek, dried ginger, Chinese cinnamon and fennel. According to Ayurveda, each meal should be a feast for all of your senses. When your plate reflects an appealing variety of colors, textures, flavors and aromas, your digestive juices start freely flowing in anticipation and your body, mind and heart are all fulfilled by the eating experience.
I am by no means an expert on cleansing or Ayurvedic medicine, I simply know my body and have tailored a cleanse to me and what I need, so please don’t take any of what I am doing as “medical advice” or anything more than me keeping a journal of my journey through this cleanse.
I plan to cleanse for 2 weeks, longer if I feel I need it. I will be posting many of the recipes here on my blog as I go. Hope it helps any of you looking to try out a cleanse or maybe you are just looking to add in some very healthy, clean detoxifying recipes! Happy New Year and happy clean eating to you all!
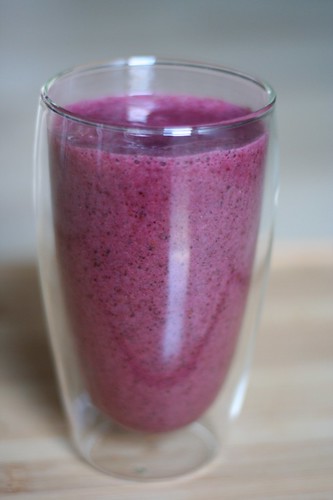
This recipe will be the first of many smoothie recipes I will feature. I think they make great breakfasts and if you include different ingredients each time, you won’t get bored. I decided to add flax seeds to this smoothie (and will likely do so often through this cleanse) to get some added fiber and healthy omega-3 fats, it is great for adding to smoothies as it tends to keep you a bit more satisfied, a bit longer. Flax seeds are also great sprinkled on salads, cooked vegetable or added to breads or cereals. This smoothie had a ton of flavor and it is now over 3 hours since I drank it and I am still quite satisfied. This is one I will for sure be making again.
Banana Pom-Berry Smoothie
serves 11/2 orange, peel and pith removed (I used a cara cara pink navel, any orange will work)
1/2 cup organic 100% pomegranate juice (no additional ingredients and definitely no sugar added)
1 organic banana, halved
1 tbsp ground organic flax seed (I buy them whole and grind them myself)
1/2 cup frozen organic mixed berriesAdd all the ingredients to your blender, blend until smooth. Enjoy!
-
Blueberry Ginger Almond Milk Smoothie
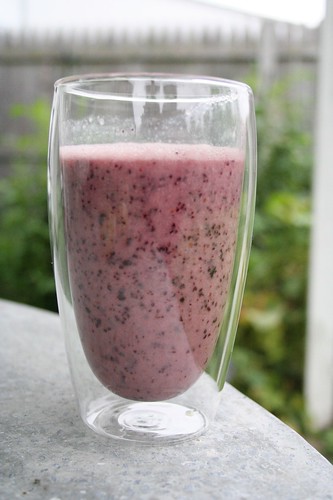
After a week at the beach, filled with friends, food, beach fires, sun and of course, cocktails, I wanted to treat my body to a 10-day cleanse when I got home. Mostly it was because I felt like I had eaten more meat, cheese and alcohol than normal. Though I stayed away from the junk food, the processed crap and yucky meats, I definitely got ice cream one night and may have had a smore or two around the fire over the week. I could feel that sluggish feeling and I knew that meant my body needed some cleaning up. I decided on top of my usual gluten-free, no processed foods lifestyle, I was going to avoid meat, dairy, sugar, caffeine and alcohol for 10 days. I am on day 5 and I am glad I made the decision to do this quick cleanse. Since I did the 30-day cleanse a few months ago and there is little detox I had to go through this time around, in a way, this feels like a breeze. Though, I am not going quite as strict as the last time, I know that just avoiding the major things will make a huge difference in the way I feel. For me, when I cleanse, I try to focus on eating a lot of vegetables, healthy grains and legumes. I go light on the fruits and healthy oils, but I don’t cut them out completely. I hope to cleanse again at the change of the seasons, but it will depend on how my body is feeling. I also really try to include a lot of spices and herbs in my meals, since they are great natural detox and healing aids and are really helpful for purifying your digestive system. I had some ginger in the fridge and thought it would be a great addition to this smoothie. Ginger is warming and promotes digestion and has been used for centuries to aid in gastrointestinal distress. It is also known to boost the immune system and is an effective remedy for coughs, congestion and sore throat.
Most almond milks have a sweetener of some sort added, I try to find one with the least amount of sweetener, I have yet to find one without any. The organic almond milk I used was very lightly sweetened with evaporated cane juice, so this smoothie didn’t need any sweetener added, but if you wish, you could add 1/2 – 1 teaspoon of organic raw honey or whatever your sweetener of choice is. Homemade almond milk is also an option. I came across this recipe on So Good and Tasty for Homemade Almond Milk and I plan to try making it very soon. The nice thing about making your own almond milk is you can control the amount of sweetness and you can even use the pulp from the nuts for a spread.
I have made this smoothie a couple of times this week and not only is it a filling and tasty breakfast, it has definitely helped with the sweet cravings I had early on.
Blueberry Ginger Almond Milk Smoothie
serves 11 – 1 1/2 cups organic almond milk (I used vanilla flavored)
1 cup fresh blueberries
1/2 – 1 teaspoon fresh ginger, finely minced
a few ice cubesPut all the ingredients in the blender, blend until smooth. Add more almond milk or ice as necessary.


