-
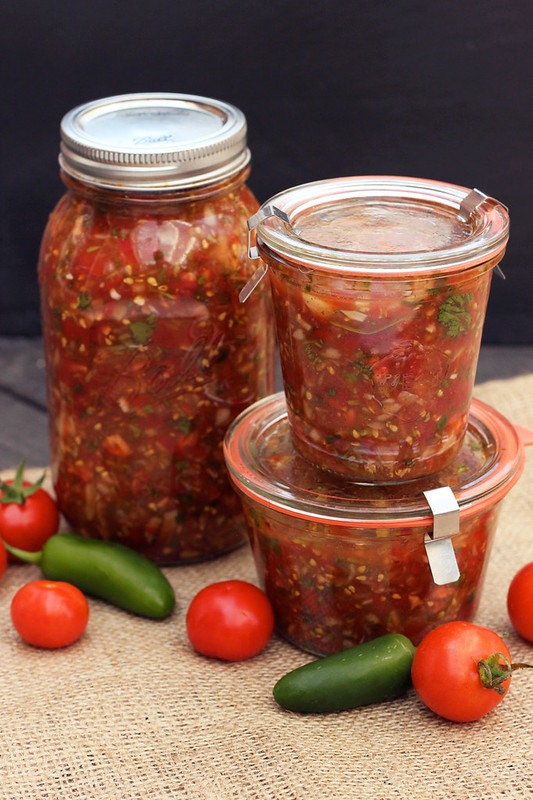
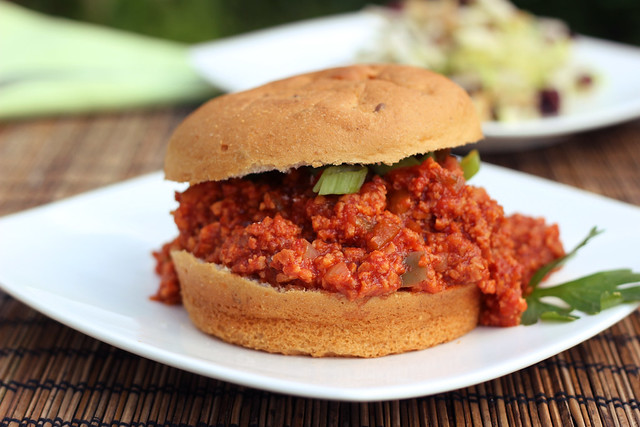
How-to Make Restaurant Style Salsa

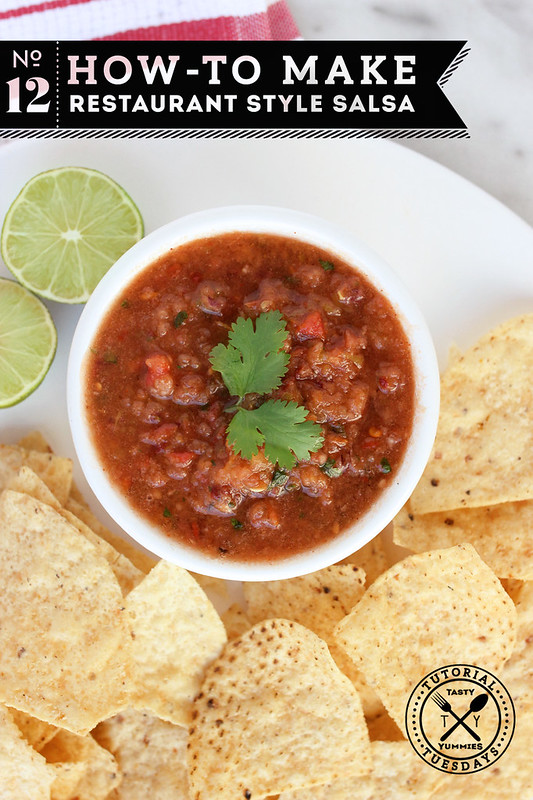
As summer’s end nears, we are left with the last few bites of the season to savor. I feel like a bit of a hoarder whenever I go to the markets this time of year and I see the beautiful heirloom tomatoes, the beautiful Hatch chiles, fresh herbs and all the other goodness. I can’t help myself. I want it all.
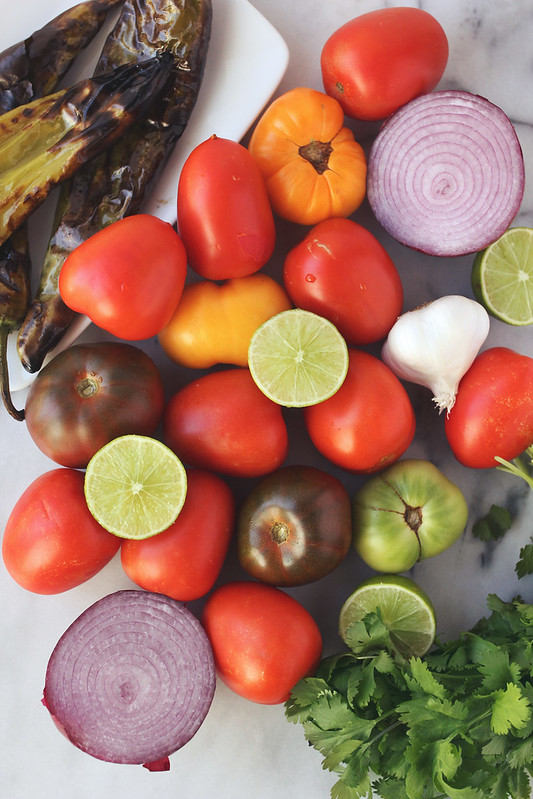
What better way to enjoy the final tastes of summer than a perfect fresh homemade salsa. For me, though I love a chunky, classic-style pico de gallo, what I don’t love is the amount of time all of the chopping takes. This restaurant-style salsa is a smoother, classic salsa and it is a cinch to whip up.
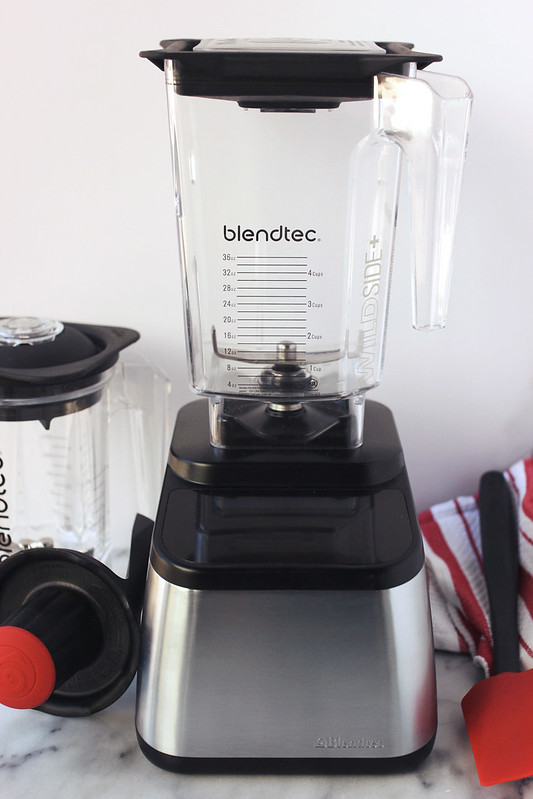
When Blendtec offered to send me one of their beautiful high-powered blenders, I immediately became excited about all of the possibilities. The middle of the road KitchenAid blender we got for our wedding 7 years ago, was nearing the end of it’s life and though it’s made literally hundreds and hundreds of smoothies, it also never overly impressed me, it was no powerhouse and it definitely couldn’t handle anything too thick.
-
Smokey Tomato Vinaigrette {Gluten-free, Vegan}
Last month while in my yoga teacher training program, I basically lived on salads every single day for lunch. They are such a simple thing to pack up in the morning and with all the many variations, I never find myself getting sick of it, even if you are having it every day. Some days I added grilled chicken or cooked lentils, often I would skip out on cheese, but other days I would add some crumbled feta cheese or goat cheese. I would add nuts or seeds, dried fruit or sun dried tomatoes, etc. It was quite fun and always delicious.
I started out the month by making my own dressings and vinaigrettes and then on a trip to Whole Foods in a moment of weakness and desperation, trying to save some time where I could, I bought a couple different bottles of organic dressings and vinaigrettes. Of course, as soon as I tried all of them, I realized I could easily be making these myself and I realized how silly it was to buy store-bought dressings, especially because even when organic, they have far more ingredients than they should, many of which as strange preservatives.
I had bought a yummy creamy, vegan, smokey tomato dressing that I really loved and instantly realized I should be making this myself. And often. This Smokey Tomato Vinaigrette is creamy and full of so many amazing flavors. It is of course, great on a salad, it would make an amazing marinade for chicken or fish, it’d be great on a pasta salad and it’s delicious drizzled on your favorite sandwich or wrap. I bet it would also be incredible as a marinade and/or dipping sauce for these grilled artichokes, too. Tomorrow I am sharing a yummy recipe for a plant-based sandwich alternative and this is the perfect condiment on it. So keep a look out for that. Read the rest of this entry »
-
Fermented Salsa – Gluten-free, Vegan
First off, I know for many of you, your very first question will likely be “Why?” Why would you ferment salsa? Well, I suppose that could be asked about many things. Why ferment? Admittedly, fermentation and cultured foods is something I am newly interested in and I am still learning a lot about. So, I will just share some of what I have learned about why fermented foods are so good for us.
There is so much more to having a balanced and happy gut than we realize. It is now estimated that over 500 species of bacteria are present in our intestinal track with reports of 50 – 75% of our immune system activity residing there. In our modern world filled with antibiotic drugs, chlorinated water, antibacterial soap and pasteurized foods, we are killing off all of the good bacteria we need to maintain good health and digestion. If we don’t actively replenish this good bacteria that we need, we won’t get the proper nutrients out of the foods we are eating.
Why Ferment?
There are so many healthy enzymes that flourish and live cultures that are created when vegetables are fermented, creating an environment full of probiotics, enzymes and minerals which are important in maintaining healthy digestion and a healthy body. These live cultures, usually bacteria or yeast, that fermented foods contain, help balance the microflora are a little city of tiny organisms in our large intestine that, when working well, help digest fiber, protect us from things we’d rather not absorb like carcinogens, and keep the bowel healthy.
The probiotic good bacteria and enzymes in fermented foods help to populate our gut and intestines with Lactobacilli which are really important for healthy digestion. They also help to eliminate toxins from our body, so eating them will allow your intestines to detox, which is a really good thing! All of this beneficial bacteria (or probiotics) have also been shown to help slow or reverse some diseases, improve bowel health, aid digestion, and improve immunity! I am a huge proponent of taking a daily probiotic, which has changed the way my gut feels on a daily basis.
-
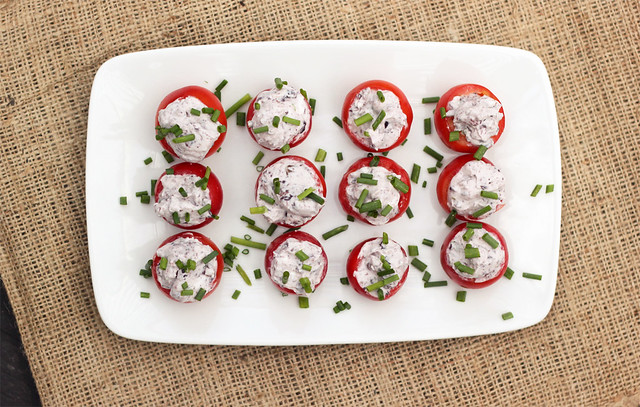
Kalamata Olive & Goat Cheese Stuffed Cherry Tomatoes – Gluten-free
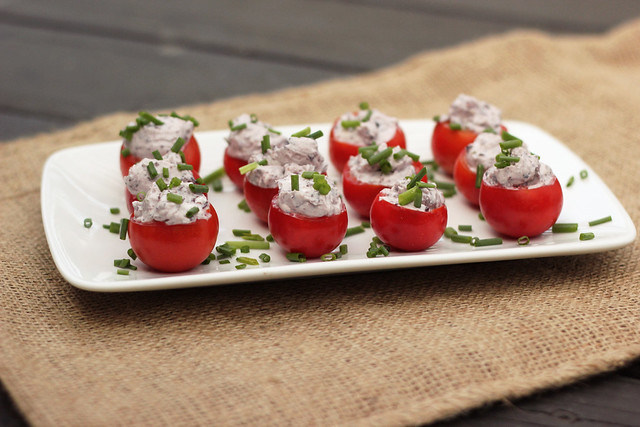
If you follow my Facebook page, you probably have seen the excessive amount of tomatoes coming from my garden. It is crazy. I am having to get really creative over here with all of them. It has been quite fun, actually.
These simple to make Kalamata Olive & Goat Cheese Stuffed Cherry Tomatoes are super simple to make and they make a great appetizer for an end-of-summer BBQ or picnic. If you don’t love olives, simply leave them out, this will still be super delicious. For a different variation, if you are vegan or avoid all dairy, try stuffing your tomatoes with some mashed avocado with cilantro, or a homemade guacamole. That’s equally as delicious.

I have been experimenting more and more with enjoying small amount of goat milk and sheeps milk cheeses and yogurt, I tend to not notice any issues when I eat it, so I do it very sparingly and in small amounts. I think for many people, this seems to be the case, outside of those with serious intolerances or allergies. At any rate, I have missed cheese a bit, so it has been a nice addition to my life. Do you have issues with dairy? Is it all dairy or just some?
This recipe was originally shared on the Free People Blog BLDG25 as part of my ongoing Restricted Diet serie.
[print_this]Kalamata Olive & Goat Cheese Stuffed Cherry Tomatoes
- 24 heirloom cherry tomatoes (about 1 pint), washed and dried
- 4 ounces goat cheese
- 1/4 cup Kalamata olives, chopped finely (optional, if you don’t like olives, you can leave them out)
- 1 tablespoon fresh oregano, roughly chopped (fresh basil would be great, too)
- Freshly ground black pepper
- Dash of sea salt
- 1 tablespoon fresh chives, sliced thin
Slice the top off of cherry tomato, about 1/4-inch. Gently scoop out the seeds using a small spoon — I find a 1/4 teaspoon works perfectly. Drain off any juice that accumulates in the shells. (If your tomatoes are rolling around, you can slice a tiny sliver off the bottom of each so it will sit without rolling.)
In a bowl, mix together the goat cheese, Kalamata olives, fresh oregano, black pepper and sea salt together. Get it stirred up really well so it is creamy — I found a fork works perfectly. You may want to add just a small splash of water to get it moving.
Gently spoon the mixture into the tomatoes. Arrange on a serving platter, top them with the fresh cut chives and serve immediately.
[/print_this]
-
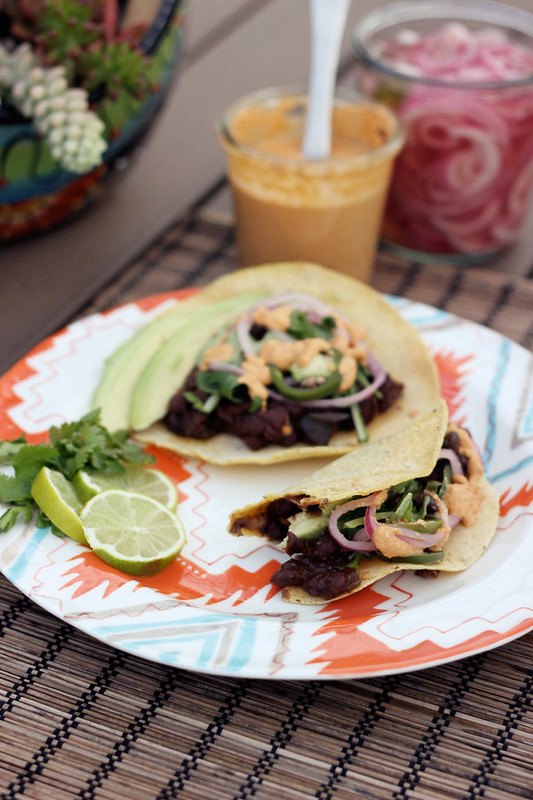
Slow-Cooked Black Bean Tacos with Vegan Chipotle Cream {Gluten-free + Vegan}

I have always LOVED tacos, but from traveling a ton to Texas and California and even Mexico once or twice, I am well aware of what makes a good taco. Living in Western New York for the past 30+ years meant getting the very best tacos I could on the road and when I was really craving them at home, just making them myself. I have made soo many different tacos, some vegan, like these, some with slow cooked meat from our farmer, some loaded just with grilled veggies, and so on. I am not saying my homemade tacos are THE very best and most authentic, but for the most part they were better than any I could get in Buffalo. (Though Lloyds Taco Truck were damn delicious and the best in WNY outside of my kitchen, for sure!)
I find the key to authentic tacos (or at least for my taste) is skipping on the loads of cheese and chopped iceberg lettuce like most Americans love. You want good quality ingredients like slow cooked beans or a meat, spiced to perfection. Add some fresh cilantro, a quick homemade pico de gallo or other salsa and add a few other simple but yummy things like quick pickled red onions, (diced onions or green onions are always great to) or maybe a simple chipotle cream. Less is more in a lot of ways.
OK so now I am living in Southern California, the land of amazing tacos. Why did I make tacos at home, you ask? Almost every week for Taco Tuesday we have tried a different place out, since you can get amazing prices/deals at most places. Last week, we didn’t wanna go out and we still wanted tacos, so this was the next best thing.
These tacos feature super flavorful slow-cooked black beans, that do their thing ALL day in the crock pot. Load it up in the morning before work and by dinner time it’s all ready for you. You can make the pickled onions and chipotle cream the day before, the morning of when you are loading up the crock pot or just a couple of hours before you serve dinner. I highly suggest making your own corn tortillas whenever possible, they are so simple to make and once you do, you will realize what you have been missing. I was forced to skip on it this time as I wasn’t able to find non-GMO masa harina around here, so I just bought some pre-made organic non-GMO corn tortillas that were very good and very fresh.
**BONUS ADDITIONAL MEALS: The great thing about this recipe is that it makes a decent amount of black beans and other goodies. So make tacos for 4 – 6, or more – or make tacos for 2 one night, then make delicious black bean and brown rice bowls another night. Instead of tortillas start with brown rice in a large bowl, top with the slow cooked black beans, add any other veggies or toppings, top with the pickled red onions and chipotle cream sauce and you have another deliciously incredible meal.
Slow-Cooked Black Bean Tacos with Vegan Chipotle Cream {Gluten-free + Vegan}
[print_this]Slow Cooked Black Beans
- 1 lb organic dried black beans – soaked overnight, drained and rinsed*
- 4 cups water and/or vegetable broth (if you aren’t using canned tomatoes, you may want a bit more water)
- 1 jalapeño, diced
- 1-2 dried chipotles, left whole
- 2 stalks celery, diced
- 1 red onion, diced
- 1 green bell pepper, diced
- 2-3 cloves garlic, minced
- 1 bay leaf
- 1 small can diced fire-roasted tomatoes (I like Muir Glen organic) you can also use fresh tomato
- 2 teaspoons ground cumin
- 3 teaspoons chili powder
- 1 teaspoon ground coriander
Salt to taste at the end of cooking
Soak the beans overnight. Drain and rinse well.
Add all of the ingredients to the crock pot. If you aren’t using canned tomatoes, add another 1-2 cups of water. You want to make sure there is enough liquid so the beans don’t scorch or burn.
Stir well. Cover and cook on low for 8 hours. Salt to taste and the end.
*If you forgot or didn’t leave time to soak the beans overnight, no problem. Put them in a large pot, and cover completely with water. Bring to a rapid boil for 10 minutes, then turn off stove and cover pot. Let your beans sit for 1 hour, then drain water and put beans into crockpot) [/print_this]
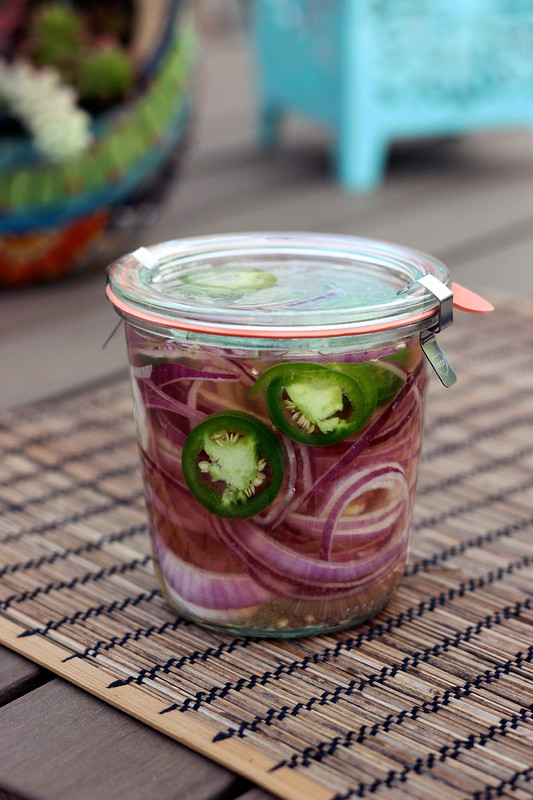
[print_this]Quick Pickled Red Onions (and Jalapeños)
These simple pickled onions can be made ahead, it will keep for 2 weeks.
- 1/3 cup red wine or apple cider vinegar
- 1 teaspoon raw sugar (if you are totally sugar-free try a splash of maple or other sweetener of your choice)
- 1 teaspoon kosher salt
- 1 red onion, thinly sliced
- 1 jalapeño, cut into rings
Whisk first 3 ingredients and 1 cup water in a small bowl until sugar and salt dissolve. Place onion and jalapeños in a jar, pour the vinegar mixture over. Let sit at room temperature for at least 1 hour and up to 8 hours. Cover and chill. Drain onions before using or just pull right out of the jar and add them to your tacos. [/print_this]
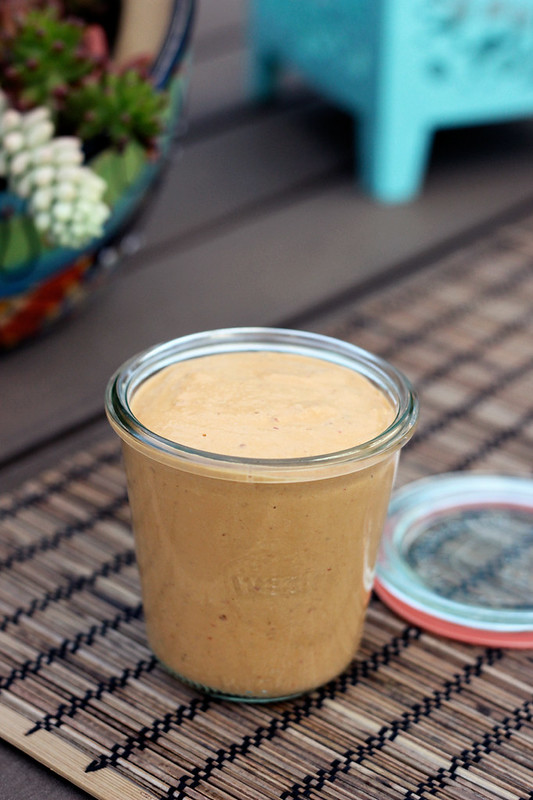
[print_this]Vegan Chipotle Cream
This sauce is great on these tacos, but also delicious in place of mayo or other spreads on sandwiches or wraps.- 1/2 cup organic raw cashews (soaked for at least an hour), drained then rinsed well
- 1/4 cup water (you may need more)
- 2-3 chipotles (the canned kind in adobo sauce)
- 1 teaspoon of apple cider vinegar
- 1 large clove garlic
- squeeze or two of fresh lime
- salt, to taste
Add all of the ingredients to your blender. Start on a low speed. You may find you need to add more water to get it moving and to reach your desired consistency. Gradually increase the speed of the blender until the desired creaminess is reached. If you add to much water and it’s too thin, just add a couple more cashews. Pour into a jar, cover and place in the fridge. [/print_this]
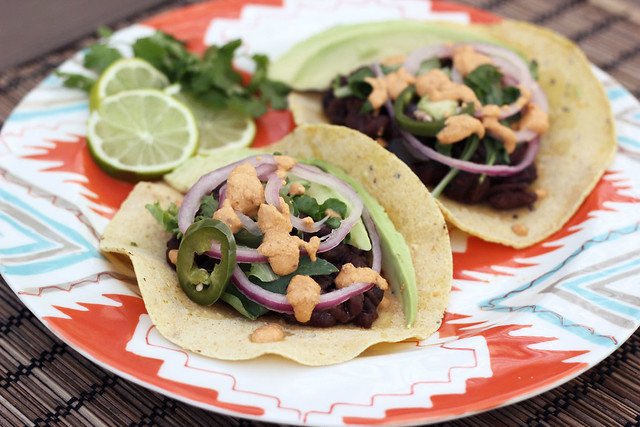
[print_this]Assembling Your Tacos – All The Add-Ons
These are the other ingredients you will need:- Slow Cooked Black Beans (above)
- Pickled Red Onions and Jalapeños (above)
- Chipotle Cream Sauce (above)
- 6-8 Corn Tortillas (more if serving more)
- Organic baby greens, shredded lettuce or cabbage
- fresh cilantro
- lime wedges
Optional:
- sliced avocado
- roasted corn
- pico de gallo, salsa or fresh tomatoes
- Tapatio or Sriracha or other hot sauce
- etc
Assemble. Heat up your corn tortillas. Add the beans, lettuce, pickled onions and jalapeños, cilantro and drizzle the chipotle cream over top. Serve with a fresh lime wedge.[/print_this]
-
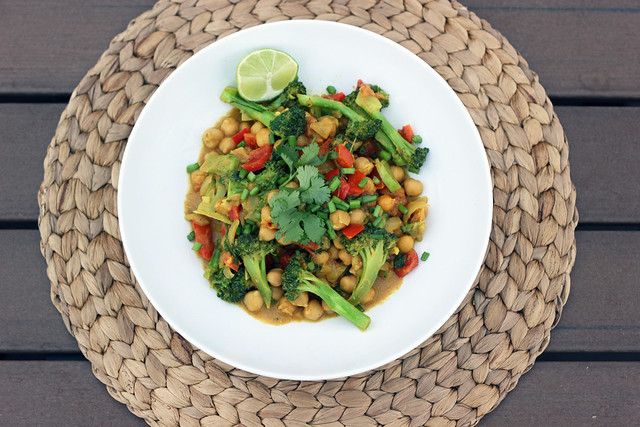
Spring Cleanse – Broccoli and Chickpea Curry – Gluten-free + Vegan

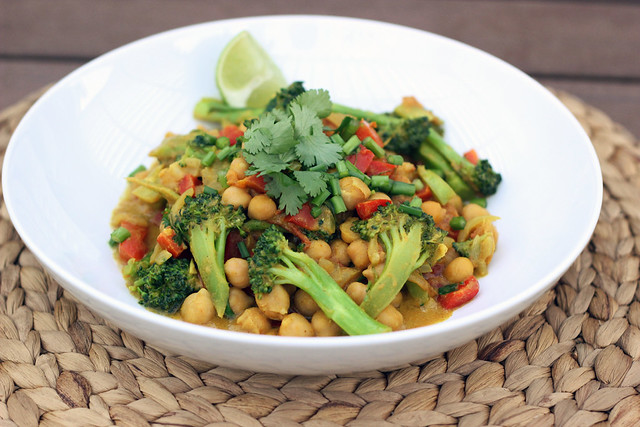
Good morning guys!! Today is day 4 of my 7-Day Cleanse. Yesterday, day 3, was a lot easier than day 2. No more headaches, but I definitely felt pretty tired. I had that delicious creamy green smoothie for breakfast and for lunch I heated up some of the leftover vegetable soup that I had made the night previously for dinner (see my Facebook page for a photo and description of the soup). I decided a curry for dinner sounded perfect. I need you to know that I fought off every single desire to serve this over brown rice, like I was craving. I wanted to keep the first 3-4 days of my cleanse totally grain free, since I am absolutely a carboholic!! Always have been. Honestly, I didn’t miss the rice one bit. Seriously.
This curry is full of flavor and has a very satisfying crunch and texture to it, and it is insanely simple and quick to make. There is so much going on with the different flavors and the creamy curry sauce is so delicious. And look at all of those beautiful colors! What a feast for your eyes and your tummy! I ended up sprinkling some shredded unsweetened coconut on top after I took photos, along with the fresh cilantro and garlic chives and it was amazing. Mark even liked this dish and it is hard to get him to eat anything that even slightly resembles Indian food (after last year’s food poisoning incident at an Indian restaurant in Austin).
FYI – if you prefer to make your own curry spice blend, definitely go for it. I have a premixed blend that I bought at an Asian market and I really love it, so it makes this dish that much easier.
How are you feeling today on Day 4 if you are following along? What have you been eating? Hope you have all been following along on my Facebook page, where I have been sharing what I am eating for each meal.
[print_this]Broccoli and Chickpea Curry – Gluten-free + Vegan
serves 2- 1/2 – 1 tablespoon olive oil (ghee or coconut oil would be great here too)
- 1 small organic onion, diced
- 1/2 large (or 1 small) organic red bell pepper
- 1-inch nub of ginger, peeled and grated
- 1 clove garlic, minced
- 1-2 tablespoon yellow curry powder (I prefer a lot and a lot of heat, so I use 2 TBS +)
- salt to taste
- 1 head organic broccoli, cut into florets
- 1 medium organic tomato, diced
- 1 cup organic chickpeas cooked, you can use canned (BPA free) or if you soak dried beans over night and cook them, those would be even better
- 2 tablespoons (up to 1/4 cup) full-fat organic coconut milk (you can certainly use more, I was just looking to go light)
- 1 lime
- bunch of cilantro
- Green onions or garlic chives
- shredded unsweetened coconut
In a large pan, heat oil. Add onion and bell pepper. Sautee for a couple of minutes until the onion is slightly translucent and both are beginning to get tender, add the ginger and garlic, stir around and cook for about a minute, until fragrant. Add the curry powder and salt to taste. Give everything a good stir to get it all covered in the spices.
Add in the broccoli, sautée/stir fry until tender to your liking. Add in the tomatoes, chickpeas and coconut milk, stir around and let it all simmer for a 5-10 minutes. Just before serving, squeeze in the juice from half the lime and a bunch of cilantro, stir around and taste. Adjust seasonings to your preference.
Serve as is (which is how I ate it) or over brown rice, topped with some fresh cilantro, green onions, a lime wedge and some shredded coconut if you wish (forgot to put it on for the picture, but it sure is good).
* I know it is repetitive on the “organic”, I truly believe it is always good to choose organic, but it is especially important to consume organic produce when cleansing!
[/print_this]
-
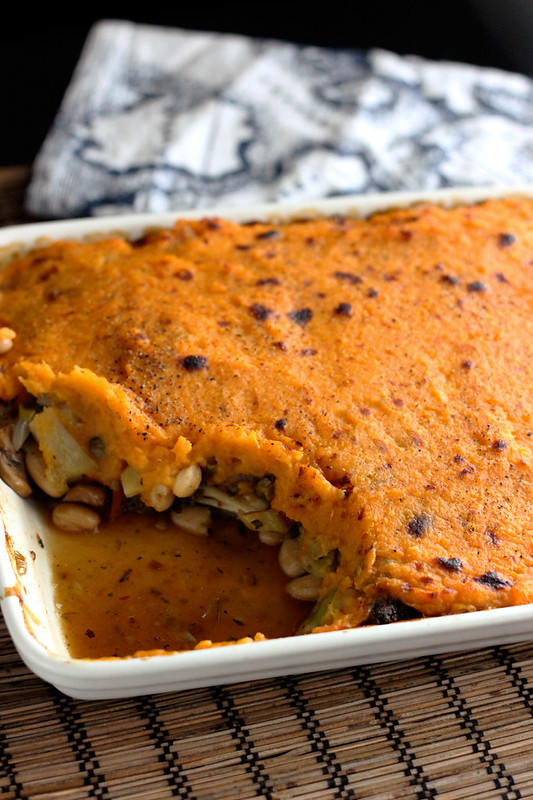
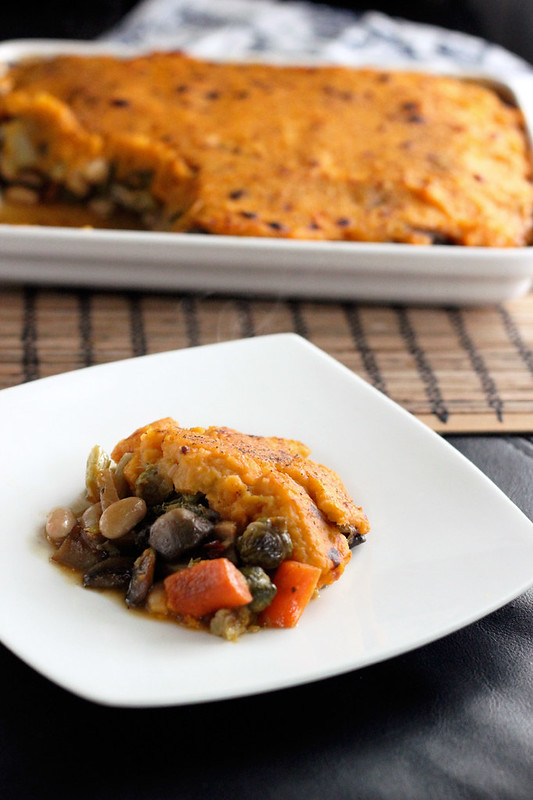
Roasted Veggie Shepherd’s Pie with Sweet Potato Topping – Vegan + Gluten-free
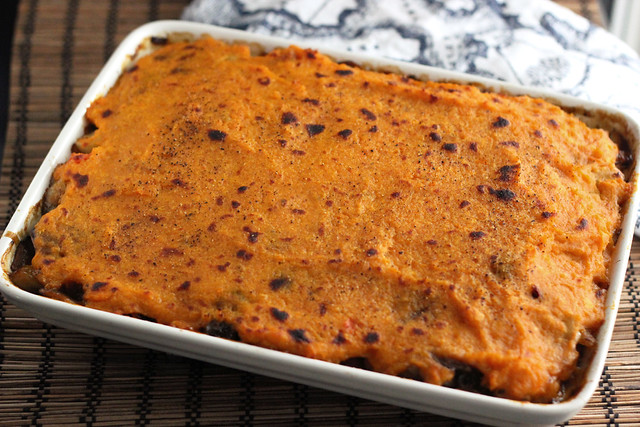
I am so excited that it’s comfort-food season!! As much as I adore the fresh local produce and cool and light dishes of the summer, there is something about the hearty, hot and comforting foods of the winter that are so enticing. A good comfort food meal will leave you feeling like you just got the biggest, warmest hug from your favorite loved one! Even better when it can be healthy comfort food! What’s your favorite comfort food?
Although this isn’t technically a one-pot meal, since it requires some prep, it is in theory and in it’s final state. I love a meal where it’s all inclusive. One big scoop and you are all set. Plus, a meal like this is perfect for leftovers. For some reason, I find meals like this even better as leftovers, I am not sure if it’s because I didn’t spend all the time prepping just before, or if it just really allows the flavors to come together to their fullest.
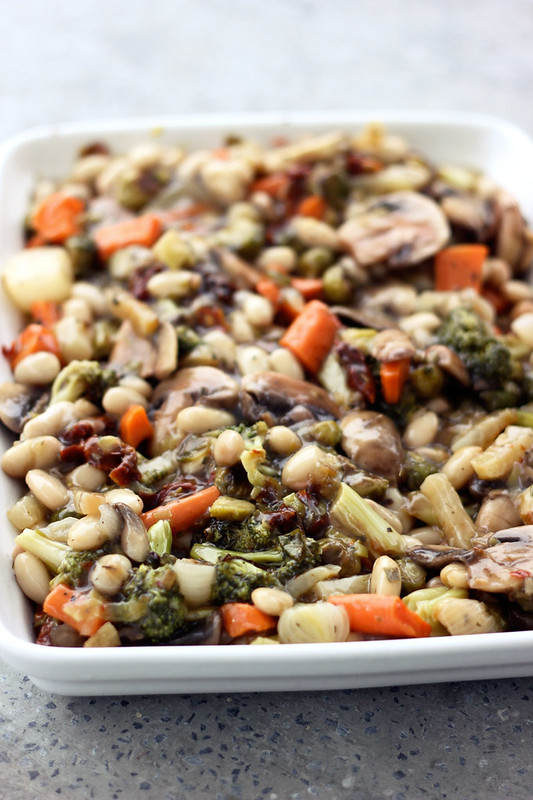
Please keep in mind, I used what vegetables I had on hand and what I would like best for the filling, but feel free to have some fun and add in whatever you’d like. Other wonderful add-ins for the filling would be squash, cauliflower, corn, green beans, asparagus, peas, lentils, beets, turnips, meat or tofu, etc, etc. The possibilities are endless. You could make this many times, each a totally different way. Another thing to note, you don’t have to roast your vegetables if you don’t want to. You could simply sautee them in a large pan on the stove top, I just personally love the flavor of roasted vegetables. I didn’t exactly accurately measure, so use my measurements below as a guide, but don’t get too hung up on the specifics, there really is no wrong way.
[print_this]Roasted Veggie Shepherd’s Pie with Sweet Potato Topping – Vegan + Gluten-free
Serves 4-6Filling:
(please keep in mind you can really use whatever veggies you would like and prefer, this is just what I had on hand.)- 2 tablespoons olive oil
- 1 small head broccoli, cut into small florets
- 1-2 cups pearl onions, peeled and halved, if need be (I used fresh, not frozen)
- 1 small bulb of kohlrabi, peeled and sliced
- 2 cups brussels sprouts, halved
- 1 leeks, rinsed very well, slice thinly white and light green parts only
- 2-3 carrots, peeled and cut into 1 1/2 inch pieces
- 2 celery stalks, diced
- 1/2 cup sun dried tomatoes, thinly slices
- 1 15 ounce can of organic white beans
- 8 ounces cremini mushrooms, sliced
- 2 cloves garlic, minced
- Fresh or dried herbs, to your liking – I used both fresh rosemary and fresh thyme
- salt and pepper, to taste
Sauce:
- 1 1/2 cups vegetable stock (or other stock like chicken or mushroom, etc)
- 2 tablespoons tapioca starch (potato or corn starch would also work)
- salt and pepper, to taste
- 1 teaspoon herbes de Provence
Sweet Potato Topping:
- 4 medium organic sweet potatoes, peeled and diced
- 1 large clove garlic, minced
- 2 tablespoons oil or butter (olive oil, coconut oil, butter, vegan butter, ghee, etc)
- splash of non-dairy milk (I used a bit of coconut milk)
- salt and pepper, to taste
Preheat the oven to 425ºF.
Toss all of your vegetables, leaving out the white beans, mushrooms and sun dried tomatoes, together with olive oil, fresh herbs, salt and pepper in a roasting pan. Place in the oven and roast for about 20 to 25 minutes, until the veggies are slightly tender and beginning to brown. While the veggies are roasting, quickly sautee the mushrooms with a small drizzle of olive oil over a medium high heat. Take the roasted vegetables out when they are ready and toss in the white beans, sauteed mushrooms and sun dried tomatoes.
Lower the oven temperature to 375ºF.
In a small saucepan heat the stock for your broth plus your herbs, over a medium-high heat, once simmering, carefully whisk in your starch to thicken. To avoid lumps, sprinkle it in lightly a little at a time or add some stock to a small bowl with the starch in and whisk quickly to fully incorporate. Once the veggies are done and all together, pour the sauce over, don’t add it all at once, you may not want it all, depending on how many veggies you have.
Pour the filling evenly into a very lightly greased glass baking pan and set aside. Meanwhile boil the sweet potatoes with the garlic in a medium saucepan full of water over a high heat. Once boiling, continue simmering for about 10-12 minutes until the sweet potatoes are nice and tender. Quickly drain the potatoes and then add back to the pot, add your oil or butter (or vegan butter) and mash with a potato masher, a hand mixer, etc. until smooth and creamy. Add a splash a non-dairy milk if you need a bit more liquid or to give just a hint of creaminess. Salt and pepper to taste.
Smooth the mashed sweet potatoes over the filling, using a spatula to spread evenly. Place in the 375ºF oven and bake for 30 – 35 minutes until the filling is bubbling. If you wish to get a bit of crispy brown goodness on top, place your shepherd’s pie under the broiler for a few minutes.
Let cool for a few minutes then serve while hot.
[/print_this]
-
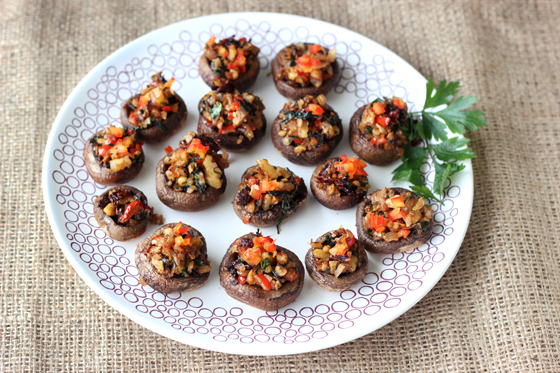
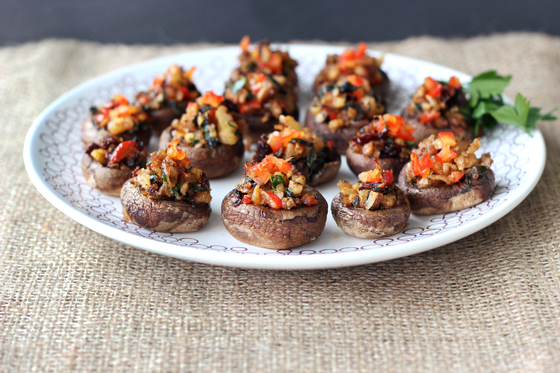
Vegan Grain-free Stuffed Mushrooms (Gluten-free + Vegan)

If you know me even just a little bit, you’d know how much I love a good party, especially those centered around eating, and OK yes, drinking, too! Everything in moderation, right? I love an excuse to wear a fun outfit, make some special treats and just enjoy myself. Our house is fairly small so it is very rare that I entertain at home, so I have to wait on other people to have parties and invite me, but when they do, I always jump at the chance to create something yummy to share with others. Besides the joy I get by making people happy with the food I make, the biggest reason I enjoy bringing something to share is the guarantee that I will have at least one thing to eat. Being that I am gluten-free and dairy-free and I also refrain from eating processed foods, it can be quite hard to indulge at parties and other get-togethers.
The other reason I love being able to bring some food to share to a party, is so I can spread the good word about eating clean and healthy. I think many people attribute the words “clean”, “processed-free” or even “gluten-free”, to mean taste-free and unexciting. I love changing people’s perceptions on food and eating and showing them just how much fun you can have with your food, even with a clean diet.
This recipe would be great for many different types of cocktail parties, whether it be a casual sports party for the Super Bowl or a fancy New Year’s Eve bash. They are as dressed down or dressed us as you need them to be. These stuffed mushrooms are grain-free and vegan, they are perfectly bite-sized and so full of flavor and texture. They are so quick to make, too. Plus, you could make these ahead of time, stuff them and put them in the oven just before the guests start to arrive.
These Vegan Grain-free Stuffed Mushrooms are so simple to make and are the perfect small-bite party food. If the party isn’t at your place, make them ahead and pop them in the oven just before serving at your holiday or cocktail party destination. They are of course perfect for any gluten-free and/or vegan eaters, but I promise all of the party guests will enjoy them and the bonus is they are easy on the waistline at a time of year when temptation is around every corner.
It was fun making these on a random work day (since we work from home) and eating them in the middle of the day, felt like we had a little party of our own.
Do you like bringing a dish or a treat to share when you go to a party or would you rather just eat what others make?
This recipe was originally shared on Cara’s Cravings as part of her Clean Eating Cocktail Party. Cara’s site is full of creative and delicious recipes that are always seasonally inspired and clean. Cara’s recipes will always give you the excitement and comfort we crave from food, but without any of the guilt.
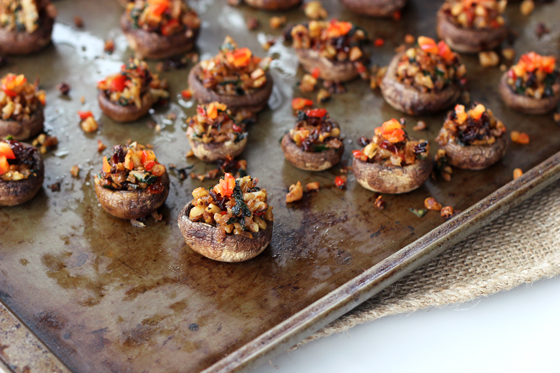
[print_this]Vegan Grain-free Stuffed Mushrooms
YIELD: 4-8, depending on size and quantity of mushrooms
What’s a party without the ever-popular stuffed mushrooms? These ones are loaded with walnuts, spinach and sundried tomatoes, a savory burst of flavor to feed any appetite.- 1 1/2 lbs. mushrooms, you can use baby portobellos, cremini or button
- 2 tablespoons olive oil
- 1/4 cup fresh parsley, roughly chopped
- 1 small red bell pepper, finely chopped – reserve a little for serving
- 1 small shallot, finely chopped
- 2 cloves garlic, finely minced
- 1/4 cup sun dried tomatoes, finely diced
- 3/4 cup walnuts, finely, roughly chopped
- 1 cup baby spinach, finely, roughly chopped
- salt and pepper, to taste
Directions:
Preheat the oven to 375ºF.Remove the stems from the mushrooms, set aside to dice and add to the filling. Brush mushrooms with a little olive oil, place stem side up and bake for 8-10 minutes.
In a medium pan over medium-high heat, add 1 tablespoon of olive oil. Saute the shallots, bell pepper, garlic and sun dried tomatoes for about 3 minutes until they start to get tender. Add in the parsley, finely chopped mushroom stems and chopped walnuts, cook another 2-3 minutes. Add in chopped baby spinach and allow it to wilt. Salt and pepper to taste.
Remove the mushrooms from the oven, pour off or soak up any water that accumulates in the mushrooms. Spoon the filling into the mushrooms and bake for an additional 10-12 minutes. Topped with fresh, raw diced red bell peppers and serve warm.[/print_this]
-
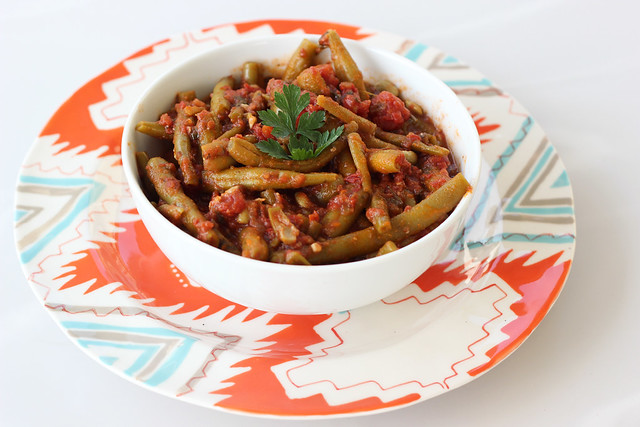
Fasolakia Freska (Greek Green Bean Stew) – Gluten-free (Vegan option)
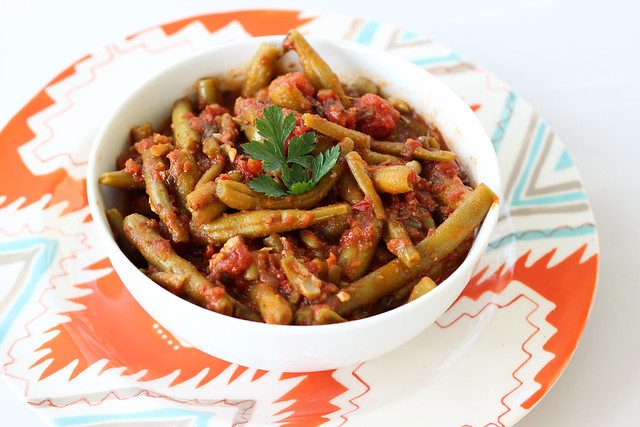
This is a traditional Greek dish that many different people in my family have made for my entire life. My Great Yia Yia (Yia Yia is Greek for grandmother), in my opinion made it the very best, I still think of her any time I smell this stew cooking. I can still remember exactly how her kitchen always smelled and just how it felt in there. There is something about the smell of this stew cooking that reminds me of her unlike any other smell can remind me of anything else in the whole world. I am not sure if it was actually this way, but in my mind I swear she had to always have had always something like this, or one of her other stewed green concoctions, cooking on the stove at her house. I swear it always smelled like this. She passed away when I was 12, so my memory is likely not exactly accurate, but that is how I like to remember it anyway 🙂 My dad’s mom, my Yia Yia, also used to make this stew and my Dad and my great Aunt Marge still make it. Even though it is a little different based on who makes it, I absolutely love it every single time. It is one of those dishes that I am not sure anyone in our family has an exact recipe for and I doubt that they ever really measure(d) as they add things. I think it is just made based on what how your own family makes it and then you just taste as you go. That is how I make it.
When we were kids on our birthday as a special treat, my parent would have us request whatever meal we wanted, and they would make it for us. I really don’t recall anything else that I would consistently ask for besides fasolakia, almost every year that was my pick. I think my parents probably thought I was insane. What child requests a vegetable based meal when they can have whatever they want only one meal a year? THIS ONE DID!!This dish can be made either with meat or vegan, my family usually makes it by cooking it low and slow for many hours with a quickly braised bone-in cut of lamb, but I have also had it without meat and it is still very good. I do think that the meat brings a nice depth of flavor and it adds a lot more taste and flavor with the extra fat. Most times they would pull the bones out just before serving so it isn’t a meat stew by any means, you may get a bit or two or stay meat, but generally it is just for the flavor. This stew may not look like much, but while it’s humble appearance it really packs a punch in the flavor department.
I didn’t have any lamb on hand, but I did have some beef spare ribs in the freezer from our cow share that we got from Sojourner Farms. Since the spare ribs are a fatty cut with a lot of flavor but not a lot of meat to really savor, they were perfect for this. I am not sure exactly how large the package of spare ribs were, maybe 2 lbs or so, it was three small sections of ribs.
I will apologize in advance for the lack of photos with this post, I hadn’t exactly planned on sharing this recipe when I started cooking it. However, when I had mentioned on Instagram and Facebook that I was making it, a handful of people requested the recipe, so I decided I would. My measurements in this recipe won’t be exactly accurate or perfect since I definitely didn’t measure as I went along, AT ALL. But you will get the general idea of the flavors that you want and you can taste as you go to make this exactly how you wish, (you may want to add more or less of something). This stew is great as a side dish with a large meal, or in my opinion it is a wonderful meal on it’s own. Just spoon the saucy stew in a bowl, with some fresh parsley and fresh ground black pepper on top. Maybe some crumbles of feta cheese and a serving of your favorite crusty gluten-free bread. It is absolute heaven in a bowl and it is for me the most comforting kind of comfort food there is.
[print_this]Fasolakia Freska (Greek Green Bean Stew) – Gluten-free (Vegan option)
serves 6- 1 package (about 2 lbs) of local pasture-raised beef or lamb spare ribs or a bone-in shoulder piece, etc (something suitable for braising)
- 2 tablespoons olive oil (if you are making it without meat)
- 1 medium onion, diced
- 3 cloves garlic, chopped
- 1 pinch red pepper flakes (optional)
- course sea salt
- 1 (28 ounce) can organic diced tomatoes
- 4 or 5 fresh tomatoes diced or quickly processed in the blender or food processor (you could also just add in another can of crushed or diced tomatoes)
- 1 bay leaf
- 1 teaspoon dried herbs de Provence (you could also just use the dried oregano and add some basil or use an Italian seasoning blend, etc)
- 1/2 teaspoon dried oregano
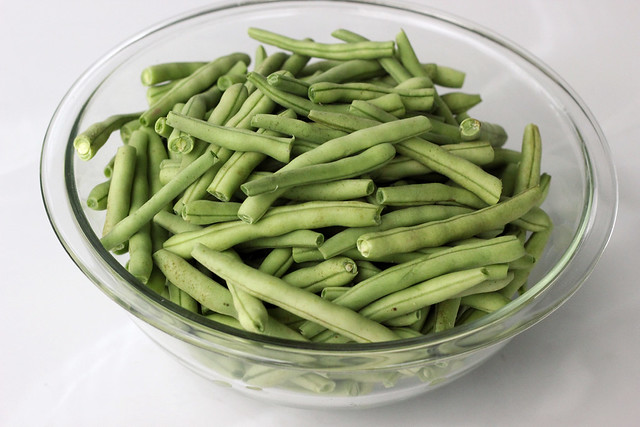
- 2 pounds fresh green beans, trimmed and cut into bite sized pieces if you’d like (you can also use frozen green beans thawed to room temperature)
- salt and pepper to taste
- 1 handful fresh parsley, chopped
- 1 small handful fresh dill, chopped (or 1 teaspoon dried)
If you are adding meat, heat a large pot or dutch oven over a medium high heat and quickly sear the meat on all side, getting a nice brown crust on each side. If you are making this vegan, just heat the pot over a medium high heat and add the olive oil.
Next, add in the onions, garlic, red pepper flakes and a pinch or two of sea salt, stirring constantly until the onions are translucent and starting to slightly brown. Reduce the heat and add in the tomatoes, bay leaf, and any dried herbs you are using, plus some salt and pepper. Allow it to simmer for an hour or two, the longer the better, in my opinion.
After the tomato sauce has simmered a while, give it a taste and add salt and pepper to taste. Then add in the fresh green beans, the parsley and the dill. Cook for another hour or so, over a low heat. You want the beans to be a dark army green color and nice and tender, you aren’t looking for a bright green bean with a crisp bite to it.
You can remove the meat when you are ready to serve, or just spoon around it. You can also pull some of the meat off the bones and add it back to the stew, which is really nice. Serve in a bowl with a piece or two of your favorite crusty gluten-free bread and chunks of feta (if you eat dairy) and top with some fresh parsley.
[/print_this]
-
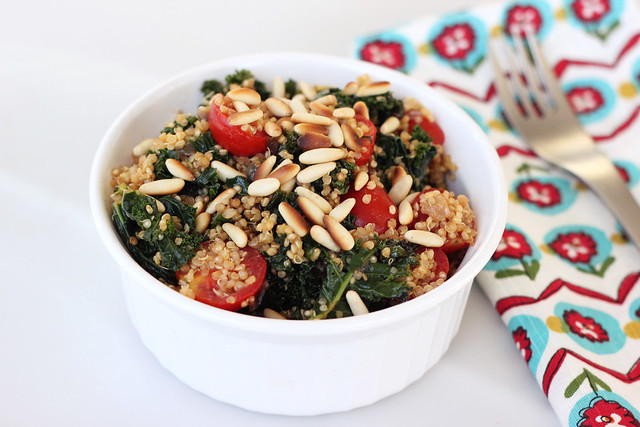
Sprouted Quinoa with Garlicky Kale, Tomatoes and Toasted Pine Nuts – Gluten-free + Vegan
I hope everyone is having a wonderful week. Being that it is a short week here with Labor Day being on Monday, it has been a busy couple of days over here. I have had a lot of different projects and tasks on my plate this week, so I have been a busy little lady. I have some really fun guest posts coming up that I have been working on and I cannot wait till they are live so I can share them with you.
I made this delicious quinoa dish for dinner last night as a nice way to highlight the delicious kale and tomato berries from our CSA share from Porter Farms. Each week the farm sends an informative newsletter with the shares, it always contains a list of all of the items you are receiving, plus some updates on the farm, their crops, how the weather is affecting them, storage tips and a recipe! This week’s recipe was for a whole wheat pasta dish that sounded quite tasty to me, but I had made a pasta a few days prior and I was really in the mood for quinoa, so I changed the recipe and adapted it to work for some delicious sprouted quinoa I had in the pantry.
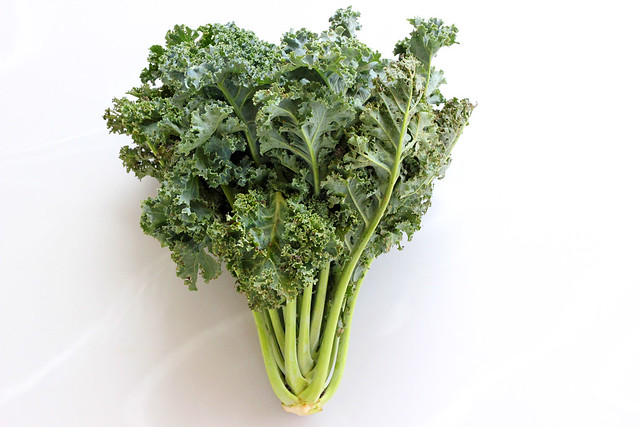
This quinoa dish (I suppose it could be called a salad, but I served it warm and it seems like so much more than a salad), was absolutely incredible. The flavor from the garlic and red onion with the nutty flavor from the quinoa and of course, the toasted pine nuts, plus the bursts of flavor from the tomato berries and the star of the show, kale. Oh my! I have to mention that the kale from Porter Farms is hands-down THE very best kale I have ever eaten. It was tender and full of flavor, but not too bitter as kale can sometimes be. I am not sure what it was about it, but it was just better than any I have ever eaten. It was perfection. I honestly get so excited about the food I get from our local farmers, nothing makes me happier than to know that the money I spend with them goes directly to them, there is no middle man, no grocery store, it is just going to support their crops, pay their workers, etc. If you follow me on Facebook, you may have seen the post I put up this past Saturday after I picked up my CSA and went to the farmers market, but if you didn’t it is worth repeating:
SUPPORT LOCAL!! For less than $40 I just brought home a huge haul from our CSA and the farmers market this morning that included: watermelons, beets, red onions, Roma tomatoes, regular tomatoes, tomato berries, green and purple bell peppers, poblano peppers, cubanelle peppers, kale, zucchini, corn, pears, eggplant, basil, cilantro, brown eggs, sweet onions & scallions.
Can you even believe all that?
Do you belong to a CSA or go to your farmers market?
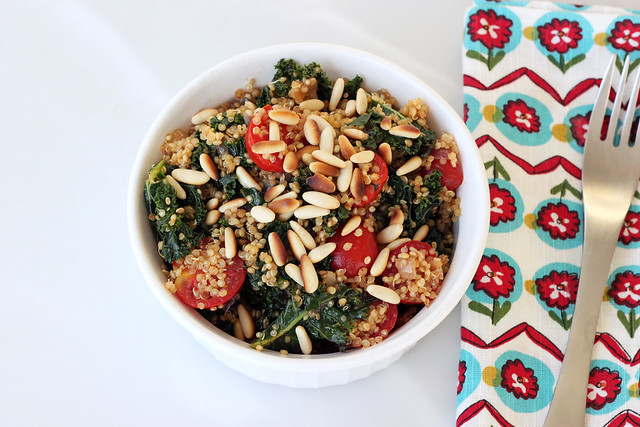
[print_this]Sprouted Quinoa with Garlicky Kale, Tomatoes and Toasted Pine Nuts – Gluten-free + Vegan
Serves 4
Inspired by this recipe from Real Simple1 cup uncooked sprouted quinoa (regular quinoa would work, too)
1 1/2 cups low-sodium vegetable broth (or water)
2 tablespoons olive oil
1 medium red onion, thinly sliced
3-4 cloves garlic, chopped
1/4 teaspoon sea salt
1/8 teaspoon black pepper
a pinch of red pepper flakes
1 bunch kale, thick stems removed and leaves torn into bite-size pieces (about 8 cups)
2 cups tomatoes berries (aka grape tomatoes), halved
1/3 cup toasted pine nutsRinse the quinoa in a strainer with cold water and rinse until the water runs clear. Heat a medium-sized saucepan over a medium-high heat. Add your quinoa to the pan and toast, stirring, until the grains have separated and begin to smell fragrant. Just a couple of minutes. Add the broth, a pinch of salt and bring it to a boil, once boiling reduce the heat to low, cover and simmer for 15 to 20 minutes, until the quinoa is tender and translucent and each grain displays a little thread.
While the quinoa is cooking, you can cut up all of your vegetables. Once the quinoa is done you can start preparing the rest of the dish.
Heat the oil in a large skillet over medium-high heat. Add the onion, with salt, pepper and red pepper flakes. Cook, stirring occasionally, until the onions are translucent and beginning to brown, 4 to 5 minutes. Toss in the garlic and cook for about a minute longer. Add the kale and cook, tossing frequently, until tender, 5-7 minutes. Add the tomatoes, tossing frequently, until the tomatoes begin to soften, 1 to 2 minutes more. In a large serving bowl, toss the cooked quinoa with the kale mixture, season to taste, if needed. Top with toasted pine nuts just before serving. Serve immediately while warm or it can also be served room temperature or even chilled. [/print_this]
-
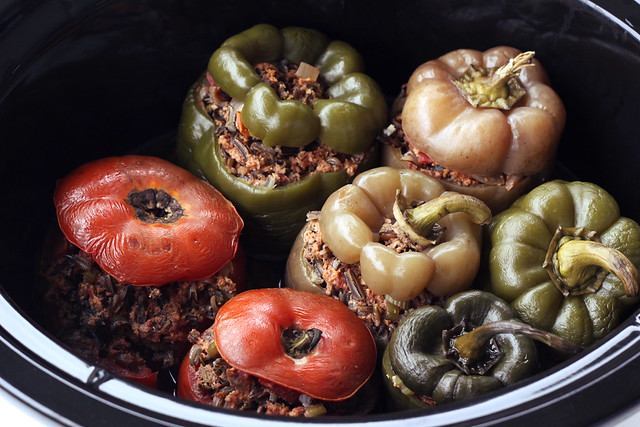
Crock-Pot Stuffed Tomatoes and Peppers – Gluten-free + Dairy-free (w/ Oven Option)
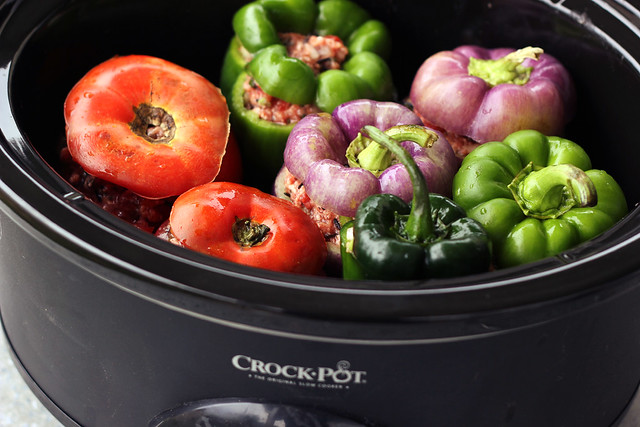
This is my version of a dish my parents have been making for as long as I can recall. They always serve it with a big Greek salad on the side as well as kalamata olives and some cut up feta cheese. So good! They bake them in the oven which I really like, but when I made these a week or two ago in the oven with black rice in the stuffing, I of course didn’t account for how long they would take to cook, I am not always the best at that type of longer term dinner planning. I didn’t get them into the oven until nearly 7:30pm, OOPS! We definitely didn’t eat dinner until 9:30pm that night, which I am not necessarily a fan of.
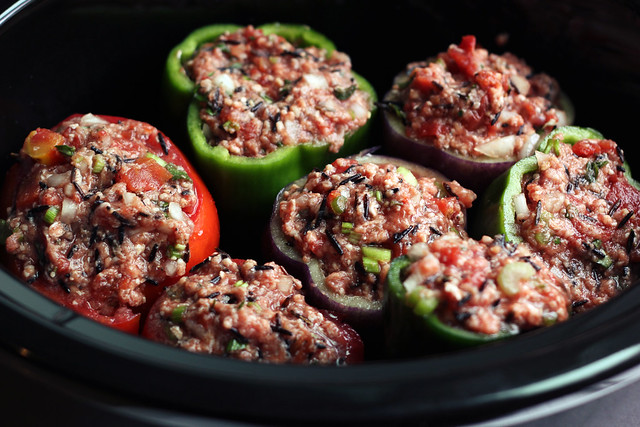
After that dinner, we got even more peppers and tomatoes the following Saturday in our CSA from Porter Farms, including more of the beautiful purple bell peppers, which are just beautiful. I thought I would try making these again since they are such a great use for the veggies, but this time in the Crock Pot, so they can just cook away all day and be hot and ready for us when we were ready for them. It turned out perfect, the peppers and tomatoes were nicely roasted and tender, but not too soft, the stuffing had a delicious taste and the wild rice had a sweet and nutty bite to it.
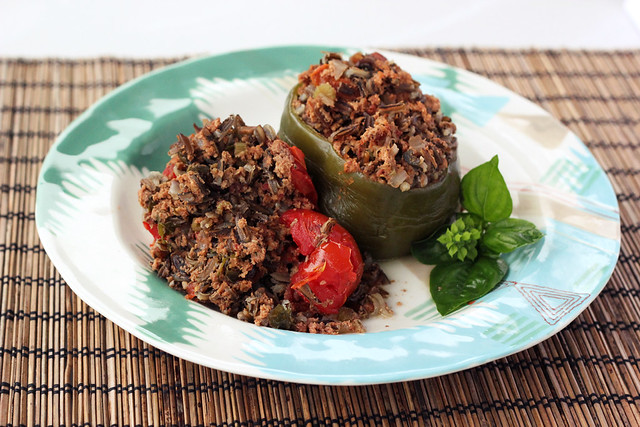
The thing I like a little bit better about making these in the oven versus the Crock Pot is if you take the foil off for a little bit, you can get a little crispiness to some of the stuffing, but other than that, the Crock Pot version is just as delicious. If you are making this in the oven and you have a bit more room, I also enjoying filling zucchini and eggplant with this stuffing.
Sadly these are so much more beautiful when they go into the Crock Pot versus when they come out, but I promise what the veggies lack in color, they make up for in taste.
[print_this]Crock-Pot Stuffed Tomatoes and Peppers – Gluten-free + Dairy-free
Serves 4- 1 lb raw local pasture-raised ground beef
- 1/2 cup uncooked wild rice (you can also use brown or white rice, black rice is also quite delicious)
- 1 28-ounce can of organic diced tomatoes
- 1 small onion, diced
- 2 cloves garlic, minced
- 2 stalks celery, diced
- 1/4 cup fresh herbs, chopped – I used basil and oregano
- 1 teaspoon sea salt
- 1/2 teaspoon freshly ground black pepper
- 1/4 – 1/3 cup water
- 6-9 tomatoes and peppers (I only had room for 7 veggies total in my crockpot but I could have filled 1 or 2 more with stuffing)
In a large bowl, mix all of the stuffing ingredients together (except for the water and the peppers). You can really get your hands in there if you wanna make sure it is well mixed.
Cut off the tops of the tomatoes and peppers and set aside. Take out the seeds and ribs on the peppers. For the tomatoes, scoop out some of the inside flesh you can add it to the stuffing or put it aside for use in something else. Wash and clean out the peppers and tomatoes, give them a quick dry.
Stuff each pepper and tomato with a good amount of the ground beef and wild rice mixture
Nestle the peppers and tomatoes into your crock and put the l tops back on. Pour in water around the bases of the peppers and tomatoes, you want just enough to cover the bottom of the crock pot.Cook on low for about 6-8 hours.
Depending on how tightly you have them packed in there, you’ll need to be a little careful when removing the veggies from your Crock Pot, you don’t want them to bust open and ruin your pretty presentation (like my tomato decided to do). They are definitely tender, the tomatoes especially. Salt and pepper to taste, if need be when serving.
Oven Option – Preheat the oven to 400º F. Prepare the peppers and tomatoes the exact same way. Add them to a glass baking pan, with just a drizzle of water at their bases. Cover with foil and bake for approximately 2 hours until the rice is fully cooked. [/print_this]
-
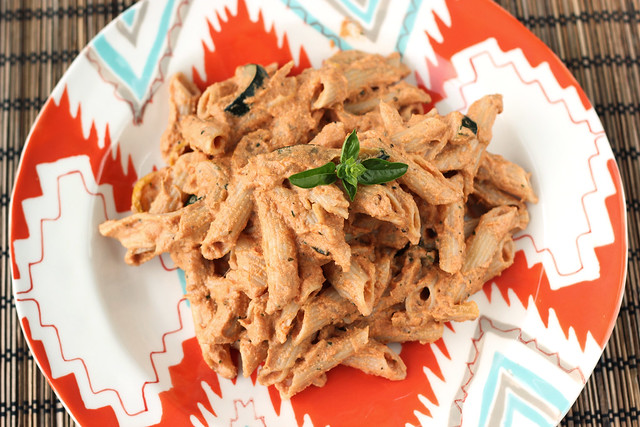
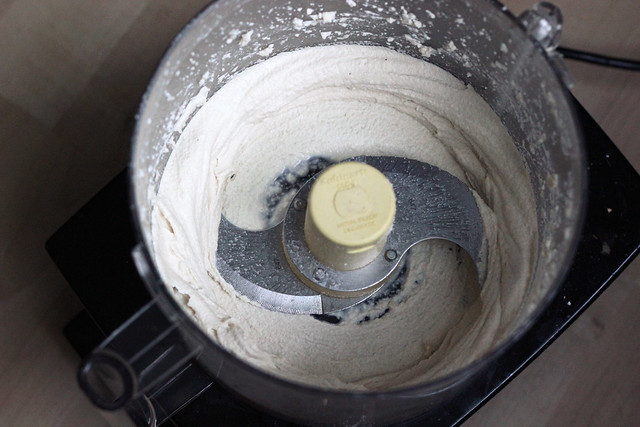
Pasta with Creamy Roasted Tomato Basil Sauce – Vegan + Gluten-free
It is finally officially tomato season here and I couldn’t be happier. We have been getting lots of different tomatoes in our weekly CSA share from Porter Farms and they are so incredible that I have mostly just been eating them raw, on salads or otherwise. Though earlier this week I did make some delicious stuffed CSA veggies that turned out amazing. I stuffed tomatoes, green bell peppers, cubanelle peppers and zucchini. I stuffed them all with a delicious mixture made with some of our ground beef from Sojourner Farms, plus some black rice, crushed tomatoes, onion, garlic and basil. It was a simple and totally perfect for the season dish!
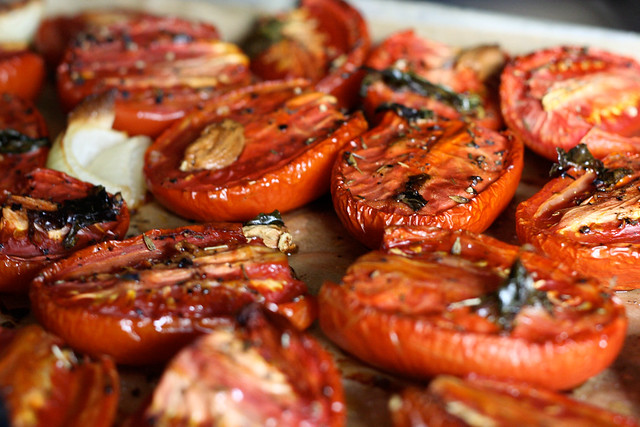
Each fall when tomato season is winding down, I buy at least 1 or 2 8-quart bushels of roma tomatoes at the farmers market so I can make tons of stuff for the winter and hold on to that yumminess as long as possible. I usually make some chili, tomato sauce and I always slow roast a ton of them to freeze them. This way I can have the delicious fresh from the farm tomato goodness, all through the winter. I knew we were coming up on that time of year again and I had savored the frozen tomatoes from last year so much so that I actually had a bag or two left in the freezer, so I decided to pull a bag out to make this delicious sauce. If you are unfamiliar on how to slow roast tomatoes, please see the note at the end of the recipe. It is so simple and it is a wonderful way to really enjoy their beautiful flavors and juices.
If you wish to make this sauce and don’t have any fresh (or frozen) roasted tomatoes, feel free to use canned whole roasted tomatoes. Those would work just as well.
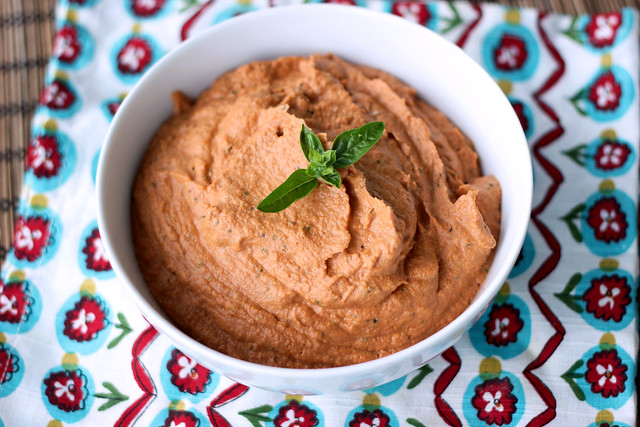
This sauce is incredibly creamy and rich, you would never believe it is totally vegan, the creaminess from the soaked cashews is really unbelievable. I promise this will fool any dairy-lover who takes a bite. We have an abundance of zucchini and yellow squash from our CSA, so I also quickly sautéed some of slices of both of those and tossed that with the pasta as well. Such a nice compliment and it basically gave us one big well rounded meal in one!

[print_this]Pasta with Creamy Roasted Tomato Basil Sauce – Vegan + Gluten-free
Serves 6
- 1 tablespoon olive oil
- 2 cloves garlic, minced
- 2-3 cups roasted roma tomatoes*, halved (fresh or canned)
- 1 cup raw unsalted cashews, soaked overnight or for at least 8 hours
- water to thin the cashew cream
- 1/2 cup fresh basil, plus more for garnish
- salt and pepper to taste
12 ounces of your favorite pasta – I used Jovial’s Gluten-free Brown Rice Penne Rigate
In a large saucepan, heat olive oil over a medium high heat. Add in the minced garlic and cook for about 1 minute, add the roasted tomatoes. Allow the tomatoes to simmer for about 10 minutes to heat the tomatoes through (if they aren’t fresh from the oven).
Meanwhile drain the soaked cashews and add them to the food processor. Puree until it is smooth and creamy, you can add water if you need to (a few tablespoons up to 1/4 cup as necessary).
Once the tomatoes have simmered for a bit, add them to the cashew cream and puree the mixture until smooth and creamy. Add the basil in, plus salt and pepper to taste. Pulse it a few times to mix.
Add the sauce back to the pan if it needs to be reheated, otherwise serve tossed with your favorite gluten-free pasta. I usually add a little of the pasta cooking water to the pasta when I add the sauce, to thin the sauce a bit so that it evenly coats all of the pasta. Also, if you wish, you can toss in some veggies like sautéed zucchini. Garnish with a little fresh basil.
* To slow roast tomatoes, preheat your oven to 325ºF and line a baking sheet with parchment paper. Half lengthwise 1 pound of roma tomatoes (approximately 8-10 tomatoes). Lay them all cut side up on parchment-lined baking sheets. Drizzle olive oil over the tomatoes and sprinkle with sea salt. You can also add onion, garlic, basil or any other herbs you’d like. Roast for 2 hours or until they have softened, wilted and wrinkled are a bit browned. This may take more or less time depending on the size of your tomatoes. Eat immediately or store in refrigerator with extra olive oil drizzled on top, or you can of course freeze them in freezer safe bags. [/print_this]
-
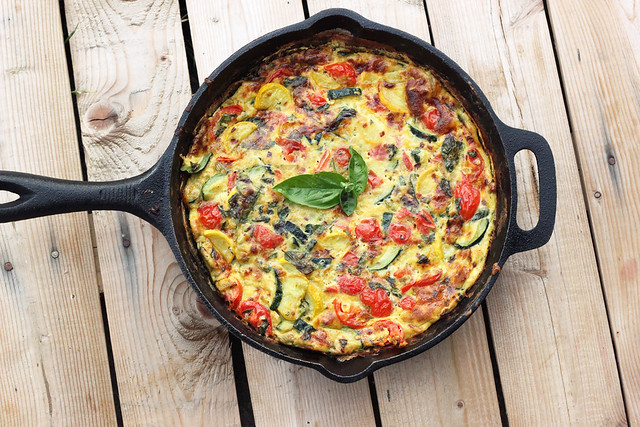
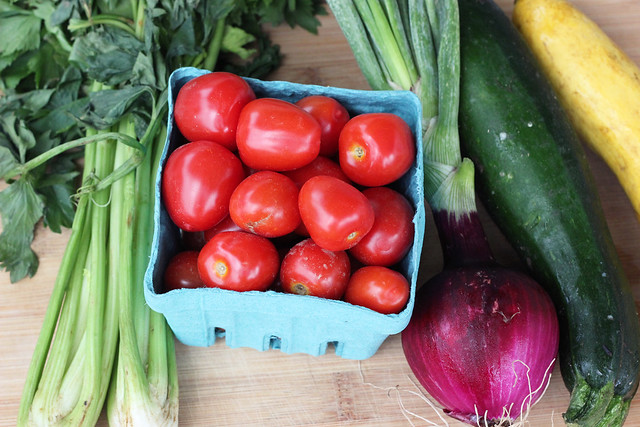
Summer Harvest Frittata – Gluten-free + Dairy-free
 <
<I am seriously in love with my CSA from Porter Farms. It is so cost effective, the produce is all organic (and obviously local) and each week there are new surprised in the bag that I get excited about playing with.
I am sure most of you do know, but if you don’t know what a CSA is, here is a quick description from the Porter Farms website:
CSA stands for “community-supported agriculture”. The idea behind it is simple: individuals share the costs, risks and bounty of growing food in an environmentally-friendly fashion. The concept first appeared in the U.S. in the early 80’s, when people sought higher quality foods available from local sources.
The meaning of “community-supported agriculture” as it relates to the mission of our program here at Porter Farms is as follows: CSA participants, through their membership, help pay for seeds, compost, irrigation supplies, equipment maintenance, fuel, labor, etc. In return, the farm provides, to the best of its ability, 22 weeks of fresh, certified organic produce throughout the growing season.
Community supported agriculture is a grassroots movement that reconnects the local community with its food source, the local farmer. This alternative to the grocery store and big chains couldn’t fit more perfectly into my lifestyle and my mindset. My only complaint about CSAs is that I didn’t join one sooner! This most definitely will be a yearly thing for us.
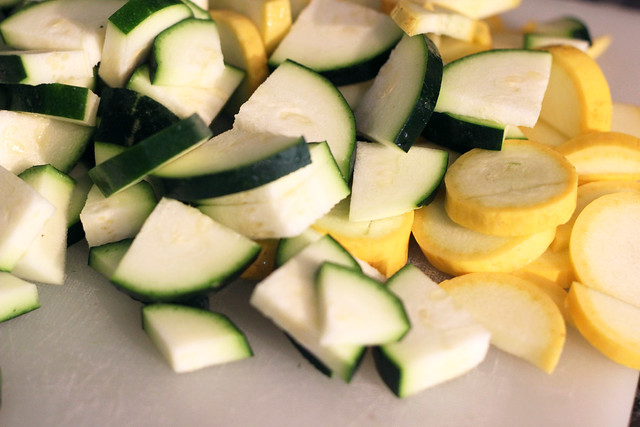
Each week I try to get creative with the offerings in my bag, playing around with new recipes, getting inspired. This week we received zucchini, yellow squash, cucumbers, celery, red and golden beets, tomato berries and red onions with their tops. So many things that I love! I wanted to play around with a dish that would really highlight as many of the ingredients as I could. I did pretty well, the only two that didn’t make it into this dish were the beets and the cucumbers and don’t worry I have big plans for both of those.
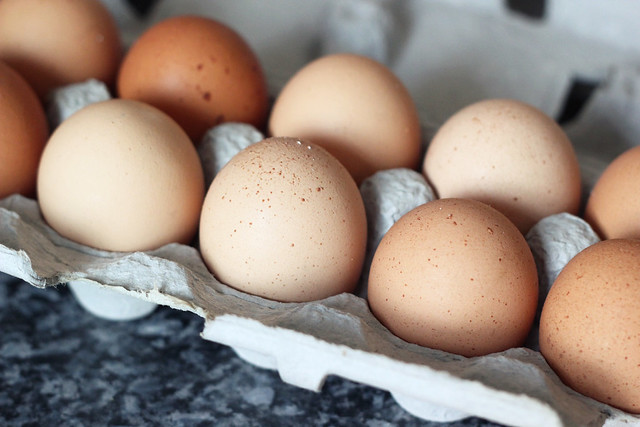
In addition to the CSA, each Saturday morning, I always pick up a dozen (or two) brown eggs from Painted Meadows Farm at the Elmwood Bidwell Farmers Market. I am telling you, until you have had eggs fresh from a farm (or maybe you have my ultimate dream and you have your own chicken in the yard), you have no clue what you are missing. The taste isn’t even comparable, the yolks are a shade of yellowy, orange you wouldn’t believe. Now I am spoiled, it’s the only kind of eggs I want to eat.
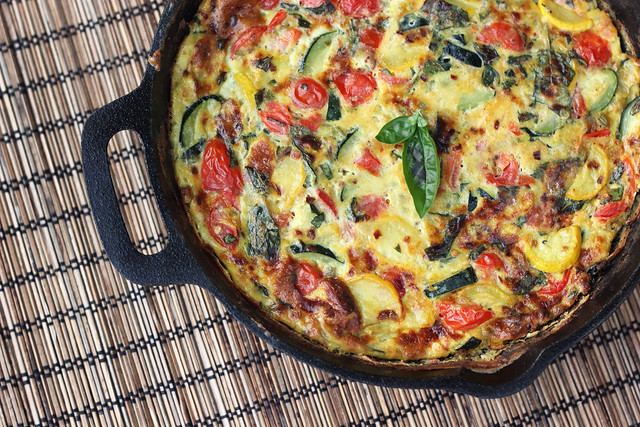 <
<In looking over our pantry and refrigerator and all of these lovely, seasonal ingredients, I had the perfect thought for a light summertime dinner – a Summer Harvest Frittata. What a great way to highlight all the wonderful items in season right now.This recipe is quite versatile so feel free to play around with it and add or take away anything you’d like or have on hand from your own CSA, farmers market or your garden. I added a bunch of fresh basil since it is growing abundantly and beautifully in our yard, but the flavor profile can easily change to whatever fresh herb or spice you have readily available. This frittata was perfectly satisfying for dinner with a small salad on the side, but it would also be great for breakfast, brunch or heck even lunch, you can eat it all day!

[print_this]Summer Harvest Frittata – Gluten-free + Dairy-free
Serves 6-8- 6-8 large local farm fresh brown eggs (more eggs will give you a fluffier thicker frittata, less eggs and it will be thinner)
- 1/8 teaspoon red pepper flakes (optional)
- 1/4 cup fresh basil, roughly chopped
- 1 tablespoon olive oil
- 1/2 cup celery, chopped
- 1 small red onion, chopped
- 2 cloves garlic, minced
- 1 medium zucchini, cut in half-length wise, then cut in half again (if it is large enough) and sliced
- 1 medium yellow squash, cut in half length wise, then cut in half again (if it is large enough) and sliced
- 1 cup grape tomatoes, halved or quartered depending on what size they are
- Salt and pepper to taste
Preheat the oven to 400ºF.
In a medium bowl, whisk the eggs with a small pinch of salt, red pepper flakes and basil. Set aside.
In a 8 to 9 inch oven-safe, cast iron skillet, heat olive oil over a medium-high heat, make sure you get the olive oil all up the sides using a brush or some wax paper, etc. (you can also use an oven-safe nonstick skillet). Add the onion and celery, with a dash of sea salt, sauté about 3-5 minutes until the onion is translucent. Add the garlic and sauté another 2 minutes, being careful not to burn it. Add the zucchini and squash, toss around and sauté about 8-10 minutes, until they are tender. Add the tomatoes and cook for another 2-3 minutes until the tomatoes start to soften and get tender. If there is any water sitting in the pan from the veggies, pour it off. Salt and pepper to taste.Turn down the heat a bit. Add the egg mixture to the skillet by pouring over the veggies and giving it all a really quick stir to combine. Cook over a medium-low heat for about 5 minutes or until the eggs are just set and there isn’t a lot of liquid running around the pan. To do this, run a spatula underneath the sides of the frittata and tilt the pan so the uncooked eggs run to the underside and cook.
Place the skillet in the center of your preheated oven. Allow to bake for 13-15 minutes, until it is golden brown, well set and puffy. Remove from oven with oven mitts and let cool for several minutes, cut into wedges and serve.
[/print_this]
-
Sloppy Joes – Gluten-free + Vegan
It is so rare that I make a dish that is meant to simulate an actual meat dish, but sometimes there are those old classic comfort foods that need to be re-imagined and updated. Hubby and I do eat meat, although at most we eat it once a week at home, and we get all of our meat from a local farmer, Sojourner Farms, who raises all of his meat on pasture without hormones or antibiotics. Since we tend to try to make the meat from him last, I make many vegan meals throughout the week, which not only is easier on my digestion it just feels better.
I’ve made these vegan sloppy joes a few times now and they have been a huge hit over here. Mark asks for them on almost a weekly basis. The first couple of times I made them, I didn’t really measure, I just added ingredients as it cooked, tasting and deciding what it needed. That is my favorite way to cook. I think I have the recipe pretty close to the way I like it, but I am known to squirt in a little more sriracha or add another spoonful of mustard.
These sloppy joes taste much like the original, but in my opinion even better. The sauce has so much great flavor from the smokiness to the hint of heat. If you don’t eat soy, consider replacing the textured vegetable protein with cooked lentils or chopped up cooked portobello mushrooms, both would be delicious. And as always with my recipes, play with the sauce, make it your own, add more heat, take out the sriracha if you don’t want any spiciness, add in your favorite BBQ sauce, etc. Play!
When I was contacted recently by the very sweet and lovely, Cara, from Forks & Beans, to share a recipe with her readers, I immediately thought of this one. Cara encourages us to have fun with our food, play with it, make it exciting and I am not sure what is more fun and whimsical that sloppy joes. It’ll instantly transport you to being a kid and having your fingers and face covered in sauce.
This recipe was originally shared on Fork & Beans. Please do head over there and make sure that you have some time to spend on Cara’s site, you’ll want to click around and check out all of her incredibly fun and delicious looking gluten-free and vegan recipes, your mouth will be watering in just a few short minutes.

[print_this]Sloppy Joes – Gluten-free + Vegan
Makes 6-8 servings- 1 tablespoon olive oil
- 1 small onion (or 1/2 of a large), diced
- 2 cloves garlic, minced
- 1 green bell pepper, diced
- 2 cups textured vegetable protein TVP – (cooked green lentils or chopped up cooked portobello mushrooms would also be great here)
- 1 28-ounce can of organic crushed tomatoes
- 1/4 cup organic tomato paste
- 2 teaspoons Worcestershire sauce (make sure it is gluten-free and vegan)
- 1-2 teaspoons sriracha sauce (optional)
- 1 teaspoon liquid smoke
- 1 tablespoon stoneground or wholegrain mustard
- 1 tablespoon maple sugar (brown sugar or any other sugar of your choice)
- 3/4 – 1 cup water (you may need a little more if it is too thick)
- Salt and pepper to taste
Heat olive oil in large sauté pan over a medium heat. Add diced onion,
green bell pepper and garlic, sauté for 5 to 8 minutes.Add the TVP, crushed tomatoes, tomato paste, Worcestershire sauce,
sriracha sauce, liquid smoke, mustard, maple sugar, 3/4 cup of water, salt
and pepper to the sauté pan. Lower the heat, cover and simmer for 40 –
45 minutes. Stirring often. You may find you want to add more water if it
seems too thick. Serve on gluten-free/vegan hamburger rolls.[/print_this] -
Tom Kha Gai (Thai Coconut Soup) Gluten-free + Dairy-free, w/Vegan options
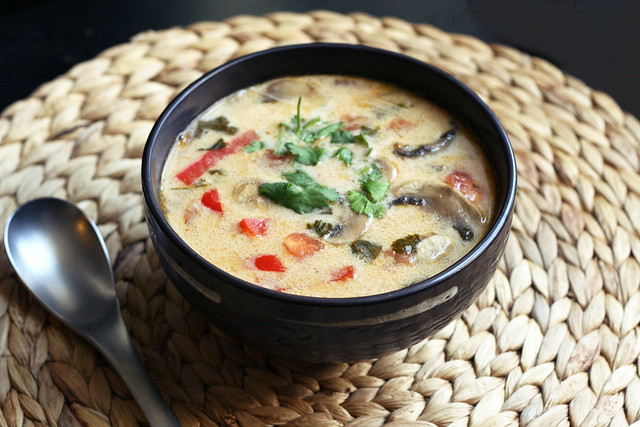
I am really obsessed with Thai food. I actually crave the flavors of Thai food quite often. Honestly, if we could go out for Thai food once a week, I would be totally content. However, we really try to not eat out very often, and I also really prefer to know what exactly is in my food. So, what better way to get what you want, then to just make it yourself. I started looking around at different authentic Thai recipes online and quickly learned to be able to really get the authentic flavors, I would need the proper ingredients. I planned to make Pad Thai and this Tom Kha Gai Soup over the weekend so I had to get all of my ingredients in order to do so. Seeing as a couple of the ingredients I was looking for didn’t exist in my regular circle of grocery shopping, this meant it was time for an adventure. I found there were two different Asian markets on Niagara Street in Downtown Buffalo, conveniently on my way home from yoga, so Saturday morning after my yoga practice, I took my little list and headed over to Niagara Street, feeling very intimidated.

First up, I stopped at A’Chau Oriental Food Market at 833 Niagara St., this is where I was able to grab most of what I needed to make my Pad Thai and Tom Kha Gai Soup, however they were out of fresh kaffir lime leaves. So, after really walking the aisles and grabbing some things not on my list, I headed over to Niagara Asian Market at 937 Niagara Street, where they had fresh kaffir lime leaves and a HUGE basement full of ingredients. In addition to the things I was looking for, I grabbed a few more that caught my eye. I actually picked up a HUGE 4-lb bag of gram flour aka chickpea flour, for just $4.99. I see lots of soccas in my near future! Both markets had so many ingredients I was already familiar with and so many that I had never heard of. They both had unlimited selections of rice noodles, rice flour, tapioca starches, palm sugar etc, available at very inexpensive prices. I could go nuts in those places for sure.

I also grabbed a bag of these Pandanus flavored Crispy Rolls from India, because they caught my eye only having 6 ingredients, coconut milk, tapioca starch, sesame, sugar, salt and pandanus extract. Naturally gluten-free and vegan, what isn’t to like? To be honest, I didn’t (and still don’t) really have a clue what pandanus is, but I didn’t care, I went for it. Some of the best foods and flavors I have discovered that I love are by completely chancing it and trying something totally new. These crispy rolls are super light and crispy, delicious and very satisfying, I love the crunch and the subtle sweetness. Looks like I will be stopping by these Asian markets a lot more than I had planned.
Once I got the few ingredients I couldn’t easily find – specifically the kaffir lime leaves and the galangal root, making this soup was an breeze. I ended up making it for lunch on Sunday! Tom Kah Gai soup has always been one of my favorites. Even when I know I am going to order some type of noodle dish at a Thai restaurant, which is more than enough food, I always feel obligated to order this soup, just because I don’t know when I will have the opportunity again. Now that I know how easy it is to make, I will just make it at home. The flavors in this soup are intense and so wonderful. The bright fresh flavor from the lemongrass is definitely the star of the show, but you get an equal burst of flavor from the keffir lime leaves. It is amazing what a punch those little guys pack! The galangal also brings a pungent flavor very similar to ginger, spicy with a little bit of bite. A little goes a long way with galangal. If you can’t find it easily, ginger will also work great here. Traditionally this soup is made with homemade chicken stock and along with diced or shredded chicken breast. I didn’t have any homemade stock at home so I went with some high quality organic low sodium chicken broth and skipped out on the meat and tofu. I just wanted to enjoy the best part, the delicious broth! To make this soup vegan you could substitute vegetable broth for the chicken and add in tofu or skip it like I did. It won’t be exactly the same flavor profile of traditional Tom Kha Gai soup, but it will still be absolutely delicious.
I am so glad I made the time to make some Thai food at home and explore the Asian markets. Look for my Pad Thai recipe, very soon! I made that Saturday night and both hubby and I were so excited with how it came out that we didn’t take a minute to stop eating so I could take pictures. Mark has already asked me when I will be making it again, so I should have that recipe up soon! Also, if you enjoy Asian foods of any kind (Thai, Chinese, Vietnamese, Japanese, Indian, etc) and you know of an Asian market in your neighborhood, I highly recommend checking it out.
What is your favorite type of Asian food? Do you have a favorite dish? Have you tried making it at home?

[print_this]Tom Kha Gai (Thai Coconut Soup) Gluten-free + Dairy-free, w/Vegan options
serves 44 cups organic free-range low sodium chicken broth (or vegetable broth)
1 15-ounce can full-fat organic coconut milk
1 stalk lemongrass, cut into 1-inch pieces and pounded to really release the flavors
6 kaffir lime leaves
6 thin slices fresh galangal root (or ginger)
1 cup sliced mushrooms
1 small red bell pepper, thinly sliced
1/2 medium red onion, thinly sliced
3 tablespoons fish sauce (or soy sauce)
2 tablespoons fresh lime juice
1/4 teaspoon chili flakes
1 cup firm tofu, diced (optional, you could also add in chicken or shrimp, etc)
1 tomato, diced
1/4 cup thai basil, roughly chopped (optional)
1/4 cup cilantro, roughly choppedBring the chicken broth to a boil in a large saucepan over a medium-high heat, add in the coconut milk, lemongrass, kaffir lime limes, galangal, mushrooms, bell pepper, red onion, fish sauce, lime juice, chili flakes and optional tofu (or meat or shellfish). Simmer for 15 minutes. Add in the diced tomato and stir. Just before serving add in the thai basil and cilantro. Ladle into bowls and serve immediately, topped with additional chopped cilantro, thai basil and maybe some thinly sliced green onions.
[/print_this]
-
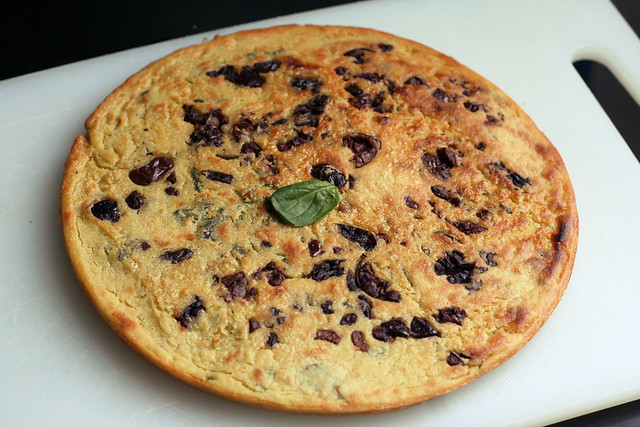
Kalamata Olive and Herb Socca with Roasted Vegetables – Gluten-free + Vegan
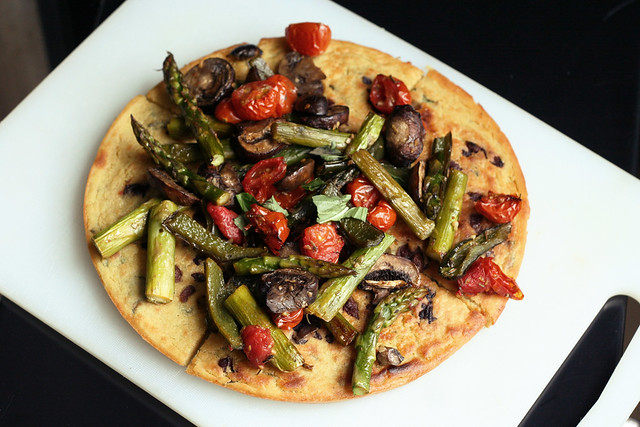
Have you ever made a dish or a recipe for the first time and upon the very first bite, immediately wondered why you haven’t been making it for years? That’s what happened when I made socca for the first time! I had seen recipes here and there online and always thought in the back of my mind “I really need to make that”. I finally did yesterday for lunch and it is official, on the first bite – I was OBSESSED.
Socca, also known as farinata or cecina, is a sort of thin, unleavened pancake or crêpe of chickpea flour. Served hot and crispy, this chickpea pancake is a quintessential street food found in Nice, France. Many times it is browned or even blackened around the edges, and it has an almost custard like, tender inside. From what I have read, traditionally it is made in a cast iron pan over hot coals or a fire, but it can certainly be made at home in a hot oven, either in a cast iron pan, cake pans or a pizza pan.
Most recipes I came across called for only about a cup of chickpea flour to make 1 big socca in a larger cast iron skillet or two smaller (about 7-inches each). Since I only have a smaller cast iron skillet and I was afraid I would ruin this on my first try, I decided to increase the ingredients to make it work in two 9-inch cake pans. Plus, I wanted to have two soccas and I also wanted them to be a bit thicker to hold up to the roasted veggies. It worked perfectly. If you have smaller cake pans or want to make one large one, or you want two and you want them a bit thinner, just go with 1 cup of chickpea flour and about 1 1/4 cups of water and maybe just 2 to 3 tablespoons of olive oil.
Besides looking incredibly delicious, what really intrigued me about all of the socca recipes I found, were that almost all of them were naturally gluten-free, since the only flour used is chickpea (or garbanzo bean) flour. I happened to have Bob’s Red Mill’s blend of Garbanzo and Fava Bean flours on hand, so I decided to go with that. It worked perfectly, but obviously if you have traditional chickpea (or garbanzo bean) flour that will work, as well. I plan to make this again and again, now that I know how easy it is to make, so there will be plenty of times to use just chickpea flour.

The nice thing about socca is you can simply pop it out of the pan, cut it into wedges and eat it as is or you can play with different toppings and/or ingredients to include in the batter. Cut up into bite-sized pieces it is a great appetizer or snack for a handful of people, or you can top it with lots of fun ingredients and serve it flatbread or pizza style for a meal, kinda like this. I bet you could even opt for sweet ingredients like a little coconut sugar, some cinnamon and a little vanilla and make it a tasty dessert treat or brunch side. So versatile. I am sure traditionalists prefer to not add things like fresh herbs and olives, but I just couldn’t help myself.
This batter comes together very quickly, but you should allow it to rest a few hours before using, at the minimum 30-minutes. You can even make the batter ahead of time and cover it and put it in the refrigerator overnight. Socca is meant to be thin and rustic, so don’t stress if yours breaks apart as you flip it out or try to cut it up, just eat it with your hands and enjoy every bit of it.
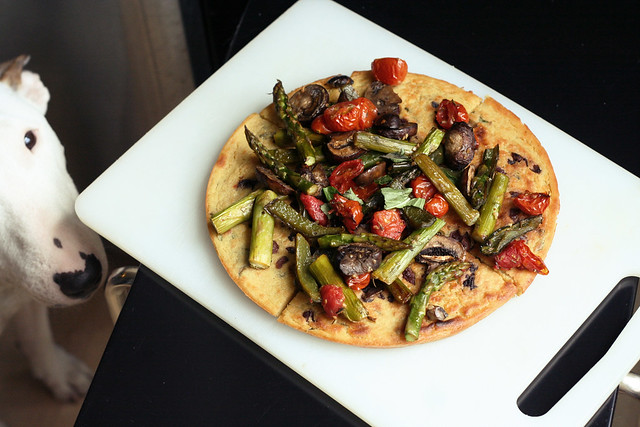
My adorable little lurker, Seri, trying to sneak a sniff of the warm socca!
[print_this]Kalamata Olive and Herb Socca with Roasted Vegetables – Gluten-free + Vegan
Adapted from many different recipes
Makes about two nine-inch soccas- 1 1/2 cups chickpea/garbanzo bean and fava bean flour blend (this is what I had on hand, you can use just chickpea (or garbanzo bean) flour alone, which is the traditional way to make it)
- 3/4 teaspoon sea salt
- 1/2 teaspoon freshly ground black pepper
- 1 3/4 cups lukewarm water
- 3 tablespoons extra-virgin olive oil, plus more for the pans
- 2 tablespoons fresh basil, roughly chopped (rosemary would also be good or any other fresh herb of your choice)
- 1/2 cup kalamata olives, pitted and roughly chopped
Roasted Vegetable Topping
2-3 cups roasted in-season vegetables of your choosing (or any other topping of your choice)
I just roasted a bunch of fresh asparagus, 1 cup of sliced mushrooms, 1 poblano pepper, 1 garlic clove and 1 cup of halved cherry tomatoes with about 1 tablespoon of olive oil and a sprinkle of Herbes de Provence and a little sea salt, in a 425º oven for about 20-25 minutes, until tender and lightly browned. Feel free to top your socca with whatever toppings of your choice or just serve it as is.In a large bowl, sift in the chickpea flour, then add in the salt, and pepper. Whisk in water and olive oil. Then stir in the basil. The batter should be very thin, much like a crepe batter. Let sit on the counter, covered, for as many hours as possible, but at least 30 minutes. You can also cover and refrigerate it overnight.
Place two nine-inch round cake pans in the center of the oven and preheat to 500º F. Remove the pans when the oven is to temperature, add a glug of olive oil to each pan (maybe around 1/2 to 1 tablespoon in each pan) swirl around in the pan to get a nice even coating all the way around and up the sides a bit. Return to pans the oven for a couple of minutes to heat up the oil. Once the oil is heated up, carefully remove the hot pans from the oven and pour half of the batter into each pan, split the chopped up olives in half and add half to each pan, just sprinkle over top of the batter. Bake for about 5 to 8 minutes or until the pancake is firm and the edges are set. Then place the pans into the broiler (or turn on the broiler in your oven) and broil for an additional 3-5 minutes, until the top gets some nice browned/black spots. Remove from oven and carefully flip out onto a cutting board. Cut into wedges and top with toppings of your choice. This is great as a meal or as an appetizer. If your pancake is a little thinner and it’s breaking apart, no worries at all, this snack is meant to be rustic and eaten with your fingers.
[/print_this]
-
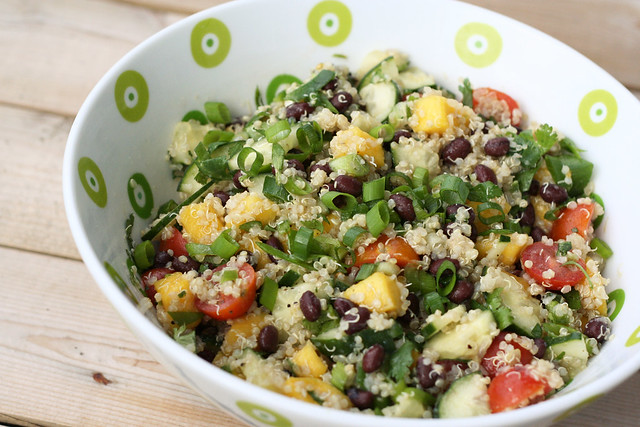
Sprouted Quinoa Salad with Mango, Black Beans and Avocado – Gluten-free + Vegan
Phew! Life has been a bit busy lately. We’re still trying to get caught up on all the work we have going on right now. Between being away from the studio for 2 weeks and with how much client work we have booked, we’ve really been putting in the hours. We also spent the weekend painting the downstairs here at the house, getting it ready to sell. OK, well actually we had a friend here doing most of the painting while we worked on client work, but I helped for a handful of hours on Sunday! We also spoke at the State University at Fredonia on Monday night, to final-year design and print making students, which was really, really fun. On top of all of this, I have been trying to get to yoga every morning for my 90-minute practice. I have had to miss a day here and there, but when life is busy, it is when I need it the most.
The last week and a half actually seems a little bit like a blur. So, I have been trying to sneak time into the kitchen here and there, when I can, but it is proving to be a bit difficult right now. Last week, besides the delicious Baingan Bharta that I made, I made a HUGE pot of vegetable soup and I also made a version of this delicious gluten-free flatbread with roasted vegetables from Karina, the Gluten-Free Goddess. I basically lived off of those meals and that worked fine, but now I am ready for life to calm down a bit, so I can start playing with new recipes!
I am hoping to have some time this weekend to play around with some gluten-free, vegan waffle recipes and I am also thinking of making a fun new dessert treat, similar idea to the coconut dark chocolate treats that I made and everyone has been loving so much! Plus, I have been dreaming of a pie recipe, that I just need to find the time to actually make. So look for those recipes, hopefully really soon, and definitely some others, too.
In the meantime, I made this salad for lunch today and I was really glad that I made the time to do so. It was super simple and a really nice bright and fresh spring meal. I happened to have sprouted quinoa that I had picked up at the market, but any regular quinoa would do. I also ended up topping this salad with avocado when I served it. I forgot about the avocado when I took the photos, but it was a perfect addition. You could also add in some red bell pepper if you have some on hand or fresh corn, etc. If you don’t want a little spice, skip the jalapeño or just start with half of one.
The weather is starting to really warm up here, but more than the temperature, the biggest change in this time of year that I absolutely adore is the sunshine. I miss the sunshine during the winter months and it is my favorite part of the spring. Salads like this feel like the perfect light meal to eat when the sun is shining!
What have you been eating lately? Have you had a lot of time in your kitchen or has life been hectic?
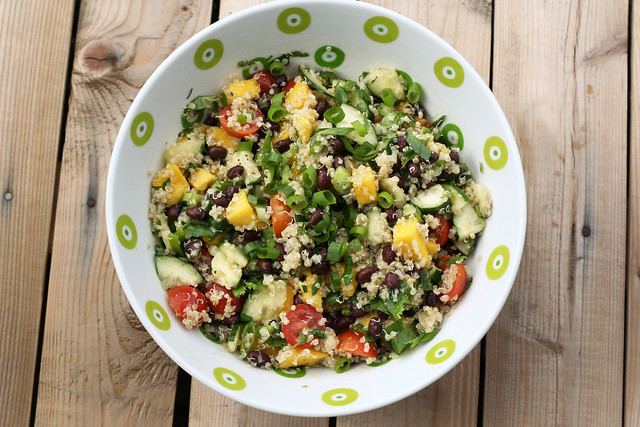
[print_this]Sprouted Quinoa Salad with Mango, Black Beans and Avocado – Gluten-free + Vegan
serves 4-6- 2 cups cooked organic sprouted quinoa
- 1 mango, diced
- 1 cup of canned organic black beans, drained and rinsed
- 1 cucumber, quartered the long way, then sliced
- 1 cup organic cherry tomatoes, halved
- 1 jalapeño, seeds removed, minced
- 3-4 scallions, sliced thinly
- 1/4 cup fresh cilantro, roughly chopped
- 1 avocado, diced
Dressing
- juice from 1 lime
- 2 tablespoons olive oil
- 1 clove garlic, minced
- zest from 1/2 lime
- salt and pepper, to taste
Cook the quinoa according to package directions. After it is cooked, fluff the quinoa with a fork and set aside to cool.
While the quinoa is cooling, mix the dressing in a small bowl, whisk well to combine.Once the quinoa is cooled, toss it with the mango, black beans, cucumber, tomatoes, jalapeño, green onions and cilantro. Drizzle the dressing over top the salad, and toss gently to evenly coat. Salt and pepper to taste.
Serve the salad at room temperature or chilled topped with a small sprinkle of sliced green onions and fresh cilantro, as well as some diced avocado on top, if you wish.
[/print_this]
-
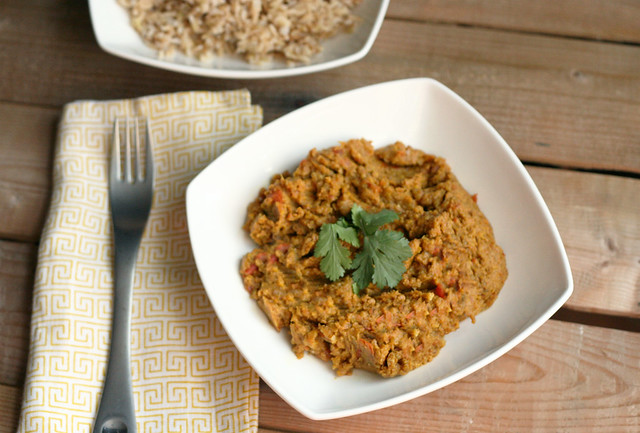
Baingan Bharta (Roasted Eggplant Curry) – Gluten-free + Vegan
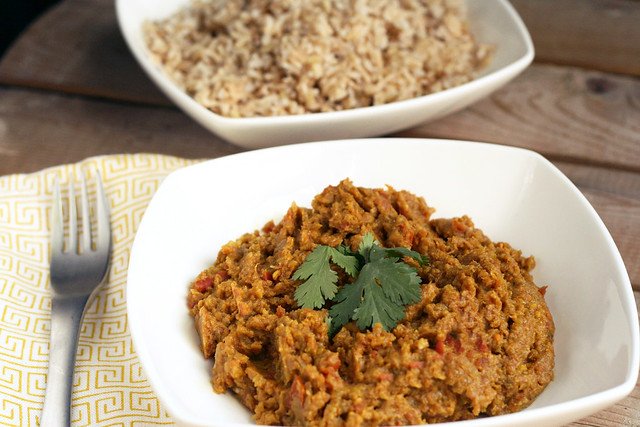
I have always loved Indian food, my husband, Mark, not so much. I have always had to either eat it without him or con him into going for my birthday, since I obviously get full say in what restaurant we go to on that night. I can get away with making different curries and such at home, but he generally didn’t get too excited about the idea of going out for Indian food. A month or so ago, I convinced Mark to give it a try again and our waiter suggested a Gufran platter for him, that had a few different Tandoori cooked meat and seafood dishes on it, this way he could try a few different things. He loved it. His favorite was a tandoori style fish in a really spicy sauce. YAY success!! After that, he kept asking me when we were gonna go again, as you can imagine this made me so very happy. So while we were in Austin for SXSW, since many of our friends are vegetarian, I suggested we go for Indian food one night. Everyone, including Mark, was down with the idea and excited to go. We ended up with a table of 17 of us! The company was amazing, the food was great, and I of course ordered my usual favorite, Baingan Bharta, while Mark ordered some Tandoori chicken and some chicken naan. All was well in the world.
This was until Mark woke up the next morning with what appeared to be food poisoning. He was the only one out of our large group that got it, but seeing as it came on very quickly, and was gone within 24 hours, that is what we assumed it to be. No one else at the table ate chicken, so it is very possible that was the culprit. But, at any rate, we are back to square one with Indian food in our household. Even though Mark says it is temporary, he needs a bit of a break until he’ll go back to it! Understandable, but still, selfishly, I am quite bummed.
So, what was I to do? I was craving Indian food since we got home. I wasn’t gonna go out for Indian food on my own and there isn’t a restaurant close by for take-out, so I decided I wanted to try to create my favorite Indian dish at home. I asked Mark if that would be OK and if the smell of it cooking would bother him, and he said he is OK with it, he just wasn’t going to eat it this time. So, while my baingan bharta cooked away, Mark made himself a frozen pizza and surprisingly he commented many times at how delicious my meal smelled. Baby steps.

Besides all of the curries I make, I really haven’t tried cooking too much Indian food at home, since frankly it intimidated me. So, I did a little looking around at classic and authentic Indian recipes for this tasty eggplant dish and then I dove right in. I am really excited at how simple it was to make and how amazing it turned out. It honestly took more time to chop, mince and dice than anything else. The actual preparation of the dish was quite simple.
This mélange is classically a bit spicy, but if you don’t want the heat, eliminate the chiles (jalapeños) or just go with a half of a small one to start. I like spicy so I went with two large peppers. I served this over some fluffy organic brown basmati rice and made a quick creamy vegan cucumber side salad (I made a simple dressing with some grapeseed vegenaise, rice wine vinegar, garlic and a little sea salt) to ease my mouth from the heat of the dish.
The key flavor to this dish is the smoked/roasted eggplant. There are a couple different ways that you can achieve this (see the first part of the recipe), classically the eggplants are grilled over charcoal or direct fire to impart a smoky flavour to the flesh of the eggplant.
Oh and by the way, if you are like me and have been wishing and hoping to come across a good gluten-free naan recipe – fear not – the lovely Leanne from Healthful Pursuit has conquered that beast. Check out her gluten-free naan recipe here. Since she had mentioned it on Facebook earlier in the day, I was dreaming about her naan the entire time I was making this dish, but Leanne hadn’t yet posted the recipe when I made this. So, it looks like I will have to make this recipe again, with her naan on the side. Thanks Leanne.
[print_this]Baingan Bharta (Roasted Eggplant Curry) – Gluten-free + Vegan
serves 4-6- 3 medium-sized eggplants
- 2 tablespoons cooking oil such as olive oil, grapeseed oil, etc (I used olive oil for brushing on the eggplant and cooked the veggies in ghee*)
- 2 medium-sized yellow onions, chopped fine
- 1 teaspoon of cumin seeds or 1/2 tsp cumin powder
- 3-5 cloves of garlic, minced
- 1-inch piece of ginger, grated or minced fine
- 1-2 green chilies (jalapeños), seeds removed and minced (optional)
- 2-3 large tomatoes, diced
- 1/2 teaspoon coriander powder
- 1 teaspoon turmeric (I was lucky enough to find fresh turmeric root at the store, that I finely minced, but I also still added a bit of the ground dried stuff, too)
- 3 teaspoons garam masala
- 1 bunch cilantro, roughly chopped
You can roast your eggplant either in your oven, on a grill or directly on your gas cooktop. If cooking your eggplant on your cooktop or grill top, place the eggplant straight on the burner or grill top, keeping the flame low. Keep turning the eggplant until the skin is charred and the inside flesh is soft and tender.
You can also roast the eggplant in your oven. Preheat oven to 425ºF. Slice the eggplant in half lengthwise and sprinkle salt on the fleshy side. Rub olive oil on both sides, place skin side up on a baking sheet and roast for 25-30 minutes until the flesh is tender and the outside is a nice dark charred color and the outside layer of the flesh is a bit caramelized.
While your eggplant is roasting, start preparing your vegetables and spices. Just before the eggplant is done, heat up the remaining oil (or ghee) in a large pan over a medium-high heat, add in the cumin seeds (if using powder, add it in at the same time as the onions) and cook for a minute or two until they get toasted and fragrant and begin to dance around in the pan. Add in the onion and chiles, sauté for 5 to 8 minutes until the onions are tender and translucent. Add in the ginger, garlic and turmeric root (if you are using fresh), sauté for about 2-3 minutes. Add in the tomato and the remaining spices, turn the heat to a medium low and allow it to cook about 5 to 10 minutes or just until the eggplant is done, stirring often.
Once the eggplant is done, allow to cool a bit and peel off and discard the charred skin, scoop the flesh into a bowl and roughly mash it. Add the eggplant to the sauce and stir well to combine, allow to cook another 3-5 minutes. Add in some of the chopped fresh cilantro and stir to combine. Turn off the heat. You can serve the sauce as is or puree it, which is how it is traditionally served.
To puree the sauce, carefully spoon the mixture into your food processor and process until smooth and return to the pan or a large serving bowl. Serve over basmati rice with a sprinkle of fresh cilantro. Serve with papadum or naan on the side. (check out Leanne from Healthful Pursuit’s gluten-free naan recipe here.)
* ghee is made from dairy, but during the clarification process, milk solids are removed, therefore all lactose and casein is removed, leaving the healthy butter fats behind. Small, trace amounts of casein and lactose can possibly remain in the ghee, but unless a person is extremely sensitive, consuming ghee will be fine, even if dairy is not. Obviously use your own judgement, and if you are making this vegan, skip out on using ghee and use whatever your cooking oil of choice is.
[/print_this]
-
Chickpea and Brown Rice Burgers
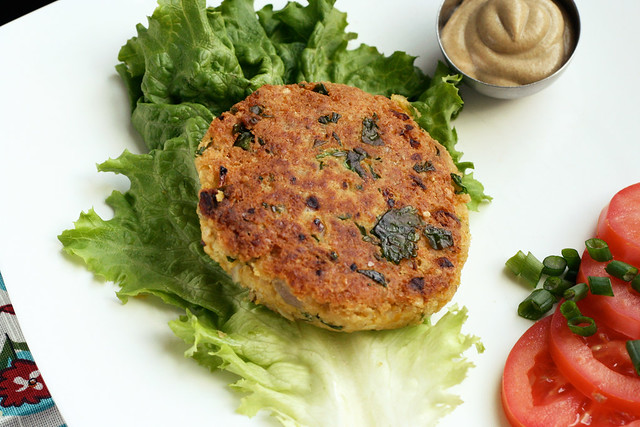
This week has been really nice. I am feeling much more like myself, I have been spending time taking the necessary (and long overdue) steps to be as organized and productive as I can (in life and work) and I have actually really been enjoying eating a limited diet.
The only bad thing about this week is that it’s almost over. I cannot believe it is already Thursday night. How did that happen?
Today is day 5 of no dairy (among other things) and I am feeling really good. I stepped on the scale today for the first time since the holidays and my weight was WAY down (like nearly 10lbs)! YAY! A wonderful bonus to healing my grumpy digestive tract, I would say! I have been enjoying piling in the vegetables this week but on Tuesday night I was wanting something a little bit different for dinner than a plate of vegetables, a smoothie or fresh juice. Since the January/February issue of Whole Living features tons (over 50) great cleansing recipes for their New Year’s Action Plan, I knew I would be able to find the perfect starting point recipe that would still adhere to all of my current self-imposed rules!
These burgers jumped out at my instantly. They are so simple, just a few ingredients and with a few tweaks on my end to my tastes, they would be exactly what I was looking for. I served my burger on top of a nice big leafy piece of green lettuce as they suggested, hoping that the raw roughage wouldn’t be too much for me right now, and it wasn’t, which I was definitely pleased about. I served my burger with some roasted cauliflower tossed with steamed baby spinach on the side and it was a nice light dinner! These patties held together very nicely when cooking and had a beautiful crispy and browned outside. The original recipe suggests mashing the chickpeas with the rice by hand, but I just wasn’t getting the consistency I was looking for and I worried they would end up falling apart, so I processed the chickpeas and brown rice and my food processor and I think that was a wise decision. I also went with cilantro instead of the recipe’s suggested parsley, for a brighter and bigger punch of flavor and I added in some lime juice and chile powder. You could certainly add whatever your favorite fresh herbs and spices are, so many different combinations would work in these bugers. The flavors I went with were so perfect together and topping the burger with fresh scallions and dijon mustard was a great way to finish them.
I kept debating adding fresh spinach to these, but I was worried about them staying together, so I figured it was best not to mess with the ratio too much, but I hope to make these again and play with adding either the spinach or shredded carrots or zucchini or something like that, for some extra color and nutrients.
I think you could also make these burgers a bit smaller and make them more of an appetizer than a meal, serving them with a fun dipping sauce.
How has your week been? Has it flown by or carried on very slowly?

Chickpea and Brown Rice Burgers
Adapted from Whole Living Magazine, January/February 2012 Issue
Makes 4 burgers2 cups cooked and drained chickpeas
1 cup cooked brown rice
1 large shallot, minced
1 clove garlic, minced
2 tablespoons chopped fresh cilantro (You could also use parsley, chives or whatever your favorite fresh herb is)
1/2 teaspoon chile powder (I used ground smoked chipotle powder)
2 tablespoons freshly squeeze lime juice
Coarse salt and pepper
1 large farm fresh brown egg, whisked (you could try an egg replacer here, I haven’t yet, but it’s worth a shot)
2 tablespoons olive oil
Whole-grain or Dijon mustard
Tomato, sliced, for garnish
4 green onions, thinly sliced, for garnish
Green-leaf lettuce, for wrappingAdd the chickpeas and brown rice to your food processor and process until a thick paste forms (you can also mash them by hand). Add the mixture to a large mixing bowl. Stir in shallot, garlic, cilantro, chile powder and fresh lime juice. Season with salt and pepper. Stir in the egg. Form into four 1/2-inch-thick patties.
Heat olive oil in a large skillet over a medium-high heat. Add the burgers and cook until golden brown, about 4 to 5 minutes per side. Spread with mustard, top with tomatoes and scallions and wrap in lettuce.
-
Tortilla Soup

I have been making this soup for years and have shared my recipe with so many people, I was shocked that I hadn’t yet posted in on here. It is one of my favorite soups, it is so simple to make and it’s loaded with so many of my favorite flavors. You could probably easily make it with vegetable broth and just double up on the vegetables and it would still be delicious. I always find this is a great way to use one of the whole chickens we get from the farm since it really makes the soup the best and the more chicken in the soup, the better it is, in my opinion.
Also, if you don’t feel like making the broth from scratch, you can use a good quality organic low sodium chicken broth or stock and pick up a quality simply spiced rotisserie chicken from the market. Just remove any fat and skin from the chicken, take the meat off the bones and shred or dice it, adding it to the soup near the end. It’s that simple.
You could certainly make your own corn tortillas from scratch for the tortilla strips, which I do most times and it is super simple, or you could just buy a package of good quality corn tortillas from the grocery store or a local Mexican market.
The fun thing about this soup, as with many, is the measurements of your ingredients can be really loose and to taste to your preferences. I almost NEVER measure when making a soup like this, I just taste it along the way and add more of things as I see fit, so definitely keep that in mind when making this for yourself. Use my measurements as a guide, but please taste along the way. If you don’t like super spicy, you can leave out the jalapeños, but I would really suggest keeping in the chipotles when making the stock and definitely in the soup, that smokey flavor really makes this soup what it is, in my opinion. If you can’t find dried chipotles, you can use the canned ones in adobo sauce and if you are worried about the spiciness, just skip adding a chipotle pepper all together and simply add a tablespoon of the adobo sauce.
You can also have fun with the toppings on this soup, besides the necessary tortilla strips, I usually like a good squeeze of lime juice, a little cubed avocado, some fresh cilantro and green onions. It’s also good with a little sprinkle of shredded sharp cheddar and if you like sour cream, it is good with a little dollop of that, too.
As usual, when I make this for the two of us, I make the full amount and we just live off of it for a week, it’s great for lunches or on those nights when I am too busy to cook. This time of year, I almost always have some type of soup or stew in the fridge that I made a couple of days prior, it is a must for me in the cooler weather.
Tortilla Soup
Serves 8-10Chicken Stock
(this soup tastes the best with homemade stock, but if you are in a rush, you can still make it delicious by using boxed organic low sodium chicken broth and adding in the meat from an already cooked rotisserie chicken you bought from the store)2-3 quarts water
1 whole organic chicken, about 4lbs (rinsed and giblets removed for the dog)
1 whole red onion, peeled and quartered
2 dried chipotles, halved
2 garlic cloves
1 bell pepper, seeded and quarteredIn a large stockpot, (use the strainer that fits in your stock pot if you have one) combine all of the ingredients making sure to use enough water to cover your chicken and bring to a gentle boil over a high heat. Reduce the heat and simmer, covered, for 2 1/2 hours, adding more water if necessary to keep the chicken and vegetables covered. Skim the surface occasionally to remove any foam or impurities that forms on the surface. The longer you cook the stock, the stronger the flavor will be, but 2 1/2 hours was more than adequate and the stock had a fantastic flavor to it.
Remove the meat and bones and reserve any meat on the bones that can be separated and added back to the soup. If you didn’t use the strainer in the pot when making the stock, strain the stock to remove all the vegetables and other bits and add the broth back to the pot. Throw out the bones and vegetables. Use the stock immediately or let the stock cool completely, and refrigerate overnight. Skim any fat that forms on the surface. Keep refrigerated in airtight containers until ready to use, up to 3 days, or freeze for up to 2 months. Since I was using the stock immediately, I skimmed any visible fat off the top, made sure that it was strained of everything, and kept it on a low heat while I prepped everything for the soup. You will probably end up with about 48-64 ounces of stock when making it homemade (give or take). Use all of it for the tortilla soup.
Tortilla Soup
6 to 8 cups of low sodium organic chicken broth or stock (I make my stock from scratch with one of our whole chickens from the farm, see above)
2 tablespoons olive oil
1 large white onion, diced
2 cloves of garlic, minced
2 dry chipotles, roughly chopped
2 to 3 bell peppers (you can use any combo you like, red, yellow, green, whatever), diced
1 (or 2) jalapeños, minced (optional, depending on how much spice you like, you’ll get a little from the chipotle)
2 teaspoons sea salt plus more to taste
2 teaspoons ground chili powder or to taste (you can add more as it cooks)
1 teaspoon ground cumin or to taste (you can add more as it cooks)
1/2 teaspoon ground coriander or to taste (you can add more as it cooks)
1 large can of organic diced tomatoes
The meat from the chicken you made your stock from or the meat from 1 small pre-cooked rotisserie chicken or 2 chicken breasts, already cooked – skin and fat removed, shredded or diced
1 or 2 limesFor Topping:
8 or more corn tortillas, cut into thin strips
lime wedges
fresh cilantro, roughly chopped
fresh green onions, thinly sliced
avocado
sour cream
shredded cheddarSaute onion, garlic and all your peppers with the olive oil. Cook till slightly soft, but I like to leave a little bit of the crunch there. Add chili powder, cumin and salt, stir. Add broth and canned tomatoes and bring to boil. If you made your stock from scratch and its already in a large pot, just cook up the vegetables in a pan and add to the broth. Bring to a simmer and continue to add seasonings to taste, depending on how spicy you like it. Cook for about 20-30 mins or so to really allow all of the flavors to come together.
Meanwhile, slice 8 or more corn tortillas into thin strips, put on a cookie sheet, drizzle with 1 teaspoon or so of olive oil and lightly salt. Bake at 375 degrees until desired crispiness. (about 10-15 mins) Put aside.
Dice and shred the chicken and add to the soup, simmer until chicken is heated through. Add a few bunches of cilantro and the juice of one to two limes stir and serve.
Serve soup topped with tortilla strips, diced avocado, fresh cilantro, green onions and a few squeezes of lime. You can also top with shredded cheddar, hot sauce, sour cream or whatever else you might like.
-
Butternut Squash & Chickpea Coconut Curry (Crock Pot Recipe)
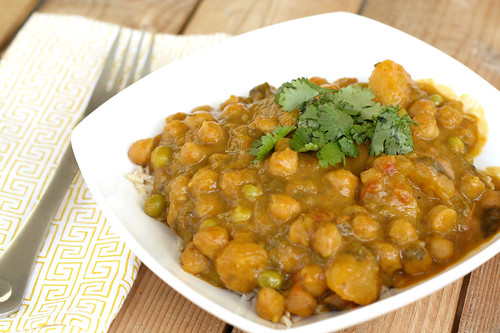
I absolutely adore my slow cooker. It is so perfect for those days where you kinda feel like cooking, but you don’t really have the time or desire to stand around stir this pot so it doesn’t stick, toss that thing in this dressing, cut up this and that. I always love eating at home and cooking my own meals, but sometimes after a long day of work, I just don’t have the energy to head to the kitchen and start on another 1-2 hour adventure. Though it hardly feels like work, sometimes it’s just hard to muster up the energy after a long and busy day. With a crock pot there is no preheating, no keeping an eye on it so it doesn’t over cook, no stirring. It’s just simple, easy home-cooking. When you are ready to eat, just head to the kitchen and serve yourself. I always tell Mark that my crock pot is the closest I will ever come to having a personal chef, it really feels like that.
This recipe is exceptionally easy, just toss all (well, almost all) of the ingredients in to your crock pot in the morning and check back later. I decided to keep out the peas until the end and wished I had done the same with the spinach, so I altered the recipe to reflect that. That’s it. You could certainly fuss with sautéing the onions and garlic ahead of time if you wish, but I really don’t see why you should bother. I tossed it all in and it was ready to go 6 hours later. I had some beautiful spinach and peas from the market so I decided to toss those in for some extra greeny goodness and that was our meal.
I truly think this was the best curry I have made yet. I personally have a wonderful yellow curry powder that I love, though I know many people swear by making your own mix, toasting the spices yourself, etc. I have yet to try that as I really love the powder I buy. If you prefer to take that route, please do. Beyond being extremely easy to make, this curry is loaded with flavor and is so satisfying. I served it over a small serving of brown basmati rice and topped it with fresh cilantro and a bit of unsweetened shredded coconut. The perfect cleanse-friendly, fall meal.
Butternut Squash & Chickpea Coconut Curry (Crock Pot Recipe)
serves 82 1/2 cups diced butternut squash
1 1/2 cups dried organic chick peas
1 small onion, chopped
2 cloves garlic, minced
1 can 13.5 ounce organic coconut milk (you can use light here, I didn’t)
1 bunch of fresh spinach, rinsed and roughly chopped (you could also use kale here)
1 1/2 cups freshly shelled peas (you can use frozen here, if you wish)
1-2 large tomatoes, diced
3 cups vegetable broth or water
3 tablespoons yellow curry powder (you can use your own blend of spices here, I just happen to have a premixed curry powder from a local indian grocery store that I love)
1 teaspoon kosher salt
handful of fresh cilantro, roughly chopped (save some for serving)Rinse and sort through the dry chickpeas. Cut the skin off the squash, remove seeds and cut into 1 inch square cubes. Add all of the ingredients to your slow cooker besides the peas and spinach. Cook on high for 6 hours. About 20-30 minutes before serving add in the fresh peas and spinach, and give it a stir. If your sauce seems to be a bit too thin or watery when it is done cooking, you could make a quick mix of cornstarch and hot water and pour a tablespoon or two of the mixture into the crock pot, allow it to simmer a bit longer. This will thicken it right up.
Serve over brown basmati or jasmine rice topped with fresh cilantro, mint or basil and maybe even some shredded coconut.


