-
Gluten-Free Blueberry Muffins with Almond Flour

I’ve never been much of a baker, however once I made the decision to avoid all processed foods entirely, I knew with that choice came the fact that I would have to start experimenting with baking if I wanted to enjoy any baked goods again. Thankfully, there are many lovely gluten-free bloggers that have done a lot of the experimenting part for me and I can play around with their recipes. See for me, the problem with baking is that you can’t wing it the way you can with cooking. If you change a measurement or try a different flour, you can’t taste it as you go and tweak it, you have to completely bake it and wait to see what happens, if it’s wrong there is no fixing it. You either have to suck it up and eat said ‘failed experiment’ or start over.
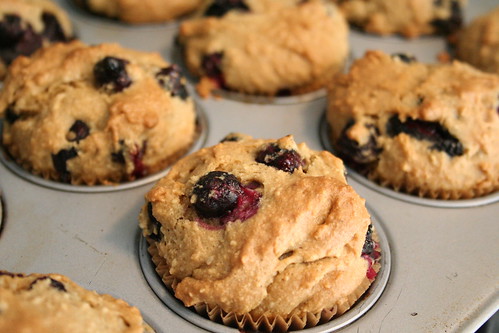
Last week was the start of blueberry season locally and I came across this recipe while searching around. It sounded and looked so good, that I decided to just go for it and make a double batch. This way we can freeze one batch and take it with us on our road trip to Chicago this upcoming week.
I am so incredibly pleased with these muffins. I believe my exact words when I took the first bite were “HOLY F*CK THESE ARE AMAZING”. Seriously, not only are these the best gluten-free blueberry muffins I have ever had, these may be THE best blueberry muffins I have ever had. They plumped up perfectly, so light and airy. They have a delicious nutty flavor from the almond flour and the blueberries just burst in your mouth. This is the first time I have baked with the almond flour and I am very pleased with it. I can’t wait to try out more stuff.
Karina of Gluten-Free Goddess (who created this recipe), recently adopted being vegan on top of her already gluten-free diet, so her recipe used Ener-G Egg Replacer instead of eggs. Since we have been buying the beautiful organic free-range brown eggs direct from the farmer, we used those instead. If you are vegan, use Karina’s original recipe and make these muffins, you won’t regret it.

Gluten-Free Blueberry Muffins with Almond Flour
makes a baker’s dozen
adapted from Gluten Free GoddessPreheat the oven to 375 degrees F. Line a standard muffin tin with paper liners.
Whisk together:
1 1/3 cups almond meal (I used Bob’s Red Mill Almond Flour)
1 cup sorghum (or brown rice flour, if desired)
1/2 cup tapioca starch or potato starch (not potato flour!)
1/2 teaspoon sea salt
1/2 teaspoon baking soda
1 teaspoon baking powder
3/4 teaspoon xanthan gumBeat in:
1 1/3 cups organic light brown sugar
2 tablespoons light olive oil
1/2 teaspoon vanilla
2-3 organic free-range egg whites (depending on the size, you are looking to get 1/4 cup of liquid), beaten until frothy
1/2 cup warm water, more as needed, up to 3/4 cup
1 teaspoon fresh lemon juiceBeat the batter until it is smooth, like a slightly thickened cake batter.
Add in:
1 pint fresh blueberries, washed and patted dry
Stir gently and briefly.
Plop the blueberry muffin batter into the twelve lined cups. You’ll probably have some xtra- for a baker’s dozen.
Bake in the center of a preheated oven for 23 to 25 minutes, until golden and firm to the touch. A wooden pick inserted into the center should emerge clean.
Cool the muffin pan on a wire rack for five minutes. Gently pop the muffins out to continue cooling on the rack (don’t cool them in the hot pan- they’ll get soggy).
If your muffins are soggy or slightly underdone– due to unforeseen oven temperature variations– place them back into the warm oven directly on the center rack for five minutes or so.
Wrap and freeze cooled muffins for future breakfast treats or road trips 😉

Thanks for this lovely recipe Karina, I am forever indebted to you.
-
Penne with Pistachio Pesto, White Beans and Arugula
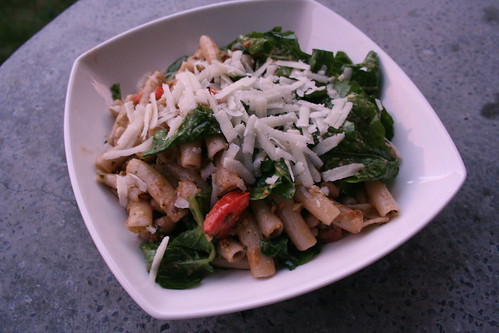
I am not super crazy about this photo, but it was late and I was hungry so I did my best.OK, so it is fair to say my pasta addiction is probably very obvious by now. It has always been one of my favorites and it is definitely both my go-to quick dinner option and my favorite comfort food. When I learned of my gluten intolerance, the loss of pasta in my life is what scared me most, then I discovered Tinkyada’s rice pastas. They are so amazing!! They are light and tasty. I much prefer them to regular pasta, any day, though I really don’t have much choice. Mark actually really loves rice pasta and always mentions how much lighter it is in your ‘gut’.
We got home late from work last night and we were both very tired from a long day of printing and other projects, so while I was contemplating dinner, Mark pulled a Wegman’s pizza out of the freezer for himself. I had pulled this recipe from a recent issue of Cooking Light and had all of the ingredients for it on hand, since it seemed so easy and quick, I decided to make it. In the time it took the oven to preheat and for the frozen pizza to cook and cool, I had made this pasta dish, served it, photographed it and I was finishing up eating, just about the time Mark was sitting down to eat his pizza. Granted, I produced WAY more of a mess and tons more dishes, but I would say cooking from scratch and eating fresh foods wins again!!
The pesto had an amazing flavor to it from the pistachios and the arugula had that lovely peppery crisp that just added to the creaminess from the beans. I was a bit unsure on the beans, but I thought they were really nice and was glad I decided not to omit them. Admittedly, I don’t usually buy romano cheese, as I tend to go for parmigiano-reggiano every time, but the romano had a stronger taste that went perfectly with these flavors, a bit saltier and sharper. I will definitely be buying more of it for pasta dishes.
Penne with Pistachio Pesto, White Beans and Arugula
serves 4
adapted from Cooking Light Magazine, July 20108 ounces uncooked organic brown rice penne pasta (any pasta will do)
1 cup packed fresh basil leaves
1/4 cup roasted shelled pistachios
6 garlic cloves
2 tablespoons olive oil
1 1/2 cups chopped seeded tomato
1 teaspoon freshly ground black pepper
3/4 teaspoon kosher salt
1 (15-ounce) can organic great northern beans, rinsed and drained
2 cups arugula
1/4 cup shredded fresh pecorino Romano cheeseCook pasta according to package direction. Drain and rinse with cold water. Drain.
Combine basil, nuts and garlic in a food process; process until finely chopped.
Heat large skillet over medium heat. Add olive oil to pan, and swirl to coat. Add basil mixture, cook for 2 minutes, stirring frequently. Stir in pasta, tomato, and next 3 ingredients (through beans); cook for 2 minutes or until thoroughly heated, tossing to combine. Remove from heat. Add arugula to pan, and toss slightly to wilt.
Place about 1 1/4 cups pasta mixture in each of 4 bowls and top each serving with 1 tablespoon of cheese.
-
Thai Basil Mojito

I wish I could take credit for the idea of this drink, but I can’t. My dad dreamt it up after tasting the thai basil I had growing in my garden. The thai basil has a subtle anise flavor and is very different from Italian basil. This was a refreshing summer drink, that was perfect for a hot day and grilling out.
Thai Basil Mojito
serves 11/2 lemon, cut into wedges
a small handful of fresh thai basil leaves
1/2 tablespoon organic pure cane sugar (or 2 oz of simple syrup)
2 oz white rum
ice cubes
club sodaPlace the lemon wedges at the bottom of a tall glass along with the basil leaves. Add sugar or simple syrup and muddle the mixture. Stir in the rum and top with ice. Top off with club soda and garnish with a lemon wedge and couple thai basil leaves.
-
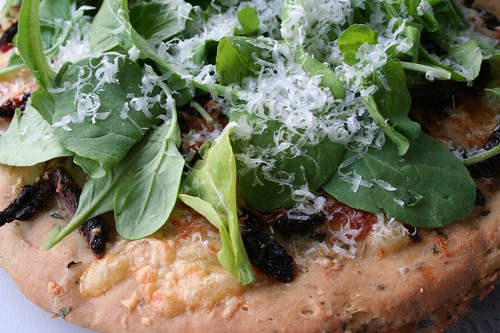
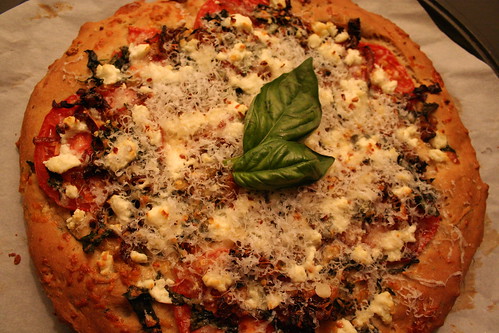
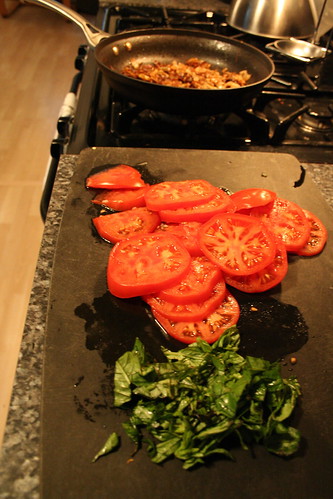
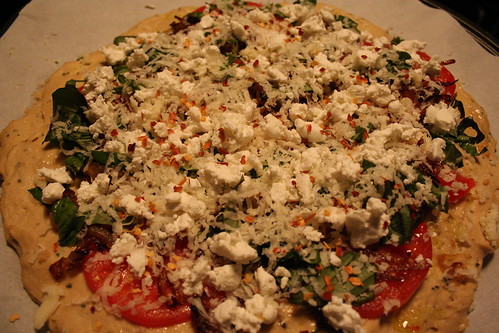
Sun-Dried Tomato, Mozzarella, Fontina & Arugula Pizza (Gluten-Free)
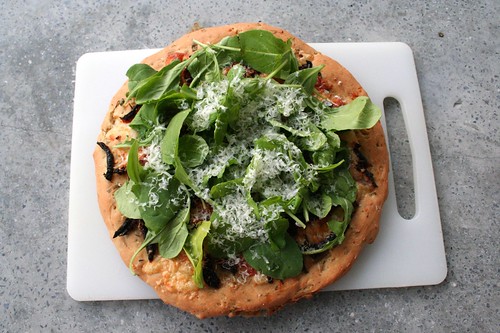
I am a big fan of homemade pizza, my Mom always made it when we were kids, with homemade pizza dough and all. I love how much fun you could have with toppings. This pizza turned out perfectly, it had so many lovely subtle flavors and the arugula finished it off nicely with a little bite. I used the same pizza dough recipe from my Caramelized Onion & Goat Cheese Pizza, but I am going to include it again here so you don’t have to look it up. Since I made this recipe up on the fly and also was making a second non-gluten-free pizza for Mark, my measurements may not be exact, so feel free to just improvise and go with what you think on the toppings. The only thing I would like to find a way to change is, some of the sun-dried tomatoes started to really blacken up as the pizza baked, it seemed to only be the ones not covered by cheese, so maybe I just need to add more cheese next time (oh darn!).
I took one leftover piece of this pizza this morning, toasted it up in the toaster oven and topped it with one fried egg. Oh my gosh was that amazing. The perfect breakfast to start a very busy day.
Sun-Dried Tomato, Mozzarella, Fontina & Arugula Pizza (Gluten-Free)
serves 2-3Gluten-free Pizza Crust
1 tsp sugar
1 1/2 tsp quick-rising yeast
3/4 cup warm water (about 110° F)
3/4 cup brown rice flour
1/4 cup garbanzo bean flour
1/4 cup tapioca flour
1/4 cup potato starch
1 1/2 tsp xanthan gum
1 tsp salt
3 tablespoons olive oil
2 eggs
1/2 tsp balsamic vinegar
2 tsp fresh rosemary, basil or oregano (I went with basil and oregano)Line a baking sheet with parchment paper or lightly grease.
In a small bowl, combine warm water, sugar and yeast. Stir until just dissolved. Cover with a kitchen towel and set aside in warm are for 10 minutes. Mixture will form a foam head of about 3/4″.
Using your food processor (which is how I did it and it worked surprisingly well), add all dry ingredients: flours, potato starch, xanthan gum and salt, directly into the processor bowl. Blend in the processor, about 1 minute. If using a mixing bowl, combine dry ingredients, and whisk together until well combined.
In another small bowl, whisk olive oil, eggs, and vinegar until blended. Add egg mixture and yeast mixture to dry ingredients, mix until combined.
Blend dough in the food processor for 2-3 minutes. Dough will be sticky and soft, it doesn’t seem much like dough at all. Add in the herbs and gently pulse or mix to combine.
Transfer the dough to the prepared baking sheet. Dip your hands in water or olive oil and shape the dough into a round shape about 1/4″ thick. Place in a warm, draft-free area and let rise 40 minutes. Dough should double in size.
Brush top with olive oil and sprinkle with a pinch of course salt.
This recipe can also be used to make gluten-free focaccia if you spread it to 1″ instead of 1/4″.Toppings
1 clove garlic, minced
1 tablespoon of chopped fresh herbs, I went with basil and oregano from my garden
2 ounces of sun-dried tomatoes, sliced very thin
1/2 cup of shredded mozzarella (I used organic)
1/2 cup of shredded fontina
red pepper flakes
2 cups of fresh baby arugula
fresh parmigiano-reggianoPreheat the oven to 400° F
After you have brushed a bit of olive oil on the crust and sprinkled with a bit of salt (see above), sprinkle the minced garlic all over the crust. Next, evenly sprinkle the fresh herbs and sun-dried tomatoes all over the crust. Add both cheeses and a pinch of red pepper flakes. Bake the pizza. Place the baking sheet in the middle of the oven and bake for 20-25 minutes until the crust is a golden brown and the cheese is melted. After you pull the pizza out, top the entire pizza with the baby arugula. Lightly grate fresh parmigiano-reggiano on top. Cut pizza into wedges, serve immediately.
-
Mint Chocolate Chunk Ice Cream

I have never been a huge fan of ice cream, until I tasted fresh homemade ice cream made from scratch with fresh ingredients. It is so insanely delicious and it has so much more flavor than the store-bought stuff. I had been talking about buying the ice cream maker attachment for my Kitchenaid mixer for some time now and finally got around to it last week. I knew before I even bought the attachment what flavor my first batch was gonna be. Mint Chocolate Chunk! We have so much mint growing wild in our yard that I couldn’t wait to snip some off and bring it in to make fresh ice cream. If you can’t get your hands on fresh mint you can use mint extract, but there is no comparing to the fresh mint. So much so that I added chopped fresh mint back in at the end, since I love the little bits of flavor.
Making ice cream from scratch, cooking down and making the custard first definitely is a lot of work, but it is absolutely worth it and is so gratifying in the end. The only thing I wished is that I could have found some place locally to buy fresh milk and cream, instead I bought organic milk and cream from the grocery store. I have searched high and low to find somewhere locally to buy dairy (preferably pasture-fed), but with no results yet, so if you know of a place in the Western New York area, please share.
This ice cream really is to die for. So rich, a small scoop is all you need. I cannot wait to experiment with other flavors.
Mint Chocolate Chunk Ice Cream
yields 1 quart
adapted from Simply Recipes3 cups of fresh mint leaves (not stems), rinsed, drained, packed
extra fresh mint leaves, chopped
1 cup organic whole milk
2 cups organic heavy cream (divided, 1 cup and 1 cup)
2/3 cup organic pure cane sugar
A pinch of salt
6 egg yolks (we prefer brown eggs from local, organic, free-range chickens)
1 teaspoon organic vanilla extract
6 ounces semisweet chocolate or dark chocolate, chopped fine, keep in the freezer until used1. Put the mint leaves in a heavy saucepan with the 1 cup of milk and 1 cup of the cream. Heat until just steaming (do not let boil), remove from heat, cover, and let stand for 30 minutes. Reheat the mixture until steaming, remove from heat and let stand for 15 more minutes.
2.While the mint is infusing in step 1, prepare the remaining cream over an ice bath. Pour the remaining 1 cup of cream into a medium size metal bowl, set in ice water (with lots of ice) over a larger bowl. Set a mesh strainer on top of the bowls. Set aside.
3. Strain the milk cream mixture into a separate bowl, pressing against the mint leaves with a rubber spatula in the sieve to get the most liquid out of them. Return the milk cream mixture to the saucepan. Add sugar and salt to the mixture. Heat until just steaming again, stirring until sugar has dissolved. Remove from heat.
4. Whisk the egg yolks in a medium-sized bowl. Slowly pour the heated milk cream mixture into the egg yolks, whisking constantly so that the egg yolks are tempered by the warm mixture, but not cooked by it. Scrape the warmed egg yolks back into the saucepan.
5. Return the saucepan to the stove, stirring the mixture constantly over medium heat with a wooden spoon, scraping the bottom as you stir, until the mixture thickens and coats the spoon so that you can run your finger across the coating and have the coating not run. This can take about 10 minutes.
6. Pour the custard through the strainer (from step 2) and stir into the cold cream to stop the cooking, add 1 teaspoon of vanilla.
7. Chill the mixture thoroughly in the refrigerator (at least a couple of hours) or stir the mixture in the bowl placed over the ice bath until thoroughly chilled (20 minutes or so). Freeze the mixture in your ice cream maker according to the manufacturer’s instructions.
8. Once the ice cream has been made in the ice cream maker it should be pretty soft. Gently fold in the finely chopped chocolate and chopped fresh mint. Put in an airtight container and place in the freezer for at least an hour, preferably several hours. If it has been frozen for more than a day, you may need to let it sit at room temperature for a few minutes to soften it before serving.
-
Strawberry Basil Mojito
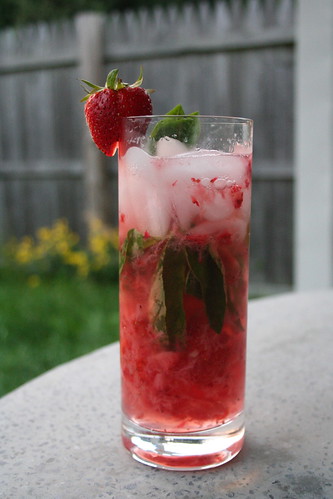
The mojito is one of my go to summer cocktails. But, as with everything, I love all the variations on the classic. This is one of my favorites and considering we had grabbed some fresh picked strawberries while we were out in the country and my herbs are growing out of control in our yard, this was a no brainer.
I love the sweetness from the strawberries and the spiciness from the basil. It is perfectly light and refreshing, the perfect Springtime twist on an old classic.
Strawberry Basil Mojito
serves 15 strawberries, hulled
5 fresh basil leaves
1/2 tablespoon organic pure cane sugar (or 2 oz of simple syrup)
2 oz white rum
ice cubes
club sodaSlice the strawberries and place at the bottom of a tall glass along with the basil leaves. Add sugar or simple syrup and muddle the mixture. Stir in the rum and top with ice. Top off with club soda and garnish with strawberry slices and basil leaves.
-
Quinoa and Goat Cheese Stuffed Peppers
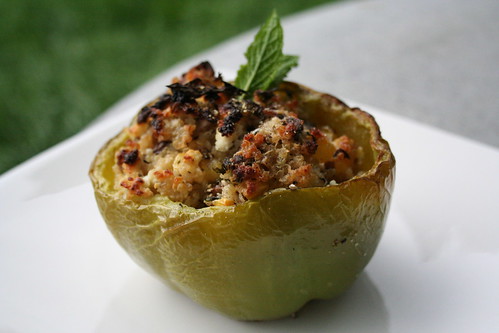
There is something about stuffed peppers that is always good, no matter what’s inside. I have been wanting to make quinoa stuffed peppers for sometime now and when I came up with the idea to add goat cheese, I figured I couldn’t go wrong. These peppers were so delicious and had the perfect balance of crunch and creaminess. The fresh mint from our herb garden, was the perfect compliment to the tangy goat cheese. These would be great as a entrée or as a side dish. We served these on the side with some fresh Italian sausage patties from Sojourner Farms that we picked up on Friday (which by the way, was better than any Italian sausage I have ever tasted).
Quinoa and Goat Cheese Stuffed Peppers
serves 44 organic bell peppers (green, red, orange or yellow, any will do)
3/4 cup cooked quinoa
1 tablespoon olive oil
1 cup baby bella mushrooms, chopped
1 clove garlic, minced
2 tablespoons fresh mint, chopped
1/2 cup frozen organic corn kernels
salt
freshly ground black pepper
6 ounces goat cheese, crumbledPreheat oven to 475º.
Cut off top of peppers and remove seeds. Set aside.
Rinse 1 cup of quinoa thoroughly. In a small saucepan, bring 1 1/2 cups water and 1 cup of quinoa to a boil. Reduce heat to medium-low and simmer for about 15 minutes, until tender. Remove from heat, let stand 5 minutes; fluff with a fork. (I refrigerated the leftover quinoa for a salad tomorrow after yoga.)
Meanwhile, in a large skillet, heat 1 tablespoon of olive oil over medium-high heat. Add garlic and chopped mushrooms; season with salt and pepper. Cook until mushrooms are tender; add corn and 1 tablespoon of fresh mint. Cook until heated.
In a large mixing bowl, add cooked quinoa, mushroom mixture, 4 ounces of goat cheese, remaining 1 tablespoon of fresh mint, salt and pepper to taste. Stir to combine.
Arrange peppers in a small glass baking pan, brush skins with a small amount of olive oil. Stuff peppers with filling, top each pepper with the remaining crumbled goat cheese. Bake until peppers are slightly blackened and the filling top is golden and crispy, 30-35 minutes. Cool in pan 10 minutes,
-
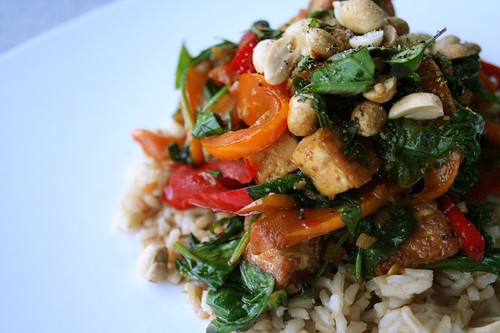
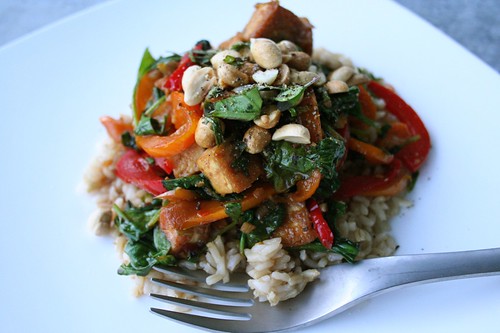
Spicy Thai Tofu and Peppers with Peanuts
After a few weeks of travel, events and lots of work, life is finally getting a bit closer to normal for us. I have still been eating well and fresh, just a bit more rushed and with no time for blogging. I planned some great meals for the next week or so, and I cannot wait to share them with you.
I decided on this dish because the thai basil I planted in my herb garden has been growing wonderfully and I couldn’t wait to use it in something. It is so fragrant and has a hint of anise flavor. If you don’t have access to thai basil, you can use regular sweet basil, as well. But I recommend trying to get thai basil if you can.
I personally recommend pre-baking tofu when using it in stir fries and the like. The tofu keeps that crunch and has a much better texture than just cooking it up in the wok. The tofu made with recipe I included below can also be used over rice, in soups, salads and just as a snack. You can also add soy sauce, citrus juice, play with spices, etc.

Crispy Baked Tofu
1 – 14-16 ounce package of extra-firm tofu drained, pressed and cut into 1-inch cubes
2 tablespoons sesame oil
1 teaspoon saltPreheat your oven to 450ºF. Arrange tofu cubes in a single layer on a baking sheet, drizzle over sesame oil and lightly toss to coat, sprinkle with salt. Bake 30-35 minutes, turning with a spatula every 10 minutes to get a good crunch on all sides.
Spicy Thai Tofu and Peppers with Peanuts
4 servings
adapted from Bon Appétit June 20081/3 cup olive oil
2 large bell peppers, seeded, thinly sliced (I used 1 red and 1 orange)
3 tablespoons minced peeled fresh ginger
3 large garlic cloves, finely chopped
3 green onions, thinly sliced on diagonal
14-16 ounces of crispy baked tofu cubes
3 tablespoons low sodium gluten-free tamari soy sauce (regular soy will do)
2 tablespoons fresh lime juice
1/2 to 3/4 teaspoon dried crushed red pepper
6-ounces organic baby spinach leaves
1/3 cup chopped fresh thai basil (you can use regular sweet basil, also)
1/3 cup lightly salted roasted peanutsHeat oil in wok over high heat. Add bell peppers, ginger, and garlic; sauté until peppers just begin to soften, about 2 minutes. Add green onions; toss 2 minutes. Add next 4 ingredients. Toss to blend, about 1 minute. Add spinach in 3 additions, tossing until beginning to wilt, about 1 minute for each addition. Mix in basil. Season with salt and pepper. Sprinkle peanuts over. Serve.
Can be served over brown rice, thin rice noodles, or alone.
-
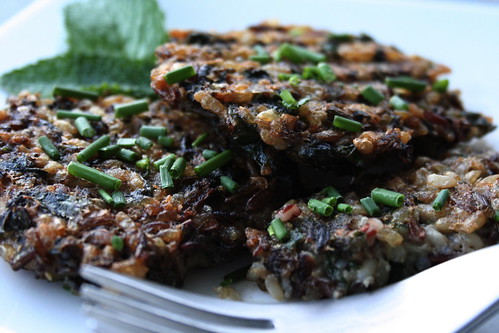
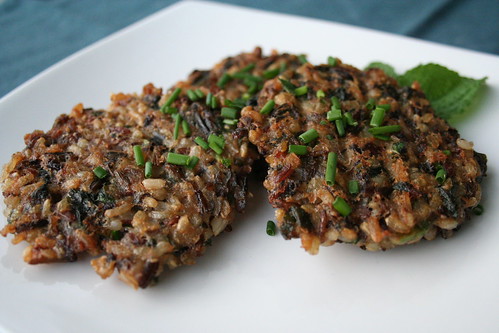
Wild Rice and Spinach Patties
This week has been an incredibly busy one for us, we are getting ready for the Renegade Craft Fair in Brooklyn next weekend where we will be vendors, selling our wares. I love all the wonderful trips we get to take throughout the year, but the two weeks leading up are always very hectic. We have been working 12 hour days, are working this entire weekend including the holiday on Monday and we still have so much to do next week before we leave. I have still been cooking dinner each night, even if it is just a salad, some steamed spinach or a fresh veggie burger from the farmer’s market and I have been keeping up with my yoga routine. I know for me, the busier and more stressed I am, the more important these things are to my health and mental well being, than any other time. Though the meals have been much more thrown together and more about quickness and ease than anything else, it still makes me so happy to sit down to something I made totally from scratch with all fresh ingredients. It calms me and allows me to have a relaxing end to my day.
I decided after hitting up the farmer’s market, planting the veggie garden, printing a poster and sewing (among many other things today), I deserved to take an hour break to cook and enjoy a more put together meal. Sometime during the week, I saw these Wild Rice Patties from fresh365 and decided I would make some variation of it, as I had just about everything on hand and it looked to be a simple and tasty meal. I had a decent amount of spinach from the farmer’s market so I thought rather than the morels, which aren’t easy to find locally, the spinach would be a wonderful substitution. These patties had so much flavor and were so satisfying. Wild rice has so much going on, there is a nutty, sweetness that you won’t find in usual white or brown rice. The mint and chives, that I grabbed fresh from the garden, were perfect, I added more mint than the recipe called for as I really wanted to get that flavor. I guess I had forgotten how great mint was in things other than mojitos, the clean and crisp taste totally blew me away and stole the show. Also, we had bought some spicy yogurt sauce today at the farmer’s market and I tried it on a few bites of these patties and it was a great compliment. I will most definitely be making these again and I am excited to try out some different variations. These would be great with a crisp green salad on the side.
Wild Rice and Spinach Patties
makes 8 small patties
adapted from fresh3651 egg
2 c cooked wild rice, brought to room temperature (leftover rice works great)
2 c chopped fresh spinach, cleaned and stems removed
3 T finely chopped chives
3 T chopped mint
1 1/2 t salt
1/2 t pepper
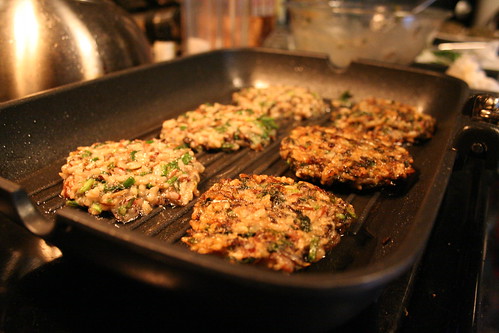
3 T olive oilPrepare the wild rice according to the package. When fully cooked, turn off heat and add the spinach, stir to combine and return the lid, allow to sit 10 minutes. In a large bowl, whisk egg. Add rice and spinach mixture, chives, mint, salt and pepper. Stir well, and form into 8 patties. In a large grill pan, heat olive oil over medium heat. Transfer patties to the pan, press down with a spatula, and cook 5-7 minutes, until golden brown. Flip patties over, press down with a spatula, and cook 5-7 minutes, until golden brown. Serve warm.
-
Shaved Asparagus and Parmesan Salad
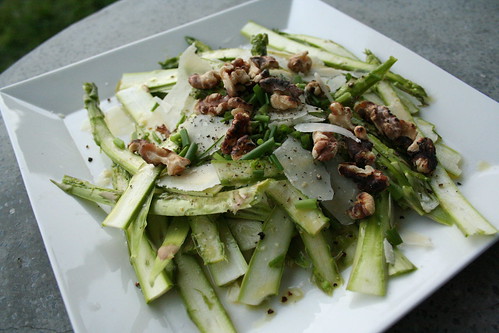
It was unseasonably hot in Buffalo today, mid-eighties and muggy. I am certainly not complaining, I love it. However, the last thing I wanted to do was come home and cook, it was far too hot for that. So, I took out a bunch of the beautiful asparagus that we grabbed on Saturday at the farmer’s market and made this delightful raw Spring salad. I served it with a piece of gluten-free focaccia and it perfectly complimented this bright and beautiful, sunny Spring day.
Shaved Asparagus and Parmesan Salad
serves 21 lemon
2 tablespoons of olive oil
1 teaspoon of kosher salt
freshly ground black pepper
1/4 cup walnuts
1 pound bunch of asparagus spears, trimmed
1 bunch fresh chives, snipped
wedge of Parmigiano-Regiano cheese, for shavingIn a small bowl whisk together the juice from one lemon, olive oil, salt and pepper. Whisk until combined. Set aside, whisk together again just before serving. In a dry pan over medium-high heat, toast the walnuts until they are lightly browned, set aside to cool. Using a mandoline, set over a cutting board, shave the asparagus lengthwise. Add the dressing to the asparagus on a large platter, let sit 5 minutes. Just before serving, top the salad with the toasted walnuts, chives, shavings of the Parmigiano-Reggiano and freshly ground black pepper. Enjoy.
-
Fish Tacos with Chipotle Cream
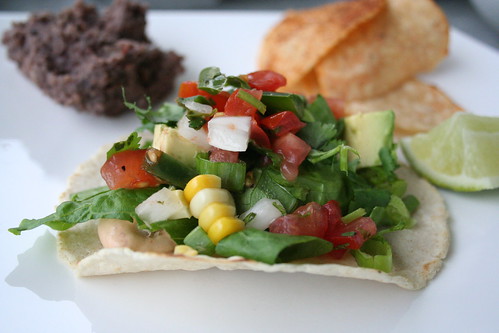
This is one of my favorite meals, so light and so fresh. The perfect summer-time meal and it was the best thing for our first patio dinner of the season. We were able to do all the cooking outside and enjoy the beautiful weather. I love the sneak up heat from the chipotle cream and the freshness from the grilled corn and the fresh pico de gallo, these three ingredients should not be skipped, they set these tacos apart from most that I have had. We served this with a small dollop of organic refried black beans and a few fresh corn chips from the farmer’s market on the side.
Fish Tacos with Chipotle Cream
serves 4Chipotle Cream
via Ellie Krieger, Food Network6oz of lowfat greek yogurt (if you cannot find greek yogurt, drain regular yogurt using a strainer and a paper towel)
2 tablespoons of mayo
2 teaspoons chipotle pepper, in adobo sauce (use just sauce if you want it less spicy, include a chopped pepper or two if you like the spice)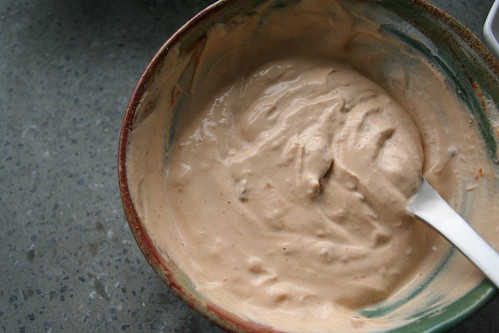
Fish
1 pound white flaky fish, such as cod, tilapia or halibut
1 tablespoon of olive oil
freshly squeezed juice, from 1 lime
1/4 teaspoon salt
freshly ground black pepper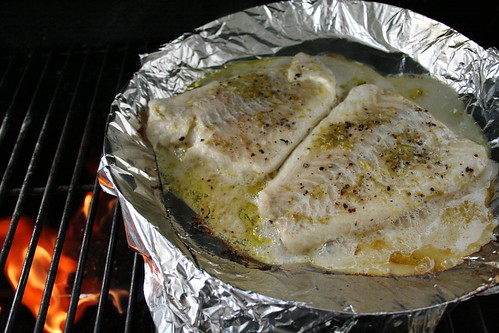
For the tacos
8-12 fresh homemade corn tortillas
chipotle cream (see recipe above)
shredded lettuce or cabbage
freshly grilled ear of corn, taken off the cob after it cools
cilantro, chopped
green onions, thinly sliced
avocado, diced
pico de gallo (I usually make by own from scratch, but we found some delicious homemade fresh pico de gallo at the Farmer’s Market)
lime wedgesTo make the chipotle cream, add the yogurt, mayo and chipotles into small bowl and stir to combine. This can be made ahead of time and chilled until you are ready to eat.
Lay the fish flat in a glass baking pan, cover in olive oil, lime juice, salt and pepper. Let marinade for at least 30 minutes.
Start your grill and after it reaches a medium-high heat add the corn and cook until done, about 15-20 minutes. We put the corn right on the grill in the husk after we soaked it a bit, you can also take it out of the husk and cook it in foil.
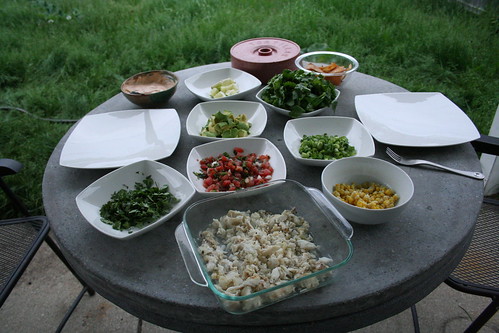
Meanwhile, chop and prep all of your ingredients for the tacos and place in bowls for serving.
Make the dough for your corn tortillas, press and cook them, store in a warm oven or in a tortilla warmer until you are ready to eat.
Remove the fish and add it to a foil lined grill pan on your hot grill, cook for approximately 3-5 minutes per side until cooked through, opaque and flaky. Set fish aside for 5 minutes. Flake the fish with a fork.
Top each tortilla with 1 tablespoon of chipotle cream. Top with fish, lettuce, corn, cilantro, green onions, pico de gallo, avocado and/or any other items that you would like. Serve with lime wedges.

-
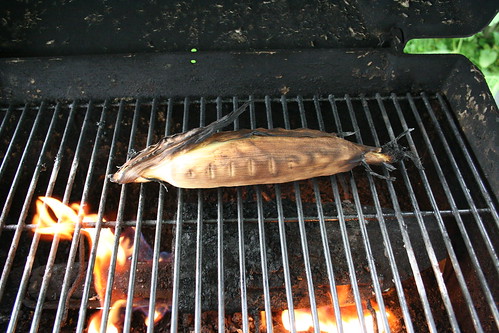
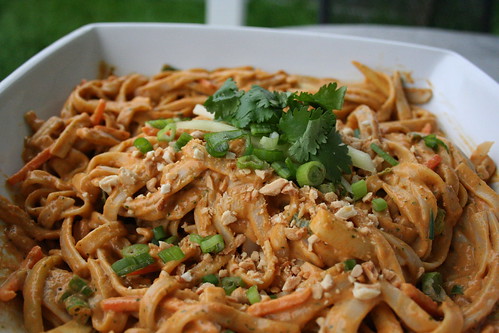
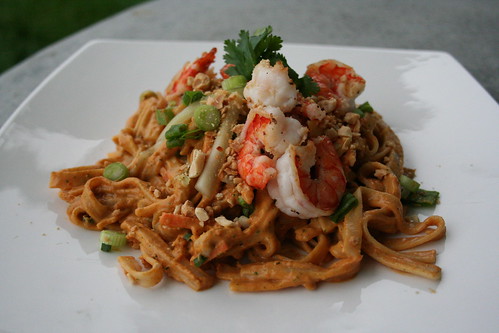
Curry Peanut Rice Noodles
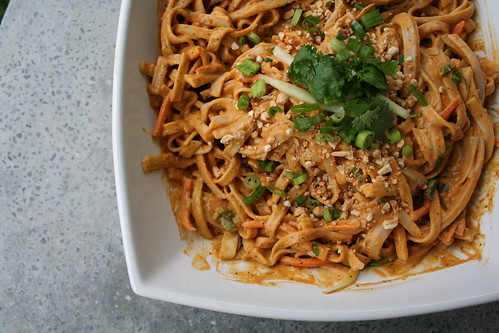
This was a delicious and quick weeknight dinner, it was full of so many different levels of flavors and textures. If you have never tried red curry, you really need to. It has a very subtle heat and it is made up of a variety of different spices, I really love the hint of lemongrass that it brings. Look for jars of red curry paste in the Asian aisle at the supermarket. These noodles have a lovely creaminess from the peanut butter, that subtle spice from the red curry and so many great textures with the green onions, carrots, cucumber and peanuts. We served a few grilled shrimp atop the noodles, but it definitely doesn’t need it, so you can go without for a great vegetarian meal.
This would also make the perfect side dish for a summer-time picnic. I rinsed our noodles in hot water to keep the dish at a warm temperature but you could easily rinse the noodles in cold water to make it a completely cold dish. You could even make the noodles and chill them up to a day ahead of time, just make the sauce the day-of and toss it together to make a quick cold noodle salad. You could use any noodle you like here, regular fettucini, whole wheat spaghetti, etc.
I didn’t think this was too spicy by any means, but if you aren’t a big fan of spicy, take the red curry paste to 1 tablespoon and leave off the red pepper flakes at the end.
Curry Peanut Rice Noodles
serves 4
adapted from Food Network Magazine, June 2010Kosher salt
12 ounces gluten-free rice noodles, I prefer Tinkyada’s pad thai style brown rice fettucini
2/3 cup organic crunchy peanut butter
2 tablespoons red curry paste
2 teaspoons rice vinegar
juice of 1 lime, plus wedges for serving
1/3 cup of fresh cilantro, plus more for sprinkling
1/2 cup water
3 green onions, thinly sliced
1 cucumber, peeled, seeded and cut into thing strips
1 large carrot, coarsely grated
1/2 cup of dry roasted unsalted peanuts, crushed
Red pepper flakesBring large pot of salted water to a boil. Add the rice noodles and cook as the label directs. Reserve 1/2 cup of cooking liquid, drain the noodles and rinse. Shake off excess water.
Meanwhile, puree the peanut butter, curry paste, vinegar, lime juice, cilantro, 1/2 cup of water and of salt in your food processor until smooth. Toss the noodles with the peanut sauce, green onions, cucumber and carrot in large bowl until coated. Season with salt and stir in some of the reserved cooking liquid from the pasta to loosen the sauce, if necessary. Serve on plates, topped with more cilantro, green onions, crushed peanuts and pepper flakes, if you like a bit of heat. Serve with lime wedges. We topped our noodles with a few pieces of shrimp that we grilled up quickly, it added a nice taste.
-
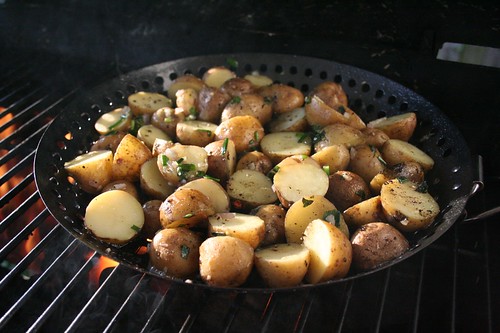
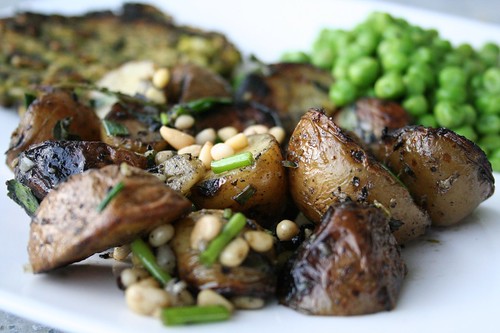
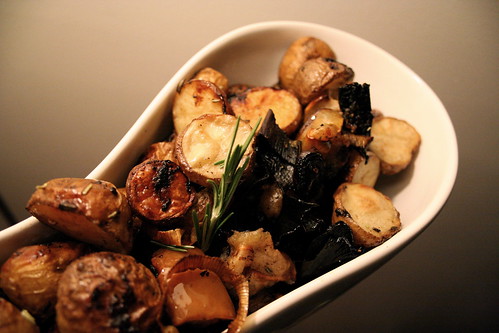
Grilled Herb Potato Salad
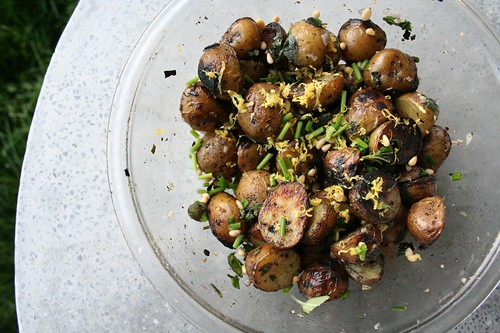
Last night after we left the studio, we had planned on throwing together something quick and heading to the grocery store to grab what we needed for the next week. By the time we got home, the sun was still shining and neither of us felt like grocery shopping, so instead I decided we could make do with what we had at home and put the grocery store off one more night. I am glad we did.
We had a bag of baby potatoes and some delicious handmade veggie burgers from the Farmers Market, so I decided we would be able to do something amazing with these plus some frozen organic peas. Both my oregano and chives came up on their own from last season and they are growing out of control, taking over my herb box, so I have been trying to take advantage and use them in almost everything I make. Since we were firing up the grill for the brown rice and spinach burgers, this sounded like the perfect way to make a side dish with the potatoes. They really turned out great. There was so much flavor from the fresh herbs and the crispy smoke flavor from the grill was perfect. I think we will be making this a lot this summer.
Grilled Herb Potato Salad
serves 430 baby potatoes, halved
coarse kosher salt
3 garlic cloves, halve two of the cloves, mince the third
olive oil
1 shallot, diced
1 bunch of fresh oregano, chopped
1 bunch of fresh chives, chopped
1/4 cup of pine nuts
freshly ground black pepper
2 teaspoons lemon zestStart by precooking the potatoes. Add the halved baby potatoes, a tablespoon of course salt, two cloves of garlic (halved) and enough water to cover the potatoes by 1-inch to a medium-sized pot over high heat. Bring it to a boil, then reduce heat and simmer for approximately 10-12 minutes or until the potatoes are just tender.
Drain potatoes in a colander and rinse with cold water to cool quickly and stop the potatoes from cooking.
Start your grill, preheat with the cover on for about 10 minutes on high. Lightly spray a grill pan with cooking spray to keep the potatoes from sticking (if you do not have a grill pan, you can also thread the potatoes onto skewers).
Meanwhile in a large bowl, combine 2 tablespoons of olive oil, the diced shallot, minced garlic, the chopped fresh herbs, plus 1 teaspoon of kosher salt and freshly ground black pepper. Mix the mixture to combine the ingredients and then remove half of the mixture to a small bowl, set aside. Add the potatoes to the large mixing bowl, and toss to coat the potatoes with the oil and herb mixture.
Pour the potatoes into the grill pan and set onto your hot grill, we got a bit of smoke because of the little bit of oil dripping, but it gave the potatoes a great smokey flavor. Give the potatoes a stir every few minutes to make sure they aren’t sticking. Once you are sure they aren’t sticking, you can stir them last which will allow them to get crispier. Cook them over a high heat for approximately 15-20 minutes until they are fully cooked and starting to brown and crisp up a bit. (This time will depend on how hot your grill is, we couldn’t get our grill super hot so it took a bit longer, it may only take about 10-15 minutes on a very hot grill). Remove the grill pan from the heat, and add the potatoes back to your large mixing bowl, add the remainder of the oil and herb mixture, the pine nuts, lemon zest and salt and pepper to taste. Toss gently to combine. Enjoy.
(This can also easily be made by roasting or broiling the potatoes in shallow baking pan in your oven. The potatoes can also be boiled 1 day ahead and kept in the refrigerator. Bring them to room temperature before boiling)
-
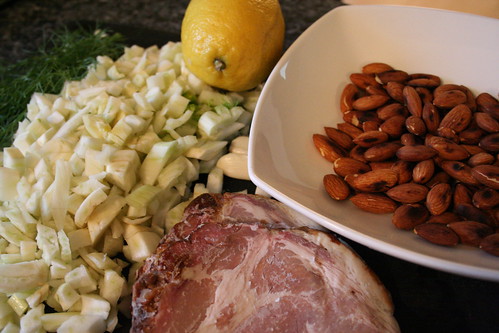
Wild Rice with Spinach, Fennel & Toasted Almonds
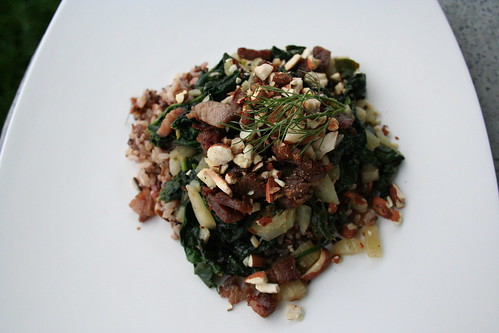
This was a recipe I came up with this morning while I drank my tea, after doing a quick inventory on the refrigerator and pantry and thumbing through my Flavor Bible. I wanted to use some of the goodies we got at the Farmer’s Market this weekend and make something Springy and tasty. The wild rice had a beautiful earthy and nutty flavor. The spinach and fennel had a lemony tang and the perfect amount of that fresh crisp that I crave. The little bit of fresh country bacon brought a salty and smokey flavor and the toasted almonds brought a robust, toasty sweetness that really enhanced the flavor of the dish as a whole and finished it off nicely.
If you wanted to make this a vegetarian dish, you could easily leave off the country bacon and the dish would be equally delicious. I rarely cook with bacon, but when we saw this beautiful fresh bacon at the Farmer’s Market, that we bought directly from the farmer, I knew I would find the perfect dish for it to compliment. The country bacon was a cross somewhere between traditional bacon and ham, not too salty and not too greasy. This is the first time I have ever cooked with it and I most definitely will again.
Wild Rice with Spinach, Fennel & Toasted Almonds
serves 24 cups of fresh spinach, stems removed and washed
2 cups fennel, chopped
3 small cloves garlic, minced
1/2 cup whole raw almonds, unsalted
2 slices of local farm fresh country-style bacon, diced
1/2 lemon
2 cups wild rice, cooked
salt
freshly ground pepperPrepare 2 servings of wild rice, according to the directions on the package. While it is cooking, over a medium-high heat, toast the whole almonds in a large dry non-stick saucepan. Remove the almonds from the pan once they begin to brown up and make slight popping sounds. Set aside. Once cooled, crush the whole almonds to your desired size.
Add the diced country bacon to the pan and brown it up over a medium-high heat (if the pan is too dry, add a drizzle of olive oil). After the bacon is browned up and heated through, remove it from the pan, cover and set aside.
Using the little bit of grease in the hot pan from the bacon, add the garlic and fennel, sauté over medium-high heat, stirring often, being careful not to burn them. Once the fennel is beginning to soften and brown up a little, about 6 minutes, add the spinach. Stir to combine the ingredients. Add a dash of salt, freshly ground pepper and the juice of half of lemon. Once the spinach has cooked down but still has a slight crisp, about 5 minutes, place 1 cup of wild rice on each plate, top it with the spinach and fennel mixture, then the bacon, crushed toasted almonds and freshly ground pepper. Serve.
-
Vegetarian Faux Pho
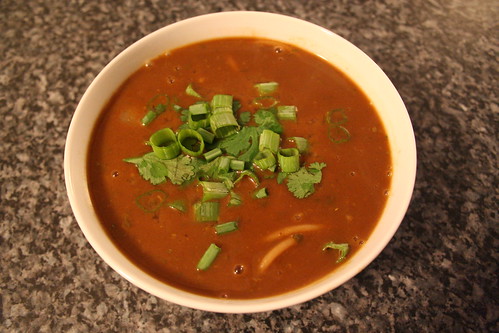
This is a VERY thrown together version of traditional Pho, though there is little that is traditional about my version. Traditional Pho (pronounced “phuh”), is a staple of Vietnamese cuisine and culture. A hearty soup usually made with a clear beef or chicken broth that includes rice noodles and distinct flavors such as cinnamon, star anise, clove, basil, lime and more. There are many, many variations to this dish and it is often eaten as breakfast, lunch or dinner.
Last night, I had a head full of congested sinuses, wasn’t feeling so hot and I just wanted something hot, spicy and brothy. Pho was all I could think of, but I didn’t want to leave the house. I had to make it with what I had on hand in the refrigerator and pantry. I would have preferred to have included some tofu, star anise, bean sprouts and thicker more traditional rice noodles, but I made do with what I had. Mine was much thicker than traditional Pho is, since I cooked my rice noodles right in the broth, but the flavors were there, none the less. I have to say, it turned out pretty good, considering it was thrown together. Which is why I decided to share my faux recipe, to show you that you can always come up with something quick and fresh with what you have on hand.
Making this faux Pho, however has made me realize that I would really like to make a full on pot of traditional Pho very soon.
Vegetarian Faux Pho
Serves 2-41 tablespoon olive oil
1 small onion, diced
1 shallot, diced
2 cloves garlic, minced
1 small jalapeño, seeds and stem removed, minced
1 tablespoon ginger, minced
1 tablespoon cinnamon (I used ground because I didn’t have sticks)
1/2 tablespoon cloves (I used ground because I didn’t have whole cloves)
6 cups vegetable broth
3 tablespoons soy sauce (I use low sodium, gluten-free Tamari)
2 tablespoons basil, finely chopped
8 ounces rice noodles (all I had on hand was gluten-free rice spaghetti)
1 lime, cut into wedges
cilantro
scallions, sliced
sriracha chili pasteHeat olive oil in a large pot over medium-high heat, add onions, shallots, garlic, jalapeño, ginger, cinnamon and cloves, stirring occasionally until the vegetables turn clear and start to char a bit. Add the stock, soy sauce, basil and a squeeze or two of sriracha and bring to a boil over high heat. Turn the heat down to medium-low and simmer for about 25 minutes.
You can cook the rice noodles separately or if you are lazy like I was, just toss them right into the broth and cook them in there. By cooking the noodles in the broth, it made the broth very, very thick, but I didn’t care, I wanted fast and easy. I added the noodles, brought it to a boil then lowered the heat to medium-high and simmered until the noodles were cooked. About 10 minutes.
Ladle the broth and scoop a bunch of noodles out into large soup bowls. Serve topped with scallions, cilantro, a squeeze or two of lime juice and if you want it more spicy a bit more sriracha.
-
Spinach Salad with Gorgonzola, Walnuts & Grapes
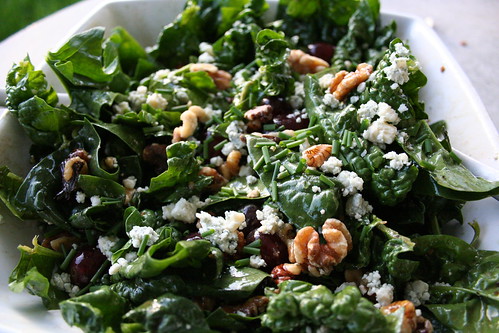
We bought two beautiful bags of fresh spinach at the farmers market last Saturday and I finally got to using some of it with our dinner Friday night. As soon as I saw the spinach, I planned on making a crisp and springy salad, so that is just what I did. This was perfectly crisp and super tasty, the grapes brought a sweet dimension, the walnuts brought the crunch and the gorgonzola gave a creamy tang. I whipped up a quick balsamic vinaigrette and that was it. Super easy and super satisfying. We enjoyed this salad as a side with some grilled Italian sausage we bought fresh from a farmer at the market.
Balsamic Vinaigrette
yields 1 cup1/4 cup balsamic vinegar
2 teaspoons honey
1 tablespoon chopped garlic
1/2 teaspoon salt
1/2 teaspoon freshly ground black pepper
3/4 cup olive oilBeat the vinegar in a bowl with the honey, garlic, salt and pepper until honey and salt dissolves. Then beat in the oil by droplets, whisking constantly. Taste and season to taste.
Spinach Salad with Gorgonzola, Walnuts & Grapes
serves 44 cups of fresh young spinach
2 handfuls of seedless red grapes
1 cup of chopped walnuts
2 oz of gorgonzola cheese, crumbled
4 tablespoons of balsamic vinaigrette
1 bunch of chives, chopped
pepperRemove the stems from the spinach and wash, drain and pat dry thoroughly. If the leaves are large you can tear them or chop them to make smaller. Place into a large mixing bowl. Add in grapes and walnuts. Toss to combine. Just before you are ready to serve, add half of the gorgonzola cheese, whisk up the vinaigrette, drizzle over the salad and gently toss to coat the entire salad with the dressing and to mix the cheese throughout. Taste, add more vinaigrette, if necessary. Top the salad with the remaining gorgonzola, freshly ground black pepper and fresh chives. Serve.
-
Penne with Chickpeas, Feta & Tomatoes
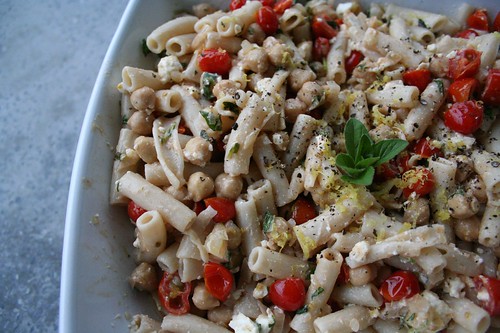
This is a quick and delicious vegetarian dinner that is full of Greek inspired flavors, perfect for any weeknight. The salty tang from the feta, the sweetness of the tomatoes and the nutty chickpeas all pair together to make for a hearty pasta dish. I was so happy to be able to walk into the yard and grab a fistful of our fresh oregano that has been growing like crazy, it gives it such a fresh and peppery taste to the flavors. I made this with gluten-free organic brown rice penne, but you can cook it with whatever your favorite pasta happens to be.
Penne with Chickpeas, Feta & Tomatoes
Adapted from Cooking Light, March 2010
Serves 48 ounces uncooked gluten-free penne (or if you aren’t gluten-free, regular penne)
2 tablespoons olive oil
1/2 cup chopped shallots
3 garlic cloves, minced
1 (15-ounce) can organic low sodium chickpeas (garbanzo beans), rinsed and drained
3 cups halved cherry tomatoes
3 ounces crumbled feta cheese
1/3 cup fresh oregano leaves, chopped
1/2 teaspoon salt
1/2 teaspoon lemon zest
1/4 teaspoon freshly ground pepperCook pasta according to directions, drain in a colander, reserving 1/4 cup of the cooking liquid. Heat a large skillet over medium-high heat. Add oil to the pan, make sure it coats the pan. Add shallots and garlic; sauté for 45 seconds, stirring constantly. Stir in chickpeas; sauté 2 minutes, stirring occasionally. Add tomatoes; sauté 2 minutes. Stir in pasta and reserved cooking liquid; cook 2 minutes or until thoroughly heated. Remove from heat and put in a serving bowl. Add feta, oregano, salt, lemon zest and pepper; toss to combine.

-
Our Anniversary in Toronto. St. Lawrence Market & Splendido

Yesterday, my husband, Mark, and I celebrated our 3 year wedding anniversary and the 7 year anniversary of our first date. Normally we are on the beach, alone, on South Padre Island. This year it wasn’t possible, so instead we decided to celebrate the day by spending it in Toronto. We skipped work, closed up the Boutique and took off in the car for the short drive over the border.

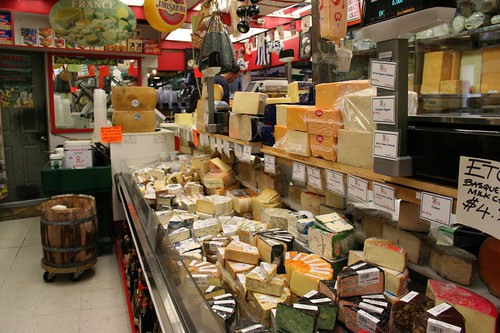
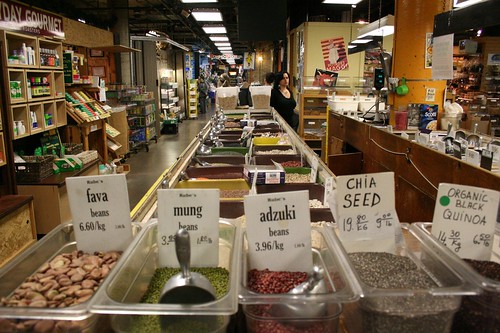
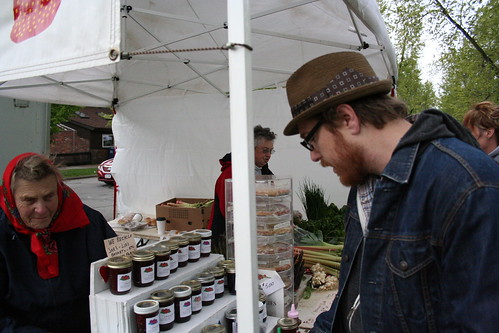
We drove up in the early afternoon and headed first to the St. Lawrence Market. I have wanted to go for a long time and we decided this would be the perfect day to check it out. It is located in the center of the historic Old Town Toronto, very close to the current downtown area. It has been named one of the 25 best markets in the world, by Food & Wine magazine. It was spectacular, there are three buildings in the complex that make it up, but the South Market, which we visited, is open Tuesday-Saturday. It had over 50 vendors, selling fresh fruits, vegetables, meat, fish, baked goods, dairy and so much more. I would love to go up on a Saturday for the Farmers’ Market that is held in the North Market, weekly. On Sundays, over 80 antique dealers fill the North Market displaying their wares from dawn until 5pm.
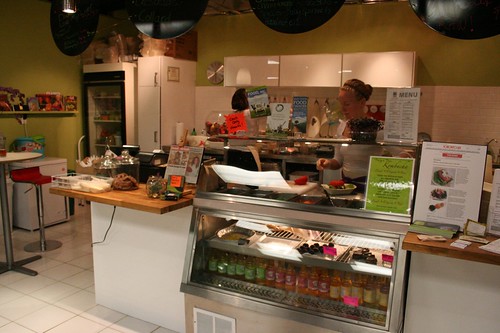
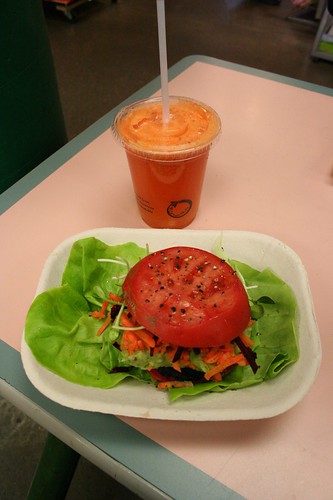
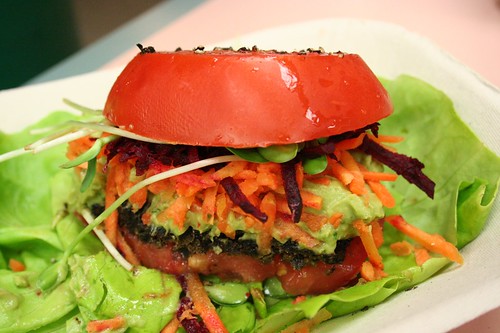
We didn’t buy a whole lot, as I didn’t know what the laws were concerning bringing food over the border, I need to look into that for next time. We did decide to grab lunch while we were at the market, and I am glad we did. It was phenomenal. I found a small takeout cafe called Cruda Cafe, (“cruda” is Spanish for “raw), which specialized in raw and vegan delights. I was so excited to see mentions of gluten-free, and to speak with the owner, Claudia, who assured me there was no gluten in any of their dishes. I ordered the Wild Mushroom Burger. It was a dense and beautiful smoky, wild mushroom and pecan patty served between two thick slices of tomato and topped with shredded carrots, beets and a fresh guacamole (made right in front of me), all on top of a few leafs of the most green Boston Lettuce I have ever seen. This isn’t your typical burger, you cannot pick it up, it is a fork and knife kind of dish. It was fantastic. I couldn’t get over all of the flavors and how wonderfully they went together with each bite. I also ordered a “Clean” juice. It was made completely fresh, while I waited, with apple, carrot, lemon & ginger.

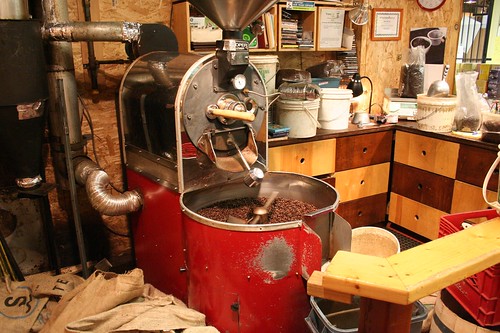
Mark grabbed a Chicken Parmesan sandwich from Mustachio, he was in heaven eating that. Afterwards, he grabbed an Americano from Everyday Gourmet, a cute little cafe and retail store on the lower level, where they roast and sell their fresh coffee beans, daily. And of course, no meal for Mark would be complete without a sweet, so he grabbed a cupcake from Future Bakery on the upper level. I bought a small tasting of chocolate from Aren’t We Sweet, a chocolate and candy shop. The chocolate was a dark chocolate featuring local hemp and topped with sea salt. Unlike anything I have ever tried, earthy and almost a bit spicy. So good.


After our lunch we walked around the market a bit more and then headed over to the Queen St. West neighborhood to window shop. I did buy a couple inexpensive items at H&M to try to outfit my new shape, since all of my clothes are too big now, a great problem to have, but a problem none the less. Ah retail therapy, it always fixes what is ailing.
We had 8:30pm reservations at Splendido on Harbord Street for dinner, so we headed there from Queen St. I read a lot of reviews when I was looking for the perfect restaurant for us to dine at and Splendido continually ranked as one of Toronto’s top fine dining restaurants. The cuisine can be classified as Modern or Eclectic European and they are known for their commitment to fresh, seasonal dishes made with locally sourced foods from family farms. I loved seeing a menu where all of the main dishes had the farm listed where the meat or fish was supplied from. The ambiance in the restaurant was perfect and it was one of the biggest restaurants I have ever been to, in Toronto. The service was great from the minute we walked in.
I started off with a cocktail and since I haven’t been drinking much at all these days I wanted something special. I went with the Anjou Sky, which was Absolut Pear Vodka, Navan Vanilla Cognac, Pear Nectar and Fresh Thyme. Wow, it was completely refreshing and hit the spot. It had a wonderful spring-time aroma and it went down easy. We decided since we hadn’t been out for a nice dinner in a very long time that we would really enjoy ourselves. We started with the Oysters 3 Bays 3 Ways. There were six oysters, two were served with horseradish, two with truffle chili mignonette and the last two with cucumber wasabi. The truffle chili mignonette was far and away our favorite, it had a subtle spice to it and it complimented the oyster perfectly. We also had the Spring Vegetable Salad, which was a mix of Spring greens and vegetables with a spinach puree underneath, a walnut emulsion and a light and tart cider vinaigrette. One of the best salads I have ever had. The perfect size too. Just a few bites.
For our main courses, Mark ordered the Beef Striploin that came with a smoked brisket raviolo and a sweet onion puree. The beef came from George’s Farm in Ontario. That was one of the tastiest and most perfectly cooked cuts of meat I have ever tried. Perfectly tender with a light crust on the outside. I didn’t get to taste the raviolo as that isn’t gluten-free, but the dollop of sweet onion puree was delicious. Mark said the “baby food” was his least favorite part (he is a textural eater), I thought it was great. After a brief description from our server, I went with the Suckling Pig, which came from Nathan’s Farm, in Ontario. It was very slow roasted pork that was so tender and tasty, it had a melt in your mouth, slow cooked taste like no pork I have every eaten. It is served pulled from the bones atop a spiced sweet potato puree, with a roasted shallot and a single spear of white asparagus. The only part I wasn’t crazy about was the two small bites of cracklings on top, that has never been a flavor I enjoy, though Mark loved it. I had a glass of the Pascal Marchand 2006 Bourgogne Rouge ‘Avalon’ Pinot Noir with my meal and it was an impressive, lighter, muted red that had hints of cherry and earth. Perfect with the roast pork. The portions on the entrees were perfectly sized for foods with such rich flavors, we finished them feeling perfectly content and not engorged.
Speaking of not feeling engorged, we opted for dessert, which I almost never do. Mark went with the ice cream sandwich which was Brioche ice cream sandwiched between two Lindt chocolate biscuits. It was a small 3 or 4 bite delight, he loved it. I went with the Rice Pudding which had a white chocolate passion fruit sauce and a tropical fruit salad on top. There were also a couple of bits of caramelized rice cereal on top. Growing up with traditional Greek style rice pudding, this was completely different, but out of this world delicious. A light and fresh finish to the meal. After we finished eating, they brought out an adorable piece of pastry that said “Happy Anniversary” and a card from the chef, Victor Barry, the manager, Carlo Catallo and our server, Steve. A very thoughtful touch and a nice way to finish a fabulous meal.
Overall, this has to be the nicest meal I have ever had at a restaurant, the service was impeccable, the ambiance was welcoming, romantic and perfect for celebrating our special occasion and of course (if you cannot gather) the food was superb. Another thing worth mentioning about Splendido, is that our server Steve, knew the dishes and ingredients well enough to know what had gluten and what did not, they were able to alter my entree and dessert to make sure that it was gluten-free, I love that assurance. I would have liked to take photos of each course, but I left my camera in the car and decided it was far more important to just enjoy the meal. Instead I shot a photo on my iPhone at the start of my meal and at the end. You’ll just have to go to Splendido to experience the rest yourself.


-
Caramelized Onion & Goat Cheese Pizza (Gluten-Free)
It has been hard to find good pizza crust since I have gone gluten-free, I have found a couple that come close, but most are thin and end up very crispy. I don’t mind that style of crust, but I have just missed a good thick and hearty crust. This was the first time I have ever made gluten-free pizza crust, completely from scratch. This crust was just that, thick, doughy and airy. So good. I came across this recipe in a book called The Gluten-Free Italian Cookbook by Mary Capone. I picked it up at this adorable, locally owned shop in Loveland, Colorado called Granny’s Gluten-Free Zone, I strolled in their randomly looking for this book after my friend Jane told me about it. I wish the crust had a bit more crisp to it, but I also think I probably could have left it in the oven just a few minutes longer, I was just way too excited and didn’t want to over bake it.
This toppings for the Caramelized Onion and Goat Cheese Pizza are perfect, I have made this so many times. I don’t like a lot of stringy, melty cheese on my pizza, which is how this pizza came about in the first place. The goat cheese gives the perfect the tang, the caramelized onions and shallots add an almost sweet element and of course the tomatoes and basil are a classic combo.
Caramelized Onion & Goat Cheese Pizza (Gluten-Free)
Serves 2-3Gluten-free Pizza Crust
1 tsp sugar
1 1/2 tsp quick-rising yeast
3/4 cup warm water (about 110° F)
3/4 cup brown rice flour
1/4 cup garbanzo bean flour
1/4 cup tapioca flour
1/4 cup potato starch
1 1/2 tsp xanthan gum
1 tsp salt
3 tablespoons olive oil
2 eggs
1/2 tsp balsamic vinegar
2 tsp fresh rosemary, basil or oregano (I went with basil and oregano)Line a baking sheet with parchment paper or lightly grease.
In a small bowl, combine warm water, sugar and yeast. Stir until just dissolved. Cover with a kitchen towel and set aside in warm are for 10 minutes. Mixture will form a foam head of about 3/4″.
Using your food processor (which is how I did it and it worked surprisingly well), add all dry ingredients: flours, potato starch, xanthan gum and salt, directly into the processor bowl. Blend in the processor, about 1 minute. If using a mixing bowl, combine dry ingredients, and whisk together until well combined.
In another small bowl, whisk olive oil, eggs, and vinegar until blended. Add egg mixture and yeast mixture to dry ingredients, mix until combined.
Blend dough in the food processor for 2-3 minutes. Dough will be sticky and soft, it doesn’t seem much like dough at all. Add in the herbs and gently pulse or mix to combine.
Transfer the dough to the prepared baking sheet. Dip your hands in water or olive oil and shape the dough into a round shape about 1/4″ thick. Place in a warm, draft-free area and let rise 40 minutes. Dough should double in size.
Brush top with olive oil and sprinkle with a pinch of course salt.
This recipe can also be used to make gluten-free focaccia if you spread it to 1″ instead of 1/4″.Toppings
2 teaspoons olive oil
salt
1 small onion, sliced
1 shallot, sliced
1 small clove garlic, minced
2 tomatoes, sliced thinly
1/2 cup fresh basil, sliced
2 oz goat cheese, crumbled
2 oz mozzarella, shredded
red pepper flakes
fresh parmigiano-reggianoPreheat the oven to 400° F
Caramelize the onions and shallots. Heat olive oil in a medium skillet over medium-high heat, add the thinly sliced onion and shallots, stir to coat them with oil. Spread the onions and shallots out evenly in the pan, stirring occasionally. After 10 minutes, sprinkle salt over the onions. Let cook for 20-30 minutes. Stirring as they stick, being careful to not let them burn. If you stir them too often, they will not brown. When they are caramelized, remove the pan from the heat.
Build your pizza. Sprinkle the minced garlic over the oiled pizza crust. Place a thin later of tomatoes on top of the crust, then lay a thin layer of the caramelized onions and shallots down. Sprinkle the fresh basil evenly over the top of that and then evenly sprinkle the shredded mozzarella, you just want a very light layer. Crumble the 2oz of goat cheese evenly over the top and sprinkle on faa pinch or two of dried red pepper flakes.
Bake the pizza. Place the baking sheet in the middle of the oven and bake for 20-25 minutes until the crust is a golden brown and the cheese is melted. Cut into 8 wedges. Lightly grate fresh parmigiano-reggiano on top, garnish with fresh basil.
-
Roast Chicken, Apples, Leeks and Baby Potatoes

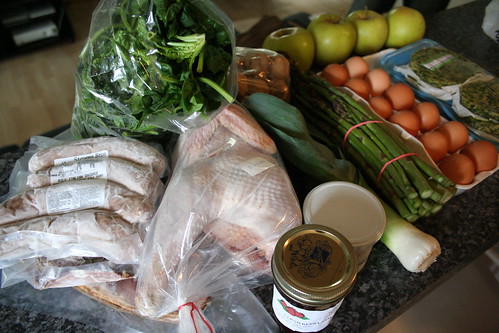
Yesterday was the first day of our big Farmers Market at Elmwood and Bidwell and I knew all week that the weather was doomed for it’s opening day. We decided to meet my parents there right at 9 am to possibly beat the rain and wind. It actually wasn’t too bad, though it felt more like a very cool Autumn Day, not Spring. We walked around, looked at everything, ran into friends and began to make a plan for what we wanted to buy. The sun even peaked out a time or two. Eventually dark clouds made their way overhead, the wind picked up and we knew we should probably make our purchases soon.
We got so much great stuff, apples, leeks, spinach, asparagus, baby potatoes, veggie burgers, yogurt leek sauce, homemade strawberry jam, fresh from the farm eggs, sausage, bacon, and a beautiful, whole, fresh Heritage chicken. I decided this would be dinner. A roast chicken. It was the perfect day for it, it was cold, rainy and windy and I just wanted to stay in. So, I took a look at everything else we bought and made a plan.

Roast Chicken, Apples, Leeks and Baby Potatoes
Serves 2 with leftover veggies2 medium apples (I used Crispin) chopped
1 leek (white and light green parts), chopped
1 pound of baby potatoes, halved
4 small sprigs fresh rosemary, chopped
olive oil
Sea salt and freshly ground black pepper
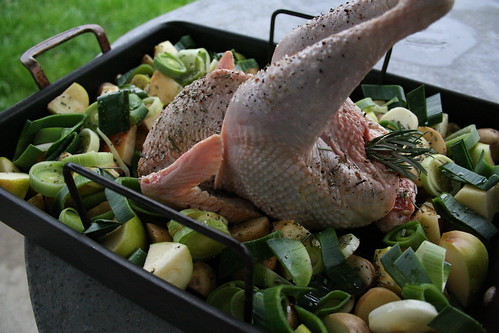
1 3 pound whole chicken – we had a farm raised, all natural, heritage chicken from Painted Meadows Farms in Franklinville, NYPreheat your oven to 350° F
Rinse the bird, inside and out and pat dry. Place the potatoes, leeks and apples in the roasting tray of a large roasting pan, place the chicken in the center (breast side up). Drizzle olive oil over everything, making sure to get a good light coating over the whole bird to give you a crispy, perfectly browned skin. Sprinkle everything with rosemary, sea salt and freshly ground pepper. You can also sprinkle the inside of the bird with your spices as well, I did that plus I stuffed a couple of chopped leeks in there, as well as a whole sprig of rosemary. Toss the vegetables gently to make sure they are coated.
Roast the chicken until it is cooked through and the apples, potatoes and leeks are tender. I took the chicken out around 2 hours and the veggies could still use more time, so I took the chicken out to rest, took the vegetables out of the roasting tray so they could cook in the juices from the chicken and turned the oven up to 400° F. I wanted to get them really brown and crispy, the way we like them. Taste the veggies as they are done and season to taste with salt and pepper.
Allow the chicken to rest 10-15 minutes before cutting into it, this will allow the juices to redistribute. Serve with a nice helping of the apples, leeks and potatoes.
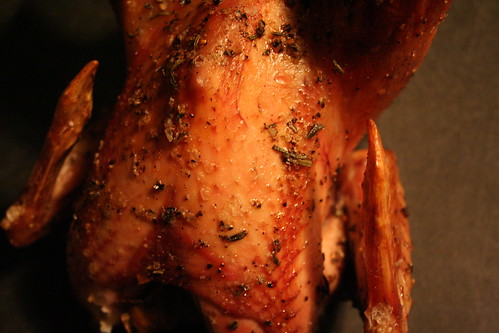
We found that the Heritage Chicken was much different from any other chicken we had ever roasted before, it had an incredible scent when it came out of the oven and it tasted so amazing, a much more rich chicken flavor than from the grocery store chickens. We found the dark meat to be very dark and slightly tougher (almost gamier), a bit more like a cornish hen. However, the breast meat was impeccable, what chicken should taste like, the best I have ever had. The skin, though I don’t typically eat it any way, was thicker than usual and tough to eat. Mark usually eats as much as he can before I start nagging him about the fat, but this time he couldn’t eat much. I’ll have to ask the women we bought the chicken from next week if there is a trick for cooking the Heritage birds, from what I had read it is best to cook these birds low and slow so as not to dry them out and toughen the meat. The legs on this bird seemed longer than I have ever seen and they were sticking straight up (!), but I didn’t have any kitchen twine to truss them, so I went without. I am curious if that could have been why the leg meat seemed tougher, maybe it was overcooked.
We ate dinner a bit later than normal last night, so by the time it was ready it was fairly dark and the pictures of the finished bird are not that great. Still working on a way around the night-time photos.
All in all, this was the perfect start to the farmers market season, I cannot wait to make more meals this week with the goodies we bought and of course to go back next week.
-
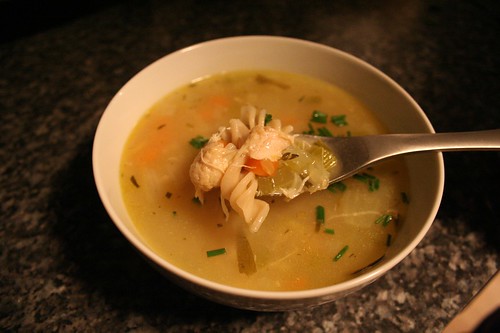
Chicken Soup for the Sniffles.
Yesterday morning, when I woke, I realized that what I thought was allergies the day before, turned out to apparently be an old-fashioned, end of the season, COLD. I had the sniffles and I was feeling off. I was also feeling guilty as it was a beautiful, warm and sunny day and I had a ton to do at the studio. For some reason being sick on cold and dreary days is much easier. I eventually realized it was far more important to take care of myself than to stay at work, so I left a few hours early, swung by the grocery store to buy supplies and headed home to make soup. I figured that, combined with everything else I was doing, was sure to make me well quicker. Now that I am eating clean, I am treating things like headaches and colds naturally, not that I was a big medicine person before, so I am attacking this cold with homeopathic syrup, vitamin C, cold care tea and zinc. I have to say, today is day two and I am actually feeling much better already.
I decided to make the stock for my soup from scratch, since there is really nothing like it. This is the first time I had meat in over 7 weeks, but chicken noodle soup was the only thing that I wanted, and I knew it would help my sniffles. Being that the chickens we ordered from the farm won’t be ready until mid-June, I settled on an organic whole fryer chicken from Wegmans and some good organic veggies, so it was perfect.
You can most certainly make this soup with canned or boxed broth or stock, but I am telling you, it just isn’t the same.
By the time the soup was ready to be served, a cold chill had come over the air, dark clouds moved in and the rain and thunder started. It was perfect soup weather. I started feeling better almost instantly and today I can tell that the cold is on its way out the door.
Chicken Stock
4 quarts of water
1 fresh whole chicken 3-4 lbs, cut into pieces or 4 lbs assorted chicken bones (I prefer organic, free range and without hormones or antibiotics)
4 celery stalks, roughly chopped
4 carrots, halved (I kept the skin on, but washed them)
1 large onion, quartered
2 garlic cloves, halved
1 cup fennel, chopped
2 bay leaves
5 sprigs fresh thyme
2 teaspoons sea salt
2 teaspoons pepper
1 tablespoon fresh tarragonIn a large stockpot, (use the strainer that fits in your stock pot if you have one) combine all the ingredients and bring to a gentle boil. Reduce the heat and simmer, uncovered, for 2 1/2 hours, skimming the surface occasionally to remove any foam that forms on the surface. I added a bit more water as it was cooking to keep the chicken and vegetables covered. The longer you cook the stock, the stronger the flavor will be, but 2 1/2 hours was more than adequate and the stock had a fantastic flavor to it.
Remove the meat and bones and reserve, the meat can be separated and added back to the soup, used for chicken salad, etc. I prefer to add it back to the soup. If you didn’t use the strainer when making the stock, strain the stock to remove all the vegetables and other bits and add back to the pot. Throw out the bones and vegetables. Use the stock immediately or let the stock cool completely, and refrigerate overnight. Skim any fat that forms on the surface. Keep refrigerated in airtight containers until ready to use, up to 3 days, or freeze for up to 2 months. Since I was using the stock immediately, I skimmed any visible fat off the top, made sure that it was strained of everything, and kept it on a low heat while I prepped everything for the soup.
Chicken Noodle Soup
Serves 6-84 quarts of chicken stock
chicken leftover from making stock or 2 chicken breast, already cooked, chopped or shredded
4 carrots, chopped
4 ribs celery, cut in half lengthwise, then chopped
1 onion, chopped
4 large cloves garlic, minced (you don’t have to use so much, but garlic is good for treating a cold)
1 tablespoon olive oil
1 tablespoon fresh rosemary, minced
2 tablespoon fresh tarragon, minced
2 1/2 cups of gluten-free noodles
1 bunch fresh chives, choppedIn a medium-sized pan, heat the olive oil over a medium heat and sautée the carrots, celery, onion and garlic. Stir occasionally, making sure they do not burn. After the onion has become translucent, but all the veggies still have a crisp, add the rosemary and tarragon, stir to mix the flavors.
Add the veggies back to the pot with the stock and bring the heat to a medium-high. Let the stock and vegetable simmer, until it comes to a gentle boil, continue to let boil for about ten minutes. After ten minutes, taste the veggies to be sure they are softening to your liking. Add the cooked chicken and stir to let all the flavors mix. Taste, then season to taste, I found it needed more salt and pepper and I added more tarragon.
At the end, add the gluten-free noodles. Make sure that you account for how much liquid you started with when deciding on an amount of noodles, if you add too many they will blow up and take in all the liquid. Cook the noodles until the are done, mine took about 10 mins or so, you want a bit of a bite to them. Ladle into bowls, add a sprinkle of your favorite salt, fresh ground pepper and top with some chopped fresh chives. I love a small sprinkling of freshly grated Parmigiano Reggiano over the top, as well. Enjoy.


