-
Penne with Deconstructed Zucchini Pistou

I came across a recipe recently for a classic Provencial dish, Penne with Zucchini Pistou, and I couldn’t wait to use the zucchini from our garden and make it. I had planned on making this dish last night after we got home from a long day at the studio, but I was so exhausted from all the late nights of work and travel. So, I instead decided I would simplify the dish and deconstruct all the bold flavors from the South of France that were featured in the original recipe and make it my way.
Pistou is to the French what pesto is to Italians, and I really love pesto, so I knew this recipe was a win. The only major thing missing from my recipe that was in the original was 1/4 cup of heavy whipping cream, which is also part of the reason I decided to change the recipe up. Since we didn’t have any on hand and I didn’t feel like hitting the grocery store, I decided to skip it. I, of course, made this with gluten-free pasta and I served it with a beautiful green salad, made completely from our garden. This was the first salad of the season and it made me so incredibly happy.
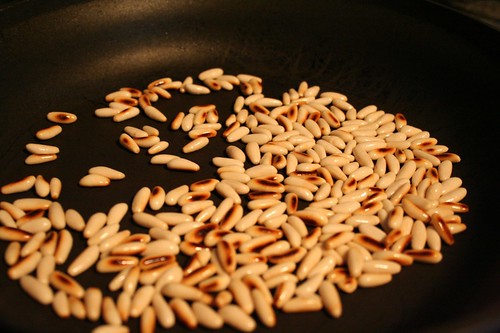
This is a fantastic vegetarian entree or would make a lovely side dish as well. I can’t wait to make it again from the original recipe, heavy cream and all! Yum. Oh and if you are even thinking about leaving the toasted pine nuts out, or skipping the toasting step, you are CRAZY! Those toasted pine nuts make this dish!!
Penne with Deconstructed Zucchini Pistou
serves 48 ounces uncooked organic brown rice penne pasta (or whatever pasta you prefer)
4 teaspoon extra-virgin olive oil
1/4 cup pine nuts
4 garlic cloves, minced
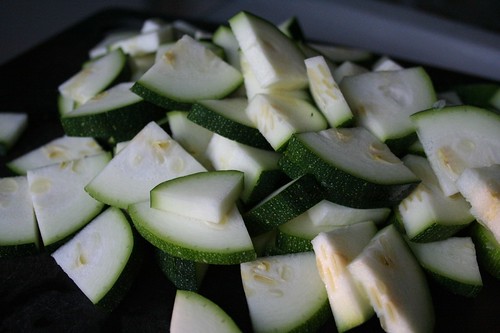
2 1/2 cups zucchini, sliced and quartered
1 cup packed fresh basil leaves, chopped roughly
3/4 cup Parmigiano-Reggiano cheese, shredded
2 teaspoons kosher salt
freshly ground black pepperBoil water with 1 teaspoon of kosher salt in a large sauce pan over high heat, cook pasta according to package instructions. Drain over a bowl and reserve 1/3 cup of the cooking liquid, rinse pasta in hot water, drain. Leave in colander.
Heat a large skillet over medium-high heat, add pine nuts and toast until golden brown, tossing often so they don’t burn. Remove from the pan and set aside in a bowl.
In the same large skillet heat 2 teaspoons of oil, over medium-high heat. Add 2 cloves garlic and zucchini to pan, saute 5-10 minutes until tender and golden. Salt and pepper to taste.
In a large serving bowl, add the pasta, zucchini, pine nuts, chopped basil, the last 2 cloves of minced garlic and 2 teaspoons of olive oil. Toss to combine and mix. Add the cheese to the pasta mixture and slowly add the reserved liquid as needed to coat the pasta and make it creamy. Toss again, salt and pepper to taste and top with a bit more shredded Parmigiano-Reggiano cheese.
-
Toasted Spicy Almonds

Sorry for the lack of posts – we have been very busy over here. We were in Chicago this past weekend for the Pitchfork Music Festival and Flatstock 26 and before that we were busting our butts designing and printed, getting ready for the festival. I have still been cooking, but pulling out the camera, trying out new recipes, etc., gets put on hold when life gets this crazy. Before we left town I did get a chance to make this delicious snack to munch on in the car on the road trip to Chicago. I know most of the reason I crave salty snacks in the car is due to boredom, but I have accepted that and I am happy to enjoy not having a mountain of work and a long to-do list, and to sit back watch the road and enjoy my hubby’s company. Rather than salty processed potato chips from a random gas station, I thought that these would be the perfect alternative. We also packed up some of the gluten-free blueberry muffins that I had previously made and froze and some chipotle hummus with sliced cucumbers from our garden. No reason to hit a drive-thru for lunch or to eat junk!
These almonds were so satisfying and easy to make. I started with roasted almonds since that is what I had on hand, but you could also start with raw almonds, and just toast them even longer. Mark and I both really love spicy food, so you can adjust the peppers accordingly. I used a premade salt-free Black and Red Spice mix from Penzeys, that was a mix of Tellicherry black pepper and hot cayenne red pepper.
We leave again in less than one week for San Francisco for the Renegade Craft Fair, then we are back home for a bit. Hoping to be able to cook a bunch and really use all the goodies we’re getting from the garden.
Toasted Spicy Almonds
1 tablespoon organic butter
8 ounces organic roasted almonds, unsalted
1/2 teaspoon black pepper
1/2 teaspoon cayenne pepper
1/2 teaspoon kosher saltSlowly melt butter in a non-stick skillet over medium-high heat. Add the nuts, peppers and salt. Toss with a rubber spatula to coat the nuts and spread them out in the pan in a single layer. Allow the nuts to start to brown a bit, then toss or stir to flip, allow them to continue to toast. This process only takes a few minutes (3-5), remove the pan from the heat when the desired amount of doneness is achieved. Adjust spices and salt to taste. Allow to cool before serving.
-
Goat Cheese Garlic Smashed Potatoes

I love mashed potatoes. My mom has always, hands down, made the best mashed potatoes in the world. One of her secrets? She always boils the whole garlic cloves with the potatoes and then leaves them in to get mashed up with the potatoes. And in our family, we don’t scrimp on the garlic, none of this one clove crap, you need at least two and they need to be huge.
I almost didn’t type this recipe up and include it, since to me, everyone knows how to make mashed potatoes and has a recipe. Then I got to thinking about all the mashed potatoes I have tried that weren’t very good. For such a simple dish, it requires a bit of a finesse, so as not to over mash, add too much milk, or undercook the potatoes, etc. I have definitely eaten mashed potatoes whose consistency mirrors that of joint compound that you use on dry wall. (I am not naming any names.)
The potatoes at the farmers market have been abundant, so I decided rather than another potato salad, mashed potatoes would be the perfect way to enjoy them. Since I had the goat cheese on hand, I decided to go with a twist on the classic. The goat cheese gives these chunky garlic smashed potatoes a delicious tangy flavor and the crisp, tasty chives on top is the perfect finish.
Goat Cheese Garlic Smashed Potatoes
serves 41 pound baby red potatoes, washed, skins left on
2 large cloves of garlic, whole, peeled
2 ounces goat cheese
1 cup organic milk (whole or skim, whichever you prefer)
1 tablespoon organic butter
kosher salt
freshly ground black pepper
small bunch of fresh chivesPlace potatoes and garlic in a large saucepan, cover with salted cold water by 1 inch. Simmer, covered, until tender – 15 to 20 minutes. Drain potatoes, return potatoes and garlic back to the saucepan.
Add the butter to the potatoes and garlic and slowly pour the milk in, a little bit at a time. Don’t add it all at once, in the event you don’t need it, otherwise you will have runny potatoes. As you add each bit of milk, mash the potatoes either with a fork, potato masher or electric hand-mixer. Continue adding milk as needed to get your desired consistency. I like my potatoes a bit on the chunky side, though there has to be the perfect balance of chunky and creamy. Crumble the goat cheese into the potatoes and add half of the chopped fresh chives; stir to combine. Season with salt and pepper and top with the remaining fresh chopped chives.
-
Green Bean and Tomato Salad
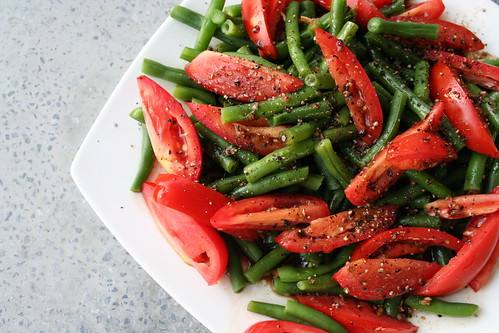
This is a very simple, fresh and quick summery salad, perfect side to so many summer dinners. You can serve it room temperature or make it ahead and serve it chilled. Had I had a red onion on hand, I probably would have thinly sliced a bit and included it, but it definitely didn’t need it.
Green Bean and Tomato Salad
serves 8 (approx 1 cup serving each)1 pound green beans, trimmed and cut into 2-inch pieces
3 plus tomatoes, cut into 1/2-inch thick wedges (or 1 pint of cherry or grape tomatoes, halved)
1/4 cup balsamic vinegar
1 large clove garlic, minced
1/2 teaspoon kosher salt
1/2 teaspoon freshly ground black pepper
3 tablespoons extra-virgin olive oilBring large pot of water to boil over high heat. Add green beans; cook 5 minutes or until crisp-tender. Drain and rinse well with cold water. Drain thoroughly and place in large bowl with tomatoes.
Combine vinegar, garlic, salt and pepper. Gradually add oil, stirring constantly with a whisk. Drizzle over bean mixture, toss gently to coat. Top with freshly ground black pepper.
-
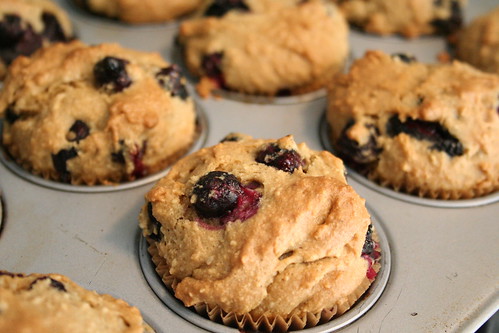
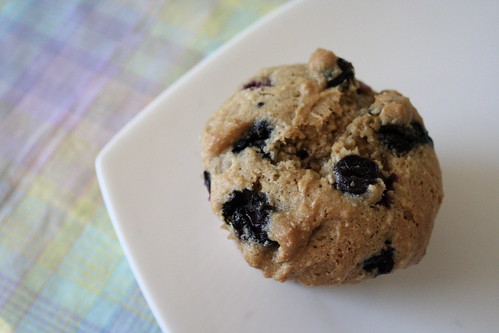
Gluten-Free Blueberry Muffins with Almond Flour

I’ve never been much of a baker, however once I made the decision to avoid all processed foods entirely, I knew with that choice came the fact that I would have to start experimenting with baking if I wanted to enjoy any baked goods again. Thankfully, there are many lovely gluten-free bloggers that have done a lot of the experimenting part for me and I can play around with their recipes. See for me, the problem with baking is that you can’t wing it the way you can with cooking. If you change a measurement or try a different flour, you can’t taste it as you go and tweak it, you have to completely bake it and wait to see what happens, if it’s wrong there is no fixing it. You either have to suck it up and eat said ‘failed experiment’ or start over.
Last week was the start of blueberry season locally and I came across this recipe while searching around. It sounded and looked so good, that I decided to just go for it and make a double batch. This way we can freeze one batch and take it with us on our road trip to Chicago this upcoming week.
I am so incredibly pleased with these muffins. I believe my exact words when I took the first bite were “HOLY F*CK THESE ARE AMAZING”. Seriously, not only are these the best gluten-free blueberry muffins I have ever had, these may be THE best blueberry muffins I have ever had. They plumped up perfectly, so light and airy. They have a delicious nutty flavor from the almond flour and the blueberries just burst in your mouth. This is the first time I have baked with the almond flour and I am very pleased with it. I can’t wait to try out more stuff.
Karina of Gluten-Free Goddess (who created this recipe), recently adopted being vegan on top of her already gluten-free diet, so her recipe used Ener-G Egg Replacer instead of eggs. Since we have been buying the beautiful organic free-range brown eggs direct from the farmer, we used those instead. If you are vegan, use Karina’s original recipe and make these muffins, you won’t regret it.
Gluten-Free Blueberry Muffins with Almond Flour
makes a baker’s dozen
adapted from Gluten Free GoddessPreheat the oven to 375 degrees F. Line a standard muffin tin with paper liners.
Whisk together:
1 1/3 cups almond meal (I used Bob’s Red Mill Almond Flour)
1 cup sorghum (or brown rice flour, if desired)
1/2 cup tapioca starch or potato starch (not potato flour!)
1/2 teaspoon sea salt
1/2 teaspoon baking soda
1 teaspoon baking powder
3/4 teaspoon xanthan gumBeat in:
1 1/3 cups organic light brown sugar
2 tablespoons light olive oil
1/2 teaspoon vanilla
2-3 organic free-range egg whites (depending on the size, you are looking to get 1/4 cup of liquid), beaten until frothy
1/2 cup warm water, more as needed, up to 3/4 cup
1 teaspoon fresh lemon juiceBeat the batter until it is smooth, like a slightly thickened cake batter.
Add in:
1 pint fresh blueberries, washed and patted dry
Stir gently and briefly.
Plop the blueberry muffin batter into the twelve lined cups. You’ll probably have some xtra- for a baker’s dozen.
Bake in the center of a preheated oven for 23 to 25 minutes, until golden and firm to the touch. A wooden pick inserted into the center should emerge clean.
Cool the muffin pan on a wire rack for five minutes. Gently pop the muffins out to continue cooling on the rack (don’t cool them in the hot pan- they’ll get soggy).
If your muffins are soggy or slightly underdone– due to unforeseen oven temperature variations– place them back into the warm oven directly on the center rack for five minutes or so.
Wrap and freeze cooled muffins for future breakfast treats or road trips 😉

Thanks for this lovely recipe Karina, I am forever indebted to you.
-
Penne with Pistachio Pesto, White Beans and Arugula
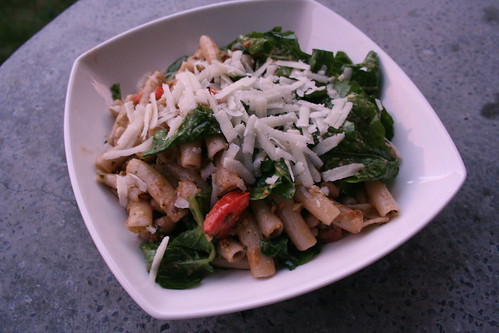
I am not super crazy about this photo, but it was late and I was hungry so I did my best.OK, so it is fair to say my pasta addiction is probably very obvious by now. It has always been one of my favorites and it is definitely both my go-to quick dinner option and my favorite comfort food. When I learned of my gluten intolerance, the loss of pasta in my life is what scared me most, then I discovered Tinkyada’s rice pastas. They are so amazing!! They are light and tasty. I much prefer them to regular pasta, any day, though I really don’t have much choice. Mark actually really loves rice pasta and always mentions how much lighter it is in your ‘gut’.
We got home late from work last night and we were both very tired from a long day of printing and other projects, so while I was contemplating dinner, Mark pulled a Wegman’s pizza out of the freezer for himself. I had pulled this recipe from a recent issue of Cooking Light and had all of the ingredients for it on hand, since it seemed so easy and quick, I decided to make it. In the time it took the oven to preheat and for the frozen pizza to cook and cool, I had made this pasta dish, served it, photographed it and I was finishing up eating, just about the time Mark was sitting down to eat his pizza. Granted, I produced WAY more of a mess and tons more dishes, but I would say cooking from scratch and eating fresh foods wins again!!
The pesto had an amazing flavor to it from the pistachios and the arugula had that lovely peppery crisp that just added to the creaminess from the beans. I was a bit unsure on the beans, but I thought they were really nice and was glad I decided not to omit them. Admittedly, I don’t usually buy romano cheese, as I tend to go for parmigiano-reggiano every time, but the romano had a stronger taste that went perfectly with these flavors, a bit saltier and sharper. I will definitely be buying more of it for pasta dishes.
Penne with Pistachio Pesto, White Beans and Arugula
serves 4
adapted from Cooking Light Magazine, July 20108 ounces uncooked organic brown rice penne pasta (any pasta will do)
1 cup packed fresh basil leaves
1/4 cup roasted shelled pistachios
6 garlic cloves
2 tablespoons olive oil
1 1/2 cups chopped seeded tomato
1 teaspoon freshly ground black pepper
3/4 teaspoon kosher salt
1 (15-ounce) can organic great northern beans, rinsed and drained
2 cups arugula
1/4 cup shredded fresh pecorino Romano cheeseCook pasta according to package direction. Drain and rinse with cold water. Drain.
Combine basil, nuts and garlic in a food process; process until finely chopped.
Heat large skillet over medium heat. Add olive oil to pan, and swirl to coat. Add basil mixture, cook for 2 minutes, stirring frequently. Stir in pasta, tomato, and next 3 ingredients (through beans); cook for 2 minutes or until thoroughly heated, tossing to combine. Remove from heat. Add arugula to pan, and toss slightly to wilt.
Place about 1 1/4 cups pasta mixture in each of 4 bowls and top each serving with 1 tablespoon of cheese.
-
Thai Basil Mojito

I wish I could take credit for the idea of this drink, but I can’t. My dad dreamt it up after tasting the thai basil I had growing in my garden. The thai basil has a subtle anise flavor and is very different from Italian basil. This was a refreshing summer drink, that was perfect for a hot day and grilling out.
Thai Basil Mojito
serves 11/2 lemon, cut into wedges
a small handful of fresh thai basil leaves
1/2 tablespoon organic pure cane sugar (or 2 oz of simple syrup)
2 oz white rum
ice cubes
club sodaPlace the lemon wedges at the bottom of a tall glass along with the basil leaves. Add sugar or simple syrup and muddle the mixture. Stir in the rum and top with ice. Top off with club soda and garnish with a lemon wedge and couple thai basil leaves.
-
Potato Salad with Yogurt Cheese Dressing

I usually am not a fan of mayo based potato salad, something about most of them just never seems very appetizing to me. However, I had been meaning to experiment with a yogurt-based dressing as an alternative. I had bought some great yogurt cheese from White Cow Dairy at the farmer’s market and I thought that would be perfect for a potato salad dressing. White Cow Dairy is located in East Otto, NY where all of their cows enjoy a life full of grazing on their lush pastures. They make a variety of artisan products including custards, crème bulgares, thick yogurts, whey drinks, sauces and more. When sweetening is required, their products are flavored with maple found right on their own land, additionally they use wild leeks, onions, blueberries and apples all from the land on or surrounding their farm. I love that.
I really don’t know much about yogurt cheese, just that it is the creamy white cheese you get when liquid whey drains from yogurt. It has a great thick and rich consistency without the fat and it really gives a nice tang to all kinds of dishes. I have put it on everything from veggie burgers to fresh berries. It is quite versatile with either sweet or savory items. I will definitely be buying it again. I have also seen recipes for making your own yogurt cheese at home, though I am not sure I would bother considering the perfection that White Cow Dairy has achieved with theirs.
As usual, I threw this recipe together by taste, so I am not exactly sure on the measurements. I had a small bushel of baby potatoes from the market last week that needed to get eaten up, so I just pulled this together on the fly.
Potato Salad with Yogurt Cheese Dressing
serves 41 cup yogurt cheese
approx 1/4 cup organic milk to thin the cheese
approx 30 or so baby potatoes, (red or otherwise)
half of a medium-sized red onion, chopped
fresh herbs, dill, chives, etc (dried will work as well)
kosher salt
fresh ground black pepperIn salty water, boil the potatoes, cook until soft. Drain and allow to cool. Once cooled, you can peel and half them. I leave the peels on myself. Put the halved potatoes in a large serving bowl, add the chopped red onion, chopped fresh chives and dill (I went with dried dill as that was all I had). To prepare the dressing, take 1 cup of the yogurt and slowly add the milk, one tablespoon at a time, whisking. Add milk until the yogurt is thinned to your desired consistency. I left mine fairly thick, but not chunky. Add the dressing to the potato salad and season with salt and pepper. Mix to combine and coat, being careful not to mash the potatoes. Taste and add more seasonings as needed. Chill until you are ready to serve. Allowing this to chill for a good couple of hours really brings all the flavors together and all the ingredients get nice and cold. Serve with fresh chives and fresh ground pepper on top. Enjoy.
-
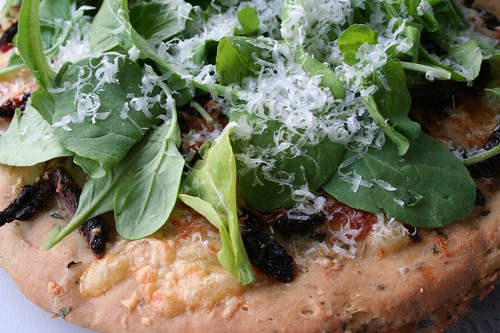
Sun-Dried Tomato, Mozzarella, Fontina & Arugula Pizza (Gluten-Free)
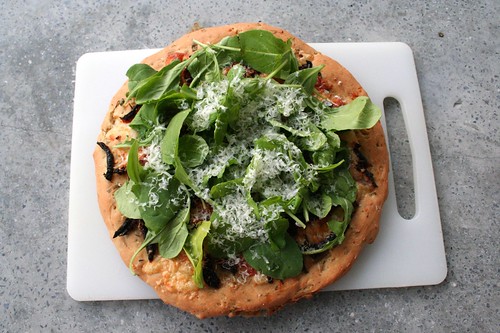
I am a big fan of homemade pizza, my Mom always made it when we were kids, with homemade pizza dough and all. I love how much fun you could have with toppings. This pizza turned out perfectly, it had so many lovely subtle flavors and the arugula finished it off nicely with a little bite. I used the same pizza dough recipe from my Caramelized Onion & Goat Cheese Pizza, but I am going to include it again here so you don’t have to look it up. Since I made this recipe up on the fly and also was making a second non-gluten-free pizza for Mark, my measurements may not be exact, so feel free to just improvise and go with what you think on the toppings. The only thing I would like to find a way to change is, some of the sun-dried tomatoes started to really blacken up as the pizza baked, it seemed to only be the ones not covered by cheese, so maybe I just need to add more cheese next time (oh darn!).
I took one leftover piece of this pizza this morning, toasted it up in the toaster oven and topped it with one fried egg. Oh my gosh was that amazing. The perfect breakfast to start a very busy day.
Sun-Dried Tomato, Mozzarella, Fontina & Arugula Pizza (Gluten-Free)
serves 2-3Gluten-free Pizza Crust
1 tsp sugar
1 1/2 tsp quick-rising yeast
3/4 cup warm water (about 110° F)
3/4 cup brown rice flour
1/4 cup garbanzo bean flour
1/4 cup tapioca flour
1/4 cup potato starch
1 1/2 tsp xanthan gum
1 tsp salt
3 tablespoons olive oil
2 eggs
1/2 tsp balsamic vinegar
2 tsp fresh rosemary, basil or oregano (I went with basil and oregano)Line a baking sheet with parchment paper or lightly grease.
In a small bowl, combine warm water, sugar and yeast. Stir until just dissolved. Cover with a kitchen towel and set aside in warm are for 10 minutes. Mixture will form a foam head of about 3/4″.
Using your food processor (which is how I did it and it worked surprisingly well), add all dry ingredients: flours, potato starch, xanthan gum and salt, directly into the processor bowl. Blend in the processor, about 1 minute. If using a mixing bowl, combine dry ingredients, and whisk together until well combined.
In another small bowl, whisk olive oil, eggs, and vinegar until blended. Add egg mixture and yeast mixture to dry ingredients, mix until combined.
Blend dough in the food processor for 2-3 minutes. Dough will be sticky and soft, it doesn’t seem much like dough at all. Add in the herbs and gently pulse or mix to combine.
Transfer the dough to the prepared baking sheet. Dip your hands in water or olive oil and shape the dough into a round shape about 1/4″ thick. Place in a warm, draft-free area and let rise 40 minutes. Dough should double in size.
Brush top with olive oil and sprinkle with a pinch of course salt.
This recipe can also be used to make gluten-free focaccia if you spread it to 1″ instead of 1/4″.Toppings
1 clove garlic, minced
1 tablespoon of chopped fresh herbs, I went with basil and oregano from my garden
2 ounces of sun-dried tomatoes, sliced very thin
1/2 cup of shredded mozzarella (I used organic)
1/2 cup of shredded fontina
red pepper flakes
2 cups of fresh baby arugula
fresh parmigiano-reggianoPreheat the oven to 400° F
After you have brushed a bit of olive oil on the crust and sprinkled with a bit of salt (see above), sprinkle the minced garlic all over the crust. Next, evenly sprinkle the fresh herbs and sun-dried tomatoes all over the crust. Add both cheeses and a pinch of red pepper flakes. Bake the pizza. Place the baking sheet in the middle of the oven and bake for 20-25 minutes until the crust is a golden brown and the cheese is melted. After you pull the pizza out, top the entire pizza with the baby arugula. Lightly grate fresh parmigiano-reggiano on top. Cut pizza into wedges, serve immediately.