-
Pumpkin Pie Chia Pudding – Gluten-free, Vegan, Sugar-free
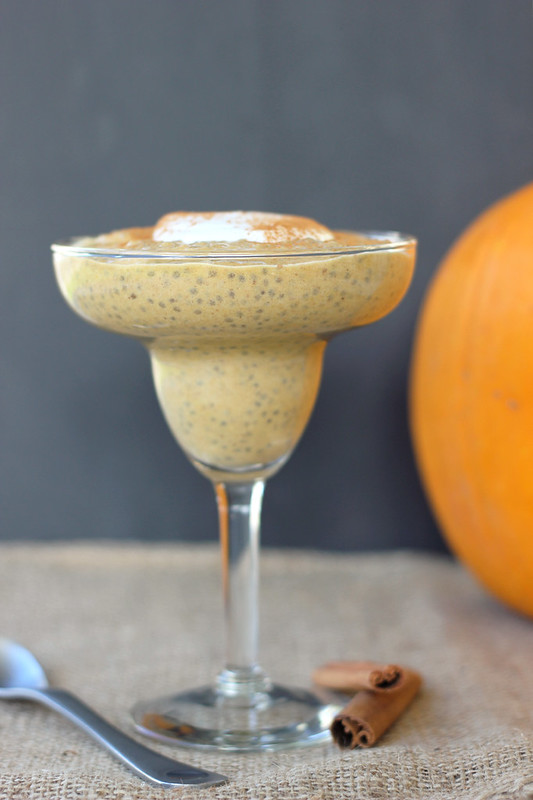
I will spare you the details of my obsession with pumpkin, I know you are all well aware. Let’s just say I cannot get enough and I am constantly trying to come up with new recipes to sneak it into. This quick and simple chia pudding recipe is a great way to indulge in all of the wonderful pumpkin pie flavors and aromatic spicy scents, but without any of the guilt. It is sugar-free so technically you can even eat it for breakfast and not feel bad about it, which is what I do. Make it the night before, let it set up in the fridge overnight and you have a perfect treat for a crisp, cool fall morning.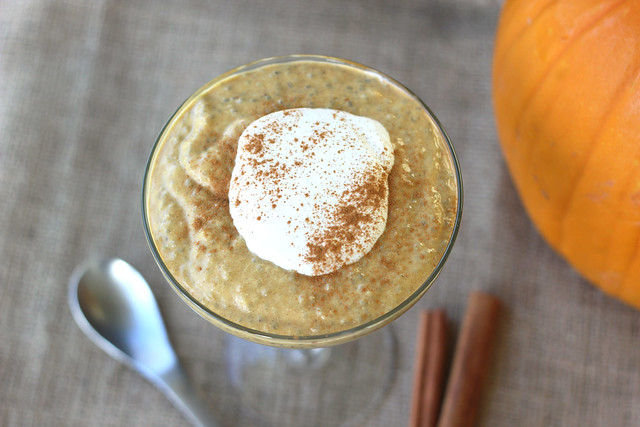
This chia pudding is really great with a dollop of freshly whipped coconut cream on top, too. This pumpkin pie inspired treat was a wonderful way to finish off my September series of gluten-free recipes with Free People. This post was originally shared on the Free People blog, BLDG 25.
[print_this]Pumpkin Pie Chia Pudding (gluten-free, vegan, sugar-free)
serves 2-4 – makes approximately 3 cups
- 1 cup coconut milk (the canned kind – lite or full-fat)
- 1 cup unsweetened almond milk (or other non-dairy milk of your choice)
- 1 cup pumpkin puree (here’s how to make it yourself)
- 2 teaspoons vanilla
- 1 teaspoon ground cinnamon
- 1/2 teaspoon ground nutmeg
- 1/4 teaspoon ground ginger
- pinch of ground cloves
- 5 medjool dates, pits removed
- 3 tablespoons chia seeds
Puree everything but the chia seeds in a blender until smooth, combined and thick. You may see a few little bits of the dates still, it’s OK. Pour the mixture into a glass bowl or a mason jar, stir in the chia seeds. Make sure to stir well to combine. Cover the bowl or put the lid on the jar. Keep in the refrigerator overnight or for at least 4 hours.
Spoon or pour into bowls, top with a sprinkle of cinnamon and maybe even some fresh whipped coconut cream, if you wish. Serve cool or room temperature.[/print_this]
-
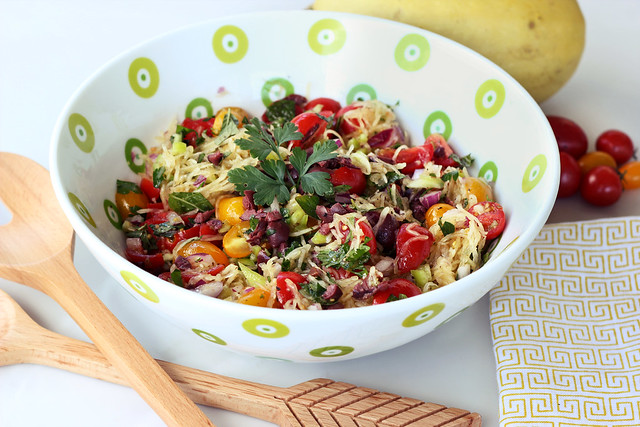
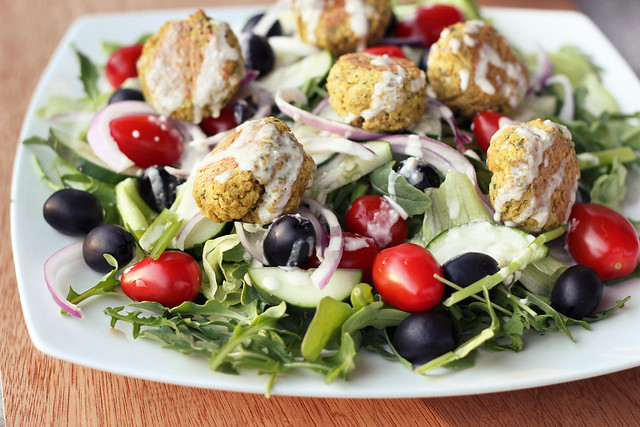
Mediterranean Spaghetti Squash Salad – Gluten-free + Vegan
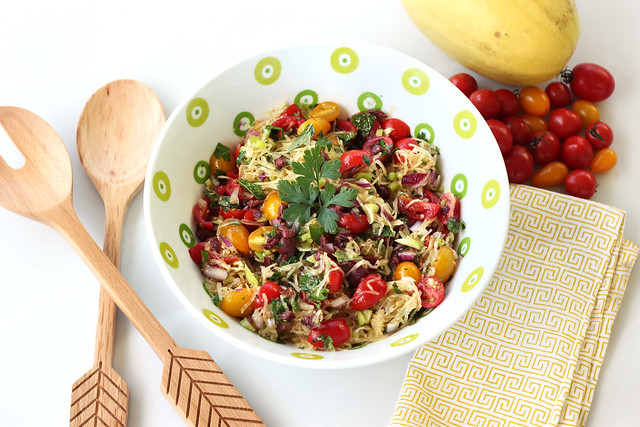
With the start of fall I am fulling embracing all things fall-food related, pumpkin, squash, apples, etc. For my next post in my September series of recipes on the Free People blog BLDG 25, I am sharing a beautifully vibrant salad full of some of my favorite Mediterranean flavors. This spaghetti squash salad is so simple and so delightful, it is hard to believe that the entire thing is basically just veggies. If you haven’t yet experimented with a spaghetti squash, get on that ASAP, especially while they are in season.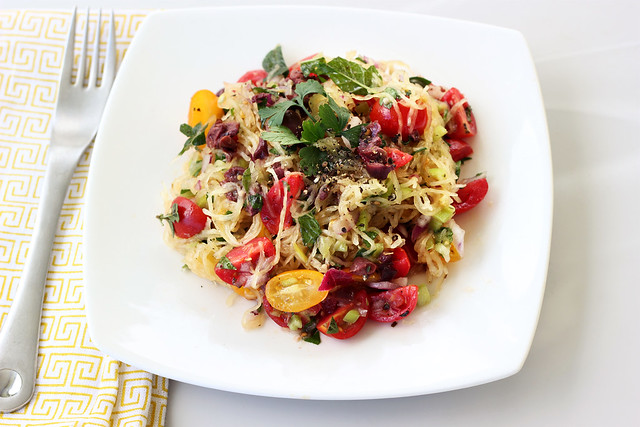
While the beautiful colors outside are starting to show themselves and summer has all but faded away, this salad is a wonderful celebration of all of it. Embracing the last bit of summer with fresh local tomatoes and of course, the fall with the delicious and versatile spaghetti squash. This salad is great vegan or if you aren’t vegan or dairy-free, it is wonderful with a small bit of crumbled goat cheese feta over top.
This recipe was originally shared on the Free People blog, BLDG 25.
[print_this]Mediterranean Spaghetti Squash Salad – Gluten-free + Vegan
serves 4-6
- 1 medium-sized spaghetti squash
- 2 cups grape tomatoes, halved or quartered
- 1 small red onion, diced
- 1 banana pepper (or bell pepper), diced
- 1/2 cup kalamata olives (or black olives), chopped
- 1/4 cup fresh herbs, roughly chopped – I used a blend of oregano, mint and parsley
- 4 oz feta cheese (optional)
Dressing:
- 1/4 cup olive oil
- 1/4 cup red wine vinegar
- 2 cloves garlic, minced
- 1 teaspoon dried oregano
- 1/2 teaspoon sea salt
- 1 teaspoon raw sugar or other sweetener
Preheat the oven to 375ºF. Using a skewer or the tip of a knife, puncture a handful of holes all over the squash, on all sides, to keep it from bursting while baking.
Place the whole squash in a glass pan and bake for 1 hour, until the flesh is soft. Allow to cool until you can easily handle it and slice in half lengthwise. Remove the seeds and fibrous strings from the center of the cooked spaghetti squash. Using a fork around the edge of the spaghetti squash, gently scrape to shred the pulp into strands. It will happen very easily. Place the spaghetti squash in a large serving bowl, and place in the fridge to cool.
Meanwhile, whisk together the dressing ingredients in a small bowl and set aside.
Once the squash has cooled to about room temperature or colder (I just make the squash the night before, place it in the fridge to cool overnight and toss the salad together the next day), add all of the other ingredients to the squash and toss well to combine. Pour the dressing over the salad and gently toss to combine.
Serve topped with additional fresh herbs and some crumbled feta cheese, if you wish! [/print_this]
-
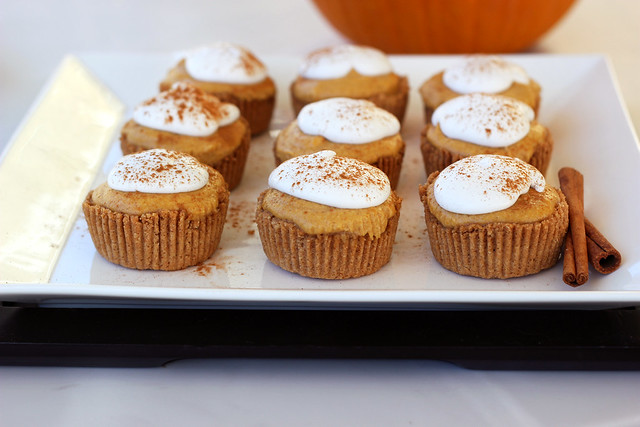
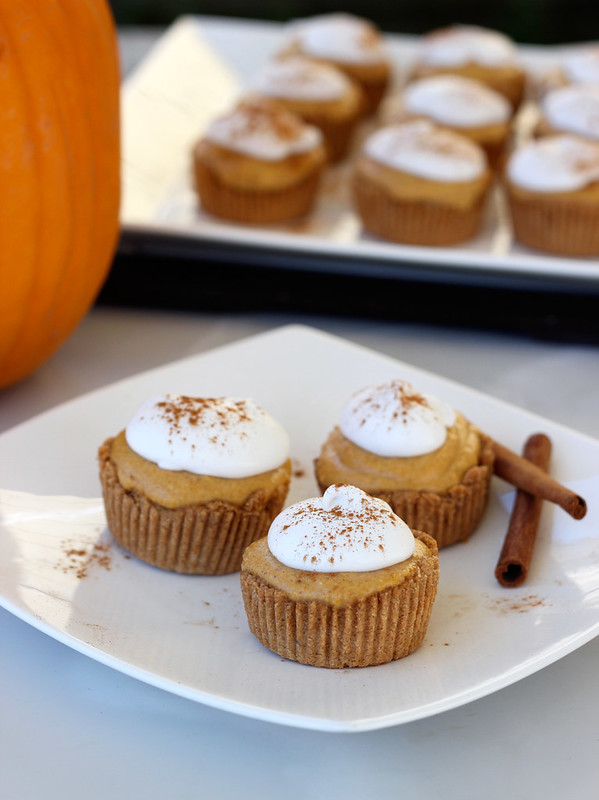
Grain-free Mini Pumpkin Pie Tarts (Gluten-free, Vegan + Refined Sugar-free)
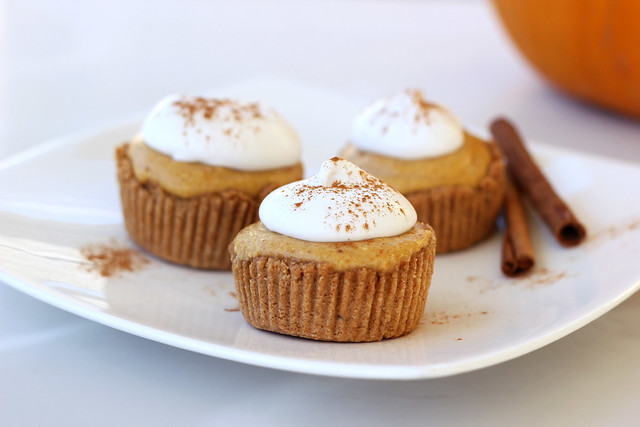
Here it is, the first of, I am sure, many, many pumpkin recipes for the season. If you haven’t noticed in years past, or if I haven’t made it clear enough, I am an absolute autumn junkie! I love just everything about it. Well everything except the part about summer being over. Living on the East Coast the fall is by far the most beautiful season of them all, the colors are incredible, the air has a crisp, cool breeze that feels like a dream, I get excited to pull out the fall boots, scarfs and other various layers and I plan lots of fun autumn activities for us. Fall is definitely the reminder that we are all getting ready to hunker down and get all cozy for the long winter ahead and somehow no one around here really minds, in fact in some ways it is welcomed with open arms and even celebrated. We haven’t even sold our house yet but I am sure of the fact that I am going to miss Autumn almost as much as my family, once we officially make the move to California.
For me, nothing celebrates all of the lovely things about Autumn better than a spiced pumpkin treat, so when Danielle of Against All Grain contacted me to share a recipe with her readers, and she gave me the list of dates, I had to choose today, September 22, the Autumnal Equinox. The perfect day to celebrate all things pumpkin!
I am sure most of you are, but if you aren’t familiar with Danielle’s incredible blog, Against All Grain, you MUST get yourself acquainted. Against All Grain celebrates and shares wonderful recipes that are entirely grain-free (and therefore consequently gluten-free), free of refined sugars, and low to minimal dairy. Danielle’s site is great for those that follow the Paleo, Primal, SCD, GAPS, and Gluten-Free lifestyles. Danielle wrote to ask me to share a post with her readers while she is off working on her Against All Grain cookbook that will be on shelves in Fall 2013 and I am so excited for her, I definitely plan to have that book in my collection!
These pumpkin pie tarts are quite simple to make (although it may seem like a lot of steps when you read the recipe) and they will knock the socks off any pumpkin lover. The crust is entirely grain-free made with almond flour and it has a hint of spices that make the house smell so lovely when they are baking. The pie filling is creamy and rich but without any dairy, which is amazingly unbelievable. Of course, I had to top these treats off with a little whipped coconut cream to round out the flavors perfectly.
This post was originally shared on Against All Grain. If you are looking for my quick and easy recipe for making your own pumpkin puree at home see my post here.[print_this]Grain-free Mini Pumpkin Pie Tarts (Gluten-free, Vegan + Refined Sugar-free)
(Makes 12 mini-tarts)Tart Shells:
- 2 cups almond flour
- 2 tablespoons maple syrup*
- 1/4 cup coconut oil, melted
- 1/2 teaspoon baking soda
- 1/2 teaspoon ground cinnamon
- dash of ground nutmeg
- 1/8 teaspoon salt
Filling:
- 1/2 cup raw cashews, soaked for at least 4 hours, preferably overnight
- 1/4 cup maple syrup*
- 1 teaspoon vanilla
- 1 cup fresh pumpkin puree (see my post on how to make your own, canned will also do)
- 2 tablespoons coconut oil, melted
- 1 teaspoon ground cinnamon
- 1/2 teaspoon ground nutmeg
- 1/2 teaspoon ground ginger
- a pinch of ground cloves
- a dash of sea salt
Whipped Coconut Cream:
- 1 can organic full fat coconut milk, refrigerated overnight
- 2 teaspoons maple syrup (use more or less or none at all, or whatever your favorite sweetener is)*
- 1 teaspoon vanilla
*Maple can be substituted 1:1 for honey if you follow SCD
Directions
Shells
Preheat oven to 350ºF. Line 12 cups in a muffin tin with paper liners (you could also use greased mini tart pans).
In a large bowl, add all of the crust ingredients and mix very well. Really get your hands in there to get it all together and work it into a nice dough.
Add the crust mixture to the muffin cups and press down firmly into the cup using your knuckles, going up the sides a tad bit.
Bake for 15-20 minutes until golden brown.
Allow to cool in the pan for about 10 minutes, then place the pan in the refrigerator until you are ready to assemble the tarts and serve. (Many times I make the tart shells the night before and keep them in the fridge until I am ready to serve)Filling
Drain the cashews and add them to your food processor and give them a whirl by themselves for a bit, to break them up and start turning them into a paste of sorts.
Once the cashews are broken up add in the maple syrup, vanilla and coconut oil, process that a bit more until it is a smooth and creamy paste.
Add in the remaining ingredients and process until smooth and creamy.Whipped Coconut Cream:
Make sure that your can of coconut milk is well chilled. I recommend leaving it in the fridge overnight. Open the can of coconut milk carefully, keeping it level. There will be a firm, waxy layer of coconut cream that solidified on top. Carefully scoop this off into a chilled glass bowl. Keep the leftover coconut water, it is great for smoothies.
Using a mixer, whip the coconut cream for 3 to 5 minutes until it becomes light and fluffy, with soft peaks. Mix in your maple syrup and vanilla, if you are using. Place the whipped coconut cream back into the fridge until you are ready to use. This may be more than what you need for all 12 tarts, depending on how much you put on top, but that’s ok, it keeps for several days, covered in the fridge.
ASSEMBLING THE TARTS:
Remove the paper liner off of the tart shells. Top each of the tart shells with a spoonful of the pumpkin filling and a dollop of whipped coconut cream, sprinkle with a little ground cinnamon. Serve immediately.
[/print_this]
-
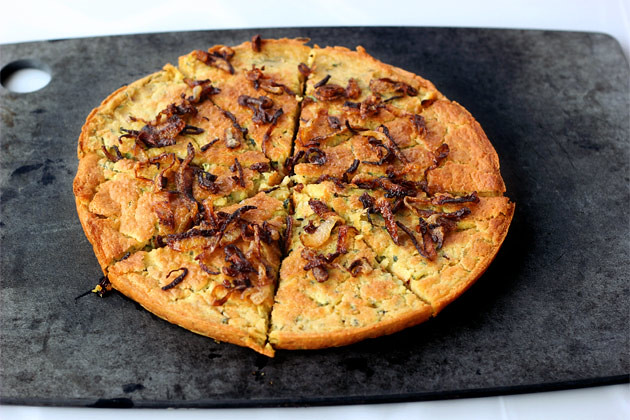
Zucchini Socca with Caramelized Onions – Gluten-free + Vegan
I am very honored to have been asked by Leanne of the Healthful Pursuit to guest post while she and her hubby make the move from Calgary to Montreal. Leanne’s blog is one of my absolute favorites and I enjoy that she and I share very similar views on food, eating and well, life in general. Leanne and I frequently email back and forth chatting about food, health and life and I am constantly grateful that blogging has brought us together. It is amazing how well you can feel like you know someone that you have never actually met.

After sharing my gluten-free and vegan lentil “meat” loaf the last time I guest posted for HP, I had some big shoes (of my own) to fill, since that has become one of my most popular recipes, to date. This time around, I decided to share a simple recipe that would be perfect way to use some of those last of the season zucchini, whether from your own garden, your neighbors or maybe like me, your CSA share. Soccas have quickly become one of my favorite go-to meals around here when I am at a loss as to what to make. They are super simple, very versatile and being that I usually have a huge bag of chickpea flour in the pantry, I always have what I need to make it. Not too long ago I shared a recipe for a Kalamata Olive and Herb Socca with Roasted Vegetables that I served as a simple lunch for myself and my hubby, but I have also made socca-style pizzas and other variation and I have been dreaming playing with a recipe for a sweet socca, maybe with some cinnamon and nutmeg and drizzled with honey. How amazing does that sound?
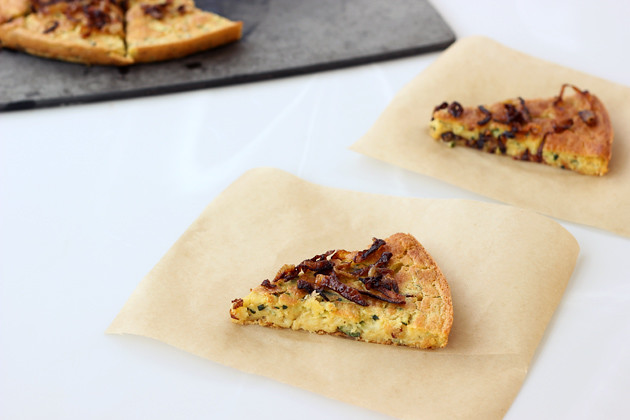
This Zucchini Socca with Caramelized Onions features shredded zucchini inside which provides a nice bit of color and flavor, but I also added in some fresh basil and some red pepper flakes and topped it all off with caramelized onions, one of my favorites! There is a wonderful crispiness to the outside and a nice creamy and delectable inside. Also, if you aren’t vegan or dairy-free this would be incredible with some crumbled goat cheese on top, as well.
Head on over to Healthful Pursuit to get the full recipe and thanks again to Leanne for having me guest post while she gets settled in her new life. It is always a pleasure.
-
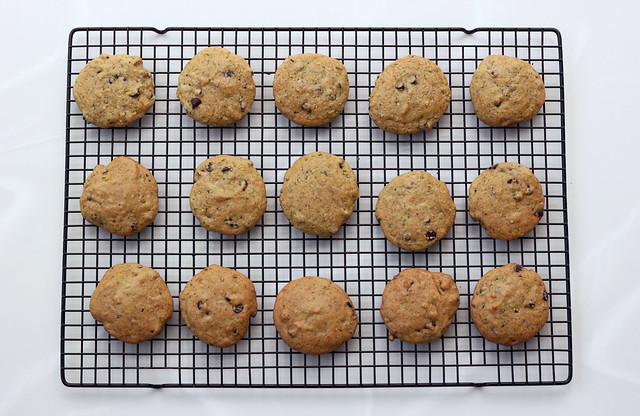
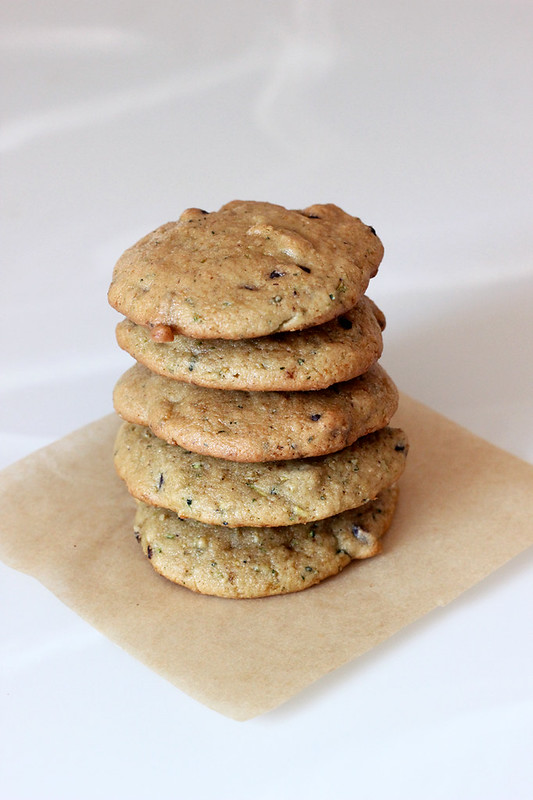
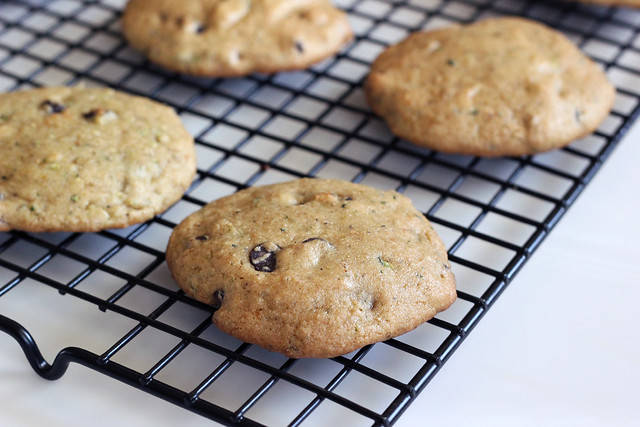
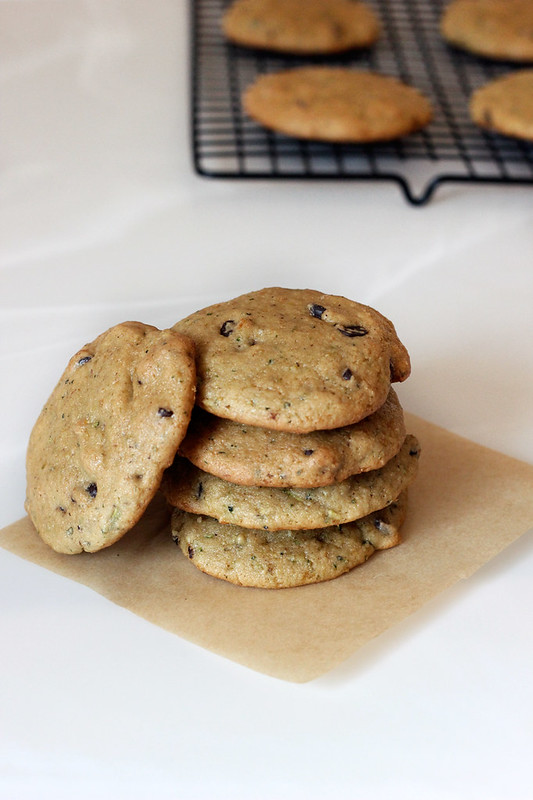
Grain-Free Zucchini Chocolate Chip Cookies – Gluten-free + Dairy-free with Vegan Option
I know I tend to usually just talk about food and cooking, sometimes I tell you guys a bit about different things we have going on, but I rarely just sit down and type out what I am feeling. I guess maybe it is for fear that no one actually cares to read it, but sometimes it feels good to just vent. It’s therapeutic. So hopefully no one minds.
This summer the one word that has been ringing in my mind over and over is “patience”. I have never had a large amount of it, but this summer I have really been learning how to embrace patience and to really go with the flow. My yoga practice has taught me many many things, I think the most important that I have personally taken away is being able to cultivate my breath and to control my emotions with it. To be OK with me and what I have been given, to hold on to what I need and to let go of what I don’t. And to embrace the flow of life. Both on and off the mat these things have all come into play in many aspects of my life. This summer I have really been able to use so much of what I have learned in so many different ways.
Trying to sell this house and move across the country was a decision we made sometime last summer. We didn’t exactly know our time frame, at the time, but we knew this was the next step for us. Early in 2012 we made the decision that we would get the process moving along and get our house on the market in the summertime to hopefully move by the fall. When you think about selling the home you have lived in for 9 years and leaving all of your family and friends behind, there are so many things to think about, there are so many self-imposed questions that you have to answer and there are even moments of doubt and fear. We thought about it all, we talked it all out, we did the research and we put the hours into readying the house. When the time came in June to list the house, we were insanely excited to get this new phase started. We started talking about what the soonest we would be out there by, and what if the house sold too quick and we didn’t wrap up all the loose ends here. We kept out summer free of our usual festivals, events and travel so we could be available for showings and get this process moving.
Obviously our house hasn’t sold yet, we are just 2 months in on having it listed and we are both very optimistic it will sell, but we quickly learned that it is likely going to take some time. More time than we both originally thought. Everyone that has seen our house has had very positive things to say, they are impressed by all of our updates to it and the price hasn’t once come up as an issue, the problem we are dealing with, is that it is a townhouse. Not everyone wants a townhouse. So, we have had a decent amount of showings and no offers, just yet. All of the feedback has been, in a nutshell, that it just wasn’t what the buyers were looking for, so there isn’t anything we can do to “fix” what isn’t right. Nothing is wrong. We just have to wait for this perfect person to come along. I know they will. But we have to wait. I am not great at waiting. I am not great at being out of control. This summer has been the biggest lesson in patience that I quite possibly have ever had. The biggest lesson in going with the flow. I cannot control everything. I cannot make everything happen the way I want it to and when I want it to. I have always known that, but now the universe is really showing it to me. It is testing me.
In some ways, I think it is good, I have been able to really enjoy the place I have called home for over 32 years, to the absolute fullest. I have been able to really enjoy my family and friends. It has been so nice. If our house sold right away, I may have felt like I wasn’t quite ready to go. I might have wanted more time, I might have regretted leaving.
Some days trying to be patient and knowing the one thing I am most looking forward to is all out of my control, I feel like I could just scream. It is like counting down the days until Christmas when you are a kid. Only I can’t count down because I don’t know when the big day is coming.
Ah. Patience.
This cookies have been a bit of a lesson in patience. The first time I made them, I was so optimistic that the recipe I created was perfect. The dough felt the way it should, it tasted perfect. I knew they were right. They were wrong. They were too soggy, they didn’t have enough flavor and the zucchini that I used was a bit to “squashy”. They just weren’t right. I knew I would have to play around with some things in the recipe to get them to match the vision I had in my head. I also had to wait to have the time to bake them again. After tweaking the recipe and finding some time on Sunday night, I made them again. With fingers crossed and some deep breaths, into the oven they went. They came out perfect. Soft, chewy, delicious cookies.
These could be a regular chocolate chip cookie’s very close sibling. The zucchini flavor is very subtle, almost undetectable. It really just tastes like a different version of a classic chocolate chip cookie. You get the green flecks from the zucchini and if you are like me, the most satisfying thing is that you get to use up at least one or two of the very many zucchini you have on hand. Plus, if you have kids, what a great way to sneak a little bit of veggies in. These cookies are a “soft-batch” type cookie, which I love, with a really nice soft and fluffy chew to them. They aren’t the thin crispy cookies that I know some people like. I also love that they are totally grain-free. I have been having so much fun playing around with recipes that don’t rely on a grain.
Thanks for letting me vent.
[print_this]Grain-Free Zucchini Chocolate Chip Cookies – Gluten-free + Dairy-free with Vegan Option
Makes approximately 18 – 24 cookies- 2 cups blanched almond flour, tightly packed
- 1/2 cup arrowroot starch (you could also use tapioca starch or potato starch)
- 1 teaspoon baking soda
- 1/2 teaspoon sea salt
- 1/2 cup maple sugar, coconut sugar, raw sugar or other granulated sweetener of your choice
- 2 tablespoons melted coconut oil (or olive oil, walnut oil, etc)
- 2 farm fresh brown eggs or 2 flax-seed eggs (2 tablespoons ground flaxseeds mixed with 6 tablespoons water)
- 1 tablespoon psyllium husk
- 2 teaspoons vanilla
- 1 cup shredded zucchini, with all of the excess moisture squeezed out (squeeze it inside of paper towels, a clean kitchen towel, cheese cloth or through a strainer)
- 3/4 cup dairy-free gluten-free chocolate chips
Preheat oven to 350ºF. Line a baking sheet with parchment paper.
In a food processor, combine almond flour, arrowroot starch, salt, baking soda and maple sugar, process until combined. In a small bowl whisk together the melted coconut oil, the eggs, vanilla and psyllium husk. Pour the wet mixture into the food processor with the dry ingredients and pulse into the dough comes together, add in the shredded zucchini and pulse a few times more, then take out the blade and stir in the chocolate chips by hand.
Scoop dough, one level tablespoon at a time onto a parchment lined baking sheet. Bake in batches, if you need to.
Bake for 18-20 minutes until the edges are slightly golden brown and they are fully cooked. Cool for a few minutes on the pan, then transfer to a wire rack to cool further. Serve.These can be stored in tightly sealed container for a few days either at room temperature or in the fridge, or you can freeze them and take them out at your leisure. [/print_this]
-
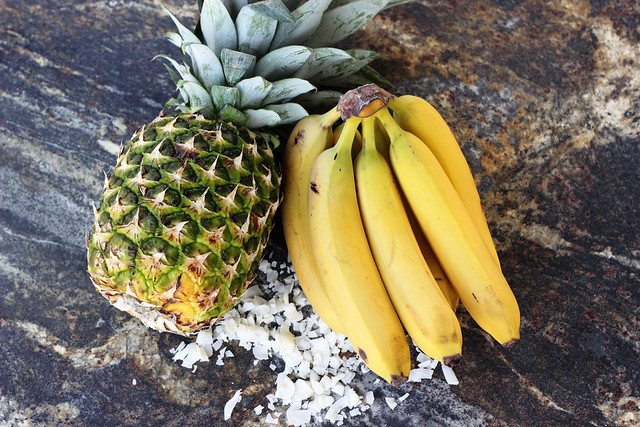
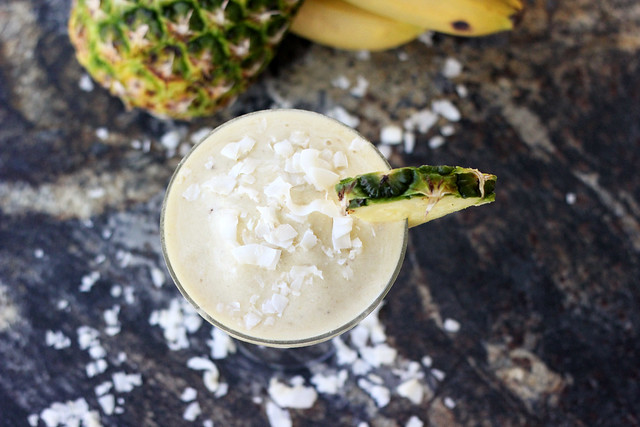
Banana Piña Colada – Gluten-free, Vegan + Refined Sugar-free
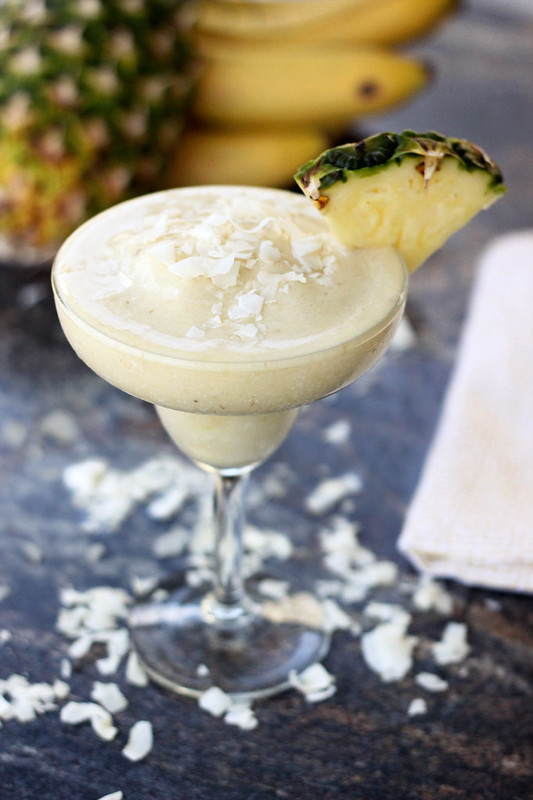
Coconut and pineapple has to be one of the quintessential flavor combinations of the summer! So what better fruit to add to that delicious mix than bananas? This is an updated lighter version of the classic beach cocktail, a piña colada. Instead of coconut cream, sugary juice or those nasty mixes, this summertime mocktail combines fresh and healthy ingredients for that same creamy and delicious satisfaction without all the garbage.
The bananas provide plenty of sweetness, so there is no need for any sugar or sweeteners and by freezing both the bananas and the coconut milk, you won’t end up with a watered down drink as the ice slush melts. Obviously, if you wish to make this an alcoholic cocktail, add in a shot or two of your favorite rum at the end and give it another whirl in the blender.
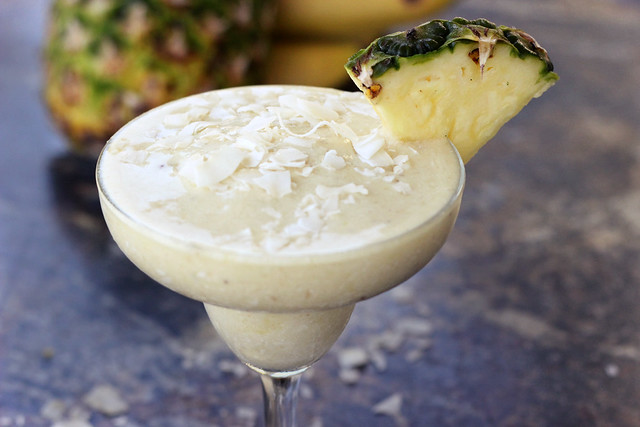
There is no refined sugar added to this and it is delicious even without the rum. The creamy sweetness from the bananas and the coconut milk provides more than enough sweet, so you don’t have to add any sugar or sweetener at all. And even if you go with the full-fat coconut milk, it is still lighter than the standard coconut cream that is used. If you want it to be even lighter and lower in fat and calories, feel free to use light coconut milk. I personally like the creaminess of full fat coconut milk and since it is a healthy fat, I can totally justify indulging! Plus, the other bonus of this creamy summertime mocktail is that it could also be enjoyed as a delicious and sinful breakfast smoothie. That would be the perfect way to start any day, if you ask me.
Banana Piña Colada
Serves 4
- 2 frozen organic ripe bananas
- 1 cup fresh pineapple chunks (frozen will work if you cannot find fresh)
- 1 cup no sugar added organic pineapple juice
- 1/2 can organic coconut milk (full fat or light) – frozen into cubes
- Coconut flakes for garnish
- Fresh pineapple wedges for garnish
*Optional – add 4 ounces of your favorite rum to make this an alcoholic cocktail
Add all of the ingredients except the coconut flakes and pineapple wedges to your blender. Blend until smooth and creamy. If you are adding rum, add it after it is creamy and blended, and blend again quickly to mix it in. Pour into 4 glasses, serve each topped with coconut flakes and garnish with a fresh pineapple wedge.
-
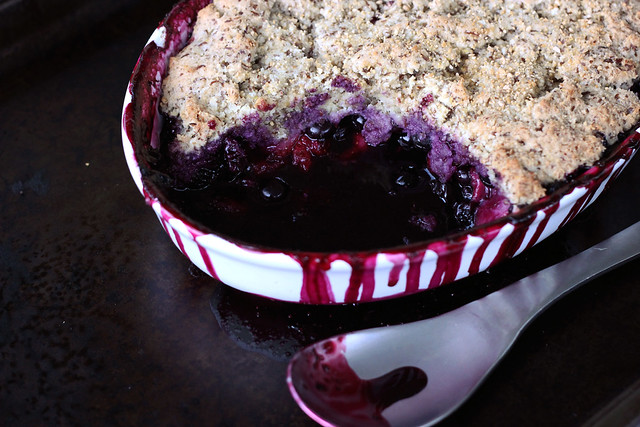
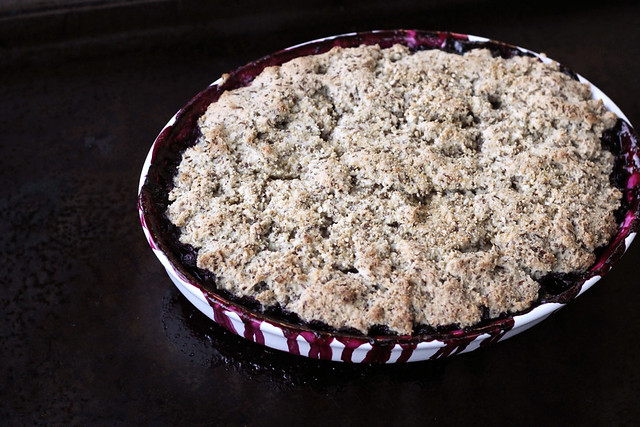
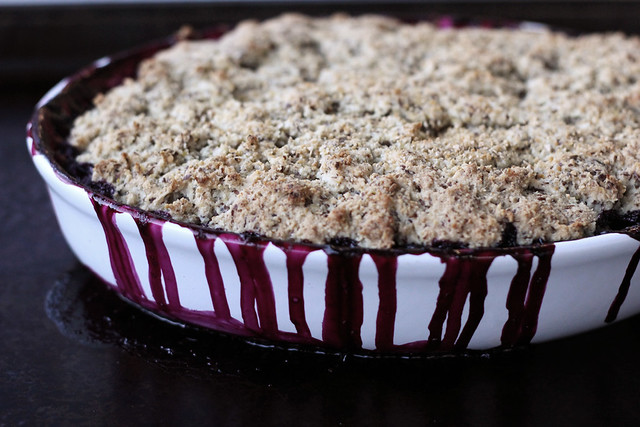
Grain-free Berry Cobbler – Gluten-free, Vegan + Refined Sugar-free
A week or two ago, I came across this amazing grain-free thick pizza crust recipe from Real Sustenance and it instantly peaked my interest. More and more I am amazed by what almond flour can do and the results you can get when baking with it. It is by far my favorite flour these days.
When I saw the photos of that crust I couldn’t wait for my order of almond flour from Honeyville to come in the mail. Oh and what a painful wait it was this time. This wait made me realize I should really stop waiting till I am totally out of almond flour to order more. Once the almond flour arrived it immediately became pizza night at our house and I made a version of my vegan hummus pizza with this new crust recipe. Oh my goodness! Best gluten-free pizza crust I have ever made at home, actually, best gluten-free crust that I have ever had anywhere. It was fluffy, soft and thick, and it has a nice subtle crisp to the outside of it. It was perfect and I couldn’t believe it was totally grain free.
As soon as I took a bite I couldn’t help but think about what else I could come up with to do with this dough. That is when I realized I needed to adapt the recipe to make a cobbler topping. It was perfect for it. I wanted to play around a bit to make it vegan, so I replaced the eggs with flax-seed eggs and I also used coconut oil instead of olive oil, plus I of course had to add a little sweetness, so I went with my go-to maple syrup. (feel free to use whatever sweetener you prefer, though)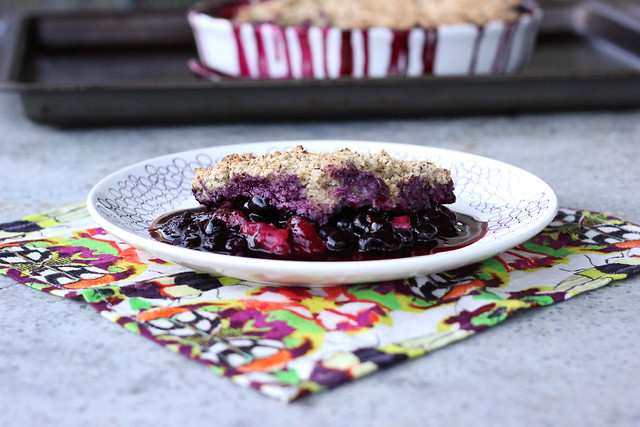
This cobbler according to my hubby, is THE best cobbler I have ever made and maybe one of the best cobblers he has EVER had anywhere. Then he declared it might just be the best gluten-free dessert I have ever made. Mark hails from the south, so for him to not just eat my cobbler but to rave on and on about it, has to be the best compliment he could give. He is a harsh critic of cobblers and I have seen him push aside sub-par cobblers if they weren’t to his liking. And don’t even get him started on crisps, he doesn’t understand them and wishes they would just be a cobbler.
The crust on this cobbler is thick and almost biscuit-like but not at all heavy or too dense. The flax seed eggs besides helping to bind also provide little golden flecks of color and texture in the crust that really makes it feel rustic, homemade and healthy, all of which it is. You can make this berry cobbler with any combination of berries that you choose. I had planned to use just blueberries, but I had a small amount of strawberries leftover that I decided to slice up and add in. You could also use blackberries, peaches, apples or whatever your favorite fruit or combination of fruits might be. I cannot wait to go apple picking in the fall and to make an apple spice version of this. Oh and like most cobblers, this one is of course be great served warm with a scoop of your favorite vanilla ice cream or even some whipped coconut cream on top.
[print_this]Grain-free Berry Cobbler – Gluten-free, Vegan + Refined Sugar-free
Serves 6-8
Inspired by this pizza crust recipeBerry Filling
- 3 cups of organic berries – I used a pint of blueberries and 1 cup of fresh strawberries, sliced
- 2 tablespoons maple syrup (you could also use honey, brown rice syrup, coconut nectar or whatever your favorite sweetener is)
- 1 tablespoon arrowroot starch
- 2 tablespoons fresh lemon juice
Cobbler Crust
- 2 tablespoons ground flaxseeds plus 6 tablespoons hot water (or two eggs)
- 1 cup blanched almond flour
1/2 cup arrowroot starch (you can also use tapioca or potato starch) - 1 teaspoon baking powder
- 1/2 teaspoon salt
- 1 tablespoon almond milk
- 1 tablespoon maple syrup (you could also use honey, brown rice syrup, coconut nectar or whatever your favorite sweetener is)
- 2 teaspoons melted coconut oil
- 1 tablespoon psyllium husk
- 1/2 teaspoon fresh lemon juice
Preheat the oven to 425º F. Grease an 8″ square pan (or something similarly sized) with some coconut oil.
In a medium sized bowl mix the berries with 2 tablespoons maple syrup, lemon juice and 1 tablespoon arrowroot starch, set aside.
In a small bowl whisk together the 2 tablespoons of ground flaxseeds with 6 tablespoons of hot water, set aside to let it thicken.In a large bowl whisk together the almond flour, arrowroot, baking powder and salt. In a second smaller bowl whisk together the flaxseed eggs, almond milk, maple syrup, coconut oil, psyllium husk and lemon juice. Add the liquid mixture to the dry and mix until well combined.
Add the berry mixture to the greased pan and drop spoonfuls of the dough to the top. Spread it out evenly with your hands or a greased spatula. You can leave it as rustic biscuit-like rounds or spread it to one even dough topping, like I did.
Place the pan onto a rimmed baking sheet to catch any berry juice that will run out. Bake for 30 minutes until the cobbler topping is golden brown and cooked through and the juices start to bubble up over the crust. Remove from oven, cool slightly, and serve.
[/print_this] -
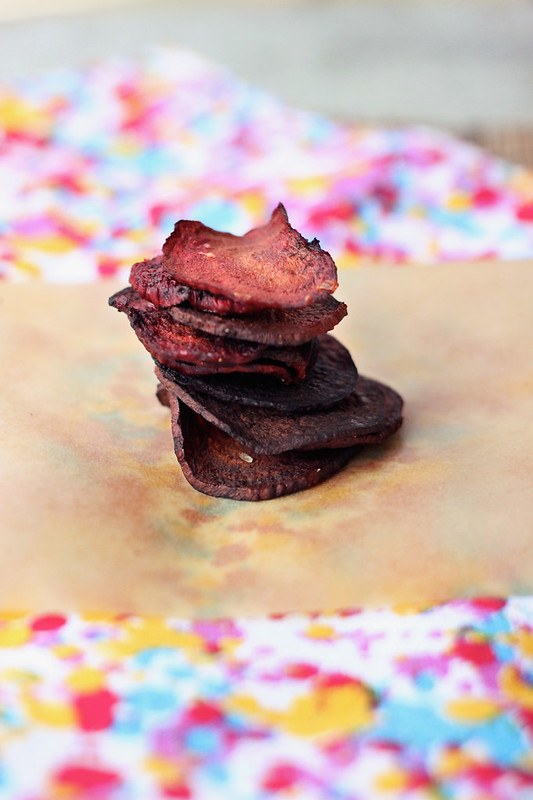
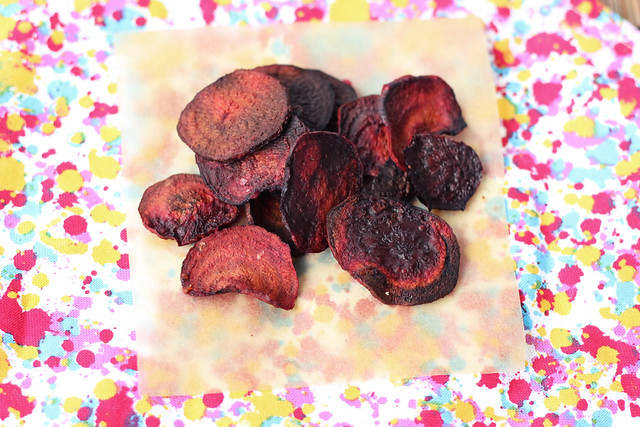
Crispy Baked Beet Chips – Gluten-free + Vegan

See, I told you that I would use up the beets from our CSA share. I wanted to do something fun and different with the beets, since I usually just juice or grill them. My husband, Mark, absolutely HATES beets, he despises them and won’t try them no matter how good I tell them they are. He thinks they are gross and taste like ‘ground’ or ‘dirt’!
Well, I can officially say – I have WON the beet war in our house! I got Mark to eat beets and he actually liked them. I didn’t even have to sneak them into something else. I just said “here, just try this beet chip, don’t be a jerk”. He tried it and he liked it, then he had another and then a few more. Then he proclaimed “I have never,ever liked beets before, ever, but these I actually like!” S U C C E S S !
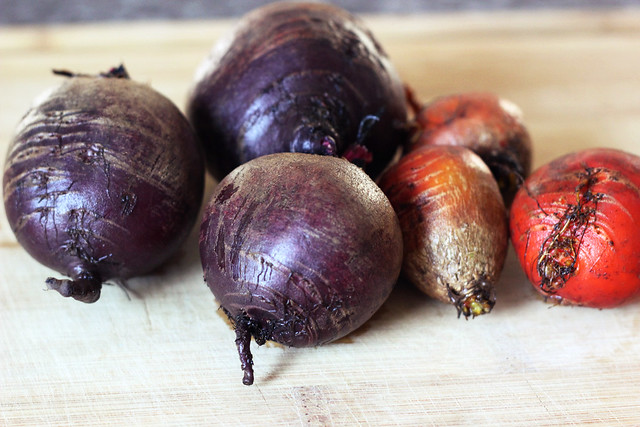

These beet chips are super easy to make and you can keep them simple with just a little sea salt, or you can add some fun things like onion powder, or rosemary or any other spices or herbs you desire. I used a mix of both golden beets and red beets that we got in our CSA share from Porter Farms. Once you peel the feels and slice them, you will not believe the vibrant bright colors. They are almost too pretty to eat. Almost. These chips are so crispy and satisfying that you won’t be able to eat just one or even a couple. I made this batch and had planned to eat a few for a mid-afternoon snack and then save the rest for an evening snack. That didn’t work. At all. We ate them all.
As far as storing goes, these chips will likely lose a bit of their crisp when you store them, so as with most crispy baked foods, best to eat these up right away when they are their crispiest. Darn.
Besides being super delicious and so vibrantly beautiful, if you need even more reasons to eat beets here are a few of their wonderful benefits, beets are a unique source of phytonutrients called betalains. The betalains found in beets have been shown to provide antioxidant, anti-inflammatory, and detoxification support. If that isn’t enough, the combination of antioxidant and anti-inflammatory molecules in beets makes this food a highly-likely candidate for risk reduction of many cancer types. Oh and don’t forget the fiber! Beet fiber (along with carrot fiber) are two specific types of food fiber that may provide special health benefits, particularly with respect to health of our digestive tract (including prevention of colon cancer) and our cardiovascular system. More info about the wonderful benefits of beets can be found here.
[print_this]Crispy Baked Beet Chips – Gluten-free + Vegan
- 3-4 medium beets (or 6-8 small beets), peeled and sliced thinly about 1/16 – 1/8 inch – using a mandoline slicer is the best and easiest way to do this
- 1 tablespoon olive oil
- Sea salt to taste
- Feel free to add any additional seasonings that you wish *
Preheat oven to 350º F. Toss beets slices with oil in a medium sized bowl until they are all well coated and lay them flat in a single-layer on a rimmed baking sheet (bake in multiple batches, if necessary). Bake for 20-30 minutes, until chips are crispy. Check after about 15 minutes since the time will vary based on thickness of chips and how dark your baking pan is, mine took about 30 minutes since my baking pan was really light in color. The second batch I made was on a much darker baking pan and they cooked up much quicker. Sprinkle a little sea salt over top when you take them out. Transfer to a wire rack and they will crisp up a bit more as they cool.
* Play around with adding in different spices and herbs. I made one batch with some fresh rosemary, another with some onion powder and then just a plain batch, all were very good.
[/print_this]
-
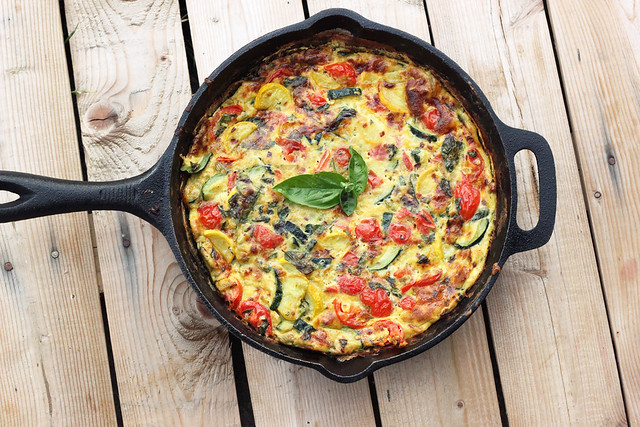
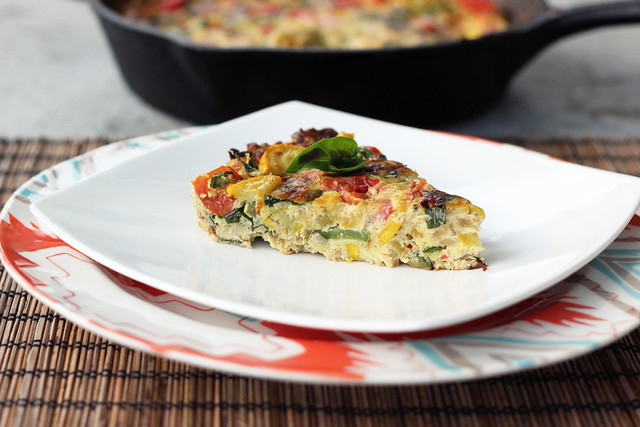
Summer Harvest Frittata – Gluten-free + Dairy-free
 <
<I am seriously in love with my CSA from Porter Farms. It is so cost effective, the produce is all organic (and obviously local) and each week there are new surprised in the bag that I get excited about playing with.
I am sure most of you do know, but if you don’t know what a CSA is, here is a quick description from the Porter Farms website:
CSA stands for “community-supported agriculture”. The idea behind it is simple: individuals share the costs, risks and bounty of growing food in an environmentally-friendly fashion. The concept first appeared in the U.S. in the early 80’s, when people sought higher quality foods available from local sources.
The meaning of “community-supported agriculture” as it relates to the mission of our program here at Porter Farms is as follows: CSA participants, through their membership, help pay for seeds, compost, irrigation supplies, equipment maintenance, fuel, labor, etc. In return, the farm provides, to the best of its ability, 22 weeks of fresh, certified organic produce throughout the growing season.
Community supported agriculture is a grassroots movement that reconnects the local community with its food source, the local farmer. This alternative to the grocery store and big chains couldn’t fit more perfectly into my lifestyle and my mindset. My only complaint about CSAs is that I didn’t join one sooner! This most definitely will be a yearly thing for us.
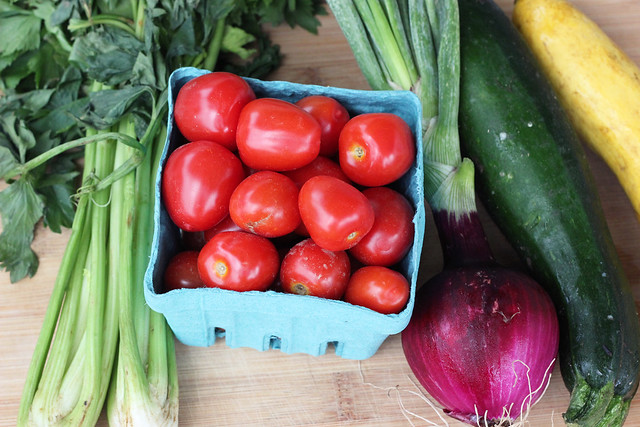
Each week I try to get creative with the offerings in my bag, playing around with new recipes, getting inspired. This week we received zucchini, yellow squash, cucumbers, celery, red and golden beets, tomato berries and red onions with their tops. So many things that I love! I wanted to play around with a dish that would really highlight as many of the ingredients as I could. I did pretty well, the only two that didn’t make it into this dish were the beets and the cucumbers and don’t worry I have big plans for both of those.
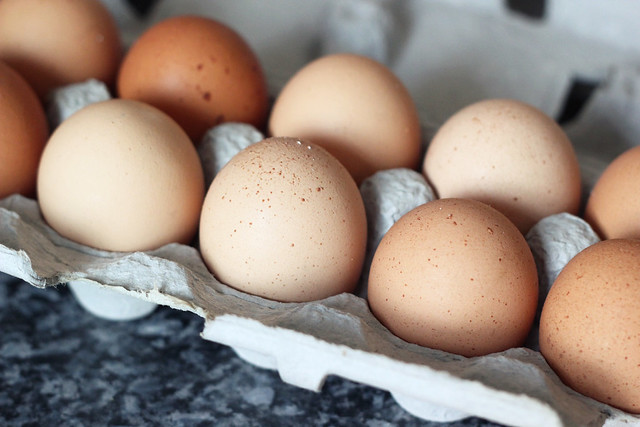
In addition to the CSA, each Saturday morning, I always pick up a dozen (or two) brown eggs from Painted Meadows Farm at the Elmwood Bidwell Farmers Market. I am telling you, until you have had eggs fresh from a farm (or maybe you have my ultimate dream and you have your own chicken in the yard), you have no clue what you are missing. The taste isn’t even comparable, the yolks are a shade of yellowy, orange you wouldn’t believe. Now I am spoiled, it’s the only kind of eggs I want to eat.
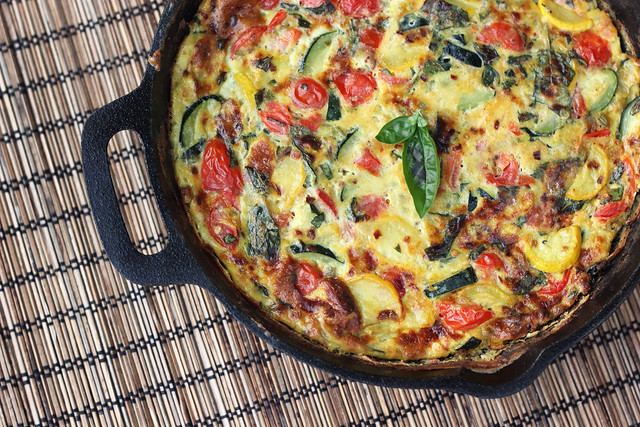 <
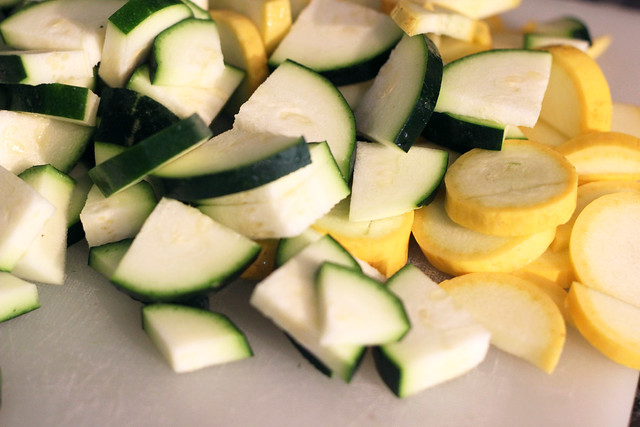
<In looking over our pantry and refrigerator and all of these lovely, seasonal ingredients, I had the perfect thought for a light summertime dinner – a Summer Harvest Frittata. What a great way to highlight all the wonderful items in season right now.This recipe is quite versatile so feel free to play around with it and add or take away anything you’d like or have on hand from your own CSA, farmers market or your garden. I added a bunch of fresh basil since it is growing abundantly and beautifully in our yard, but the flavor profile can easily change to whatever fresh herb or spice you have readily available. This frittata was perfectly satisfying for dinner with a small salad on the side, but it would also be great for breakfast, brunch or heck even lunch, you can eat it all day!
[print_this]Summer Harvest Frittata – Gluten-free + Dairy-free
Serves 6-8- 6-8 large local farm fresh brown eggs (more eggs will give you a fluffier thicker frittata, less eggs and it will be thinner)
- 1/8 teaspoon red pepper flakes (optional)
- 1/4 cup fresh basil, roughly chopped
- 1 tablespoon olive oil
- 1/2 cup celery, chopped
- 1 small red onion, chopped
- 2 cloves garlic, minced
- 1 medium zucchini, cut in half-length wise, then cut in half again (if it is large enough) and sliced
- 1 medium yellow squash, cut in half length wise, then cut in half again (if it is large enough) and sliced
- 1 cup grape tomatoes, halved or quartered depending on what size they are
- Salt and pepper to taste
Preheat the oven to 400ºF.
In a medium bowl, whisk the eggs with a small pinch of salt, red pepper flakes and basil. Set aside.
In a 8 to 9 inch oven-safe, cast iron skillet, heat olive oil over a medium-high heat, make sure you get the olive oil all up the sides using a brush or some wax paper, etc. (you can also use an oven-safe nonstick skillet). Add the onion and celery, with a dash of sea salt, sauté about 3-5 minutes until the onion is translucent. Add the garlic and sauté another 2 minutes, being careful not to burn it. Add the zucchini and squash, toss around and sauté about 8-10 minutes, until they are tender. Add the tomatoes and cook for another 2-3 minutes until the tomatoes start to soften and get tender. If there is any water sitting in the pan from the veggies, pour it off. Salt and pepper to taste.Turn down the heat a bit. Add the egg mixture to the skillet by pouring over the veggies and giving it all a really quick stir to combine. Cook over a medium-low heat for about 5 minutes or until the eggs are just set and there isn’t a lot of liquid running around the pan. To do this, run a spatula underneath the sides of the frittata and tilt the pan so the uncooked eggs run to the underside and cook.
Place the skillet in the center of your preheated oven. Allow to bake for 13-15 minutes, until it is golden brown, well set and puffy. Remove from oven with oven mitts and let cool for several minutes, cut into wedges and serve.
[/print_this]
-
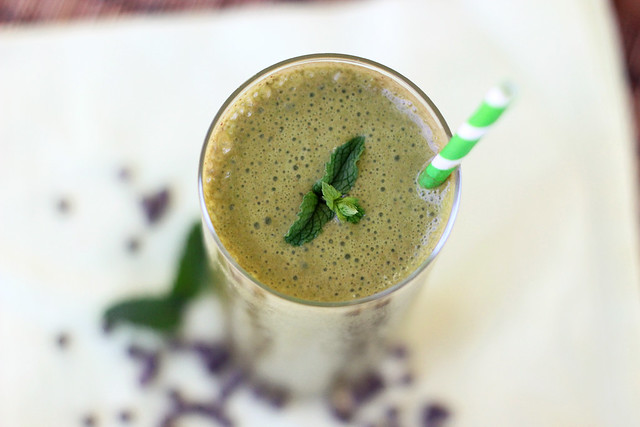
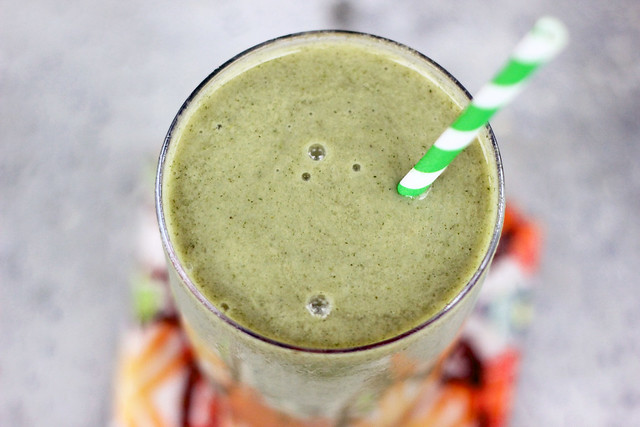
Mint Chocolate Chip Smoothie – Gluten-free + Vegan
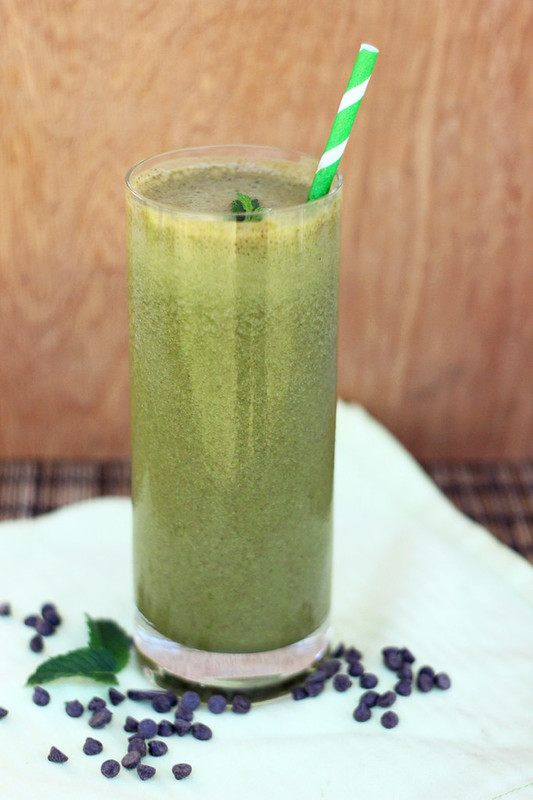
With the abundance of fresh mint in the yard, I decided I had to find a smoothie to make that would really highlight the mint. And what goes best with fresh mint? OK, that isn’t really a serious question, we all know the answer… it’s chocolate.
I created a quick and very easy mint chocolate chip smoothie that you would swear cannot be good for you, until you hear there is a full 2 cups of baby spinach in there. If Mark hadn’t walked into the kitchen while I was making it, I know I could have totally convinced him it was some type of junk food. But when he tasted it and I asked him what he thought, his reply was “this is so amazing, but I saw you put something green in there, what was it?”. He couldn’t believe that is was baby spinach. There is no weird texture or taste, at all.
The spinach brings a beautiful shade of green to the drink, but besides a serving or two of your daily veggies, it also supplies you with many wonderful benefits like Vitamins K, A and C. Plus spinach is a great natural anti-inflammatory. Additionally, spinach is found to have a new category of health-supportive nutrients called glycoclycerolipids, studies are now showing glycoglycerolipids from spinach can help protect the lining of the digestive tract from damage — especially damage related to unwanted inflammation. Read more about the benefits of spinach here.
This smoothie is creamy with a really nice fresh mint flavor and the little flecks of chocolate are perfect. If you don’t want to blend the chocolate chips in or you don’t want the little bit of sugar from them, instead just blend in a tablespoon or two of good quality unsweetened baking cocoa or even shavings of a good quality unsweetened chocolate. I didn’t have any unsweetened chocolate on hand or I would have went with that.
This would be a great smoothie to serve the kids (or your hubby) to sneak in a ton of veggies.
[print_this]Mint Chocolate Chip Smoothie – Gluten-free + Vegan
serves 1- 1 cup organic unsweetened vanilla almond milk (or other non-dairy milk of your choice)
- 1 frozen organic banana (if it isn’t frozen, just add a bit more ice in at the end)
- 2 cups tightly packed organic baby spinach
- 1/3 cup tightly packed fresh mint leaves
- 1 tablespoon ground chia seeds (optional)
- 2 Medjool dates (or any other sweetener of your choice like maple syrup or maple sugar, honey, liquid stevia, etc)
- 1/4 – 1/3 cup dairy-free, gluten-free mini chocolate chips
- small handful of ice cubes
Add all of the ingredients except the chocolate chips and the ice to your blender and blend until very smooth and creamy, blend for about 3 minutes. Then add in the ice and blend until there are no large chunks, then add the chocolate chips and give it a few pulses to break them up a bit. Serve immediately. Toss a few chocolate chips or some chocolate shavings on top with a sprig of fresh mint, if you wish.
[/print_this]
-
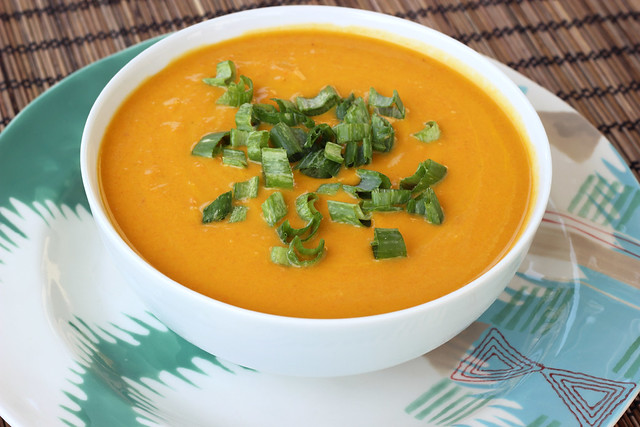
Chilled Carrot Ginger Coconut Soup – Gluten-free + Vegan
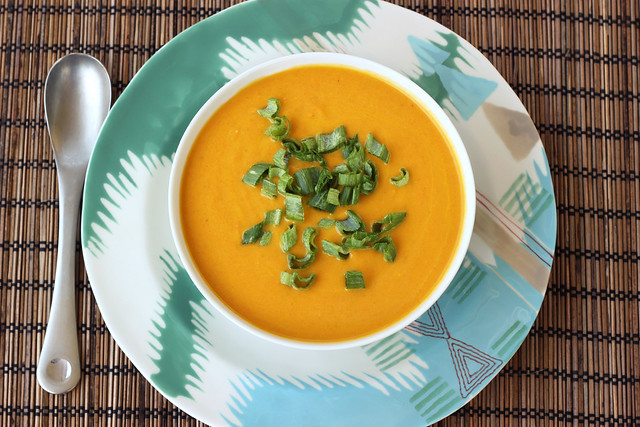
I am very excited to be sharing another recipe with the Free People Blog, BLDG 25. Today’s recipe is a simple but totally impressive chilled soup that is perfect for all of these hot weather days we’ve all been having.
When it is as hot as it has been, I find it hard to want to start up the stove or oven and then do all the prep work in a hot kitchen. Then, once I am really good and sweaty, that’s when dinner is ready. Nothing like eating a hot meal and feeling like you want to just pass out or jump in a pool.
The great thing about this chilled carrot soup is you can do the prep work the night before or early in the morning when the kitchen and the rest of your house still has a chill to it from the overnight cool down. You make the soup quick, puree it and then put it in the fridge until you are ready to eat. It makes a wonderful dinner or lunch with a simple side salad, or it would be wonderful as an appetizer.
But, if you are like my hubby, Mark, and chilled soups totally skeeve you out, you can enjoy this soup warm, room temperature or hot. Trust me, I may have taken many spoonfuls of it, while it was cooling and it was just as incredible.
This recipe was originally shared on the Free People blog.
[print_this]Chilled Carrot Ginger Coconut Soup – Vegan + Gluten-Free
serves 4-6- 1 tablespoon olive oil
- 1 onion, chopped
- 3 tablespoons finely chopped ginger
- 3 cloves garlic, minced
- 1 lb. organic carrots, peeled and chopped into 1-inch pieces
- 4 cups organic low sodium vegetable broth
- 1/2 teaspoon sea salt
- 1-2 teaspoons yellow curry powder (optional)
- 1/4 teaspoon red pepper flakes (optional)
- 1 cup full fat organic coconut milk
Heat olive oil in a large saucepan over a medium/high heat. Add in the onions and ginger, sauté for 4-5 minutes until the onions are beginning to get translucent and both the onions and ginger are fragrant. Add the garlic and sauté for another minute. Then pour in the broth, add in the carrots, salt, curry powder and red pepper flakes.
Bring to a boil, then turn the heat down and cover the pan and allow to simmer for 25-30 minutes until the carrots are nicely tender. Remove the pan from the heat (or just turn off) and allow the soup to cool, uncovered, for about 15-20 minutes.
Purée with an immersion blender or in batches using a regular blender or food processor*, until smooth. Return the puree to pot over a low heat. Pour in the coconut milk, stirring well to combine. Once combined, remove it from the heat and serve hot, or store it in the refrigerator and serve chilled, which is what I did. Top each bowl with some thinly sliced green onions.
*When puréeing hot soup in a blender or food processor, do so in small batches, filling the blender pitcher only about halfway. Put the lid on, but remove that small cap in the lid (if you have it) and hold the lid down tight with a towel, otherwise the steam will cause the lid to explode off, spewing hot liquid everywhere. This has never happened to me, but it can, so be careful. [/print_this]
While you are over there check out some of my other recipes: Roasted Balsamic Strawberry Mini-Tarts with Whipped Coconut Cream – Gluten-free + Vegan, No-Bake Banana Cream Pie – Gluten-free + Vegan, Blueberry Lavender Vanilla Ice Cream – Vegan, Gluten-free, Refined Sugar-free
-
Mango Banana Green Smoothie – Gluten-free + Vegan
I figured as long as I am on a smoothie kick, I will continue to share my recipes with you guys. It’s been a bit of a busy work week and I just haven’t been motivated to make many large involved recipes, plus I am waiting on a shipment of almond flour to make a few recipes that have been in the queue for this week. I’ve been cooking pretty simple recipes for dinner and quick easy salads and other veggies for lunch. As much as I love cooking, when the rest of my life feels hectic and busy, it is hard sometimes to muster up the energy to want to be patient and take photos after I do all the cooking. I love creating the recipes, I love cooking and I really love eating, but sometimes setting up for the photos, worrying about lighting and stressing about props is just more than I can handle. I want my photos to be as good as they can be, so I think I tend to put way too much pressure on myself, in that way.
This morning, after a somewhat restless night of sleep, I actually slept in a little bit (until 8:30am) and didn’t make it to yoga, so I decided to make a smoothie first thing and enjoy it outside on the patio. I had no real plans of sharing the recipe or taking photos, but after I took the first sip I decided it was way too good not to share (plus I wanted to tell you guys about the yummy green superfood powder). So, I ended up grabbing my camera quick and setting up a really fast shoot for the smoothie, trying not to stress over details. No harm, no foul. Until…. the wood backdrop that you see behind all of the ingredients in the photo below, decided to fall forward and spill almond milk everywhere, it was the last of the almond milk in the house and was supposed to be enough to make a smoothie tomorrow. Not exactly the way to start a day. I took a really deep breath (OK maybe I threw the wood in anger first, then took the deep breath) and cleaned it up. At any rate, thankfully I got a few decent photos before that whole fiasco, but I have to say, I am not gonna lie, editing these photos definitely gave me a little anxiety thinking about that crash, and the almond milk spilling everywhere.
OK, enough of all that, let’s talk smoothie…many times I just make up my smoothie recipes as I go and this morning I was pleasantly surprised with the results. I really wanted to include some veggies but since I was out of kale and didn’t have any spinach, I decided to add a scoop of Orange Dreamsicle Green SuperFood from Amazing Grass. They aren’t paying me to say any of this, it is a product I grabbed at the Lexington CoOp a while back after they had someone there offering samples. I was impressed with the taste, but I also love that one single scoop helps provide you with your 5 to 9 daily servings of veggies. Not too bad for a small unassuming scoop of gluten-free and vegan green powder.
The powder has a very subtle orange creamsicle flavor and it isn’t chalky or strange, it pairs nicely in fruit smoothies as well as a smoothie with cocoa powder and almond butter. I bought this container back in March and I still have a decent amount left. Each container has about 30 servings and once opened you store it in the refrigerator for optimal freshness. The Orange Dreamsicle flavor is so good I have on occasion mixed it with just water or almond milk for a quick green pick me up. You should definitely give it a try if you are looking for ways to add more greens into your diet.
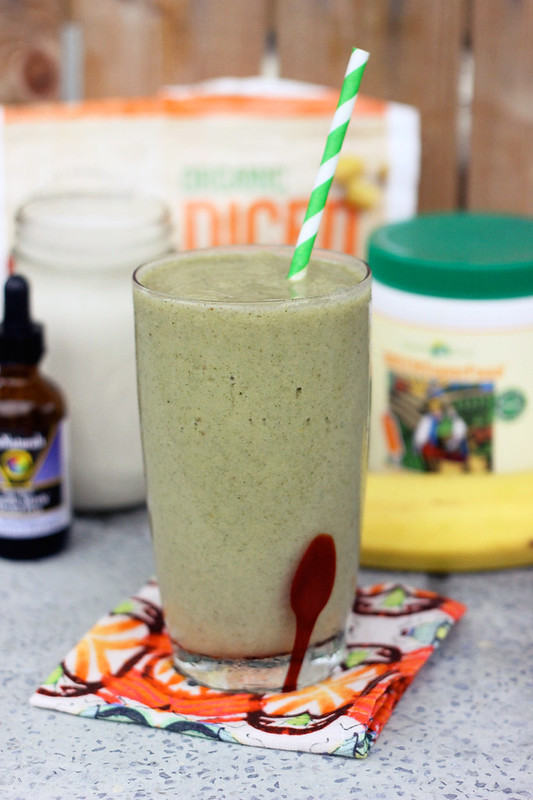
[print_this]Mango Banana Green Smoothie – Gluten-free, Vegan + Refined Sugar-free
serves 1- 1 cup unsweetened organic vanilla almond milk (or any non-dairy milk of your choice)
- 1 organic banana, preferably frozen
- 3/4 cup frozen organic diced mango
- 5-7 drops of NuNaturals Liquid Vanilla Alcohol-Free Stevia (or any other sweetener of your choice)
- 1 scoop of Green SuperFood Powder (if you don’t have this or something like this but you still want greens, add 1 cup of
- spinach or kale or just leave it out)
- 1 handful of ice if your banana isn’t frozen
Add all of the ingredients to the blender and blend until smooth and creamy. If it is too thick, add more almond milk or some water to thin it.
[/print_this]
-
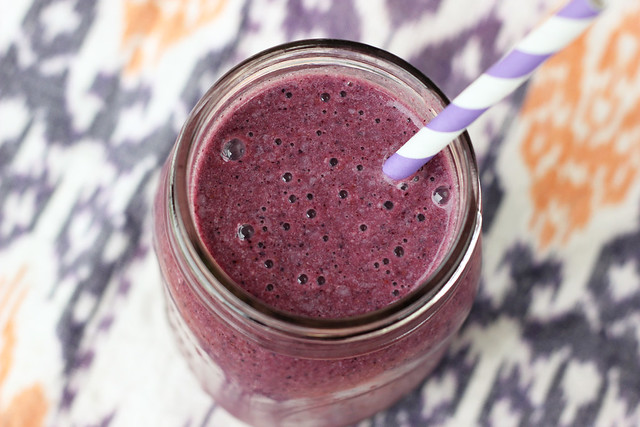
Banana Blueberry Coconut Smoothie – Vegan + Gluten-free
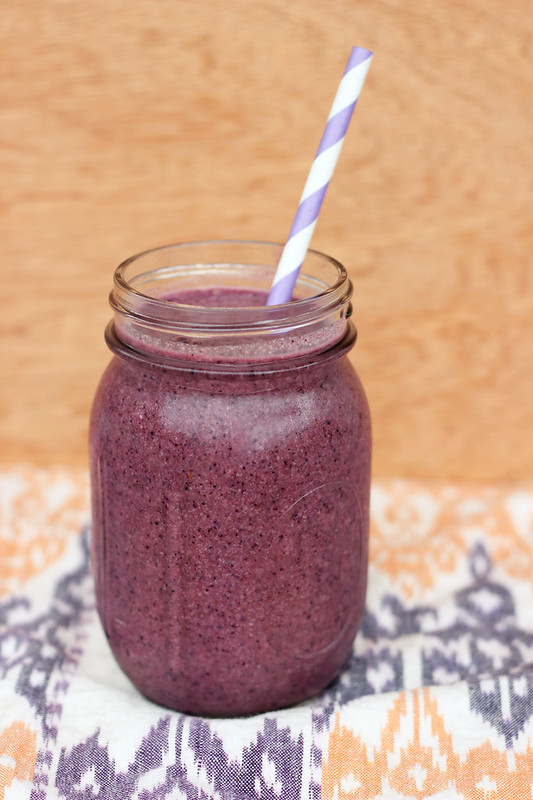
I am still on a huge smoothie kick right now and I see no end in sight. For me, smoothies are the perfect after-yoga snack/breakfast that keeps me pleasantly full and satisfied until lunch. Plus I love having fun playing with different ingredients and flavors.
This satisfying and tasty drink was so smooth and creamy from the banana and coconut oil. The blueberries gave the smoothie a really nice bright and tart flavor and a really beautiful color. I really love the great texture from the shredded coconut flakes and ground flaxseeds, I have found that I like a little bit of texture in my smoothies, feel free to leave either or both of these out, if you wish. Besides the texture, ground flaxseeds are great in smoothies because they work as a thickener and the bonus is all of the added benefits of flaxseeds, like the Omega-3 essential fatty acids. These “good” fats that have been shown to have heart-healthy effects. Each tablespoon of ground flaxseed contains about 1.8 grams of plant omega-3s. Plus of course, the wonderful fiber. The list of benefits goes on and on too, what more can you ask for in a little seed? I tend to find smoothies that I add flaxseeds to, also tend to keep me fuller and satisfied a bit longer.
I personally found this smoothie to be plenty sweet on it’s own with no sweetener, I just added 3 drops of liquid stevia to offset some of the tartness from the berries. If it isn’t sweet enough for you, feel free to add any sweetener of your choice like maple syrup, medjool dates, raw honey, etc. If you wish, you can top your smoothie with a small sprinkle of shredded coconut, I actually had meant to, but totally forgot. Definitely would have been nice in the photos, but by the time I remembered, I was halfway through the smoothie, oh well.
What are your favorite things to add to smoothies?
[print_this]Banana Blueberry Coconut Smoothie – Vegan + Gluten-free
serves 1- 1 cup organic unsweetened vanilla almond milk (or any other non-dairy milk)
- 1 cup organic blueberries (fresh or frozen)
- 1 organic banana
- 1 tablespoon flaxseed
- 1 tablespoon coconut oil, in liquid form
- 1/4 cup unsweetened coconut flakes, plus more for topping if you wish
- 1 teaspoon vanilla extract
- 3-5 drops of vanilla stevia or any sweetener of your choice (optional)
- handful of ice if the blueberries aren’t frozen
Add all of the ingredients to the blender and puree until smooth and creamy, adding ice if desired.
[/print_this]
-
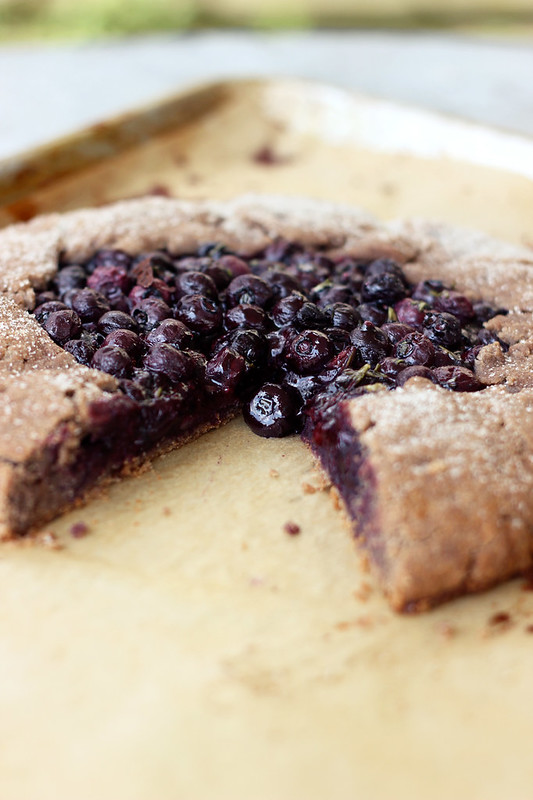
Blueberry Rosemary Multi-Grain Galette – Gluten-free + Vegan

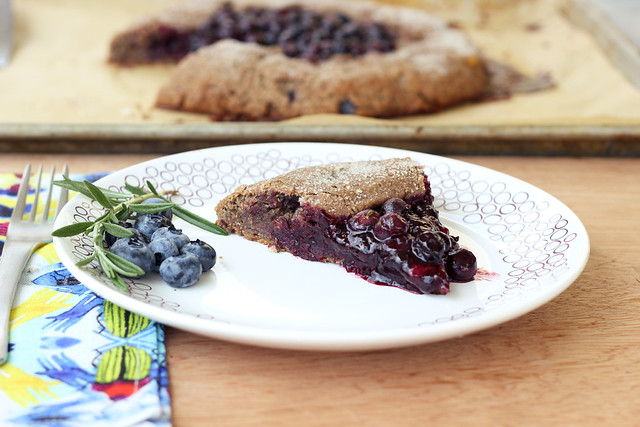
First off, don’t let this fancy name deter you from making this. This is like a rustic pie, that can have imperfect edges, the filling can ooze out and it can be totally uneven, and guess what, it doesn’t matter. It still tastes incredible and will impress the heck out of anyone!
I have been wanting to play around with a galette recipe for a while but I couldn’t make a decision as to what the filling should be. I decided to let the season dictate it for this time. I grabbed a beautiful pint of fresh blueberries at the farmers market, and picked some of the rosemary that is growing abundantly in my garden. They paired perfectly together with just a bit of local raw honey as a sweetener for the filling. (If you are vegan, obviously skip the honey and go with maple syrup, agave or any other sweetener of your choice.)
Additionally, if you don’t care for the flavor combination I came up with for the filling, play with whatever you’d like. I think strawberry basil would also be delicious and unique, but you could just stick to classics like mixed berries, apricots would be great as would peaches, etc – whatever is in season and is your favorite that is what makes the perfect filling. Also – don’t discount savory fillings. I definitely plan to make a delicious heirloom tomato and basil galette when the tomatoes are in season here. How incredible does that sound?
In looking at different photos and recipes for galettes, some people really get fancy when folding over the edges of the crust, there is pleating and beautiful symmetrical folds, etc. If you have been following me for some time here on Tasty Yummies, you know this isn’t me. To me, imperfections are beautiful, especially with food! I like my dishes to look like they are handmade and I don’t like to fuss. I already have a job where I have to make things the way people want to see it, I like having fun and playing with my food.
How about you – do you like things to be perfect or do you celebrate life’s little imperfections?
I am off to California for a few days to celebrate the marriage of our very good friends Patrick and Summer. We’ll be up in wine country north of Santa Barbara for 5 days. It is a very short trip, but I cannot wait to be out there again, I have really fallen in love with California and I get excited just at the thought of it one day being home. I have some fun stuff in store for you guys when I am back next week. Until then, enjoy your weekend!
[print_this]Blueberry Rosemary Multi-Grain Galette – Gluten-free + Vegan
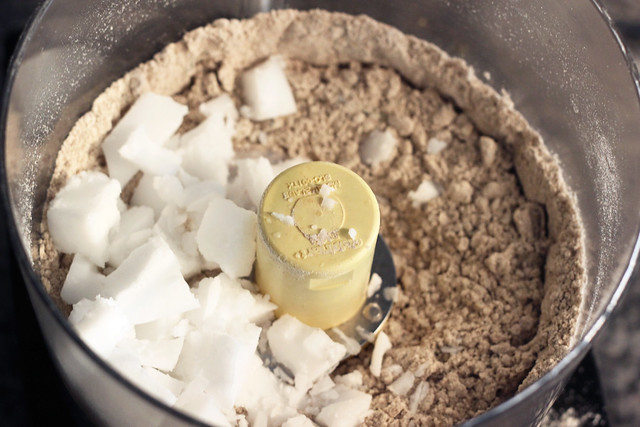
serves 6-8Gluten-Free Multi-Grain Galette Crust
- 250 grams of the following flour and starch blend – please feel free to experiment with your own blend or use 250 grams of your favorite gluten-free all purpose flour
- 180 grams of flour – I used 45 grams each of the following flours: Teff, Buckwheat, Almond and Sorghum
- 70 grams of starch – I used 35 grams each of the following starches: arrowroot starch and potato starch
- 1/2 cup coconut oil, frozen for approx 15-30 minutes*
- 1/2 teaspoon salt
- 2 teaspoons rosemary, chopped
- 1/2 cup ice water
* note – you could also use 1 stick of regular butter if you aren’t dairy-free/vegan
Blueberry Rosemary Filling
- 1 pint fresh blueberries
- 1/4 cup maple syrup (or honey, agave, brown rice syrup, sugar, etc)
- 1 tablespoon rosemary, finely chopped
- 2 teaspoons arrowroot starch (or corn starch)
- 2 teaspoons fresh lemon juice
Additional melted coconut oil for brushing on the crust
A small amount of raw sugar, maple sugar or coconut sugar to sprinkle on the crustPreparing the Crust:
To make the crust, start by putting all of the flours and starches plus the rosemary into your food processor and pulsing until it is fully combined and nice and fluffy.Then remove the coconut oil from the freezer and cut into approximately one-inch cubes. Add the coconut oil cubes to the flour mixture and pulse a handful of times, 15-20 or until you are left with a sand-like mixture with visible pieces of coconut oil.
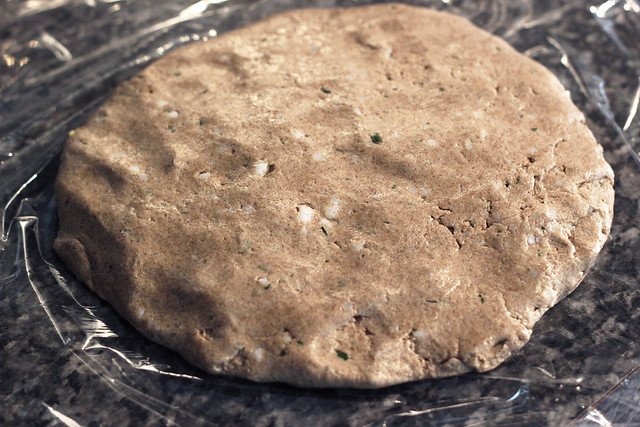
Next, pour in the ice water. Pulse just a couple of times to mix the water in. Look at the dough, if you need more water add it, but you will likely not need any more. You want the dough to look like a dry cottage cheese.
Roll the dough quickly into a pall and form it into a disk and wrap with plastic wrap, place it in the refrigerator for at least 30 minutes.
Preparing the filling:
While the dough is chilling, make the galette filling. In a medium sized bowl, mix together the blueberries, syrup (or honey), rosemary, arrowroot starch and lemon juice, toss very well to combine and to coat all of the berries. Set aside.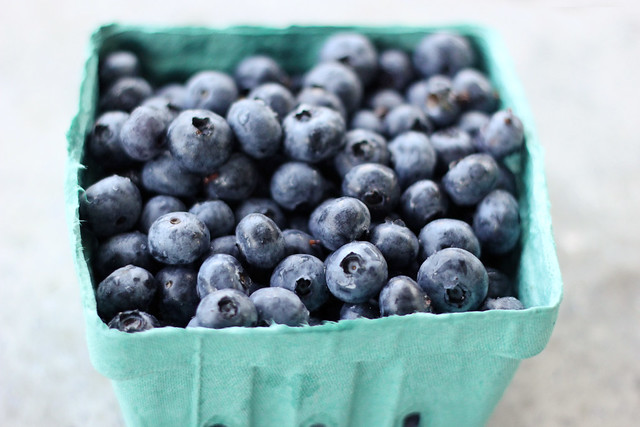
Making the galette:
Take the galette dough out of the refrigerator and allow it to sit for about 10 minutes and meanwhile preheat your oven to 425ºF.For rolling out the dough you can either work on a floured countertop, a floured marble pastry board, or two pieces of parchment paper.
Gluten-free dough is definitely stickier than regular gluten dough. Be sure to use plenty of gluten-free flour on your surface when rolling it out. I almost always use two pieces of parchment paper and I lightly dust a bit of flour down on each side of the dough before I place it between the sheets of parchment paper.
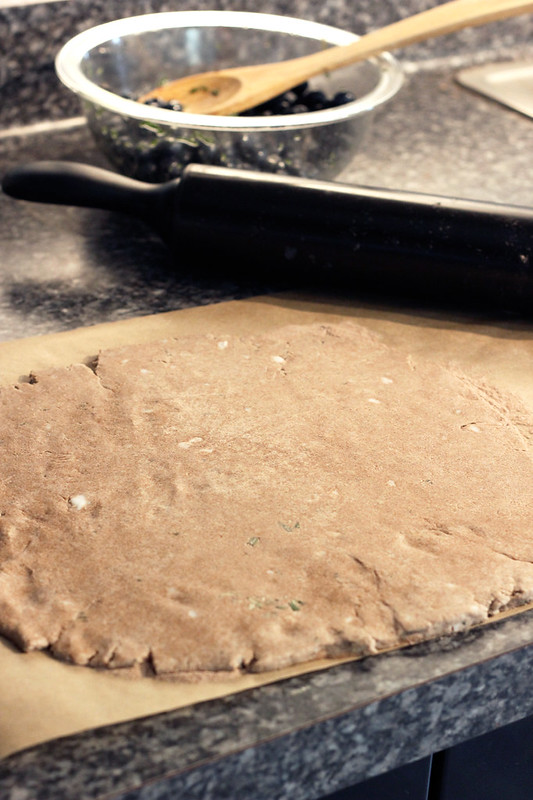
Roll out the crust to about 12 – 14 inches round, you want it to be somewhere between 1/8 and 1/4 inch thick. When you get it to the proper size, peel off the top layer of parchment and pick up the bottom piece with the dough on top and carefully set it on a large enough baking pan.
Pour the blueberry filling on top and in the center of the dough, leaving approximately 1-2 inches all the way around. You can really pile that berries up in the middle.
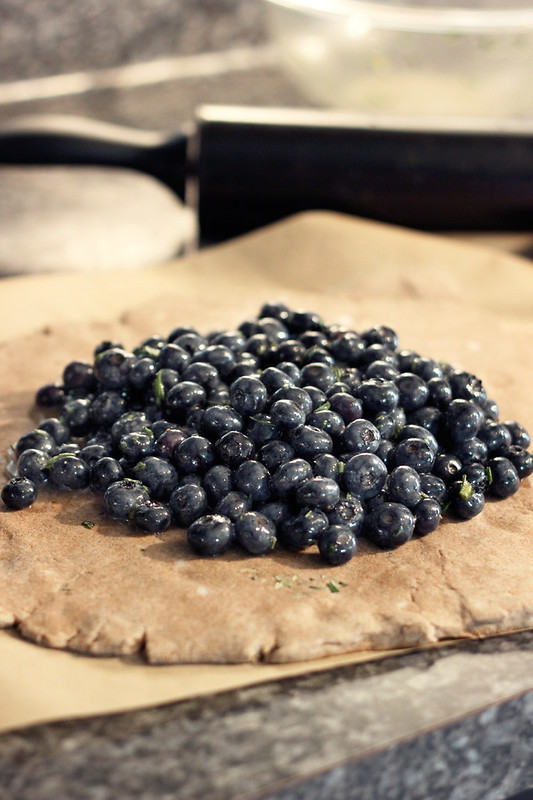
The fold the dough toward the center – you can do it really nicely, with beautiful overlapping pleats or you can be a total hot mess whirlwind like me and just fold it up and over. If the dough tears or breaks at all, just use your fingers to repair it, it’s super simple with this dough. And don’t forget, this doesn’t have to be perfect.
Using a pastry brush, gently brush on a small amount of melted coconut oil to the crust and sprinkle with a small amount of raw sugar (or whatever sugar you wish).
Place the baking sheet in the middle rack of your oven and bake for 45-50 minutes until the filling is starting to bubble and the crust is nice and lightly browned. Let cool slightly and serve. We found this to be the best when served slightly warm. Hubby enjoyed his slice with a scoop of vanilla ice cream on the side.
[/print_this]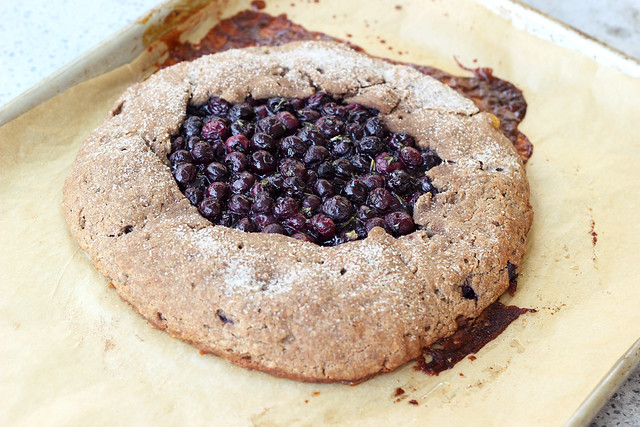
-
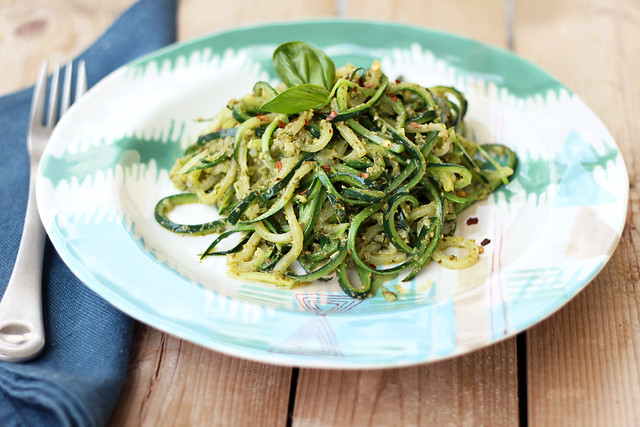
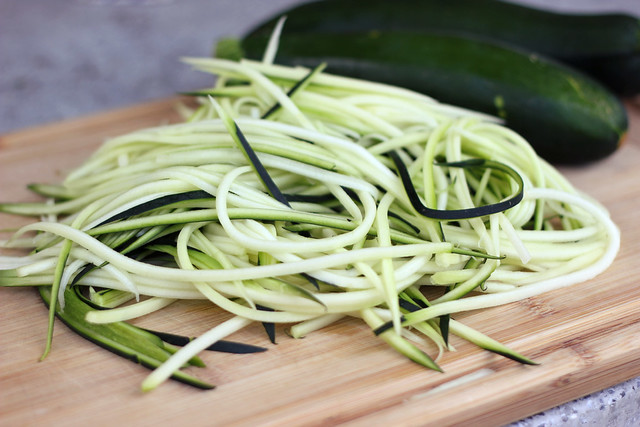
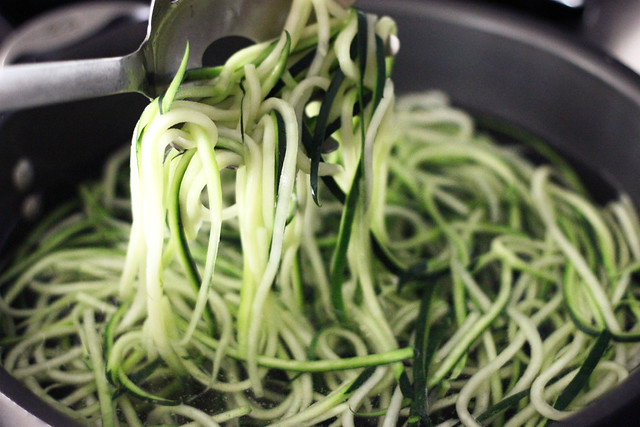
Zucchini Noodles – Vegan & Gluten-free, Raw option
I have said it before and I will say it again…I am a self-proclaimed pasta addict. If I could, I would eat pasta every single day. However, I know that carbs and I (read my butt and thighs) don’t necessarily see eye to eye on this idea. I would likely be the size of a house if I ate pasta every day! I have to be mindful of the amount of grains I consume, I am starting to learn. Healthy, whole-grain, gluten-free or otherwise, I tend to find myself feeling more bloated and heavy when I eat a lot of carbs. I have been trying to be a bit more aware of this fact as of late. So, if I have a sandwich or a wrap for lunch, I will skip out on any starch with dinner, if I know dinner is going to be pasta, I will have a big salad for lunch!
As of late, with the insane amount of vegetables we have from our CSA, I have really been enjoying the challenge of what to do with everything. With all of the lettuce, we have been eating salads like they are going out of style but I have been trying to be a bit more creative with the other foods we have gotten. In this past Saturday’s share, we got 9 zucchini, 4 yellow squash, a huge handful of green beans, some radishes, green onions and some more lettuce. On Sunday, I decided I wanted to experiment and try using my mandoline slicer to make these delicious zucchini noodles and it worked out great! I decided to blanch them quick in boiling water, to make the noodles a bit more tender, but feel free to go totally raw, too – just sprinkle a little salt on the noodles and let them sit for a bit to drain some of the excess moisture off, squeeze off the water and serve with your favorite sauce. It would be just as delicious.
If you don’t have a mandoline slicer, you can also use a vegetable peeler to make ribbons. I do that often to add some of the raw zucchini or yellow squash to my big green salads, I love how the yellow squash adds color and texture. They also make julienne peelers, which I have never used, but would likely provide similar results to the mandoline slicer.
I was pleasantly surprised at how perfect the zucchini lent itself to being eaten as noodles. I tossed the noodles in some of the garlic scape and Swiss chard pesto that I had previously made and it was a super refreshing and simple lunch, ready in minutes! I enjoyed it so much that I made them again last night and tossed it with a little roasted garlic marinara and fresh basil from the garden. It was perfect, light and super simple.
[print_this]Zucchini Noodles
serves 2- 1 large (or 2 medium-ish) zucchini
- 1 cup sauce of your choice
Using a mandoline slicer (vegetable peeler or julienne peeler) run the zucchini on all four sides across the mandoline slicer on the 1/8″ julienne setting, slice the zucchini until you reach the seeds in the middle and then stop (the seeds will cause the noodles to fall apart). Use your fingers to separate the strands from each other and if you wish, you can place them in between paper towels to bring out some of the excess moisture, or you can lay them in a colander or strainer and sprinkle with a little salt to do the same. I have made them both ways (with salting and without), and I didn’t notice a huge difference.
Bring a large sauce pan of salted water to a rolling boil, add the zucchini noodles and allow them to cook for just two minutes. Remove the noodles from the boiling water and add them to a serving bowl with sauce. Toss gently and serve immediately. I have also read then you can quickly cook them in a pan with a little olive oil, again just for a minute or two. I will have to try that soon.
[/print_this]
-
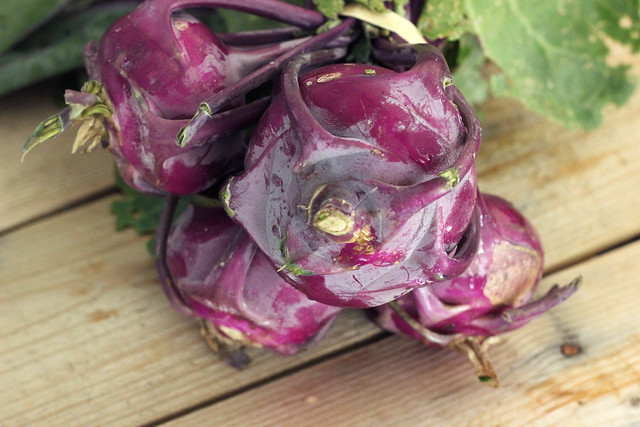
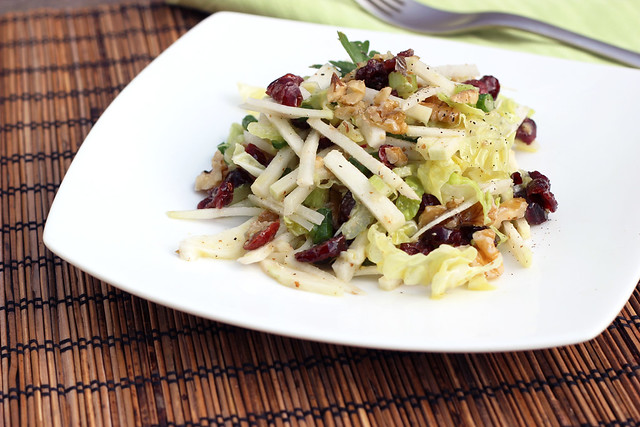
Kohlrabi Slaw with Dried Cranberries and Walnuts – Gluten-free + Vegan

This past Saturday was the first pickup day for our CSA share from Porter Farms. Besides getting delicious, fresh, seasonal, local organic produce directly from the farm, if that isn’t exciting enough, another enticing benefit is getting foods that I have never cooked with before. There is nothing more fun than playing with an ingredient you aren’t familiar with, creating a new recipe and treating your taste buds to a brand new experience. The first week was supposedly one of the smaller weeks, since it is early in the season, but I thought the bag was loaded. We got green romaine, green leaf, Boston and red leaf lettuces plus bok choy, kohlrabi, Swiss chard and green onions. I have been eating salads like crazy, it’s Wednesday night and we still have so much stuff left. It’s exciting!
When I saw the beautiful purple kohlrabi in the first bag of veggies, I literally squealed with glee that in the first week I was already presented with a food I had never cooked with. It’s like those silly game shows on the food and cooking channels where they get a basket with a bunch of random, secret ingredients. The only difference is, besides my hubby there is no one to judge the results of my experiments. That is until today, when a good friend of ours, Jim (aka Jammer) called to stop by about a quick design job he needed Mark to help him with. We’ve been trying to make dinner happen with Jammer for a while now, so Mark told him he should stay for dinner. While the boys chatted design, I cooked away on a meal I wasn’t sure Jammer would be too into. Vegan, gluten-free Sloppy Joes with a kohlrabi slaw on the side. Yup, after really thinking about what I was going to serve him, I definitely realized he might never come back for dinner again.
I carried on, made my meal, took my photos and called the boys down. Jammer exclaimed he had a steak a few hours earlier and wasn’t terribly hungry so he would probably only eat half a sandwich and a little slaw. Before I cook look up again, his entire sloppy joe was gone and the salad had disappeared completely. Jammer couldn’t say enough good things about both and even went on to tell me and I quote ” I was afraid of that salad at first, but it was f*cking good.” So there you have it folks. (Jammer insisted that I quote him on this and that I share it with my readers.)
Never heard of kohlrabi? Kohlrabi is a member of the brassica family, those nutrient-dense cabbages (as well as kales, brussels sprouts, broccoli and cauliflower) whose phytochemicals are highly regarded for their antioxidant properties. Kohlrabi grows in both pale green and purple varieties. It tastes slightly milder than a broccoli stem and can be eaten raw or cooked. Think about kohlrabi as what you would get if broccoli and cabbage were to make a baby. Additionally, if you can get your kohlrabi with the greens attached, cook them as you would turnip greens or kale. I saved mine and plan to do something with them in the next day or two.
This slaw is crisp, fresh and bright and loaded with tangy flavor from the vinaigrette. The garlic scapes that I grabbed at the Lexington Co-Op in the morning were the perfect crunchy addition. If you don’t have garlic scapes, thinly sliced scallions would be absolute wonderful, too. The sweetness from the cranberries and the nutty crunch from the walnuts finished the slaw perfectly, the perfect final harmonious ingredients to pull it all together into a sweet song for your mouth. I cannot wait to see what is in this week’s CSA share. So exciting.
Do you like cooking with new ingredients? What has been your favorite new food you have tried recently?
 <
<
[print_this]Kohlrabi Slaw with Dried Cranberries and Walnuts – gluten-free + vegan
serves 4-6Vinaigrette:
- 1/4 cup apple cider vinegar
- 1/4 cup olive oil
- 1 tablespoon stoneground mustard
- 1/4 teaspoon sea salt
- 1/4 teaspoon black pepper
Salad:
- 4 small green or purple kohlrabi, cleaned, peeled and cut into matchsticks, about 2 cups
- 1/4 head of savoy cabbage, sliced as thinly as possible, about 1 cup
- 1 stalk of celery, thinly sliced
- 2 garlic scapes, very thinly sliced (you could also use green onions)
- 1/3 cup dried cranberries
- 1/3 cup raw walnuts, roughly chopped
- Salt and black pepper to taste
In a small bowl, mix together the vinaigrette ingredients with a whisk until well combined. Set aside.
In a large serving bowl, add all of the salad ingredients except the cranberries and walnuts. Toss gently to combine, the pour over some of the vinaigrette, you may not need it all, go conservative to start, you can always add more. Toss well to coat the entire salad with the vinaigrette. Sprinkle the cranberries and walnuts on top, salt and pepper to taste and serve.[/print_this]
-
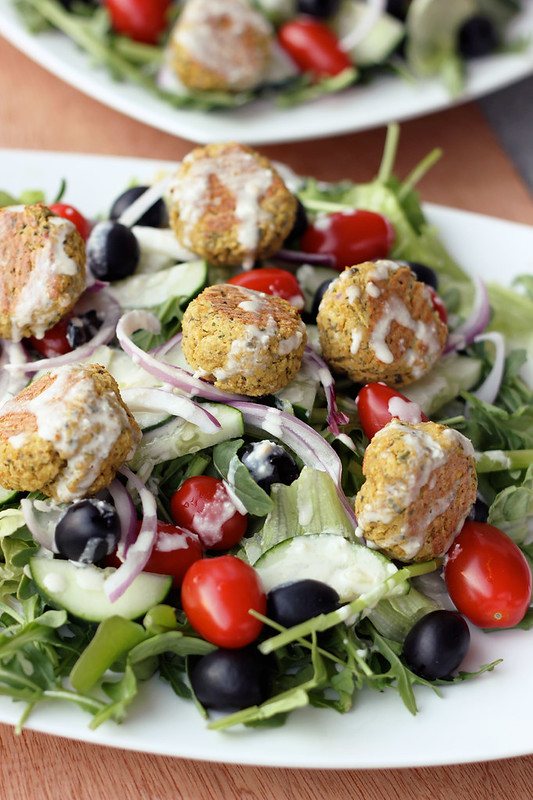
Baked Falafel Bites with Creamy Tahini Dressing – Gluten-free + Vegan

Happy summer everyone! I know I am a few days late with my wishes but I forgot to send them your way last week. I actually welcomed the change of the seasons last Thursday night with 108 sun salutations at East Meets West Yoga. A small group of us celebrated the summer solstice by doing 108 Surya Namaskar A. The significance of the number 108 is an auspicious number, open to interpretation but it has long been considered a sacred number in Hinduism and yoga. You can read more about the importance of the number 108, here in this wonderful article by Shiva Rea. The practice was such a nice way to welcome the new season and all the change that lies ahead. I am so glad I was able to participate and experience it with some of my fellow practitioners and teachers.
This time of year, even just at the very start of the summer in the midst of the heat and humidity, I crave clever and fresh meals that don’t require a ton of prep and standing around in the hot kitchen. But you have to get creative if you want to do more than just grilling. I absolutely adore salads in the summertime! Anything I can come up with that is simple, green and not hot makes me happy as can be.
The other night I wanted something more than just a regular green salad and I had been craving falafel, but I had to figure out how I could make falafel without dying of heat. I figured the best way to have it all was to mix up the “dough” mixture for the falafel and allow it to cool and come together in the fridge, while I cut up all the veggies for the salad. Then I plated the salads, made the dressing and placed that in the fridge. When it was time to preheat the oven, I quickly rolled up the falafel got it on the pan and then went outside on the patio. While the falafel baked I enjoyed the cool breeze outside and didn’t have to deal with the heat from the oven. When the falafel were ready, I tossed a couple on the already plated salads, drizzled the dressing on top and carried our plates out onto the patio where we enjoyed a beautiful dinner while the sun set. It was perfect.
These falafel are insanely simple and so delicious. I have fresh parsley and oregano growing in my garden, so I popped out back and grabbed a bunch to add to the mixture and they brought a really nice bright fresh flavor. One of my favorite things about falafel is the spicy intense flavor from the garlic, I cannot have too much garlic in my life (although those around me probably wish I consumed less). It is so good. You can feel free to add more or less, I used 3 cloves, 2 of which were so massively sized. I served the baked falafel on top of a green salad that was a mix of local greens from the farmers market, I used a half and half mix of romaine lettuce and arugula and I topped them with grape tomatoes, black olives, cucumbers and red onions. The only thing we were both missing the minute we took a bite, were some tangy and slightly spicy peperoncini. They would have been perfect.
As any good Greek girl would, I have always absolutely loved tzatziki sauce and that is how I have always preferred my falafel to be served, but since I have stopped eating dairy, I had to get creative and come up with a new way to serve it. Since tahini pairs so well with the flavor of chickpeas, I figured a creamy tahini dressing was the way to go. The nutty flavor was perfect with the creamy vegenaise and the tangy lemon juice. Feel free to stick with classic tzatziki or whatever your favorite dressing is. And if you aren’t gluten-free (or maybe you have a good gluten-free recipe), you can stuff a sliced open pita pocket with your greens, some tomatoes and onions and whatever else you’d like and top with a couple of falafel balls. That is heaven!
On Saturday, I just picked up my first CSA share from Porter Farms and it was loaded with 4 different lettuces and a variety of other greens, so you can be sure you will be seeing more salad recipes! It’s time to get creative with my salads and their toppings.
What is your favorite way to eat a salad? What foods do you crave when it is hot out?
Baked Falafel Bites with Creamy Tahini Dressing
[print_this]Baked Falafel Bites – Gluten-free + Vegan
Makes 20-25 balls, serves 2-4- 1 25-ounce can of organic chickpeas, drained and rinsed*
- 1 small red onion, chopped
- 2-3 garlic cloves, peeled (feel free to add more garlic if you like your falafel super garlicky)
- 1/4 cup fresh parsley
- 1/4 cup fresh oregano
- Juice from 1/2 lemon
- 1 teaspoon salt
- Freshly ground black pepper
- 1 1/2 teaspoons baking powder
- 1/4 cup plus 2 tablespoons chickpea flour (aka garbanzo bean flour, gram flour or besan) – you could also use a gluten-free all-purpose flour
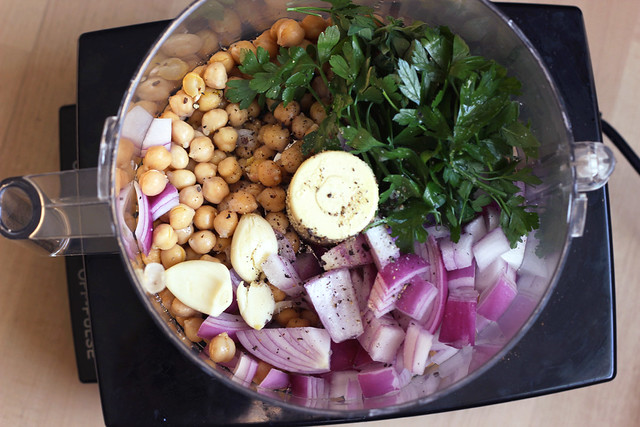
Add everything but the chickpea flour and baking powder to the food processor and pulse until everything is well combined. You want the chickpeas coarsely chopped and all of the ingredients combine, but don’t puree it, you do not want it smooth and pastey.
Add the baking powder and chickpea flour and pulse to bring it all together into a dough. Add more flour if need the dough is too wet and not holding together well. Form the dough into a large ball and cover, refrigerate the dough for about 30 minutes to an hour.
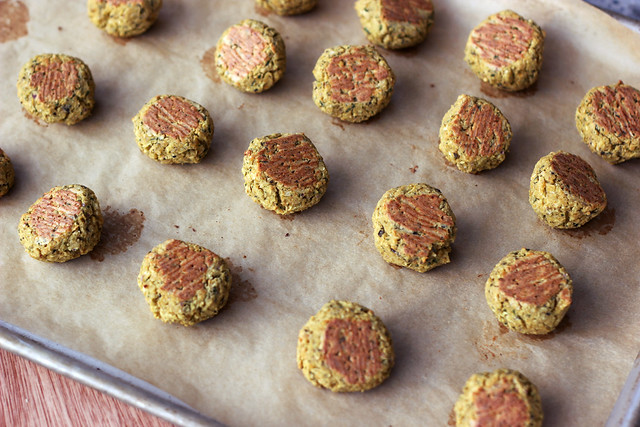
Preheat the oven to 400ºF. Line a baking sheet with parchment paper.
Form the mixture into 1 1/2 inch – 2 inches balls (you can also make patties if you prefer). Place the balls (or patties) onto the baking sheet, they don’t need much room between them since they don’t change size or expand.
Bake for 20-25 minutes, turning them over about halfway through, bake until nicely browned.
Serve the falafel on top of a beautiful green salad with all of your favorite things and drizzle with creamy tahini dressing (recipe below), you could also serve them inside of a pita pocket or over rice.
*note – I love chickpeas and I eat them very often, so I always buy the larger can that is 25 ounces, if you buy a standard sized can that is 15 ounces, just use a bit less chickpea flour and baking power, more like 1/4 cup of flour and 1 teaspoon of baking powder and you will just end up with a few less falafel balls or patties.[/print_this]
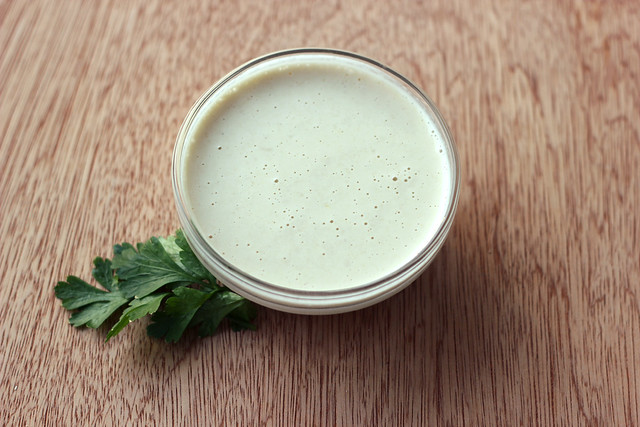
[print_this]Creamy Tahini Dressing
makes approximately 1 cup of dressing- 1/4 cup tahini
- 1/4 cup vegan mayo (I use homemade)
- Juice from 1 lemon
- 1 garlic clove
- 1/2 teaspoon salt
- 1/4 cup water
Add all of the dressing ingredients to the food processor or blender and process until smooth and creamy. Place in the fridge until you are ready to serve, the dressing will get thicker as it chills.This dressing will keep for approximately 7-10 days in the fridge. [/print_this]
-
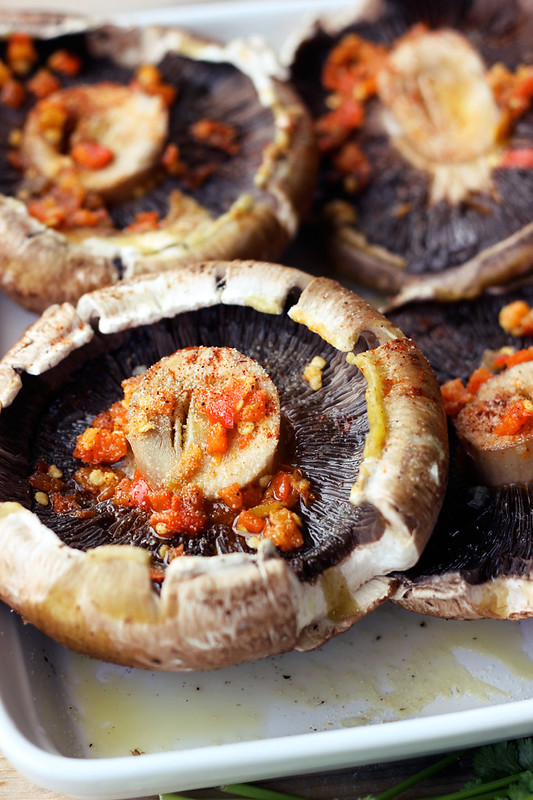
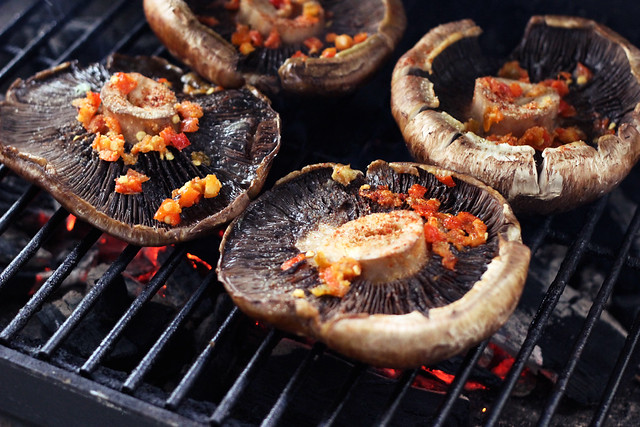
Grilled Portobello Mushroom Tacos with Mango Black Bean Salsa – Gluten-free + Vegan
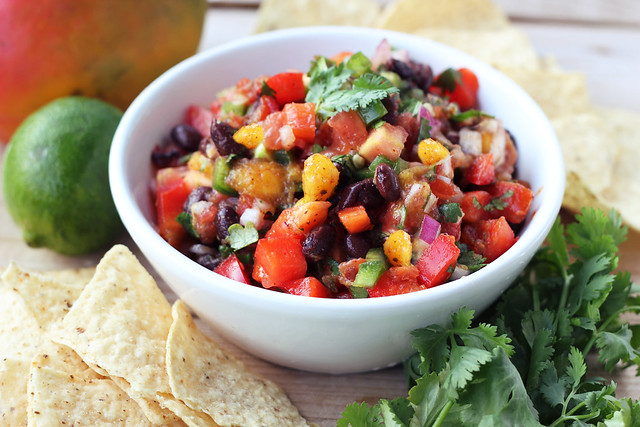
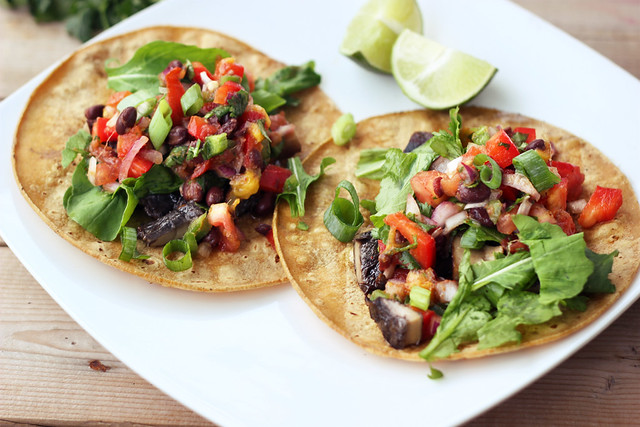
Tuesdays have slowly, inadvertently turned into Taco Tuesdays here at our house. Totally unplanned every week I have been making some type of fun vegan, grilled tacos! This portobello mushroom taco has become a new favorite in our house. Even though we both eat meat (though very rarely), it is always a super welcomed challenge to come up with fun vegan versions of classic meat dishes. In my opinion, portobello mushrooms are better than any creepy overly processed meat alternative on the market. By grilling the portobellos slowly over a smoky charcoal grill, they end up so loaded with flavor, even the most hardcore meat eater couldn’t turn it down.
I keep these fairly simple and they are always a little bit different each time I make them. I have served them with this tangy, sweet and spicy mango black bean salsa, but I have also just used the traditional pico de gallo or salsa verde. I have topped them with baby spinach and tatsoi instead of arugula, and sometimes I add avocado or a drizzle of sriracha, it just depends on what I have on hand and what I feel like. Play with this recipe, add and take away as you’d like, that is one of my favorite things about tacos, they are so versatile and really hard to screw up. This is just a nice, simple recipe to use as a guide.

In keeping with the Taco Tuesday thing we have going on around here, tonight we are having Crock Pot Korean Beef Short Rib Tacos. We have a few servings of short ribs from the 1/4 share of a pasture-raised cow we purchased from our local farmer and I honestly have no clue what to do with them. Now that it is so hot, I have no interest in slow braising them in the oven and turning the house into a sauna, so I thought slow-cooking the short ribs in the crock pot all day will make for a very simple and incredibly delicious dinner (here’s hoping). I plan to make a tangy cabbage and cucumber slaw to serve on top of the tacos and possibly a dairy-free creamy spicy sauce. I have never made anything like this before, so it is an experiment. If it works out, I will definitely make it again to share the recipe. So cross your fingers for me!

Oh and in other news, we finally got the house on the market yesterday morning. I couldn’t be happier to start this process and to begin our journey into the next chapter of our life. Who knows how long it will take before we get to make the move to California, there is so much out of our control and we are OK with it, but it feels good to have accomplished this first major feat towards our new adventure. Hold some positive house-selling thoughts and vibes for us, if you will, we would love if we could move past this part and start this journey, as soon as possible. We are so excited!
[print_this]Grilled Portobello Mushroom Tacos with Mango Black Bean Salsa – Gluten-free + Vegan
serves 2-4Mango Black Bean Salsa
- 1 mango, diced
- 1-2 tomatoes, diced
- 1 red bell pepper, diced
- 1 jalapeño, finely diced
- juice from 1 lime
- 1/4 cup fresh cilantro, roughly chipped
- 1/2 medium red onion, diced
- 1 cup cooked black beans
- 1/2 teaspoon cumin
- 1/2 teaspoon chili powder
- salt and pepper, to taste
Add all of the ingredients to a medium bowl, stir/toss well to combine. Set aside while you make your tacos. Taste again just before serving to see if it needs any additional seasoning.
Grilled Portobello Mushroom Tacos
makes 6-8 tacos- 4 portobello mushrooms
- 1-2 tablespoons hot pepper spread or a teaspoon or two of red pepper flakes (optional)
- 1-2 cloves garlic, finely minced
- 2-4 tablespoons olive oil
- juice from 1/2 lime
- salt and pepper, to taste
- 6-8 corn tortillas (store-bought or you can make your own)
- 3 cups arugula, roughly chopped or torn (or baby spinach or tatsoi, etc)
- 3 or 4 green onions, thinly sliced
- 1/4 cup fresh cilantro, roughly chopped
- fresh lime wedges
Additional topping options:
- avocado
- queso fresco or vegan cheese
- sour cream or vegan sour cream
- tomatoes
- black olives
- radishes
- pickled red onion
Place the portobello mushrooms stem side up on a plate, drizzle olive oil over both sides of the mushrooms use a brush to evenly disperse, divide the hot pepper spread (or red pepper flakes) and garlic evenly over all 4 mushrooms and salt and pepper, to taste. Squeeze the juice from 1/2 a lime over them all. Set the mushrooms aside to marinate a bit while you preheat your grill. We have a charcoal grill that we burn all natural wood charcoal in. We allow it to heat up for approximately 15 minutes before we start grilling. Once your grill is a medium-high heat, add the mushrooms, stem side facing up and close the lid. Allow the mushrooms to cook for 15-20 minutes or until they are tender and getting some nice browned/blackened grill marks. It may take less time if you have them on a direct flame on a gas grill. Just keep your eye on them, we check ours every 5 or so minutes.
Once the mushrooms are cooked, place them on a plate and allow them to cool enough to cut them into strips or cut into small cubes, whichever you prefer. While the grill is still hot, add your corn tortillas, heat for approximately 30 seconds to 1 minutes per side, until the edges are slightly browned, being careful not to burn them or dry them out.
When you are ready to serve the tacos, top each corn tortilla with grilled portobello mushroom pieces, a small handful of arugula (or green of your choice), fresh cilantro, green onions, the mango black bean salsa and a squeeze or two of fresh lime juice. If you are looking for even more heat, squeeze a little sriracha on top. Our salsa was perfectly spicy, so we didn’t need it.
Have fun with these tacos, add any other toppings that you prefer. [/print_this]
-
Paleo Double Chocolate Donuts with Coconut {Gluten-free, Dairy-free, Refined Sugar-free}
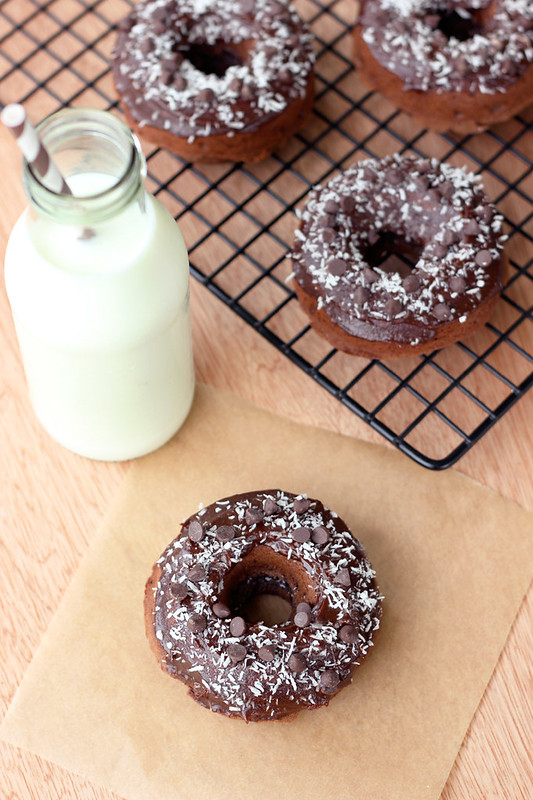
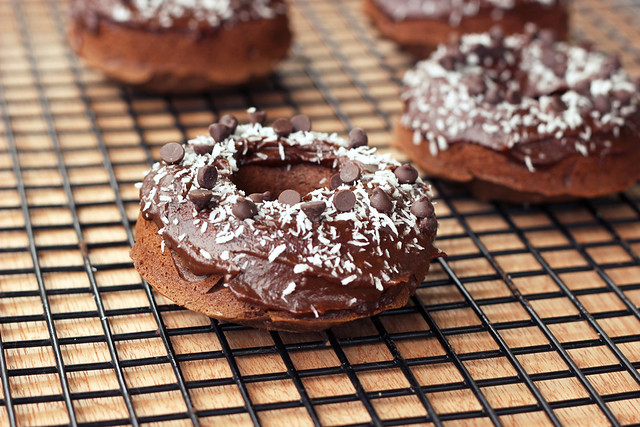
This weekend was the last hurrah for getting things done on the house. The realtor comes in the morning and we are starting the process of getting the house on the market, finally. Yay! Since yesterday afternoon my project was to re-caulk the bath tub and shower walls, it had to sit for at least 24 hours before getting wet. I woke up this morning, realized that I couldn’t shower before leaving for yoga, but felt so gross from all the house work yesterday, so I decided to take the day off and lay in bed for a bit this morning with hubby and the pooch to watch a movie! It felt really nice to just get up at my leisure and be lazy for a bit. It has been a while since I have done that. I will likely squeeze some time in later today for a brief yoga practice at home on the grass in the yard.After the movie was over, I rolled over and asked Mark what he wanted for breakfast. Since most mornings I don’t even eat breakfast since I am at yoga, I get really excited when I have the time to make something special. Mark exclaimed “donuts!” and I jumped out of bed and made my way to the kitchen to start creating. Even though we don’t have kids and Mark may only be a daddy to our pooch, our two cats and our business, I still thought that he should be spoiled this morning for Fathers day. So his wish was my command.
I used Coco from Roost’s recipe for donuts not too long ago and I was incredibly impressed, so I decided to make that my starting point for these. I also decided to play around with a simple frosting recipe that didn’t require any sugar. Topped with some shredded coconut and some mini-chocolate chips, these were perfect and Mark was happy!
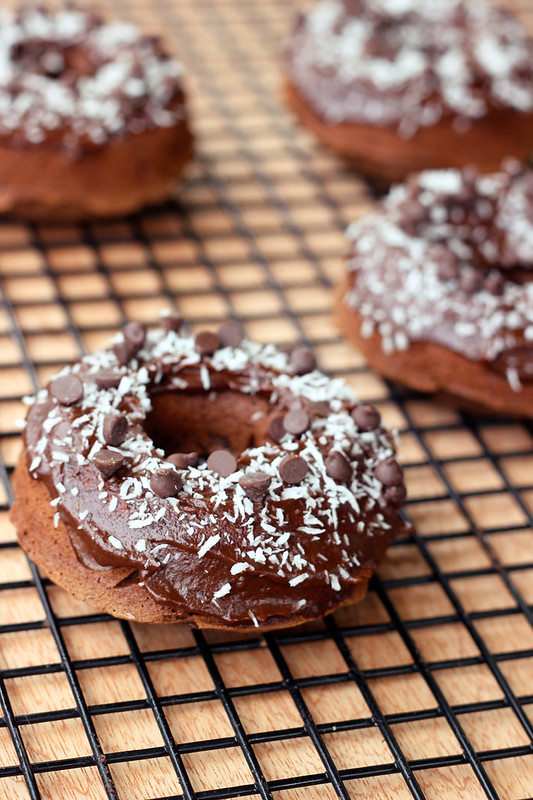
[print_this]Double Chocolate Donuts with Coconut- Gluten-free, Grain-free, Dairy-free + Refined Sugar Free
(makes 6 regular sized donuts or 18 mini donuts)- 1 1/4 cup blanched almond flour (I prefer Honeyville brand)
- 1/4 tsp salt
- 1/2 tsp baking soda
- 1/4 cup cocoa powder
- 3 organic farm fresh brown eggs
- 1/4 cup coconut oil, melted (you could also use ghee, grape seed oil, etc)
- 2 tablespoons honey (you could also use maple syrup, brown rice syrup, agave, etc)
- 1/2 teaspoon pure vanilla extract
Preheat oven to 350F. Grease your donut pan with coconut oil.
In a medium-sized bowl, whisk together all of the dry ingredients. Transfer to the blender*.
In the same bowl, whisk together all of the wet ingredients. Add to the blender.
Blend the batter until is very smooth. Pour into greased donut molds, filling them about 2/3 of the way.
Bake for 12 minutes. DO NOT OVERBAKE or they will be dry. Remove the donut pans from the oven, allow to cool in the pan for 3 minutes, then pop them out and all them to cool the rest of the way on a rack. Make your frosting in the meantime.* I never thought to blend a batter like this, but I went with Coco’s suggestion and it is brilliant. It can be challenging to get a smooth batter with nut flours, but using the blender definitely gives you a very nice, smooth batter.
Chocolate Frosting – Gluten-free, Grain-free, Vegan + Refined Sugar Free
- 3/4 cup pitted Medjool dates
- 1/4 cup cocoa powder
- 1/4 cup sustainable organic palm oil shortening or coconut butter
- 1/3 – 1/2 cup water (you may need less or a tad bit more depending on how soft your dates are, be careful not too add too much though)
Add all of the ingredients to a high-speed blender, start with just 1/3 cup of water, you can always add more. Let everything sit for a few minutes, especially if your dates are very firm.
Blend everything together at a high speed. It may take a little bit to get the it started, so you can start at a slower speed and increase the speed a little at a time.
Continue blending long enough to get a smooth, velvety consistency, this may take 5 minutes or more. If the frosting seems like it isn’t moving around in the blender because it is too thick, before you add more water, use a spatula to unstick the mixture from the blades and make some room in there. Put the lid back on and keep blending. When there are relatively no bits of dates and you have a rich, smooth chocolatey mixture, your frosting is ready.
In addition to donuts, this icing would be great on cakes, cupcakes, brownies, cookies, etc. Store any remaining icing in the refrigerator.
SERVING THE DONUTS:
Additional toppings:
1/4 cup unsweetened finely shredded coconut
1-2 tablespoons of semi-sweet mini chocolate chipsOnce the donuts have cooled, spread a thin layer of frosting on top and sprinkle with some finely shredded unsweetened coconut and a few mini chocolate chips. Instead of these toppings or in addition to them, you could also add some crushed cocoa nibs, chopped nuts or anything else you might like.
[/print_this]
-
Roasted Balsamic Strawberry Mini-Tarts with Whipped Coconut Cream – Gluten-free + Vegan
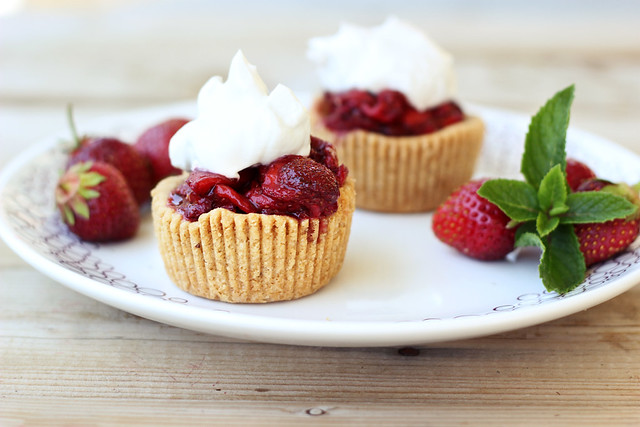
I am so elated over the outcome of this super fun, kickoff to summer-time recipe. It was one of those things I dreamt up (and loosely wrote up) while sitting at my computer working and when it finally came time to make it, I crossed my fingers and dove right in. I had to make a few subtle corrections from my original notes to make the tart shells work perfectly, but other than that, it all came together so perfectly. On the first batch, I didn’t use the paper muffin cup liners and the tart shells didn’t want to come out in one piece, even with greasing the pan, but add in the paper liners, and it was simple as can be!
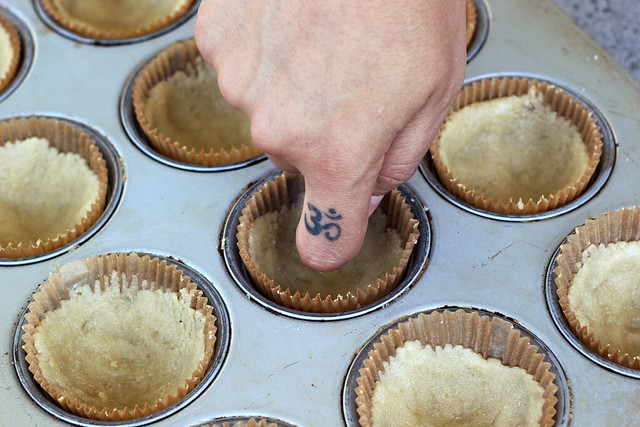
This recipe is insanely simple to make, please don’t let the three-part recipe throw you off. Just remember to refrigerate your coconut milk the night before for the whipped “cream”. The dough for the tart shells takes just minutes to make, you need only one bowl and you can literally just use your hands to mix it, that’s what I do. It takes just a couple of minutes to get it evenly divided and pressed into the muffin cup and while the mini tart shells bake, you can cut up the strawberries and allow them to sit for a small bit in the balsamic/maple sugar mixture. Once they are done baking, you can chill the tart shells while you roast the strawberries, meanwhile you can whip up your coconut cream and when the strawberries are done, you can serve it all up. It can all be done in less than an hour, probably more like 45 minutes and it is so simple, you won’t believe it. If you want to make it even quicker and skip out on the heat from the oven, serve the strawberries fresh. With or without the balsamic vinegar. No matter which way you make it, this recipe will impress the pants off any one at a party, especially those that are gluten intolerant and vegan. They truly won’t believe that it is safe to eat. It is that good.
My favorite thing about this recipe is that although it is gluten-free and vegan, no one would never know it. Mark kept eating bite after bite telling me, that this was seriously one of the best things I had ever made. ‘Pastry shop grade’ – he even said. Quite the compliment. Beyond the shells being totally grain-free, and everything being refined sugar-free, it is hard to believe the fluffy, creamy whipped “cream” is dairy free. I honestly need to have a can of full-fat organic coconut milk on hand at all times, so I can always make some whipped “cream”. The other great thing about this recipe is how versatile it is. It can go through the summer with you as different fruits come into season. I cannot wait to make it in the fall with some baked spiced apple slices. YUM!
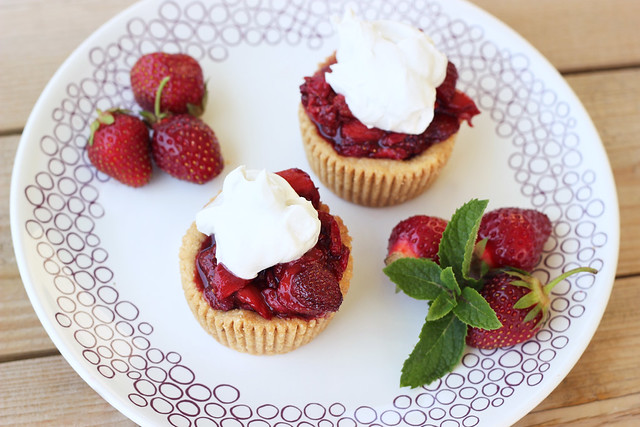
I am happy to once again be posting over at Free People’s blog, BLDG 25 where this week they are celebrating all things ‘Americana’. When they asked me to share a recipe that went along with that trend, I kept thinking of all of the wonderful summertime picnics, BBQs and beach trips. I wanted something simple and tasty, but full of beautiful, bright summertime flavors! Although nothing says summertime in America better than ice cream, berry pies and strawberry shortcakes, if you are the gluten-free and/or vegan at the party, that doesn’t always leave much for you. So, I decided to marry the idea of a berry pie with strawberry shortcakes to create these adorable little mini-tarts!
This recipe was originally shared on Free People’s Blog, BLDG 25.
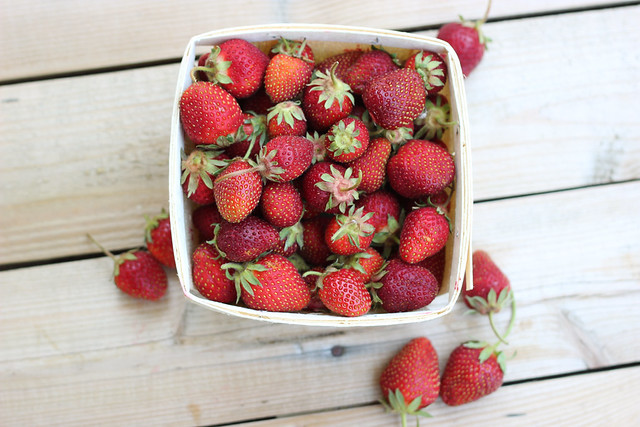
[print_this]Roasted Balsamic Strawberry Mini-Tarts with Whipped Coconut Cream – Gluten-free + Vegan
makes 12Grain-free Mini Tart Shells
- 2 cups blanched almond flour
- 2 tablespoons maple syrup
- 1/4 cup coconut oil, melted
- 1/2 teaspoon baking soda
- 1/8 teaspoon salt
Preheat oven to 350ºF. Line 12 cups in a muffin tin with paper liners (you could also use greased mini tart pans). In a large bowl, add all of the crust ingredients and mix very well. Really get your hands in there to get it all together and work it into a nice dough. Add the crust mixture to the muffin cups and press down firmly into the cup using your knuckles, going up the sides a tad bit. Bake for 15-20 minutes until golden brown. Allow to cool in the pan for about 10 minutes, then place the pan in the refrigerator until you are ready to serve.
Roasted Balsamic Strawberries
- 2 pints baskets of strawberries, hulled and sliced (it’ll look like a lot of berries, but they cook down a lot)
- 3 tablespoons balsamic vinegar
- 3 tablespoons maple sugar (or palm/coconut sugar, raw sugar, etc)
Raise the oven to 400º F. Toss the strawberries with the balsamic vinegar and maple sugar. Allow to sit for a few minutes while your oven preheats. Pour all of the strawberries and their juices onto a parchment paper lined baking sheet or any other overproof dish or pan. Roast for about 10 to 12 minutes until the strawberries are hot but not too overly mushy. You can separate the berries and pour off some of the juices if you want to use it for drizzling, or you can just keep it all together. I kept some of the juice aside to add to some sparkling water for a refreshing drink.
Whipped Coconut Cream
- 2 cans organic full fat coconut milk, refrigerated overnight
- 1 tablespoon maple syrup (use more or less or none at all, or whatever your favorite sweetener is)
- 2 teaspoons vanilla
Make sure that your cans of coconut milk are well chilled. I recommend leaving item in the fridge overnight. Open the cans of coconut milk carefully, keeping them level. There will be a firm, waxy layer of coconut cream that solidified on top. Carefully scoop this off into a chilled glass bowl. Keep the leftover coconut water, it is great for smoothies.
Using a mixer, whip the coconut cream for 3 to 5 minutes until it becomes light and fluffy, with soft peaks. Mix in your maple syrup and vanilla, if you are using. Place the whipped coconut cream back into the fridge until you are ready to use. This may be more than what you need for all 12 tarts, but that’s ok, it keeps for several days, covered in the fridge.
ASSEMBLING THE TARTS:
Remove the paper liner off of the tart shells. Top each of the tart shells with a spoonful of the roasted balsamic strawberries and a dollop of whipped coconut cream. Serve immediately. [/print_this]
-
Mint Chocolate Chip Brownie Bites – Gluten-free + Vegan
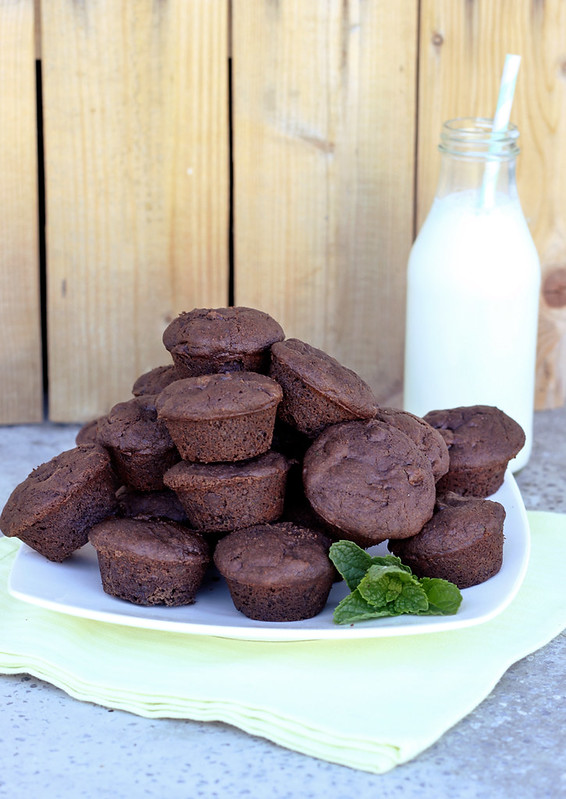
I feel a little bad, because I really haven’t addressed the running thing in about two weeks. So many of you offered really great advice and I was really feeling great about it all. I went on a total of three runs and I really took each one very easy, trying not to go too hard too fast. Because I was using an iPhone app that basically was helping me ease into running, it had me on a program where I would walk for about 90 seconds then run for 45 and so forth, including a warm up and a cool down. The workouts were 30 minutes long and I was “running” about 2 miles each time. After my third run I was experiencing some very severe inner knee pain almost immediately afterward. I hesitate to even call it knee pain, as it was far more like leg pain, than knee pain. I wasn’t having any pain in my knee caps, I could kneel on them, etc. It was more any amount of pressure was seriously irritating both of my inner legs near the knee. Going up and down the stairs was horrid. I decided I need to take a break from running before I did any major damage to my body. Shortest running career, EVER! I kept up with my daily yoga practice and I did a ton of icing and I was taking ibuprofen, as needed. All of those things helped, but it took a solid 2 weeks for my legs and knees to stop hurting as much as they were. I wouldn’t say that now I am back to the way I was before this happened, but I am very close. So yeh, that was seriously upsetting and totally a let down. It is partially why I haven’t really mentioned it, because I was a little let down that only 3 runs in, I was already forced to take a break.
In talking with my friend Elyssa, who is also my amazing chiropractor and one of my yoga teachers, and in her looking at my knees, she explained that it seemed to be a tracking issue. My knees just aren’t tracking straight, so when I bend them, they tend to want to fall in, instead of staying in line over my toes. Not caused by the running, something that was already there, but aggravated by the running. Now that I am aware of this, I notice all of these things I do, even in yoga, where I allow my knees to fall in. So she gave me some strengthening exercises to do and I haven’t given up all hope, just yet. I do feel like I need to do some work on my body before I jump back into running. That knee pain honestly scared the crap out of me and made me quite sad that I was never going to be able to enjoy running.
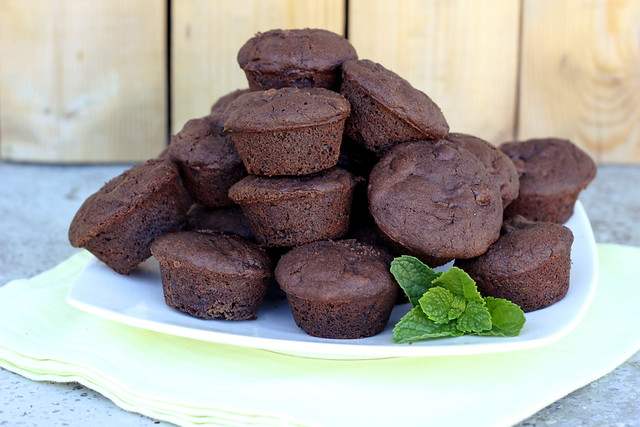
At any rate, the running stuff really has very little to do with these brownies, but I felt the need to share the status on my newfound and short love affair with running, since I had left everyone high and dry after you all offered so much incredible advice and encouragement. Thank you again, seriously and hopefully I will need more of that advice again soon, when I feel ready to go back.
I guess what these brownies do have to do with this story is that I made them over the weekend for a Sip ‘N See party for Elyssa, her husband Aaron and their brand new baby boy, Oliver! The party was a bit of baby shower, but everyone got to meet the amazing Oliver and welcome him to the world. Elyssa and Aaron adopted baby Oliver and the party was one of the nicest celebrations I have ever been to. It was a very casual and laid back get together with lots of people from our yoga studio and obviously some of their other family and friends. Everyone just got to visit, swoon over the baby and just enjoy each other’s company and lots of yummy food. Since a handful of other people there are also gluten-free, a few are vegan, some are just dairy-free or just vegan, etc – my friend Kathleeen (hi, Kathleen! 🙂 ) asked me to make something sweet for a dessert! I was all over that. I love making sweets for people, especially when I know they will appreciate them being gluten-free and vegan!
It took me a couple of days to decide what to make for a good amount of people, in a casual grab-it and go kinda setting. It had to be small, bite-sized and easy to just pick up and eat. I was thinking about cupcakes for a while, but I am not much for the decorating part of cupcakes. It just isn’t my thing. That’s when I realized a brownie bite would be perfect. When I made these for the party, I wasn’t sure everyone would love the addition of mint, so I made half of them mint and half just classic chocolate. It could have been their placement on the plate, or coincidence, but the mint ones went so quickly. They were gone long before the classic ones. Since it was the first time I had made them, for the party, I did decide that I wanted to change a couple things about the recipe, so I made them again a few days later, to try to perfect them. The second time was definitely the charm, I seemed to get the ratios more on point and they were exactly right.
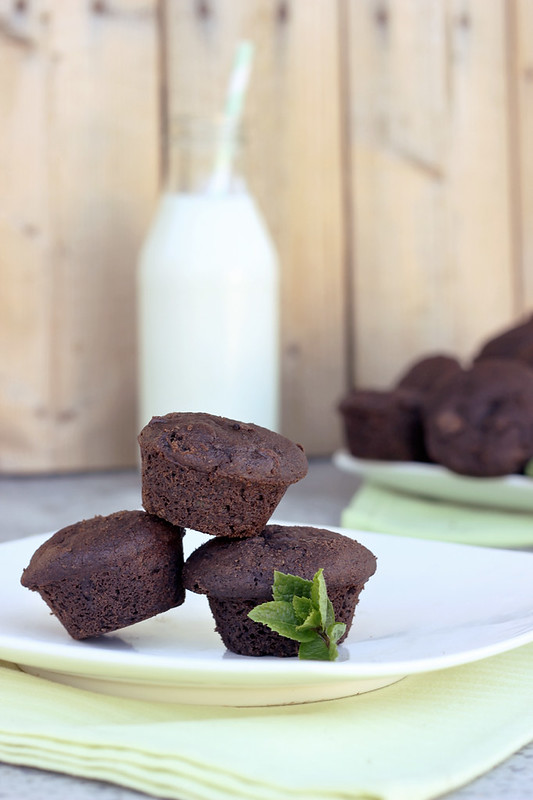
The fact that I have an overabundance of fresh mint growing in my yard, is the reason why I
wanted tohad to include some fresh mint in these brownie bites. I couldn’t resist. If you don’t have any on hand, no worries, you can simply leave it out. If you don’t like mint flavor, just leave out the fresh mint and the mint extract and add in a little more vanilla and you are left with classic chocolate chip brownie bites.These tasty little nuggets are filled with flavor, they are the perfect size, they are easy to eat and the mint and chocolate combination is really to die for! They are fluffy and moist, while being chocolatey and gooey from the chocolate chips and for me, they are the right amount of sweet.

[print_this]Mint Chocolate Chip Brownie Bites – Gluten-free + Vegan
makes approximately 30 brownie bites
Loosely adapted from this recipe- 1/2 cup coconut oil, melted, plus a little more for the pans
- 1/2 cup garbanzo and fava bean flour
- 1/2 cup almond flour (aka almond meal)
- 1/4 cup potato starch
- 2 tablespoons arrowroot starch
- 1/2 cup maple syrup
- 2 1/2 teaspoons baking powder
- 1/2 teaspoon baking soda
- 1 teaspoon salt
- 3/4 cup unsweetened cocoa powder
- 1/2 cup mashed ripe bananas
- 1 tablespoon pure vanilla extract
- 1/4 – 1/2 teaspoon mint extract (I used just about 1/2 teaspoon and the mint flavor was perfect, not too overpowering at all)
- 1/4 cup hot water
- 10 ounces vegan, gluten-free semi-sweet chocolate chips (mini chocolate chips would also be good)
- 1/4 cup firmly packed, fresh mint, very finely chopped
Preheat oven to 325 degrees. Brush 3 dozen mini-muffin pans with oil; set aside. You can also just use one pan and wait until each batch cools to unfold them and then regrease the pan to make the next batch (this is what I did).
In a medium bowl, whisk together garbanzo and fava bean flour, almond flour, potato starch, arrowroot, baking powder, baking soda, salt, and unsweetened cocoa powder; set aside. In a large bowl, mix together banana, maple syrup, coconut oil, vanilla and mint extract. Slowly add flour mixture, stirring to combine. Stir in water until it forms a batter. Fold in chocolate chips and fresh mint.
Place approximately 1 tablespoon batter into each prepared muffin cup, you want them about 3/4 of the way filled. Transfer muffin pans to oven, and bake until a toothpick inserted into the center comes out clean, 18 to 22 minutes. Let cool completely in the pan on a wire rack before unmolding.
[/print_this]


