-
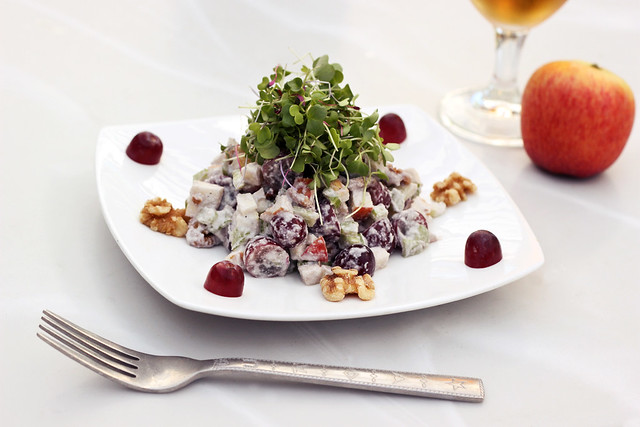
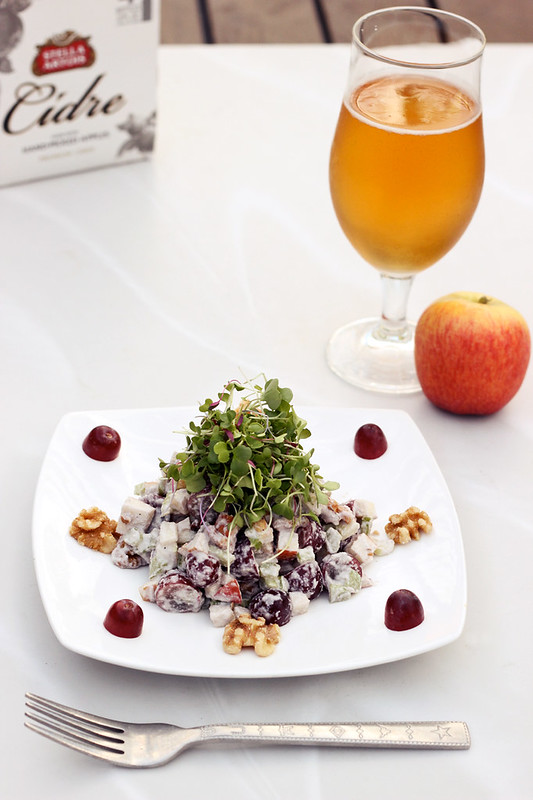
Vegan Waldorf Salad – Stella Artois Apple Cidre Perfect Pairing
It’s that time of year already, apple season is upon us! I think I may be in the minority when I say I might get more excited about the apples than pumpkins this time of year. GASP! I know right? While everyone else is going pumpkin crazy, I am quietly enjoying and celebrating the often-forgotten apple! This year I am lucky enough to have a small apple tree in our yard, that has already given me a few apples. Honestly, if you saw this tree, that would shock you. It is barely 3 and a half feet tall and really nothing spectacular, but it must be healthy, hearty and well since we’ve already gotten 4 big apples from it and it has another few that will be ready soon.
Since we won’t be getting a ton of apples from our tree, I wanted to make something that would highlight and use just one apple in a very special way. I didn’t want to just juice it or mix it up in a cake or some muffins. When I was offered the opportunity to try Stella Artois’ newest beverage, a delicious Apple Cidre, I was inspired to make a light and savory fall salad to pair with it.
Stella Artois Apple Cidre is a European-style cider made from fresh, hand-picked red apples with accents of peach, apricot, and orange. The crisp, and refreshing taste paired perfectly with this light, fresh salad. I will for sure be serving the two together at our next BBQ if we still have apples from the our tree. My favorite part of the Cidre is how it instantly brings me to the feeling of the fall that I grew up with back east! Something I am going to miss intensely this year! This Cidre has a hint of spice and the perfect apple flavor and it isn’t overly sweet like some ciders can be and it is far lighter and more natural tasting than most every other hard cider I have tried. It’s basically a grown-up spiked, sparkling apple juice! Plus, the best part is, like most hard ciders, Stella Artois’ Apple Cidre is naturally gluten-free. BONUS! Back in the day, I used to love Stella Artois’ signature lager, it was one of my go-to beers, but after going gluten-free nearly 9 years ago, I haven’t been able to enjoy it. So as you can imagine, I was super excited to see they had introduced a naturally gluten-free Apple Cidre to the market and of course, even more excited that it tastes so good.
-
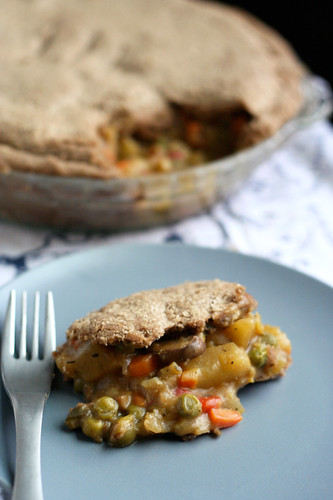
Gluten-free & Vegan Vegetable Pot Pie
I am super excited to share this recipe with you. I know it seems complicated and like a lot of steps, but it really isn’t that bad. If you want to buy a store bought pie crust or mix, and just make this filling, I say go for it. If you aren’t gluten-free and you wanna make this filling, just sub in your regular flour. Just looking for vegetarian not vegan, use butter and regular milk. But whatever you do, make time to make this pot pie. It is so delicious!
I have really come to love baking and even though I am not quite at the point with my baking where I can completely, on my own, create a complicated recipe yet, like a vegan gluten-free pie crust, I still really love doing it. Having a beautiful and perfect recipe for a pie crust from a true pro like Shauna (Gluten-free Girl), is seriously a blessing. It is a great jumping off point for recipes like this one and I am truly grateful for people like her that can find the perfect ratios, keep their cool while experimenting and destroying things and come up with the perfect pie crust! It is so damn admirable.
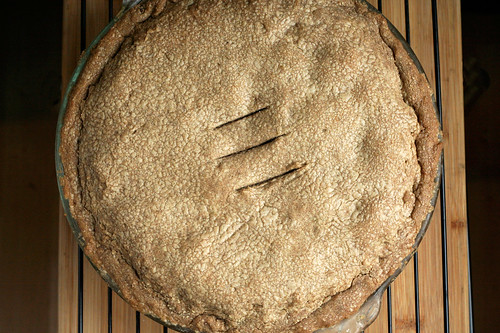
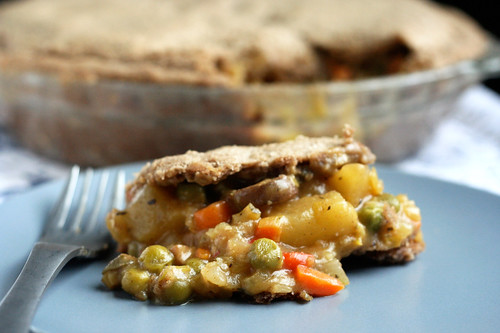
I keep my own gluten-free whole-grain flour blend on hand (that I make using Gluten Free Girl’s suggestions on flours, starches and ratios) in a large quantity for use in lots of different recipes. I used Shauna’s pie recipe after Thanksgiving to make a turkey pot pie and I made it exactly as the recipe calls for, with the same flour blend that she uses and with butter. It turned out perfectly. Since I have since cut out dairy, I was very excited to try it all again but making the pie dough vegan and using a whole-grain blend of flours instead. The crust was definitely a bit flakier with the butter than the vegan butter sticks, but I have to say I am extremely excited and impressed with both the crust on this pie and the delicious vegan filling. The pie crust was tender and it had a beautiful tasty crisp and even a slight flakiness to it. The filling is thick, hearty and even a bit creamy. It amazed even me that there wasn’t a bit of dairy in this whole pie. Since it has been nearly 3 weeks since I have had any dairy, I kept feeling like I was doing something wrong when I was eating this. But I made the entire thing myself, not a drop of dairy in the whole thing. Considering my meat and cheese loving hubby, Mark, not only at this, but went back for seconds – I knew I had struck gold!
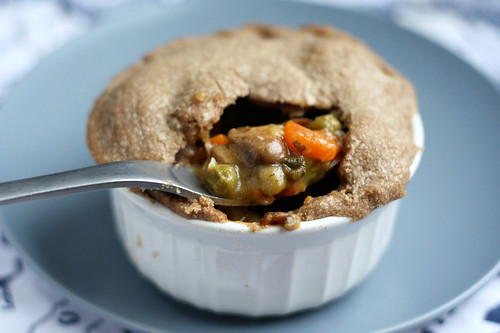
When making the large pie, I was afraid to overload it with too much filling, so I had a little bit leftover after putting the top crust on (though I realized after I should have just mounded it all in there), I also ended up with the smallest piece of extra pie dough since I had over rolled it just a tad, so I made the tiniest little mini-pot pie in a ramekin. I was actually really excited that it worked out this way, since I wanted to see how it would turn out if I made mini pot pies instead. It was perfect! The only thing I would change for the next time is to load all of the filling in, even though it seems like a lot. The filling does cook down a bit, so there is more room there than you think. I just had visions of veggie filling overflowing all over my own and ruining the pretty picture-perfect pie I had made.
You can have some fun with your pot pie fillings and add or take away any of your favorite or not so favorite ingredients. Turnips or parsnips would be good, asparagus or butternut squash, chives instead of sage. Play with your ingredients depending on what is in season. You could add some tofu. Have fun with this!
[print_this]Gluten-free & Vegan Vegetable Pot Pie
serves 6-8This pot pie has a top and bottom crust, which is how my husband requires his pot pies! If you wish to only have a top crust or if you wish to make smaller pot pies in ramekins with just top crusts, make sure to halve the pie dough recipe.
Gluten-Free Vegan Whole-Grain Pie Dough:
Adapted from Gluten-free Girl350 grams all-purpose gluten-free whole-grain flour (or your favorite gluten-free AP flour) – I used Shauna’s ratio and flour suggestion list to make my own whole-grain flour mix. My blend included a combination of almond flour, buckwheat, teff, sorghum, arrowroot and potato starch.
1/2 teaspoon kosher salt
226 grams (2 sticks) Earth Balance Vegan Buttery Sticks (you can use two regular sticks of butter if you aren’t vegan)
1/2 cup ice-cold water, plus a few splashes moreGluten-Free Vegan Veggie Pot Pie Filling:
1 tablespoon olive oil
1 medium onion, diced
1 leek, white and green parts only, diced
1 clove garlic, minced
3 carrots, peeled and diced into 1/2-inch pieces
2 stalks celery, diced into 1/2-inch pieces
1 red bell pepper, diced into 1/2-inch pieces
1 sweet potato, diced into 1-inch cubes
1/2 cup dry white wine
1/2 cup gluten-free flour
2 cups vegetable broth (mushroom stock would also be good)
1 cup non-dairy milk (almond, cashew, coconut, etc)
1 cup frozen peas
1 tablespoon fresh sage, roughly choppedCut the buttery sticks into one-inch cubes. Place them on a plate in the freezer for 15 minutes.
Put the flour and salt into a large food processor. Pulse them together a few times until the flour is fluffy and aerated. Add the butter cubes. Pulse ten times. Your flour mixture should now look sandy, with some butter chunks still visible.
Pour in the ½ cup of ice-cold water. Pulse five times. Look at the dough. If it still looks a bit dry, add a splash more water, not exceeding another ¼ cup. The finished dough should like curds of dry cottage cheese. Do not add anymore water.
Forming the dough into a disk. Dump the dough onto a clean, cool surface. I work on a piece of parchment paper on the counter top. Gently gather all the dough together in your hands. Working quickly, take half the dough, make it into a ball, then flatten it into a plump disk, about 2 inches tall. Wrap it in plastic wrap and let it rest in the refrigerator for 30 minutes. Do the same with the remaining dough.
While the dough is chilling you can make your pot pie filling. Heat 1/2 of the olive oil in a large saucepan over a medium-high heat. Add in the carrots, celery, onion, garlic, bell pepper, sweet potato and leek. Stir frequently and allow to cook for 5 minutes. Add in the white wine and turn the heat down to medium-low, cover and allow the vegetables to simmer and steam for about 15-minutes, stirring frequently. Meanwhile heat a medium pan over a medium-high heat and add the remaining olive oil. Add in the mushroom and saute until they are browned and tender, about 10 minutes.
Add the mushrooms to the other vegetables and sprinkle the flour over the vegetables, stir to evenly distribute and add the vegetable broth, sage and frozen peas. Stir to combine and break up the flour clumps, it should immediately start to thicken. Add in the non-dairy milk. Stir. You can add more broth if the mixture gets too thick. Allow to simmer on low for another 5 minutes, to cook the peas, then turn off the heat.
Once the filling is done, set it aside to cool slightly.
You are now ready to assemble your pot pie. Take the pie dough disks out of the refrigerator and let them sit out for 15 minutes or so, so they are still slightly chilly – but a wee bit closer to room temperature and preheat the oven to 425°. (Honestly, this time around I forgot to let the dough sit and it rolled out just perfectly.)
For rolling out the dough you can either work on a floured countertop, a floured marble pastry board, or two pieces of parchment paper (I go this route and I still add a tad bit of flour). I would love to one day make my pies with a marble pastry board!
Gluten-free dough is definitely stickier than regular gluten dough. Be sure to use plenty of gluten-free flour on your surface when rolling it out. When I use two pieces of parchment paper, I lightly dust a bit of flour down on each side of the dough before I place it between the sheets of parchment paper. Shauna recommends very, very lightly oiling the parchment paper, to try to prevent sticking. (I have never done it this way)
could try really hard to explain in detail exactly how to do these next steps, or I could quote Shauna’s beautiful and incredibly descriptive words on rolling out the dough and prepping it to place in the pie pan. Honestly I wrote this part out in my own words so many times and it just never sounded as good as how Shauna put it. Somehow she makes rolling out a pie dough sound like a graceful dance. Seriously, you’ll see what I mean…
“Pat down the disk and put the rolling pin on it. Now, imagine that the dough is the face of a clock. Roll out once at 12 o’clock. Then, lift the pin and roll at 12:10. Moving in “ten-minute” increments, roll out the pie dough to slightly larger than your pie pan. Be patient. Think of this as meditation. Roll out the dough evenly.
Now, if you have worked with the parchment paper, lift the top paper, put the pie pan on top of the dough, and flip it over. Carefully, strip away the parchment paper. Go slowly. Voila! Pat the dough down into the pan.
Now, if some of the pie dough has stuck onto the parchment, do not despair. Simply peel it off and pat into the rest of the pie dough. With a gluten dough, this might make a crust tough. Guess what here? No gluten! No problem. Pat away.
(If you have used the marble board or countertop, roll the dough onto your rolling pin and transfer to the pie pan. Again, if it sticks, no worries.)
Crimping the edges. Crimp the edges of the pie pan by working with floured fingers. I press from the inside of the pie pan with my thumb and first finger on the left hand, then press between those with the first finger of my right hand from the outside. (That’s a lot of words. Try to visualize it. This will make sense.) This is one of my favorite activities in the world. Go slowly and enjoy it.
Fill the pie with the filling. Pat it down.
Roll out the remaining dough the same way. Lay it onto the pie gently, like you’re putting a blanket on a sleeping child. And if the dough sticks and breaks, just pat the pieces together. (That’s what happened with both the finished pies you see here. They didn’t suffer.) Tuck the edges into the crust.”
I will be honest, crimping the edges of a pie crust just isn’t my thing, not because I don’t like it or think it is pretty, I just find myself getting frustrated and wanting to just get it in the oven and then eat it. I guess I just go with the rustic look. I make sure all the edges are sealed and tucked in and go with that! Maybe some day I will have the patience and the eye for pretty pastry techniques.
It is now time to bake the pot pie! YAY! Cut a few slits into the top crust. Place a sheet pan on the bottom rack of the oven, under the rack where the pie pan will be, to catch any potential drip overs. Place the pie pan into the oven and bake for 15 minutes at 425ºF, then turn the temperature down to 375°F. Bake until the juices are bubbling out of the pie (this may or may not actually happen depending on how juicy or thick your pot pie filling is) and the crust is browned, about 45 to 55 minutes.
Allow the pot pie to cool 10 to 15 minutes before serving. Enjoy!
Please note, instead of one large pot pie with a top and bottom crust, you could certainly halve the dough recipe and make mini-pot pies in 6 – 10 ounce oven-safe ramekins. Just cut the dough into 6 rounds that are slightly larger than the circumference of the ramekins. Lay the dough onto the filling and bake the same way. I had a little extra filling and some extra pie dough, so I made one this way to try it out. It was perfect and super adorable.[/print_this]
-
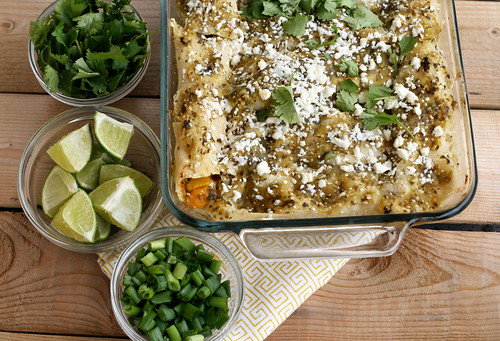
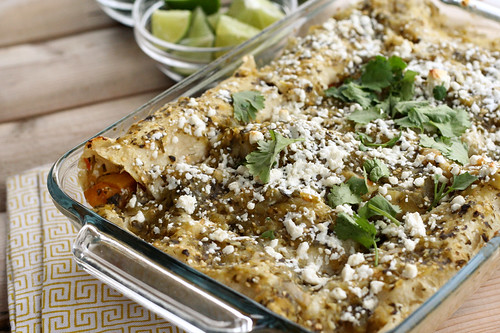
Butternut Squash Enchiladas with Tomatillo Sauce

Having a creative job means that sometimes you just can’t work. I know that sounds like an excuse, but when you are supposed to be creating something and you just don’t have any ideas, it’s quite hard to “work”. I am very lucky that we now work from home, so some days when that “creative block” happens – if I can’t find some silly administrative task like updating our webstore, shooting photos of new products or responding to emails, I can just walk away from my computer and get into any number of different things that are completely unrelated to work, like taking the dog for a walk, heading to a yoga class, watching TV, reading a book or magazine and my most favorite distraction from work… cooking! This week I have been feeling a bit stressed and the ideas just haven’t been flowing as freely. It has been a bit frustrating to say the least. We have a ton of work on the books right now, so it is no time to screw around or to just stare at a blank sketch pad. Wednesday, I decided rather than sitting at my desk with my sketchpad, that I would make our dinner early, so we could enjoy it for lunch and I could take photos when it was freshly cooked instead of trying to shoot them without daylight or shooting the leftovers the next day!
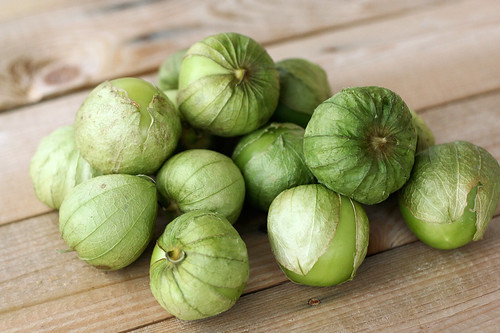
So, I got up at my usual 7am and started prepping the squash and the tomatillos for the sauce. Then I went upstairs for a few hours, it was the perfect boost that I needed and I started working on a poster design that I was stuck on and I made some major headway! It felt great. When lunchtime came, I scooted downstairs, preheated the oven, heated up the sauce and started assembling the enchiladas. I popped them in the oven and went back upstairs to work for a bit. When the buzzer rang, I ran down, took some photos and served my husband and our assistant the best lunch we’ve had since we moved the business home. It was actually really fun to eat a bigger meal in the middle of the day. It felt like the right time to eat that way.
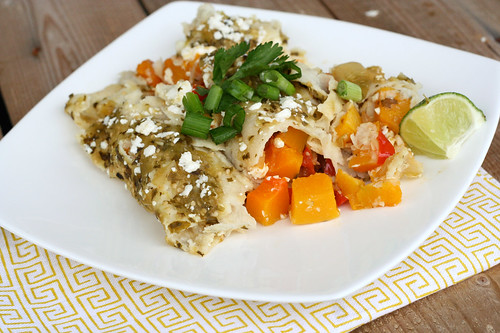
These enchiladas, besides being a burst of beautiful colors, are so full of delicious and bright flavors. The squash has a bit of a rustic nuttiness, the tomatillo has a bright almost citrus flavor to it, with a little bit of heat from the lemon drop peppers I added. I thought about adding black beans inside of the enchiladas, but ended up deciding against it since I thought they would just be bursting open. I think even though it would taste incredible, it would be too many things inside with the big hunks of squash. But I will likely make them that way at some point. I used a simple traditional Mexican crumbly white cheese called queso fresca, it was the perfect compliment and didn’t make the dish too heavy and gooey cheesy, which can be a bit too much for me, sometimes. They were delicious topped with a fresh squeeze of lime juice, fresh green onions and cilantro and a little dollop of organic low-fat sour cream. If you are vegan, you could definitely leave out the cheese or substitute Daiya for the queso fresco. Or if you can’t find queso fresco, you could go with a small amount of good quality sharp cheddar cheese.
I have made homemade tortillas in the past when making enchiladas and it is most definitely worth it, but since I didn’t really have an unlimited amount of time to make these, I decided to go with a high quality corn tortilla from the store. The key to making enchiladas keep their shape, is to steam the tortillas first, otherwise they will break apart a bit. I know this and I steamed mine, but I think they should have been steamed a bit more, some definitely fell apart just a tad when I rolled them up. I decided to just go with it, since I knew it would all taste the same, but some would just fall apart when I served them. Of course, the two that I decided to take a photo of did just that when I served them, but I kinda liked how rustic they looked and I love how you could see the color from the squash exploding out. So I said, screw perfection and just went with it! Life isn’t perfect, I’m not perfect and my enchiladas aren’t perfect – and I am OK with ALL of it! I embrace it.
Yesterday afternoon I had another one of those moments where I hit a creative road-block, for some reason this one hit me harder than ever. I actually felt sad over it and I let it beat me, a bit. I was working on a project that is seemingly very simple and should have an easy solution, but I was struggling. It broke me! I cried. I decided to take a step away “virtually” and move over to another project and then to editing the photos for this post. It definitely helped and today I am looking at it again with fresh eyes and I am ready to tackle it again. So I wanna hear from you….What do you do when you hit a creative roadblock?
Do you find cooking and baking to be a good escape from everyday life and your work or does it stress you out too much?
I’d love to hear your thoughts on how you get through when you are feeling stumped with a problem, creatively or otherwise. Share away!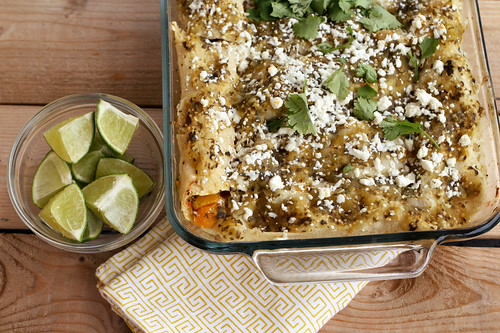
Butternut Squash Enchiladas with Tomatillo Sauce
serves 6Tomatillo Sauce
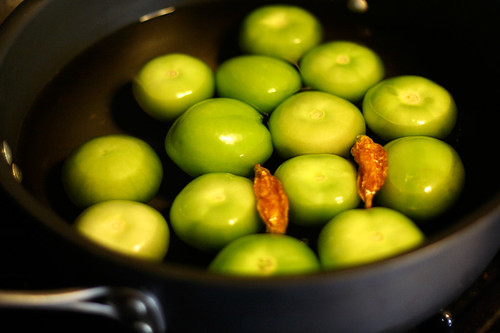
1 1/2 pounds of fresh whole tomatillos, husked and rinsed
2 hot chiles of your choice, stems removed (I used dried lemon drop peppers from my garden) – you can skip this or just use one if you want it less spicy
enough water to cover the tomatillos
3 whole cloves garlic, peeled
1 handful of fresh cilantro (about 1/4 cup)
1/2 teaspoon kosher saltAdd your tomatillos and chiles to a large saucepan and cover with water. Bring to a boil over a medium-high heat, then reduce the heat and allow to simmer for approximately 5-7 minutes until the tomatillos are soft but still whole. If they aren’t all totally soft, no worries, still remove them from the heat and drain. Add the tomatillos and chiles to a food processor and add 2 cloves of garlic, fresh cilantro and salt, puree all the ingredients together and set the sauce aside.
Butternut Squash Enchiladas
1 – 2lb butternut squash, peeled, seeded and diced into 1-inch cubes
1 tablespoon plus 1 teaspoon extra virgin olive oil
1 red bell pepper, diced
1 yellow onion, diced
1 large garlic clove, minced
6-8 ounces queso fresco, crumbled (you can skip the cheese or use Daiya to make this vegan) – reserve approximately 1/4 cup for the topping
12 corn tortillasfresh lime wedges
fresh cilantro, roughly chopped
fresh green onions, thinly sliced
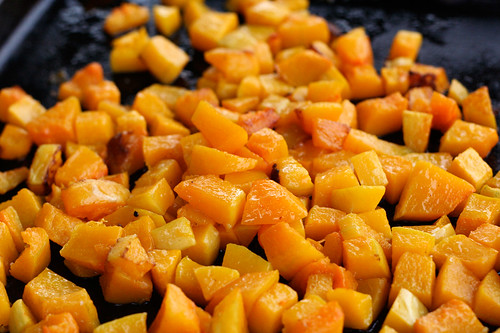
organic sour creamPreheat the oven to 400º, place the squash cubes on a rimmed baking sheet toss with 1 tablespoon of the olive oil and place into the oven to roast for 30-40 minutes until tender and lightly browned. Set aside when done.
While the squash is baking, add the onion, garlic, red bell pepper and a dash of salt to the teaspoon of olive oil in a medium pan over a medium-high heat, sauté. Cook for 5-8 minutes until the onion is translucent and both the onion and pepper are tender. Remove the vegetables from the pan and set aside in a bowl.
Use the same pan from the onion and pepper mixture to heat up your tomatillo sauce. Bring it to a simmer over a medium-heat and allow it to heat through and slightly thicken. Just about 5 minutes.
Once the squash is done, you are ready to start assembling your enchiladas.
Start by spooning a small amount of the tomatillo sauce into the bottom of a 9 x 13 inch baking dish (I used an 8.5 x 11 pan and it was a bit crowded, but it worked) – just enough to cover the bottom with a very thin layer.
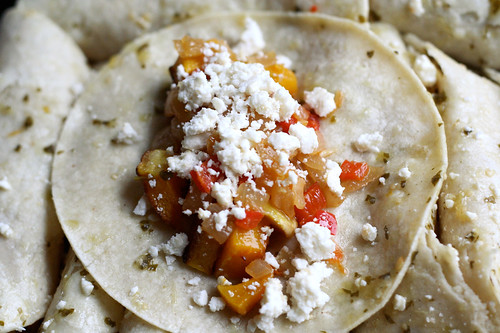
You will need to steam the corn tortillas so that they don’t break when rolled. Moisten two paper towels, working in batches of 3 or 4 tortillas at a time, wrap the tortillas in the damp paper towels and microwave them for approximately 30-45 seconds. Once microwaved, dip each tortilla into the tomatillo sauce, one at a time, making sure both sides get coated in the sauce. Scoop a small amount of butternut squash cubes (probably about 2 tablespoons), the onion and pepper mixture and cheese, keeping in mind how much to use so that you can roll the enchiladas shut and also so you have enough to fill 11 more. Place the enchilada, seam side down, in the baking dish. Repeat until you’ve made as many enchiladas as you want or have filling for (this recipe made 12, with a small amount of squash and pepper mixture leftover).
Spoon the remaining tomatillo sauce overtop all of the enchiladas and top with the remaining 1/4 cup of queso fresco.
Place the pan in the oven and bake for 30-40 minutes until the cheese is slightly melted, golden brown and everything is bubbling. Pull it out of the oven, sprinkle a bit of fresh cilantro on top to make it even prettier and allow it to cool for 5 minutes. Serve your enchiladas warm with fresh cilantro, fresh green onions and a squeeze of fresh lime juice, you can also add a dollop of organic sour cream, if you wish.


