-
Skillet Baked Eggs and Greens with Herby Feta Yogurt Drizzle
Breakfast for breakfast, breakfast for dinner, breakfast at any time, this flavor-loaded Skillet Baked Eggs and Greens with Herby Feta Yogurt Drizzle is a one-skillet meal that you too will be obsessed with.
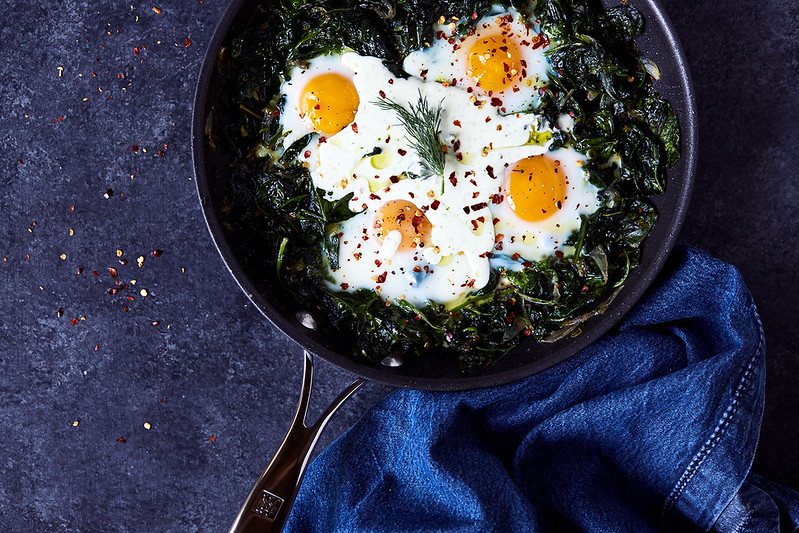
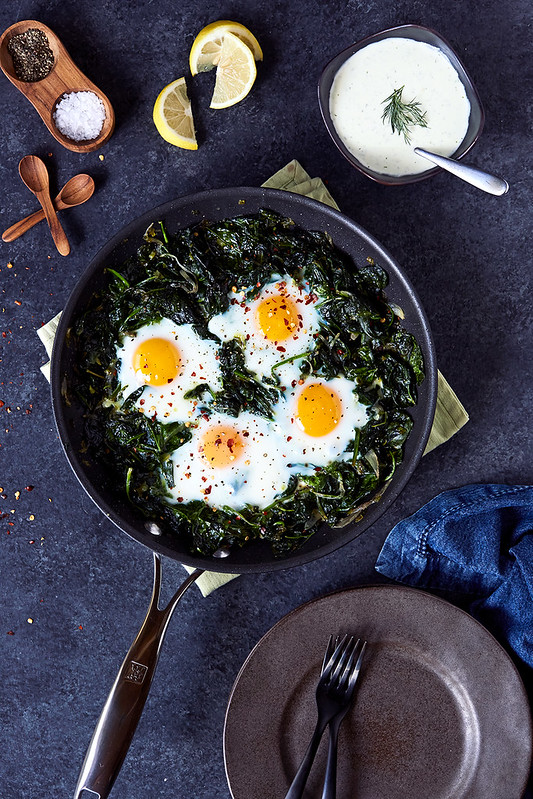
If you haven’t deducted from the insane amount of breakfast and brunch posts – I love eggs. I love meals centered around eggs. I like eggs for breakfast, just fine, but I also really love eggs for dinner. Shakshuka is one of my absolute, all-time favorite dishes, but to be fully honest, baked eggs of any kind will forever have my heart.
I also have a really big soft spot in my heart for one-skillet meals, especially those that can get me everything I need in one gorgeous pan. This meal is a fabulous, versatile dish that can be served at any meal – breakfast, lunch or dinner. With a gorgeous bed of nutrient-abundant greens, laced with the caramelized shallots and scallions, topped with the most perfect, soft, baked eggs with luscious, runny yolks, it’s all topped with a rich, drizzly, herby, feta-yogurt sauce that is the finishing move to end all finishing moves.
-
Green Tahini Sauce {+ Video}
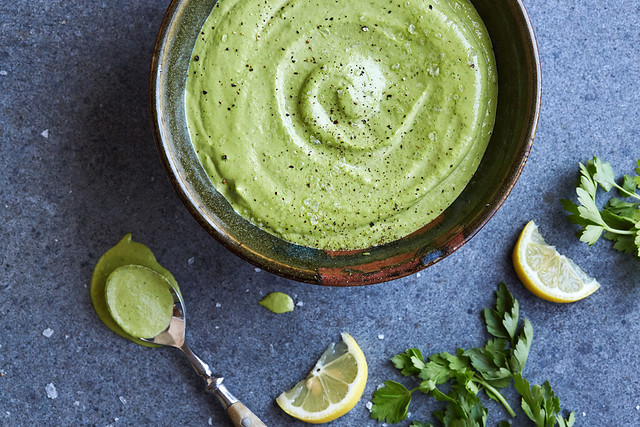
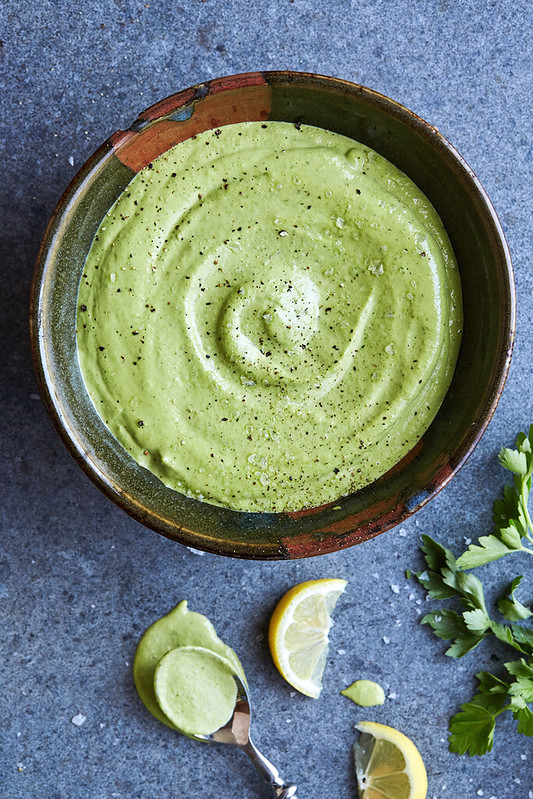
Tahini is my life blood. If you aren’t yet aware of what tahini is, it is a condiment made from toasted ground hulled sesame seeds, with a consistency similar to other nut butters. It has come to be one of my most coveted pantry staples. I almost always have a homemade tahini dressing or sauce of some sort, on hand, if not two. My garlic tahini, or some variation on it, is mainstay in my kitchen weekly.
Recently with all the fresh, local herbs in season I have been veering off and getting a bit more creative with my tahini sauce. This vibrant, herby, Green Tahini Sauce is so versatile. It’s wonderful simply as a dip for crudités, grain-free crackers or chips. It makes am amazing creamy, salad dressing for a traditional green salad, or better yet the perfect way to dress up a summer potato salad. It’s a lovely compliment to grain and veggie bowls or simply just steamed, roasted or sautéed vegetables of any and all kinds. It is also great in place of mayo on sandwiches. This Green Tahini is also a wonderful sauce for seafood, chicken and pork, especially when grilled or roasted.
-
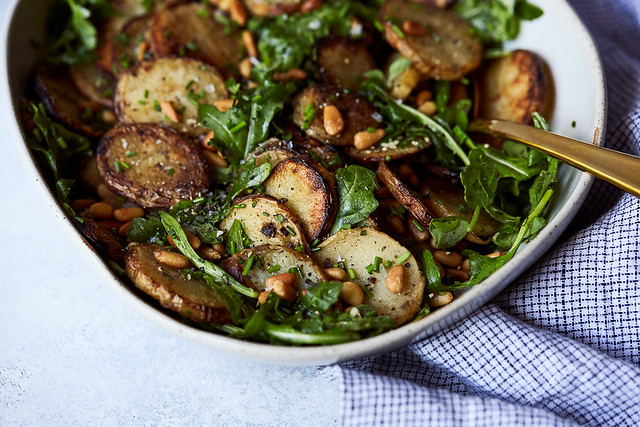
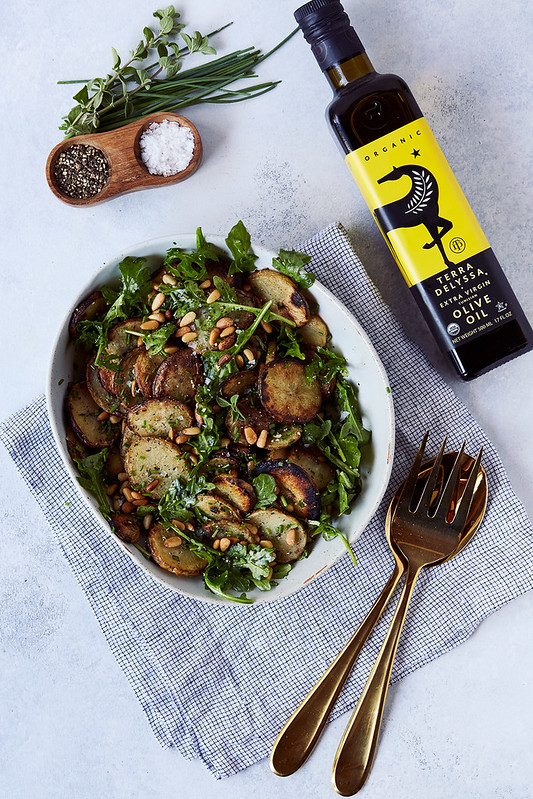
Grilled Potato and Arugula Salad with Fresh Herbs
This Grilled Potato and Arugula Salad with Fresh Herbs is a summertime backyard BBQ staple around here. A must when we are entertaining. Put all other potato salads to shame with multiple layers of flavor and texture.
[This is an updated post from 2011.]
For well over 6 years now this potato salad has been a staple of our summertime cookouts. Whenever we have people over, whether we are cooking up the most elaborate or the most simple of meals – this side dish stunner is my go-to.
Cooking up the potatoes first allows them to soften up a bit, so when they hit the grilled glistening with the Terra Delyssa olive oil, they get a golden brown char to the outside of them, while still holding their shape.
Try substituting baby spinach, kale or other lettuces or greens for the arugula and even play with different vinaigrette moves, try adding in a whole grain mustard, a little lemon zest, maybe add some red pepper flakes.
-
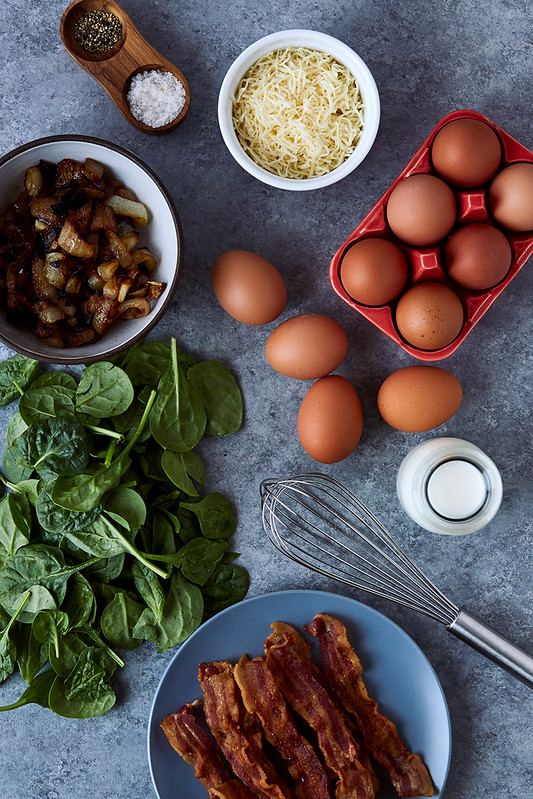
How-to Make Sheet Pan Baked Eggs {+ Video}
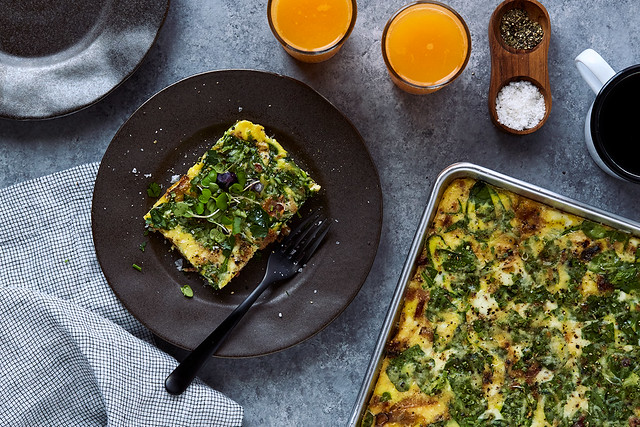
With Easter this Sunday and Spring in full effect, brunch season is fully upon us. These Sheet Pan Baked Eggs have become a staple around here, especially when we are serving brunch to a crowd. What I love about is how simple it is to make and just how versatile a dish it can be – which is great for optimizing for the season and the crowd and it’s the ultimate in customization and creativity for those of you that love playing in the kitchen.
Much like many of the other recipes I share around here, I am offering you the formula and base for the perfect baked eggs and how you customize these – that’s up to you. For the baked eggs pictured here, I went with caramelized onions at the bottom and mixed into the eggs, which were whisked with unsweetened unflavored homemade coconut/almond milk, we added cooked pasture-raised bacon, roughly chopped baby spinach, shredded goat milk cheddar cheese, chives and micro-greens for serving.
-
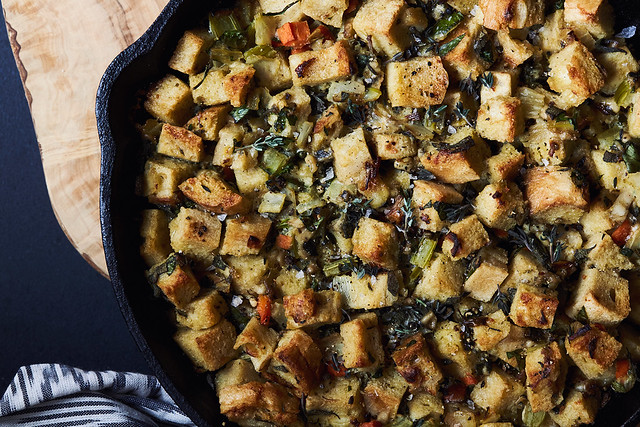
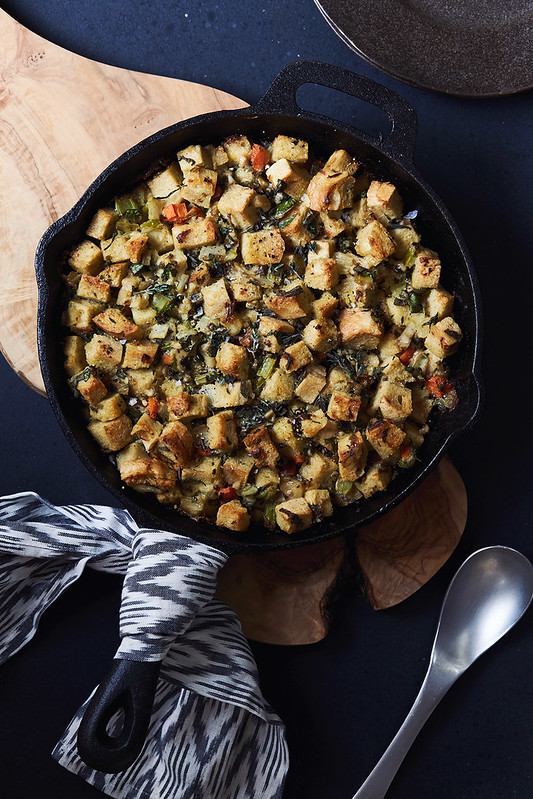
Gluten-free Oyster Sourdough Stuffing
Alright, here we go! The final stuffing recipe of the season and I am really excited about this one. Shhh, don’t tell the mashed potatoes, but I am pretty sure stuffing is my favorite. It’s a dish that just doesn’t get any love outside of Thanksgiving and I just don’t know why.
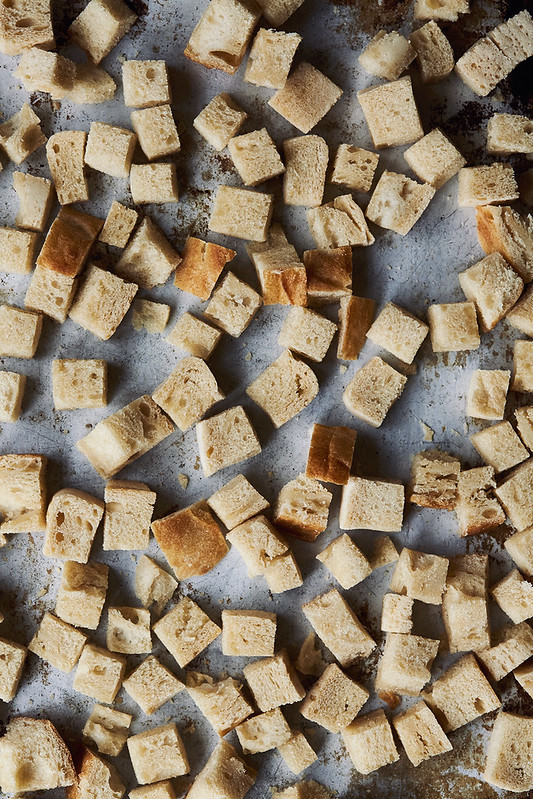
While this stuffing isn’t grain-free, it uses my absolute favorite gluten-free bread ever – Bread SRSLY’s sourdough loaf. It would also be delicious with non-gluten-free sourdough (obviously), any crusty French-style bread, cornbread or even with a good grain-free bread. As far as I am concerned, always remember whatever your bread choice, your stuffing (or dressing) is only as good as your bread.
Oyster stuffing is more traditional in the New England region and I believe some areas of the south, along the gulf coast. It isn’t one that I grew up eating, necessarily, but I have had it before and I love it, I also know it’s a staple for so many of you. Veering a bit from the traditional, I paired the shellfish in a more West Coast way, with the sourdough. Think of Northern Cali, San Francisco to be exact, the Hangtown Fry and all the sourdough bread paired with oysters, clams, chowders and so on. It’s a match made in heaven. A little tang, with the subtle, savory brininess of the oysters. This classic stuffing will bring an amazing and unique matrix of flavors to your Thanksgiving dinner.
-
How-To Preserve and Freeze Fresh Herbs in Olive Oil

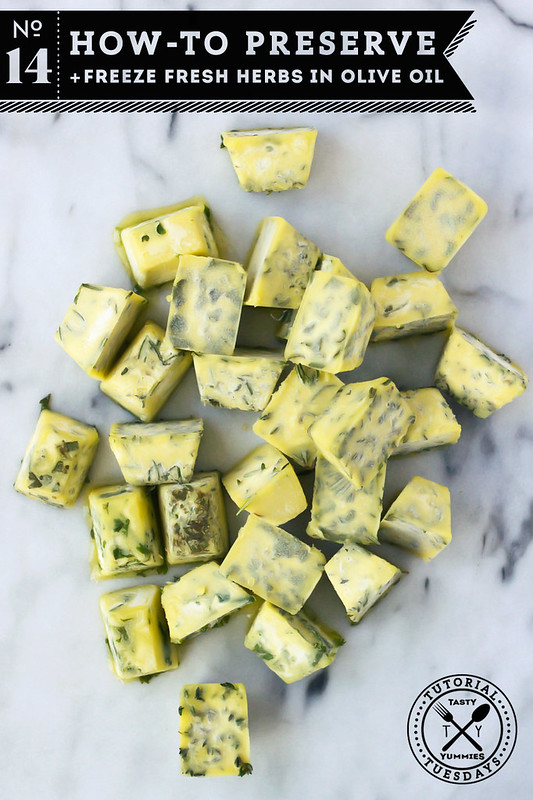
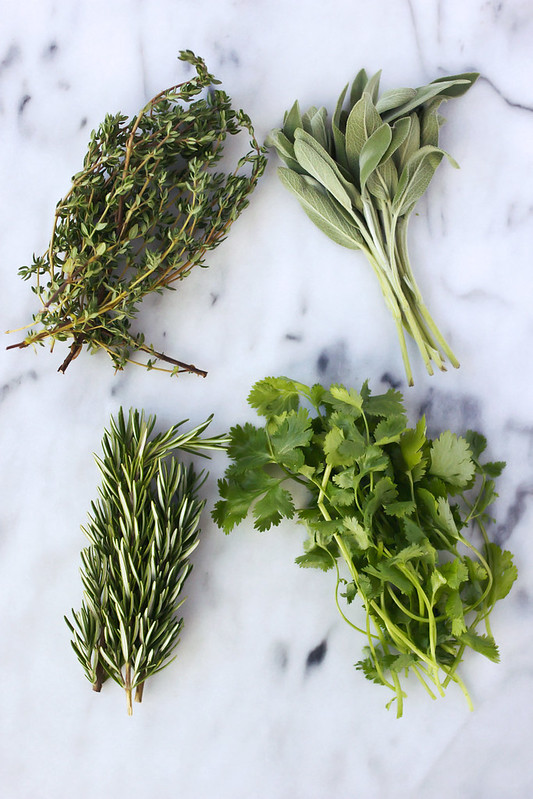
Living in California, worrying about not having access to the fresh local herbs in the winter, isn’t exactly an issue, but I do remember what it was like living in New York. The minute the first frost hits in the early fall, there is a scramble to save plants and there is a huge sense of loss when you can no longer just walk into the yard and snip off your favorite fresh herbs. If you are
luckysmart enough to have your fresh herbs in pots, you can just bring those in, otherwise you can kiss them goodbye until the start of the next season.This simple method for preserving fresh herbs is a really great way to keep the fresh flavors of your summer garden or the local farmers market – all through the fall and winter. When thawed or just heated right up from frozen, these frozen cubes work great in stews, sautés, soups, roasts and more. Besides being super helpful and functional, this project is super fun and very simple – it would be a really great and educational project to do with kids.
Regardless of how cold it gets where you live, this is such a great, money-saving way to make the most of your herbs. For me, I love this method of preserving because oftentimes I will buy a large amount of fresh herbs for a recipe that I am testing, however if there are any leftover, they tend to go bad or get sad and wilted before I can get to them again. -
Grilled Scallop and Veggie Skewers with Green Tahini
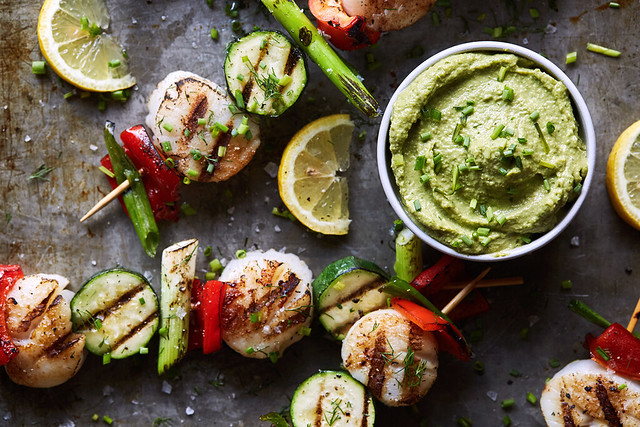
I am not sure about all of you, but our grill becomes the center of many meals this time of year. Without any AC at all and many hot summer days of working from home, tossing a light and healthy meal on the grill at the end of a sweaty work day sounds like the perfect idea. But, also a perfect idea? Dinners that can be thrown together start to finish in under 30 minutes.
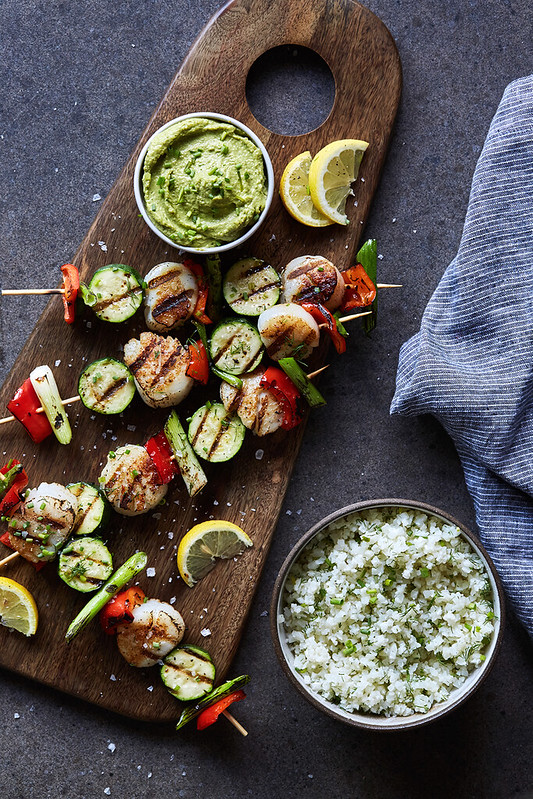
These Grilled Scallop and Veggie Skewers with Green Tahini are what summer weeknight meal dreams are made of. I love serving these alongside an herby cauli-rice. They’d also be great with regular rice, other grains of your choosing or atop a big green salad.
-
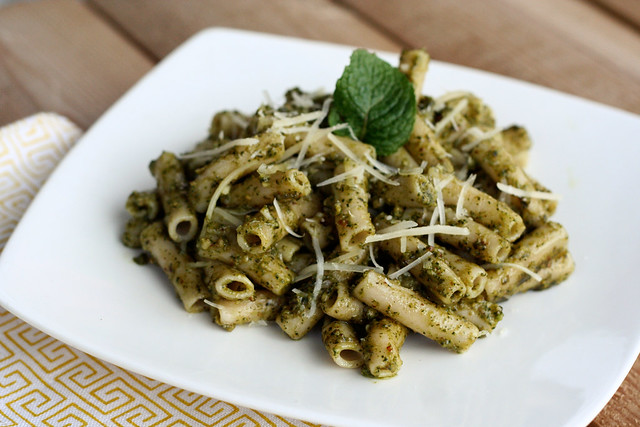
Mint Pesto

Last summer I made, what I later learned, to be a big mistake – I planted mint in our yard, not in any pot or planter, just in the dirt on the side of the yard near my vegetable and herb gardens. I originally planted it because I absolutely LOVE fresh homemade mojitos in the summer time. There is nothing more refreshing. The reason my planting of said mint turned out to be a mistake, was the fact that it has grown out of control and it is taking over that section of the yard. Because I have never grown it in my own yard, I didn’t realize how quickly it grows and how far it can spread. We travel so much, that getting into the yard and weeding my gardens gets increasingly difficult as the summer goes on. I know I should get out there more, but I don’t, so I always try to plant things that need very little upkeep. Well, mint definitely falls into that category. Early in the summer I took a look out in the yard to see the progress of things and I was floored at how the mint was spreading. It was crazy. So I made a lot of mojitos this summer. I also decided I needed to find other things to do with the mint. I mentioned something on Twitter and Kelly from Design Crush made the wonderful suggestion of mint pesto. I had never thought of that. So, earlier this summer I played around and made mint pesto to serve with gluten-free penne. It was sooo good that we ate it all up and I forgot to write-up my recipe or photograph it. Ooops. That just meant I needed to make it again. Darn.
This time around, I again served this over delicious organic gluten-free penne with some gluten-free crispy zucchini rounds on the side. We both were in heaven with this meal. This pesto, much like the original that we all know, is bright and light but chock full of flavors. I like my pestos garlicky, which gives a bit of a spicy kick, you can certainly take it down to one clove if you don’t like a lot of garlic (shame on you). I also love playing around with different nuts in my pestos. Most original basil pesto recipes call for pine nuts, which I really love, but they can be hard to find sometimes and many times are insanely expensive. I have played with both toasted almonds and walnuts in pesto recipes, both of which are absolutely equally delicious, if not more. I think any one of those nuts would be great in this mint pesto. I went ahead and still included some basil in this mint pesto, since I also grow that in my yard and I thought it would round out the flavor of the mint nicely, so it wouldn’t be too overpowering. Also, it should be noted, it is crucial to use a good quality olive oil in your pestos, since the sauce is left raw and is never cooked, the olive oil flavor remains in the forefront of the flavors, so you want it to be a good one.
In addition to all the usual dishes that pesto is great in; pasta, sandwiches, pizza, in soup, over a baked potato etc, – you could definitely use this mint pesto for other non-traditional uses as well, such as a marinade or served over-top grilled lamb or steak, etc, you could just skip the basil and cheese, maybe add some lemon juice and red pepper flakes and make it more of a Chimichurri style condiment. Have fun with it and make sure if you plant mint of any kind in your yard plant it in a pot, unless you are looking to be able to make enough mojitos and pesto to serve a small country.
Mint Pesto
makes approximately 1 cup2 cups fresh mint
1 cup fresh basil
1/4 cup toasted sliced almonds (walnuts or pine nuts would also be great)
2 medium-large cloves garlic
1/2 cup extra-virgin olive oil
1/4 – 1/2 cup parmigiano reggiano, shredded (plus more for serving)
1/4 teaspoon sea salt
freshly ground black pepperPlace mint, basil, almonds, garlic and salt in a food processor; pulse a few times, and process until everything is finely chopped and combined. With the processor running, gradually pour the olive oil in and process until smooth. Use a rubber spatula to scrape down the sides to get all the little bits. Add the parmigiano reggiano and pulse again until blended and smooth. Season with additional salt, if needed, and freshly ground black pepper to taste.
If you are serving this immediately, keep the sauce at room temperature and pour it over your cooked pasta (I used my usual gluten-free organic brown rice penne) and quickly stir to combine, top it with fresh parmigiano reggiano and serve immediately. I always recommend reserving approximately 1/4 cup of the cooking liquid from your pasta so you can add it in to the final dish, if need be, to thin the sauce if it is too thick.
If you aren’t serving this immediately, it can be stored in a tightly closed container in your refrigerator for up to 3 days.
Notes:
To toast sliced almonds, cook them over a medium-low heat in a small dry skillet, stirring and tossing constantly, until fragrant and lightly browned, this will take less than 5 minutes.
If you’d like to freeze your pesto, leave out the parmigiano reggiano. When you’re ready use the pesto, defrost it first, then stir in the cheese.

Seri hiding out in the mass amount of mint in our yard, earlier this summer
-
Spicy Spaghetti with Fennel and Herbs (Gluten-free)
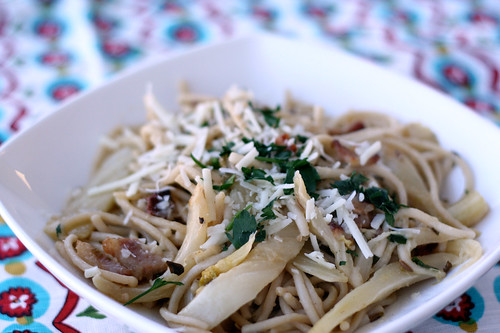
Yes, yet another pasta dish. I am a pasta-aholic, I can admit it. I cannot get enough of the stuff and I am always excited to try out new recipes. The possibilities really are endless and it’s rare that I meet a pasta dish that I don’t love. This recipe is no exception. I came across it a while back and couldn’t wait to try it with a few subtle changes. Even with the bacon and cheese, it is still very light and healthy pasta dish. See you can have your bacon and eat it, too!
The subtle crunch and bold flavor from the fennel is so wonderful and the heat from the chilies is what I live for in a spicy dish. The original recipe calls for red jalapeños, though I could only find green, I think the red would have really been nice for a pop of color. It also called for seeding the chilies, but I left them in, when I tasted the peppers while I was cutting they didn’t have too much heat, and I really wanted a good kick. It is rare that I find something to be too spicy. If you want a more subtle spice, certainly leave the seeds from the chilies out and you can always make it spicier at the end, if it needs it, by adding in some red pepper flakes. The recipe also called for adding in crushed fennel seeds untoasted, I felt like toasting the whole seeds first would give a much better flavor by releasing it during toasting, not only did it taste great, the house smell amazing. Additionally, the original recipe called for pancetta instead of bacon. Since we buy all of our pork from Sojourner Farms, a local pasture-raised farm, I decided to use some of the delicious bacon that we purchased from them, instead. I would advise not to substitute dried herbs for the fresh stuff in this dish, it would surely be missed. It is also important to use a low-sodium broth, as you will reduce the broth down and you will also be getting some salt from the bacon (or pancetta), you can always add more salt to taste, before serving. I am a big fan of using the pasta water to thicken and bring back liquid to a pasta dish, just go slow so you don’t add too much, but don’t leave this step out, it can make or break a dish without sauce, like this one. Obviously, I also changed the original recipe by substituting gluten-free spaghetti, if you aren’t gluten-free you can use whatever your favorite pasta is, a nice whole-wheat spaghetti would be great, I am sure.
If you wanted to make this vegetarian you could easily leave out the bacon and use a vegetable broth instead of chicken, you may just want to add in a bit more fresh herbs to bump up the flavors. It would still be very tasty and hearty.
Spicy Spaghetti with Fennel and Herbs
serves 8
Adapted from Bon Appétit Magazine6 slices of farm fresh local, pasture raised bacon, chopped
1 tablespoon olive oil
3 garlic cloves, chopped
2 large jalapeño chiles, finely chopped – remove seeds if you want less heat
2 large fennel bulbs, stalks trimmed, cut into thin wedges with some core attached
1 1/2 cups low-salt organic free-range chicken broth
4 tablespoons finely chopped fresh Italian parsley, divided
2 tablespoons fresh lemon juice
11/2 teaspoons fennel seeds
1 pound gluten-free organic brown rice spaghetti (or whatever your favorite pasta is, gluten-free or not)
2 tablespoons extra-virgin olive oil
1 1/2 cups finely grated Pecorino Romano or Pecorino Toscano cheese, dividedToast the fennel seeds in a large dry skillet over high heat, until slightly brown and fragrant. Remove the seeds and set aside. Sauté bacon in the same large skillet over medium heat until golden and a bit crispy. Using slotted spoon, transfer bacon to paper towels and set aside. Add 1 tablespoon oil to the bacon drippings in skillet. Add garlic and chiles; sauté over medium heat 1 minute. Add the fresh fennel; cook until beginning to soften, 5 minutes. Mix in broth, 2 tablespoons parsley, lemon juice, and the toasted fennel seeds. Bring to boil. Reduce heat to low, cover, and cook until fennel is very tender, 20 minutes. Remove from heat. Season to taste with salt and pepper.
Cook pasta until tender; drain. Reserve 1 cup cooking liquid. Transfer pasta back to the pot or a large serving bowl.
Uncover skillet with fennel mixture and return to high heat. Cook until almost all liquid is absorbed, about 4 minutes. Add fennel to pasta. Stir in 2 tablespoons oil, 1/2 cup cheese, and pancetta. Add cooking liquid by 1/4 cupfuls if it’s too dry. Toss pasta; transfer to serving bowl if it was in a pot. Season to taste with salt and pepper. Sprinkle 2 tablespoons parsley over. Serve with cheese. -
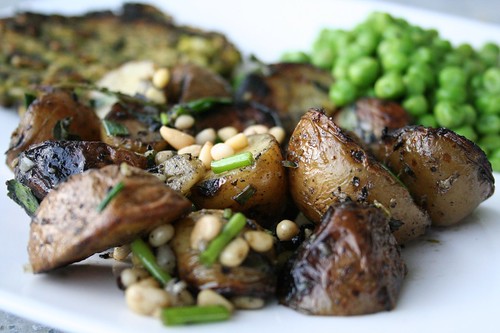
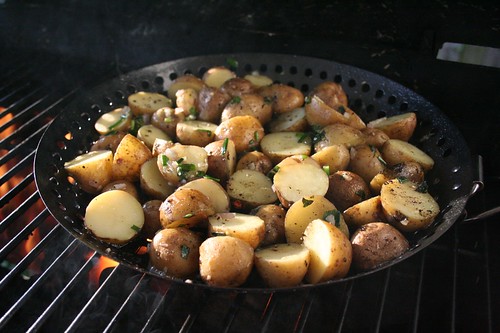
Grilled Herb Potato Salad
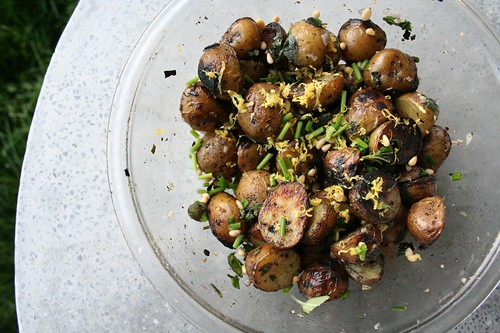
Last night after we left the studio, we had planned on throwing together something quick and heading to the grocery store to grab what we needed for the next week. By the time we got home, the sun was still shining and neither of us felt like grocery shopping, so instead I decided we could make do with what we had at home and put the grocery store off one more night. I am glad we did.
We had a bag of baby potatoes and some delicious handmade veggie burgers from the Farmers Market, so I decided we would be able to do something amazing with these plus some frozen organic peas. Both my oregano and chives came up on their own from last season and they are growing out of control, taking over my herb box, so I have been trying to take advantage and use them in almost everything I make. Since we were firing up the grill for the brown rice and spinach burgers, this sounded like the perfect way to make a side dish with the potatoes. They really turned out great. There was so much flavor from the fresh herbs and the crispy smoke flavor from the grill was perfect. I think we will be making this a lot this summer.
Grilled Herb Potato Salad
serves 430 baby potatoes, halved
coarse kosher salt
3 garlic cloves, halve two of the cloves, mince the third
olive oil
1 shallot, diced
1 bunch of fresh oregano, chopped
1 bunch of fresh chives, chopped
1/4 cup of pine nuts
freshly ground black pepper
2 teaspoons lemon zestStart by precooking the potatoes. Add the halved baby potatoes, a tablespoon of course salt, two cloves of garlic (halved) and enough water to cover the potatoes by 1-inch to a medium-sized pot over high heat. Bring it to a boil, then reduce heat and simmer for approximately 10-12 minutes or until the potatoes are just tender.
Drain potatoes in a colander and rinse with cold water to cool quickly and stop the potatoes from cooking.
Start your grill, preheat with the cover on for about 10 minutes on high. Lightly spray a grill pan with cooking spray to keep the potatoes from sticking (if you do not have a grill pan, you can also thread the potatoes onto skewers).
Meanwhile in a large bowl, combine 2 tablespoons of olive oil, the diced shallot, minced garlic, the chopped fresh herbs, plus 1 teaspoon of kosher salt and freshly ground black pepper. Mix the mixture to combine the ingredients and then remove half of the mixture to a small bowl, set aside. Add the potatoes to the large mixing bowl, and toss to coat the potatoes with the oil and herb mixture.
Pour the potatoes into the grill pan and set onto your hot grill, we got a bit of smoke because of the little bit of oil dripping, but it gave the potatoes a great smokey flavor. Give the potatoes a stir every few minutes to make sure they aren’t sticking. Once you are sure they aren’t sticking, you can stir them last which will allow them to get crispier. Cook them over a high heat for approximately 15-20 minutes until they are fully cooked and starting to brown and crisp up a bit. (This time will depend on how hot your grill is, we couldn’t get our grill super hot so it took a bit longer, it may only take about 10-15 minutes on a very hot grill). Remove the grill pan from the heat, and add the potatoes back to your large mixing bowl, add the remainder of the oil and herb mixture, the pine nuts, lemon zest and salt and pepper to taste. Toss gently to combine. Enjoy.
(This can also easily be made by roasting or broiling the potatoes in shallow baking pan in your oven. The potatoes can also be boiled 1 day ahead and kept in the refrigerator. Bring them to room temperature before boiling)