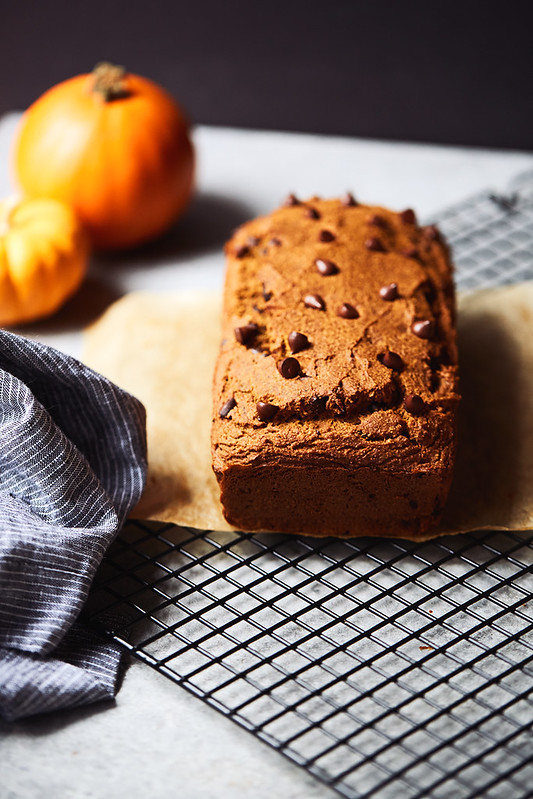
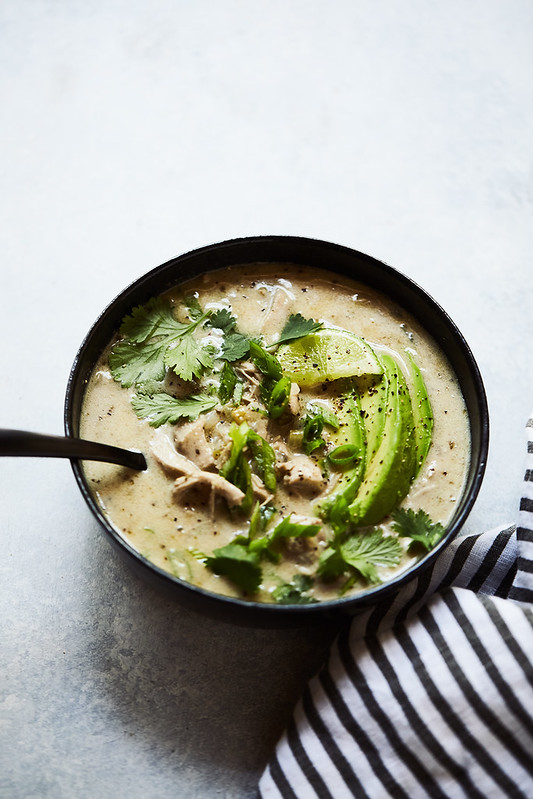
-
Gluten-free Cheesesteak Bowls {keto, grain-free, options for paleo + whole30}
These Gluten-free Cheesesteak Bowls are a fun and different way to get dinner on the table in no time, especially when you planned ahead and pre-prepped the protein using our Protein Prep Chipped Beef recipe. These Gluten-free Cheesesteak bowls are also Keto-friendly, grain-free and if you swap out the cheese, you can easily make it paleo or Whole30, see below for suggestions.
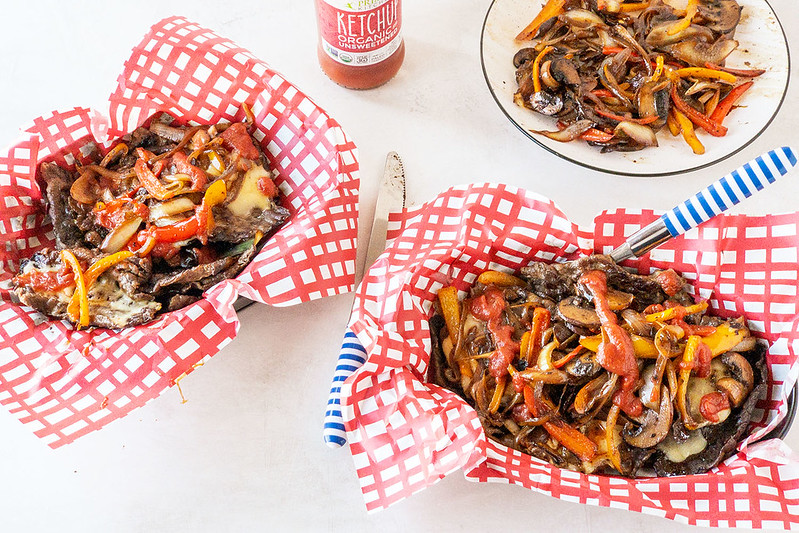

I really feel like cheesesteaks are an underrated meal prepped option. They are so simple but offer so much flavor using add ins and toppings that you love. We chose to forgo the roll and turn these delicious, chipped beef cheesesteaks into hearty bowls with lots of mushrooms, onions, and peppers. As we like to note, this recipe is meant to inspire you and you are totally allowed and encourage to swap out ingredients depending on your taste and preference.
The Cheesesteak mixture would also be delicious over rice, cauliflower rice or other veggies, a top a huge salad or throw it on top of your favorite bread.
-
Grain-free Steak Quesadilla {gluten-free, paleo + dairy-free options}
Tortillas are one of the best vessels for food and I dare anyone to challenge that! Keeping with the theme of our chipped beef as part of our Protein Prep Method, let us introduce our chipped beef quesadillas. If you’ve made the chipped beef for easy meal prep, you are going to need to add this to your list of recipes to use that beef with. Check out our Chipped Beef Recipe for meal prep here.

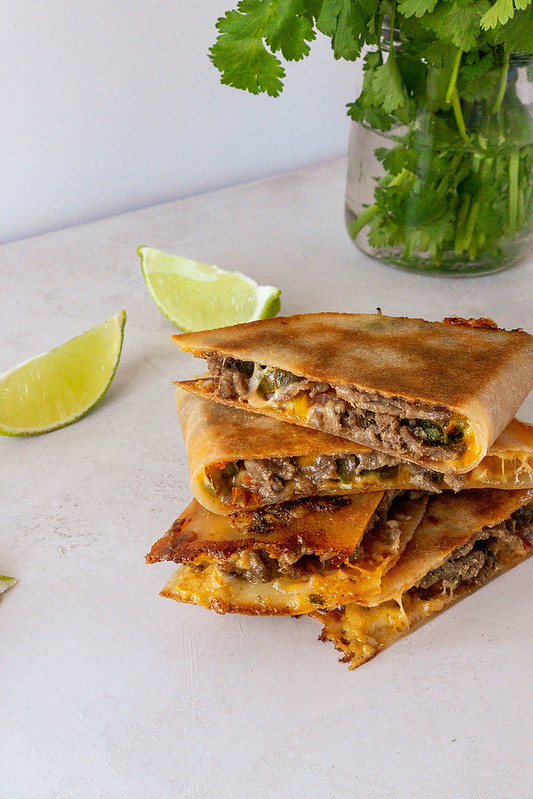
These quesadillas are super simple and take hardly any time at all to make. The key is to prep all of your add ins so they are ready to go in the quesadilla because this recipe takes minutes.
Some people aren’t into the leftover game, but I suggest you make extras! These reheat great in the oven at 350ºF for 10-12 minutes. If you’re in the office a microwave or toaster oven also work well. This recipe goes with that saying, “cook once and eat for the week.”
-
Protein Prep: How-to Make Chipped Beef
We are so excited to bring you a new series of posts and recipes to make meal planning even easier for you. Protein prep is one of the most basic ways to meal prep and plan for yourself without elaborate recipes, tons of work or time.


The goal with the Protein Prep Method is to start the week with maybe 2 to 3 super versatile basic proteins at the start of the week, that you can easily prepare and cook in bulk and then can be used throughout the week a variety of ways to make quick, easy, simple meals that require little to no effort. This month we are sharing a simple but unique way to prepare beef that will give you loads of options for meals throughout your busy week, along with a handful of recipes to utilize this prepped protein.
Chipped beef is something that you never knew you were missing in your meal prep until now. If you haven’t heard of chipped beef it is typically a very thinly sliced beef that is salted and preserved. To simplify things, with our recipe we had the butcher shred some beef into thin slices for us to make our own version that doesn’t require a ton of work or time to preserve that you can feel good eating.
-
Wine Braised Short Ribs with Rustic Mashed Potatoes {gluten-free, grain-free, paleo + Whole30}
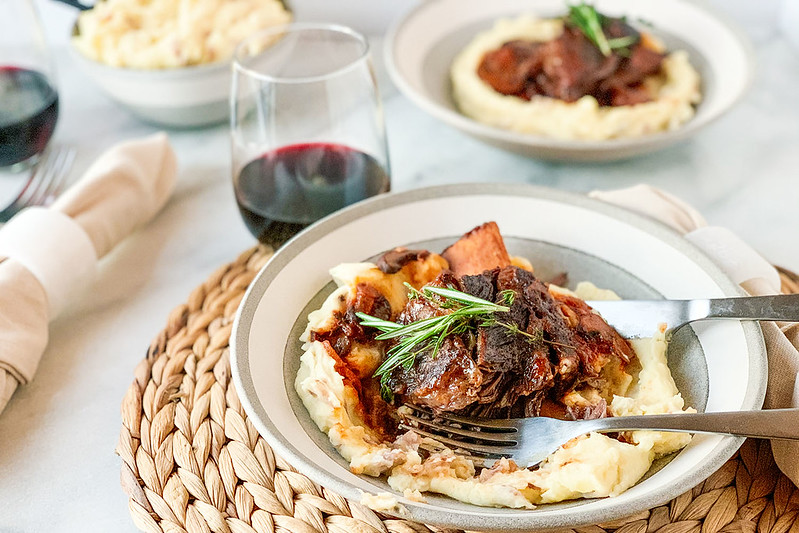
Braised short ribs are one of those dishes that I tend to lean towards ordering from restaurants. I never knew how they’d get that meat so tender and where the heck I could buy that meat to make at home. Well years ago, I finally did some investigating and realized that wow, pretty much every grocery store carries beef short ribs.
I’ve made variations of this recipe for years but decided I needed to clean up the quality of my ingredients. This recipe does say WINE BRAISED but don’t we have an adaptable version for those who do not want to use alcohol in this recipe, if you are following Whole30, etc.
We start off with 3-4 pounds of bone in beef short ribs. This dish is set to serve 4, but I would suggest that if you’d like to have leftovers, I’d double the recipe. This recipe takes a little bit of prep but it is totally worth your time!
-
Gluten-free Butter Cookies (Dairy-free option)
These Gluten-free Butter cookies are a classic simple recipe that can be made during any time of the year but are special to us during the winter holiday season. We adapted one of our family’s recipes to make our butter cookies gluten and dairy free. The cookies still have the same buttery rich flavor from the ghee (clarified butter) without the lactose or casein.


Butter cookies can be known to be a bit dense so for our recipe we really recommend you mix the butter and sugars together until they are light and fluffy. It may take 3-5 minutes to get to that fluffy consistency that we are looking for so we recommend using a stand mixer if you have one and a hand mixer will also work for this recipe. Room temperature ingredients are important with this recipe. Having the butter and egg yolks at room temperature helps the dough come together with the coconut sugar.
If you can’t find ghee at your local grocery store, we have a recipe to make your own ghee at home and it is so easy and worth your time to make a batch to have on hand. Using a high quality organic butter (pasture-raised if you can find it) is optimal when making ghee. If you do not have dairy sensitivity you can for sure use regular high quality butter in this recipe it swaps very easily.
-
Bone Broth Risotto with Pan Seared Scallops {gluten-free + dairy-free}
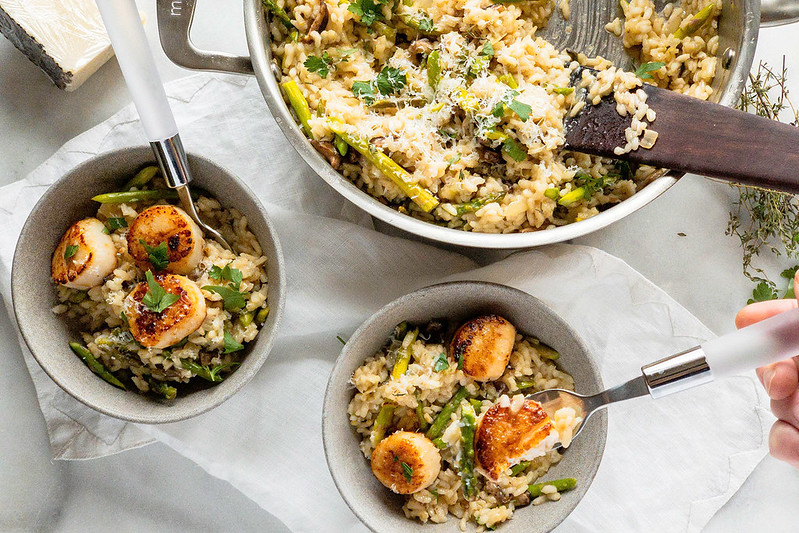
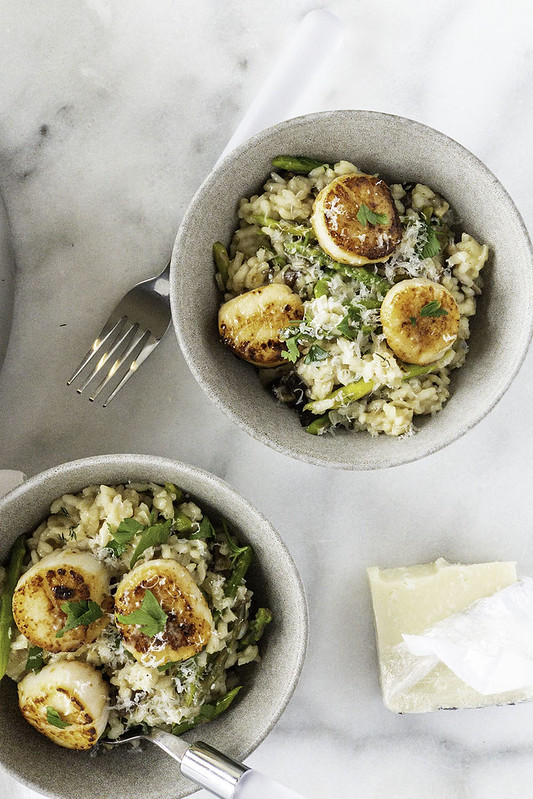
Risotto is one of those comfort foods that’s easier and more versatile than most people think. This recipe does take some attention because you need to add one cup of broth at a time, but it is well worth it! One of the best parts about this Bone Broth Risotto with Pan Seared Scallops is that it is packed with flavor, ingredients that you know have added nutritional value, but the best part is you save more than half of the amount of money on this dish making it at home than buying at a restaurant. There are no extra oils and ingredients that you can’t pronounce the name of. This recipe is great for a novice cook looking to dip their toe in an elegant new dish to show off to their family and friends.
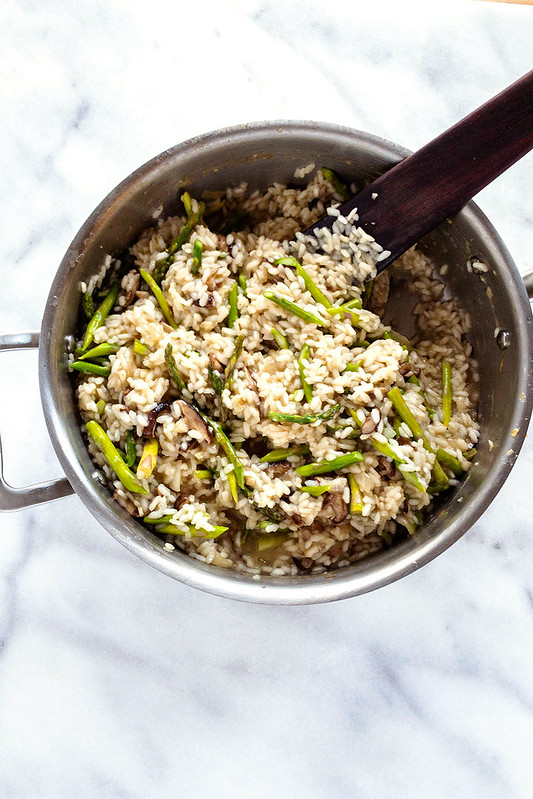
In this recipe we use arborio rice. Arborio rice is known to be very starchy which in turn creates this creaminess without using any milk or cream. Arborio rice is also naturally gluten free for those that are sensitive or intolerant to gluten this is a great option.
We chose turkey bone broth in this recipe because Thanksgiving has just come and gone, and we had a batch on hand. Don’t worry though, any bone broth or stock that is homemade or store-bought will work with this recipe. Bone broth has lots of nutritional value! It’s rich in minerals, amino acids, protein. Here is a post we did on making your own bone broth with more information on the nutritional aspects.
-
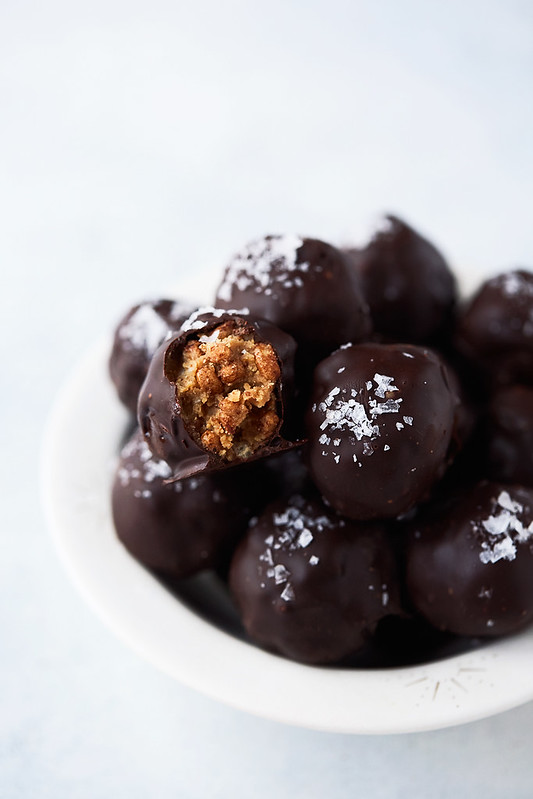
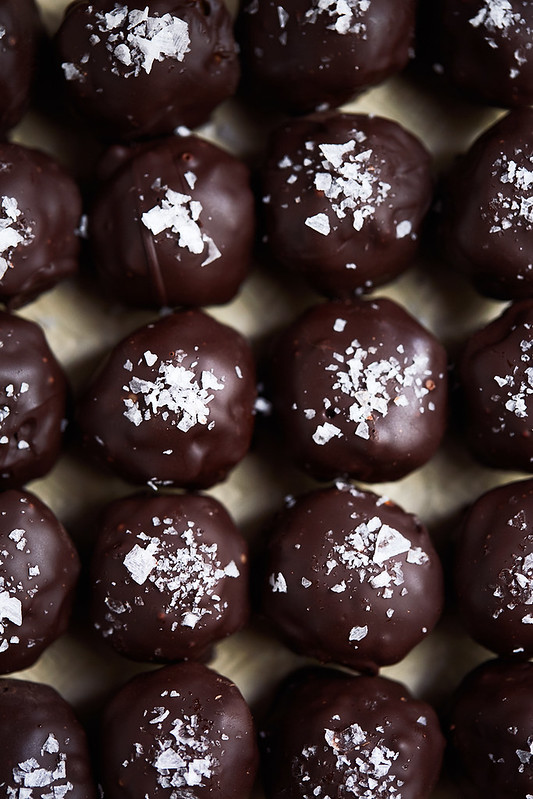
Dark Chocolate Crispy Peanut Butter Balls – No Bake {Gluten-Free + Cane Sugar-Free}
These gluten-free Dark Chocolate Crispy Peanut Butter Balls are literally ALL of my favorite things in one. Dark chocolate, peanut butter, they’re a little creamy, a little crunchy and they have the perfect bit of salt on top. WHAT? Did I dream these?

We had a small outdoor, safe, Thanksgiving celebration here at out house with our little “Pandemic Pod of Pals” and I made a full spread of classic, Thanksgiving food w could enjoy outside on our deck. Our friend Audrey offered to bring her famous Chocolate Peanut Butter Balls to share and when dinner ended and I pulled them from the fridge, made sure they were gluten-free and then promptly popped one into my mouth. After I yelled a few overly excited expletives I realized for me, it was love at first bite!! I believe while I was dancing with one of these in my mouth, my exact quote was (and I will leave out my excited use of the F-word) – “OMG, what is this magic? This is all of my most favorite things in one bite!!!”
After getting Audrey’s original recipe, I made a few small tweaks to the recipe, swapping powdered sugar for coconut sugar and maple syrup, leaving out vegan butter and cutting it in half and opting for salted grass-fed butter instead (you can also use ghee or coconut oil here, too) and the box of sprouted brown rice cacao crisps I already had in the pantry made for the perfect crispy crunchy interior.
There’s just something about the classic flavors of dark chocolate and peanut butter that I will never tired of and while there are so many nut butter alternatives and yeh, sure, they are good, they just don’t quite do it for me the way that peanut butter does (see below for options and alternatives for other options, if you must).
Making these Dark Chocolate Crispy Peanut Butter Balls was a therapeutic baking session (sans actually baking) thanks to the sadness of my cancelled plans. There’s something about being in the kitchen, Christmas music blaring and making something sweet that is instantly soothing to the soul.
The best part about these, since they make well over 4 dozen balls, they are perfect to portion out and share with people you love, especially for the holidays. Leave a small box for your neighbors, give some to your trainer in an effort to bribe him to go easy on you in your workout (I might have done that) or just keep them ALL for yourself.
I have since learned, thanks to Google that these Rice Crispy Peanut Butter Balls are a classic recipe, though many of the original recipes include half as much cereal and peanut butter and a full cup of powdered sugar, plus milk chocolate. I can’t even imagine how overly sweet those are. I really love that these Dark Chocolate Crispy Peanut Butter Balls are the perfect amount of sweet without hitting you over the head with it.
I hope you enjoy these Dark Chocolate Crispy Peanut Butter Balls as such as I did – and please let me know if they make you scream swear words out of pure glee, too!
By the way, in other circumstances I would have loved to share process photos while I made these, but to be fair, I did make them at like 8pm on a Sunday night after we found out our Yosemite trip had been officially cancelled because our campgrounds had closed due to this secondary lock down in California. So it is what it is, like the rest of 2020!

Also, hey – did you hear the news?
Speaking of chocolate, in case you missed it, I officially unveiled the brand new Tasty Yummies web store last week and introduced the three exclusive Tasty Yummies raw organic dark chocolate bars – Basic B, Salty B and Spicy B. All of the bars are dairy-free, cane sugar-free featuring the right amount of sweetness from mineral-rich coconut sugar, and luscious raw cacao butter stone ground at low temperatures. I am so proud of these bars and I am so excited to finally share them with all of you.
While I wouldn’t necessarily recommend melting down these Tasty Yummies Chocolate Bars like 10 of them for this particular recipe, they are the perfect bar to savor and enjoy every single day.
-
Winter Salad with Chicken, Root Veggies & Champagne Vinaigrette
If you thought salad was only a summer dish, I promise this Winter Salad with Chicken, Root Veggies & Champagne Vinaigrette is sure to change your mind. This salad has a ton of warming flavors with a winter vibe from the rosemary to root veggies with lots of options for you to customize to your family’s needs.

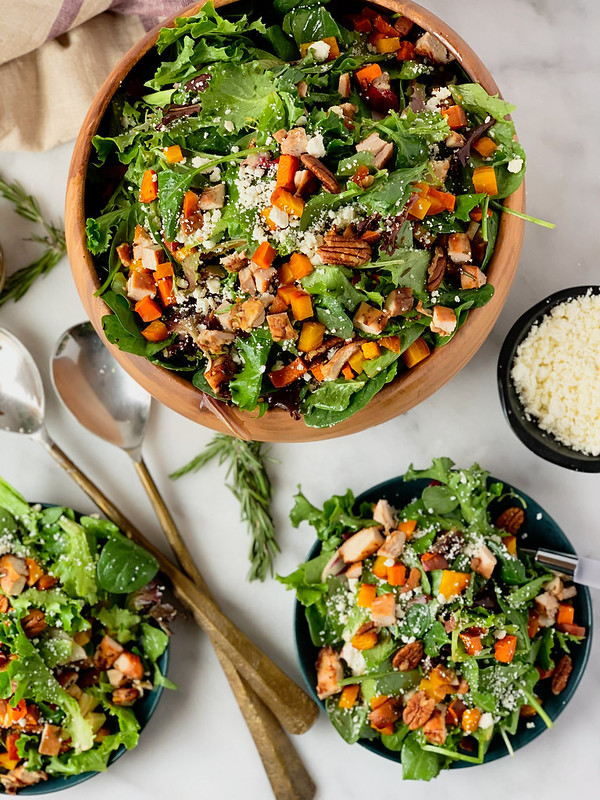
This Winter Salad with Chicken, Root Veggies & Champagne Vinaigrette is a wonderful way to celebrate the bounty of the season with a meal-sized salad FULL of nutrients and valor.


First up is the roasted rosemary balsamic garlic chicken that smells like a night with heavy snow and everyone hanging out by the fire all nicely warm and cozy. This chicken is quick to cook, but you can also plan ahead and prep the chicken a day or two ahead, if you are someone who batch preps your proteins at the start of the week. It makes easy weeknight meals even easier. If you want to this Winter Salad to be a side dish to another protein, simply leave the chicken out.
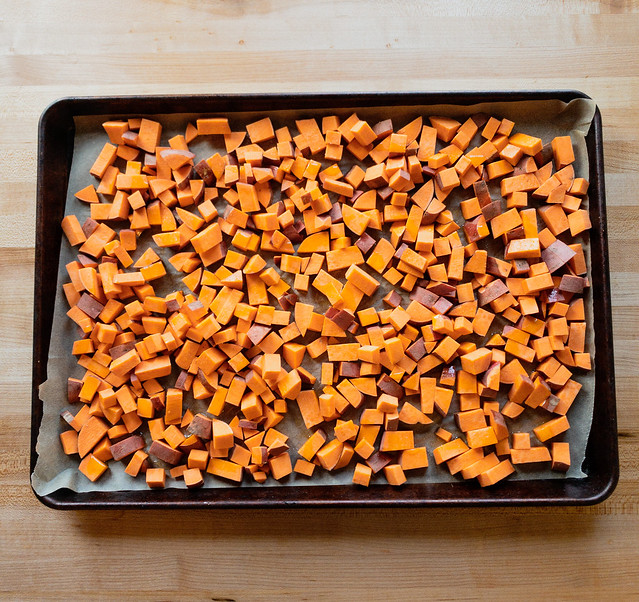
Next up we have some roasted sweet potatoes that add a nice sweetness and texture and can take the place of croutons any day. You may be surprised with the roasted beets in this salad but the nutty earthy flavor they provide pairs very nicely with the rosemary chicken. A sprinkle of goat cheese and chopped pecans are the perfect final add-ins. The topper is the champagne vinaigrette. It sounds fancy, it tastes fancy, but don’t worry it is very simple to make and I’m pretty sure this will become a staple dressing.
-
5 Simple Tips to Relax and Calm Your Mind and Body
This post was created in partnership with MegaFood, a company crafting premium supplements with real food and added nutrients. I am proud to work with brands that care about the health of its consumers and the planet. As always, all opinions, ideas and text are my own. Thanks for supporting the sponsors that allow me to create new and special content like this for Tasty Yummies.

There is no denying stress is part of the human experience and while stress may be an inevitable part of living, supporting the body in its stress resiliency and working on our response to stress doesn’t have to be a complicated undertaking.
Stress is pervasive, and as I teach all of my Nutritional Therapy clients, it isn’t just the typical mental and emotional life stressors we need to consider. Stress and our body’s response to stress can sneak in through blood sugar dysregulation, inflammation, circadian rhythm disruption, and so much more. What are we to do when stress surrounds us and we are desperate to relax and find peace and calm in our mind and body?
Many of the stressors we’re exposed to might be beyond our control; we can control our response to stress and bring a sense of calm to the mind and body to support our nervous system from being impacted by the stress.
Here are my top 5 tips to relax and calm your mind and body and to support a healthy response to stress:
-
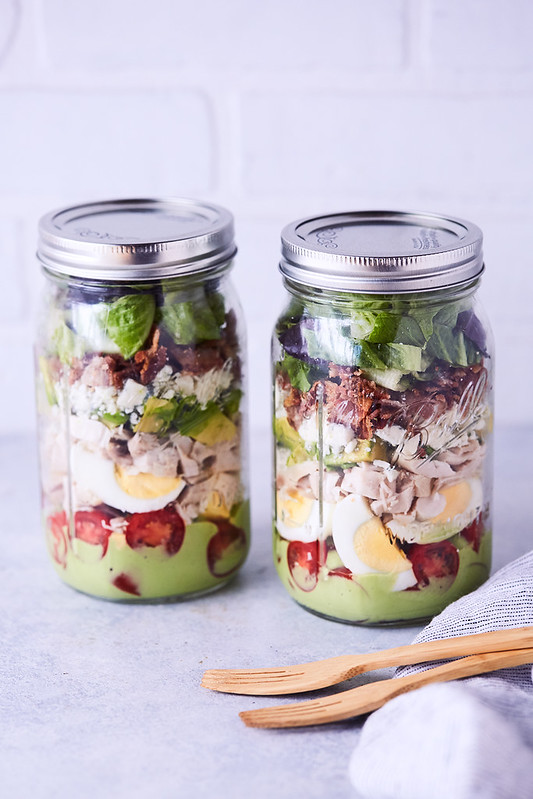
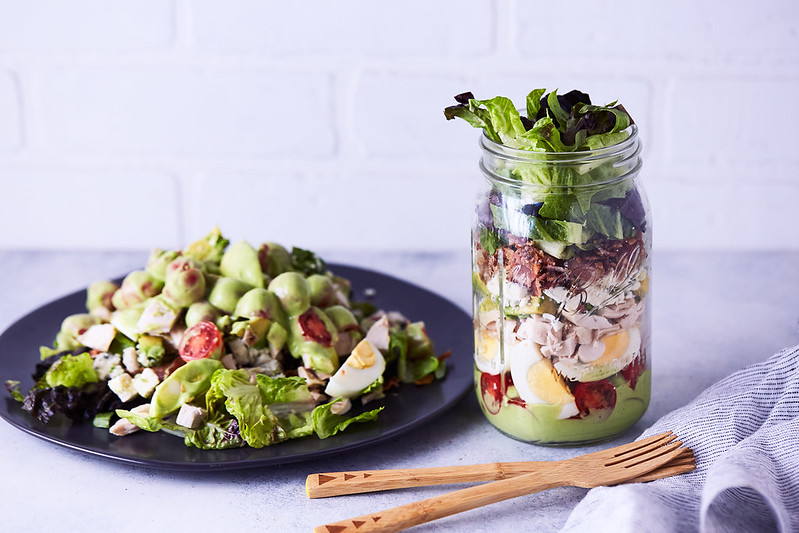
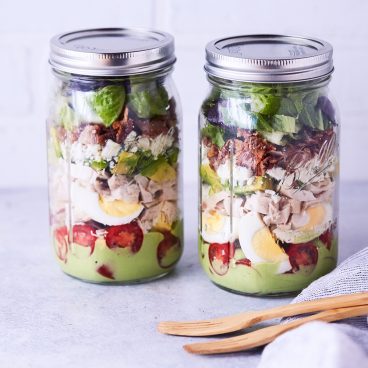
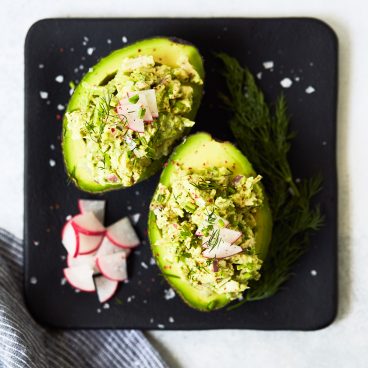
California Cobb Mason Jar Salad with Green Goddess Dressing {gluten-free, keto, paleo + Whole30 options}

California Cobb Mason Jar Salad with Green Goddess Dressing
California is known for so many incredible things, these California Cobb Mason Jars Salads with Green Goddess Dressing featuring California Avocados essentially combines them all in one easy-to-make, on-the-go meal!
Summer in California looks a lot different this year, but we are making the most of the current situation and of course, all the incredible goodness that California always has to offer us.
We’ve gotten quite creative with our time outside of the house this summer, including our date nights. Weekends used to mean heading to a new restaurant, somewhere we could feel pampered, explore a new neighborhood and have a true California experience. In recent months, we have been taking drives to the ocean, picking a new beach each week, grabbing take out from our favorite local, farm-to-table restaurants, supporting California farmers and purveyors or just making and taking our own meals to-go!!
We are always celebrating the goodness that California offers from amazing produce and signature flavors in classic recipes to the best dang views and outdoor living there is!
One of my most favorite classic California creations is the California Cobb Salad. I am not quite sure where this iconic salad originated but today I am sharing a fun new twist so you can take it up a notch and make it portable.
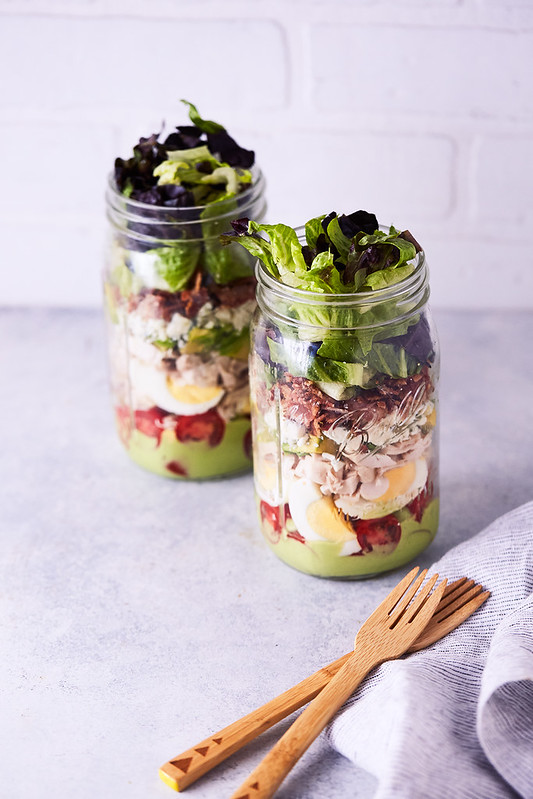
California Cobb Salad
A classic California Cobb salad featuring chicken, bacon, California avocado, hard boiled egg, blue cheese crumbles and various fresh produce like lettuce and tomatoes, usually lined up and arranged beautifully in a rainbow presentation.
Here’s the thing about a Cobb salad, you can really make it your own. Add some red onions or cucumbers, maybe some chickpeas. Add in spinach, kale or arugula for more dark leafy greens. Swap out the blue cheese for more avocado. As for the dressing, there are many variations you will find here, as well, from ranch to blue cheese dressing or even a simple balsamic vinaigrettes – but today, since we are celebrating California this California Avocado Green Goddess Dressing felt very apropos to celebrate one of California’s greatest gifts, the avocado!
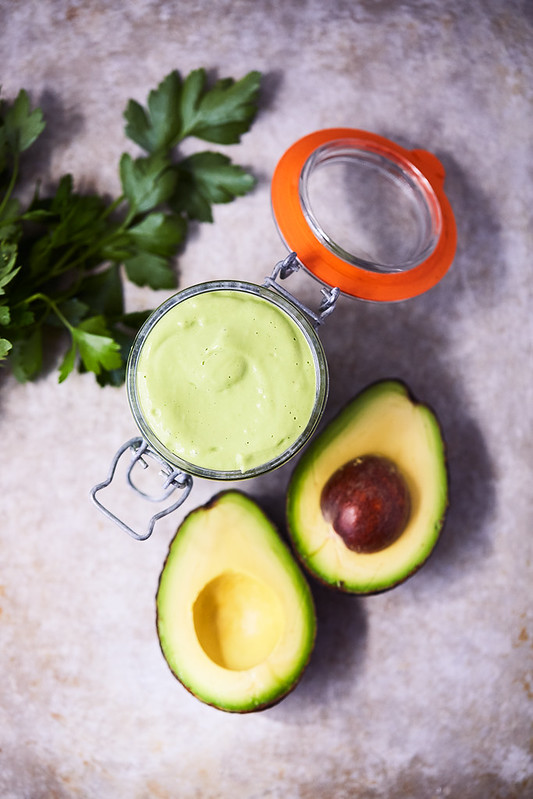
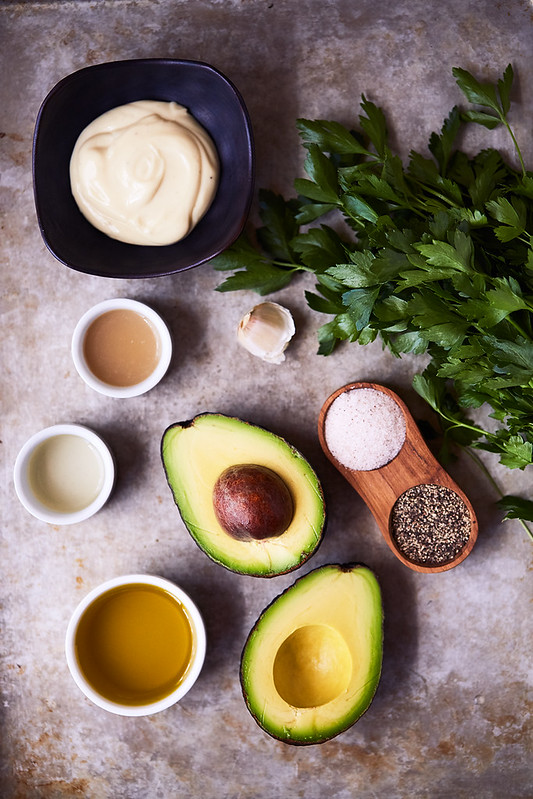
California Avocado Green Goddess Dressing
This simple-to-make creamy green goddess dressing is THE perfect compliment to this California-inspired salad. From it’s vibrant color to the fresh, bright flavor and rich, creamy goodness. This makes more than what you need for two large mason jar salads, but keep it on hand for dipping fresh veggies, throw it over any salad or grilled veggies, over eggs, etc.

How to Make California Cobb Salad in a Jar:
Creating and serving a salad in a jar is a game-changer for summer eats, especially on-the-go. Picnics and beach trips may not be as abundant but we’ve been maximizing our date nights with grabbing food and driving to the beach in LA for what I will venture to call the finest oceanside dining, from the luxury of our own car.
When creating mason jar salads here are a few simple tips to make the best salad experience possible – meaning NO sad, soggy lettuce:
- Start with your dressing at the bottom, anywhere from 1-4 tablespoons of dressing, depending on how much you like and how large the salad is. By keeping the dressing at the bottom you’ll prevent the lettuce and other ingredients from getting mushy.
- Continue to layer your mason jar salad by adding any hard veggies and fruits. I find adding tomatoes at the bottom right after the dressing helps to keep any excess water from the tomatoes away from the other ingredients.
- Next add your proteins.
- Layer any soft veggies or fruit (like avocados) mid-jar or just right before the greens.
- Add the blue cheese at any point in the middle, if using.
- Finally, add the salad greens. Salad greens such as lettuce have to always be on top to avoid them getting soggy or wilted.
By finishing with the lettuce or greens last you can squeeze in as much as you can fit into the jar. With the greens being on top, when you turn the jar over to empty it out, you create a bed of greens.
Mason Jar Salads are the Perfect On-the-Go Meal
With how these salads are stored, you can make it up to a day head and just grab and go. Bringing a plate and some forks along for the ride. Most people assume you eat a mason jar salad straight from the jar… NOPE! That wouldn’t be very fun or easy.
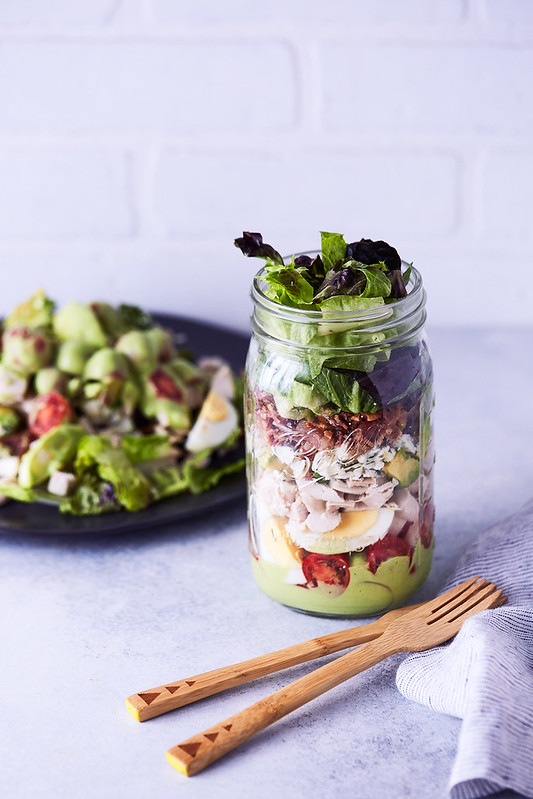
How Do You Eat a Mason Jar Salad?
Well, when you are ready to eat the mason jar salad, just…
- remove the cap to the mason jar;
- if there is room in the jar, give the mason jar salad a really shake to mix the dressing with the rest of the ingredients;
- either way just shake the salad into a bowl or a large plate as you pour all the ingredients out;
- toss as needed to combine.
Enjoy!!
How Long Will a Mason Jar Salad Last?
Most mason jar salads will last up to 5 days, if stored properly, so feel free to make ahead or even use this method for meal prepping for the week.
Be sure the lid is screwed on tightly so it’s sealed and store in the fridge.
Great for on-the-go lunches if you are heading to work, the perfect park lunch if you need a break from working from home or a fun date night beach-side dinner.
California Cobb Mason Jar Salad with Green Goddess Dressing {gluten-free, keto, paleo + Whole30 options}
gluten-free, grain-free, nut-free, keto, options for Whole30, paleo, dairy-freePrint Pin RateServings: 2 -4 servingsIngredients
- 2-8 tablespoons California Avocado Green Goddess Dressing, see recipe below
- 1 pint grape or cherry tomatoes, halved
- 2 to 4 hard boiled eggs
- 6 to 8 oz of cooked chicken, shredded, cubed, etc
- 1 California Avocado, cut into cubes
- 2-4 oz crumbled blue cheese
- 6 pieces of cooked bacon, crumbled or roughly chopped
- 4 cups+ of salad greens, I used little gem lettuce, because it was local and in season
Instructions
- Make sure your two wide-mouth mason jars are clean and dry.
- Add 1-4 tablespoons of California Avocado Green Goddess Dressing to the bottom each jar. (it’s your preference for how much dressing you like and how many ingredients there are). These keeps the other ingredients from getting soft or mushy.
- Diving the ingredients between the two jars, begin layering the ingredients, in the order listed above.
- Tomatoes, then eggs, chicken, avocado, cheese, bacon, then lettuce.
- When you get to the lettuce, ass as much as you can squeeze into the jar, feel free to gently press down to make enough room for the greens.
- When you are ready to eat your California Cobb Mason Jar Salad unscrew the lid and shake the contents out into a bowl or plate. Toss everything well to combine, as needed so everything is coated in the dressing and the ingredients are well dispersed.
Notes
Anything listed above typically found in a Classic Cobb is obviously optional. Feel free to add your favorite salad ingredient, like cucumber, red onion, radish, chickpeas, a different cheese, your favorite lettuce or other greens – you can make these Mason Jar Cobb Salads your own!!
Green Goddess Dressing {gluten-free, keto, paleo + Whole30}
gluten-free, paleo, keto, whole30Print Pin RateIngredients
- 1 large ripe California avocado
- 1 cup packed fresh parsley, stems removed
- ¼ cup extra virgin olive oil
- ¼ cup water, more or less as needed for desired thickness
- 3 tablespoons avocado oil mayo
- 2 tablespoons fresh lemon juice
- 1 tablespoon white wine vinegar, or apple cider vinegar
- 1 large garlic clove, or 1 very small shallot
- 3 tablespoons avocado oil mayo
- sea salt and pepper to taste
Instructions
- Add all of the ingredients to a high speed blender or small food processor. Pulse a few times then blend until well incorporated and super creamy. Add more water as needed to reach your desired consistency.
Notes
You can use half basil and half parsley, if you’d like
Add a small jalapeño (seeds and ribs removed) or red pepper flakes for a little heat
Use a vegan mayo to avoid eggs, as neededThis post is sponsored by the California Avocado Commission but all opinions are my own.
-
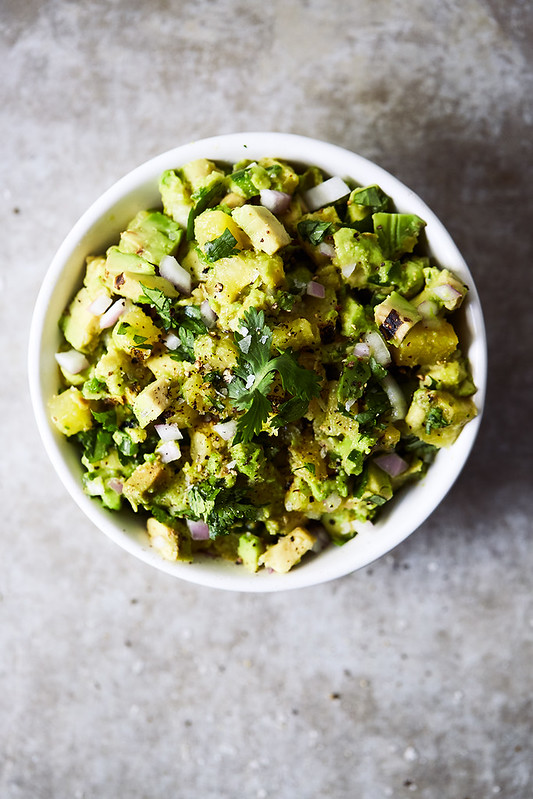
Grilled Pineapple and California Avocado Salsa {Paleo, Whole30, Keto, Vegan}
This easy Grilled Pineapple and California Avocado Salsa recipe makes everything tastier! It’s made with fresh pineapple, California avocado, red onions, jalapeño, cilantro and lime juice.


While June feels like the official kick-off of grill season, it is also California avocado month, and I am already getting creative with what we are putting on the fire (though, let’s just be really honest, here in California it’s always grill season).
Grilling is my favorite. It has become a bit of a weekend activity around here. We pick a dinner (or brunch) project and we make a whole thing of it. Because, I think we can all agree that everything is better grilled.

Included in that – AVOCADOS. Have you ever grilled an avocado? It’s magical! Avocados are a fabulous, versatile fruit that lends itself to savory and sweet dishes of all kind, but did ya know they can be grilled, too! When grilled in their skins, avocados take on a really spectacular smoky flavor and their flesh becomes soft and warm. Beyond this salsa recipe you are about to become obsessed with, grilled avocados are amazing just as they are served up with some salt and pepper, fresh lime juice and a spoon. Grilled avocados are also delicious smashed up into an epic guacamole or just spread on toast for an avocado toast to end all others.
Mixed into a delicious salsa, the creamy, fatty flesh of the grilled avocado is such a welcomed contrast to the bright flavors from the lime and the pineapple and crunchy textures from the pepper and the red onion.
Combined with the pineapple it all comes together perfectly in a stand-out, impressive dish that is sure to wow.The pineapple beautifully caramelizes as it grills – it gets soft, sweet and it transforms into a smokey, caramelized version of itself.
Serve this Grilled Pineapple and California Avocado Salsa with chips as an appetizer or snack, on top of your favorite grilled protein (it would honestly be delicious with chicken, fish, pork or steak), over your favorite salad or to put the finishing touch on your favorite tacos!
It is a delectable balance of sweet, spicy and smoky.

Recipe Options:
- Make the pineapple salsa without the avocado and serve the salsa in the grilled 1/2 avocado “boats” for a fun presentation at your summer dinner party.
- Wanna take it up a notch, grill the onion and jalapeños, too
- Serve over grilled proteins like fish, chicken, pork chops or steak. Add to tacos, salads or any other dish that you want to bring a little flair to.

Grilled Pineapple and California Avocado Salsa
gluten-free, grain-free, dairy-free, nut-free, egg-free, paleo, keto, whole30Print Pin RateServings: 4 +Ingredients
- 1 small whole pineapple
- 2 medium ripe California Avocados
- 1-2 tbs olive oil
- ¼ cup diced red onion
- ¼ cup roughly chopped cilantro
- ½ lime, juiced
- ¼ teaspoon fine sea salt, more or less to taste
- 1-2 tbs finely minced jalapeño, optional (can also use bell pepper or other peppers)
- black pepper, to taste
- Heat your grill, or grill pan to medium-high. Allow to pre-heat for long enough so the grates get super hot. Slice the pineapple into rounds or sliced vertically. Cut the avocados in half and remove the pit.
- Brush both sides of the pineapple slices with olive oil. Brush the flesh side of the avocados with olive oil. Grill the pineapple until caramelized on both sides, about 5-7 minutes per side. Grill the avocado on the flesh side for 5-7 minutes.
- Remove both from grill, let cool slightly. Remove the core on the pineapple slices and dice the the pineapple into 2 cups of bite-sized chunks. Save any extra grilled pineapple rings for a tasty dessert, to serve over yogurt, etc. Dice the avocado into tiny cubes.
- In a large bowl, toss together 2 cups of the diced pineapple and avocado with the jalapeño, onion, cilantro, lime juice and sea salt.
- Serve with chips, over your favorite grilled fish, chicken or pork, use on tacos or atop a salad
- This post is sponsored by the California Avocado Commission but all opinions are my own.
Instructions
- Heat your grill (or grill pan) to medium-high. Allow to pre-heat for long enough so the grates get super hot. Slice the pineapple into rounds or sliced vertically. Cut the avocados in half and remove the pit.
- Brush both sides of the pineapple slices with olive oil. Brush the flesh side of the avocados with olive oil. Grill the pineapple until caramelized on both sides, about 5-7 minutes per side. Grill the avocado on the flesh side for 5-7 minutes.
- Remove both from grill, let cool slightly. Remove the core on the pineapple slices and dice the the pineapple into 2 cups of bite-sized chunks. Save any extra grilled pineapple rings for a tasty dessert, to serve over yogurt, etc. Dice the avocado into tiny cubes.
- In a large bowl, toss together 2 cups of the diced pineapple and avocado with the jalapeño, onion, cilantro, lime juice and sea salt.
- Serve with chips, over your favorite grilled fish, chicken or pork, use on tacos or atop a salad
- This post is sponsored by the California Avocado Commission but all opinions are my own.
This post is sponsored by the California Avocado Commission but all opinions are my own.
-
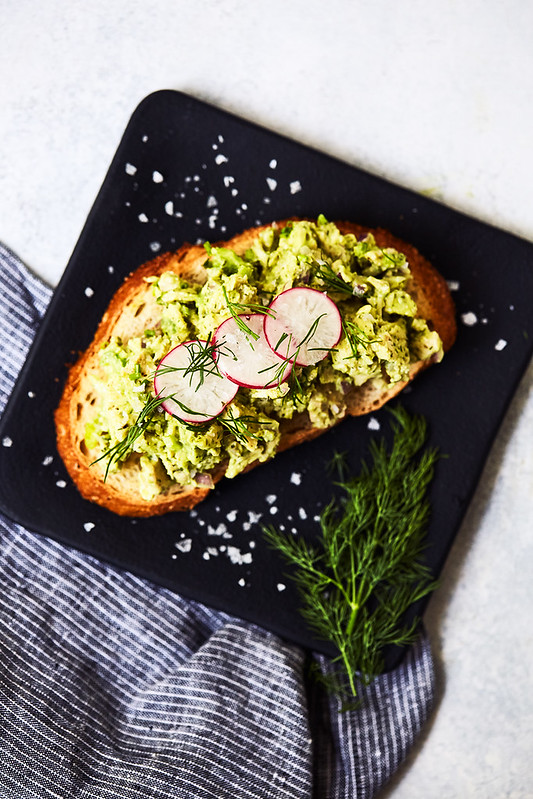
California Avocado Ranch Chicken Salad
This creamy rich, California Avocado ranch chicken salad recipe is a delicious, easy, everyday dairy-free recipe, it is also Paleo, Keto and Whole30 compliant!

When it comes to easy meals on the go, for me, it always starts with quality protein and healthy fat. A meal that starts with these two staple macronutrients means more balanced blood sugar, adequate satiation and satisfaction levels and less of a need for all day snacking.
Whether you follow a paleo approach to your eating, keto or low carb, if you are simply focusing on a balance nutrient-dense, whole foods diet, this simple recipe can be made with leftover batch prepped shredded chicken or a roasted or rotisserie chicken and it’s great for prepping ahead for the week for easy quick lunches or even a quick breakfast option.
Serve on top of your favorite greens in California Avocado boats, on your favorite toasts or with crackers, however you want to enjoy it.

We love chicken salads for easy, fast meals. Most weeks I prep a few pounds of shredded chicken in the Instant Pot or we grab a rotisserie chicken at the market, this makes for fast meals and lots of versatility. You can also buy pre-cooked chicken, or make shredded chicken in a slow cooker with enough chicken broth to cover and cook it for 4 hours on low.

This California Avocado Ranch Chicken Salad features my easy-to-make, dairy-free avocado ranch dressing with California Avocados as the star of the show, bringing rich, creamy goodness without dairy or eggs. Best part, you can use this amazing California Avocado ranch dressing here in the chicken salad, or whip it up quickly and thin it out a bit to dress your favorite salad or leave it on the thicker side for a delicious dip for fresh veggies.
I love how quickly this can get put together with minimal ingredients and so much satiating and flavorful goodness.
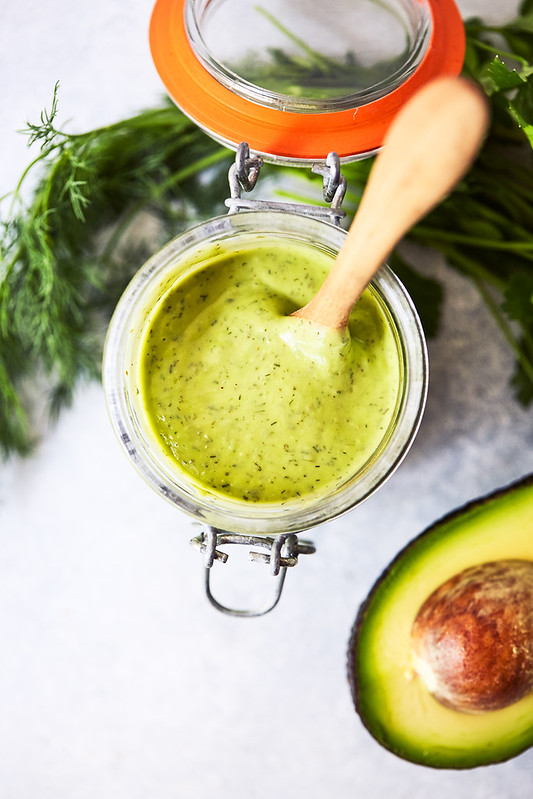
California Avocado Ranch Dressing
gluten-free, dairy-free, paleo, egg-free, nut-free, whole30, keto, AIPPrint Pin RateIngredients
- makes approx. 8oz dressing
- 1 Fresh California Avocado, seeded
- ¼ - ⅓ cup unsweetened non-dairy milk*
- 1 tablespoon lemon juice
- 1 teaspoon chives
- ½ teaspoon dried dill
- ½ teaspoon garlic
- ½ teaspoon onion
- ½ teaspoon sea salt
- Black pepper, to taste
Instructions
- Add all the ingredients to a food process or the butcher of a high speed blender. Start with the 1/4 cup of non-dairy milk, continuing to add more as needed to reach your desired consistency, you may want to add upwards of 1/2 cup for a thinner dressing. You can also use a hand-held immersion blender.
- Cover and refrigerate; eat within 3-5 days.
Notes
Recipe notes:
Add as much non-dairy milk or water to thin to your desired consistency
You can use fresh herbs in place of dried, I recommend approximately 1 tablespoon of each of the herbs. 1 small clove of garlic and 2 tablespoons fresh onion
Depending on your dietary preferences, to make your California Avocado Ranch dressing creamy like a traditional ranch dressing you can also add in 1/4 cup greek yogurt or 1/4 cup avocado oil mayonnaise
California Avocado Ranch Chicken Salad
gluten-free, dairy-free, egg-free, nut-free, paleo, Whole30, Keto, AIPPrint Pin RateServings: 4 servingsIngredients
- 2 cups cooked chicken, shredded or diced, chilled
- ¼ cup diced celery
- ¼ cup dice red onion
- ¾ cup California avocado ranch dressing, more or less to taste
- Salt and pepper, to taste
Instructions
- Add the chicken, celery and onion to a medium mixing bowl. Add desired amount of avocado ranch and mix well. Refrigerate until ready to eat. Serve in California Avocado, on toast, over a salad or enjoy as is.
- Refrigerate, eat within 3-5 days.
This post is sponsored by the California Avocado Commission but all opinions are my own.
-
3-Ingredient Dark Chocolate California Avocado Truffles


3-Ingredient Dark Chocolate California Avocado Truffles
These decadent and delicious Dark Chocolate California Avocado Truffles can be made with just 3 simple ingredients. Plus, with the added bonus of the avocado you get all the amazing nutritious goodness of one of my favorite functional foods.
Rather than heavy cream or butter you’d usually find in a traditional chocolate truffle recipe, avocado steps in and takes this simple recipe up a notch. Best part, you don’t even taste the avocado, all you taste is the rich dark chocolate, but it gives the truffles a decadent, creamy texture and it takes your dessert to the next level. Read the rest of this entry »
-
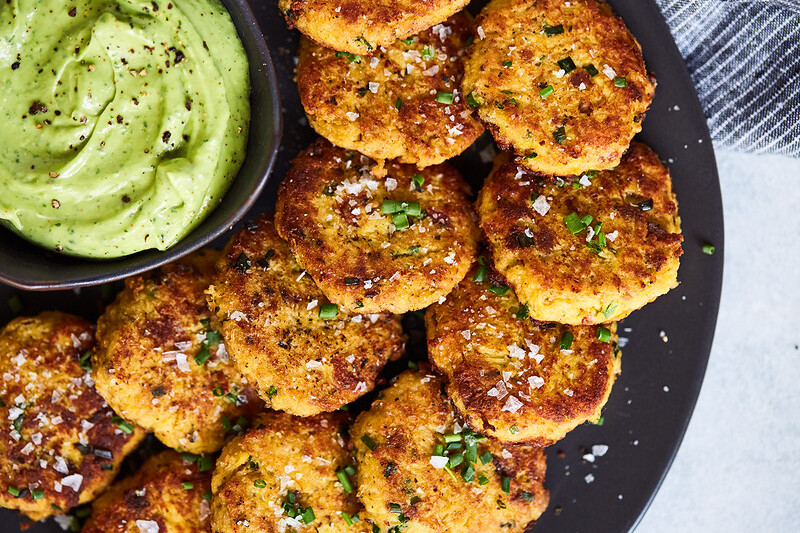
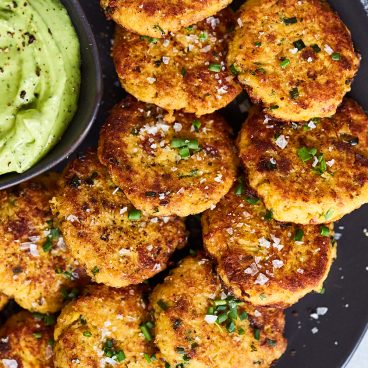
Bacon and Chive Spaghetti Squash Fritters with California Avocado Lime Dipping Sauce {gluten-free, paleo, Whole30, keto}

I try very hard to not play favorites with foods, but that’s a lot easier than it sounds. I will always have favorites, not just from a a flavor standpoint, of course there are foods that hold emotional attachments, memories and traditions and as a Holistic Nutritionist, there is a great long list foods I also really love from a functional perspective.
Avocados are one of my favorites that cross all three. There is not a week that goes by that we don’t have avocados available in our home. Besides being totally obsessed with how they taste and how versatile they are, they can go from savory to sweet, with ease, I also love what a functional and healthful food avocados are.
With nearly 20 essential vitamins and nutrients avocado are also a good source of fiber and folate, potassium, vitamin E and B vitamins. As well, as a source of healthy fats, avocados they play a vital role in a balanced, nutrient-dense diet and health fats essentially work as a nutrient-booster enabling fat soluble nutrients in foods eaten alongside the avocado, to become more assimilated and absorbed, nutrients like vitamins A, D, E and K.
I had the pleasure, a couple years back, of visiting a California Avocado grove not too far from my own home and I was so honored to see these beautiful fruits growing in their natural habitat, being cared for and tended to by a family of growers right here in my own state. The lab of love for this fruit, picked by hand by families who have been growing to and tending these trees for years, gave me a new appreciation for one of my favorite foods. Walking the groves I got to, first hand, see the patience, the love, care and craftsmanship and taste the difference and my love grew deeper.

I have a long list of ways that I love to enjoy avocados, but I especially love a delicious sauce like this one, to highlight the flavor of this delicious fruit. These crispy, flavor packed bacon and chive spaghetti squash fritters are taken up a notch thanks to this flavorful, creamy sauce that you are absolutely going to want to put on anything and everything.
With the addition of the lime and a tangy yogurt, besides flavor and a little punch, the acidity also works to prevent the avocado from browning, keeping this delicious dipping sauce, vibrant and fresh.

This California Avocado Lime Dipping sauce is also great as a creamy salad dressing, it’s amazing drizzled over roasted veggies. Use it as a marinade for chicken or as a sauce a top your favorite fish or other protein. It also makes a great veggie dip or a dip for your favorite crackers or chips.
These simple Bacon and Chive Spaghetti Squash Fritters with California Avocado Lime Dipping Sauce is a quick recipe to make and a great option for leftover spaghetti squash. They make a delicious side dish or a super fun starter / appetizer. I think you are really gonna love these.
I like to make the dipping sauce first and place into the fridge to chill while making the fritters.
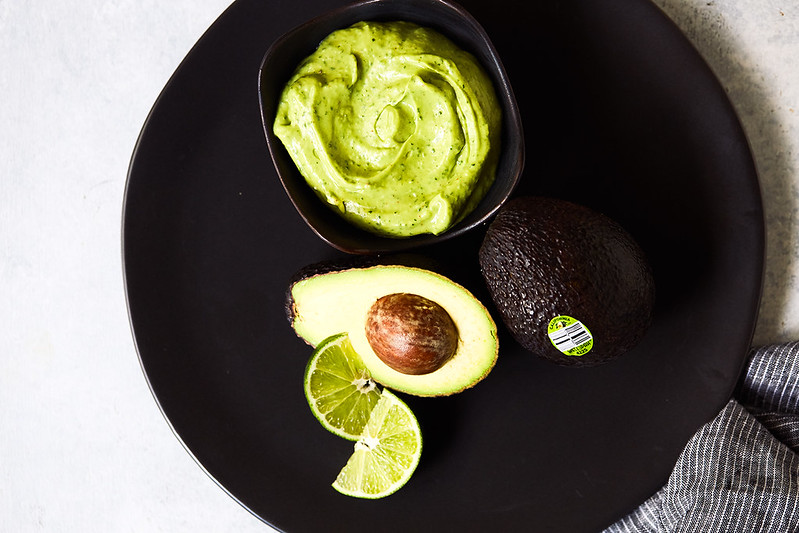
California Avocado Lime Dipping Sauce {gluten-free, paleo, Whole30, keto}
gluten-free, keto, paleo, whole30, nut-freePrint Pin RateIngredients
- 2 California avocados
- 4 tablespoons lime juice, from 2 limes
- ¼ cup fresh cilantro
- ¼ cup yogurt, non-dairy yogurt works just fine here
- ¼ teaspoon sea salt, more to taste, as needed
- black pepper or red pepper flakes, to taste
Instructions
- Add all of the ingredients to a high powered blender or food processor and blend until well combined. An immersion blender will also work.
- Season with salt and pepper to taste (just a little at a time), then blend again and taste. Add more salt and pepper, if necessary. Store the sauce in the fridge in an airtight container and give it a good stir before serving. It will keep and stay fresh for upwards of 3 to 4 days.

Bacon and Chive Spaghetti Squash Fritters with California Avocado Lime Dipping Sauce {gluten-free, paleo, Whole30, keto}
gluten-free, paleo, Whole30, keto, grain-free, dairy-free, nut-freePrint Pin RateServings: 12 frittersIngredients
- 4 cups cooked spaghetti squash threads
- 1 teaspoon garlic powder
- 1 teaspoon onion powder
- ½ teaspoon sea salt
- ⅛ teaspoon black pepper
- ¼ cup coconut flour
- 2 large eggs, whisked
- 4-5 slices bacon, cooked, drained of fat, and finely chopped (1/4 cup)
- 2 tablespoon chives, finely minced
- 1-3 tbsp ghee, refined organic coconut oil or preferred cooking fat for frying
Options to add:
- ¼ cup parmesan cheese, freshly grated
- ¼ teaspoon chipotle powder
- Cook in bacon fat for extra flavor
Instructions
- Remove the "spaghetti" from your spaghetti squash with a fork and place in a large mixing bowl.
- Add the mound of squash to a clean kitchen towel (or a few paper towels) and squeeze out any excess moisture. Really give it some good squeezes. Don’t skip this step, it’s worth it for finished product - you will be surprised how much excess liquid comes out. Add the garlic and onion, power salt, pepper, and coconut flour. Add in the whisked eggs, the bacon and the chives.
- Mix really well with fork until all ingredients are fully combined.
- Using your hands, form into 12 equally sized patties, made with approximately 1/4 cup of the mixture each.
- Flatten and place on a parchment lined baking sheet. Continue forming until all are ready to be cooked.
- Heat a large skillet over medium high heat and add your ghee or coconut oil. Once the pan is hot, please the fritters in.
- Once they'e browned on one side, flip and brown on the second side.
- Drain on paper towels and continue to fry in batches, as necessary, adding more cooking oil as needed.
- Serve right away with the avocado lime dipping sauce and enjoy!
Notes
Leave out the bacon to make these vegetarian.This post is sponsored by the California Avocado Commission but all opinions are my own.
-
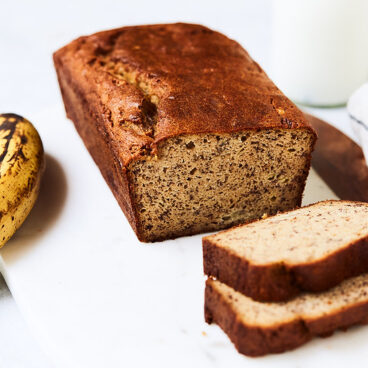
Low Carb Banana Bread {paleo, keto, gluten-free, dairy-free}
This delicious, low carb banana bread is only sweetened with a few ripe bananas and it’s so delicious, super satisfying and perfectly subtle. Grain-free, dairy-free, paleo and keto-friendly.

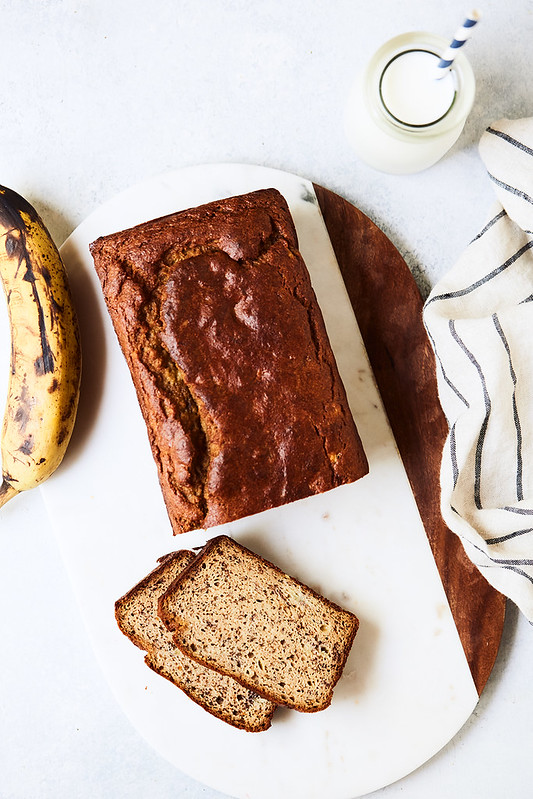
I don’t exactly love straight-up bananas, personally, but Mark often requests having a bunch on hand. I will occasionally add them to our organic CSA box (community supported agriculture) that gets delivered to the house each week. But, often, he won’t eat all of them and then they get a bit over ripe. YUCK! Literally one of my least favorite things, in the entire world. Usually I just peel them and freeze for smoothies, but this most recent time, it felt like a perfect reason to make banana bread, a treat I haven’t made in maybe nearly a decade. (not joking)
For my low key sweet taste buds, the ripe bananas are the perfect sweetener – nothing extra needed. I find for my palate, the subtle sweetness from a ripe, in-season fruit, some coconut cream, super dark chocolate or even just caramelized, roasted veggies – these are often plenty sweet for me to satisfy that important taste. I absolutely don’t believe sweet is a taste that needs to be avoided but redefining the relationship that we have with sweet is the ultimate goal. These beautiful, nuanced, naturally sweet flavors from real whole foods can easily get missed when we flood our taste buds constantly with sugar or sugar alternatives. This is what leads to the constant sugar cravings and needing more and more sweet stuff. Imagine if a piece of fruit were enough!! Talk about taking away the power a food has over us (ahem, this is what sugar is best at) and experiencing true food freedom.
If reducing your sugar intake is still fairly new for yo and you are worried bananas as a sweetener might not cut it for you, I challenge you to give it a try and then you can always consider a light drizzle of honey over your warm, toasted banana bread. Or you can always add a tablespoon or two of coconut sugar or date sugar to the batter. Some dark chocolate chips might also be a nice addition to the bread, too, if that’s your thing. Mmmmmm.

How to Make Low Carb Banana Bread:
The most important step is the super ripe bananas, they bring the flavor and the sweetness here. Regular ripe bananas will be far less sweet. If your bananas have green tips, that’s awesome for a lower sugar fruit option, but they tend to be more starchy and less sweet and you definitely won’t be able to mash them up.
Flour Options for Low Carb Banana Bread:
Next, the almond flour is the star here!! This recipe was developed and tested with blanched almond flour. Be sure to go with a blanched fine almond flour, an almond meal with the skins included in the flour will likely results in a slightly different texture. If you can’t have almond flour, you can experiment with another nut flour, like cashew flour, macadamia flour or hazelnut flour. Sunflower seed flour may work, but be aware that the baking soda combined with sunflower seed flour can result in a green color due to chlorophyll present in the seeds, half the baking soda and add 1 teaspoon of cream of tartar. You might also try oat flour or an all-purpose gluten-free flour, while not grain-free or low carb, these might work for some of you, they *should* substitute 1:1. Please note – I have not tested ANY of these, so experiment at your own risk and please report back if you do. You CANNOT swap coconut flour for almond flour as a 1:1, they are totally different flours and they behave and react completely different. Coconut flour is more absorbent. A good starting point if opting for coconut flour would be to use 1 cup of tapioca flour and 1 cup of coconut flour in place of the 2 cups of almond flour and add two additional eggs. Again, these are educated guesses, this HAS NOT been tested on my end.
Optional Add-ins for Low Carb Banana Bread:
Add in your favorite nut or seed, walnuts, pecans or hemp seeds are really great options. You can also add in dark chocolate chips or chunks, cacao nibs, cranberries, raisins or other dried fruit. You can also add cut up bananas to the top of your loaf just before baking.

Ingredients
- 2 cups blanched superfine almond flour
- ¼ cup arrowroot starch, tapioca starch would also work*
- 1 teaspoon baking soda
- ½ teaspoon baking powder, use or make a paleo baking power, if necessary
- ¼ teaspoon fine sea salt
- 2 teaspoons ground cinnamon
- generous pinch ground nutmeg, optional
- 4 small-medium very ripe bananas, or 3 large, mashed well (measures to a bit over 1 cup)
- 4 large eggs, room temperature
- ¼ cup ghee, melted (melted coconut oil, avocado oil or melted butter would also work)
- 1 tablespoon vanilla extract
Instructions
- Preheat the oven to 350ºF. Line a small loaf pan (my pan was 7.5 X 3.5 inches) with parchment paper strips, leaving two inches of overhang on the sides of the pan. Lightly brush or spray the lined pan with oil.
- In a large bowl, whisk together the almond flour breaking up any big clumps, arrowroot starch, baking soda, baking powder, salt, cinnamon and nutmeg.
- In a medium bowl, whisk together the mashed banana, eggs, vanilla and ghee (or coconut oil) until well combined.
- Stir the wet ingredients into the dry, slowly. Stir by hand until it is smooth and no clumps of flour remains.
- Transfer the batter to the prepared pan. Gently tap the pan on the counter top to distribute the batter and eliminate any air pockets.
- Bake in the preheated oven for 50-60 minutes until it's a nice deep golden brown color on top and set and a toothpick inserted in the center comes out clean. (if the top of the loaf starts to brown too quickly, tent it with foil).
- Using the parchment paper strips that overhang, carefully lift up and remove the banana bread from the pan and transfer it to a wire rack to cool. Carefully remove the parchment paper so the bread can cool.
- Allow to cool at least 30 minutes. Cut into 10-12 slices, serve and enjoy.
Notes
if you wish to skip the arrowroot or tapioca starch, try instead ground golden flaxseed meal -
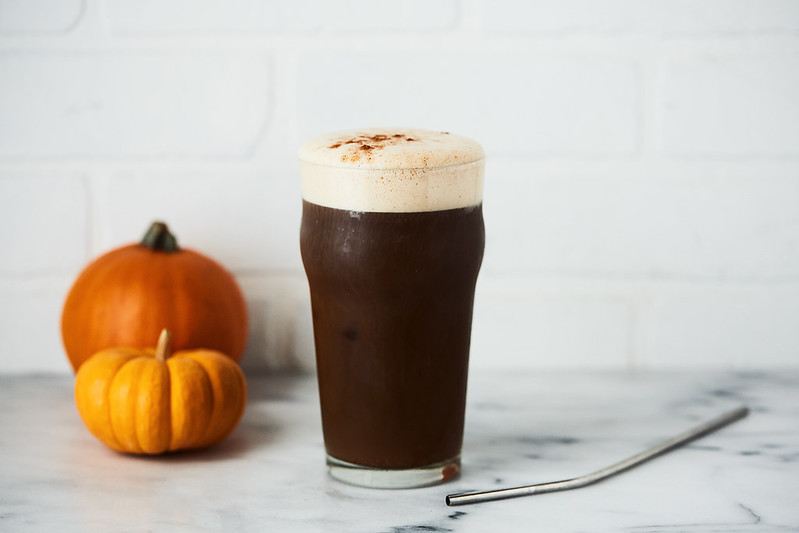
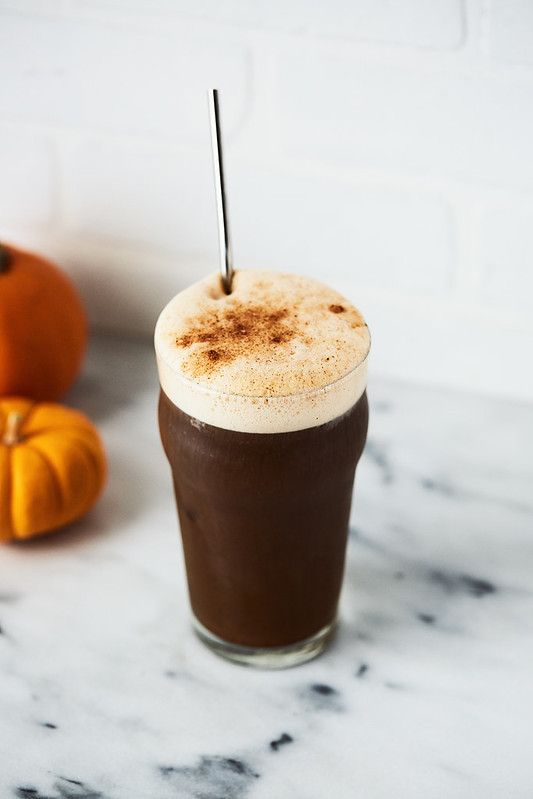
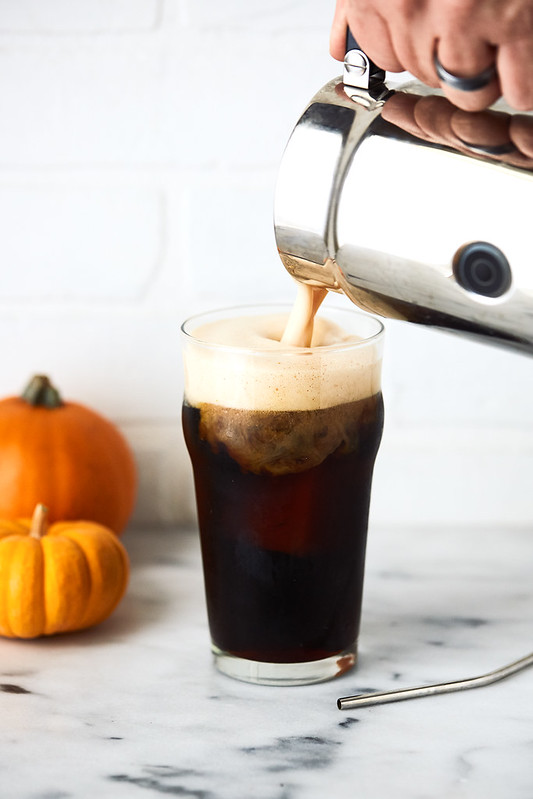
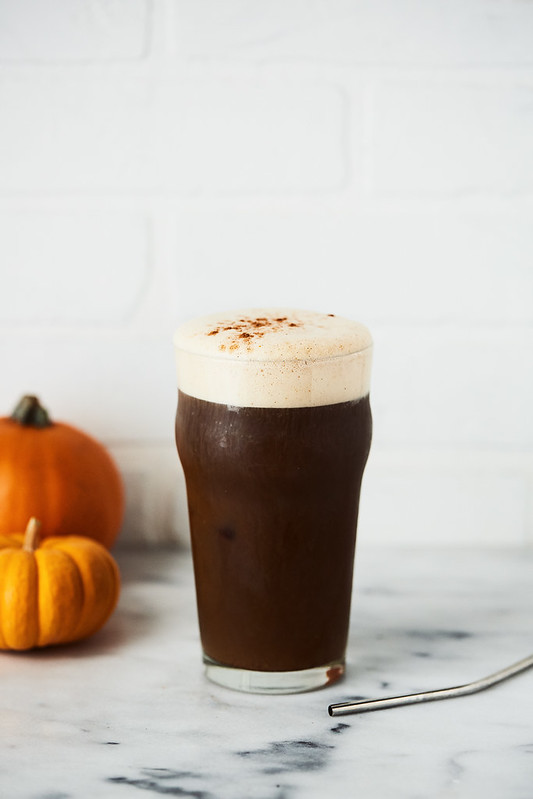
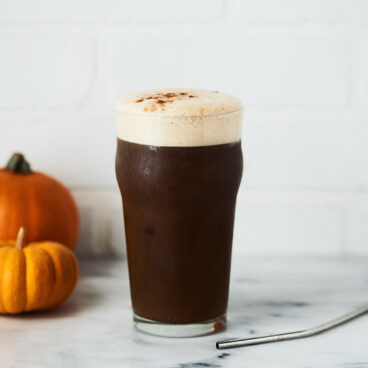
Pumpkin Cream Cold Brew (Starbucks Copycat Recipe) – {options for keto, paleo, dairy-free, vegan}
The Starbucks Pumpkin Cream Cold Brew is made with their signature cold brew coffee, vanilla syrup, a sweetened pumpkin cream cold foam on top that actually contains real pumpkin and it is finished with a sprinkle of pumpkin spice topping but it also has a lot of sugar, some not so great ingredients and of course, dairy. This copycat recipe was recreated at home to ditch all the refined sweeteners and sugar and to use the quality ingredients I personally prefer. I am sharing options for dairy and non-dairy and lots of opportunity for you to customize to your preference, follow the instructions for paleo, keto, etc.
I am married to a Starbucks addict. Mark likes Starbucks. A lot. Me, not so much. Mark loves their straight up cold brew, extra ice, splash of whole milk. He’s simple but he knows what he likes. He also like knowing what he will get, Starbucks are everywhere and he knows what to expect. He will occasionally venture out and try something seasonal that isn’t too obscene and he hasn’t stopped raving about the Pumpkin Cream Cold Brew. Recently he basically FORCED me to try the Starbucks Pumpkin Cream Cold Brew, a persistent little dude – because I think deep down he knew that my fall-obsessed, pumpkin spice lovin’, recipe recreating soul would fall in love and recreate it at home – which he really benefits from!!
And I loved it and I couldn’t do much more than take a sip because it was grossly over-sweetened, even with me asking for only one pump of vanilla syrup in the coffee. But, I considered it market research and off I went trying to figure out how I could recreate it at home.
How to Make a Pumpkin Cream Cold Brew Coffee:

1) Make Your Own Cold Brew or Buy Your Favorite Cold Brew:
Making your own cold brew at home is surprisingly simple and very cost effective. We do this often and the best part is being able to control the strength of my cold brew, the quality of the beans (I always go for organic as coffee beans are one of the most highly pesticide-sprayed foods) and often if I am avoiding or limiting caffeine I will make my own decaf or half caff cold brew, something you can’t find anywhere else.

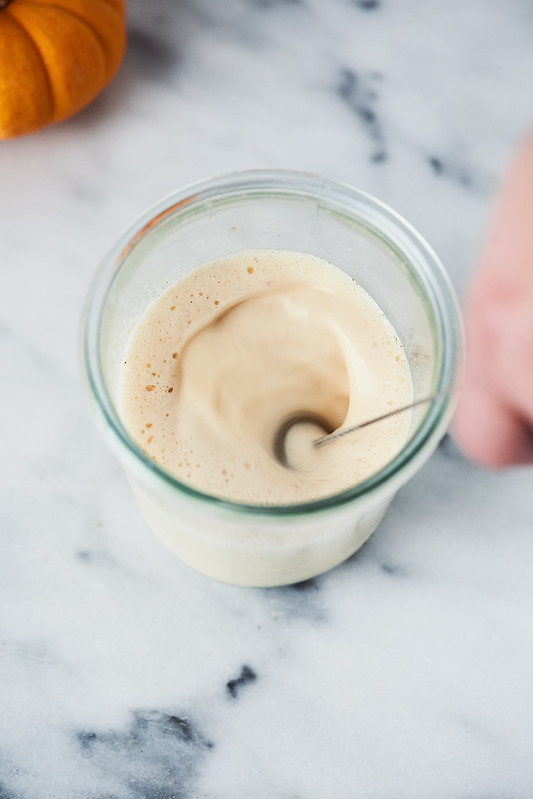
2) Milk Options for the Pumpkin Cream Cold Foam:
Closest to the Starbucks Original Pumpkin Cream Cold Brew – only if you tolerate dairy:
After some investigating and lots of testing, I learned that Starbucks uses skim milk to get their light frothy cream. In the pumpkin cream cold froth it actually contains a condensed skim milk. I wasn’t going there since those are always high in sugar. But I also read in the ingredients on their website it also contains cream and milk. Just for the heck of it, I also tried frothing half and half and it definitely didn’t foam up and get nearly as frothy. From what I understand the protein without the fat content found in skim or low fat milks creates large air bubbles which allows it stay light and foamy. Now in most other scenarios I would say GO WITH FAT, skim milk is kinda blech yucky face, in my opinion, the fat is where the goodness and taste is and skim milk is generally so crazy stripped of any potential nutrients, but look, if you are looking for a really close replica at home and you tolerate dairy, skim milk is the answer. Again this homemade version of the cold cream foam made without the carageeenan (a stabilizer) and all the sugar that you will find in the Starbucks version, means this DIY rendition is a bit lighter – but it’s really quite nice. If you want a thicker, richer cream try half and half or heavy cream, but just know that it definitely doesn’t get as frothy.
For Dairy-free/Paleo Pumpkin Cream Cold Brew – a very close second
The best results that I found, to recreate the frothy cream, without dairy, is to FIRST select your favorite non-dairy milk. I have tried store-bought macadamia, almond, cashew and coconut milk. They all frothed up a little bit on their own, but not nearly like the skim milk did. Homemade unstrained cashew milk froths up quite wonderfully. The store-bought barista blends that usually have gums and many have sugar these frothed better than the non-barista blends. Coconut milk was least frothy, I think it’s a bit too heavy.
SECOND, ok so here is what I did next my secret for the ultimate frothy, non-dairy milk: stay with me on this one, ADD EGG WHITE!! Hear me out, think of those old school frothy cocktails, a whiskey sour, gin fizz or a pisco sour, they are light, frothy and have that distinct mouth feel that I realized is kinda close-ish to the Starbucks Cold Cream Foams, this is the best way I have found to create a non-dairy copycat. I use approximately 1/2 of 1 egg white and add it to the 1/4 cup on non-dairy milk and VOILA – frothy, non-dairy cold cream foam. I recommend going with less pumpkin on the non-dairy versions, 1/2 teaspoon.
For Vegan Pumpkin Cream Cold Brew:
If you can’t do dairy and you can’t consume egg whites or you prefer not to, you can certainly froth up your favorite non-dairy milk, but as I said, it isn’t quite the same, you definitely don’t get those exact foam vibes but it’s still VERY delicious. Try homemade unstrained cashew milk to get the creaminess or for a richer version coconut milk is nice for taste and thickness, but again it’s not as frothy. I recommend going with less pumpkin on the non-dairy versions, 1/2 teaspoon.
3) Options for Sweeteners:
In the Starbucks Original Pumpkin Cream Cold Brew the Grande size has 2 pumps of vanilla syrup in the coffee alone (which you can easily ask for them to leave out), but there is also a fair amount of additional sugar in the vanilla syrup found in the flavoring that gives the pumpkin cream foam topping all of it’s taste, which as far as I understand is mixed in with the pumpkin flavor already, so you can’t leave it out. In a Grande, which is 16 oz the drink as it comes contains 32 grams of sugar.
For me, I really love the way just a little smidge of maple syrup tastes in the homemade pumpkin cream cold foam. 1/4 – 1/2 teaspoon is honestly more than enough for my low-key sweet taste buds. At just over 1 gram of sugar for 1/4 teaspoon of maple syrup or 2.5 grams of sugar for 1/2 teaspoon, this keeps this drink low carb and keto-friendly, easily. You can certainly add more to your liking, maybe upwards or a teaspoon or two, but be aware as you start to add more maple syrup, it may affect the frothiness and it will obviously increase the amount of sugar.
If you are more a straight-up sugar kinda guy/gal than I would recommend making a simple syrup (I would recommend doing so with unrefined sugar or even coconut sugar) vs. adding granulated sugar as that too would affect the cold cream. You can also opt for a few drops of stevia or another non-caloric sweetener, if that’s your scene. I did make one version with this pumpkin spice sugar-free stevia syrup that I happened to have here since it was sent to me as a sample. It was delicious, though I generally do not recommend these type of highly refined products. I would personally rather opt for real food.
I personally prefer to leave the sweetener out of the coffee itself, but if you wanted it sweet, again a little maple syrup would be a nice option.

4) Additional Ingredients:
Pumpkin Puree – yes we add REAL pumpkin to this tasty pumpkin cream foam. It’s not a lot, but it brings just a lil pumpkin flavor. Just an FYI if your foam isn’t frothing to your liking, you may want to take your pumpkin puree down to 1/2 or 3/4 teaspoon
Pumpkin Pie Spice – this is where the real flavor comes from, cinnamon, nutmeg, ginger, cloves – so much fall flavor.
Vanilla Extract – the original contains vanilla syrup both in the coffee and the foam. Rather than a syrup, I like to add straight up real vanilla extract to the foam. You can also add to the coffee, as well. Vanilla bean paste or fresh vanilla beans are also really nice.
Maple Syrup or other sweetener (see above) – this is often my go-to sweetener, a little goes a long way, it’s a whole food that hasn’t been refined and stripped of it’s nutrients, it blends nicely into the pumpkin cream cold foam.
Real Salt – just a pinch is all you need, quality unrefined salt always makes sweet flavors pop. I like using Redmond’s Real Salt to get in some extra trace minerals.
5) What You Need to Make Your Pumpkin Cream Cold Brew Foam (any of these will work):
Milk Frother: You can buy a stand alone milk frother, like the Aeroccino and most offer the option for heat froth or cold. I use this one from Nespresso and I love it, you can make cold or hot foam and also just heat milk without frothing (though it seems this model has been discontinued so this is WAYYY expensive.)
Handheld Milk Frother Wand: I see these everywhere now, they are affordable and surprisingly very, very effective. Do a quick search on Amazon, there are loads of options. I tested this recipe with a high quality Nespresso milk frother and a FREE handheld wand I was sent as a promo and the results with both were about the same!
Steam Wand on an Espresso Machine: this would work but would heat the cream.
High Speed Blender: To froth milk in a blender, pour in the ingredients then let the machine rip for 15-30 seconds, or until the milk is foamy.
Shake it Like a Polaroid Picture: add to a jar and shake, shake, shake. Won’t be the same, but hey, it’s something.
Pumpkin Cream Cold Brew (Starbucks Copycat Recipe) - {options for keto, paleo, dairy-free, vegan}
gluten-free, grain-free, keto/low carb, options for: paleo, dairy-free, egg-free, nut-freePrint Pin RateServings: 1 servingIngredients
- Cold Brew Coffee
- 12 ounces cold brew coffee
- ¼ teaspoon vanilla extract, optional
- maple syrup or other sweetener, to taste (optional)
- Pumpkin Cream Cold Foam, see options below
- Pumpkin pie spice blend for topping
Pumpkin Cream Cold Foam (dairy version)
- ¼ cup cold organic grass-fed skim milk
- 1 teaspoon pumpkin puree
- ¼ - ½ teaspoon maple syrup, or to taste (or other sweetener)
- ¼ teaspoon pumpkin pie spice
- ¼ teaspoon vanilla extract
- pinch real salt or sea salt
Pumpkin Cream Cold Foam (non-dairy version)
- ¼ cup cold non-dairy milk, of your choice (homemade cashew milk is great, store bought barista blends froth up nicely)
- ½ egg white from pasture-raised or free-range egg, just an approximation
- ½ teaspoon pumpkin puree
- ¼ - ½ teaspoon maple syrup, or to taste (or other sweetener)
- ¼ teaspoon pumpkin pie spice
- ¼ teaspoon vanilla extract
- pinch real salt or sea salt
Pumpkin Cream Cold Foam (vegan version)
- ¼ cup cold non-dairy milk
- ½ teaspoon pumpkin puree
- ¼ - ½ teaspoon maple syrup, or to taste (or other sweetener)
- ¼ teaspoon pumpkin pie spice
- ¼ teaspoon vanilla extract
- pinch real salt or sea salt
Instructions
- Make your cold brew ahead of time if you are making yourself. Strain and chill.
- Add all of the Pumpkin Cream Cold Foam ingredients to a jar or measuring cup if using a hand held brother or the pitcher of a milk frother (if mixing by hand add to a jar with a tightly fitting lid).
- Froth until it is fluffy, light and foamy.
- Add ice to a large glass, add the cold brew coffee (if adding vanilla or sweetener, mix well to combine). Pour or spoon the Pumpkin Cream Cold Foam over top. Sprinkle a little pumpkin spice blend on top.
- Enjoy.

-
Low Carb Chicken Pesto Cast Iron Meatza {Keto, Grain-free w/ easy options for Paleo, Whole30, Dairy-free}
This delicious Low Carb Chicken Pesto Cast Iron Meatza is a really simple recipe that comes together in no time. It brings all the pizza vibes without all the grains and heaviness that some of us can experience as a result of traditional pizza. You can use the base crust recipe for other pizza variations and get creative with your toppings! This recipe is low-carb and keto-friendly and it’s great for those who eat gluten-free or grain-free and easily adaptable to be dairy-free or nut-free.
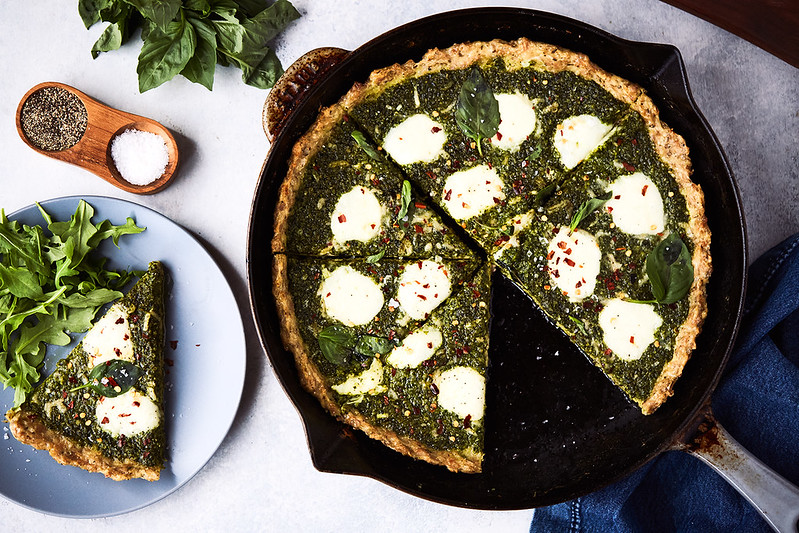
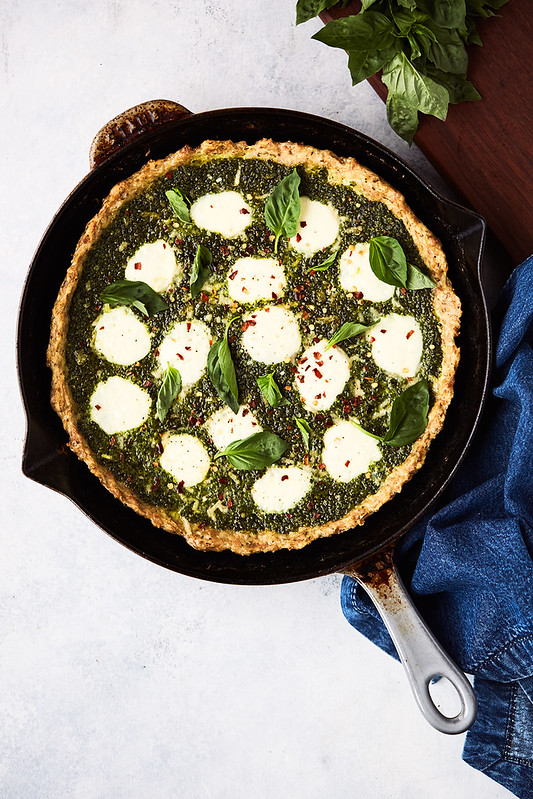
I remember the first time I hear the word “meatza”, I remember thinking – “Um… that’s weird”. Then I thought about it, people eat meatloafs and meatballs, we make meat patties for burgers – why can’t we make a pizza crust from meat? It’s brilliant. I’d love to take credit for the idea, but I can’t. But I can take credit for making it in a cast iron and dressing it up with a tasty pesto sauce. This meatza crust holds up so well to lots of toppings, you can actually pick it up with one hand or go all in with a fork – that’s up to you and your style. It’s loaded with flavor, it is super satisfying, filling and a breeze to make.
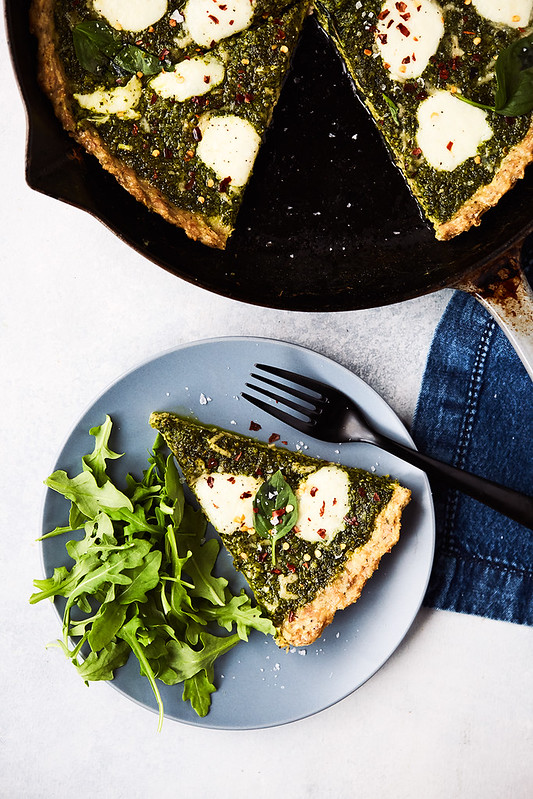
You can certainly shape your crust and make it on a sheet pan or any other baking dish that has sides (since you will have a little grease), if you prefer, but I find making this delicious low carb pizza in a seasoned cast iron skillet makes for a really nice crispy crust. Since cast iron skillets get pretty dang hot and stay hot, it’s just perfect for even cooking and a nice high heat sear. I use a 12-inch cast iron skillet but it would work in any size cast iron pan. Obviously the bigger the pan the thinner the crust, the smaller the pan, the thicker.
-
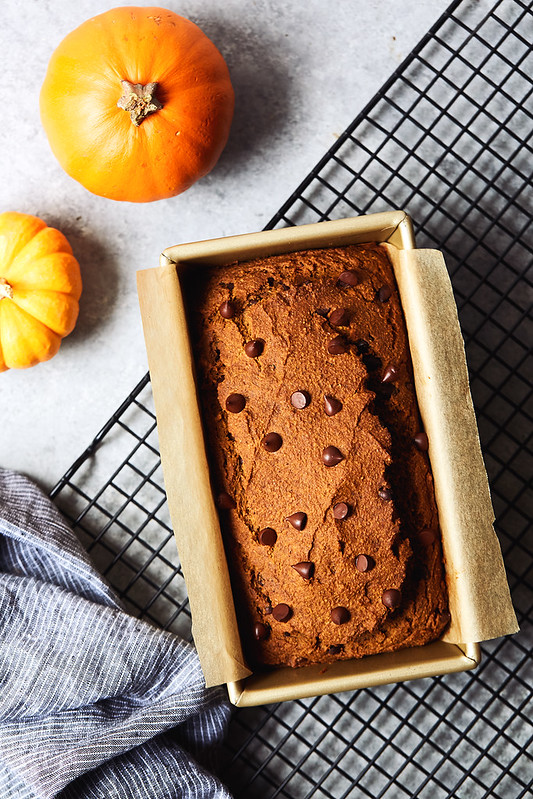
Low Carb Pumpkin Bread with Dark Chocolate Chips {Grain-free, Sweetener-free, Dairy-free}
This Low Carb Pumpkin Bread with Dark Chocolate Chips is grain-free, sweetener-free and dairy-free and it’s the most perfect way to kick-off my favorite season of them all. Serve this delicious low carb pumpkin bread warm with a little butter, ghee, coconut butter or cream cheese. Depending on your vibes with sweet stuff, you might consider a light drizzle of maple syrup or raw honey.

For those of us in the Northern Hemisphere autumn is upon us once again and we can get super basic and pumpkin spice ALL the things. I find myself getting super inspired in the kitchen this time of year, this is my favorite season to create. Cozy, comfort foods is my favorite, this is what it’s all about!
Because most of the pumpkin spice foods you find in the world are aggressively over-sweetened with refined sugars or corn syrups or to make “sugar-free” treats, they are blasted with highly-refined, non-caloric sweeteners, which I don’t personally love – it just doesn’t leave a lot of options!
REDEFINING SWEET with Sweetener-Free
As you all know, I am a really big fan of redefining the term sweet. Developing a new relationship with this important taste in our palate is something I find to be very important. Instead of continuously having to push the boundaries of sweet, going sweeter and sweeter and it never being enough, then taking on a bi-annual sugar detox where you completely cut out sweet entirely because it gets out of hand, all this before the cycle starts over again (because news flash, deprivation doesn’t work) – I prefer to instead break this cycle, redefine the relationship with sweet and really learn to appreciate and crave the natural sweetness of foods. I don’t think sweetness is a taste we need to avoid completely, it’s important to our palate and our food experiences – but I do feel that it is one that can be changed.
I love that by redefining what sweetness is for you, not only do you get the wonderful pleasure of truly appreciating the inherent sweetness and the subtleties of flavors from so many delicious foods, you also redefine the often troublesome relationship many of us can have with sweet things.
Many alternative sweeteners, natural and artificial alike, while they may not contain calories and they may not increase your blood glucose, they also can be anywhere from 100 to 20,000 times sweetener than regular table sugar. This can lead to a hypersensitive palate, where an individual will find that more and more sweet stuff is needed to receive pleasure and to placate the sweet taste receptors. But, it’s also common that other taste receptors are affected as well, the body’s ability to effectively taste (and therefore crave) important flavors like “bitter” (an important taste than can ensure that we are consuming nutrient-dense foods like dark-leafy greens, etc.) can also be affected, which is why you will often hear people who are addicted to sugar and sweet stuff adamantly swear they HATE the way some veggies taste. I believe it, they aren’t being picky, their taste buds are off!
Some research 1https://www.medicalnewstoday.com/articles/261179.php has also shown that while non-caloric sweeteners may not cause a blood glucose response, some may still trigger an insulin response and what’s worse, it’s an increase of insulin without the high blood glucose. When insulin rises without an increase in the blood glucose that it intends to shuttle out of the blood stream and this can lead to blood glucose levels to follow that fall too low.
Additionally, many of these non-caloric alternative sweeteners don’t raise important satiety hormones that tell the body when it is satiated, satisfied and full. These sweeteners also do not affect neurotransmitters the way that sugar traditionally does, so if the sweet receptors are triggered by the sweet food but it doesn’t receive the expected results of satiety or the feel-good vibes (due to the affects on neurotransmitters) that regular sugar provides it can be quite confusing to the metabolism and this can lead to overeating and increased hunger and cravings.
Finally, many non-caloric sweeteners can lead to GI discomfort like bloating and gas and many have been shown disrupt the gut microbiome, I am sure you know by now the gut plays an incredibly crucial role in our digestion, immune health and overall vitality! We definitely don’t want to be messing with that delicate balance.
In my personal approach, I would rather use a very, very small amount of the natural options on the rare occasion I want something sweet – a date or two, a banana, a light drizzle of unrefined dark maple syrup or raw honey. Not only are they unrefined and unadulterated, blasted with heat or solvents, unlike totally nutrient-depleted sweeteners and even refined table sugar, these foods left in their whole form do contain some actual nutrients. Now, I am not at all suggesting you chug maple syrup to get your B vitamins, but they are in there. Of course, the reason a little goes a long way with these foods is that the less you consume sugar and of course, the sweetener alternatives, first of all, the less you will crave them and the less you will need, but also the more sensitive your taste receptors becomes to sweetness. And suddenly a single date will taste like straight up candy. Coconut milk will take on a sweetness you never noticed before, 85% or 90% dark chocolate will be plenty sweet and warming spices often paired with sweets, like cinnamon or nutmeg or even a little pure vanilla extract, these alone will bring a little sense of sweetness to your palate. It’s incredible.
This Low Carb Pumpkin Bread with Dark Chocolate Chips is sweetener-free. I like it this way! Yes, the dark chocolate chips, depending on which you use may have a little sugar, this is going to be up to you. You can use dark chocolate chips that are stevia-sweetened like Lily’s or maybe go for 100% dark chocolate chips (YES PLEASE). If you are like “UMMM NOPE, Beth, I need some sweetness” you can add a little coconut sugar, maple sugar or date sugar to the recipe, start with 1/4 cup and go from there. Sometimes I will drizzle the littlest amount of maple syrup or raw honey over a warm, toasted slice of this bread, with a little salted grass-fed ghee or butter.
I plan to share a podcast episode or write an article going more into depth on my thoughts on sweeteners and sugar – is that something you might enjoy? If so, please share any questions you may have about alternative / non-caloric sweeteners and my approach to sweetness!
References
1. ↑ https://www.medicalnewstoday.com/articles/261179.php -
White Chicken Chili {Keto, Paleo, Whole30, Nightshade-free}
This comforting and hearty low carb White Chicken Chili cooks in under 30 minutes and in one pot. It’s perfect for a delicious fall or winter weeknight meal! It’s keto, paleo, whole30 and nightshade-free. With a few simple tweaks, AIP-compliant, too.

It’s about that time of year, soup, stew and chili season. My absolute favorite!!! I adore the comforts of these foods, I crave them. This is the food that makes my soul happy.
I also REALLY love meals that are ready in 30 minutes or less on the stove top, one pot, no special tools or equipment, just a straight-up, easy, hearty meal.
This particular White Chicken Chili recipe is low carb and keto-friendly, it’s paleo, Whole30 compliant and made without any nightshades. With a few minor changes you can also make this White Chicken Chili AIP compliant.
What are Nightshades?
Nightshades are a botanical family of plants, more technically called Solanaceae. The most common nightshades are tomatoes, peppers, potatoes and eggplant. These plants all have certain characteristics in common (like the shape of the flower and how the seed is arranged within the fruit–Wikipedia has a good description). There are more than two thousand plant species in the nightshade family, the vast majority of which are inedible and many of which are highly poisonous (like deadly nightshade and jimsomweed). Tobacco is a nightshade, and is known to cause heart, lung, and circulatory problems, as well as cancer and other health problems (although, clearly some of this has to do with the other toxins in tobacco products derived from the processing.) The reason why nightshades are problematic for many people is due to the glycoalkaloid content. Over-consumption of these edible species can actually be poisonous to anyone, and it is possible that the low-level toxic properties of nightshade vegetables contribute to a variety of health issues over time.1https://www.thepaleomom.com/what-are-nightshades/ Read more here about the potential concerns with nightshades for those with autoimmune disease.

Why Nightshade-free?
While I am not 100% nightshade-free, 100% of the time, I have discovered in this last year that in abundance, nightshades can trigger my autoimmune symptoms and cause noticeable joint pain for me, it can cause migraines and allergy-like symptoms, so, I have been careful about how much I consume them and the amount. If I am struggling with an autoimmune flare-up or digestive flare-ups, I will cut nightshades out completely until things calm down a bit. On the regular, when my autoimmune symptoms are managed, I still prefer to avoid them in whole food form, like tomatoes, peppers, potatoes and eggplants, but usually in pretty small amounts, as a garnish or in spice blends, etc – nightshade do not trigger a noticeable response for me, so I don’t overly concern myself with obsessing over it, in that sense. I know folks who have to be 100% nightshade-free and it can certainly be challenging, in a lot of ways I think even more than having to avoid gluten, since they can hide in spices, seasonings, sauces, etc.
References
1. ↑ https://www.thepaleomom.com/what-are-nightshades/ -
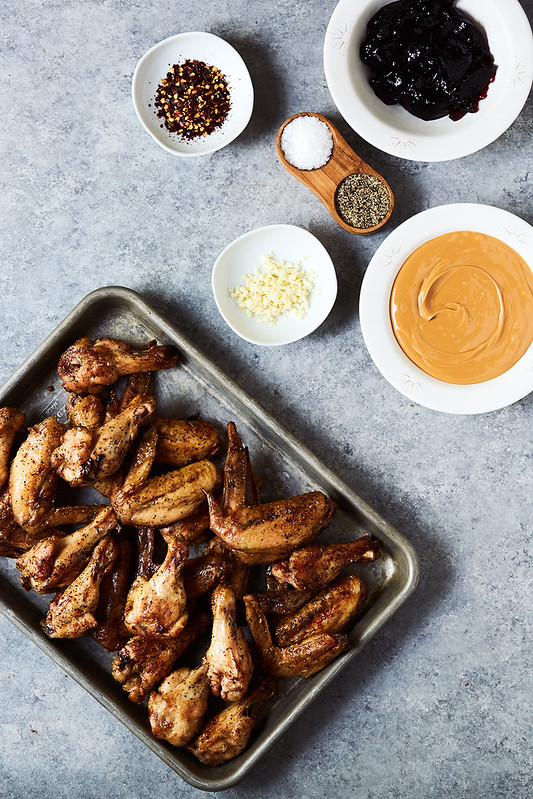
Grilled Peanut Butter and Jelly Chicken Wings {gluten-free}
This post is sponsored by the National Peanut Board. I received compensation, but all opinions and content are my own.
These delicious, grilled chicken wings take the classic flavors of peanut butter and jelly and elevate it to another level. This recipe is the perfect way to make your summer BBQ a legend.

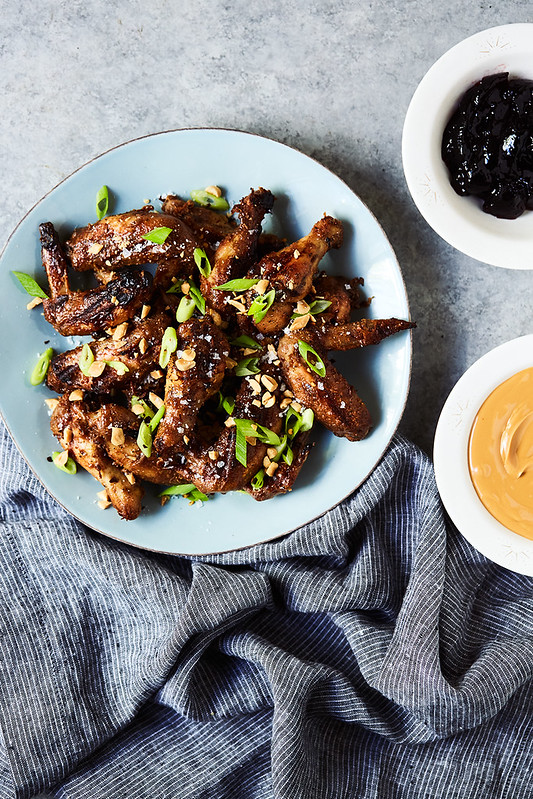
Peanut butter and jelly is a classic combination that I think we can all agree reminds us of childhood. From picnic lunches to after school snacks – it was a staple for so many of us. Budget-friendly eats at their finest, there is something so comforting about peanut butter.
Why leave that PB&J deliciousness in our past? I am bringing you a fun, new, delicious summertime recipe that brings this classic, tasty goodness into adulthood. These Grilled Peanut Butter and Jelly Wings are the perfect summer food. They will wow the pants off of your BBQ guests, and they are so simple to make.
I would LOVE to take credit for these wings, but the original idea comes from my cousin Dave, back home in Buffalo, NY. He is always coming up with unique flavor ideas for his pizzeria, from unique pizzas to fun and funky chicken wings. How very Buffalo of him, I know. His rendition is quite different than mine, without the grilling and only getting sauced after they’ve been deep fried, they are sticky and saucy and far more sweet than mine. For my chicken wing preferences, I want a little char on my wings, and I want less saucy, more savory and definitely more crispy.
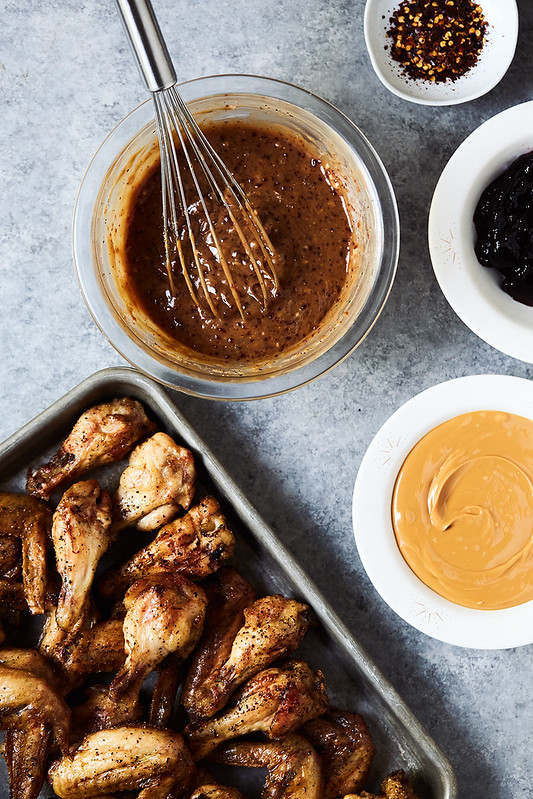
Using our famous indirect method for grilled chicken wings, these wings get grilled till they are golden brown and crispy, they take a bath in sauce made from the creamy peanut butter and the sweet grape jelly, with a little garlic in there to keep in on the savory side and back onto the grill they go! This is KEY for getting a little crispy and some crunch and for making these wings the stars that they are!
You can use your favorite peanut butter in this recipe. I opt for creamy, but crunchy would absolutely work here, too! I personally find the flavor of a classic, high quality concord grape jelly to work best here. I offer a range of 1/3 – 1/2 cup, because everyone is different with their preferred levels of sweet. Use your best judgement, taste and adjust as you go. You can use homemade sugar-free or lightly honey-sweetened jelly, if you prefer.
-
Instant Pot Thai Peanut Chicken {Keto, Gluten-free}
This post is sponsored by the National Peanut Board. I received compensation, but all opinions and content are my own.
This Instant Pot Thai Peanut Chicken is coated in the most incredible, flavor-rich peanut sauce. Serve it over zucchini noodles or cauliflower rice for an easy meal, and garnish with extra peanuts for added crunch!

I know you all are with me on those easy, weeknight meals that come together in no time but pack a major flavor punch. This simple Instant Pot meal requires very little prep and it’s layered with rich flavors. I find this easy meal brings the flavor of the Thai classic Chicken Satay with Peanut Sauce but with far less work, no need to skewer meat and no grilling necessary. Just pull it all together, set it and forget it.

Peanut butter is front and center in this easy, weeknight meal. I love how a creamy organic, unsweetened peanut butter fits into a tasty, savory dish like this Instant Pot Thai Peanut Chicken. It’s so rich and creamy and together the peanut butter and the coconut milk leave the chicken super juicy, moist and tender.


