-
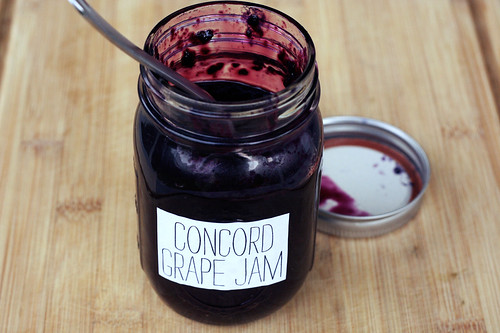
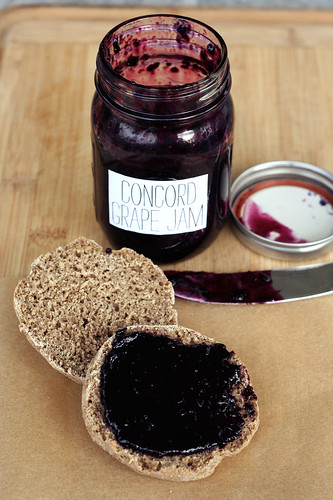
Concord Grape Jam
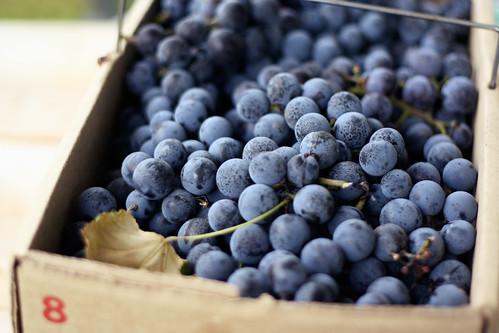
I got an email a few weeks ago from Farmers & Artisans, an amazing local shop that features produce, dairy and meat from local farms. They were offering 4 and 8 quart baskets of Concord grapes from Blackman Homestead Farm in Lockport. I decided with how much I am in love with my juicer right now, I need to buy the 8 quart basket, so I could experiment with making juice and trying to make jam for the first time. I never buy jam at the store because I hate all the preservatives, but occasionally I will buy a jar from the farmers market. I was a little concerned about the jam making since I had never done it before and I really didn’t have a great way to remove the seeds as I don’t have a food mill. I made jam twice, trying out two different methods to see which would work best. The first way, I added the grapes whole to the food processor, with the sugar and pulsed them a few times to break them down and mash em up. Then I cooked the jam down, allowing it to thicken. Once it seemed like it had cooked down enough and was quite thick, I ran it through a strainer to remove the seeds. The only problem with this method is that not only did it remove the seeds, but it also removed the thick hunks of gooey goodness (the natural pectin) that makes jam what it is. I ended up with more of a Concord Grape sauce or thinner jelly. I tried adding it back to the saucepan to allow it to thicken more, but it just didn’t do it. The jam needed bits of the skins and more of the natural pectin. All was not lost, I have been spooning the first batch of jam over granola and oatmeal, it would also be great drizzled over ice cream or yogurt or in a smoothie.
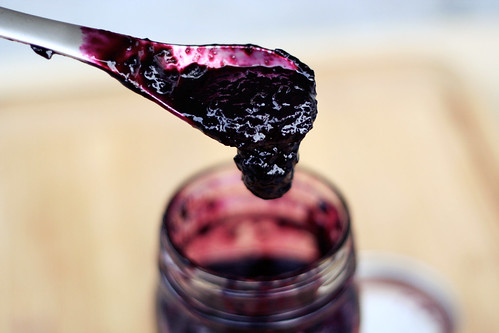
So, the second time around I decided to separate the skins from the flesh or pulp (and therefore the seeds) of the grapes, one by one. It sounds kinda tedious, and I guess it kinda was, but I didn’t mind, I knew it would be worth it. Then I pulsed the skins with the sugar in the food processor and cooked that down on its own, cooking the pulp down in a second saucepan by itself, mashing every so often to break it down. Once the skins had cooked down quite a bit and really gotten thick and jam-like, I strained the pulp from the other saucepan through the strainer to get as much of the juice and added it to the beautiful skin mixture. It was surprising how easy the whole process was. From what I have read Concord grapes are a slip-skin variety grape so I suppose that is what made that part of the process so much easier than I had anticipated.
You could certainly make a larger batch and go through the hassle of canning and preserving if you wish. I am not versed at all in preserving and honestly am quite intimidated by the whole process. Maybe some day when I have a huge kitchen and tons of storage space I will experiment with it.
This jam is preservative free and is full of intense grape flavor. It is perfectly sweet and tart. I am sure you could experiment with using honey as a sweetener instead of sugar, I just wanted to go the traditional route for my first time. If I get around to experimenting with honey, I will report back.
Obviously if you have a food mill you can simply process the grapes whole with the sugar, then use your mill to remove the seeds and cook down the mixture in one pan, no need to strain.
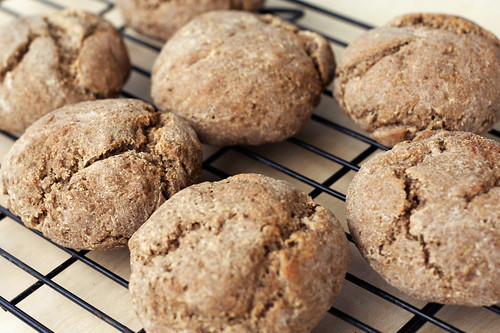
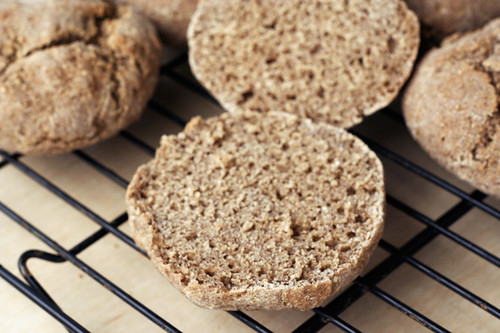
I decided to fully enjoy this jam I needed to make some delicious gluten-free multi-grain rolls. I couldn’t just slop it on any ol’ store-bought bread or roll, it seemed sacrilegious. I used gluten-free girl’s recipe with a few subtle substitutions. I used tapioca starch instead of potato flour and I made my own oat flour since I couldn’t find any that was certified gluten-free. I highly recommend this recipe. These rolls are incredible and I love that the recipe is gum free (no xanthan or guar gum). They are super crusty on the outside and soft and chewy on the inside. These rolls are perfect as is with a little jam, toasted with a veggie burger, etc. The same recipe with make two boules instead of the rolls, if you wish. I thought I was in love with gluten-free girl’s previous bread recipe, but this one blows it out of the water. Try it!
Oh and by the way, I have a very small amount of grapes left – not enough to really do anything major with – so I plan to soak them in vodka to make some tasty Concord grape infused vodka!! Come on, how could it not be good?

Concord Grape Jam
makes about 1 cup
Inspired by Healthy Green Kitchen and a handful of other recipes I came across2 lbs fresh local concord grapes, about 5 1/5 cups or so (if you can find them seedless YAY – I wasn’t that lucky)
2/3 cup organic raw sugar plus 1 tablespoon
juice from 1/2 lemonSeparate the skin from the pulp of each grape, by applying pressure to the grape with your thumb and index finger, shooting the pulp right out. It’s fun and very simple to do.
Process the grape skins with the sugar in your food processor or blender until mostly smooth but still a tad bit chunky. If you want your jam super smooth, process longer. Transfer to a medium saucepan and add the juice of half a lemon. Bring to a boil over medium heat. Watch it carefully and stir often so it doesn’t stick or scorch. Once boiling, reduce the heat and simmer for approximately 25 minutes until it has reduced down and thickened.
Meanwhile in a smaller saucepan cook the grape pulp (insides) and 1 tablespoon of sugar over a medium-high heat, bring to a boil and mash the pulp as it cooks to break the down. Once bowling reduce the heat and allow to simmer as long as your grape skins do. Once the grape skin mixture has thickened, remove the pulp from the heat and strain through a strainer or cheesecloth to remove the seeds. Add the juice that drained out to the grape skin mixture.
Allow the jam to continue cooking another 10 minutes until thick. Taste for sweetness and add more sugar if it isn’t sweet enough for you. This was plenty sweet for me. The jam will continue to thicken as it cools. Trust me. It also thickens a bit more once in the refrigerator, so down cook it down too much.
Allow the jam to cool before pouring it into a well cleaned and tightly sealing jar. This jam will keep in the refrigerator for approximately 1 month.
NOTE: I have to apologize for the lack of process photos with this post, I had intentions of showing step by step photos of the entire process. However, the morning I was making this jam it was very dark and stormy. The lighting in my kitchen was horrible and with the yucky wind and rain, I wasn’t able to tote things out to the back patio as I usually do. If you have any questions regarding the process, please don’t hesitate to ask.
-
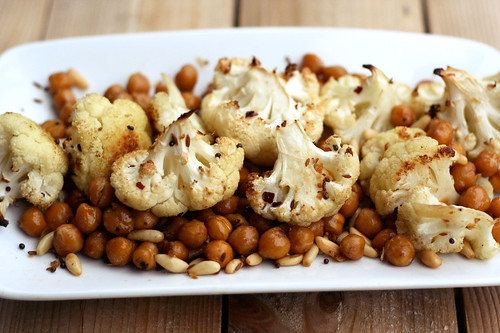
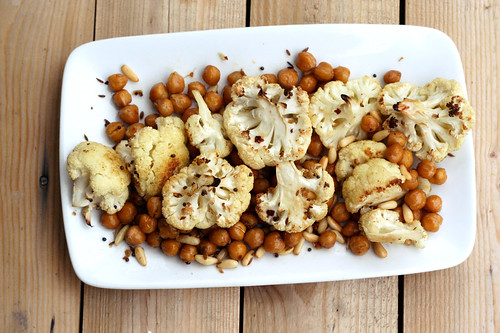
Spicy Roasted Cauliflower and Chickpeas with Pine Nuts
I know that I always carry on about my love of pasta on here, but you’d be surprised to know that for as much love as I have for those delicious carbs, I have an equal and unrelenting love for vegetables. I honestly cannot think of a vegetable that I don’t love. I love them raw, steamed, grilled, roasted, it doesn’t matter. After traveling and eating at restaurants, where many times the serving of vegetables on your plate, if they even give you one, is so tiny you can’t tell if it is an inedible garnish or a side dish, I come home with a craving for anything green, leafy or with a stem. One of my favorite things is to go to the farmers market and pick out new vegetables that I have never tried before and experiment with ways to cook them. This past Saturday we grabbed some of the usuals at the market, arugula, tomatoes, swiss chard, cauliflower plus this time I also bought a purple cauliflower, butter beets and a large bunch of perpetual spinach. The perpetual spinach and butter beets were both brought home for juicing and I haven’t yet decided what to do with the purple cauliflower, I will probably just make this dish again. After looking at all of those delicious veggies at the market, I wanted to come home and make a delicious vegetable feast for lunch, so I decided on this.
I love roasted cauliflower, even on its own with just olive oil, salt and pepper, it is so delicious. Add in one of my other favorites, chickpeas and you have a winner. Together with the spices, the high heat and a little olive oil, it gets beautifully browned, caramelized and it has a wonderful nutty and sweet flavor. This dish was inspired by all of the delicious spices I have been cooking with on this cleanse and I added in chickpeas for protein and fiber and the pine nuts for a nutty crunch, which I am a big fan of. We served this as a main dish, with nothing else so we ended up with 2 big servings, with a small amount leftover. This would be good just as side dish or for a real hearty meal, you could serve it over some brown rice, quinoa or even with some pasta.
Spicy Roasted Cauliflower and Chickpeas with Pine Nuts
Serves 2 to 41 medium head organic cauliflower (about 2 pounds), cut into large florets
1/4 cup pine nuts
2 cups cooked organic chickpeas, drained and rinsed if canned
2 tablespoons olive oil
1 teaspoon whole cumin seeds
1 teaspoon whole mustard seeds
1 teaspoon finely minced, peeled fresh ginger
2 cloves garlic, finely minced
1/2 teaspoon sea salt
1-2 small red chiles, finely chopped, seeds removed for less heat (I used some dried korean heirloom red chiles from my garden)Preheat the oven to 450º.
Place the cauliflower, chickpeas and pine nuts on a large rimmed baking sheet. Add the spices, fresh ginger and garlic, salt and red chiles. Drizzle olive oil evenly over everything and toss gently to combine. Bake for 20 to 25 minutes tossing occasionally to ensure even cooking, bake until edges are golden brown, and the cauliflower is slightly tender,
Serve on its own, as a side dish or over rice for an entrée.
-
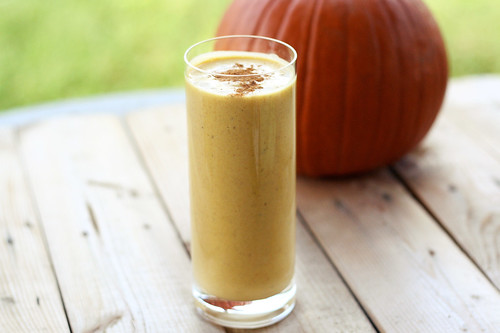
Vegan Pumpkin Pie Smoothie
I have to be honest with this post, I have been a little sad this week. I’ll tell you why in a moment, but first I have to preface with this – I try really, really hard to not complain. I despise relentless complainers and people who are negative. I have realized how hard it is to be around people who are constantly in that state, it’s both draining and sad. I have hit that point in my life before and I truly think it’s a downward spiral, it can affect both your mind and spirit and I firmly believe it affects your health. Nowadays, when I start drifting in that direction, I try to acknowledge when I am feeling sad or negative, to pinpoint where it is coming from, deal with it, let it out privately (and maybe a little to Mark) and move on. Sitting around and complaining about things you are unhappy about doesn’t change them or you, it simply makes it all seem so much worse. It also starts to push the people who love you, away. You are the only one that can control your life and the decisions you make, if you are unhappy with a situation, a person or how you are feeling, doing something to change it. Even what seems to be the littlest, most insignificant action is better than doing nothing at all.
So back to why I am feeling sad, Saturday afternoon I was in my kitchen at home, baking pumpkins from the market, so that I could puree and freeze the flesh and toast the seeds for a yummy fall snack. As the last pumpkin was finishing baking, I was loading the dishwasher with all the dishes I had used, I hate a messy kitchen. As I was bent over the dishwasher and was standing up, I sneezed so violently at that same moment and instantly felt pain in my low back. It was excruciating. So much so that I had to call Mark into the room to help me down to lay on the floor of the kitchen. I don’t think I am a wuss about pain, I try really hard to be tough. Prior to this, probably the worst injury I can recall is when I broke my foot in college and I cried much, much harder when this happened to me on Saturday afternoon. Saturday and Sunday were quite rough, I needed help standing up, sitting down and getting up the stairs. I couldn’t roll over in bed. It sucked, there really is no other way to say it.
I emailed my amazing chiropractor, Elyssa, shortly after it happened, who is also one of my yoga instructors and she gave me some instructions on what to do to ease the pain and get through the worst of it and I made an appointment to see her first thing Monday morning. By Monday morning I was already feeling a bit better, though with every sneeze, I took two steps backward again (if you know me, you know how much I sneeze, so this part sucked). After the appointment with Elyssa, I already felt a bit better, some of the muscular tension around the pain had lessened and I just felt less stressed and sad. I have been doing some gentle cat and cow poses along with baby cobra. Each day it’s a bit better and I can tell I am on the mend. The hardest part right now is that I can move and twist, I can even get into downward dog, I am sleeping better, but I still can hardly bend forward at my waist, it is just so painful.
I am sad because all of this means at the minimum I have to take at least a week away from my yoga practice and cooking has been slowed down quite a bit, it’s hard to stand over the kitchen counter and cut vegetables and it’s quite painful to bend over to get stuff out of the oven. Don’t get me wrong, I still managed to make a huge pot of vegetable soup Monday night and I roasted a batch of Roma tomatoes to freeze last night, but I have had to slow everything down and not overdo it and make things worse. I know I am lucky that because of my daily yoga practice and the way I eat, I am healing much quicker than if I was without these things, but it is still hard for me to have to sit still and not be active. Over the last few days, not only am I thankful for all the leftovers we have in the fridge, but I am super thankful that I have an amazing husband that makes everything easier. He has had to pick up the slack on doing dishes (I am a little afraid of that dishwasher now), cleaning cat boxes and other things. Because my job requires me to sit at a computer all day, I have had to suck it up and just power through all of this. We have too much work on the books for me to just go lay in bed all day and feel sorry for myself. I am just working with a big pillow behind my back, lots of ice packs and making sure I get up often and move around and stretch. I am getting there.
The reason I decided to share this with you is because when this happened, I was on day 6 of my cleanse. I instantly wanted to just quit the cleanse, have a glass of wine, something sweet and maybe some cheese, yeh cheese would make me feel better. I wanted comfort and sadly I actually thought for a bit that food would give it to me. Thankfully, I sat down and really thought about it, I know that alcohol, sugar are dairy are all inflammatory foods and no matter what they would or wouldn’t do to me physically, I knew it wouldn’t fix this, if anything it would make it worse. (Read this list of the top 10 inflammatory foods, strangely all things I am avoiding while on this cleanse, so luck is on my side in that sense, I didn’t have to remove anything from my diet to ease the healing.) Ultimately, I ate some leftover vegan fettucine alfredo for dinner that night and made my way to bed before 9:30pm, since I knew a good night sleep would do me good.
Sunday morning I was still wanting something more than fresh vegetable juice, so I decided to make this smoothie. It felt naughty, but it was totally cleanse-friendly and with my extreme obsession with all things fall, I knew it would lift my spirits. And, that it did.
It actually tastes like pumpkin pie in a glass. It’s creamy, thick and full of the perfect pumpkin pie spices. It was so filling that I went right through lunchtime and never felt hungry. I love to eat and hate missing meals, so I knew this smoothie was magical. It’s thick just like a milkshake and the sweetness from the dates is incredible.
As much as food can be comfort and this isn’t a bad thing in the least, it’s also quite exciting when you can shift your mindset away from the really bad stuff to find that comfort in other, healthier foods. I made it through the worst of this back pain, I stuck with my cleanse, I didn’t take a single medication and I am proud of myself. I have another appointment with my chiropractor tomorrow and I am hoping that maybe next week I can get myself to a gentle/restorative yoga class.
Vegan Pumpkin Pie Smoothie
serves 23/4 cup cooked pumpkin (you can use canned, but fresh is much better)
1 1/2 cups unsweetened organic vanilla almond milk
1/2 teaspoon cinnamon
1/4 teaspoon nutmeg
1 teaspoon fresh ginger, finely minced
2-3 Medjool dates, pits removed (soak first if they aren’t soft)
(You can add honey or maple syrup if you wish for it to be sweeter)
*you can experiment with adding a small handful of raw pecans to make it even more creamy and to get a nice lovely taste. I have done this when I have them on hand and it’s so delicious.Add all of your ingredients to the blender. Puree until smooth and creamy.
If your pumpkin and/or almond milk isn’t cold, you could add a handful of ice. I decided not to, so it would stay as creamy as possible. You can also add a splash of water or additional almond milk if your smoothie is too thick. Top with a sprinkle of cinnamon and/or nutmeg.
-
Honeydew Almond Milk Smoothie
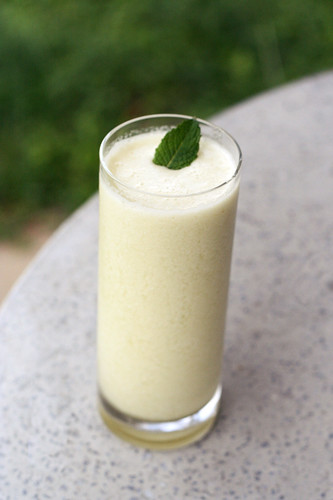
After our nearly 2-week long trip that we took mid-July to California for the Renegade Craft Fairs in San Francisco and Los Angeles, I am so happy to be home for a stretch and back into a more normal routine. It seems to take a week or two for things to settle down and feel calm again after a trip that big and with how crazy we were before we left. Besides being able to cook and bake in my own home, one of the most important things for me is to get right back into my daily routine of yoga. I try to get to 5 or 6, 90-minute classes a week. I tend to prefer the morning classes, since I can just come home after I practice and get right to my desk and work for the rest of the day. I don’t eat before I leave for yoga, I usually have a kombucha after I practice, so most times when I get home I am not looking for a large meal, just something light to hold me over until lunch. Many mornings I whip up a quick smoothie and head up for my office. So I can “eat” and work. This past week I was just making up smoothies as I went along, trying out new flavor combinations and just exploring. This honeydew almond smoothie is probably my favorite discovery of the week. It was simple, very light and had a unique and bright flavor. The honeydew that I cut up was so sweet on it’s own I didn’t even have to add any sweetener. If your honeydew leaves a bit to be desired in the sweetness department, feel free to add in a tablespoon of agave syrup or honey.
We don’t leave home again until August 24, when we had back to NYC for another event with the Metropolitan Museum of Art. We are doing a poster for St. Vincent who is playing on the rooftop of the Met. I am so excited to be going back to the city again but I am trying not to count down the days to that trip so as not to rush our time at home, but it is hard. I am hoping to accomplish a ton in the time before we leave again. Beside all of the work we have on the schedule, I have a ton of cooking and baking I want to do, a few crafty projects and some work around the house. Here’s hoping I can be that productive.
Honeydew Almond Milk Smoothie
serves 22 cups honeydew, diced (this was half of a melon for me)
2 cups, organic unsweetened almond milk
1-2 cups of iceAdd all of the ingredients to the blender and process until smooth. Serve immediately.
-
Summer Squash Salad
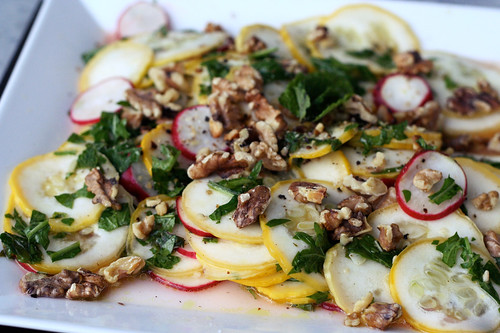
Zucchini and yellow squash are two of my favorites and both automatically come to mind when I think of summertime eating! They remind me so much of growing up, my parent’s always had an abundance of both growing in our garden. The last few years when I have planted them in my own garden, they take up a HUGE amount of real estate and never really produce much. They must not like my soil. I skipped out on planting them this year. Thankfully, my parent’s still grow both in their garden and never have a problem sharing with me.
After our family dinner this past week, I came home with a bag full of beautiful yellow summer squash and I couldn’t wait to start cooking with them. They are wonderful sliced and browned up on the grill, sauteed or roasted and added in salads or pasta, etc. Not only as a kid when my dad would cook with them, but now as an adult in my own kitchen, I always find myself eating the raw squash slices as I am cutting them to cook, so I decided I wanted to experiment with a raw salad.
When I was dreaming up this salad, I was so excited about it combining so many beautiful summery ingredients and flavors, some of my favorite ingredients. The soft and flavorful squash pairs so nicely with the crisp and spicy radishes and the peppery arugula rounded it all out with a refreshing bite. The fresh mint was a nice compliment to the light and refreshing dressing, the brightness from the lemon sings in your mouth with every bite and the toasted walnuts were a bonus crunch at the end. I couldn’t help but feeling like this salad is everything that summer is about, on one plate.
The other great thing about this salad are the many wonderful variations you could take, by changing out the herbs and going with fresh basil, oregano or chives. You can play with different nuts and seeds like toasted pine nuts, almond slivers or even sunflower seeds. You could even top the salad with cheeses like feta, goat cheese, fresh parmigiano reggiano, pecorino or asiago. I personally opted for no cheese since we wanted a vegan side-salad to accompany our vegan creamy avocado pasta. There is so much you can do with this salad. Keep in mind when picking squash that smaller, younger squashes are better since the larger squash tend to have larger tougher seeds and sometimes a tough skin.
Summer Squash Salad Recipe
serves 41 pound summer squash (yellow or green, or a mixture of both)
5 to 8 radishes (depending on how large they are)
3 tablespoons extra-virgin olive oil
2 tablespoons fresh lemon juice
1 large garlic clove, minced
1/4 teaspoon kosher salt
freshly ground black pepper, to taste
1/4 cup whole walnuts
1 bunch of baby arugula, roughly chopped
1/3 cup fresh mint leaves, roughly choppedToast the walnuts in a dry skillet, the oven or toaster oven and set aside and allow to cool, then roughly chop.
Slice the squash very thin slices using a mandoline or a steady hand and a sharp knife. Set aside in a large bowl. Do the same with the radishes. Add in the roughly chopped arugula.
Combine the oil, lemon juice, garlic and salt and pepper in a small bowl and whisk together. Pour the dressing over the squash, radishes and arugula, toss lightly. Let stand for at least 10 minutes. Add in the fresh mint and toasted walnuts, toss gently again to thoroughly combine.
Serve to individual salad plates or on 1 large serving platter, top with fresh mint and freshly ground black pepper. Enjoy immediately.
-
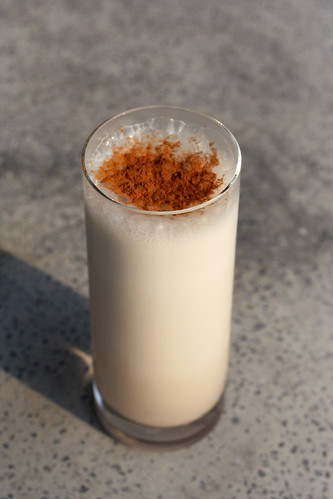
Horchata
It has been a hot summer in Buffalo. One of the hottest that I personally can recall. We’ve been traveling a ton and trying to enjoy every last-minute of the heat and sun while we are in town. We don’t leave again for another month so we hope to get the bikes out a few times, head to the beach and maybe even squeeze in some hiking or camping or something. Now that we are working from home, we really want to take advantage of the summer months while we can and enjoy the beautiful weather, before the snow and cold set in.
One of my favorite things about the short-lived summertime in Buffalo, is playing around with refreshing drink recipes. Admittedly, I planted mint in my yard, just to make mojitos and this summer I even infused my own liquors after reading this article in Bon Appetit magazine. Now that I made my first two batches and they turned out great, I plan to write-up a post about them. Don’t worry though, it isn’t just “adult beverages” I like to create, I love making fresh smoothies in the morning, iced teas, flavored sparkling waters and the like. Naturally, when I came across a post on David Lebovitz’s blog about making homemade horchata, I couldn’t wait to try it. There is nothing better than an ice-cold refreshing glass at an authentic mexican restaurant. OK, so maybe it is a close second to a good margarita, but it’s still incredible. It’s light, full of delicious flavors and it is perfect on ice on a hot summer day. There are few “authentic” Mexican restaurants here in Buffalo, (as far as I am concerned, none of them are authentic) and definitely no taquerias, so the chances of finding horchata here, are slim to none. I usually reserve my mexican indulgences for when we travel, rather than being let down, so when we aren’t traveling and I am craving Mexican, I tackle it myself at home. It isn’t nearly the same, but I still find it to be better than any of the Mexican restaurants here. I make my own tortillas, pico de gallo and guacamole, which is already a step above most places. We are actually having black bean tacos at home this week and I cannot wait.
When I saw how easy this horchata recipe was, I knew that this would be another Mexican treat worth trying at home. It is quite simple, you will spend more time waiting for the rice to soak then all of the prep time combined. You definitely want to make sure you strain in through cheese-cloth so you get all the rice bits, otherwise it will settle to the bottom of the pitcher in the fridge.
In addition to David’s recipe, I also checked out Rick Bayless’ recipe and many others. I came across many variations on the recipe, some include almonds, lime zest, etc. I decided to alter them all slightly and go with my own combination and I was very happy with the results. Oh and definitely try a glass with a shot of good rum stirred in, YUM!
Another fun twist you can take with the horchata is something that I have now learned is called a “Cochata”: Iced Coffee + Horchata. I made this apparently trendy drink in accidental desperation the morning after making the horchata. I wanted an iced coffee and realized after it was poured that we were out of any milk or cream, so I poured in a large glug of the horchata and was instantly in love. You have to try it.
On a side note, I apologize for the lack of posts and recipes on here, we just got home from nearly 2 weeks on the west coast. So I am hoping to get more recipes up here in the next few weeks as we are home for a month straight, finally. It has been a busy summer, full of travel and events, so I am excited to have some time at home.
Horchata
Makes 7 servings
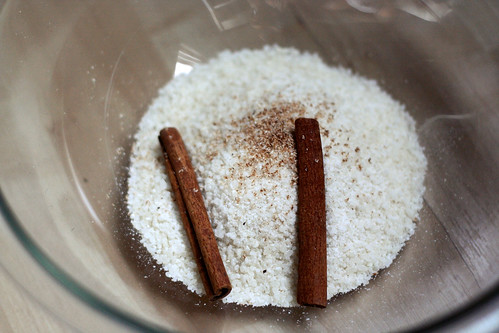
Adapted from recipes from Rick Bayless and David Lebovitz2/3 cup white rice
2 cinnamon sticks
Pinch of freshly ground nutmeg
3 2-inch strips of lime zest (colored rind only) 3/4 inch wide
3 cups of hot water
3/4 – 1 cup sugar
3 cups of cold waterGrind the rice in a blender or spice grinder into fine pieces. Transfer to a medium-sized bowl and add in the cinnamon sticks, nutmeg and lime zest. Stir in 3 cups of hot tap water, cover and let stand at least 6 hours or preferably, overnight.
Remove the cinnamon sticks and pour the mixture into a blender and blend for 3 to 4 minutes, until it no longer feels very gritty. Add 2 cups of water, and then blend for a few seconds more. Set a large sieve over a mixing bowl and line with 3 layers of dampened cheese cloth. Pour in the mixture a little at time, gently stirring to help the liquid pass through. Squeeze the cheese cloth firmly to extract as much of the rice flavor as possible.
Add 1 cup of water and stir in your desired amount of sugar, mix until the sugar is dissolved. Taste, and adjust sweetness, if necessary. If the consistency is too thick, add additional water. Cover and refrigerate until you’re ready to serve. Stir before pouring. Serve over ice with a sprinkling of ground cinnamon on top.
-
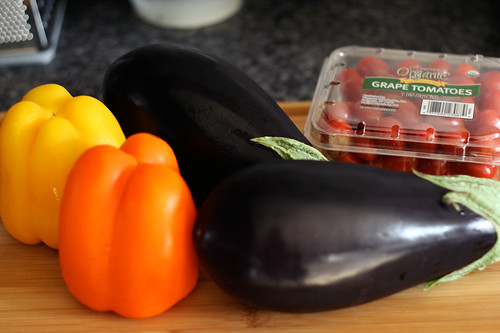
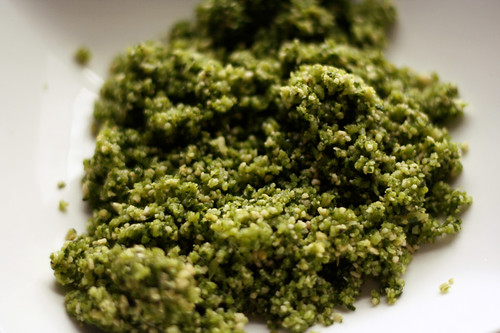
Penne with Eggplant and Pine Nut Crunch (Gluten-free)
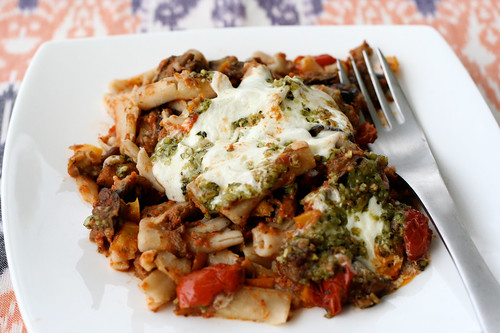
It is no secret that I love pasta. More than your regular ‘ol pasta dish made on the stove top, what I love most is a good and hearty, baked pasta dish. There is something so comforting about baked pasta, I am sure it has a bit to do with the extra cheesiness (aka fat and calories), but either way it’s always good. This particular recipe really caught my eye because though it’s traditional in concept, the ingredients are a bit unique. Although I know eggplant isn’t in season, ironically throughout the winter when I looked for it, it either wasn’t in stock or didn’t look very good. This past grocery trip was the first time I saw it there and looking good, in a while.
Loaded with veggies (yes, this does offset the cheese and heavy cream) and full of flavor, this baked pasta really is a meal all in itself. The fresh basil brings a wonderful bright taste to the dish and the fresh mozzarella is creamy and melty but not too over the top. The original recipe called for a whole pound of cheese, but as I was adding the cubes of cheese, I realized that by the time I got to 3/4 of a pound it was more than enough. The pine nut crunch on top is quite the finishing move, it basically tastes like pesto without the oil. It was so good and crunchy, that I think next time I make this I will actually make a bit more of that.
As stated in the recipe below, if you are concerned about fat and calories from the heavy cream (though I don’t think you should be, each serving will have barely 2 tablespoons), you could either go with half and half or whole milk or just hit a few extra yoga classes and enjoy your life. I made this over a weekend for nice dinner and we enjoyed for meals throughout the week, I love dishes like that.

Penne with Eggplant and Pine Nut Crunch (Gluten-free)
Adapted from Bon Appétit Magazine, March 2011
Serves 81 unpeeled large (or 2 small) eggplant (1 1/2 to 1 3/4 pounds), cut into 1/2-inch cubes
2 medium yellow bell peppers, cut into 1/2-inch squares (I used one yellow and one orange)
2 cups organic grape tomatoes
3 large garlic cloves, divided
1/3 cup olive oil
2 cups (firmly packed) fresh basil leaves, divided
1 cup freshly grated Parmesan cheese, divided
1/4 cup pine nuts
1 28-ounce can organic whole tomatoes in juice
1 cup organic heavy whipping cream (you can use less, use half and half or milk if you are concerned about fat and calories)
1 pound organic gluten-free brown rice pasta
3/4 pound fresh mozzarella cheese, cut into 1/2-inch cubesPreheat oven to 425°F. Place eggplant and peppers on a large rimmed baking sheet. Cut tomatoes in half lengthwise; add to sheet. Using garlic press, squeeze 1 garlic clove onto vegetables. Drizzle vegetables with olive oil; toss. Sprinkle with salt and pepper. Roast vegetables until tender, stirring often, 35 to 45 minutes.
Combine 2/3 cup basil, 1/2 cup Parmesan, pine nuts, and 1 garlic clove in the food processor. Blend until crumbly. Season topping with salt and set aside.
Blend tomatoes with juice, cream, 1 1/3 cups basil, and 1 garlic clove in processor until smooth. Season sauce with salt and pepper.Cook pasta in pot of boiling salted water according to package directions. Only cook until just tender but still firm to bite, stirring occasionally; drain. Return to pot or a large bowl. Toss with vegetables, sauce, and 1/2 cup Parmesan. Transfer to 13x9x2-inch baking dish. Sprinkle with fresh mozzarella and pine nut topping.
Bake pasta until heated through, 25 to 35 minutes. Let stand 10 minutes and serve.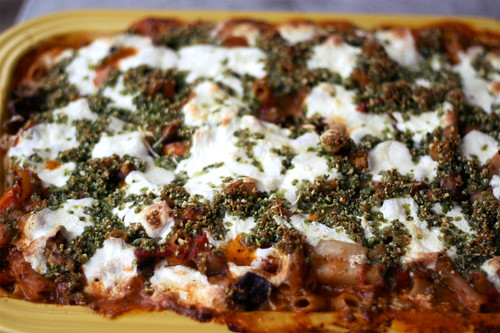
-
Baked Sweet Potato Chips
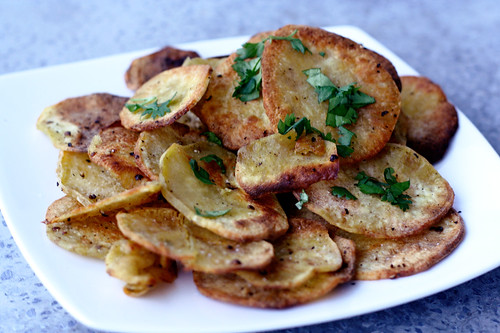
This is a super easy and healthy treat you can make at home that is perfect for a mid-day snack or for the road trip munchies. I made these for our drive to NYC a couple of weekends ago, they were perfect for the car.
You can certainly leave the peels on, though the potatoes that I had on-hand were looking a bit rough, so I decided to peel them. I used organic white sweet potatoes but any sweet potato or regular potato would work just as well. You can have fun with spices, oils and other flavors. I kept it simple with just salt and pepper and a good olive oil and topped them with a squeeze of lime and a bit of chopped cilantro. You could add chili powder, cinnamon or any other spice or herb you desire. I made these again today, for a mid-afternoon snack, and this time I used applewood smoked sea salt! WOW, it was incredible.
Once you get into making your own chips, you’ll really laugh at the thought of eating them out of a bag. These are so much more filling and have a great flavor. You will still have the great crunch but without the insane amount of fat from frying and all the chemicals and preservatives.
Once thing I recommend highly when it comes to making your own chips at home is to slice the potatoes (or whatever you are making the chips from) with a mandoline slicer. This ensures a consistent thickness on all the chips so they will cook evenly, plus it is incredibly easy to use. You can go-it by hand with a sharp knife and a steady hand, but it isn’t easy.
Baked Sweet Potato Chips
serves 42 medium organic sweet potatoes, scrubbed well or peeled, sliced about 1/8 inch thick
1 tablespoon olive oil
1/2 teaspoon coarse sea salt
1/2 teaspoon freshly ground black pepperlime wedges for serving
fresh chopped cilantro for servingPreheat oven to 400º F.
In a large bowl, add the potato slices, olive oil, salt and pepper. Toss gently to evenly coat.
Place the potato slices on two rimmed baking pans, drizzle with olive oil and sprinkle with salt and pepper. Gently toss to coat evenly. Arrange in a single layer between the two pans.
Bake uncovered for 20 to 25 minutes until the potato slices are golden brown, crisp and cooked thoroughly, turning a couple of times to crisp evenly. Sprinkle with a bit more salt and pepper a squeeze of lime juice and the chopped cilantro just before serving.
-
Spring Mushroom Risotto with Leeks and Sweet Peas
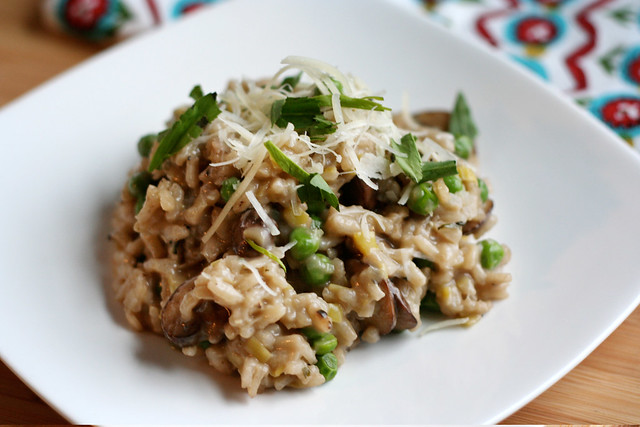
I am so ready for it to just be spring already. This chilly, dreary weather is getting a tad bit old and we’ve gotten a taste of the warm weather already, so I just wish it would stay. It was near 80º when we were in NYC last weekend and apparently it was in the 70s here in Buffalo at the same time. Today it is in the low 30s and it’s snowing again. Don’t get me wrong, I love the snow and the change of seasons, but this has been one of the longest and nastiest winters I can ever recall here.
I guess since the weather isn’t cooperating the only thing to do is to bring the spring to our bellies via delicious spring inspired dishes like this one! Once again this risotto, like the pasta recipe I posted yesterday, was inspired by what looked best in the produce section when we went to the market. I had actually hoped to find fresh sweet peas, but I guess it is still a bit early, so I went with frozen organic sweet peas. You can certainly substitute fresh peas here, you’d just want to quickly blanch them first.
This risotto is so creamy and satisfying it is hard to believe it is healthy. There is very little cheese and really since arborio rice creates such a creamy risotto, if you wanted to make this vegan you could simply leave out the cheese and it would still be incredible. The leeks bring a nice fresh but subtle onion flavor, the mushrooms a nice rustic earthy aroma and taste and the peas are a nice burst of brightness to finish it all off. The fresh tarragon was the perfect unique compliment to all of these flavors, bringing subtle scent and taste reminiscent of anise. You can play with adding in some white wine or vermouth as well as different cheeses, mascarpone or heavy cream, different herbs, lemon zest, etc. There are so many variations on classic risotto and you really can’t go wrong.
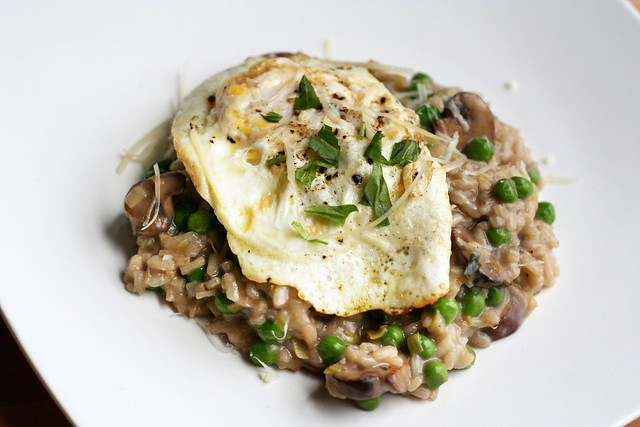
I had a dozen local farm fresh eggs that I picked up and want to use while they are at their freshest so I decided to fry up an egg for each of us to serve on top of the risotto. I had never done this before, but I knew it would be incredible and I was right. Such a nice way to finish it off. The yolk was a tad runny and it was just perfect.
Spring Mushroom Risotto with Leeks and Sweet Peas
serves 4-65-6 cups of organic mushroom broth
2 tablespoons organic olive oil
1/2 lb sliced mushrooms, I used baby bellas
2 leeks, rinsed very well, slice thinly white and green parts only*
1 clove garlic, minced
1 1/2 cups arborio rice
1 1/2 cups frozen organic sweet peas (I would have preferred fresh, but they weren’t yet at the market)
1 tablespoon fresh tarragon, chopped
kosher salt
freshly ground black pepper
1/2 cup freshly grated Parmigiano-ReggianoBring the broth to a simmer in a heavy medium saucepan. Keep the broth warm over very low heat.
Heat 1 tablespoon olive oil in a large saucepan over medium-high heat. Add the sliced mushrooms and a sprinkle of salt, sauté until tender and beginning to brown, 3 to 4 minutes. Transfer to a bowl and set aside.
Add the remaining tablespoon of oil to the pan over a medium-low heat. Add the leeks and garlic, sprinkle with salt. Sauté until the leeks are tender, about 5 minutes. Add the rice and increase the heat to medium. Stir until the edges begin to look transparent, careful not to brown the rice or leeks. Add the mushroom broth, 2 ladles at a time (or approximately 3/4 cup); stirring constantly and waiting for the stock to be absorbed before adding more. Always adding enough just to cover the rice. Continue stirring and adding broth, waiting for it to absorb and then adding more. Cook about halfway, which should be about 10-15 minutes. Stir in the sautéed mushrooms. Continue adding broth until the rice is tender but has a bit of a firm bite and the risotto is creamy, another 10-15 minutes. Add the frozen peas and fresh tarragon with just a few minutes remaining, stir to combine. The peas will cook very quickly. Once cooked, turn off the heat. Taste the risotto and salt and pepper to taste.
Stir in approximately 1/4 cup of the parmigiano-reggiano cheese, reserving the remaining for serving. Transfer the risotto to a serving bowl, top with fresh ground black pepper and a pinch or two of freshly chopped tarragon. Serve with the remaining grated parmigiano-raggiano. This risotto is incredible with a fried farm-fresh egg served on top. If the yolk is just a tad bit runny, it is absolute perfection! Trust me, try it.
* a quick note on cleaning leeks: leeks tend to have a lot of dirt and grit in them. If you aren’t careful when cleaning them, you may think they are totally clean, start cooking with them and find your entire dish has a nasty grittiness to it. This can ruin a dish After trimming off the ends (called the beards) and the dark green tops (save these for stocks). You can run them under cold water at this point, or even better, you can submerge the leeks in a large pot of cold water. Swirl them around to really remove all the grit and dirt. Drain well and then cut.

Oh and one last thing to mention, this is what was going on outside my kitchen window while I crafted up this beautiful spring dinner. Ironic, isn’t it?
-
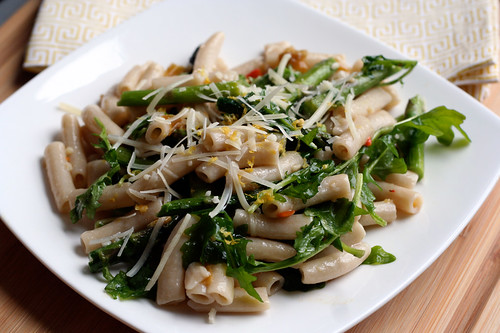
Spicy Spring Pasta with Roasted Asparagus and Baby Arugula (Gluten-Free)
Pasta is definitely my go-to comfort meal, it rarely disappoints. I almost always have a couple of pounds of dried gluten-free pasta in the pantry and enough ingredients to throw together a tasty and seasonal dish with it. Plus, I really love how little effort it takes. In the time it takes to preheat the oven and make a horrible processed frozen pizza, you can have a delicious main-course pasta made with fresh ingredients. With all the traveling we’ve had going on and how busy we’ve been I have been craving one of my homemade pasta creations, so last week after we got home from NYC and before we left again for Pittsburgh, I thought up this dish and threw it together for us.
Besides the beautiful spring produce that is finally showing itself at the grocery store, what inspired this dish was a jar of hot pepper spread from Wegmans in my refrigerator. We always have it on-hand for things like sandwiches, soups, eggs, pizza etc. It has a mere 5 ingredients, all natural, and it’s the perfect condiment. It caught my eye the other day and I realized that I had never made a pasta dish with it. I decided to take a trip to the grocery store and let the fresh produce decide the rest. I was definitely craving a spring inspired dish! Though the choices are still limited and it isn’t all necessarily local, I was happy to see more green in the produce section. It feels like we are finally through the winter and onto brighter things, literally.
The asparagus and baby arugula both jumped out at me in the produce section and I thought paired with the spicy peppers, a nice parmigiano-reggiano and some lemon, they would be perfect. Certainly skip the hot pepper spread if you don’t care for spicy or if you can’t find anything like it, or you can substitute it with a teaspoon or two of red pepper flakes. Have fun with it and always start out slow with the spicy ingredients if you don’t like the heat, you can always add more. This pasta just explodes with fresh flavors, the heat from the hot pepper spread brings a nice zing, but it’s not too overpowering, the subtle peppery crunch from baby arugula is fresh and welcomed after a long winter, along with the brightness from the lemon. It is a very light and healthy, but certainly satisfying, spring dinner. If you are looking for a nice vegan spring pasta dish, just leave off the cheese or substitute with your favorite cheese substitute, it will still be delicious.
After a winter of root vegetables, frozen vegetables and just plain ‘blah’ produce, it really is nice to start seeing better fresh produce options again at the grocery store. The farmers market opens in less than 3 weeks (I am counting down the days) and shortly thereafter I will be starting our garden.
Here’s to the spring, more green and a lot sunshine!! (FYI – as I type this, it is snowing)
Spicy Spring Pasta with Roasted Asparagus and Baby Arugula (Gluten-Free)
serves 4-61 lb asparagus
3 tablespoon organic olive oil
kosher salt
fresh ground black pepper
1 lb organic gluten-free brown rice pasta (you can use any shape you’d like and certainly you can use regular pasta here, as well)
2 cups organic baby arugula roughly chopped or torn
2 cloves organic garlic, minced
1 tablespoon hot pepper spread (I buy Wegmans brand, but you can also substitute 1 teaspoon of red pepper flakes or leave it out)
1/2 cup freshly grated Parmigiano-Reggiano
Lemon zest
fresh lemon juicePreheat the oven to 400º F.
Clean your asparagus and snap off the tough ends. Cut into 2-inch pieces and toss with 1 tablespoon olive oil, a sprinkle of kosher salt and fresh ground black pepper. Arrange in a single layer on a baking pan and place in the preheated oven. Roast for 15-25 minutes until tender, but still a bit crisp.
Meanwhile, cook your pasta according to package directions. Once the pasta is cooked to al dente, reserve approximately 1/4 cup of the cooking liquid, drain the pasta and rinse in hot water. Place the rinsed pasta in a large serving bowl, immediately add the baby arugula and toss, so it begins to wilt. Then add the minced garlic, hot pepper spread (or red pepper flakes), 2 tablespoons of olive oil and as much cooking liquid as necessary to make the pasta a bit creamy. Toss carefully to combine all the ingredients, add more cooking liquid as needed. Once the asparagus is done, add this to the pasta along with most of the parmigiano-reggiano cheese, reserving a bit for serving. Squeeze a bit of lemon juice over the pasta, taste the pasta and salt and pepper to taste. Toss everything carefully one last time. Plate the pasta individually and top each serving with fresh lemon zest and the remaining cheese.
-
Spicy Spaghetti with Fennel and Herbs (Gluten-free)
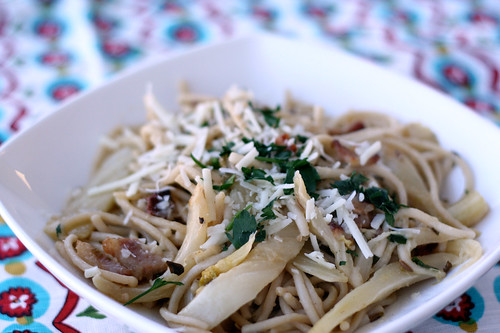
Yes, yet another pasta dish. I am a pasta-aholic, I can admit it. I cannot get enough of the stuff and I am always excited to try out new recipes. The possibilities really are endless and it’s rare that I meet a pasta dish that I don’t love. This recipe is no exception. I came across it a while back and couldn’t wait to try it with a few subtle changes. Even with the bacon and cheese, it is still very light and healthy pasta dish. See you can have your bacon and eat it, too!
The subtle crunch and bold flavor from the fennel is so wonderful and the heat from the chilies is what I live for in a spicy dish. The original recipe calls for red jalapeños, though I could only find green, I think the red would have really been nice for a pop of color. It also called for seeding the chilies, but I left them in, when I tasted the peppers while I was cutting they didn’t have too much heat, and I really wanted a good kick. It is rare that I find something to be too spicy. If you want a more subtle spice, certainly leave the seeds from the chilies out and you can always make it spicier at the end, if it needs it, by adding in some red pepper flakes. The recipe also called for adding in crushed fennel seeds untoasted, I felt like toasting the whole seeds first would give a much better flavor by releasing it during toasting, not only did it taste great, the house smell amazing. Additionally, the original recipe called for pancetta instead of bacon. Since we buy all of our pork from Sojourner Farms, a local pasture-raised farm, I decided to use some of the delicious bacon that we purchased from them, instead. I would advise not to substitute dried herbs for the fresh stuff in this dish, it would surely be missed. It is also important to use a low-sodium broth, as you will reduce the broth down and you will also be getting some salt from the bacon (or pancetta), you can always add more salt to taste, before serving. I am a big fan of using the pasta water to thicken and bring back liquid to a pasta dish, just go slow so you don’t add too much, but don’t leave this step out, it can make or break a dish without sauce, like this one. Obviously, I also changed the original recipe by substituting gluten-free spaghetti, if you aren’t gluten-free you can use whatever your favorite pasta is, a nice whole-wheat spaghetti would be great, I am sure.
If you wanted to make this vegetarian you could easily leave out the bacon and use a vegetable broth instead of chicken, you may just want to add in a bit more fresh herbs to bump up the flavors. It would still be very tasty and hearty.
Spicy Spaghetti with Fennel and Herbs
serves 8
Adapted from Bon Appétit Magazine6 slices of farm fresh local, pasture raised bacon, chopped
1 tablespoon olive oil
3 garlic cloves, chopped
2 large jalapeño chiles, finely chopped – remove seeds if you want less heat
2 large fennel bulbs, stalks trimmed, cut into thin wedges with some core attached
1 1/2 cups low-salt organic free-range chicken broth
4 tablespoons finely chopped fresh Italian parsley, divided
2 tablespoons fresh lemon juice
11/2 teaspoons fennel seeds
1 pound gluten-free organic brown rice spaghetti (or whatever your favorite pasta is, gluten-free or not)
2 tablespoons extra-virgin olive oil
1 1/2 cups finely grated Pecorino Romano or Pecorino Toscano cheese, dividedToast the fennel seeds in a large dry skillet over high heat, until slightly brown and fragrant. Remove the seeds and set aside. Sauté bacon in the same large skillet over medium heat until golden and a bit crispy. Using slotted spoon, transfer bacon to paper towels and set aside. Add 1 tablespoon oil to the bacon drippings in skillet. Add garlic and chiles; sauté over medium heat 1 minute. Add the fresh fennel; cook until beginning to soften, 5 minutes. Mix in broth, 2 tablespoons parsley, lemon juice, and the toasted fennel seeds. Bring to boil. Reduce heat to low, cover, and cook until fennel is very tender, 20 minutes. Remove from heat. Season to taste with salt and pepper.
Cook pasta until tender; drain. Reserve 1 cup cooking liquid. Transfer pasta back to the pot or a large serving bowl.
Uncover skillet with fennel mixture and return to high heat. Cook until almost all liquid is absorbed, about 4 minutes. Add fennel to pasta. Stir in 2 tablespoons oil, 1/2 cup cheese, and pancetta. Add cooking liquid by 1/4 cupfuls if it’s too dry. Toss pasta; transfer to serving bowl if it was in a pot. Season to taste with salt and pepper. Sprinkle 2 tablespoons parsley over. Serve with cheese. -
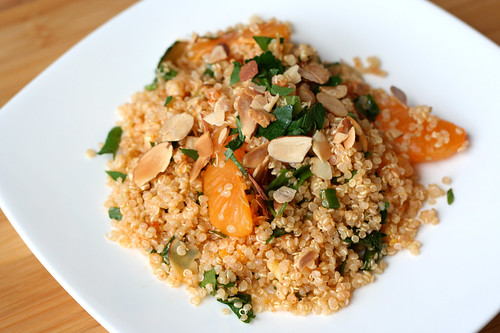
Citrus Quinoa Salad with Toasted Almonds
I have sung quinoa’s praises many, many times on this blog, so I think you know by now how I feel about it. It really is a super food and incredibly versatile. This salad caught my eye while I was searching the web last week, looking at recipes. I couldn’t wait to make it as a side for dinner and to enjoy the leftovers throughout the week for lunch. I ended up doubling the recipe so we had extra for leftovers.
This salad has a bright and sunny taste to it and it was the perfect side with the grilled pork steaks from Sojourner Farms that we were making. It was even more perfect being that it finally warmed up a bit here. It was a balmy 42º when we were getting ready to start dinner last night and rather than heating up the oven and cooking inside, we decided it would be the perfect night to fire up the grill. Honestly, it felt a bit like a heat-wave, it has been such a brutal and frigid winter here. I am actually calling “Uncle” on the 2010/11 Winter season, officially here and now! I am done, I want to see the sun, some lovely flower buds and the beautiful green grass and trees. We have been buried since early December in so many feet of snow. Don’t get me wrong, I love the snow and I still, after all these years of living here, get excited with each and every flake that falls and even the major storms, but this year I have hit my limit. Thankfully Spring is just around the corner and with the Spring comes more green and more fresh produce, which I am equally missing.
Oranges and other citrus are in season right now, but I have never been a big orange eater. However, I have been trying out different types of oranges and tangerines and I am liking them more each time, I particularly like them in dishes instead of just plain. The tangerines in this salad were perfectly juicy and sweet but not too overpowering. You could certainly use your citrus of choice, oranges would be just as good. The fresh scallions and parsley were both perfect, I changed the original recipe a bit by adding garlic and adding a bit more sriracha, since I like spicy, though even with increasing the sriracha it was still a very subtle spiciness, not intense by any stretch of the imagination. This salad is best served room temperature and it was perfect with the grilled pork and green beans with pine nuts that I also made. This salad was great as a side, but would also be great as the main dish or an appetizer. Additionally, it would be a nice vegan dish to bring to a party. If you double the recipe as I did, just top each individual serving with the toasted almonds and keep them on the side, this way they won’t lose that lovely crunch by sitting in the fridge with the salad. Just top each serving individually as you serve them.
Citrus Quinoa Salad with Toasted Almonds
Serves 4
adapted from Cooking with Amy1 tangerine, peeled, seeded and cut into chunks (remove as much of the membranes as you can)
1 cup organic quinoa, rinsed well
1 3/4 cups water
1/2 teaspoon kosher salt, plus more for serving
1/2 lemon, preferably organic
2 tablespoons extra-virgin olive oil
2 garlic cloves, minced
2 medium scallions, thinly sliced
2 tablespoons Italian parsley, minced
1/2 tablespoon sriracha, or more to taste
2 tablespoons thinly sliced toasted almondsToast your almond slices ahead of time and set aside.
Rinse the quinoa thoroughly, then toast it in a dry medium saucepan, over medium heat for a few minutes until it is fragrant.
Add the water and salt to the quinoa, and bring to a boil over a high heat. Cover and reduce the heat to medium, and simmer until the water is absorbed and the quinoa is tender, 10 to 15 minutes. Spread the quinoa out on a baking sheet to cool to room temperature quicker, while you prepare the salad.
Before cutting the lemon, finely grate the zest and then squeeze the juice into a large serving bowl. Add the olive oil, garlic, scallions, parsley and sriracha. Once the quinoa has cooled and is room temperature add in the quinoa and tangerine pieces, season to taste with salt and top with almonds and a bit of fresh parsley just before serving.
-
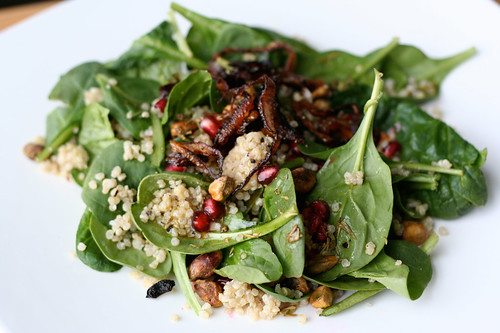
Coconut Quinoa and Spinach Salad
I came across this recipe on Sprouted Kitchen earlier in the week and was so excited that I had every ingredient on-hand to make it. I was happy I had time to put this together last night. It has been a very busy week with a lot of quick meals and leftovers, though I have still been able to stick with the cleanse, which I am proud of. I am feeling incredible, today is day 12 of 14 and I feel light and so much less weighed down and “blah”. It definitely helps that in the last 12 days I have been able to make it to six 90+ minute yoga classes and I will be getting to 2 more in the next 2 days. Starting this new year out as healthy as I can be, has made me so happy and ready for everything that lies ahead. It is incredible what a cleanse does, not only for your body, but also your mind. The brain fog is lifted and you are left with an exorbitant amount of energy. You can’t believe it until you try it for yourself.
Beyond being beautiful to look at with all the colors, there are so many wonderful flavors in this salad and all of the textures work great together, the crispy crunch from the pomegranate seeds and pistachios finish it so nicely. The coconut flavor is subtle and the crispy shallots? OH MY! This recipe calls for salt in a few places, I still included it but went very light. I made this as a main course for dinner last night and had it again for lunch today, though it would make a great side dish or starter.
Coconut Quinoa and Spinach Salad
Serves 6 as a side, less as a main dish
Via Sprouted Kitchen1 cup organic quinoa
1 cup light organic coconut milk
1/3 cup vegetable broth or water2 large shallots
2 tablespoons coconut oil (If you don’t have coconut oil on hand, canola oil will work as an alternative, which is what I used)1 cup fresh organic pomegranate seeds
4 cups (ish) organic baby spinach
1/2 cup toasted pistachio nuts2 tablespoons orange juice (Lemon or lime juice will work here as well)
2 teaspoons fresh thyme
3 tablespoons olive oil
Salt/PepperCombine the quinoa, coconut milk, water and a pinch of salt and pepper in a small saucepan and bring to a boil. Reduce heat to a simmer, cover, and cook until the liquid is absorbed, this will take about 10-12 minutes. Empty quinoa into a bowl and allow to cool. If you want it to cool quicker, you can spread it out on a cookie sheet in a thin layer.
Slice the shallots width wise into thin slices. Heat up the oil in a medium saute pan over a medium-high heat. When the oil begins to shimmer, add in the shallots. They will begin to move around in the pan, once the edges turn golden flip them over or gently toss them around, they can burn quickly so watch them. Set up a double layer of paper towels, remove the shallots just as they turn brown and drain on the paper towels.
In a small bowl, mix the orange juice, thyme, olive oil and a few small pinches of salt and pepper.
Before you assemble the salad, be sure your quinoa is room temperature or it will wilt the spinach. In a large salad bowl, spinach, the cooked quinoa, the pomegranate seeds and pistachios with the dressing. Leave a bit of the pomegranates and pistachios to garnish the top with. Garnish the top with the rest of the pomegranate seeds, pistachios and all of your crispy shallots. Top with fresh ground black pepper and enjoy. You will love it.
* If you aren’t going to eat the salad in one sitting, which I didn’t, you can mix it up half at a time and leave the rest of the elements separate, this way you can mix it again the next time you serve it and it won’t be soggy.
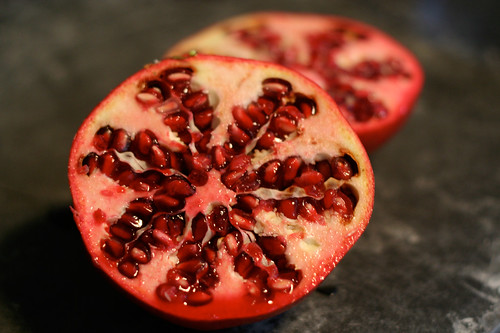
By the way, I am fairly certain a pomegranate is one of the most beautiful and tasty things that nature has to offer.
-
Banana Almond Butter Smoothie
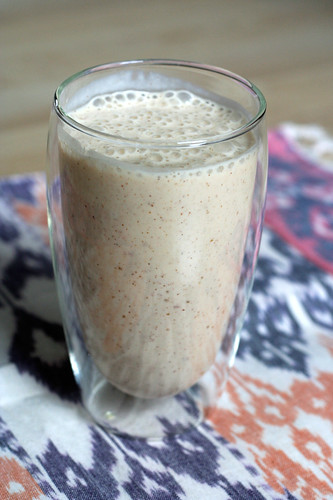
You all know by now that I am on a two-week cleanse and have become obsessed with smoothies in this time. I have been having so much fun experimenting with different flavor combinations and new ingredients. This past week, the first week of my cleanse, I discovered the magic of dates!! Now I know why they call them “nature’s candy”. Sweet enough to pop in your mouth whole to conquer any cravings, but all natural, fresh and cleanse friendly. My new-found love of dates came by accident, I happened across a container of something called “organic date coconut rolls” in the bulk section at Lexington Coop and became intrigued when I noticed they looked like little cookies and had only two ingredients: organic dates and organic coconut flakes. That’s it. Both ingredients are cleanse-friendly, so I bought them. They are incredible and so delicious, so much flavor and perfectly sweet. I have enjoyed maybe one a day or one every other day and they have been the perfect way to handle any sweet cravings I may have. Yesterday, when I went to the Coop to stock up on some things I needed for this week, I grabbed a pound of fresh organic Medjool dates to use in smoothies, eat on their own and to possibly experiment making my own date coconut rolls with. I thought tossing one date in a smoothie would be a nice natural and whole way to add a bit of sweetness. I was right. It was the perfect bit of sweet in this delicious smoothie. If you don’t like dates or can’t find them, you could certainly substitute a tablespoon of maple syrup, honey or agave syrup to your smoothie.
I also bought a jar of unsweetened almond butter for a recipe I am excited to try after my cleanse is over, but while in the shower this morning (yes, I think about food in the shower) I thought it would be great in a banana almond butter smoothie. So, I decided to experiment a bit this morning and wow, I am glad I did. This smoothie is the best one I have made yet, it has the perfect amount of sweetness and it is so wonderfully creamy that you actually feel like you are having a milkshake. I had meant to freeze a banana last night but forgot, so I just added a handful of ice cubes, if you use a frozen banana you can leave the ice cubes out. Frozen bananas are amazing in smoothies, such a brilliant way to get the chilly frostiness!
Do yourself a favor and make this smoothie, you will be amazed that something so good for you can taste so sinfully delightful.
Banana Almond Butter Smoothie
serves 11 cup organic unsweetened almond milk
1 organic banana (preferably frozen)
2 tablespoons unsalted, unsweetened organic almond butter
1 fresh Medjool date, pit removed and cut in half
1 teaspoon organic vanilla
Whole nutmeg, grate a small amount into the blender just before blending
A small handfull of ice cubes (if your banana wasn’t frozen)Add all the ingredients to your blender and process until smooth!
-
Peaches and Cream Smoothie
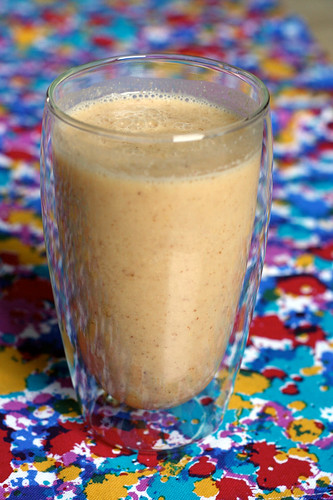
I have really been loving smoothies while I am on this cleanse. They have been the perfect morning breakfast, light, but still substantial enough to keep me going until lunch. A lot of mornings I get up and I am out the door before 7am for Mysore yoga (a self-led Ashtanga yoga practice) and I don’t eat beforehand. When I get home (or to the studio) I am hungry but pleasantly relaxed and not ravenous for a large breakfast. The smoothies are perfect. I have been playing around with all the different fresh and frozen organic fruit and fruit juices I have, some have almond milk, others don’t and I have added in the ground flax-seeds when I think I could use it (these can certainly be left out in this recipe or any of the others). This smoothie was so delicious. I am so obsessed and amazed with almond milk. I have never been a big milk drinker, but I really don’t care much for soy milk either, when I tried almond milk I knew that was the one for me.
This was yesterday’s smoothie, cleanse day number 7! I am now in week 2 and excited to experiment with new smoothies and other breakfast options. Got any smoothie recipes to share?
Peaches and Cream Smoothie
serves 11 cup organic unsweetened almond milk
1 cup frozen organic peaches
1/2 teaspoon organic vanilla
1 tablespoon ground organic flax-seed
small drizzle of honey (you can add more if you wish, I am trying to go very light with the sweeteners during the cleanse)Combine ingredients in blender and blend until frothy and smooth.
-
Roasted Winter Vegetable Ragout
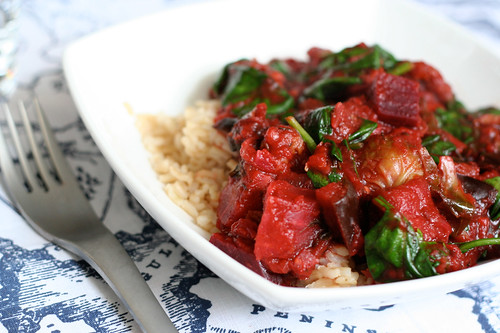
I made such a big batch of Roasted Winter Vegetables last week that I have been enjoying them lots of different ways ever since. Because Mark refuses to eat beets, I have been slowly making a dent in them all by myself and I have been loving it. I had about half of them left, so, I decided to take the remainder and make this ragout over the weekend, I served it over some brown rice with a lot of freshly ground black pepper, for a nice hearty and hot winter lunch. There was enough that I also enjoyed it served over some organic brown rice linguine last night for dinner. There is still one small serving left and that will be a great lunch tomorrow. There really are many ways you can do this, the main point is to create a quick and easy chunky tomato sauce. I didn’t have diced or whole canned tomatoes so I just used the crushed tomatoes that I had and then I added some sun-dried tomatoes slices in. Because there are onions and garlic in with the roasted vegetables you really don’t have to add much. I added baby spinach for some green crunch. This was great over the brown rice and brown rice pasta, it would also be great over polenta, quinoa or millet.
Roasted Winter Vegetable Ragout
serves 3-43 cups leftover roasted winter vegetables (or however much you have)
1/2 of a 28 ounce can organic crushed tomatoes (put the remainder in a leftover container in the fridge for another meal later in the week)
2 cups organic vegetable broth, low sodium
Pinch or two of dried herbs de provence
1 cup sun-dried tomatoes sliced
2 cups organic baby spinachAdd the crushed tomatoes and vegetable broth to a large pan over a medium-high heat, bring to a simmer. Add in the herbs, sun-dried tomatoes and roasted vegetables, cook over a high heat about 15 minutes. Stir in the baby spinach and cook another 2 to 3 minutes. Season with salt and pepper to taste. To serve, spoon over rice, pasta, polenta, etc.
-
Vegan Pumpkin Spice Ice Cream

Ever since I got my ice cream maker, I’ve been wanting to try my hand at making a vegan ice cream. This ice cream is so creamy you would never ever know it is dairy free. Mark didn’t believe me. I liked it better than most ice creams I have ever had, because it was a bit lighter and didn’t give my stomach that heavy feeling after I ate it, like many ice creams can. I also really loved how easy this was to make. Basically no work at all. A lot of people are hesitant to bake and cook with coconut milk for fear the coconut flavor will outshine the other ingredients. There is relatively no coconut flavor from the milk, so it doesn’t over power the taste of the pumpkin or the spices.Each spoonful of this ice cream actually tastes just like a perfect bite of crustless pumpkin pie with a dollop of whipped cream on top. I can’t recommend enough using fresh pumpkin puree if you can. If you can’t some good quality canned organic pumpkin puree will do.
Vegan Pumpkin Spice Ice Cream
1 – 14 ounce can organic coconut milk (full fat, not light)
1 cup unsweetened organic almond milk (or any other non-dairy milk)
1 teaspoon vanilla extract
1 teaspoon cinnamon
1/2 teaspoon ground nutmeg
1/4 teaspoon ground cloves
3/4 cup organic pure cane sugar (coconut sugar, palm sugar or sucanat, also work great)
1 1/4 cup fresh pumpkin puree (you can use canned if you don’t have fresh, but fresh is much tastier)Combine all of the ingredients together in a large bowl and whisk to combine well. Let chill for about an hour in your fridge. Once it is thoroughly chilled, follow instructions for your ice cream maker.
-
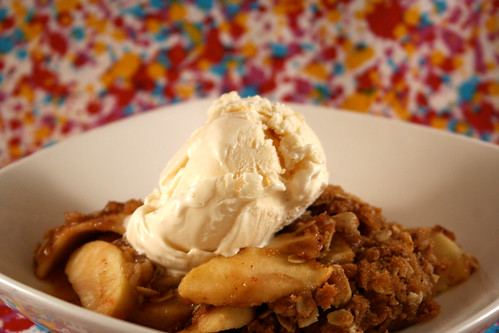
Gluten-Free Apple Crisp
NOTE: I posted an updated version of this recipe – here! The new version is still gluten-free but it is also vegan and refined sugar free!
This is my Mom’s recipe, she is an incredible baker. My Dad does most of the cooking and my mom does all of the baking. Every Fall she whips up a pan of this just for me, with the freshly picked apples from the tree in their yard and it is the best. She made a big pan of it for dessert for the big dinner I made last night. This is what Autumn tastes and smells like! This recipe is super simple, I have made it a couple of times myself, though somehow it is never as good as when my mom makes it.
Gluten-Free Apple Crisp
4 cups of peeled and sliced apples (4 med)
2/3 – 3/4 cup packed brown sugar
1/2 cup gluten-free flour (your favorite all-purpose will work perfectly)
1/2 cup certified gluten-free oats (I like Bob’s Red Mill Gluten Free Rolled Oats)
3/4 tsp ground cinnamon
3/4 tsp ground nutmeg
1/3 cup butter softenedPreheat oven to 375°F.
Grease a square 8″ x 8″ pan. Place apples in pan.
Mix remaining ingredients cutting butter in to make crumbly consistency.
Sprinkle over the apples and bake 30 minutes or until apples are tender and topping is golden brown. Serve warm topped with fresh whip cream or your favorite vanilla ice cream.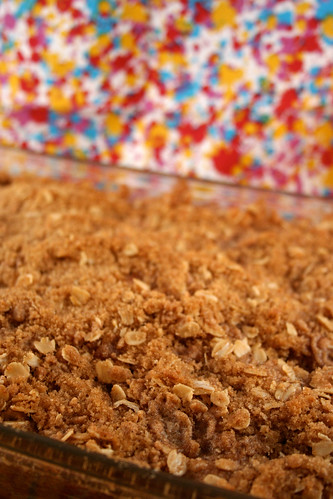
-
Brown & Black Rice Casserole with Black Beans & Garden Vegetables
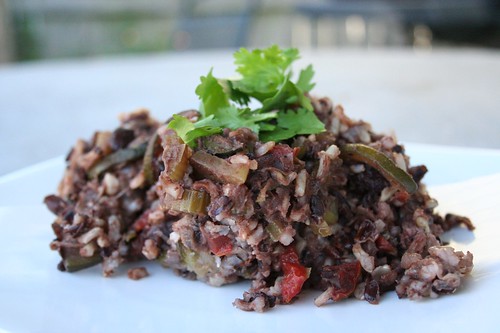
Yesterday was a bit cooler of a day and it got me so excited, Autumn is coming, yay yay! It’s my favorite time of year! I can’t wait to do more cooking inside and stop relying on the grill and cold dishes. I wanted to make some sort of casserole or bake with ingredients I had on hand, and it of course had to be cleanse-friendly, so I came up with this recipe on the fly. It is a wordy name, but it is a super simple dish to prepare. It is quite hearty and really can be pretty versatile, as well. I would have added bell peppers if I had any on hand, but since I have an abundance of banana peppers from our garden, I thought that little kick of spice would be nice. You could also add carrots if you had them on hand. I had black rice in the pantry that I thought would make this dish even tastier, so instead of just brown rice, I decided to add a bit of the black rice in. The flavor from the it is unlike any other rice I have had, a bit sweet and nutty. Certainly if you don’t have any on hand, just brown rice would do or you could add in wild rice.
This would also make a great side dish or if you like your meat with dinner, you could to bake it with chicken breasts. For you cheese lovers, topping the casserole with a bit of shredded cheese right at the end to get a little melty top would be delicious, too. Since I am avoiding dairy right now on this cleanse, I was of course thinking about the cheese on top, the whole time I was making this, however when it came out and I took that first bite, I realized quickly, it didn’t need it at all. I put a dollop of guacamole on the side and it was perfect.
I was concerned about how this dish would photograph as the color from the beans and black rice took over and made it a bit muddy. After making this, I think that a yellow or orange bell pepper would have added a bit more of a pop of color. What do you think – does it look tasty?
Brown & Black Rice Casserole with Black Beans & Garden Vegetables
serves 4 as a main course, 6-8 as a side dish1 cup uncooked organic brown rice
1/2 cup uncooked black rice
1 small red onion, diced
2 cloves garlic, minced
2 banana peppers, chopped, seeds and ribs removed
1 medium zucchini, halved lengthwise and sliced
2 stalks celery, sliced
1-2 plum tomatoes, diced
1 can organic black beans, drained and rinsed
2 cups water
1 teaspoon ground cumin
1/2 teaspoon chili powder
small bunch of cilantro, freshly chopped
2 teaspoons kosher salt
freshly ground black pepper
1 tablespoon organic olive oilPreheat oven to 375º
Rinse the brown and black rice; our into a 2 quart casserole dish. To the rice add the next 7 ingredients. Stir in cumin, chili powder, salt, fresh cilantro (reserve some for serving) and olive oil, mix well. Pour water over the mixture and cover.
Bake in preheated oven for 45 minutes; check at this point to see if more water needs to be added. Bake another 30-45 minutes more, or until rice is cooked (cooking time with vary greatly based on the types of rice used). Stir well before serving and season with salt and freshly ground black pepper, top with fresh cilantro.
-
Mexican Frittata

Andrea and I decided on a whim to whip up this Mexican Frittata the last morning we were all together at the beach house and I have to say, I am super impressed with how it came out for completely winging it. I really love cooking for people, I could have stayed at the beach house another week and just continued to cook, enjoy that view and relax. Unfortunately, that wasn’t possible, we leave again in a few days for Seattle, then Chicago. I guess we will have to just make this a yearly trip, then.
My measurements are not exact on some of this, we were trying to use up a lot of the food we had on hand from the week at the beach. I only used half of a green pepper and 11 eggs, because that’s what we had. You can definitely improvise with frittatas, use what you have on hand and get creative. There really are no wrong ingredients. Frittatas are a great way to make breakfast for a large group of people with very little effort. For us, it was a great way to put a lot of the fresh leftover ingredients to good use. I had some ground pork breakfast sausage from Sojourner Farms that I really wanted to make something with, so we came up with the idea to do a Mexican inspired frittata.
Later that same day, we took a trip out to Sojourner to pick up our chickens for the rest of the season, it was so awesome to be able to show our friends the farm where a lot of the food they ate over the week came from and introduce them to the man who grows it all. We even got to meet and pet a bunch of the pigs. Pierre took us around and we really got to spend some quality time on the land. I really cannot recommend enough that you find a pasture-raised farm close by you, that you truly love, that raises safe, healthy and natural animals. Sojourner Farms has pasture-raised chickens, pork, beef and eggs, he also raises bees and makes honey. We are so lucky that it is a short trip to get there and we are rewarded with supporting a sustainable farmer who raises his animals from birth to market and has a great love not only for his practice and the animals, but also for the land he raises them on. It is so important to see where your food comes from and how it is raised. Find a grass-fed farm near you using Eat Wild

This is Sam and Black from Sojourner Farms, they are huge lovable adults used for breeding.
Mexican Frittata
serves 83/4 lb ground breakfast sausage, I use pastured-raised, antibiotic and hormone free, pork breakfast sausage from Sojourner Farms
1 tablespoon olive oil
1 clove garlic, minced
1 shallot, minced
1/2 green pepper, diced
1 small zucchini, halved lengthwise and sliced
1 small yellow squash, halved lengthwise and sliced
2 teaspoons crushed red pepper flakes
2 tablespoons butter
12 fresh farm eggs, I use brown eggs from Painted Meadows Farms
1 cup mexican blend cheeses, grated (Monterey Jack, Cheddar, Colby, etc)
1 cup of halved cherry tomatoes
2 or 3 scallions, sliced thinly
1/2 cup cilantro, roughly choppedHeat large oven-safe non-stick skillet (or cast iron skillet) over medium heat until hot, add sausage and cook until browned. Remove the sausage from the pan and drain off most of the liquid, leave a bit and add olive oil. Once hot again, add garlic and shallot, cook and stir until tender. Add in green pepper, zucchini, squash and red pepper flakes, stir and sauté until tender, about 5-10 minutes. Drain off any excess liquid. Whisk eggs, salt and pepper in a large bowl. Add the sausage and butter to the vegetable mixture in the skillet, allow the butter to melt. Add the beaten eggs to the skillet, fold gently to combine. Allow the eggs to begin to set. With a spatula, lift up an edge of the frittata and tilt the skillet to allow the uncooked mixture to flow to the bottom of the pan. Continue to lift until the egg on top is barely runny. Top the frittata with the halved cherry tomatoes, sprinkle with grated cheese and slide the skillet into the oven. Bake the frittata until it is firm to the touch, about 5-10 minutes. Slide the frittata out of the pan onto a serving platter, top with red pepper flakes, sliced scallions, chopped cilantro and a bit of kosher salt, cut into 8 wedges. We served a bit of salsa verde on the side.
-
Mint Chocolate Chunk Ice Cream

I have never been a huge fan of ice cream, until I tasted fresh homemade ice cream made from scratch with fresh ingredients. It is so insanely delicious and it has so much more flavor than the store-bought stuff. I had been talking about buying the ice cream maker attachment for my Kitchenaid mixer for some time now and finally got around to it last week. I knew before I even bought the attachment what flavor my first batch was gonna be. Mint Chocolate Chunk! We have so much mint growing wild in our yard that I couldn’t wait to snip some off and bring it in to make fresh ice cream. If you can’t get your hands on fresh mint you can use mint extract, but there is no comparing to the fresh mint. So much so that I added chopped fresh mint back in at the end, since I love the little bits of flavor.
Making ice cream from scratch, cooking down and making the custard first definitely is a lot of work, but it is absolutely worth it and is so gratifying in the end. The only thing I wished is that I could have found some place locally to buy fresh milk and cream, instead I bought organic milk and cream from the grocery store. I have searched high and low to find somewhere locally to buy dairy (preferably pasture-fed), but with no results yet, so if you know of a place in the Western New York area, please share.
This ice cream really is to die for. So rich, a small scoop is all you need. I cannot wait to experiment with other flavors.
Mint Chocolate Chunk Ice Cream
yields 1 quart
adapted from Simply Recipes3 cups of fresh mint leaves (not stems), rinsed, drained, packed
extra fresh mint leaves, chopped
1 cup organic whole milk
2 cups organic heavy cream (divided, 1 cup and 1 cup)
2/3 cup organic pure cane sugar
A pinch of salt
6 egg yolks (we prefer brown eggs from local, organic, free-range chickens)
1 teaspoon organic vanilla extract
6 ounces semisweet chocolate or dark chocolate, chopped fine, keep in the freezer until used1. Put the mint leaves in a heavy saucepan with the 1 cup of milk and 1 cup of the cream. Heat until just steaming (do not let boil), remove from heat, cover, and let stand for 30 minutes. Reheat the mixture until steaming, remove from heat and let stand for 15 more minutes.
2.While the mint is infusing in step 1, prepare the remaining cream over an ice bath. Pour the remaining 1 cup of cream into a medium size metal bowl, set in ice water (with lots of ice) over a larger bowl. Set a mesh strainer on top of the bowls. Set aside.
3. Strain the milk cream mixture into a separate bowl, pressing against the mint leaves with a rubber spatula in the sieve to get the most liquid out of them. Return the milk cream mixture to the saucepan. Add sugar and salt to the mixture. Heat until just steaming again, stirring until sugar has dissolved. Remove from heat.
4. Whisk the egg yolks in a medium-sized bowl. Slowly pour the heated milk cream mixture into the egg yolks, whisking constantly so that the egg yolks are tempered by the warm mixture, but not cooked by it. Scrape the warmed egg yolks back into the saucepan.
5. Return the saucepan to the stove, stirring the mixture constantly over medium heat with a wooden spoon, scraping the bottom as you stir, until the mixture thickens and coats the spoon so that you can run your finger across the coating and have the coating not run. This can take about 10 minutes.
6. Pour the custard through the strainer (from step 2) and stir into the cold cream to stop the cooking, add 1 teaspoon of vanilla.
7. Chill the mixture thoroughly in the refrigerator (at least a couple of hours) or stir the mixture in the bowl placed over the ice bath until thoroughly chilled (20 minutes or so). Freeze the mixture in your ice cream maker according to the manufacturer’s instructions.
8. Once the ice cream has been made in the ice cream maker it should be pretty soft. Gently fold in the finely chopped chocolate and chopped fresh mint. Put in an airtight container and place in the freezer for at least an hour, preferably several hours. If it has been frozen for more than a day, you may need to let it sit at room temperature for a few minutes to soften it before serving.


