-
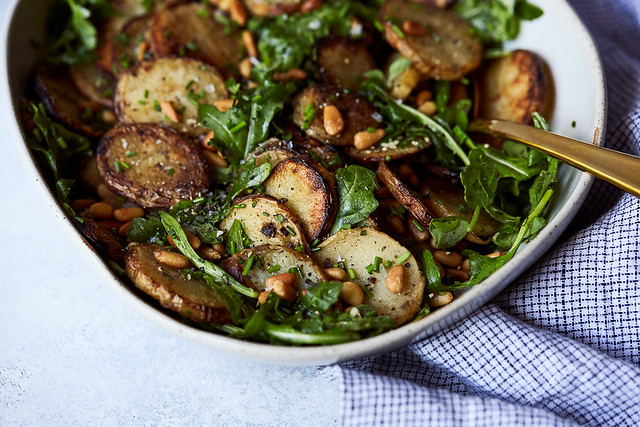
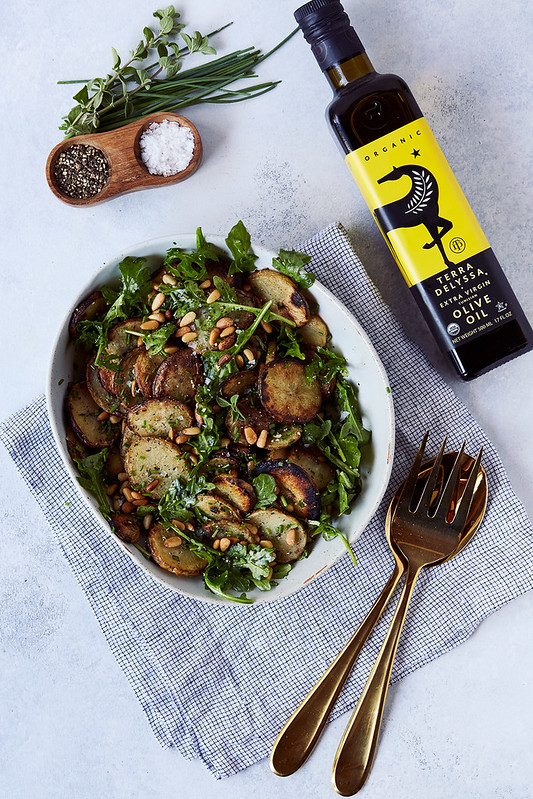
Grilled Potato and Arugula Salad with Fresh Herbs
This Grilled Potato and Arugula Salad with Fresh Herbs is a summertime backyard BBQ staple around here. A must when we are entertaining. Put all other potato salads to shame with multiple layers of flavor and texture.
[This is an updated post from 2011.]
For well over 6 years now this potato salad has been a staple of our summertime cookouts. Whenever we have people over, whether we are cooking up the most elaborate or the most simple of meals – this side dish stunner is my go-to.
Cooking up the potatoes first allows them to soften up a bit, so when they hit the grilled glistening with the Terra Delyssa olive oil, they get a golden brown char to the outside of them, while still holding their shape.
Try substituting baby spinach, kale or other lettuces or greens for the arugula and even play with different vinaigrette moves, try adding in a whole grain mustard, a little lemon zest, maybe add some red pepper flakes.
-
Baked Eggs with Asparagus and Lemony Pea Pesto {Paleo, Whole30}

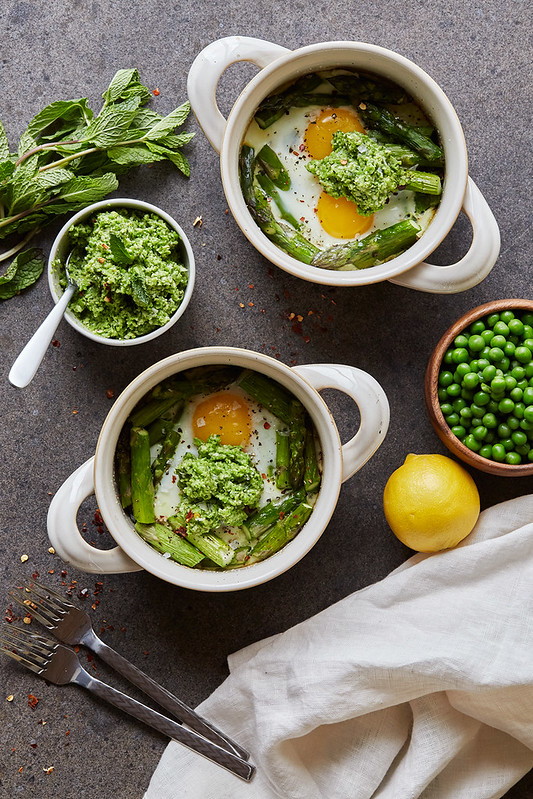
We are officially through the winter, onto the other side and into the spring. I absolutely adore this time of year. It’s so refreshing and inspiring. Spring brings so much fresh newness and light. Despite being nearly 4 months from the start of the new year, to me, the springtime truly feels like birth of the new year. We welcome the light back into our lives and there is a very palpable energy floating amongst us. I feel rejuvenated and ready to take on the world.
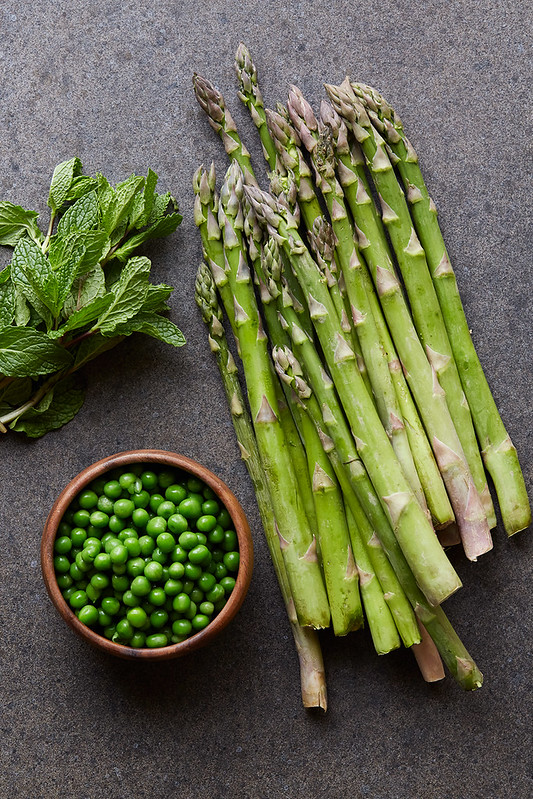
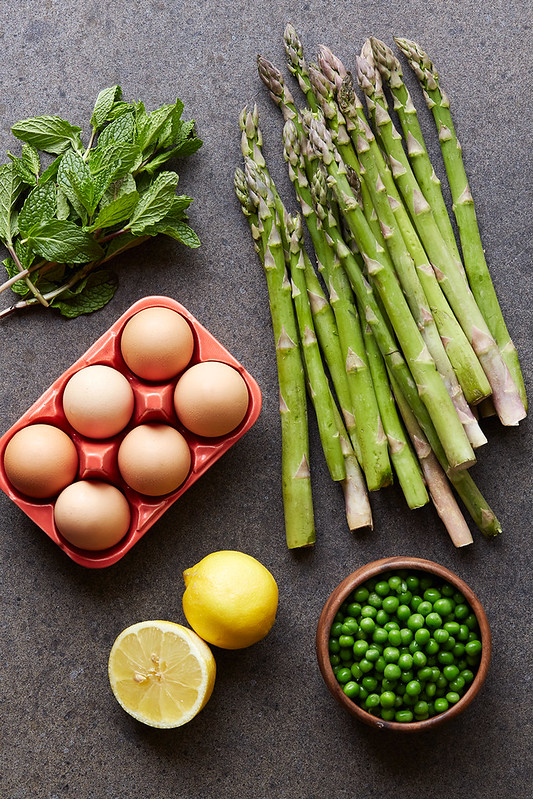
From a food standpoint, there is so much beautiful produce popping up, once again. So much is in bloom and there is much greenery. I feel so inspired to create in the kitchen this time of year. While I won’t be hosting a big Easter brunch this year, I am very much in the mood to think about beautiful spring-inspired brunch foods right now. More than the typical omelet or scrambled eggs, these baked eggs incorporate the best of the season and they can become a meal in and of themselves. They can be made in single servings, so you can prep everything and just place the ramekins or crocks into the oven. What comes out are these beautiful little baked eggs with an elegant vernal twist. The perfect dish for guests. Asparagus and green peas are stars of this show, making their first appearance of the season, in the first of many delicious dishes.
-
Orange Cranberry Coconut Smoothie

This time of year while most folks are looking for holiday cookies and sweets, I find myself seeking out comforting, healthy foods that I feel good about eating. Don’t get me wrong, I do indulge a little here and there, but generally speaking I find myself craving fresh fruits and vegetables and foods that will give me the energy I desperately need this time of year.
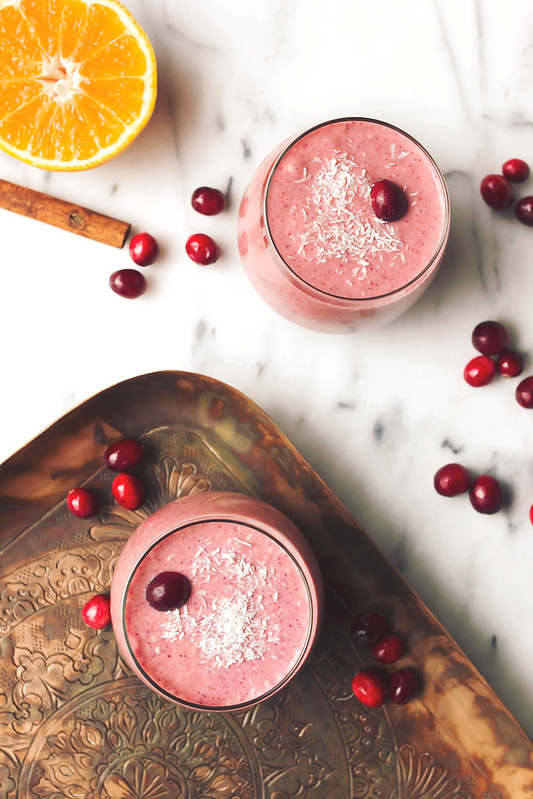
I had an abundance of fresh cranberries on hand from our Thanksgiving feast, so I thought a seasonally-inspired smoothie was the perfect way to use some of them. We have beautiful, juicy fresh oranges ready to be picked from our tree and I always have bananas and Medjool dates in the freezer ready for smoothie-making, so this sweet and tart, creamy, vegan, spiced Orange Cranberry Coconut Smoothie was born. Read the rest of this entry »
-
How-to Make Restaurant Style Salsa

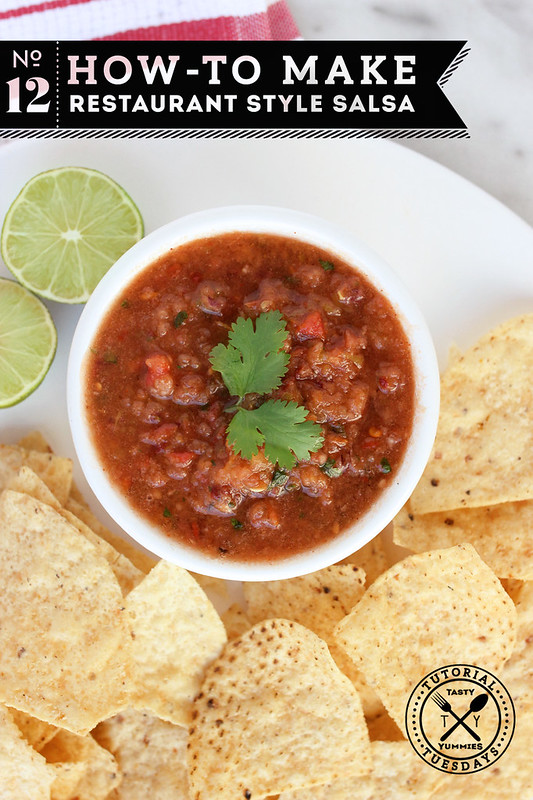
As summer’s end nears, we are left with the last few bites of the season to savor. I feel like a bit of a hoarder whenever I go to the markets this time of year and I see the beautiful heirloom tomatoes, the beautiful Hatch chiles, fresh herbs and all the other goodness. I can’t help myself. I want it all.
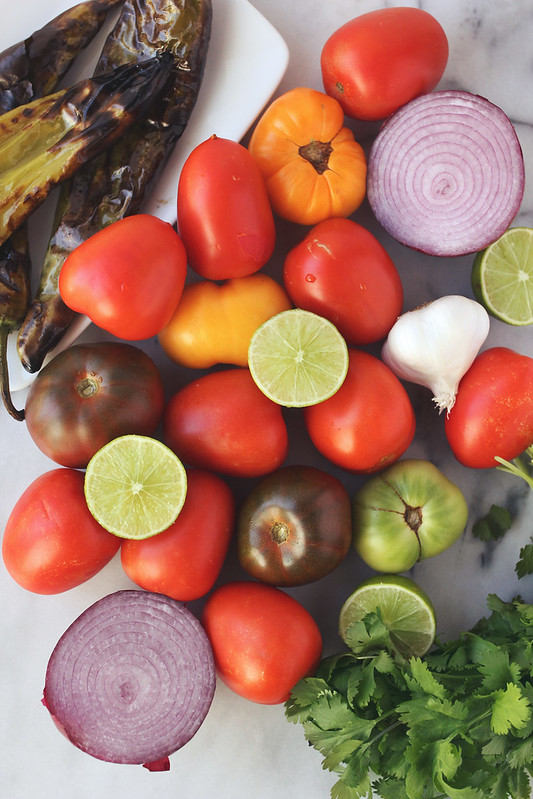
What better way to enjoy the final tastes of summer than a perfect fresh homemade salsa. For me, though I love a chunky, classic-style pico de gallo, what I don’t love is the amount of time all of the chopping takes. This restaurant-style salsa is a smoother, classic salsa and it is a cinch to whip up.
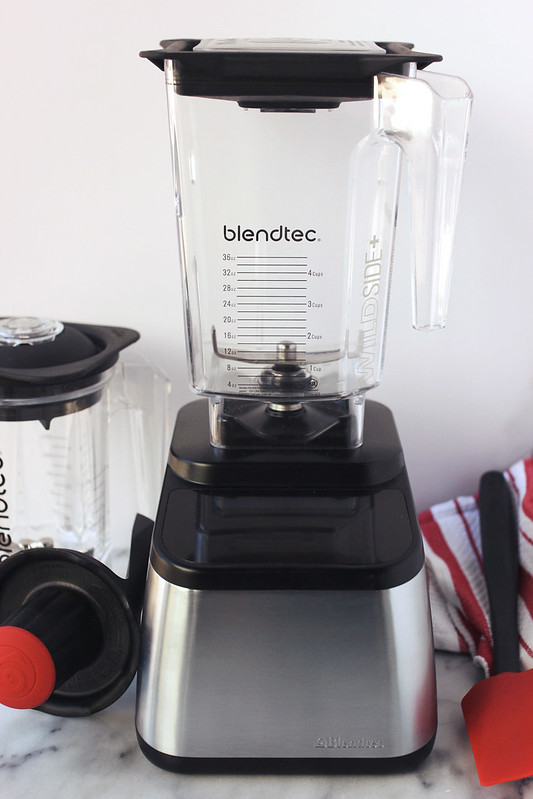
When Blendtec offered to send me one of their beautiful high-powered blenders, I immediately became excited about all of the possibilities. The middle of the road KitchenAid blender we got for our wedding 7 years ago, was nearing the end of it’s life and though it’s made literally hundreds and hundreds of smoothies, it also never overly impressed me, it was no powerhouse and it definitely couldn’t handle anything too thick.
-
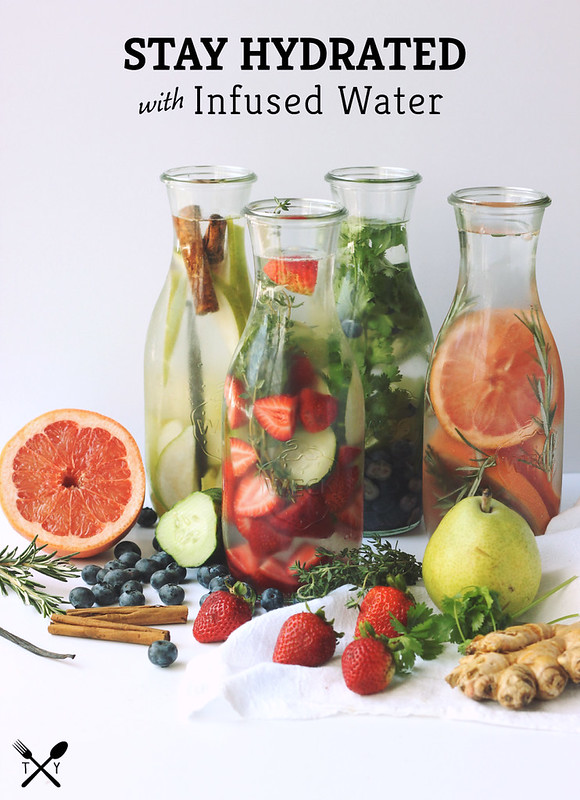
Infused Waters to Keep You Hydrated this Summer
We all know how important it is to stay hydrated, year round, but this is especially important in the summer. When the weather is hot and you are spending much of the day outside being active, it is extra important to drink more fluids than usual and most especially that you are doing so before you start feeling thirsty – as that is a sure sign you are on your way to dehydration.
Did you know that every single cell in the human body needs water to function properly? Much like the plants in your garden, your cells, too, can perk up immediately upon watering. It’s that simple.
What Does Water Do in My Body?
Water Helps Your Body with the Following:
- Getting rid of waste through urination, perspiration, and bowel movements.
- Keeping it’s temperature normal.
- Lubricating and cushioning your joints.
- Protecting your spinal cord and other sensitive tissues.
Tips for Drinking More Water:
- Drink a glass of water as soon as you wake up in the morning (I prefer mine warm with a little lemon).
- Carry a dedicated bottle or container with you are all times, at work, at home, even if you are just out running a few errands.
- Use an app on your mobile phone to track your water intake or simply set an alert on your phone to remind you.
- Choose water at restaurants instead of other beverages. not only will you save on calories while simultaneously hydrating yourself, but it also saves money.
- When you are hungry, start with a glass of water before you reach for the snack. sometimes feelings of hunger are actually your body telling you that it’s thirsty. it may just curb the cravings.
- Drink before you eat. 16 ounces 30 minutes before every meal can actually keep you from over indulging. make this a regular practice and you might even find yourself losing weight.
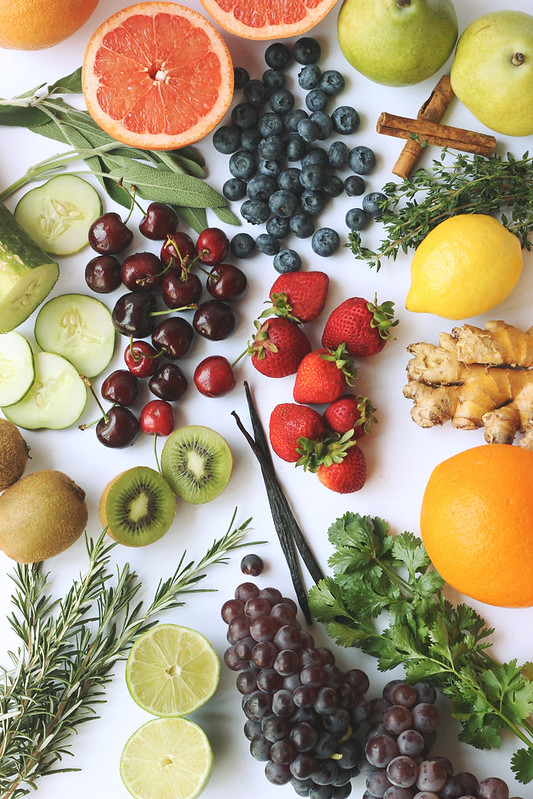
- Infuse and flavor your own water.
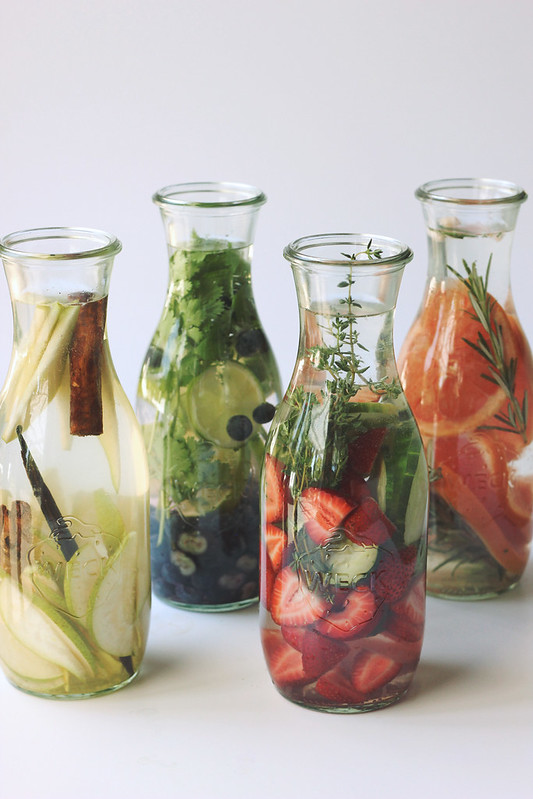
Today, I am sharing with you one of my very favorite ways to stay hydrated during the summer months…
INFUSED WATER!
Infused water is not only a tasty way to stay hydrated but it is nutritional, healthy, fresh and all-natural!
How-to Make Infused Water:
 Read the rest of this entry »
 -
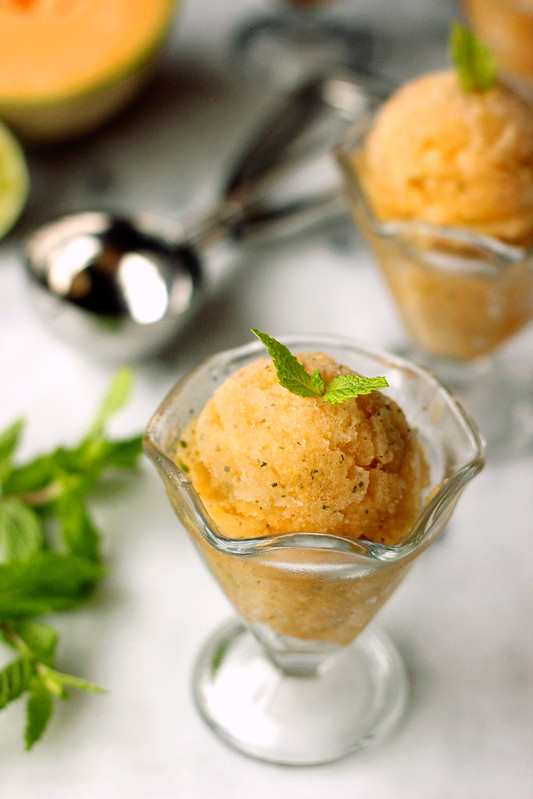
Cantaloupe Mint Sorbet (Gluten-free and Vegan)
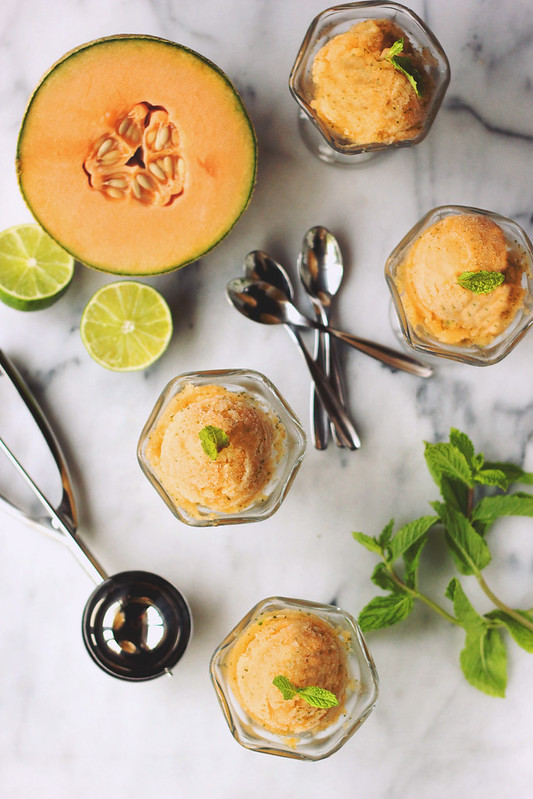
There is something about summertime and it’s fresh vibrant fruit that just makes me school-girl giddy!! Sitting in the sun, enjoying your favorite fruit, juice running down your face and your arms, that’s when you know it’s really summer!
We’ve been fortunate that for a few weeks now we’ve been getting some of the freshest, sweetest fruit in our weekly CSA box. Peaches, nectarines, watermelons, cantaloupes and so much more. I decided this year that rather than just cutting up the fruit and stuffing it into our faces, that I would get creative with some of it. Treat it like I do all of the many veggies we get.
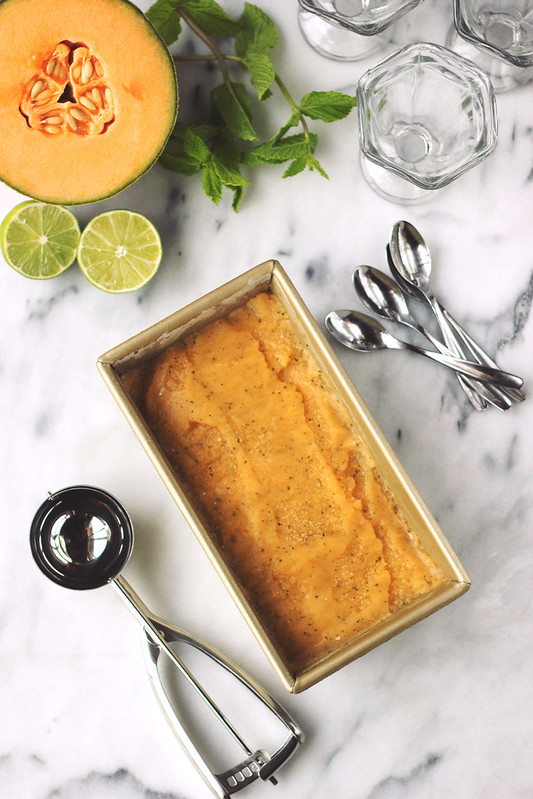
I was dreaming up frozen summery desserts when I realized that I hadn’t pulled my ice cream maker out once since we moved to California last year. That feels like a MAJOR sin, considering I basically live in perpetual summer, here in Southern California. In discovering my terrible neglect of my ice cream maker, I also realized that I had never made a sorbet! Sacrilege isn’t it?
-
Strawberry Avocado Jalapeño Salsa {Gluten-free and Vegan}
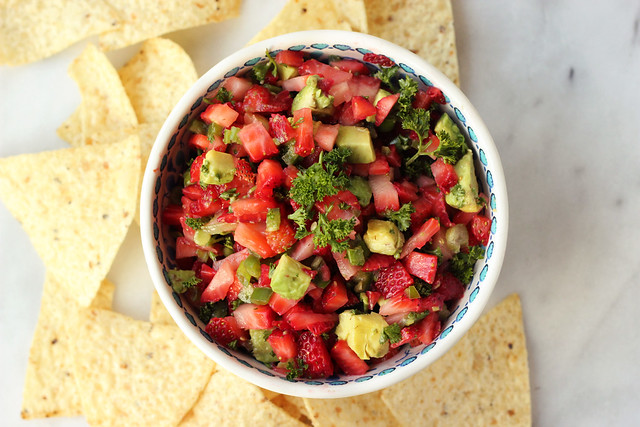
It’s strawberry season, it’s strawberry season and I might be just a little bit excited! Iapologize in advance, I know it isn’t quite strawberry season for those of you not in Southern California. But, that just means you can start bookmarking and saving all of these yummy strawberry recipes I share and they’ll be all ready for you to get to cooking as soon as they are in season near you.
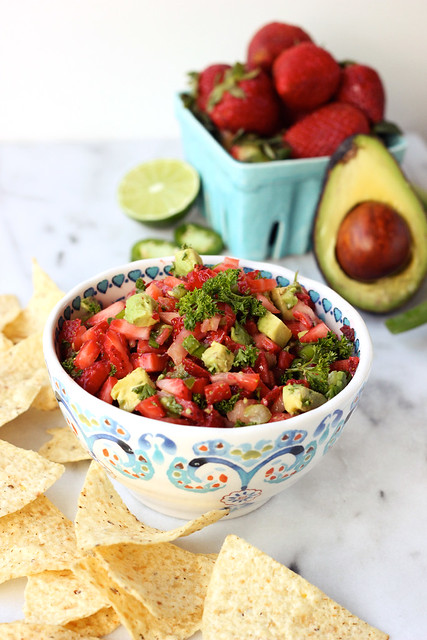
This slighty sweet, kinda tart, and a little bit spicy, Strawberry Avocado Jalapeño Salsa, is just as amazing as it is beautiful. Great on tortilla chips, over your favorite tacos, on grilled chicken or fish, or even just with a spoon. We have already had some hot weather here in Southern California, so I have been enjoying summery treats a little early. This salsa is simple to make and just full of so much flavor. I don’t always love fruit in savory dishes, but this one is incredible. I have a feeling this is going to be a staple snack around here this strawberry season! Read the rest of this entry »
-
How-to Make Preserved Lemons


How-to Make Preserved Lemons
Along with the gluten-free cooking demo I hosted on Saturday night at Surfas, I had the pleasure of hosting a hands-on preserved lemons workshop this weekend at the Patchwork Show Edible Edition in Costa Mesa and it was so much fun! It was a packed house. My only regret is that I didn’t stop to take some photos of everyone working on their jars of preserved lemons. It was so fun for me to look out and see everyone getting their hands dirty and learning to do make something new. Not a single person there had ever made preserved lemons!
For those that were are the workshop, these are the instructions for what I taught you on Sunday, thanks again so much for coming. For those that couldn’t make it to the workshop, here is how you easy it is to make preserved lemons. It is really this simple.
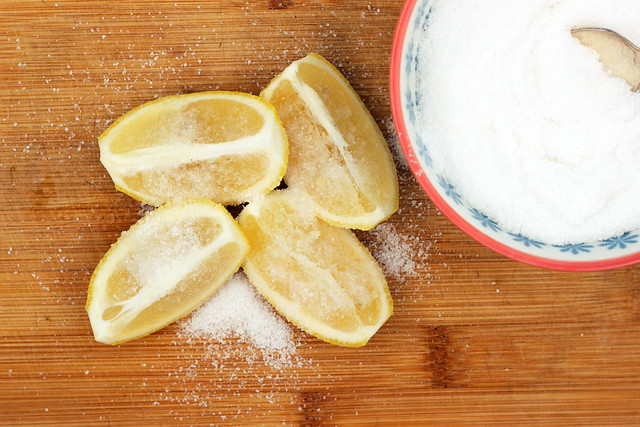
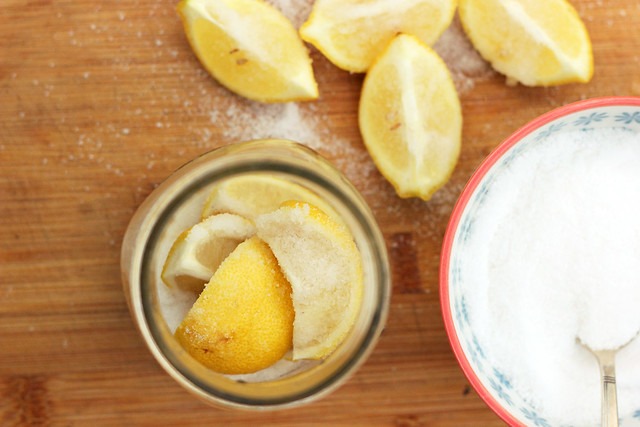
I prefer to work with a 16-ounce or quart-sized wide-mouthed jar when I can, but they just aren’t always available at our house, I literally use jars for everything. So, these measurements are for one 12-ounce jar. Adjust your quantities as needed for different sized jars or multiples. Additionally it should be noted, the amount of salt and the number of lemons is just an approximation. It doesn’t have to be exact and it will depend on the size of your lemons.
By the way, you can also add spices to your preserved lemons such as, cinnamon sticks, bay leaves, peppercorns, cloves, coriander, dried peppers, cardamom, etc. Read the rest of this entry »
-
Grilled Asian Green Beans – Gluten-free + Vegan
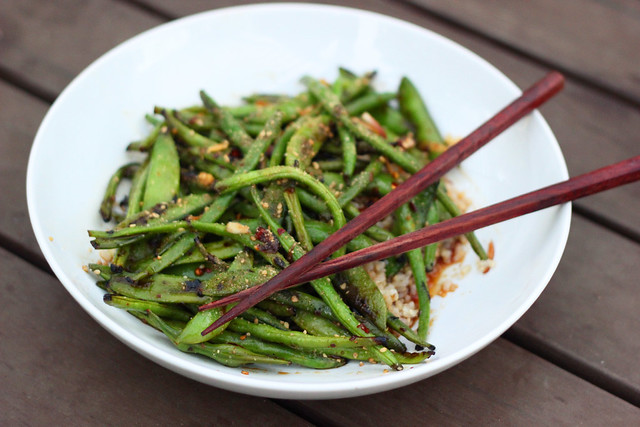
This recipe is one of those times I created something on the fly with what I had on hand, haphazardly adding ingredients that made sense to my vision, doing my best to measure and take photos when possible. This particular night I hadn’t made any plans for dinner, it was getting late and I came up with the idea to grill some green beans that we had from our CSA and sugar snap peas I had that also needed to get eaten up. I am pretty sure Mark was a tad apprehensive about having so much green stuff for dinner, but let’s be honest he had no choice really! It was this or cereal. We all know those nights.
I decided to snap photos while I was making this, since some of my most favorite dishes I create are the ones that I don’t stress over, that are inspired by what is fresh from our farmer and what is quick and easy. The sun was literally setting quicker than I could get this served up, so although these may not be the most glamorous or well-styled photos, this dish was far too good not to share with you guys, especially with green beans in season right now.
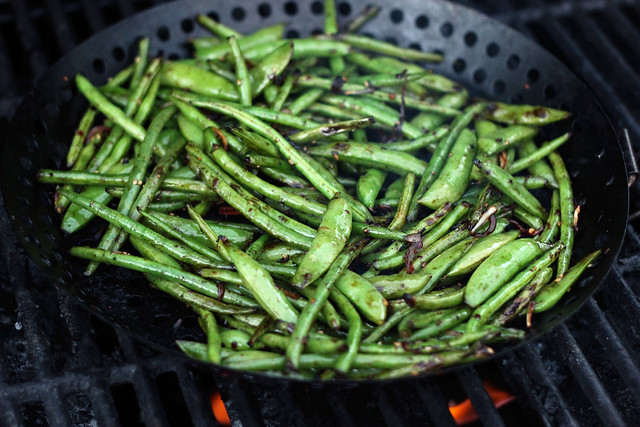
For the record, Mark absolutely LOVED this green dinner! He couldn’t get over all the flavor and how filling it all was served over a small serving of brown rice. I liked it because for not only the wonderful flavors, but the fact that in less than 30 minutes I went from not knowing what to make us, to this delicious, light and satisfying dinner. Read the rest of this entry »
-
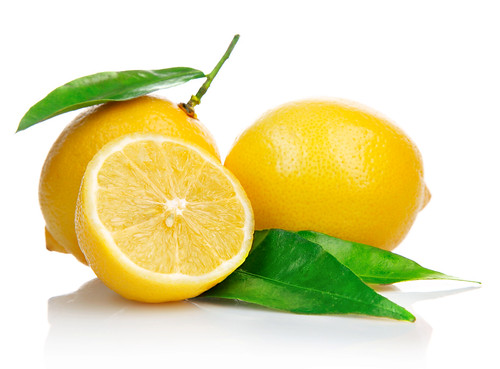
10 Benefits to Drinking Warm Lemon Water Every Morning

Something that has been very important for my body during this 7-Day Spring Cleanse, but has also been a part of my daily routine for a few months now, is drinking warm lemon water. I have started (almost) every day with a glass of warm lemon water and it has made a huge differences for me. Warm lemon water in the morning helps kickstart the digestion process for the day. According to Ayurvedic philosophy, choices that you make regarding your daily routine either build up resistance to disease or tear it down. Ayurveda invites us to get a jump-start on the day by focusing on morning rituals that work to align the body with nature’s rhythms, balance the doshas and foster self-esteem alongside self-discipline.
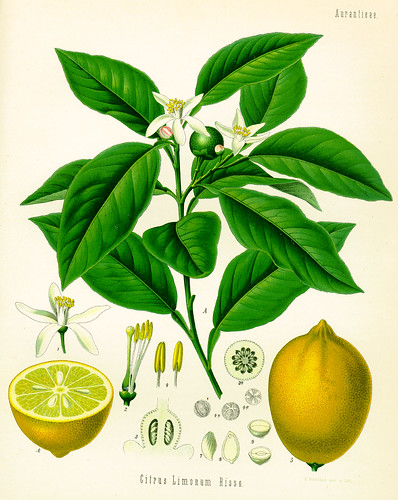
There are many health benefits of lemons that have been known for centuries. The two biggest are lemons’ strong antibacterial, antiviral, and immune-boosting powers and their use as a weight loss aid because lemon juice is a digestive aid and liver cleanser. Lemons contain many substances–notably citric acid, calcium, magnesium, vitamin C, bioflavonoids, pectin, and limonene–that promote immunity and fight infection.
HOW TO DO IT:
You should be using purified water and it should be lukewarm not scalding hot. You want to avoid ice cold water, since that can be a lot for your body to process and it takes more energy to process ice cold water than the warm. Always use fresh lemons, organic if possible, never bottled lemon juice. I squeeze 1/2 a lemon with each glass and I drink it down first thing before I eat a single thing, or workout, etc.
BONUS: try adding freshly grated ginger or a little cayenne for a boost.
10 Benefits to Drinking Warm Lemon Water Every Morning
1) Aids Digestion. Lemon juice flushes out unwanted materials and toxins from the body. It’s atomic composition is similar to saliva and the hydrochloric acid of digestive juices. It encourages the liver to produce bile which is an acid that is required for digestion. Lemons are also high in minerals and vitamins and help loosen ama, or toxins, in the digestive tract. The digestive qualities of lemon juice help to relieve symptoms of indigestion, such as heartburn, belching and bloating. The American Cancer Society actually recommends offering warm lemon water to cancer sufferers to help stimulate bowel movements.
2) Cleanses Your System / is a Diuretic. Lemon juice helps flush out unwanted materials in part because lemons increase the rate of urination in the body. Therefore toxins are released at a faster rate which helps keep your urinary tract healthy. The citric acid in lemons helps maximize enzyme function, which stimulates the liver and aids in detoxification.
3) Boosts Your Immune System. Lemons are high in vitamin C, which is great for fighting colds. They’re high in potassium, which stimulates brain and nerve function. Potassium also helps control blood pressure. Ascorbic acid (vitamin C) found in lemons demonstrates anti-inflammatory effects, and is used as complementary support for asthma and other respiratory symptoms plus it enhances iron absorption in the body; iron plays an important role in immune function. Lemons also contain saponins, which show antimicrobial properties that may help keep cold and flu at bay. Lemons also reduce the amount of phlegm produced by the body.
4) Balances pH Levels. Lemons are one of the most alkalizing foods for the body. Sure, they are acidic on their own, but inside our bodies they’re alkaline (the citric acid does not create acidity in the body once metabolized). Lemons contain both citric and ascorbic acid, weak acids easily metabolized from the body allowing the mineral content of lemons to help alkalize the blood. Disease states only occur when the body pH is acidic. Drinking lemon water regularly can help to remove overall acidity in the body, including uric acid in the joints, which is one of the primary causes of pain and inflammation.
5) Clears Skin. The vitamin C component as well as other antioxidants helps decrease wrinkles and blemishes and it helps to combat free radical damage. Vitamin C is vital for healthy glowing skin while its alkaline nature kills some types of bacteria known to cause acne. It can actually be applied directly to scars or age spots to help reduce their appearance. Since lemon water purges toxins from your blood, it would also be helping to keep your skin clear of blemishes from the inside out. The vitamin C contained in the lemon rejuvenates the skin from within your body.
6) Energizes You and Enhances Your Mood. The energy a human receives from food comes from the atoms and molecules in your food. A reaction occurs when the positive charged ions from food enter the digestive tract and interact with the negative charged enzymes. Lemon is one of the few foods that contain more negative charged ions, providing your body with more energy when it enters the digestive tract. The scent of lemon also has mood enhancing and energizing properties. The smell of lemon juice can brighten your mood and help clear your mind. Lemon can also help reduce anxiety and depression.
7) Promotes Healing. Ascorbic acid (vitamin C), found in abundance in lemons, promotes wound healing, and is an essential nutrient in the maintenance of healthy bones, connective tissue, and cartilage. As noted previously, vitamin C also displays anti-inflammatory properties. Combined, vitamin C is an essential nutrient in the maintenance of good health and recovery from stress and injury.
8) Freshens Breath. Besides fresher breath, lemons have been known to help relieve tooth pain and gingivitis. Be aware that citric acid can erode tooth enamel, so you should be mindful of this. No not brush your teeth just after drinking your lemon water. It is best to brush your teeth first, then drink your lemon water, or wait a significant amount of time after to brush your teeth. Additionally, you can rinse your mouth with purified water after you finish your lemon water.
9) Hydrates Your Lymph System. Warm water and lemon juice supports the immune system by hydrating and replacing fluids lost by your body. When your body is deprived of water, you can definitely feel the side effects, which include: feeling tired, sluggish, decreased immune function, constipation, lack of energy, low/high blood pressure, lack of sleep, lack of mental clarity and feeling stressed, just to name a few.
10) Aids in Weight Loss. Lemons are high in pectin fiber, which helps fight hunger cravings. Studies have shown people who maintain a more alkaline diet, do in fact lose weight faster. I personally find myself making better choices throughout the day, if I start my day off right, by making a health conscious choice to drink warm lemon water first thing every morning.
Do you drink warm lemon water every morning? What are your favorite benefits?
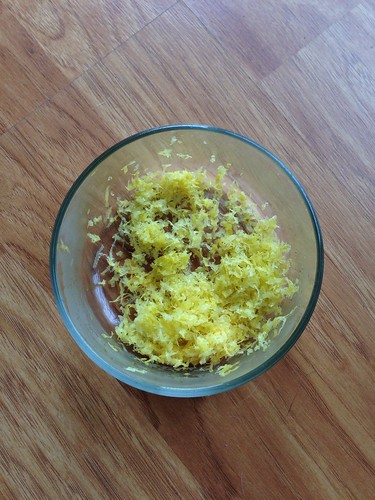
I always zest my lemons before I juice them for my daily warm lemon water. I keep a container in the freezer and I just keep adding to it. It’s great to toss into pasta dishes, in salad dressings, etc.
-
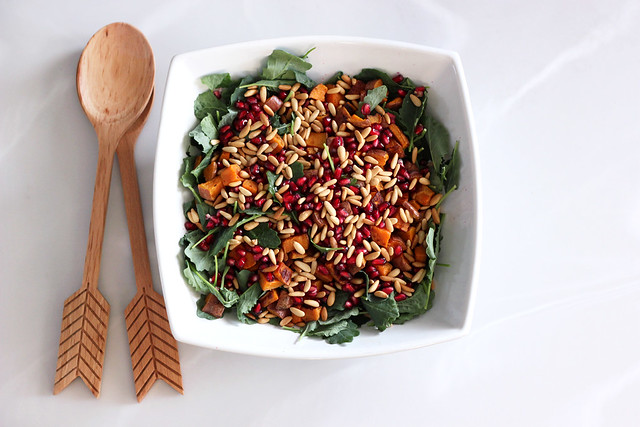
Baby Kale and Roasted Sweet Potato Salad with Pomegranate and Toasted Pine Nuts (Gluten-free + Vegan)
Happy New Year Everyone!! Is everyone as excited to welcome 2013 as I am? We have a lot on schedule for this year and at the stroke of midnight on New Year’s Eve it all felt very real! We are still in the middle of packing up our house for the big move to California. The moving truck comes on Friday and our house closes in just over a week and we have been working like crazy to wrap up all of the end of year loose ends with the business and to go through the house room by room to decide what is making the move, what can get donated and what can be sold. It has been an arduous few weeks with the holidays squished into the middle of it all, but it was a welcomed distraction during such a stressful time.
A few days after Christmas we had an emergency scare with our dog Seri, when she got into some gum with Xylitol in it. As you can imagine, this definitely aded to the stress. You can read a little about it here. I do plan to do a post here on Tasty Yummies about our experience, as well. I would like to share my story and get the word out about how dangerous and highly xylitol is for dogs, since the I feel that not enough dog owners know. I am so grateful for the other food bloggers that have mentioned it, otherwise I wouldn’t have known to act quickly. I consciously do not keep it in the house, but I didn’t know it was hidden in so many common things. I was unaware we even had it in the house. She is thankfully (and very luckily) OK now, but it was a very rough few days, my body actually broke out into a full on cold in the middle of it. I could feel I had been fighting it for a few days and I guess the stress of worrying about my baby just brought it on full force.
With our pooch being back home with us now and yesterday officially ending the holidays and making this move our only focus, the stress of it definitely hit me like a ton of bricks last night. I am not at all a person stricken with anxiety in the least, I consider myself to be mostly calm, but wow, is this move testing me on that. You always hear people say that a big move is one of the most stressful things you can ever go through. They aren’t kidding.
I have been trying to find as much time to cook as I can in this time, since like my yoga it is one of the most calming and soothing things to me. I made a huge pot of chicken pho when my cold was in it’s full force and it was so perfect! I also made a big feast on New Year’s Eve for hubby and I. Yesterday we had dinner with my family at my parents house and since I am now in full-on clean out the fridge and pantry mode, I decided to come up with a salad inspired by what is in season and in my fridge!
Everyone absolutely LOVED this salad, which made me so happy! It is full of beautiful vibrant colors and bright fresh flavors. If you can’t find baby kale, you could also use arugula, baby spinach, field greens, frisée, endive, etc.
I am starting to pack up my kitchen stuff today, so this may be the last recipe post you see for a while. We will be temporarily staying with my parents for a few weeks while we fly out to California to find a house and get everything in order. Hopefully I will have some time to cook for and with my parents in that time.
What are you most looking forward to in 2013?
[print_this]Baby Kale and Roasted Sweet Potato Salad with Pomegranate and Toasted Pine Nuts (Gluten-free + Vegan)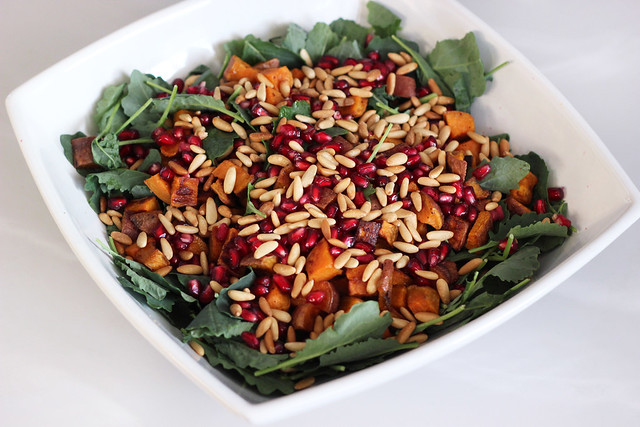
serves 4-6Salad:
- 2-3 small/medium organic sweet potatoes, cleaned well and cut into 1-inch cubes, I leave the skin on
- 1 tablespoon olive oil
- 1/2 teaspoon dried thyme
- 1/4 teaspoon onion powder
- sea salt and pepper, to taste
- 5 cups organic baby kale (or arugula, baby spinach, field greens, frisée, endive, etc.)
- 2 green onions, thinly sliced
- 1/4 cup toasted pine nuts
- 1 small organic pomegranate, seeded – you are looking for about 1/2 to 3/4 cup of seeds
Dressing:
- 1/2 cup olive oil
- 1/4 cup fresh squeezed orange juice, plus some fresh orange zest
- 2 tablespoons champagne vinegar (or white wine vinegar)
- 2 small cloves garlic, minced
- 1/8 teaspoon red pepper flakes (optional)
- sea salt and pepper, to taste
(I didn’t need all of this dressing, so use as much as you’d like and then store the rest in a sealed container in the fridge for other salads)
Preheat the oven to 400ºF. Toss the sweet potatoes with olive oil, thyme, onion powder, salt and pepper. Spread into a single layer on a baking pan and roast for 20-30 minutes until they start to brown and are tender. Set aside to cool.
While the potatoes are roasting make the dressing. Whisk all of the ingredients together. Taste and adjust seasonings, as needed.
After the sweet potatoes have cooled a bit, layer those on top of the baby kale in a large serving bowl, add the green onions, toasted pine nuts, and top with toasted pine nuts and pomegranate seeds. Toss with the dressing just before serving (you may not need all of it, so add slowly). Grate a little fresh orange zest on top as you are serving.
[/print_this] -
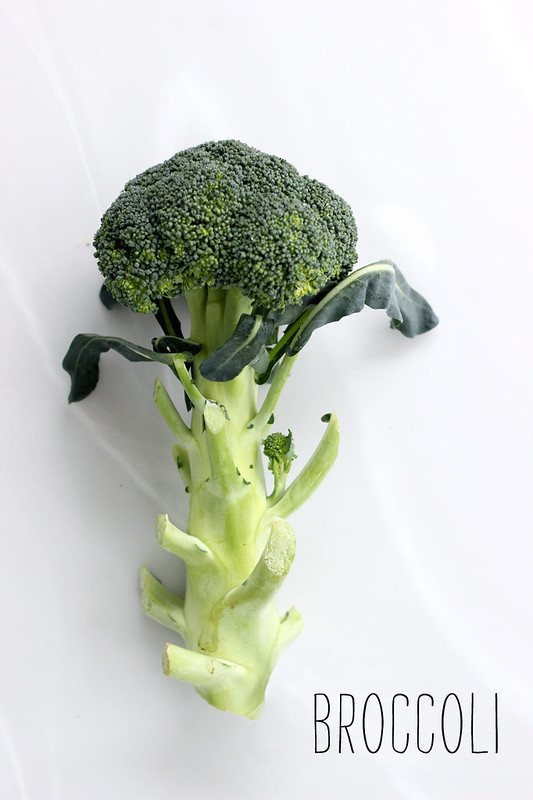
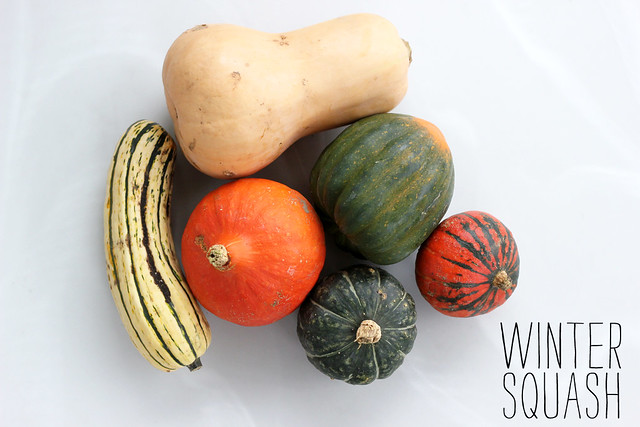
Seasonal Shopping: Fresh Fruit & Veggies to Buy in November!
I am not sure how, but November is now upon us. So many of the beautiful, colorful leaves have fallen from the trees, there is a crisp coolness to the air that reminds us that winter isn’t too far off (OK, well that’s the case over here in Western New York anyhow), I know you Southern Californians have been dealing with a super HOT fall! I am still getting myself used to the idea of that for when we eventually get there.
Considering how cold it actually has been, it is always so surprising to me how much produce is still growing around here and just how delicious and tasty it all is! We are loaded up on squashes and peppers from our CSA, I think I could be set for the winter just on those two, but we’ve been getting so many other delicious fresh goodies too, like kohlrabi, collards, broccoli, beets, turnips, and so much more! It’s a really fun time for fresh produce.
I still think the squash is my absolute favorite thing this time of year, how about you?
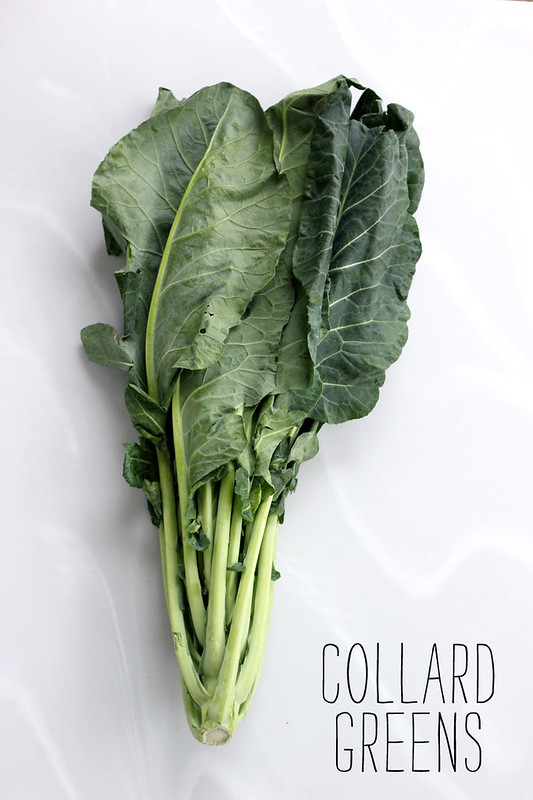

Seasonal Shopping: Fresh Fruit & Veggies to Buy in November!
Broccoli
Winter Squash
Collard Greens
Turnips
Parsnips
Brussels Sprouts
Cranberries
Apples
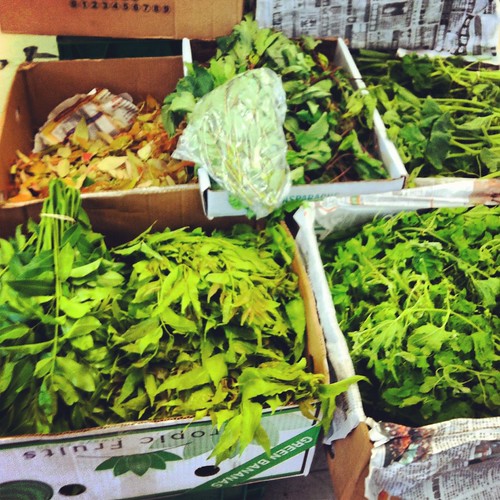
Arugula
Garlic
Kale
Onions
Potatoes
Carrots
Radishes
Beets
-
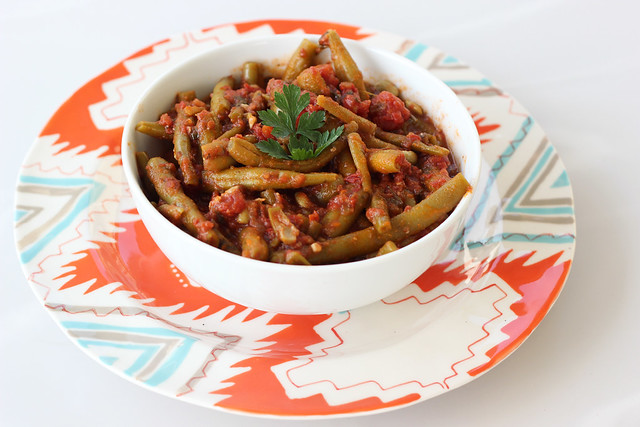
Fasolakia Freska (Greek Green Bean Stew) – Gluten-free (Vegan option)
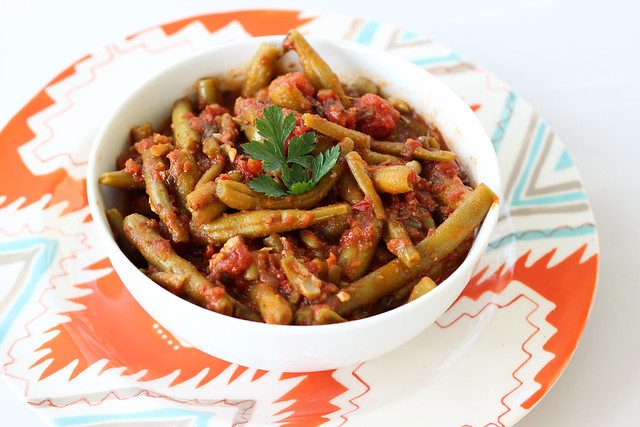
This is a traditional Greek dish that many different people in my family have made for my entire life. My Great Yia Yia (Yia Yia is Greek for grandmother), in my opinion made it the very best, I still think of her any time I smell this stew cooking. I can still remember exactly how her kitchen always smelled and just how it felt in there. There is something about the smell of this stew cooking that reminds me of her unlike any other smell can remind me of anything else in the whole world. I am not sure if it was actually this way, but in my mind I swear she had to always have had always something like this, or one of her other stewed green concoctions, cooking on the stove at her house. I swear it always smelled like this. She passed away when I was 12, so my memory is likely not exactly accurate, but that is how I like to remember it anyway 🙂 My dad’s mom, my Yia Yia, also used to make this stew and my Dad and my great Aunt Marge still make it. Even though it is a little different based on who makes it, I absolutely love it every single time. It is one of those dishes that I am not sure anyone in our family has an exact recipe for and I doubt that they ever really measure(d) as they add things. I think it is just made based on what how your own family makes it and then you just taste as you go. That is how I make it.
When we were kids on our birthday as a special treat, my parent would have us request whatever meal we wanted, and they would make it for us. I really don’t recall anything else that I would consistently ask for besides fasolakia, almost every year that was my pick. I think my parents probably thought I was insane. What child requests a vegetable based meal when they can have whatever they want only one meal a year? THIS ONE DID!!This dish can be made either with meat or vegan, my family usually makes it by cooking it low and slow for many hours with a quickly braised bone-in cut of lamb, but I have also had it without meat and it is still very good. I do think that the meat brings a nice depth of flavor and it adds a lot more taste and flavor with the extra fat. Most times they would pull the bones out just before serving so it isn’t a meat stew by any means, you may get a bit or two or stay meat, but generally it is just for the flavor. This stew may not look like much, but while it’s humble appearance it really packs a punch in the flavor department.
I didn’t have any lamb on hand, but I did have some beef spare ribs in the freezer from our cow share that we got from Sojourner Farms. Since the spare ribs are a fatty cut with a lot of flavor but not a lot of meat to really savor, they were perfect for this. I am not sure exactly how large the package of spare ribs were, maybe 2 lbs or so, it was three small sections of ribs.
I will apologize in advance for the lack of photos with this post, I hadn’t exactly planned on sharing this recipe when I started cooking it. However, when I had mentioned on Instagram and Facebook that I was making it, a handful of people requested the recipe, so I decided I would. My measurements in this recipe won’t be exactly accurate or perfect since I definitely didn’t measure as I went along, AT ALL. But you will get the general idea of the flavors that you want and you can taste as you go to make this exactly how you wish, (you may want to add more or less of something). This stew is great as a side dish with a large meal, or in my opinion it is a wonderful meal on it’s own. Just spoon the saucy stew in a bowl, with some fresh parsley and fresh ground black pepper on top. Maybe some crumbles of feta cheese and a serving of your favorite crusty gluten-free bread. It is absolute heaven in a bowl and it is for me the most comforting kind of comfort food there is.
[print_this]Fasolakia Freska (Greek Green Bean Stew) – Gluten-free (Vegan option)
serves 6- 1 package (about 2 lbs) of local pasture-raised beef or lamb spare ribs or a bone-in shoulder piece, etc (something suitable for braising)
- 2 tablespoons olive oil (if you are making it without meat)
- 1 medium onion, diced
- 3 cloves garlic, chopped
- 1 pinch red pepper flakes (optional)
- course sea salt
- 1 (28 ounce) can organic diced tomatoes
- 4 or 5 fresh tomatoes diced or quickly processed in the blender or food processor (you could also just add in another can of crushed or diced tomatoes)
- 1 bay leaf
- 1 teaspoon dried herbs de Provence (you could also just use the dried oregano and add some basil or use an Italian seasoning blend, etc)
- 1/2 teaspoon dried oregano
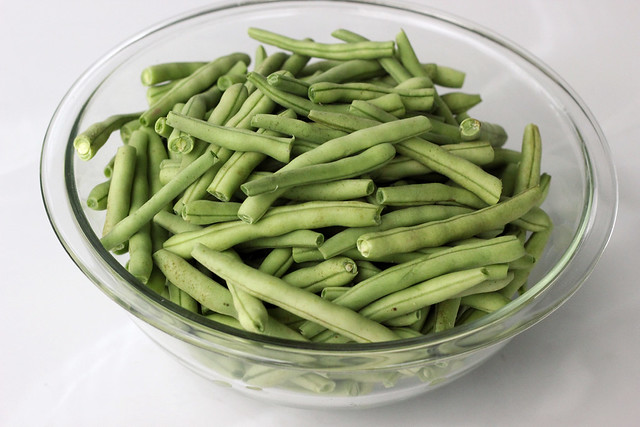
- 2 pounds fresh green beans, trimmed and cut into bite sized pieces if you’d like (you can also use frozen green beans thawed to room temperature)
- salt and pepper to taste
- 1 handful fresh parsley, chopped
- 1 small handful fresh dill, chopped (or 1 teaspoon dried)
If you are adding meat, heat a large pot or dutch oven over a medium high heat and quickly sear the meat on all side, getting a nice brown crust on each side. If you are making this vegan, just heat the pot over a medium high heat and add the olive oil.
Next, add in the onions, garlic, red pepper flakes and a pinch or two of sea salt, stirring constantly until the onions are translucent and starting to slightly brown. Reduce the heat and add in the tomatoes, bay leaf, and any dried herbs you are using, plus some salt and pepper. Allow it to simmer for an hour or two, the longer the better, in my opinion.
After the tomato sauce has simmered a while, give it a taste and add salt and pepper to taste. Then add in the fresh green beans, the parsley and the dill. Cook for another hour or so, over a low heat. You want the beans to be a dark army green color and nice and tender, you aren’t looking for a bright green bean with a crisp bite to it.
You can remove the meat when you are ready to serve, or just spoon around it. You can also pull some of the meat off the bones and add it back to the stew, which is really nice. Serve in a bowl with a piece or two of your favorite crusty gluten-free bread and chunks of feta (if you eat dairy) and top with some fresh parsley.
[/print_this]
-
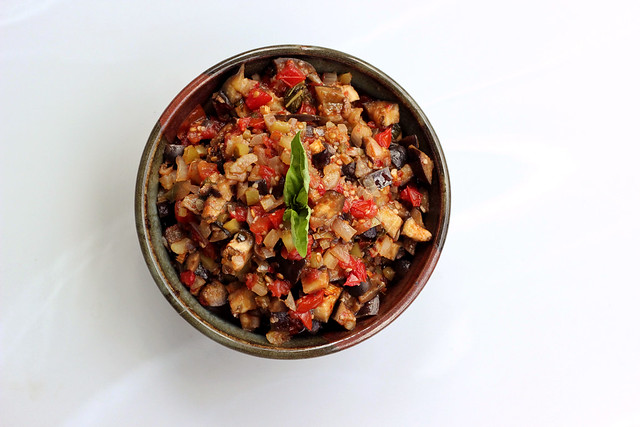
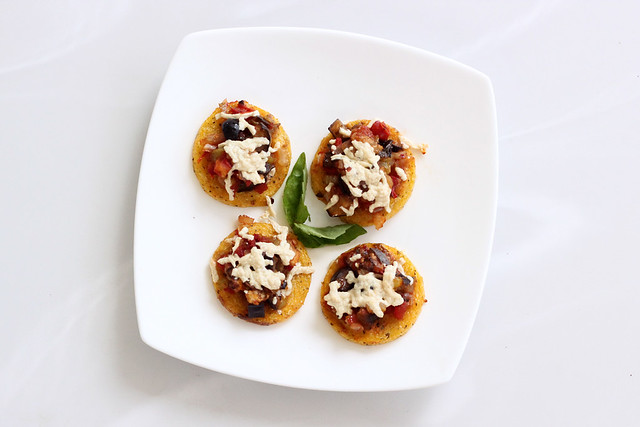
Polenta Rounds with Eggplant Caponata – Gluten-free + Vegan
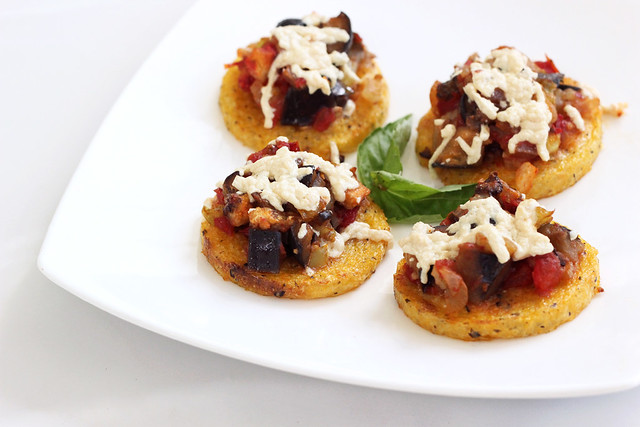
I am excited to be guest-posting another series of recipes on the Free People blog BLDG 25. This month the theme just so happens to be gluten-free, so I get to really go nuts!
All of the recipes I am sharing will celebrate the seasonal foods of now with simple, easy to make delicious foods! The first recipe is simple and comforting polenta rounds with a flavorful eggplant caponata. I made them vegan by just using a small sprinkle of vegan Daiya “cheese” on top, if you aren’t vegan or dairy-free, feel free to use parmesan or mozzarella.
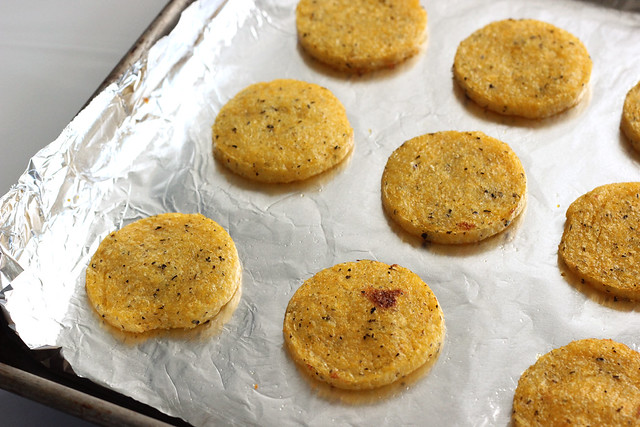
These polenta rounds are a perfect bite sized snack or appetizer or they are also great as a meal with a delicious green salad on the side. The eggplant caponata is also delicious tossed with pasta or layered as a sauce on a pizza. There is a bit leftover when you make these, so you can get creative!!
Head on over to the Free People blog now to get the full recipe for these Polenta Rounds with Eggplant Caponata
-
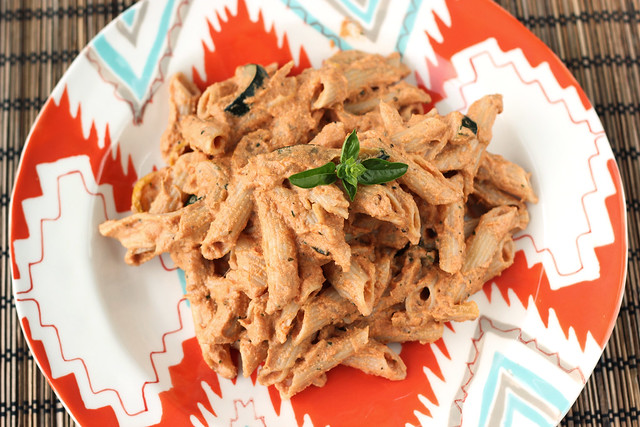
Pasta with Creamy Roasted Tomato Basil Sauce – Vegan + Gluten-free
It is finally officially tomato season here and I couldn’t be happier. We have been getting lots of different tomatoes in our weekly CSA share from Porter Farms and they are so incredible that I have mostly just been eating them raw, on salads or otherwise. Though earlier this week I did make some delicious stuffed CSA veggies that turned out amazing. I stuffed tomatoes, green bell peppers, cubanelle peppers and zucchini. I stuffed them all with a delicious mixture made with some of our ground beef from Sojourner Farms, plus some black rice, crushed tomatoes, onion, garlic and basil. It was a simple and totally perfect for the season dish!
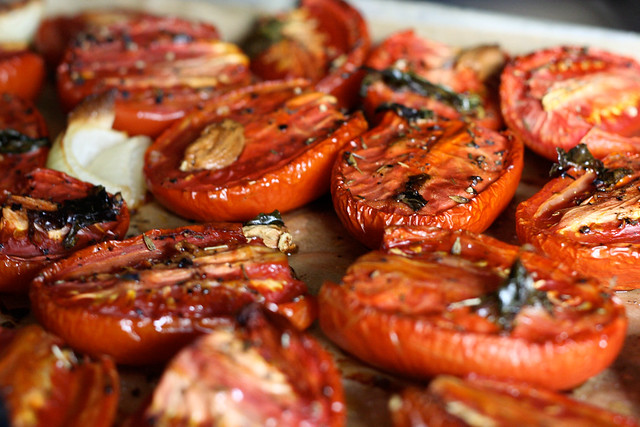
Each fall when tomato season is winding down, I buy at least 1 or 2 8-quart bushels of roma tomatoes at the farmers market so I can make tons of stuff for the winter and hold on to that yumminess as long as possible. I usually make some chili, tomato sauce and I always slow roast a ton of them to freeze them. This way I can have the delicious fresh from the farm tomato goodness, all through the winter. I knew we were coming up on that time of year again and I had savored the frozen tomatoes from last year so much so that I actually had a bag or two left in the freezer, so I decided to pull a bag out to make this delicious sauce. If you are unfamiliar on how to slow roast tomatoes, please see the note at the end of the recipe. It is so simple and it is a wonderful way to really enjoy their beautiful flavors and juices.
If you wish to make this sauce and don’t have any fresh (or frozen) roasted tomatoes, feel free to use canned whole roasted tomatoes. Those would work just as well.
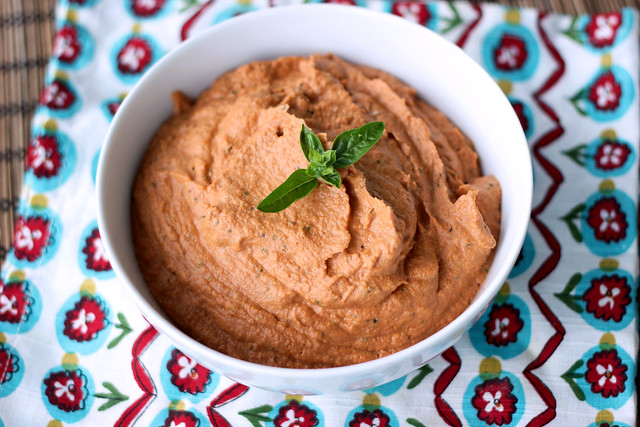
This sauce is incredibly creamy and rich, you would never believe it is totally vegan, the creaminess from the soaked cashews is really unbelievable. I promise this will fool any dairy-lover who takes a bite. We have an abundance of zucchini and yellow squash from our CSA, so I also quickly sautéed some of slices of both of those and tossed that with the pasta as well. Such a nice compliment and it basically gave us one big well rounded meal in one!

[print_this]Pasta with Creamy Roasted Tomato Basil Sauce – Vegan + Gluten-free
Serves 6
- 1 tablespoon olive oil
- 2 cloves garlic, minced
- 2-3 cups roasted roma tomatoes*, halved (fresh or canned)
- 1 cup raw unsalted cashews, soaked overnight or for at least 8 hours
- water to thin the cashew cream
- 1/2 cup fresh basil, plus more for garnish
- salt and pepper to taste
12 ounces of your favorite pasta – I used Jovial’s Gluten-free Brown Rice Penne Rigate
In a large saucepan, heat olive oil over a medium high heat. Add in the minced garlic and cook for about 1 minute, add the roasted tomatoes. Allow the tomatoes to simmer for about 10 minutes to heat the tomatoes through (if they aren’t fresh from the oven).
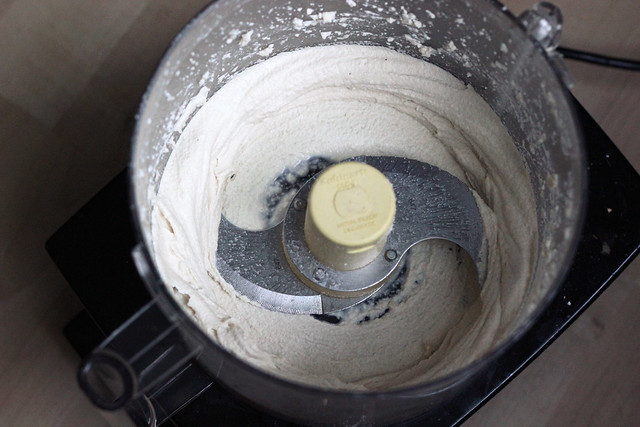
Meanwhile drain the soaked cashews and add them to the food processor. Puree until it is smooth and creamy, you can add water if you need to (a few tablespoons up to 1/4 cup as necessary).
Once the tomatoes have simmered for a bit, add them to the cashew cream and puree the mixture until smooth and creamy. Add the basil in, plus salt and pepper to taste. Pulse it a few times to mix.
Add the sauce back to the pan if it needs to be reheated, otherwise serve tossed with your favorite gluten-free pasta. I usually add a little of the pasta cooking water to the pasta when I add the sauce, to thin the sauce a bit so that it evenly coats all of the pasta. Also, if you wish, you can toss in some veggies like sautéed zucchini. Garnish with a little fresh basil.
* To slow roast tomatoes, preheat your oven to 325ºF and line a baking sheet with parchment paper. Half lengthwise 1 pound of roma tomatoes (approximately 8-10 tomatoes). Lay them all cut side up on parchment-lined baking sheets. Drizzle olive oil over the tomatoes and sprinkle with sea salt. You can also add onion, garlic, basil or any other herbs you’d like. Roast for 2 hours or until they have softened, wilted and wrinkled are a bit browned. This may take more or less time depending on the size of your tomatoes. Eat immediately or store in refrigerator with extra olive oil drizzled on top, or you can of course freeze them in freezer safe bags. [/print_this]
-
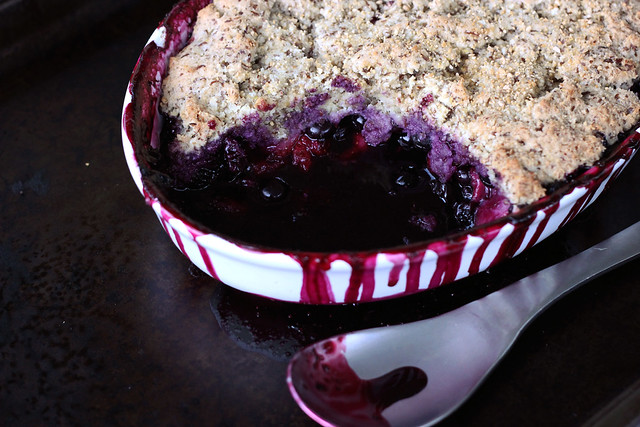
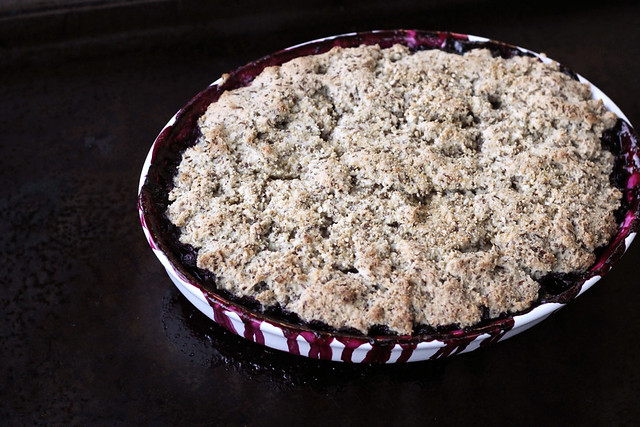
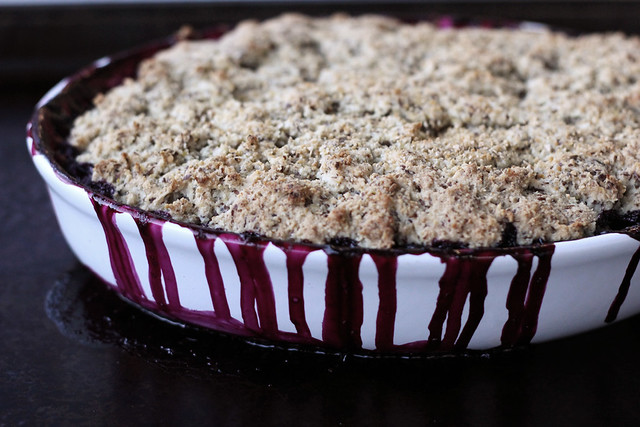
Grain-free Berry Cobbler – Gluten-free, Vegan + Refined Sugar-free
A week or two ago, I came across this amazing grain-free thick pizza crust recipe from Real Sustenance and it instantly peaked my interest. More and more I am amazed by what almond flour can do and the results you can get when baking with it. It is by far my favorite flour these days.
When I saw the photos of that crust I couldn’t wait for my order of almond flour from Honeyville to come in the mail. Oh and what a painful wait it was this time. This wait made me realize I should really stop waiting till I am totally out of almond flour to order more. Once the almond flour arrived it immediately became pizza night at our house and I made a version of my vegan hummus pizza with this new crust recipe. Oh my goodness! Best gluten-free pizza crust I have ever made at home, actually, best gluten-free crust that I have ever had anywhere. It was fluffy, soft and thick, and it has a nice subtle crisp to the outside of it. It was perfect and I couldn’t believe it was totally grain free.
As soon as I took a bite I couldn’t help but think about what else I could come up with to do with this dough. That is when I realized I needed to adapt the recipe to make a cobbler topping. It was perfect for it. I wanted to play around a bit to make it vegan, so I replaced the eggs with flax-seed eggs and I also used coconut oil instead of olive oil, plus I of course had to add a little sweetness, so I went with my go-to maple syrup. (feel free to use whatever sweetener you prefer, though)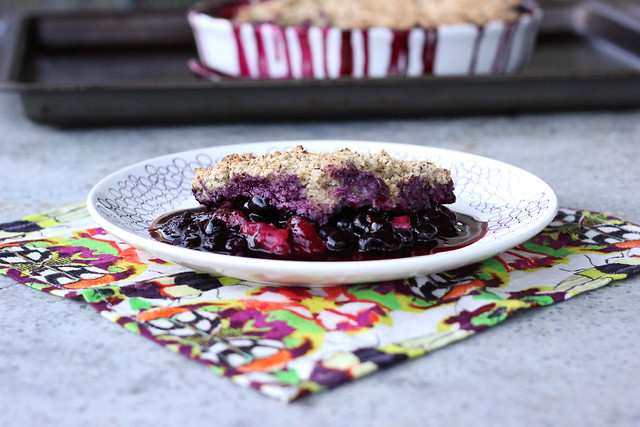
This cobbler according to my hubby, is THE best cobbler I have ever made and maybe one of the best cobblers he has EVER had anywhere. Then he declared it might just be the best gluten-free dessert I have ever made. Mark hails from the south, so for him to not just eat my cobbler but to rave on and on about it, has to be the best compliment he could give. He is a harsh critic of cobblers and I have seen him push aside sub-par cobblers if they weren’t to his liking. And don’t even get him started on crisps, he doesn’t understand them and wishes they would just be a cobbler.
The crust on this cobbler is thick and almost biscuit-like but not at all heavy or too dense. The flax seed eggs besides helping to bind also provide little golden flecks of color and texture in the crust that really makes it feel rustic, homemade and healthy, all of which it is. You can make this berry cobbler with any combination of berries that you choose. I had planned to use just blueberries, but I had a small amount of strawberries leftover that I decided to slice up and add in. You could also use blackberries, peaches, apples or whatever your favorite fruit or combination of fruits might be. I cannot wait to go apple picking in the fall and to make an apple spice version of this. Oh and like most cobblers, this one is of course be great served warm with a scoop of your favorite vanilla ice cream or even some whipped coconut cream on top.
[print_this]Grain-free Berry Cobbler – Gluten-free, Vegan + Refined Sugar-free
Serves 6-8
Inspired by this pizza crust recipeBerry Filling
- 3 cups of organic berries – I used a pint of blueberries and 1 cup of fresh strawberries, sliced
- 2 tablespoons maple syrup (you could also use honey, brown rice syrup, coconut nectar or whatever your favorite sweetener is)
- 1 tablespoon arrowroot starch
- 2 tablespoons fresh lemon juice
Cobbler Crust
- 2 tablespoons ground flaxseeds plus 6 tablespoons hot water (or two eggs)
- 1 cup blanched almond flour
1/2 cup arrowroot starch (you can also use tapioca or potato starch) - 1 teaspoon baking powder
- 1/2 teaspoon salt
- 1 tablespoon almond milk
- 1 tablespoon maple syrup (you could also use honey, brown rice syrup, coconut nectar or whatever your favorite sweetener is)
- 2 teaspoons melted coconut oil
- 1 tablespoon psyllium husk
- 1/2 teaspoon fresh lemon juice
Preheat the oven to 425º F. Grease an 8″ square pan (or something similarly sized) with some coconut oil.
In a medium sized bowl mix the berries with 2 tablespoons maple syrup, lemon juice and 1 tablespoon arrowroot starch, set aside.
In a small bowl whisk together the 2 tablespoons of ground flaxseeds with 6 tablespoons of hot water, set aside to let it thicken.In a large bowl whisk together the almond flour, arrowroot, baking powder and salt. In a second smaller bowl whisk together the flaxseed eggs, almond milk, maple syrup, coconut oil, psyllium husk and lemon juice. Add the liquid mixture to the dry and mix until well combined.
Add the berry mixture to the greased pan and drop spoonfuls of the dough to the top. Spread it out evenly with your hands or a greased spatula. You can leave it as rustic biscuit-like rounds or spread it to one even dough topping, like I did.
Place the pan onto a rimmed baking sheet to catch any berry juice that will run out. Bake for 30 minutes until the cobbler topping is golden brown and cooked through and the juices start to bubble up over the crust. Remove from oven, cool slightly, and serve.
[/print_this] -
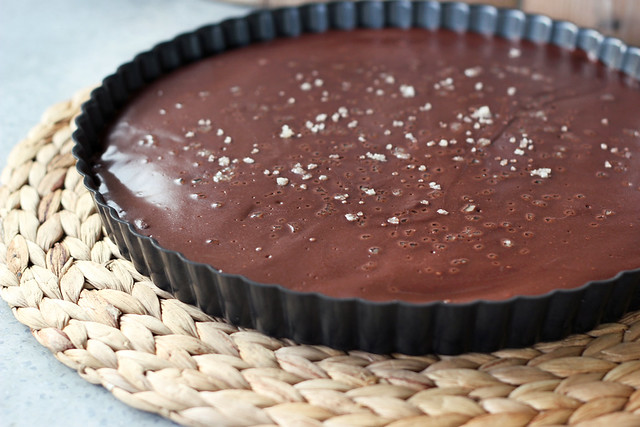
Salted Chocolate Tart – Gluten-free, Grain-free + Vegan
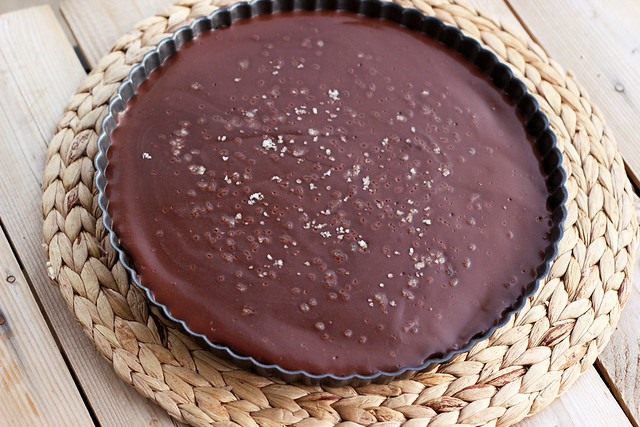
When you are craving something very specific and you want it just how you envision it in your own head, there is nothing left to do but to just figure out how to make it yourself.
I had been wanting a delicious but not too rich simple chocolate dessert, with just a touch of saltiness. There is nothing better than a good quality chocolate treat and tad bit of good quality sea salt. Yum, one of my very favorite things. I decided to just write up a recipe first, that I thought would work and just play it by ear, adding things as I went if I thought it needed it and then hope for the best. I find this to be one of the best ways to cook and bake and I am pleasantly surprised at how often it actually works out.

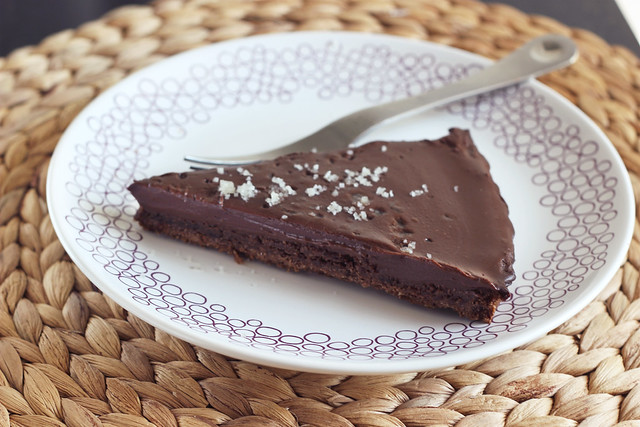
This tart was super simple to make and it was exactly what I was looking for. A slightly crunchy and nutty crust that needs the littlest bit of baking and a super creamy and velvety filling that is the perfect amount of richness, without going overboard and crossing into the world overly heavy and too rich. One of my biggest complaints of so many desserts. The sea salt on top is so perfect, both in how it looks on top of the glossy chocolate and the delicious treat that it provides your taste buds.
I ended up melting some dairy-free semi-sweet mini chocolate chips (from Enjoy Life) that I had on hand in my pantry, but you can also just use your favorite bittersweet chocolate, coarsely chopped for melting. If you want to make this refined sugar free, you could also try melting unsweetened bakers chocolate, and sweeten it to your liking with whatever you choose, such as stevia, maple syrup, palm sugar, etc.
I am super excited at how simple the crust was on this tart, I definitely plan to make some really fun tarts this spring and summer with this recipe
[print_this]Salted Chocolate Tart – Gluten-free, Grain-free + Vegan
serves 8 to 10Crust
- 2 cups almond flour, aka almond meal
- 2 tablespoons flax seed meal
- 2 tablespoons maple syrup
- 2 tablespoons cocoa powder
- 2 tablespoons coconut oil, melted
- 1/4 teaspoon baking soda
- 1/8 teaspoon salt
Filling
- 10 ounces non-dairy bittersweet chocolate, coarsely chopped (or dairy-free mini semi-sweet chocolate chips)
- 1 1/2 cups unsweetened non-dairy milk (I used a blend of coconut and almond milk)
- 1 tablespoon arrowroot starch (You could also use tapioca starch or corn starch)
- 2 tablespoons coconut oil
- 1 teaspoon vanilla extract
- High quality sea salt for topping (see below note)
Preheat oven to 350º. Lightly grease a 9 or 10-inch tart pan. In a large bowl, add all of the crust ingredients and mix very well. Add the crust mixture to the tart pan and press down firmly into the pan, going up the sides just a tad bit. Bake for 15-20 minutes until golden brown.
Meanwhile, place the chocolate into a glass bowl and set aside. In a small saucepan, add the non-dairy milk and arrowroot starch and whisk very well to combine and remove any lumps. Over a medium-high heat, heat until it just barely starts to boil. Remove from the heat and add in the coconut oil and stir well to melt the coconut oil (if it wasn’t already) and to combine well. Pour the milk mixture over the chocolate and let sit a few minutes until the chocolate is melting, add in the vanilla extract, then stir very well for a few minutes, until the mixture is smooth, glassy and creamy.
Pour the chocolate mixture into the prepared crust and allow it to cool completely. Cover with plastic wrap and place in the refrigerator for at least 4 hours or until fully set. Pop the ring from the tart pan off, sprinkle with a small amount of high quality sea salt, cut into slices and serve chilled.
NOTE: Sprinkle the sea salt on just before serving. If you sprinkle the salt on before the tart has fully set, it will start to dissolve into the surface, I had sprinkled a small amount on after it had chilled a bit, but before it was fully set, since I didn’t really think about that happening. It did start to dissolve a bit, so I just sprinkled just a tad a bit more on top before serving and for taking photos.
[/print_this] -
Tom Kha Gai (Thai Coconut Soup) Gluten-free + Dairy-free, w/Vegan options
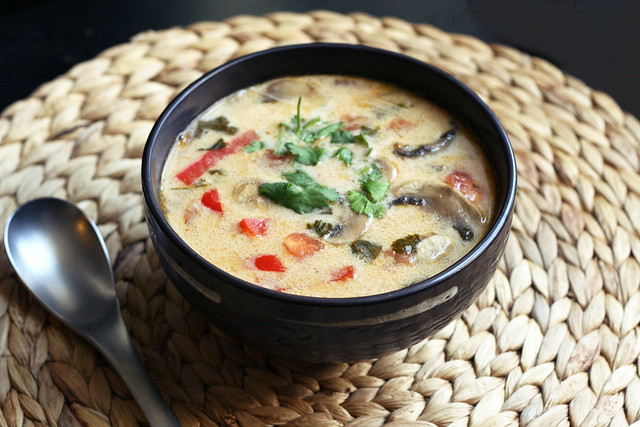
I am really obsessed with Thai food. I actually crave the flavors of Thai food quite often. Honestly, if we could go out for Thai food once a week, I would be totally content. However, we really try to not eat out very often, and I also really prefer to know what exactly is in my food. So, what better way to get what you want, then to just make it yourself. I started looking around at different authentic Thai recipes online and quickly learned to be able to really get the authentic flavors, I would need the proper ingredients. I planned to make Pad Thai and this Tom Kha Gai Soup over the weekend so I had to get all of my ingredients in order to do so. Seeing as a couple of the ingredients I was looking for didn’t exist in my regular circle of grocery shopping, this meant it was time for an adventure. I found there were two different Asian markets on Niagara Street in Downtown Buffalo, conveniently on my way home from yoga, so Saturday morning after my yoga practice, I took my little list and headed over to Niagara Street, feeling very intimidated.

First up, I stopped at A’Chau Oriental Food Market at 833 Niagara St., this is where I was able to grab most of what I needed to make my Pad Thai and Tom Kha Gai Soup, however they were out of fresh kaffir lime leaves. So, after really walking the aisles and grabbing some things not on my list, I headed over to Niagara Asian Market at 937 Niagara Street, where they had fresh kaffir lime leaves and a HUGE basement full of ingredients. In addition to the things I was looking for, I grabbed a few more that caught my eye. I actually picked up a HUGE 4-lb bag of gram flour aka chickpea flour, for just $4.99. I see lots of soccas in my near future! Both markets had so many ingredients I was already familiar with and so many that I had never heard of. They both had unlimited selections of rice noodles, rice flour, tapioca starches, palm sugar etc, available at very inexpensive prices. I could go nuts in those places for sure.

I also grabbed a bag of these Pandanus flavored Crispy Rolls from India, because they caught my eye only having 6 ingredients, coconut milk, tapioca starch, sesame, sugar, salt and pandanus extract. Naturally gluten-free and vegan, what isn’t to like? To be honest, I didn’t (and still don’t) really have a clue what pandanus is, but I didn’t care, I went for it. Some of the best foods and flavors I have discovered that I love are by completely chancing it and trying something totally new. These crispy rolls are super light and crispy, delicious and very satisfying, I love the crunch and the subtle sweetness. Looks like I will be stopping by these Asian markets a lot more than I had planned.
Once I got the few ingredients I couldn’t easily find – specifically the kaffir lime leaves and the galangal root, making this soup was an breeze. I ended up making it for lunch on Sunday! Tom Kah Gai soup has always been one of my favorites. Even when I know I am going to order some type of noodle dish at a Thai restaurant, which is more than enough food, I always feel obligated to order this soup, just because I don’t know when I will have the opportunity again. Now that I know how easy it is to make, I will just make it at home. The flavors in this soup are intense and so wonderful. The bright fresh flavor from the lemongrass is definitely the star of the show, but you get an equal burst of flavor from the keffir lime leaves. It is amazing what a punch those little guys pack! The galangal also brings a pungent flavor very similar to ginger, spicy with a little bit of bite. A little goes a long way with galangal. If you can’t find it easily, ginger will also work great here. Traditionally this soup is made with homemade chicken stock and along with diced or shredded chicken breast. I didn’t have any homemade stock at home so I went with some high quality organic low sodium chicken broth and skipped out on the meat and tofu. I just wanted to enjoy the best part, the delicious broth! To make this soup vegan you could substitute vegetable broth for the chicken and add in tofu or skip it like I did. It won’t be exactly the same flavor profile of traditional Tom Kha Gai soup, but it will still be absolutely delicious.
I am so glad I made the time to make some Thai food at home and explore the Asian markets. Look for my Pad Thai recipe, very soon! I made that Saturday night and both hubby and I were so excited with how it came out that we didn’t take a minute to stop eating so I could take pictures. Mark has already asked me when I will be making it again, so I should have that recipe up soon! Also, if you enjoy Asian foods of any kind (Thai, Chinese, Vietnamese, Japanese, Indian, etc) and you know of an Asian market in your neighborhood, I highly recommend checking it out.
What is your favorite type of Asian food? Do you have a favorite dish? Have you tried making it at home?

[print_this]Tom Kha Gai (Thai Coconut Soup) Gluten-free + Dairy-free, w/Vegan options
serves 44 cups organic free-range low sodium chicken broth (or vegetable broth)
1 15-ounce can full-fat organic coconut milk
1 stalk lemongrass, cut into 1-inch pieces and pounded to really release the flavors
6 kaffir lime leaves
6 thin slices fresh galangal root (or ginger)
1 cup sliced mushrooms
1 small red bell pepper, thinly sliced
1/2 medium red onion, thinly sliced
3 tablespoons fish sauce (or soy sauce)
2 tablespoons fresh lime juice
1/4 teaspoon chili flakes
1 cup firm tofu, diced (optional, you could also add in chicken or shrimp, etc)
1 tomato, diced
1/4 cup thai basil, roughly chopped (optional)
1/4 cup cilantro, roughly choppedBring the chicken broth to a boil in a large saucepan over a medium-high heat, add in the coconut milk, lemongrass, kaffir lime limes, galangal, mushrooms, bell pepper, red onion, fish sauce, lime juice, chili flakes and optional tofu (or meat or shellfish). Simmer for 15 minutes. Add in the diced tomato and stir. Just before serving add in the thai basil and cilantro. Ladle into bowls and serve immediately, topped with additional chopped cilantro, thai basil and maybe some thinly sliced green onions.
[/print_this]
-
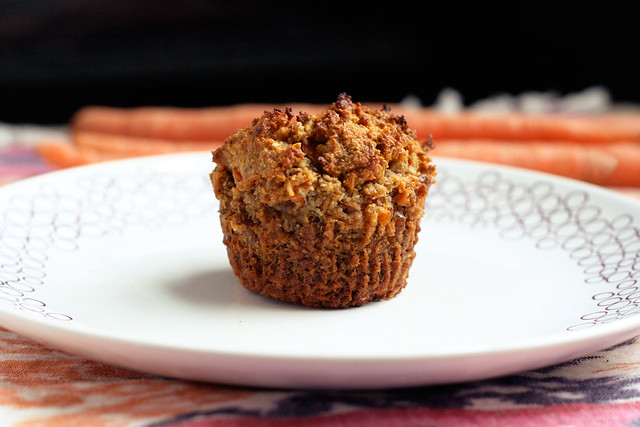
Gluten-Free + Vegan Carrot Cake Muffins
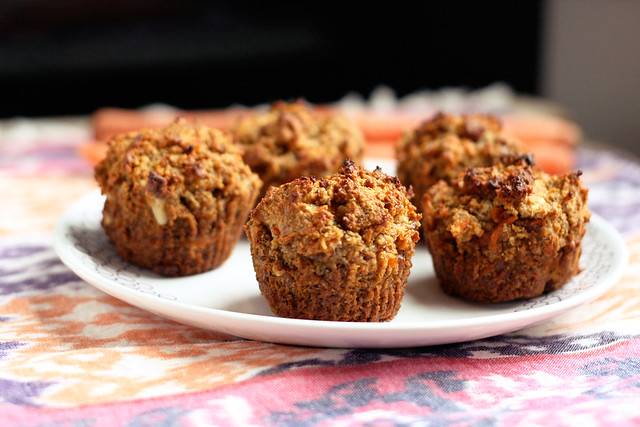
These delicious little treats were the second batch of muffins I made after the first batch ended up too soggy. They were very tasty, but I think that the carrot shreds have more water content than I gave them credit for, so the second time around I decided to add in some finely shredded coconut, since coconut is known to soak up moisture in recipes. You could also give coconut flour a try, but I am not sure if you would want the full 1/2 cup. Experiment.
The coconut flavor is subtle but it really compliments the rest of the flavors in this muffin quite nicely. The walnuts and golden raisins are both optional, but I would say unless you hate them, you should add them in. Their addition to this muffin reminds me of a slice of traditional carrot cake. These muffins are subtly sweet so they would be perfect for breakfast, dessert or even a little snack. Hubby was of course begging for some sort of cream cheese frosting.
I love how rustic these muffins ended up looking after baking, that is why I ended up taking off the papers before I photographed them. The outside of each muffin had such a beautiful toasted, golden brown hue with specs of the shreds of carrots shining through.
Normally when I am writing up a recipe or editing photos, I still have leftovers in the kitchen, so after I am done staring at the photos forever and craving another taste of whatever it is, I head downstairs and grab a little bite. Sadly, I made these muffins about 10 days ago, but we’ve been so busy getting ready for our pop-up shop this past weekend that I haven’t had a moment to edit the photos and write this up. So, now I think I am going to have to make another batch of these ASAP, I want them that badly.
[print_this]Gluten-Free + Vegan Carrot Cake Muffins
Makes approximately 6 large muffins2 flaxseed eggs (or you could also just use two large eggs):
2 tablespoons ground flaxseed
6 tablespoons hot water2 cups blanched almond flour*
1/2 cup unsweetened finely shredded coconut
1 teaspoon baking soda
1/2 teaspoon sea salt
1/2 teaspoon nutmeg
1/2 teaspoon cinnamon
1/4 cup maple syrup (or honey)
1/4 cup olive oil (melted coconut oil or melted ghee)
1 teaspoon vanilla extract
1 cup shredded carrot
1/4 cup walnuts, roughly chopped (optional)
1/4 cup golden raisins (optional)Preheat oven to 350˚F. Line a muffin tin with paper liners.
In a small bowl, whisk together the ground flaxseeds and water, set aside and allow to get thick and gelatinous.
In a large bowl, whisk together the almond flour, baking soda, salt, nutmeg and cinnamon. Add in the shredded coconut, stir to combine.
In a separate bowl, combine the maple syrup (or honey), vanilla, oil and flax seed eggs and whisk until well combined.
Add the dry mixture to the wet, stirring until combined. Carefully fold in the carrots, walnuts and raisins.
Spoon the batter into the muffin tin, filling each cup to the top if you want a nice muffin dome. Bake for approximately 25 minutes or until the tops are golden brown and a toothpick inserted into the center comes out clean. Cool the muffin pan on a wire rack for five minutes. Gently pop the muffins out to continue cooling on the rack (don’t cool them longer than 5 minutes in the hot pan they’ll definitely get soggy). Enjoy a muffin after they have cooled 10 minutes, you know you want to.
I find storing muffins covered tightly in the refrigerator or freezer to be the best, especially in the heat of summer. Just pop one out as you want it, heat slightly in the microwave if you want to take the chill off and go.
*NOTE: Something I have learned from baking on my own and from reading Elana’s Pantry, is that not all almond flour (or meal) is created equal. Bob’s Red Mill makes an almond flour, though easy to find, that doesn’t seem to react quite the same as other almond flours. It doesn’t seem to rise as much and it just seems to leave recipes flat. On Elana’s recommendation I now buy Honeyville brand almond flour in a 5-lb bag from their website. [/print_this]
-
Carrot, Pear, Raspberry, Cucumber Juice
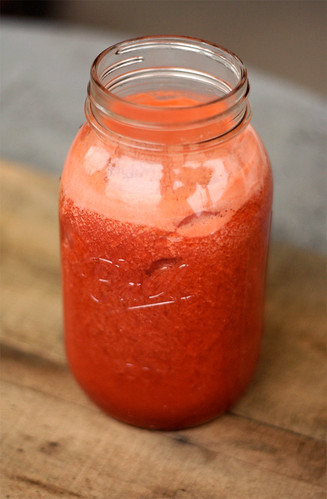
This is gonna be a quick post – I am a bit behind on recipes and my day is full of client work and other projects, but I really wanted to share this juice recipe with you. I have to admit, I was a bit at a loss for a clever and cute name for this juice, so I went with the obvious. I kept wanting to find a way to combine the words “berry” and “brightness” but I just didn’t have it in me this time.
At any rate, this juice is FULL of flavor. It is incredible bright and perfectly tart, with the right about of sweetness. It sounds like and will look like a lot of berries, but sadly they don’t produce a ton of juice, which is why I rarely buy berries for juicing. But even in small amounts they bring a really wonderful tart flavor to juice and the color from the raspberries are just so beautiful. I found this fun fact about raspberries that I thought was interesting “Raspberries possess almost 50% higher antioxidant activity than strawberries, three times that of kiwis, and ten times the antioxidant activity of tomatoes”. Raspberries are low in calories and they are a wonderful source of dietary fiber. Raspberries are also an excellent source of Vitamin C.
I always love adding cucumbers to my juices since one cucumber offers up so much juice and I really love the flavor from it. Cucumbers are almost 96% water, that is naturally distilled, which makes it superior to ordinary water. The skin contains a high percentage of vitamin A, so should not be peeled off. Read on about the many other benefits from adding cucumbers to your juice.
Pears are an excellent source of water-soluble fiber. The high vitamin C and copper content in a pear act as good anti-oxidants that protect cells from damages by free radicals. You can read more about the health benefits of juicing with pears, here.
I’ve already sung the praises of the carrot, in this juice recipe. The main point about carrots are they are one of the most healing foods. Carotenes, the famous ingredient in carrots, is an anti-oxidant that has powerful healing virtues for many diseases. Read more about the health benefits of carrots here.
What would you call this juice?
[print_this]Carrot, Pear, Raspberry, Cucumber Juice
makes 1 large serving4 or 5 carrots
1 pear (I used a green Anjou)
12 ounces of organic raspberries
1 cucumberJuice all of the ingredients. Serve immediately with ice, if you wish.
[/print_this] -
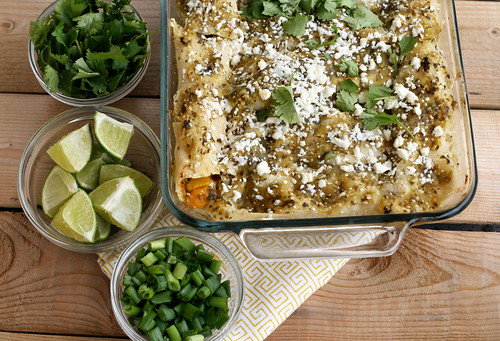
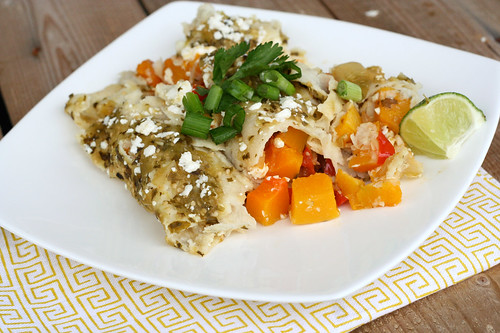
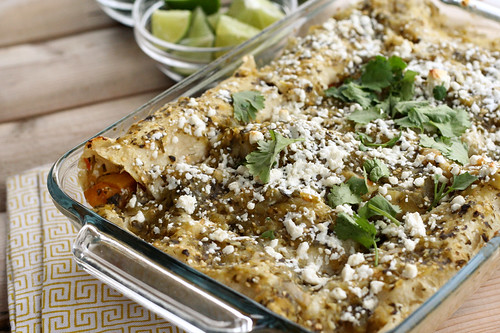
Butternut Squash Enchiladas with Tomatillo Sauce

Having a creative job means that sometimes you just can’t work. I know that sounds like an excuse, but when you are supposed to be creating something and you just don’t have any ideas, it’s quite hard to “work”. I am very lucky that we now work from home, so some days when that “creative block” happens – if I can’t find some silly administrative task like updating our webstore, shooting photos of new products or responding to emails, I can just walk away from my computer and get into any number of different things that are completely unrelated to work, like taking the dog for a walk, heading to a yoga class, watching TV, reading a book or magazine and my most favorite distraction from work… cooking! This week I have been feeling a bit stressed and the ideas just haven’t been flowing as freely. It has been a bit frustrating to say the least. We have a ton of work on the books right now, so it is no time to screw around or to just stare at a blank sketch pad. Wednesday, I decided rather than sitting at my desk with my sketchpad, that I would make our dinner early, so we could enjoy it for lunch and I could take photos when it was freshly cooked instead of trying to shoot them without daylight or shooting the leftovers the next day!
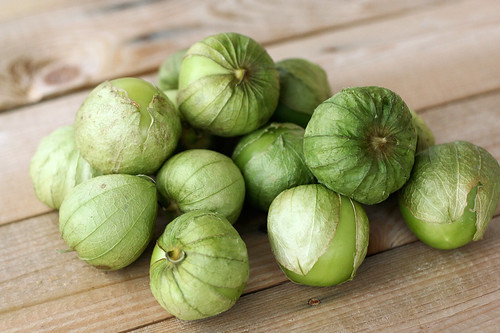
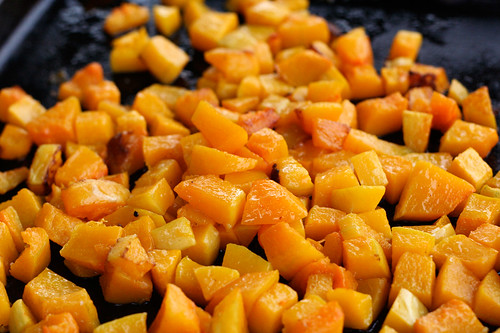
So, I got up at my usual 7am and started prepping the squash and the tomatillos for the sauce. Then I went upstairs for a few hours, it was the perfect boost that I needed and I started working on a poster design that I was stuck on and I made some major headway! It felt great. When lunchtime came, I scooted downstairs, preheated the oven, heated up the sauce and started assembling the enchiladas. I popped them in the oven and went back upstairs to work for a bit. When the buzzer rang, I ran down, took some photos and served my husband and our assistant the best lunch we’ve had since we moved the business home. It was actually really fun to eat a bigger meal in the middle of the day. It felt like the right time to eat that way.
These enchiladas, besides being a burst of beautiful colors, are so full of delicious and bright flavors. The squash has a bit of a rustic nuttiness, the tomatillo has a bright almost citrus flavor to it, with a little bit of heat from the lemon drop peppers I added. I thought about adding black beans inside of the enchiladas, but ended up deciding against it since I thought they would just be bursting open. I think even though it would taste incredible, it would be too many things inside with the big hunks of squash. But I will likely make them that way at some point. I used a simple traditional Mexican crumbly white cheese called queso fresca, it was the perfect compliment and didn’t make the dish too heavy and gooey cheesy, which can be a bit too much for me, sometimes. They were delicious topped with a fresh squeeze of lime juice, fresh green onions and cilantro and a little dollop of organic low-fat sour cream. If you are vegan, you could definitely leave out the cheese or substitute Daiya for the queso fresco. Or if you can’t find queso fresco, you could go with a small amount of good quality sharp cheddar cheese.
I have made homemade tortillas in the past when making enchiladas and it is most definitely worth it, but since I didn’t really have an unlimited amount of time to make these, I decided to go with a high quality corn tortilla from the store. The key to making enchiladas keep their shape, is to steam the tortillas first, otherwise they will break apart a bit. I know this and I steamed mine, but I think they should have been steamed a bit more, some definitely fell apart just a tad when I rolled them up. I decided to just go with it, since I knew it would all taste the same, but some would just fall apart when I served them. Of course, the two that I decided to take a photo of did just that when I served them, but I kinda liked how rustic they looked and I love how you could see the color from the squash exploding out. So I said, screw perfection and just went with it! Life isn’t perfect, I’m not perfect and my enchiladas aren’t perfect – and I am OK with ALL of it! I embrace it.

Yesterday afternoon I had another one of those moments where I hit a creative road-block, for some reason this one hit me harder than ever. I actually felt sad over it and I let it beat me, a bit. I was working on a project that is seemingly very simple and should have an easy solution, but I was struggling. It broke me! I cried. I decided to take a step away “virtually” and move over to another project and then to editing the photos for this post. It definitely helped and today I am looking at it again with fresh eyes and I am ready to tackle it again. So I wanna hear from you….What do you do when you hit a creative roadblock?
Do you find cooking and baking to be a good escape from everyday life and your work or does it stress you out too much?
I’d love to hear your thoughts on how you get through when you are feeling stumped with a problem, creatively or otherwise. Share away!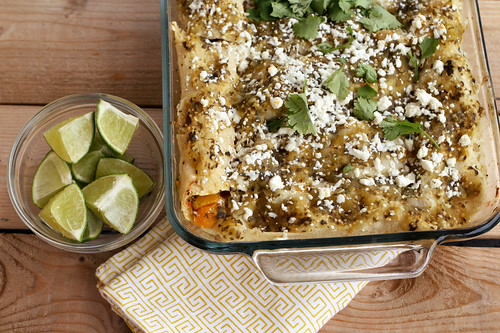
Butternut Squash Enchiladas with Tomatillo Sauce
serves 6Tomatillo Sauce
1 1/2 pounds of fresh whole tomatillos, husked and rinsed
2 hot chiles of your choice, stems removed (I used dried lemon drop peppers from my garden) – you can skip this or just use one if you want it less spicy
enough water to cover the tomatillos
3 whole cloves garlic, peeled
1 handful of fresh cilantro (about 1/4 cup)
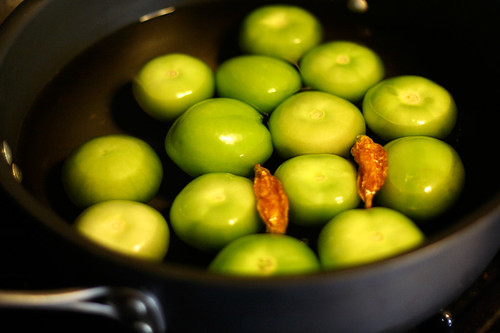
1/2 teaspoon kosher saltAdd your tomatillos and chiles to a large saucepan and cover with water. Bring to a boil over a medium-high heat, then reduce the heat and allow to simmer for approximately 5-7 minutes until the tomatillos are soft but still whole. If they aren’t all totally soft, no worries, still remove them from the heat and drain. Add the tomatillos and chiles to a food processor and add 2 cloves of garlic, fresh cilantro and salt, puree all the ingredients together and set the sauce aside.
Butternut Squash Enchiladas
1 – 2lb butternut squash, peeled, seeded and diced into 1-inch cubes
1 tablespoon plus 1 teaspoon extra virgin olive oil
1 red bell pepper, diced
1 yellow onion, diced
1 large garlic clove, minced
6-8 ounces queso fresco, crumbled (you can skip the cheese or use Daiya to make this vegan) – reserve approximately 1/4 cup for the topping
12 corn tortillasfresh lime wedges
fresh cilantro, roughly chopped
fresh green onions, thinly sliced
organic sour creamPreheat the oven to 400º, place the squash cubes on a rimmed baking sheet toss with 1 tablespoon of the olive oil and place into the oven to roast for 30-40 minutes until tender and lightly browned. Set aside when done.
While the squash is baking, add the onion, garlic, red bell pepper and a dash of salt to the teaspoon of olive oil in a medium pan over a medium-high heat, sauté. Cook for 5-8 minutes until the onion is translucent and both the onion and pepper are tender. Remove the vegetables from the pan and set aside in a bowl.
Use the same pan from the onion and pepper mixture to heat up your tomatillo sauce. Bring it to a simmer over a medium-heat and allow it to heat through and slightly thicken. Just about 5 minutes.
Once the squash is done, you are ready to start assembling your enchiladas.
Start by spooning a small amount of the tomatillo sauce into the bottom of a 9 x 13 inch baking dish (I used an 8.5 x 11 pan and it was a bit crowded, but it worked) – just enough to cover the bottom with a very thin layer.
You will need to steam the corn tortillas so that they don’t break when rolled. Moisten two paper towels, working in batches of 3 or 4 tortillas at a time, wrap the tortillas in the damp paper towels and microwave them for approximately 30-45 seconds. Once microwaved, dip each tortilla into the tomatillo sauce, one at a time, making sure both sides get coated in the sauce. Scoop a small amount of butternut squash cubes (probably about 2 tablespoons), the onion and pepper mixture and cheese, keeping in mind how much to use so that you can roll the enchiladas shut and also so you have enough to fill 11 more. Place the enchilada, seam side down, in the baking dish. Repeat until you’ve made as many enchiladas as you want or have filling for (this recipe made 12, with a small amount of squash and pepper mixture leftover).
Spoon the remaining tomatillo sauce overtop all of the enchiladas and top with the remaining 1/4 cup of queso fresco.
Place the pan in the oven and bake for 30-40 minutes until the cheese is slightly melted, golden brown and everything is bubbling. Pull it out of the oven, sprinkle a bit of fresh cilantro on top to make it even prettier and allow it to cool for 5 minutes. Serve your enchiladas warm with fresh cilantro, fresh green onions and a squeeze of fresh lime juice, you can also add a dollop of organic sour cream, if you wish.


