I am super excited to share this recipe with you. I know it seems complicated and like a lot of steps, but it really isn’t that bad. If you want to buy a store bought pie crust or mix, and just make this filling, I say go for it. If you aren’t gluten-free and you wanna make this filling, just sub in your regular flour. Just looking for vegetarian not vegan, use butter and regular milk. But whatever you do, make time to make this pot pie. It is so delicious!
I have really come to love baking and even though I am not quite at the point with my baking where I can completely, on my own, create a complicated recipe yet, like a vegan gluten-free pie crust, I still really love doing it. Having a beautiful and perfect recipe for a pie crust from a true pro like Shauna (Gluten-free Girl), is seriously a blessing. It is a great jumping off point for recipes like this one and I am truly grateful for people like her that can find the perfect ratios, keep their cool while experimenting and destroying things and come up with the perfect pie crust! It is so damn admirable.
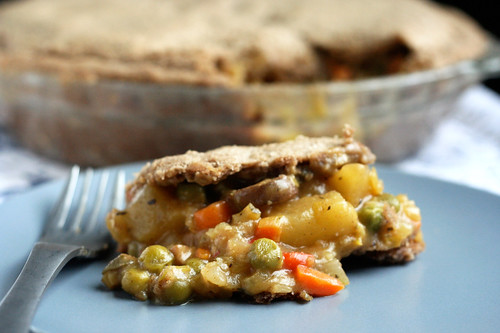
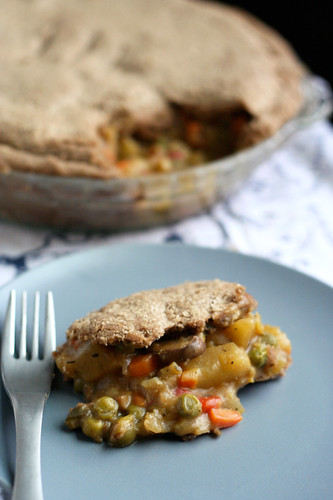
I keep my own gluten-free whole-grain flour blend on hand (that I make using Gluten Free Girl’s suggestions on flours, starches and ratios) in a large quantity for use in lots of different recipes. I used Shauna’s pie recipe after Thanksgiving to make a turkey pot pie and I made it exactly as the recipe calls for, with the same flour blend that she uses and with butter. It turned out perfectly. Since I have since cut out dairy, I was very excited to try it all again but making the pie dough vegan and using a whole-grain blend of flours instead. The crust was definitely a bit flakier with the butter than the vegan butter sticks, but I have to say I am extremely excited and impressed with both the crust on this pie and the delicious vegan filling. The pie crust was tender and it had a beautiful tasty crisp and even a slight flakiness to it. The filling is thick, hearty and even a bit creamy. It amazed even me that there wasn’t a bit of dairy in this whole pie. Since it has been nearly 3 weeks since I have had any dairy, I kept feeling like I was doing something wrong when I was eating this. But I made the entire thing myself, not a drop of dairy in the whole thing. Considering my meat and cheese loving hubby, Mark, not only at this, but went back for seconds – I knew I had struck gold!
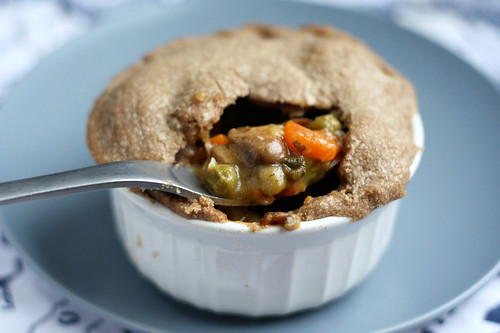
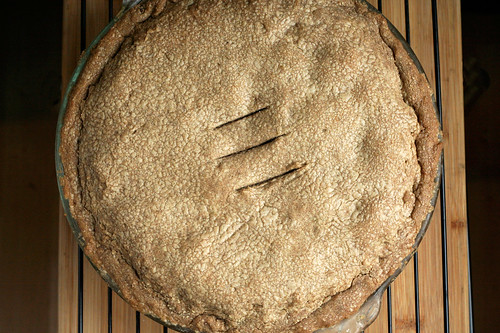
When making the large pie, I was afraid to overload it with too much filling, so I had a little bit leftover after putting the top crust on (though I realized after I should have just mounded it all in there), I also ended up with the smallest piece of extra pie dough since I had over rolled it just a tad, so I made the tiniest little mini-pot pie in a ramekin. I was actually really excited that it worked out this way, since I wanted to see how it would turn out if I made mini pot pies instead. It was perfect! The only thing I would change for the next time is to load all of the filling in, even though it seems like a lot. The filling does cook down a bit, so there is more room there than you think. I just had visions of veggie filling overflowing all over my own and ruining the pretty picture-perfect pie I had made.
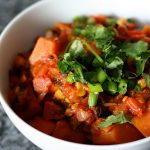
You can have some fun with your pot pie fillings and add or take away any of your favorite or not so favorite ingredients. Turnips or parsnips would be good, asparagus or butternut squash, chives instead of sage. Play with your ingredients depending on what is in season. You could add some tofu. Have fun with this!

[print_this]Gluten-free & Vegan Vegetable Pot Pie
serves 6-8
This pot pie has a top and bottom crust, which is how my husband requires his pot pies! If you wish to only have a top crust or if you wish to make smaller pot pies in ramekins with just top crusts, make sure to halve the pie dough recipe.
Gluten-Free Vegan Whole-Grain Pie Dough:
Adapted from Gluten-free Girl
350 grams all-purpose gluten-free whole-grain flour (or your favorite gluten-free AP flour) – I used Shauna’s ratio and flour suggestion list to make my own whole-grain flour mix. My blend included a combination of almond flour, buckwheat, teff, sorghum, arrowroot and potato starch.
1/2 teaspoon kosher salt
226 grams (2 sticks) Earth Balance Vegan Buttery Sticks (you can use two regular sticks of butter if you aren’t vegan)
1/2 cup ice-cold water, plus a few splashes more
Gluten-Free Vegan Veggie Pot Pie Filling:
1 tablespoon olive oil
1 medium onion, diced
1 leek, white and green parts only, diced
1 clove garlic, minced
3 carrots, peeled and diced into 1/2-inch pieces
2 stalks celery, diced into 1/2-inch pieces
1 red bell pepper, diced into 1/2-inch pieces
1 sweet potato, diced into 1-inch cubes
1/2 cup dry white wine
1/2 cup gluten-free flour
2 cups vegetable broth (mushroom stock would also be good)
1 cup non-dairy milk (almond, cashew, coconut, etc)
1 cup frozen peas
1 tablespoon fresh sage, roughly chopped
Cut the buttery sticks into one-inch cubes. Place them on a plate in the freezer for 15 minutes.
Put the flour and salt into a large food processor. Pulse them together a few times until the flour is fluffy and aerated. Add the butter cubes. Pulse ten times. Your flour mixture should now look sandy, with some butter chunks still visible.
Pour in the ½ cup of ice-cold water. Pulse five times. Look at the dough. If it still looks a bit dry, add a splash more water, not exceeding another ¼ cup. The finished dough should like curds of dry cottage cheese. Do not add anymore water.
Forming the dough into a disk. Dump the dough onto a clean, cool surface. I work on a piece of parchment paper on the counter top. Gently gather all the dough together in your hands. Working quickly, take half the dough, make it into a ball, then flatten it into a plump disk, about 2 inches tall. Wrap it in plastic wrap and let it rest in the refrigerator for 30 minutes. Do the same with the remaining dough.
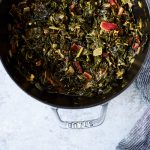
While the dough is chilling you can make your pot pie filling. Heat 1/2 of the olive oil in a large saucepan over a medium-high heat. Add in the carrots, celery, onion, garlic, bell pepper, sweet potato and leek. Stir frequently and allow to cook for 5 minutes. Add in the white wine and turn the heat down to medium-low, cover and allow the vegetables to simmer and steam for about 15-minutes, stirring frequently. Meanwhile heat a medium pan over a medium-high heat and add the remaining olive oil. Add in the mushroom and saute until they are browned and tender, about 10 minutes.
Add the mushrooms to the other vegetables and sprinkle the flour over the vegetables, stir to evenly distribute and add the vegetable broth, sage and frozen peas. Stir to combine and break up the flour clumps, it should immediately start to thicken. Add in the non-dairy milk. Stir. You can add more broth if the mixture gets too thick. Allow to simmer on low for another 5 minutes, to cook the peas, then turn off the heat.
Once the filling is done, set it aside to cool slightly.
You are now ready to assemble your pot pie. Take the pie dough disks out of the refrigerator and let them sit out for 15 minutes or so, so they are still slightly chilly – but a wee bit closer to room temperature and preheat the oven to 425°. (Honestly, this time around I forgot to let the dough sit and it rolled out just perfectly.)
For rolling out the dough you can either work on a floured countertop, a floured marble pastry board, or two pieces of parchment paper (I go this route and I still add a tad bit of flour). I would love to one day make my pies with a marble pastry board!
Gluten-free dough is definitely stickier than regular gluten dough. Be sure to use plenty of gluten-free flour on your surface when rolling it out. When I use two pieces of parchment paper, I lightly dust a bit of flour down on each side of the dough before I place it between the sheets of parchment paper. Shauna recommends very, very lightly oiling the parchment paper, to try to prevent sticking. (I have never done it this way)
could try really hard to explain in detail exactly how to do these next steps, or I could quote Shauna’s beautiful and incredibly descriptive words on rolling out the dough and prepping it to place in the pie pan. Honestly I wrote this part out in my own words so many times and it just never sounded as good as how Shauna put it. Somehow she makes rolling out a pie dough sound like a graceful dance. Seriously, you’ll see what I mean…
“Pat down the disk and put the rolling pin on it. Now, imagine that the dough is the face of a clock. Roll out once at 12 o’clock. Then, lift the pin and roll at 12:10. Moving in “ten-minute” increments, roll out the pie dough to slightly larger than your pie pan. Be patient. Think of this as meditation. Roll out the dough evenly.
Now, if you have worked with the parchment paper, lift the top paper, put the pie pan on top of the dough, and flip it over. Carefully, strip away the parchment paper. Go slowly. Voila! Pat the dough down into the pan.
Now, if some of the pie dough has stuck onto the parchment, do not despair. Simply peel it off and pat into the rest of the pie dough. With a gluten dough, this might make a crust tough. Guess what here? No gluten! No problem. Pat away.
(If you have used the marble board or countertop, roll the dough onto your rolling pin and transfer to the pie pan. Again, if it sticks, no worries.)
Crimping the edges. Crimp the edges of the pie pan by working with floured fingers. I press from the inside of the pie pan with my thumb and first finger on the left hand, then press between those with the first finger of my right hand from the outside. (That’s a lot of words. Try to visualize it. This will make sense.) This is one of my favorite activities in the world. Go slowly and enjoy it.
Fill the pie with the filling. Pat it down.
Roll out the remaining dough the same way. Lay it onto the pie gently, like you’re putting a blanket on a sleeping child. And if the dough sticks and breaks, just pat the pieces together. (That’s what happened with both the finished pies you see here. They didn’t suffer.) Tuck the edges into the crust.”
I will be honest, crimping the edges of a pie crust just isn’t my thing, not because I don’t like it or think it is pretty, I just find myself getting frustrated and wanting to just get it in the oven and then eat it. I guess I just go with the rustic look. I make sure all the edges are sealed and tucked in and go with that! Maybe some day I will have the patience and the eye for pretty pastry techniques.
It is now time to bake the pot pie! YAY! Cut a few slits into the top crust. Place a sheet pan on the bottom rack of the oven, under the rack where the pie pan will be, to catch any potential drip overs. Place the pie pan into the oven and bake for 15 minutes at 425ºF, then turn the temperature down to 375°F. Bake until the juices are bubbling out of the pie (this may or may not actually happen depending on how juicy or thick your pot pie filling is) and the crust is browned, about 45 to 55 minutes.
Allow the pot pie to cool 10 to 15 minutes before serving. Enjoy!
Please note, instead of one large pot pie with a top and bottom crust, you could certainly halve the dough recipe and make mini-pot pies in 6 – 10 ounce oven-safe ramekins. Just cut the dough into 6 rounds that are slightly larger than the circumference of the ramekins. Lay the dough onto the filling and bake the same way. I had a little extra filling and some extra pie dough, so I made one this way to try it out. It was perfect and super adorable.[/print_this]


24 Responses
This looks amazing! Thanks for sharing. Start to finish how long did it take? So I can plan!
You are welcome and thanks Addie! It really is quite delicious!
I would say with prepping all the veggies (washing, cutting, dicing, etc), making the dough, making the filling and preparing the pot pie, that is about 75-90 minutes total (I am probably being a bit generous, but you get the idea).
Then you have the hour plus of bake time and 15 minutes of cooling. But you can accomplish other stuff in that time 🙂
TOTALLY need to pass this on to my mom to make for my GF-Dairy Free brother!!! It looks insanely good!!!
Jenn – yay, I hope your brother likes it! It is super tasty, I was so excited every time I heated up the leftovers!
YES!!! This is amazing, I have been dreaming of a pot pie all winter long. I cannot wait to try this out. Thank you so much.
Joanne – I have been too. I made the one back after Thanksgiving and all I could think about was attempting to make a vegetable one! Hope you like this. Thank you.
[…] Tasty Yummies shared Vegan Pot Pie […]
I love that mini pot pie, Beth! Too cute and a perfect-sized serving, too. 🙂 I have a vegan pot pie on my site, too. It’s a popular recipe and I forget how good it is until I make it again. 😉 Yummy pot pies! Have a good weekend!
Shirley
Thanks Shirley! What is it about mini foods that make them even better than their full-sized counterparts? I just went and checked out your pot pie recipe and it looks absolutely amazing. I LOVE that there is no fat in the crust. That is the only thing I dislike about both my recipe and others – the excessive amount of butter or other fats. I am gonna have to try one your way next time. Thanks for letting me know about it 🙂
Made this for dinner tonight and it was awesome. Would make a great company dinner even for carnivores. Thank you for the recipe and the glute free flour tips.
Is it weird to say that I am in love with the color of the crust??? I think those of us who are gluten-free understand this though. WOW! Gonna have to be more creative with my whole grain flour blends because pasty white is not inspiring at all the way this beautiful brown color is! xo
[…] has a simple and delicious recipe for a vegetable pot pie. If you are vegan or gluten free or both you can find tons of resources for comfort winter dishes and keep the lifestyle that you love. Viva […]
do you think it would be possible to add tofu to this? thanks! 🙂
Yes definitely, I would personally fry it up in a little olive oil or roast in the oven first to get it a little crispy before adding it to the filling.
Have you tried freezing these for later consumption? I would like to make a bunch for dinner later in the month, but not sure when to freeze. Best to not cook the whole pie, but freeze right after putting the pie together? What are your thoughts…. 🙂
[…] Gluten-free & Vegan Vegetable Pot Pie (GF, V) […]
This is my favorite recipe I’ve ever followed. Bringing two pies to a dinner party tonight. I am excited to see what people think!
Made this recipe last night. It was amazing! I had enough filling for 2 pies so I will be making another one tonight. I had wonderful feedback. People were blown away that there was no gluten or dairy in the pie. Thanks for the recipe, it’s a keeper.
You mention mushrooms in the recipe (cooking them and adding them to the other veggies) but you don’t mention them in the ingredients… How much and what kind did you use? I’m definitely making this recipe over the weekend!
Hi Beth! Your pie looks amazing. I am trying to find a gluten-free and RICE-free flour mix that I can use in my gluten free baking, since I am allergic to rice. It is VERY hard to find. It looks like you have figured out a flour mix that I can use, only you didn’t share the amounts you used. It would mean so much if you could share that flour mix so I can finally put together some gluten and rice free baking recipes. All gluten free flour mixes I have found either contain rice flour or tapioca flour (which is also rice). Thank so much!!
Hanks for this great recipe. Pie is my favourite dinner and when I was diagnosed with coeliac disease it was very bad news! Getting used to it now though and experimenting more with recipes. Really enjoyed this recipe. It went down well with everyone, including
the meat, dairy and gluten eaters! Just one question you mention mushrooms in the recipe but not in the ingredients. How many would you add or does it matter? Thanks again!
Of course that should say Thanks! Sorry…
I just want to say that I have had one of the most frustrating days of cooking I think I’ve ever experienced while trying to make this recipe. Followed exactly (I used a commercial GF flour), the crust was basically impossible to roll, stuck to absolutely everything, and I couldn’t even make a top crust that didn’t just congeal and sink into the filling. And with the quantities followed directly for the filling, what I ended up with was a giant pot of runny soup. I just put the thing in the oven, so I guess the taste is yet to be determined, but how in the absolute hell are you supposed to make a cohesive crust using GF dough? I almost wanted to give up after HOURS of cooking and just throw the stuff out I’m so frustrated. AAARGH
Well, I have to apologize, the pot pie ended up delicious! Even though the crust didn’t start out the consistency I expected, it baked deliciously, and it was very much enjoyed. Thank you 🙂